實驗環境
注意:ffmpeg進程stdin寫入兩張圖片的時間間隔不能太長,否則mediamtx會出現對應的推流session超時退出。

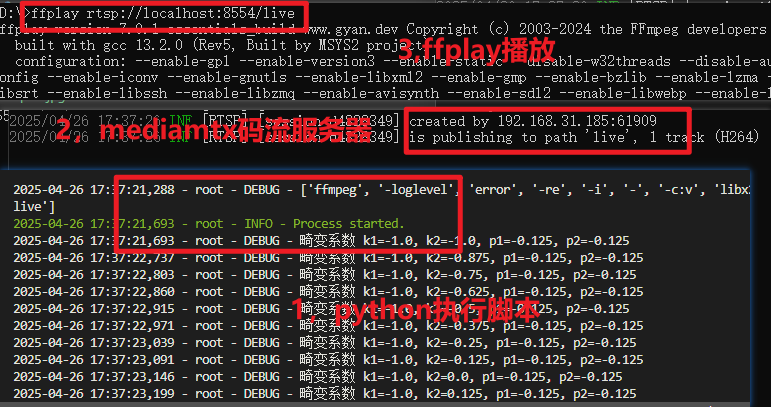
實驗效果

全部代碼
my_util.py
#進度條
import os
import sys
import time
import shutil
import logging
import time
from datetime import datetimedef print_progress_bar(iteration, total, prefix='', suffix='', decimals=1, length=100, fill='█', print_end="\r"):"""調用在Python終端中打印自定義進度條的函數iteration - 當前迭代(Int)total - 總迭代(Int)prefix - 前綴字符串(Str)suffix - 后綴字符串(Str)decimals - 正數的小數位數(Int)length - 進度條的長度(Int)fill - 進度條填充字符(Str)print_end - 行尾字符(Str)"""percent = ("{0:." + str(decimals) + "f}").format(100 * (iteration / float(total)))filled_length = int(length * iteration // total)bar = fill * filled_length + '-' * (length - filled_length)print(f'\r{prefix} |{bar}| {percent}% {suffix}', end=print_end)# 打印新行,完成進度條if iteration == total:print()class Logger(object):"""終端打印不同顏色的日志"""ch = logging.StreamHandler()  # 創建日志處理器對象,在__init__外創建,是類當中的靜態屬性,不是__init__中的實例屬性# #創建靜態的日志處理器可以減少內存消耗# # 創建 FileHandler 實例,指定日志文件路徑# ch = logging.FileHandler(filename='app1.log')def __init__(self):self.logger = logging.getLogger()  # 創建日志記錄對象self.logger.setLevel(logging.DEBUG)  # 設置日志等級info,其他低于此等級的不打印def debug(self, message):self.fontColor('\033[0;37m%s\033[0m')self.logger.debug(message)def info(self, message):self.fontColor('\033[0;32m%s\033[0m')self.logger.info(message)def warning(self, message):self.fontColor('\033[0;33m%s\033[0m')self.logger.warning(message)def error(self, message):self.fontColor('\033[0;31m%s\033[0m')self.logger.error(message)def fontColor(self, color):formatter = logging.Formatter(color % '%(asctime)s - %(name)s - %(levelname)s - %(message)s')  # 控制日志輸出顏色self.ch.setFormatter(formatter)self.logger.addHandler(self.ch)  # 向日志記錄對象中加入日志處理器對象def delete_files(folder_path, max_files):"""監控指定文件夾中的文件數量,并在超過max_files時刪除最舊的文件。"""print("進入刪除圖片文件夾"+folder_path)print("需要刪除文件數量")print(max_files)if True:# 獲取文件夾中的文件列表files = os.listdir(folder_path)file_count = len(files)print(f"當前文件夾 {folder_path} 中的文件數量: {file_count}")# 如果文件數量超過max_files,則刪除最舊的文件if file_count > max_files:# 獲取文件夾中所有文件的完整路徑,并帶上修改時間file_paths_with_mtime = [(os.path.join(folder_path, f), os.path.getmtime(os.path.join(folder_path, f))) forf in files]# 按修改時間排序sorted_files = sorted(file_paths_with_mtime, key=lambda x: x[1])# 刪除最舊的文件,直到文件數量在閾值以下for file_path, mtime in sorted_files[:file_count - max_files]:try:os.remove(file_path)print(f"已刪除文件: {file_path}")except OSError as e:print(f"刪除文件時出錯: {e.strerror}")def copy_file(src, dst):shutil.copy2(src, dst)  # copy2會嘗試保留文件的元數據def end_sentence(text, max_length):'''保證在max_length長度前以句號或點號結束文本:param text: 文本:param max_length: 最大長度:return:'''# 如果文本長度已經超過最大長度,則直接截斷if len(text) > max_length:text = text[:max_length]# print("結果長度 {}".format(len(text)))# 查找句號的位置(en)period_index = max(text.rfind('.'), text.rfind(','),text.rfind(':'), text.rfind(';'),text.rfind('!'), text.rfind('?'))  # 從后往前找,找到最后一個句號# 如果找到了句號且它在最大長度內if period_index != -1 and (period_index + 1 < max_length ormax_length == -1):# 如果需要替換,則替換句號text = text[:period_index] + '.'# 查找句號的位置(cn)period_index = max(text.rfind('。'), text.rfind(','),text.rfind(':'), text.rfind(';'),text.rfind('!'), text.rfind('?'))  # 從后往前找,找到最后一個句號# 如果找到了句號且它在最大長度內if period_index != -1 and (period_index + 1 < max_length ormax_length == -1):# 如果需要替換,則替換句號text = text[:period_index] + '。'return textimport base64def encode_base64(input_string):"""對字符串進行Base64編碼"""encoded_bytes = base64.b64encode(input_string.encode('utf-8'))encoded_string = encoded_bytes.decode('utf-8')return encoded_stringdef decode_base64(input_string):"""對Base64編碼的字符串進行解碼"""decoded_bytes = base64.b64decode(input_string.encode('utf-8'))decoded_string = decoded_bytes.decode('utf-8')return decoded_stringimport socketdef get_local_ip():try:# 創建一個 UDP 套接字s = socket.socket(socket.AF_INET, socket.SOCK_DGRAM)# 連接到一個公共的 IP 地址和端口s.connect(("8.8.8.8", 80))# 獲取本地 IP 地址local_ip = s.getsockname()[0]s.close()return local_ipexcept Exception as e:print(f"獲取本地 IP 地址時出錯: {e}")return None
make_pics.py
import numpy as np
import cv2
import math
import time
from PIL import Image, ImageDraw, ImageFontdef distort_image(image, k1, k2, p1, p2):"""對圖像應用徑向和切向畸變:param image: 輸入圖像:param k1: 徑向畸變系數:param k2: 徑向畸變系數:param p1: 切向畸變系數:param p2: 切向畸變系數:return: 畸變后的圖像"""h, w = image.shape[:2]camera_matrix = np.array([[w, 0, w / 2],[0, h, h / 2],[0, 0, 1]], dtype=np.float32)distort_coeffs = np.array([k1, k2, p1, p2, 0], dtype=np.float32)# 生成畸變映射map1, map2 = cv2.initUndistortRectifyMap(camera_matrix, distort_coeffs, np.eye(3), camera_matrix, (w, h), cv2.CV_32FC1)# 應用畸變映射distorted_img = cv2.remap(image, map1, map2, cv2.INTER_LINEAR)return distorted_imgdef put_chinese_text(img, text, position, font_path, font_size, color):"""在圖像上添加中文文字:param img: 輸入圖像:param text: 要添加的文字:param position: 文字位置:param font_path: 字體文件路徑:param font_size: 字體大小:param color: 文字顏色:return: 添加文字后的圖像"""img_pil = Image.fromarray(cv2.cvtColor(img, cv2.COLOR_BGR2RGB))draw = ImageDraw.Draw(img_pil)font = ImageFont.truetype(font_path, font_size)draw.text(position, text, font=font, fill=color)return cv2.cvtColor(np.array(img_pil), cv2.COLOR_RGB2BGR)def make_pics(pic_path="picture.jpg", k1=-0.5, k2=0.0, p1=0.0, p2=0.0):# 生成棋盤圖像chessboard = np.zeros((400, 400, 3), dtype=np.uint8)for i in range(0, 400, 40):for j in range(0, 400, 40):if (i // 40 + j // 40) % 2 == 0:chessboard[i:i + 40, j:j + 40] = [255, 255, 255]# 生成雷達圖radar = chessboard.copy()x0, y0 = radar.shape[1] // 2, radar.shape[0] // 2for radius in range(0, 400, 40):cv2.circle(radar, (x0, y0), radius, (0, 0, 255), 1)# 繪制徑向線for angle in range(0, 360, 40):# 使用最大半徑 400 計算徑向線的終點坐標x = int(x0 + 400 * math.cos(math.radians(angle)))y = int(y0 + 400 * math.sin(math.radians(angle)))cv2.line(radar, (x0, y0), (x, y), (0, 0, 255), 1)font_size = 15font_color = (250, 100, 0)combined_distorted_chessboard = distort_image(radar, k1, k2, p1, p2)text1 = "k1={:.2f},k2={:.2f},p1={:.2f},p2={:.2f}".format(k1,k2,p1,p2)text2 = "圖像畸變"combined_distorted_chessboard = put_chinese_text(combined_distorted_chessboard, text1, (10, 30), 'simhei.ttf', font_size, font_color)combined_distorted_chessboard = put_chinese_text(combined_distorted_chessboard, text2, (10, 60), 'simhei.ttf', font_size, font_color)# 保存圖像cv2.imwrite(pic_path, combined_distorted_chessboard)# cv2.imshow(pic_path, combined_distorted_chessboard)# cv2.waitKey(0)# cv2.destroyAllWindows()returnif False:for k1 in np.arange(-100,100,0.1):for k2 in np.arange(-100, 100, 0.1):for p1 in np.arange(-100, 100, 0.1):for p2 in np.arange(-100, 100, 0.1):make_pics("picture.jpg", k1, k2, p1, p2)
pic_2_rtsp.py
import numpy as np
import make_pics
import sys
import msvcrt
import subprocess
import time
import shlex
import my_util
from PIL import Image, ImageDraw
import random
import oslog = my_util.Logger()
# RTSP_DEF_IP = "192.168.31.185"
RTSP_DEF_IP = my_util.get_local_ip()
RTSP_PORT = 8554
local_ip = my_util.get_local_ip()
if local_ip:RTSP_URL = "rtsp://{}:{}/live".format(local_ip, RTSP_PORT)
else:RTSP_URL = "rtsp://{}:{}/live".format(RTSP_DEF_IP, RTSP_PORT)
frame_duration = 1/25  # 每張圖片顯示的時長(秒),process.stdin.wirte寫入速度需要夠快,否則可能接收端接受數據不足無法獲取解碼信息(抓包看看)
frame_num = 0old_picname = "past.jpg"
new_picname = "now.jpg"
k1 = k2 = p1 = p2 = 0.0def generate_orig(old_picname):"""生成默認圖片"""image = Image.new('RGB', (640, 480), color=(random.randint(0, 255), random.randint(0, 255), random.randint(0, 255)))draw = ImageDraw.Draw(image)draw.text((100, 100), 'No Signal', fill=(255, 255, 255))image.save(old_picname)returndef generate_image(new_picname, k1, k2, p1, p2):"""生成圖片"""make_pics.make_pics(new_picname, k1, k2, p1, p2)return# 構建 ffmpeg 命令使用圖片序列
command_line = 'ffmpeg -loglevel error -re -i - -c:v libx264 -pix_fmt yuv420p -r {} -f rtsp {}'.format(1/frame_duration, RTSP_URL)
command_list = shlex.split(command_line)log.debug(command_list)def start_process():global processprocess = subprocess.Popen(command_list, stdin=subprocess.PIPE, text=False)log.info("Process started.")start_time = time.time()class QuitException(Exception):passtry:# 默認先生成初始圖step_length = 0.125generate_orig(old_picname)start_process()while True:for p1 in np.arange(-1 * step_length, step_length, step_length):for p2 in np.arange(-1 * step_length, step_length, step_length):for k1 in np.arange(-1, 1, step_length):for k2 in np.arange(-1, 1, step_length):log.debug("畸變系數 k1={}, k2={}, p1={}, p2={}".format(k1, k2, p1, p2))generate_image(new_picname, k1, k2, p1, p2)if msvcrt.kbhit():  # 檢查是否有鍵盤輸入input_char = msvcrt.getch().decode('utf-8')if input_char == 'q' or input_char == 'Q':try:# 向進程的標準輸入發送 'q' 并換行if process.stdin:process.stdin.write('q\n'.encode())process.stdin.flush()except Exception as e:passraise QuitException()# 持續生成新圖片替換舊圖片try:if os.path.exists(new_picname):with open(new_picname, 'rb') as f:process.stdin.write(f.read())else:with open(old_picname, 'rb') as f:process.stdin.write(f.read())except Exception as e:log.error(f"Error writing to process stdin: {e}")log.info("Restarting process...")process.terminate()try:process.wait(timeout=1)except subprocess.TimeoutExpired:process.kill()start_process()time.sleep(frame_duration)except QuitException:pass
finally:try:process.terminate()try:process.wait(timeout=1)except subprocess.TimeoutExpired:process.kill()except Exception:passtry:if os.path.exists(new_picname):os.remove(new_picname)except Exception as e:log.error(f"Error removing {new_picname}: {e}")end_time = time.time()time_cnt = end_time - start_timelog.info("FFmpeg進程已執行{}秒并通過輸入 'q' 退出。".format(round(time_cnt)))


:C 語言強制類型轉換詳解)


 吳恩達版提示詞工程 6. 轉換 (翻譯,通用翻譯,語氣風格變換,文本格式轉換,拼寫檢查和語法檢查))

:STM32F103加入AFIO控制器)

:TOGAF ADM架構愿景的核心價值)


