
????????前邊我們已經講解了使用cv2進行圖像預處理與邊緣檢測等方面的知識,這里我們以答題卡自動批閱這一案例來實操一下。
大致思路
? ? ? ? 答題卡自動批閱的大致流程可以分為這五步:圖像預處理-尋找考試信息區域與涂卡區域-考生信息區域OCR識別-涂卡區域填涂答案判斷-圖像中標記結果
接下來我們按照這五步來進行講解。
圖像預處理
答題卡獲取首先,在網上隨便找一張答題卡圖片
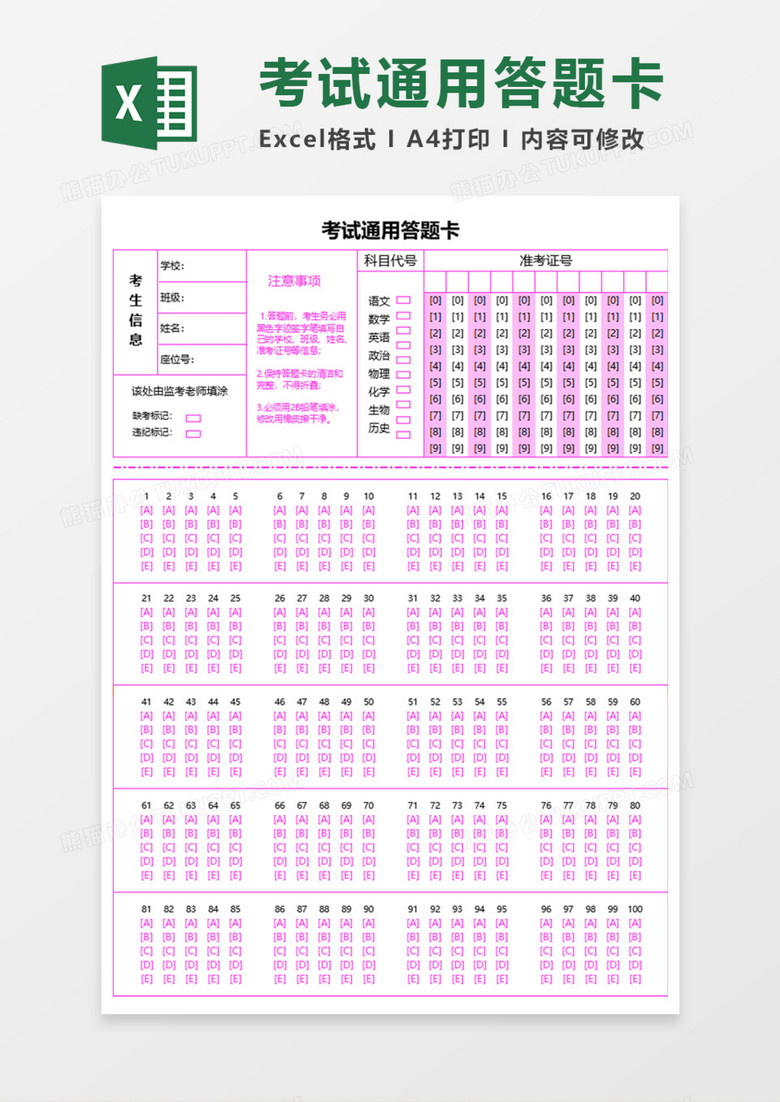
由于這里我只需要考生信息與填途題目,所以只是截取了左上角這一部分作為我們后續的目標。?
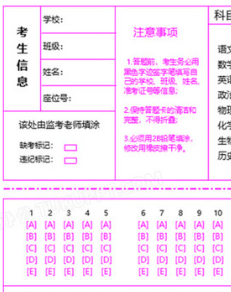
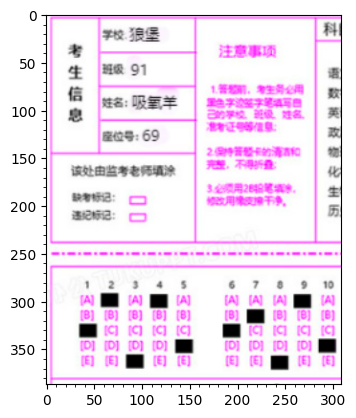
?接著,我們使用圖像編輯軟件將考生信息填入,并將10道題目進行填涂。
讀取圖像?
# #讀取答題卡圖片
import cv2
import matplotlib.pyplot as plt
src_image=cv2.imread(filename='answercard4.jpg',flags=cv2.IMREAD_COLOR_RGB)
height,width=src_image.shape[:2]
plt.xticks(range(0,width,10),minor=True)
plt.yticks(range(0,height,10),minor=True)
plt.imshow(src_image)
????????這里我使用matplotlib的imshow函數來顯示圖像,這樣在jupyter環境中可以不打開任何彈窗直接顯示圖像,比較方便。
轉為灰度圖
#轉為灰度圖
gray_image=cv2.cvtColor(src=src_image,code=cv2.COLOR_RGB2GRAY)
plt.title('原始圖像(灰度圖)')
plt.imshow(gray_image,cmap='gray')
????????
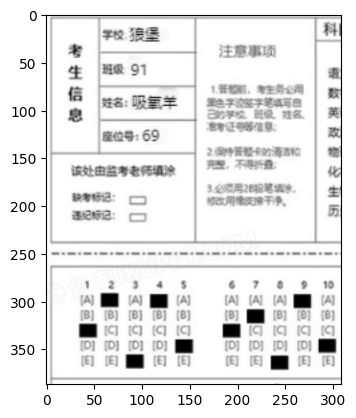
????????將原始圖像轉化為灰度圖是為了后續的檢測等操作,在計算機視覺任務中,基本上所有的操作都是針對灰度圖來進行的,灰度圖是將原始圖像的多個通道按照一定權重求和疊加而來,這樣一來多通道變成了單通道(),在計算量上也會比較友好。
?閾值化
#閾值化
thresh,binary_image=cv2.threshold(src=gray_image,thresh=128,maxval=255,type=cv2.THRESH_OTSU+cv2.THRESH_BINARY)
plt.imshow(binary_image,cmap='gray')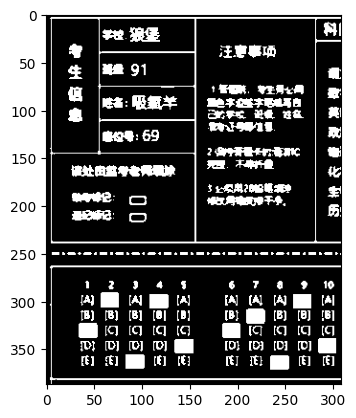
????????閾值化是為了更好的查找輪廓。這里閾值化我們使用cv2.THRESH+cv2.THRESH-OTSU方法來自動對圖像進行二值化閾值分割。?
考生信息與答題區域分割
#考生信息區域與答題區域分割
contours,hiercahy=cv2.findContours(binary_image,cv2.RETR_TREE,cv2.CHAIN_APPROX_SIMPLE)
possible_rectangles=[]
answer_rectangle=[]
for points in contours:x,y,w,h=cv2.boundingRect(points)if 800<w*h<120000:possible_rectangles.append((x,y,w,h))
information_rectangles=[rect for rect in possible_rectangles if 100<rect[2]<140 and 30<rect[3]<60]#長在100~~60
answer_rectangle=sorted(possible_rectangles,key=lambda x:x[2]*x[3])[-2]
marked_img=src_image.copy()
information_images=[]
for rect in information_rectangles:x, y, w, h,=rectcv2.rectangle(marked_img, (x, y), (x+w, y+h), (0, 255, 0), 3)information_images.append(marked_img[y:y+h,x:x+w])
x,y,w,h=answer_rectangle
answer_area=marked_img[y:y+h,x:x+w]
answer_area=cv2.cvtColor(src=answer_area,code=cv2.COLOR_RGB2GRAY)
cv2.rectangle(marked_img,(x,y),(x+w,y+h),(255,0,0),3)
plt.xticks(range(0,marked_img.shape[1],10),minor=True)
plt.yticks(range(0,marked_img.shape[0],10),minor=True)
plt.imshow(marked_img)
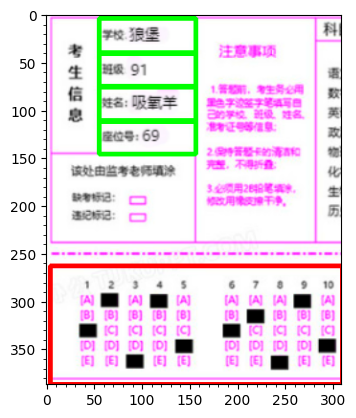
?????????查找輪廓時我們通常使用findContours函數來進行查找(返回值為所有可能的輪廓點contours以及這些點之間的拓撲結構hierachy),考慮到要分割的區域都是矩形,因此我們可以在查找到的輪廓點中使用cv2.boundingrectangle函數來對查找到的輪廓進行矩形擬合。
? ? ? ?然后,我們再使用cv2.drawContours函數將其在原始圖像中標記出來即可。
OCR識別
? ?這里我使用現成的OCR字符識別庫,這里我使用的是paddleocr
獲取方式
pip install paddlepaddle paddleocrOCR識別
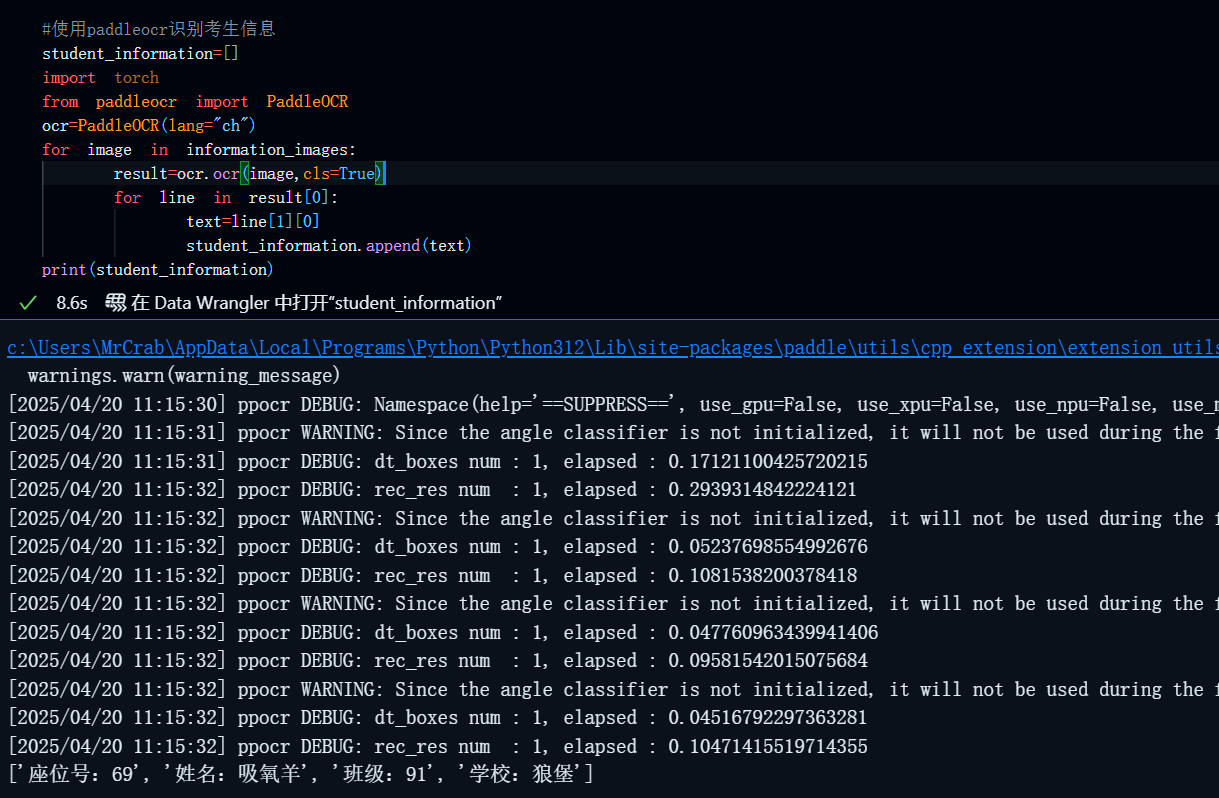
#使用paddleocr識別考生信息
student_information=[]
import torch
from paddleocr import PaddleOCR
ocr=PaddleOCR(lang="ch")
for image in information_images:result=ocr.ocr(image,cls=True)for line in result[0]:text=line[1][0]student_information.append(text)
print(student_information)
?結果:
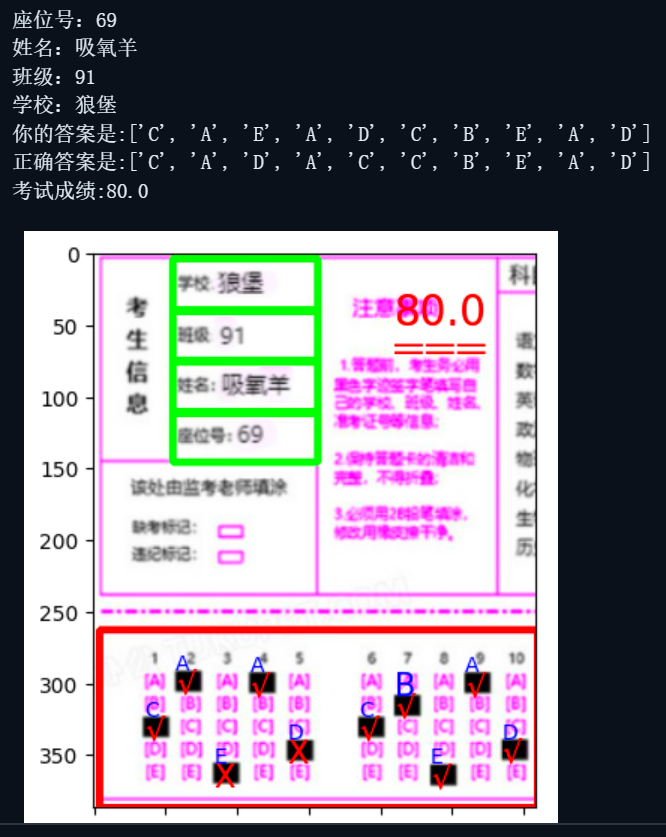
答題區域答案識別
? ? ? ? ?這一步是整個任務的關鍵,但其實也比較簡單,就是按照查找到的填涂過的黑色矩形的位置來判斷,首先我們要在這個填涂答案的區域內定位所有黑色矩形的位置以及長和寬,然后根據以下的關系來判斷每一列的答案是ABCDE的哪一個,其中filled_area_top是指整個填涂答案中最頂部的位置,即A的位置(我的答案中有A,倘若沒有的話,也可以完全根據y坐標自行指定一個ABCDE所在的范圍),filled_area_bottom是整個填入答案中最底部的位置,即E的位置。
thresh,binary_answer_area=cv2.threshold(src=answer_area,thresh=128,maxval=255,type=cv2.THRESH_BINARY+cv2.THRESH_OTSU)
contours,hiercahy=cv2.findContours(image=binary_answer_area,mode=cv2.RETR_TREE,method=cv2.CHAIN_APPROX_SIMPLE)
filled_areas=[]
answers=[]
epsilon=5
true_answers=['C','A','D','A','C','C','B','E','A','D']
for points in contours:x,y,w,h=cv2.boundingRect(points)if 300<w*h<500:filled_areas.append((x,y,w,h))
filled_areas=sorted(filled_areas,key=lambda point:point[1])
filled_area_top,filled_area_bottom=filled_areas[0][1],filled_areas[-1][1]
filled_areas=sorted(filled_areas,key=lambda point:point[0])
score=0
total_num=len(filled_areas)
avg_score=100/total_num
plt.imshow(marked_img)
for i in range(len(filled_areas)):x,y,w,h=filled_areas[i]if 0<=(y-filled_area_top)<=epsilon:answers.append('A')plt.text(x=x+5,y=y+height-answer_area.shape[0],s='A',color='blue')if true_answers[i]==answers[i]:plt.text(x=x+5,y=y+h+height-answer_area.shape[0],s='√',color='red',size=15)score+=avg_scoreelse:plt.text(x=x+5,y=y+h+height-answer_area.shape[0],s='X',color='red',size=15)if epsilon<abs(y-filled_area_top)<=h+epsilon:answers.append('B')plt.text(x=x+5,y=y+height-answer_area.shape[0],s='B',color='blue',size=15)if true_answers[i]==answers[i]:plt.text(x=x+5,y=y+h+height-answer_area.shape[0],s='√',color='red',size=15)score+=avg_scoreelse:plt.text(x=x+5,y=y+h+height-answer_area.shape[0],s='X',color='red',size=15)if h+epsilon<abs(y-filled_area_top)<=2*h+epsilon:answers.append('C')plt.text(x=x+5,y=y+height-answer_area.shape[0],s='C',color='blue')if true_answers[i]==answers[i]:plt.text(x=x+5,y=y+h+height-answer_area.shape[0],s='√',color='red',size=15)score+=avg_scoreelse:plt.text(x=x+5,y=y+h+height-answer_area.shape[0],s='X',color='red',size=15)if 2*h+epsilon<abs(y-filled_area_top)<=3*h+epsilon:answers.append('D')plt.text(x=x+5,y=y+height-answer_area.shape[0],s='D',color='blue')if true_answers[i]==answers[i]:plt.text(x=x+5,y=y+h+height-answer_area.shape[0],s='√',color='red',size=15)score+=avg_scoreelse:plt.text(x=x+5,y=y+h+height-answer_area.shape[0],s='X',color='red',size=15)if 0<=filled_area_bottom-y<=epsilon:answers.append('E')plt.text(x=x+5,y=y+height-answer_area.shape[0],s='E',color='blue')if true_answers[i]==answers[i]:plt.text(x=x+5,y=y+h+height-answer_area.shape[0],s='√',color='red',size=15)score+=avg_scoreelse:plt.text(x=x+5,y=y+h+height-answer_area.shape[0],s='X',color='red',size=15)
plt.text(x=width-100,y=50,s=score,color='red',size='20')
plt.text(x=width-100,y=70,s='———',color='red',size='15')
plt.text(x=width-100,y=75,s='———',color='red',size='15')
for info in student_information:print(info)
print(f'你的答案是:{answers}')
print(f'正確答案是:{true_answers}')
print(f'考試成績:{score}')
結果:?
完整代碼
# #讀取答題卡圖片
import cv2
import matplotlib.pyplot as plt
src_image=cv2.imread(filename='answercard4.jpg',flags=cv2.IMREAD_COLOR_RGB)
height,width=src_image.shape[:2]
plt.xticks(range(0,width,10),minor=True)
plt.yticks(range(0,height,10),minor=True)
plt.imshow(src_image)
#轉為灰度圖
gray_image=cv2.cvtColor(src=src_image,code=cv2.COLOR_RGB2GRAY)
plt.imshow(gray_image,cmap='gray')
thresh,binary_image=cv2.threshold(src=gray_image,thresh=128,maxval=255,type=cv2.THRESH_BINARY_INV+cv2.THRESH_OTSU)
plt.imshow(binary_image,cmap='gray')
#考生信息區域與答題區域分割
contours,hiercahy=cv2.findContours(binary_image,cv2.RETR_TREE,cv2.CHAIN_APPROX_SIMPLE)
possible_rectangles=[]
answer_rectangle=[]
for points in contours:x,y,w,h=cv2.boundingRect(points)if 800<w*h<120000:possible_rectangles.append((x,y,w,h))
information_rectangles=[rect for rect in possible_rectangles if 100<rect[2]<140 and 30<rect[3]<60]#長在100~~60
answer_rectangle=sorted(possible_rectangles,key=lambda x:x[2]*x[3])[-2]
marked_img=src_image.copy()
information_images=[]
for rect in information_rectangles:x, y, w, h,=rectcv2.rectangle(marked_img, (x, y), (x+w, y+h), (0, 255, 0), 3)information_images.append(marked_img[y:y+h,x:x+w])
x,y,w,h=answer_rectangle
answer_area=marked_img[y:y+h,x:x+w]
answer_area=cv2.cvtColor(src=answer_area,code=cv2.COLOR_RGB2GRAY)
cv2.rectangle(marked_img,(x,y),(x+w,y+h),(255,0,0),3)
plt.xticks(range(0,marked_img.shape[1],10),minor=True)
plt.yticks(range(0,marked_img.shape[0],10),minor=True)
plt.imshow(marked_img)
#使用paddleocr識別考生信息
student_information=[]
import torch
from paddleocr import PaddleOCR
ocr=PaddleOCR(lang="ch")
for image in information_images:result=ocr.ocr(image,cls=True)for line in result[0]:text=line[1][0]student_information.append(text)
print(student_information)     thresh,binary_answer_area=cv2.threshold(src=answer_area,thresh=128,maxval=255,type=cv2.THRESH_BINARY+cv2.THRESH_OTSU)
contours,hiercahy=cv2.findContours(image=binary_answer_area,mode=cv2.RETR_TREE,method=cv2.CHAIN_APPROX_SIMPLE)
filled_areas=[]
answers=[]
epsilon=5
true_answers=['C','A','D','A','C','C','B','E','A','D']
for points in contours:x,y,w,h=cv2.boundingRect(points)if 300<w*h<500:filled_areas.append((x,y,w,h))
filled_areas=sorted(filled_areas,key=lambda point:point[1])
filled_area_top,filled_area_bottom=filled_areas[0][1],filled_areas[-1][1]
filled_areas=sorted(filled_areas,key=lambda point:point[0])
score=0
total_num=len(filled_areas)
avg_score=100/total_num
plt.imshow(marked_img)
for i in range(len(filled_areas)):x,y,w,h=filled_areas[i]if 0<=(y-filled_area_top)<=epsilon:answers.append('A')plt.text(x=x+5,y=y+height-answer_area.shape[0],s='A',color='blue')if true_answers[i]==answers[i]:plt.text(x=x+5,y=y+h+height-answer_area.shape[0],s='√',color='red',size=15)score+=avg_scoreelse:plt.text(x=x+5,y=y+h+height-answer_area.shape[0],s='X',color='red',size=15)if epsilon<abs(y-filled_area_top)<=h+epsilon:answers.append('B')plt.text(x=x+5,y=y+height-answer_area.shape[0],s='B',color='blue',size=15)if true_answers[i]==answers[i]:plt.text(x=x+5,y=y+h+height-answer_area.shape[0],s='√',color='red',size=15)score+=avg_scoreelse:plt.text(x=x+5,y=y+h+height-answer_area.shape[0],s='X',color='red',size=15)if h+epsilon<abs(y-filled_area_top)<=2*h+epsilon:answers.append('C')plt.text(x=x+5,y=y+height-answer_area.shape[0],s='C',color='blue')if true_answers[i]==answers[i]:plt.text(x=x+5,y=y+h+height-answer_area.shape[0],s='√',color='red',size=15)score+=avg_scoreelse:plt.text(x=x+5,y=y+h+height-answer_area.shape[0],s='X',color='red',size=15)if 2*h+epsilon<abs(y-filled_area_top)<=3*h+epsilon:answers.append('D')plt.text(x=x+5,y=y+height-answer_area.shape[0],s='D',color='blue')if true_answers[i]==answers[i]:plt.text(x=x+5,y=y+h+height-answer_area.shape[0],s='√',color='red',size=15)score+=avg_scoreelse:plt.text(x=x+5,y=y+h+height-answer_area.shape[0],s='X',color='red',size=15)if 0<=filled_area_bottom-y<=epsilon:answers.append('E')plt.text(x=x+5,y=y+height-answer_area.shape[0],s='E',color='blue')if true_answers[i]==answers[i]:plt.text(x=x+5,y=y+h+height-answer_area.shape[0],s='√',color='red',size=15)score+=avg_scoreelse:plt.text(x=x+5,y=y+h+height-answer_area.shape[0],s='X',color='red',size=15)
plt.text(x=width-100,y=50,s=score,color='red',size='20')
plt.text(x=width-100,y=70,s='———',color='red',size='15')
plt.text(x=width-100,y=75,s='———',color='red',size='15')
for info in student_information:print(info)
print(f'你的答案是:{answers}')
print(f'正確答案是:{true_answers}')
print(f'考試成績:{score}')
總結?

?
?
????????以上便是計算機視覺cv2入門之答題卡自動批閱的所有內容,所有代碼作者純手敲無任何AI,如果本文對你有用,還勞駕各位一鍵三連支持一下博主。

 | IoU GIoU DIoU CIoU EIoU Focal-EIoU)


——K均值聚類)


![[QMT量化交易小白入門]-四十六、年化收益率118%的回測參數,如何用貪心算法挑選50個兩兩相關性最小的ETF組合](http://pic.xiahunao.cn/[QMT量化交易小白入門]-四十六、年化收益率118%的回測參數,如何用貪心算法挑選50個兩兩相關性最小的ETF組合)


:cut)


