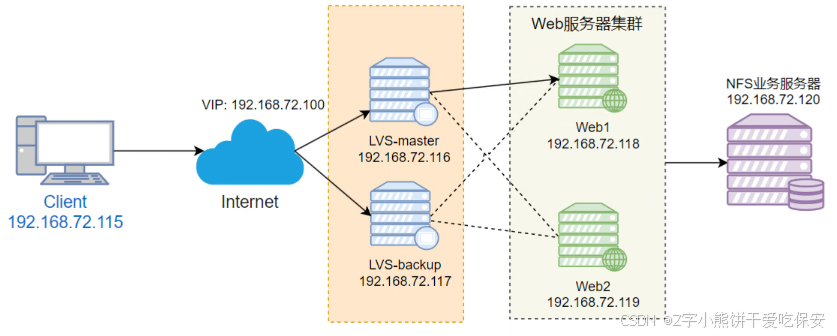
項目架構
分析
主機規劃
| 主機 | 系統 | 安裝應用 | 網絡 | IP |
|---|---|---|---|---|
| client | redhat 9.5 | 無 | NAT | 172.25.250.115/24 |
| lvs-master | rocky 9.5 | ipvsadm,keepalived | NAT | 172.25.250.116/24 VIP 172.25.250.100/32 |
| lvs-backup | rocky 9.5 | ipvsadm,keepalived | NAT | 172.25.250.117/24 VIP 172.25.250.100/32 |
| rs1 | openEuler 24.03 | nginx,nfs-utils | NAT | 172.25.250.118/24 |
| rs2 | openEuler 24.03 | nginx,nfs-utils | NAT | 172.25.250.119/24 |
| nfs | redhat 9.5 | nfs-utils | NAT | 172.25.250.120/24 |
注意:所有主機的防火墻和 Selinux 都關閉
# 關閉防火墻
systemctl disable --now firewalld# 臨時關閉selinux
setenforce 0
# 永久關閉selinux
sed -i "s/SELINUX=enforcing/SELINUX=permissive/g" /etc/selinux/config
配置 NFS
修改主機名和 IP 地址
(這一步不是必須的,可以用自己原本的主機名和IP地址,我這里是為了方便演示)
# 1、修改主機名
[root@localhost ~]# hostnamectl hostname nfs# 2、修改網絡(這一步不是必須的,可以用自己原本的IP地址,我這里是為了方便演示)
[root@localhost ~]# nmcli c m ens160 ipv4.method manual ipv4.addresses 172.25.250.120/24 ipv4.gateway 172.25.250.2 ipv4.dns 223.5.5.5 connection.autoconnect yes# 3、重新加載網絡
[root@localhost ~]# nmcli c up ens160# 4、查看網絡信息
[root@nfs ~]# nmcli d show ens160
GENERAL.DEVICE:                         ens160
GENERAL.TYPE:                           ethernet
GENERAL.HWADDR:                         00:0C:29:4F:88:54
GENERAL.MTU:                            1500
GENERAL.STATE:                          100 (connected)
GENERAL.CONNECTION:                     ens160
GENERAL.CON-PATH:                       /org/freedesktop/NetworkManager/ActiveConnection/3
WIRED-PROPERTIES.CARRIER:               on
IP4.ADDRESS[1]:                         172.25.250.120/24
IP4.GATEWAY:                            172.25.250.2
IP4.ROUTE[1]:                           dst = 172.25.250.0/24, nh = 0.0.0.0, mt = 100
IP4.ROUTE[2]:                           dst = 0.0.0.0/0, nh = 172.25.250.2, mt = 100
IP4.DNS[1]:                             223.5.5.5
IP6.ADDRESS[1]:                         fe80::20c:29ff:fe4f:8854/64
IP6.GATEWAY:                            --
IP6.ROUTE[1]:                           dst = fe80::/64, nh = ::, mt = 1024
掛載倉庫并下載 nfs 服務?
[root@nfs ~]# mount /dev/sr0 /mnt
mount: /mnt: WARNING: source write-protected, mounted read-only.
[root@nfs ~]# dnf -y install nfs-utils
配置 nfs 服務
# 1、創建共享目錄
[root@nfs ~]# mkdir /nfs/share -p
[root@nfs ~]# cd /nfs/share# 2、為了有所區分,共享兩個頁面
[root@nfs share]# echo "rs1 index.html" > index1.html
[root@nfs share]# echo "rs2 index.html" > index2.html
[root@nfs share]# cd# 3、編寫配置文件
[root@nfs ~]# vim /etc/exports# 4、啟動服務
[root@nfs ~]# systemctl start nfs-server# 5、功能測試
[root@nfs ~]# showmount -e 172.25.250.120
Export list for 172.25.250.120:
/nfs/share 172.25.250.119,172.25.250.118
搭建 RS 服務器
rs1
修改主機名和 IP 地址
# 1、修改主機名
[root@localhost ~]# hostnamectl hostname rs1# 2、修改IP地址
[root@localhost ~]# nmcli c m ens160 ipv4.method manual ipv4.addresses 172.25.250.118/24 ipv4.gateway 172.25.250.2 ipv4.dns 223.5.5.5 connection.autoconnect yes# 3、重新加載
[root@localhost ~]# nmcli c up ens160
掛載倉庫并下載 nginx 和 nfs 服務
[root@rs1 ~]# mount /dev/sr0 /mnt
mount: /mnt: WARNING: source write-protected, mounted read-only.
[root@rs1 ~]# dnf -y install nginx nfs-utils
掛載共享目錄
[root@rs1 ~]# mount -t nfs 172.25.250.120:/nfs/share /usr/share/nginx/html/
啟動服務并測試
[root@rs1 ~]# systemctl start nginx nfs-server
[root@rs1 ~]# showmount -e 172.25.250.120
Export list for 172.25.250.120:
/nfs/share 172.25.250.119,172.25.250.118
為了方便后續的操作這里我們配置一個自動掛載
[root@rs1 ~]# vim /etc/fstab
……
172.25.250.120:/nfs/share	/usr/share/nginx/html/	nfs	defaults	0 0[root@rs1 ~]# systemctl daemon-reload
[root@rs1 ~]# mount -a
配置 nginx
[root@rs1 ~]# vim /etc/nginx/conf.d/rs1.conf
[root@rs1 ~]# cat /etc/nginx/conf.d/rs1.conf
server {listen 80;server_name 172.25.250.118;location / {root /usr/share/nginx/html;index index1.html;}
}
開機自啟動 nginx 和 nfs 服務
[root@rs1 ~]# systemctl enable nginx
Created symlink /etc/systemd/system/multi-user.target.wants/nginx.service → /usr/lib/systemd/system/nginx.service.
[root@rs1 ~]# systemctl enable nfs-server
Created symlink /etc/systemd/system/multi-user.target.wants/nfs-server.service → /usr/lib/systemd/system/nfs-server.service.
測試
[root@rs1 ~]# curl 172.25.250.118
rs1 index.html
rs2
關閉 rs1 服務器,克隆這臺服務器名為 rs2,然后啟動 rs2 并做如下的修改。
修改主機名和 IP 地址
[root@rs1 ~]# hostnamectl hostname rs2
[root@rs1 ~]# nmcli c modify ens160 ipv4.addresses 172.25.250.119/24
[root@rs1 ~]# nmcli c up ens160
拷貝 rs1 上編寫的自動掛載文件 重新加載和測試
[root@rs2 ~]# scp /etc/fstab 172.25.250.118:/etc/
The authenticity of host '172.25.250.118 (172.25.250.118)' can't be established.
ED25519 key fingerprint is SHA256:zQRVAzxowh+vQParI9tLut0o4tqknS8RIH86Oa4QB/A.
This key is not known by any other names
Are you sure you want to continue connecting (yes/no/[fingerprint])? yes
Warning: Permanently added '172.25.250.118' (ED25519) to the list of known hosts.
root@172.25.250.118's password:
fstab                            100%  743   216.7KB/s   00:00
[root@rs2 ~]# systemctl daemon-reload
[root@rs2 ~]# mount -a
配置 nginx
[root@rs2 ~]# vim /etc/nginx/conf.d/rs2.conf
[root@rs2 ~]# cat /etc/nginx/conf.d/rs2.conf
server {listen 80;server_name 172.25.250.119;location / {root /usr/share/nginx/html;index index2.html;}
}# 重啟nginx
[root@rs2 ~]# systemctl restart nginx
測試
[root@rs2 ~]# curl 172.25.250.119
rs2 index.html
搭建 Keekalived 和 LVS 服務
配置 lvs-master?
修改主機名和 IP 地址
[root@localhost ~]# hostnamectl hostname lvs-master
[root@localhost ~]#  nmcli c modify ens160 ipv4.method manual ipv4.addresses 172.25.250.116/24 ipv4.gateway 172.25.250.2 ipv4.dns 223.5.5.5
[root@localhost ~]# nmcli c up ens160
掛載倉庫和安裝 keepalived 和 lvs
[root@lvs-master ~]# mount /dev/sr0 /mnt
mount: /mnt: WARNING: source write-protected, mounted read-only.
[root@lvs-master ~]# dnf -y install keepalived ipvsadm
編寫檢測腳本?
[root@lvs-master ~]# vim /etc/keepalived/check_nginx.sh
[root@lvs-master ~]# cat /etc/keepalived/check_nginx.sh
#!/bin/bash
counter=$(ps -C nginx --no-header|wc -l)
if [ $counter -eq 0 ]; thensystemctl start nginxif [ `ps -C nginx --no-header|wc -l` -eq 0 ]; thensystemctl stop keepalivedfi
fi# 給腳本可執行權限
[root@lvs-master ~]# chmod +x /etc/keepalived/check_nginx.sh# 復制到 lvs-backup 上
[root@lvs-master ~]# scp /etc/keepalived/check_nginx.sh root@172.25.250.117:/etc/keepalived/
The authenticity of host '172.25.250.117 (172.25.250.117)' can't be established.
ED25519 key fingerprint is SHA256:zQRVAzxowh+vQParI9tLut0o4tqknS8RIH86Oa4QB/A.
This key is not known by any other names
Are you sure you want to continue connecting (yes/no/[fingerprint])? yes
Warning: Permanently added '172.25.250.117' (ED25519) to the list of known hosts.
root@172.25.250.117's password:
check_nginx.sh                             100%  191    37.3KB/s   00:00
配置 keepalived 和 lvs
[root@lvs-master ~]# ipvsadm-save -n >/etc/sysconfig/ipvsadm
[root@lvs-master ~]# vim /etc/keepalived/keepalived.conf
[root@lvs-master ~]# cat /etc/keepalived/keepalived.conf
global_defs {router_id LVS-MASTER
}vrrp_script chk_nginx {script "/etc/keepalived/check_nginx.sh"interval 2
}vrrp_instance VI_1 {state MASTERinterface ens160virtual_router_id 51priority 100advert_int 1authentication {auth_type PASSauth_pass 1111}virtual_ipaddress {172.25.250.100}track_script {chk_nginx}
}
virtual_server 172.25.250.100 80 {delay_loop 6lb_algo rrlb_kind DRpersistence_timeout 50protocol TCPreal_server 172.25.250.118 80 {weight 3TCP_CHECK {connect_timeout 3retry 3delay_before_retry 3}}real_server 172.25.250.119 80 {weight 1TCP_CHECK {connect_timeout 3retry 3delay_before_retry 3}}
}
啟動服務
[root@lvs-master ~]# systemctl start keepalived ipvsadm
查詢 LVS 配置規則
[root@lvs-master ~]# ipvsadm -Ln
IP Virtual Server version 1.2.1 (size=4096)
Prot LocalAddress:Port Scheduler Flags-> RemoteAddress:Port           Forward Weight ActiveConn InActConn
TCP  172.25.250.100:80 rr persistent 50-> 172.25.250.118:80            Route   3      0          0         -> 172.25.250.119:80            Route   1      0          0
配置 lvs-backup?
關閉 lvs-master 主機,克隆出 lvs-backup ,并啟動 lvs-backup,然后做如下的修改。
修改主機名和 IP 地址
[root@lvs-master ~]# hostnamectl hostname lvs-backup
[root@lvs-master ~]# nmcli c m ens160 ipv4.addresses 172.25.250.117/24
[root@lvs-master ~]# nmcli c up ens160
配置 keepalived 和 lvs
[root@lvs-backup ~]# vim /etc/keepalived/keepalived.conf
[root@lvs-backup ~]# cat /etc/keepalived/keepalived.conf
global_defs {router_id LVS-BACKUP
}vrrp_script chk_nginx {script "/etc/keepalived/check_nginx.sh"interval 2
}vrrp_instance VI_1 {state BACKUPinterface ens160virtual_router_id 51priority 90advert_int 1authentication {auth_type PASSauth_pass 1111}virtual_ipaddress {172.25.250.100}track_script {chk_nginx}
}
virtual_server 172.25.250.100 80 {delay_loop 6lb_algo rrlb_kind DRpersistence_timeout 50protocol TCPreal_server 172.25.250.118 80 {weight 3TCP_CHECK {connect_timeout 3retry 3delay_before_retry 3}}real_server 172.25.250.119 80 {weight 1TCP_CHECK {connect_timeout 3retry 3delay_before_retry 3}}
}
啟動服務
[root@lvs-backup ~]# systemctl start keepalived ipvsadm
查詢 LVS 配置規則
[root@lvs-backup ~]# ipvsadm -Ln
IP Virtual Server version 1.2.1 (size=4096)
Prot LocalAddress:Port Scheduler Flags-> RemoteAddress:Port           Forward Weight ActiveConn InActConn
TCP  172.25.250.100:80 rr persistent 50-> 172.25.250.118:80            Route   3      0          0         -> 172.25.250.119:80            Route   1      0          0
修改 RS 服務器
rs1
配置 VIP
[root@rs1 ~]# ifconfig lo:1 172.25.250.100 netmask 255.255.255.255 broadcast 172.25.250.100 up
[root@rs1 ~]# ip a show lo
1: lo: <LOOPBACK,UP,LOWER_UP> mtu 65536 qdisc noqueue state UNKNOWN group default qlen 1000link/loopback 00:00:00:00:00:00 brd 00:00:00:00:00:00inet 127.0.0.1/8 scope host lovalid_lft forever preferred_lft foreverinet 172.25.250.100/32 brd 172.25.250.100 scope global lo:1valid_lft forever preferred_lft foreverinet6 ::1/128 scope host valid_lft forever preferred_lft forever
添加內核參數
[root@rs1 ~]# vim /etc/sysctl.conf
[root@rs1 ~]# sysctl -p
net.ipv4.conf.all.arp_ignore = 1
net.ipv4.conf.lo.arp_ignore = 1
net.ipv4.conf.all.arp_announce = 2
net.ipv4.conf.lo.arp_announce = 2
net.ipv4.ip_forward = 0
增加一個路由
[root@rs2 ~]# route add -host 172.25.250.100 dev lo:1
[root@rs2 ~]# route -n
Kernel IP routing table
Destination     Gateway         Genmask         Flags Metric Ref    Use Iface
0.0.0.0         172.25.250.2    0.0.0.0         UG    100    0        0 ens160
172.25.250.0    0.0.0.0         255.255.255.0   U     100    0        0 ens160
172.25.250.100  0.0.0.0         255.255.255.255 UH    0      0        0 lo
rs2
配置 VIP
[root@rs2 ~]# ifconfig lo:1 172.25.250.100 netmask 255.255.255.255 broadcast 172.25.250.100 up
[root@rs2 ~]# ip a show lo
'1: lo: <LOOPBACK,UP,LOWER_UP> mtu 65536 qdisc noqueue state UNKNOWN group default qlen 1000link/loopback 00:00:00:00:00:00 brd 00:00:00:00:00:00inet 127.0.0.1/8 scope host lovalid_lft forever preferred_lft foreverinet 172.25.250.100/32 brd 172.25.250.100 scope global lo:1valid_lft forever preferred_lft foreverinet6 ::1/128 scope host valid_lft forever preferred_lft forever
添加內核參數
[root@rs2 ~]# vim /etc/sysctl.conf
[root@rs2 ~]# sysctl -p
net.ipv4.conf.all.arp_ignore = 1
net.ipv4.conf.lo.arp_ignore = 1
net.ipv4.conf.all.arp_announce = 2
net.ipv4.conf.lo.arp_announce = 2
net.ipv4.ip_forward = 0
增加一個路由
[root@rs2 ~]# route add -host 172.25.250.100 dev lo:1
[root@rs2 ~]# route -n
Kernel IP routing table
Destination     Gateway         Genmask         Flags Metric Ref    Use Iface
0.0.0.0         172.25.250.2    0.0.0.0         UG    100    0        0 ens160
172.25.250.0    0.0.0.0         255.255.255.0   U     100    0        0 ens160
172.25.250.100  0.0.0.0         255.255.255.255 UH    0      0        0 lo
測試
[root@client ~]# curl 172.25.250.100
rs1 index.html
[root@client ~]# curl 172.25.250.100
rs2 index.html
也可以通過瀏覽器測試


)

:矩陣距離)


:基于MaskNet和WideDeep的商品推薦CTR模型實現)
)


將一個矩陣(或圖像)與一個標量值相加的函數addC())
