文章目錄
- 一、Netty服務器端啟動細節分析
- 1.1 實現一個簡單的http服務器
- 1.2 服務器端啟動細節分析
- 1.3 創建與初始化 NioServerSocketChannel
- 1.3.1 **通過反射工廠創建 Channel**:
- 1.3.2 **初始化 Channel**
- 1.4 注冊到 Boss EventLoopGroup
- 1.4.1 **異步提交注冊任務**
- 1.4.2 **EventLoop 執行注冊**
- 1.4.3 觸發 Handler 添加事件
- 1.4.4 觸發 Channel 注冊成功事件
- 1.5 綁定端口與激活
- 1.5.1 執行綁定操作
- 1.5.2 標記 Channel 為激活狀態
- 1.5.3 觸發 Channel 激活事件
- 1.5.4 自動注冊ACCEPT事件
- 1.6 接收連接 - ServerBootstrapAcceptor 的工作
- 1.7 總結與精要分析
推薦閱讀:
【01】Netty從0到1系列之I/O模型
【02】Netty從0到1系列之NIO
【03】Netty從0到1系列之Selector
【04】Netty從0到1系列之Channel
【05】Netty從0到1系列之Buffer(上)
【06】Netty從0到1系列之Buffer(下)
【07】Netty從0到1系列之零拷貝技術
【08】Netty從0到1系列之整體架構、入門程序
【09】Netty從0到1系列之EventLoop
【10】Netty從0到1系列之EventLoopGroup
【11】Netty從0到1系列之Future
【12】Netty從0到1系列之Promise
【13】Netty從0到1系列之Netty Channel
【14】Netty從0到1系列之ChannelFuture
【15】Netty從0到1系列之CloseFuture
【16】Netty從0到1系列之Netty Handler
【17】Netty從0到1系列之Netty Pipeline【上】
【18】Netty從0到1系列之Netty Pipeline【下】
【19】Netty從0到1系列之Netty ByteBuf【上】
【20】Netty從0到1系列之Netty ByteBuf【中】
【21】Netty從0到1系列之Netty ByteBuf【下】
【22】Netty從0到1系列之Netty 邏輯架構【上】
【23】Netty從0到1系列之Netty 邏輯架構【下】
一、Netty服務器端啟動細節分析
1.1 實現一個簡單的http服務器
目標
- 完成
http服務器,請求-響應的過程.
作為開發者來說,只要照葫蘆畫瓢即可輕松上手。大多數場景下,你只需要實現與業務邏輯相關的一系列 ChannelHandler,再加上 Netty 已經預置了 HTTP 相關的編解碼器就可以快速完成服務端框架的搭建。所以,我們只需要兩個類就可以完成一個最簡單的 HTTP 服務器,它們分別為服務器啟動類和業務邏輯處理類,結合完整的代碼實現我將對它們分別進行講解。
- 服務器端代碼
package cn.tcmeta.httpserver;import io.netty.bootstrap.ServerBootstrap;
import io.netty.channel.ChannelFuture;
import io.netty.channel.ChannelInitializer;
import io.netty.channel.ChannelOption;
import io.netty.channel.ChannelPipeline;
import io.netty.channel.nio.NioEventLoopGroup;
import io.netty.channel.socket.nio.NioServerSocketChannel;
import io.netty.channel.socket.nio.NioSocketChannel;
import io.netty.handler.codec.http.HttpContentCompressor;
import io.netty.handler.codec.http.HttpObjectAggregator;
import io.netty.handler.codec.http.HttpServerCodec;/*** @author: laoren* @description: 實現一個簡單的http服務器* @version: 1.0.0*/
public class MyHttpSimpleServer {public void doStart(int port) throws InterruptedException {NioEventLoopGroup bossGroup = new NioEventLoopGroup(1);NioEventLoopGroup workerGroup = new NioEventLoopGroup(2);try {ServerBootstrap bootstrap = new ServerBootstrap();bootstrap.group(bossGroup, workerGroup).channel(NioServerSocketChannel.class).childHandler(new ChannelInitializer<NioSocketChannel>() {@Overrideprotected void initChannel(NioSocketChannel ch) throws Exception {ChannelPipeline pipeline = ch.pipeline();// 編碼、解碼處理器pipeline.addLast("codec", new HttpServerCodec());// 壓縮處理器pipeline.addLast("compressor", new HttpContentCompressor());// 合并處理器pipeline.addLast("aggregator", new HttpObjectAggregator(1024 * 1024));// 自定義處理器pipeline.addLast("handler", new MyHttpServerHandler());}}).childOption(ChannelOption.SO_KEEPALIVE, true);ChannelFuture future = bootstrap.bind(port).sync();System.out.println("? MyHttpSimpleServer 啟動,端口: " + port);future.channel().closeFuture().sync();}finally {bossGroup.shutdownGracefully();workerGroup.shutdownGracefully();}}public static void main(String[] args) {try {new MyHttpSimpleServer().doStart(8080);} catch (InterruptedException e) {throw new RuntimeException(e);}}}- 自定義處理器代碼
package cn.tcmeta.httpserver;import io.netty.buffer.Unpooled;
import io.netty.channel.ChannelFutureListener;
import io.netty.channel.ChannelHandlerContext;
import io.netty.channel.SimpleChannelInboundHandler;
import io.netty.handler.codec.http.*;
import io.netty.util.CharsetUtil;
import lombok.extern.slf4j.Slf4j;/*** @author: laoren* @description: 自定義處理類* @version: 1.0.0*/
@Slf4j
public class MyHttpServerHandler extends SimpleChannelInboundHandler<FullHttpRequest> {@Overrideprotected void channelRead0(ChannelHandlerContext ctx, FullHttpRequest request) throws Exception {String content =String.format("Receive http request, uri: %s, method: %s, content: %s%n", request.uri(), request.method(), request.content().toString(CharsetUtil.UTF_8));log.info("uri: {}, request method: {}, content: {}", request.uri(), request.method(), request.content());// 處理響應事件FullHttpResponse response = new DefaultFullHttpResponse(HttpVersion.HTTP_1_1,HttpResponseStatus.OK,Unpooled.wrappedBuffer(content.getBytes()));ctx.writeAndFlush(response).addListener(ChannelFutureListener.CLOSE);}
}- 測試示例
-
客戶端測試
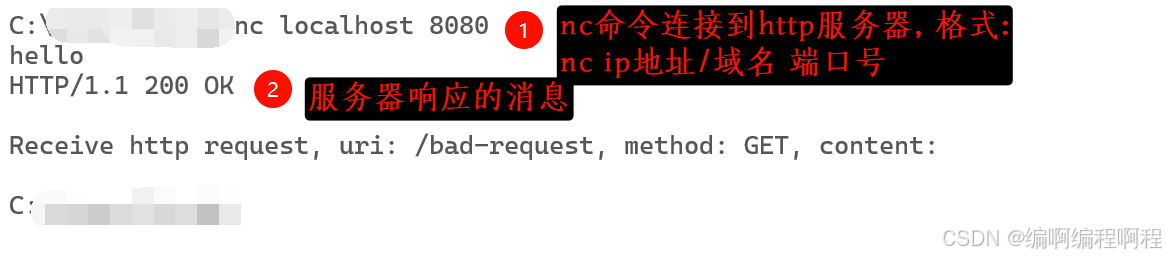
-
服務器端日志
? MyHttpSimpleServer 啟動,端口: 8080
15:47:34 [INFO ] [nioEventLoopGroup-3-1] c.t.h.MyHttpServerHandler - uri: /bad-request, request method: GET, content: UnpooledByteBufAllocator$InstrumentedUnpooledUnsafeHeapByteBuf(ridx: 0, widx: 0, cap: 0)Process finished with exit code 130
1.2 服務器端啟動細節分析
- 階段一: 創建與初始化 NioServerSocketChannel
- 階段二: 注冊到 Boss EventLoopGroup
- 階段三: 綁定端口與激活
- 階段四: 接收連接 - ServerBootstrapAcceptor 的工作
1.3 創建與初始化 NioServerSocketChannel
當調用 ServerBootstrap.bind(port) 時,Netty 并不會立即進行網絡調用。第一步是創建服務端的“大門”。
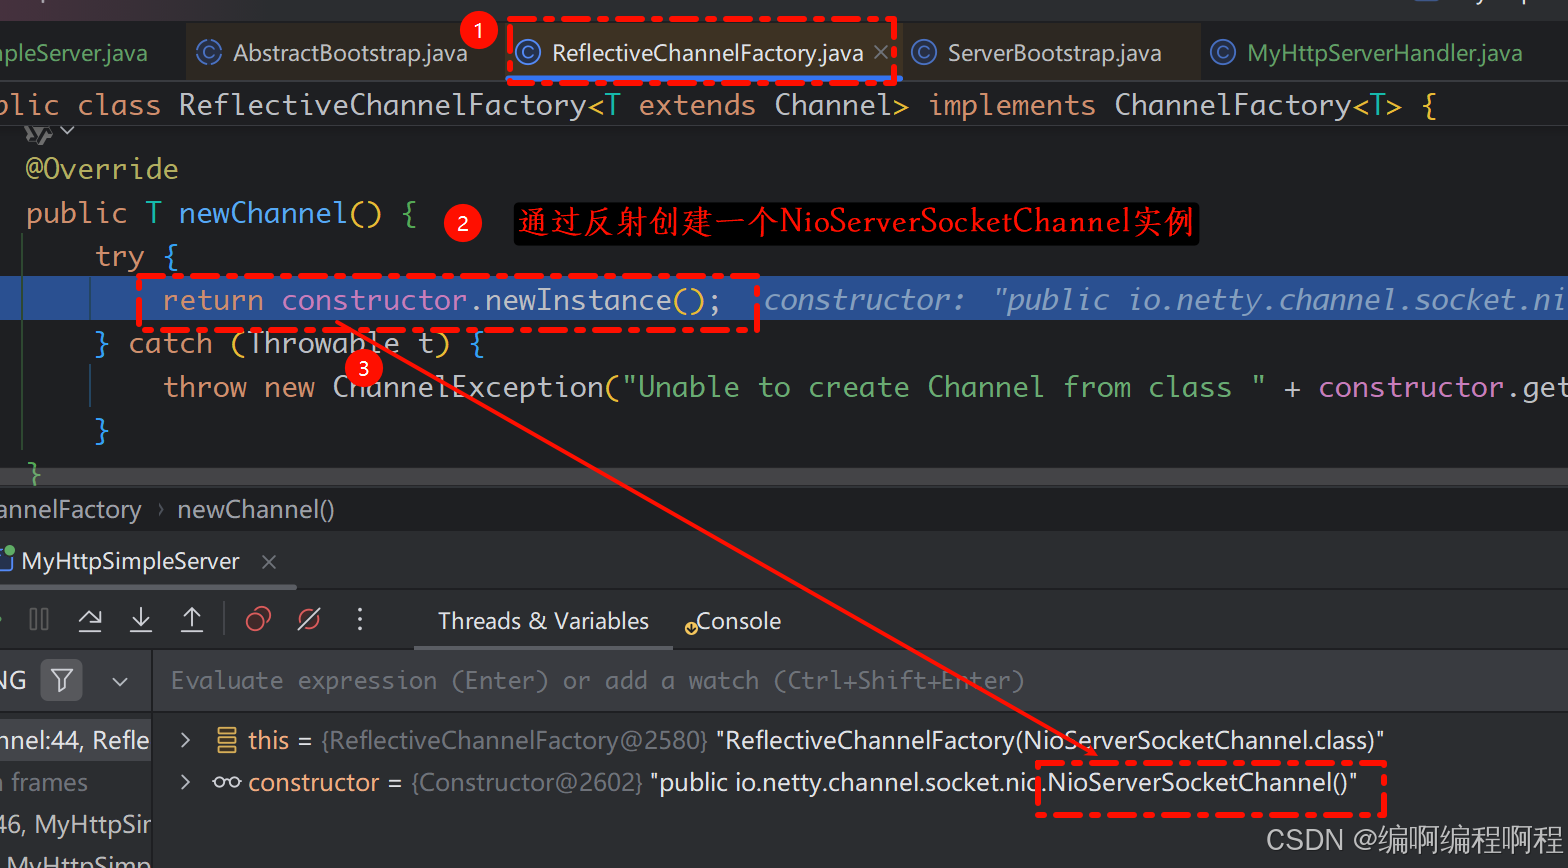
1.3.1 通過反射工廠創建 Channel:
ServerBootstrap通過其內部的ChannelFactory(通常是ReflectiveChannelFactory)來創建一個新的NioServerSocketChannel實例。
相關核心代碼:
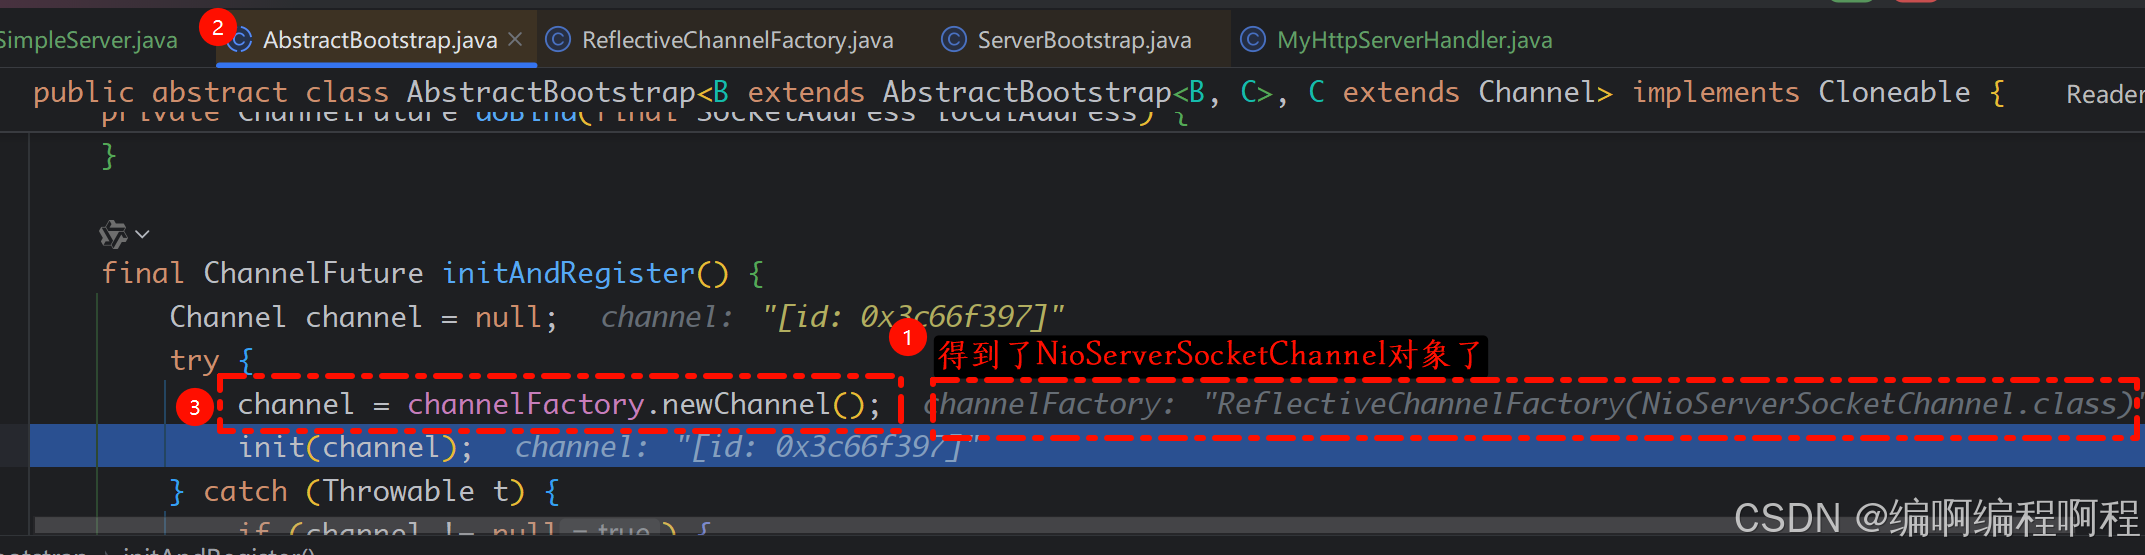
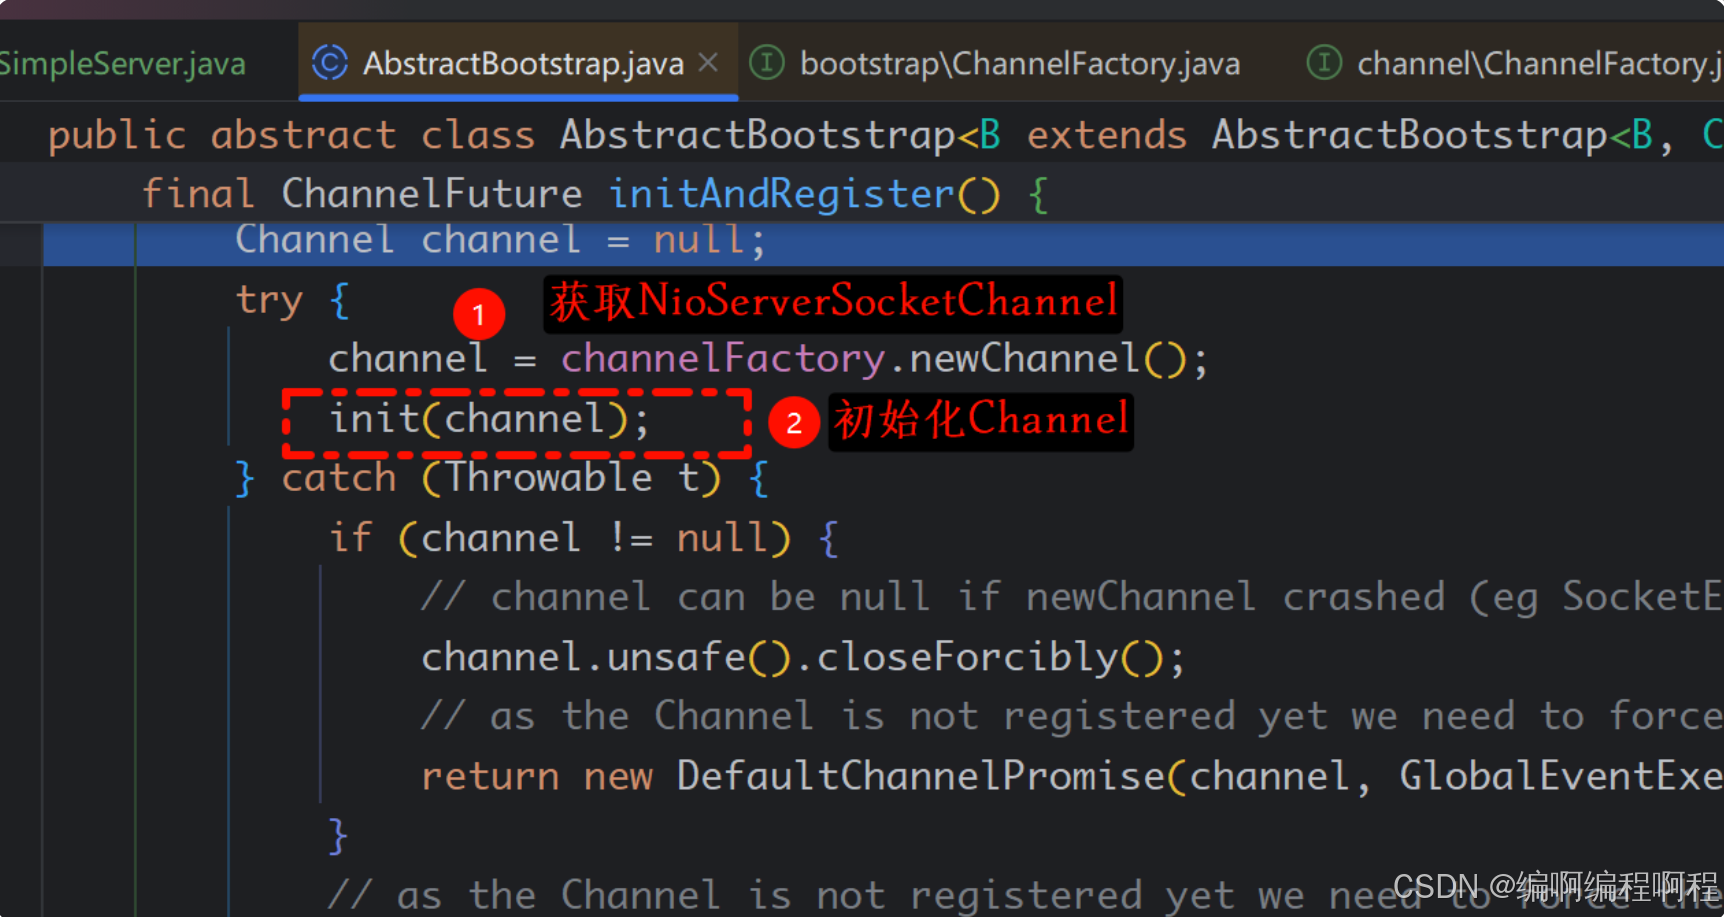
- io/netty/bootstrap/AbstractBootstrap.java
final ChannelFuture initAndRegister() {Channel channel = null;try {// 1. 通過反射創建NioServerSocketChannel對象channel = channelFactory.newChannel();init(channel);} catch (Throwable t) {}
- io/netty/channel/ReflectiveChannelFactory.java
@Override
public T newChannel() {try {return constructor.newInstance();} catch (Throwable t) {throw new ChannelException("Unable to create Channel from class " + constructor.getDeclaringClass(), t);}
}
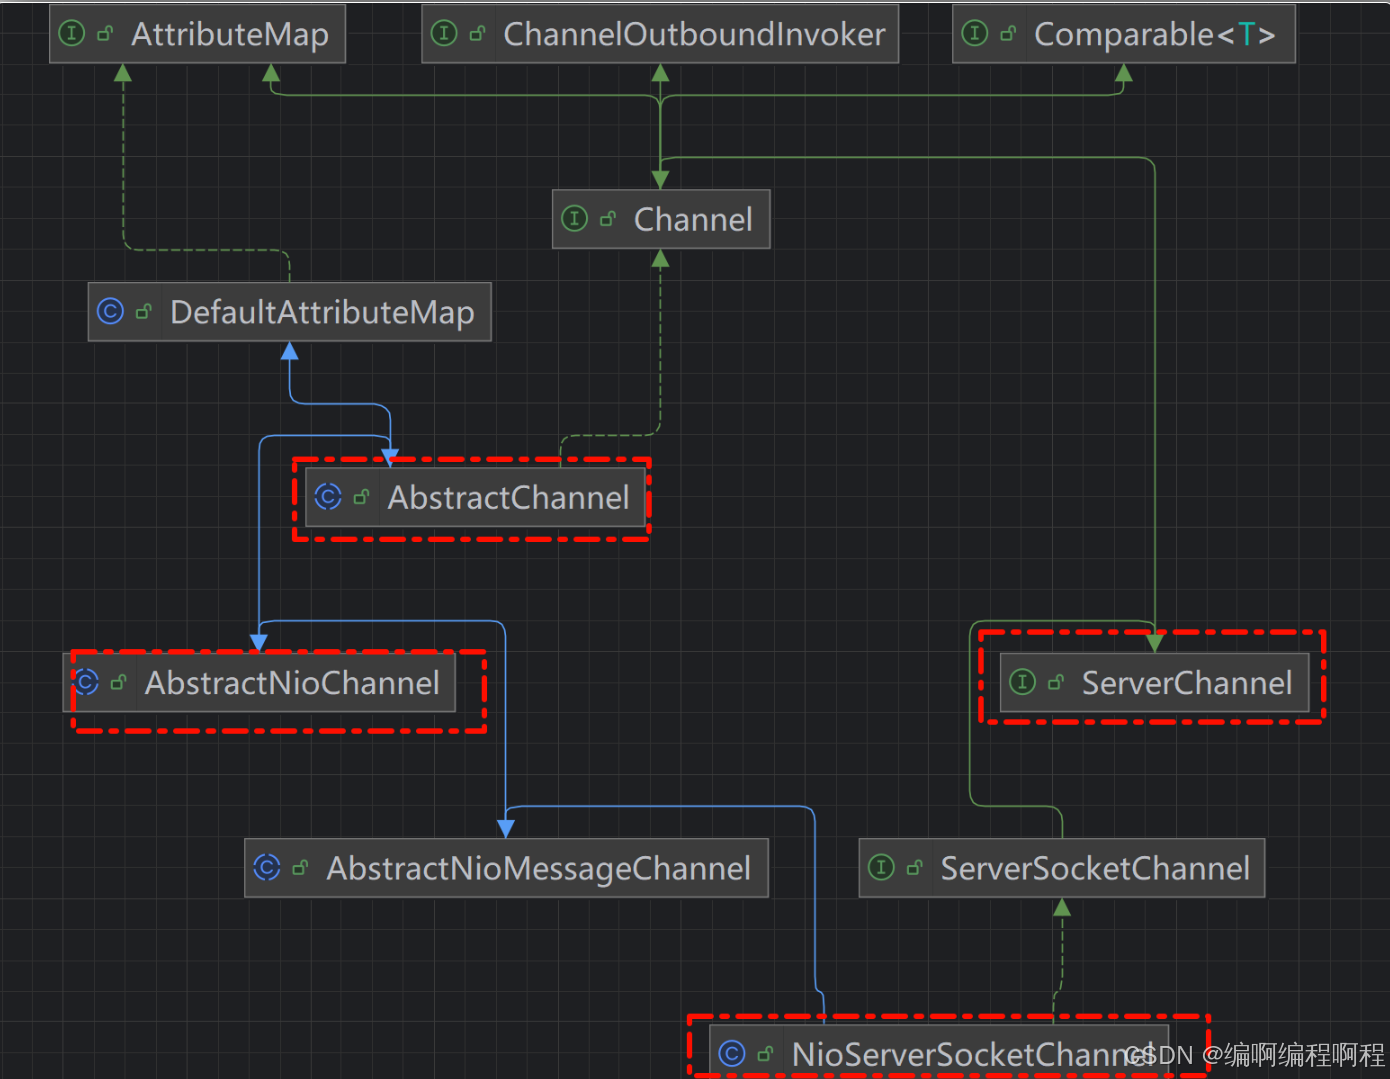
- 底層結節實現
在 NioServerSocketChannel 的構造函數中,Netty 會做幾件關鍵事:
- SocketChannel.open(): 打開一個新的 Java NIO
ServerSocketChannel。 .configureBlocking(false): 立即將其設置為非阻塞模式。這是異步編程的基礎。- 創建該 Channel 的核心組件:
ChannelId(唯一標識)、Unsafe(負責底層讀寫操作)、以及最重要的DefaultChannelPipeline。
核心代碼:
protected AbstractChannel(Channel parent) {this.parent = parent;id = newId();unsafe = newUnsafe();pipeline = newChannelPipeline();
}
rotected AbstractNioChannel(Channel parent, SelectableChannel ch, int readInterestOp) {super(parent);this.ch = ch;this.readInterestOp = readInterestOp;try {ch.configureBlocking(false); // 設置為非阻塞模式} catch (IOException e) {try {ch.close();} catch (IOException e2) {logger.warn("Failed to close a partially initialized socket.", e2);}throw new ChannelException("Failed to enter non-blocking mode.", e);}
}
1.3.2 初始化 Channel
- 創建完成后,
ServerBootstrap會調用init(Channel channel)方法來初始化這個新 Channel。- 設置 ChannelOptions 和 Attributes: 將
ServerBootstrap.option()和ServerBootstrap.attr()中設置的參數應用到該 Channel 的配置中。- 設置 Pipeline 的“大門保安”:
- 這是最關鍵的一步。Netty 會通過
pipeline.addLast()方法將一個特殊的ChannelHandler——ServerBootstrapAcceptor——添加到 Channel 的 Pipeline 中。ServerBootstrapAcceptor的職責: 它本身是一個ChannelInboundHandler。它的唯一使命就是在“有連接到來”這個入站事件被觸發時,將新接入的客戶端連接(SocketChannel)正式接手過來。我們會在階段三詳細講解它。
- 核心代碼
final ChannelFuture initAndRegister() {Channel channel = null;try {channel = channelFactory.newChannel();init(channel); // 初始化Channel} catch (Throwable t) {}
@Override
void init(Channel channel) {// 設置ChannelOptions setChannelOptions(channel, newOptionsArray(), logger);// 設置AttributessetAttributes(channel, newAttributesArray());// 獲取綁定的PipelineChannelPipeline p = channel.pipeline();final EventLoopGroup currentChildGroup = childGroup;final ChannelHandler currentChildHandler = childHandler;final Entry<ChannelOption<?>, Object>[] currentChildOptions = newOptionsArray(childOptions);final Entry<AttributeKey<?>, Object>[] currentChildAttrs = newAttributesArray(childAttrs);final Collection<ChannelInitializerExtension> extensions = getInitializerExtensions();p.addLast(new ChannelInitializer<Channel>() {@Overridepublic void initChannel(final Channel ch) {final ChannelPipeline pipeline = ch.pipeline();ChannelHandler handler = config.handler();if (handler != null) {pipeline.addLast(handler);}ch.eventLoop().execute(new Runnable() {@Overridepublic void run() {// 將ServerBootstrapAcceptor添加到Pipeline中pipeline.addLast(new ServerBootstrapAcceptor(ch, currentChildGroup, currentChildHandler, currentChildOptions, currentChildAttrs,extensions));}});}});if (!extensions.isEmpty() && channel instanceof ServerChannel) {ServerChannel serverChannel = (ServerChannel) channel;for (ChannelInitializerExtension extension : extensions) {try {extension.postInitializeServerListenerChannel(serverChannel);} catch (Exception e) {logger.warn("Exception thrown from postInitializeServerListenerChannel", e);}}}
}
至此,一個功能完備、配置齊全的 NioServerSocketChannel 就準備好了,但它還沒有被賦予“生命”(即注冊到 EventLoop)。
1.4 注冊到 Boss EventLoopGroup
這是 Netty 異步設計的核心體現。注冊操作本身是異步的
1.4.1 異步提交注冊任務
ServerBootstrap將AbstractUnsafe.register0()操作封裝成一個任務,提交給BossGroup中的一個EventLoop。- 主線程(調用
bind()的線程)在此刻立即返回一個ChannelFuture,它可以用來監聽注冊(和后續綁定)是否成功。主線程不會被阻塞

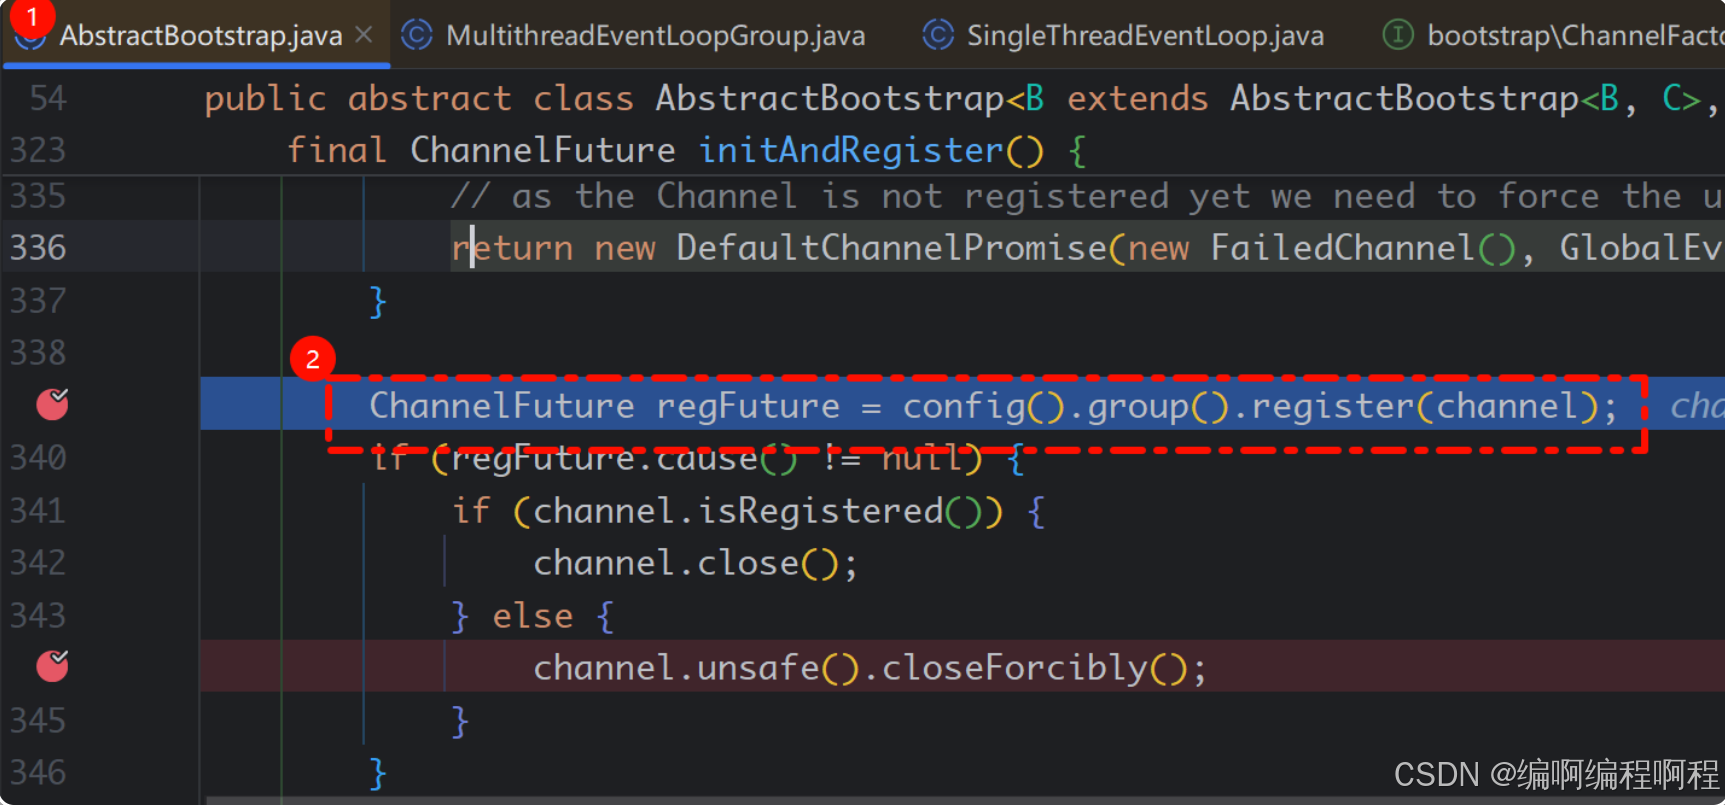
注冊不會阻塞主線程,直接返回一個ChannelFuture
ChannelFuture regFuture = config().group().register(channel);if (regFuture.cause() != null) {if (channel.isRegistered()) {channel.close();} else {channel.unsafe().closeForcibly();}}
-
bossGroup中的NioEventLoop

-
AbstractUnsafe.register0()注冊的EventLoop

1.4.2 EventLoop 執行注冊
- 被選中的
EventLoop線程會在其運行周期內的某個時間點執行這個注冊任務。- 真正的注冊: 在
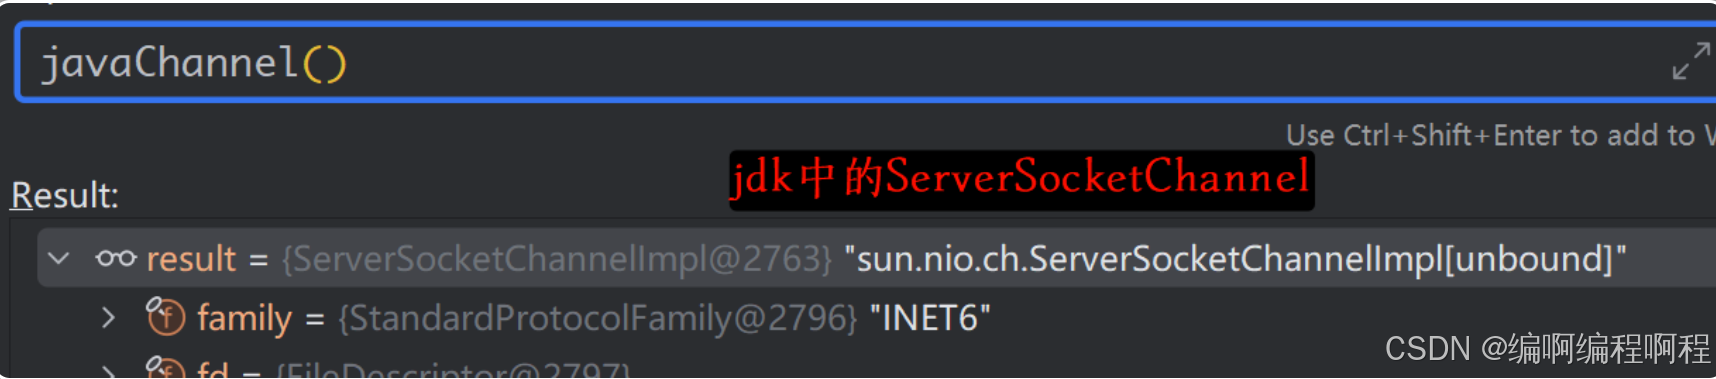
doRegister()方法中,會調用 Java NIO 的ServerSocketChannel.register(eventLoop.selector, 0, this)。
- 關鍵點 1: 將 JDK 的
ServerSocketChannel注冊到EventLoop持有的Selector上。- 關鍵點 2: 興趣操作為
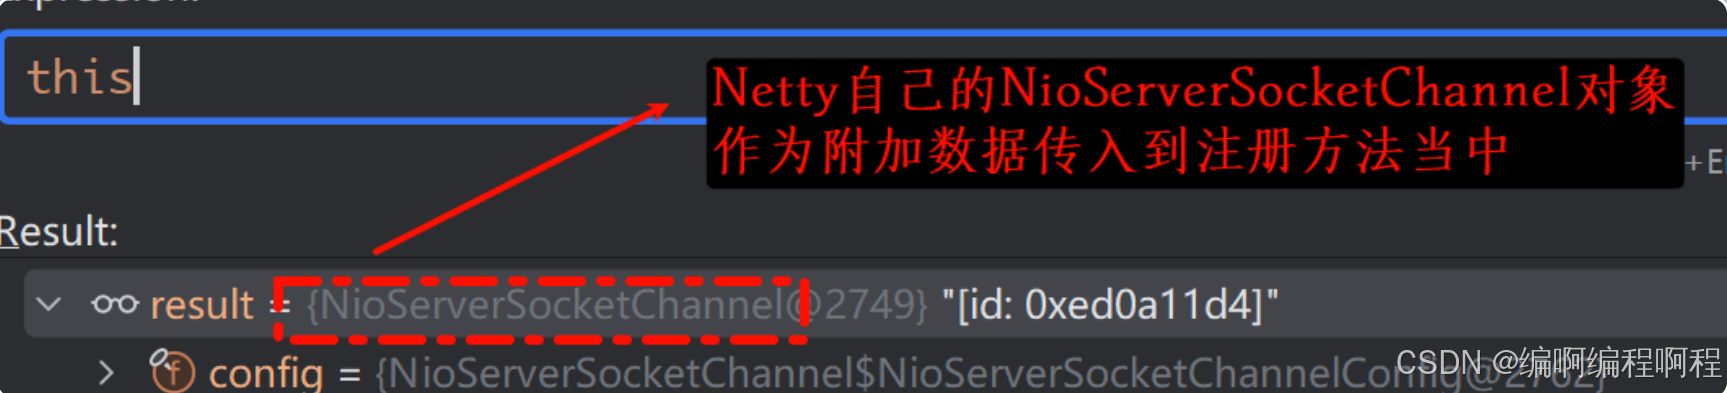
0,表示暫時不監聽任何事件。這是因為此時 Channel 還未激活(未綁定端口),監聽OP_ACCEPT沒有意義。- 關鍵點 3: 附件(Attachment) 設置為 Netty 自己的
NioServerSocketChannel對象。這樣,當Selector返回事件時,Netty 可以直接從SelectionKey中取出附件,就知道是哪個 Netty Channel 發生了事件。
- io/netty/channel/AbstractChannel#register0
private void register0(ChannelPromise promise) {try {// check if the channel is still open as it could be closed in the mean time when the register// call was outside of the eventLoopif (!promise.setUncancellable() || !ensureOpen(promise)) {return;}boolean firstRegistration = neverRegistered;doRegister(); // ????? 核心注冊方法neverRegistered = false;registered = true;// Ensure we call handlerAdded(...) before we actually notify the promise. This is needed as the// user may already fire events through the pipeline in the ChannelFutureListener.pipeline.invokeHandlerAddedIfNeeded();safeSetSuccess(promise);pipeline.fireChannelRegistered();// Only fire a channelActive if the channel has never been registered. This prevents firing// multiple channel actives if the channel is deregistered and re-registered.if (isActive()) {if (firstRegistration) {pipeline.fireChannelActive();} else if (config().isAutoRead()) {// This channel was registered before and autoRead() is set. This means we need to begin read// again so that we process inbound data.//// See https://github.com/netty/netty/issues/4805beginRead();}}} catch (Throwable t) {// Close the channel directly to avoid FD leak.closeForcibly();closeFuture.setClosed();safeSetFailure(promise, t);}
}
- io/netty/channel/nio/AbstractNioChannel#doRegister()
@Overrideprotected void doRegister() throws Exception {boolean selected = false;for (;;) {try {// 參數1: Selector// 參數2: 0: 表示暫時不監聽任何事件。這是因為此時 Channel 還未激活(未綁定端口),監聽 OP_ACCEPT 沒有意義。// 參數3: this: 附件(Attachment) 設置為 Netty 自己的 NioServerSocketChannel 對象。這樣,當 Selector 返回事件時,Netty 可以直接從 SelectionKey 中取出附件,就知道是哪個 Netty Channel 發生了事件selectionKey = javaChannel().register(eventLoop().unwrappedSelector(), 0, this);return;} catch (CancelledKeyException e) {if (!selected) {// Force the Selector to select now as the "canceled" SelectionKey may still be// cached and not removed because no Select.select(..) operation was called yet.eventLoop().selectNow();selected = true;} else {// We forced a select operation on the selector before but the SelectionKey is still cached// for whatever reason. JDK bug ?throw e;}}}}
- register簽名
// 參數1: Selector
// 參數2: 監聽的事件
// 參數3: 附加數據
public abstract SelectionKey register(Selector sel, int ops, Object att)throws ClosedChannelException;
1.4.3 觸發 Handler 添加事件
- 注冊成功后,
EventLoop線程會回調ChannelHandler.handlerAdded(ctx)方法。對于ServerBootstrapAcceptor來說,此時它正式“上崗”。
1.4.4 觸發 Channel 注冊成功事件
- 最后,
EventLoop線程會通過Pipeline從Head開始向后傳播channelRegistered事件。此時,所有用戶添加到服務端 Channel 的ChannelHandler都會感知到注冊成功。
1.5 綁定端口與激活
注冊成功后,才開始真正的綁定。
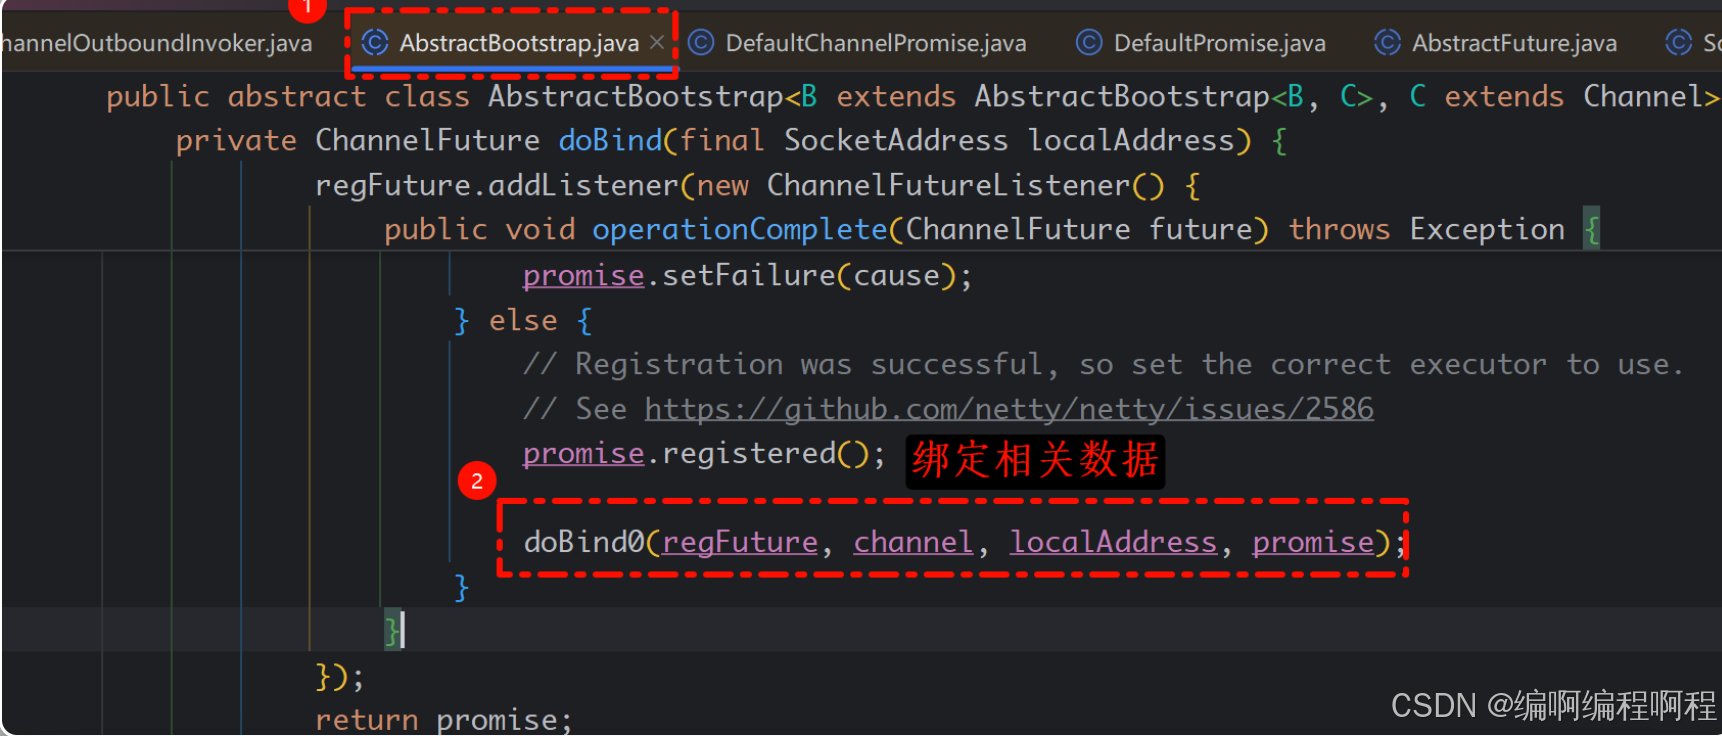
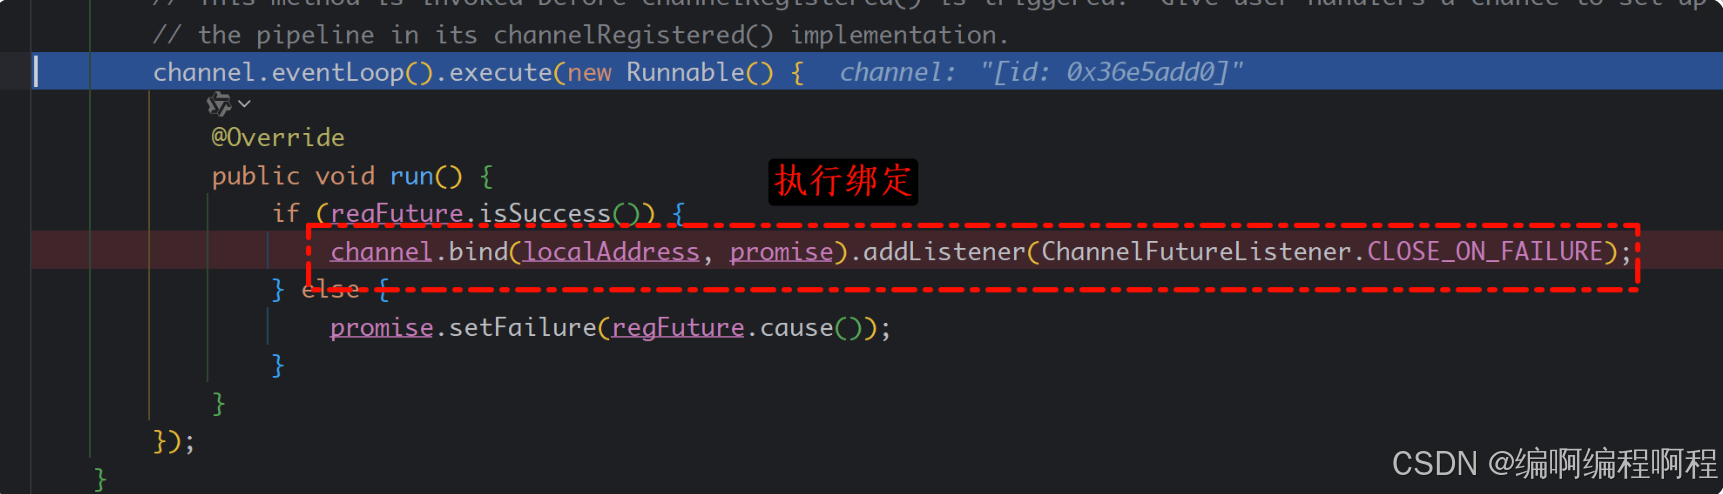
1.5.1 執行綁定操作
- 同樣在
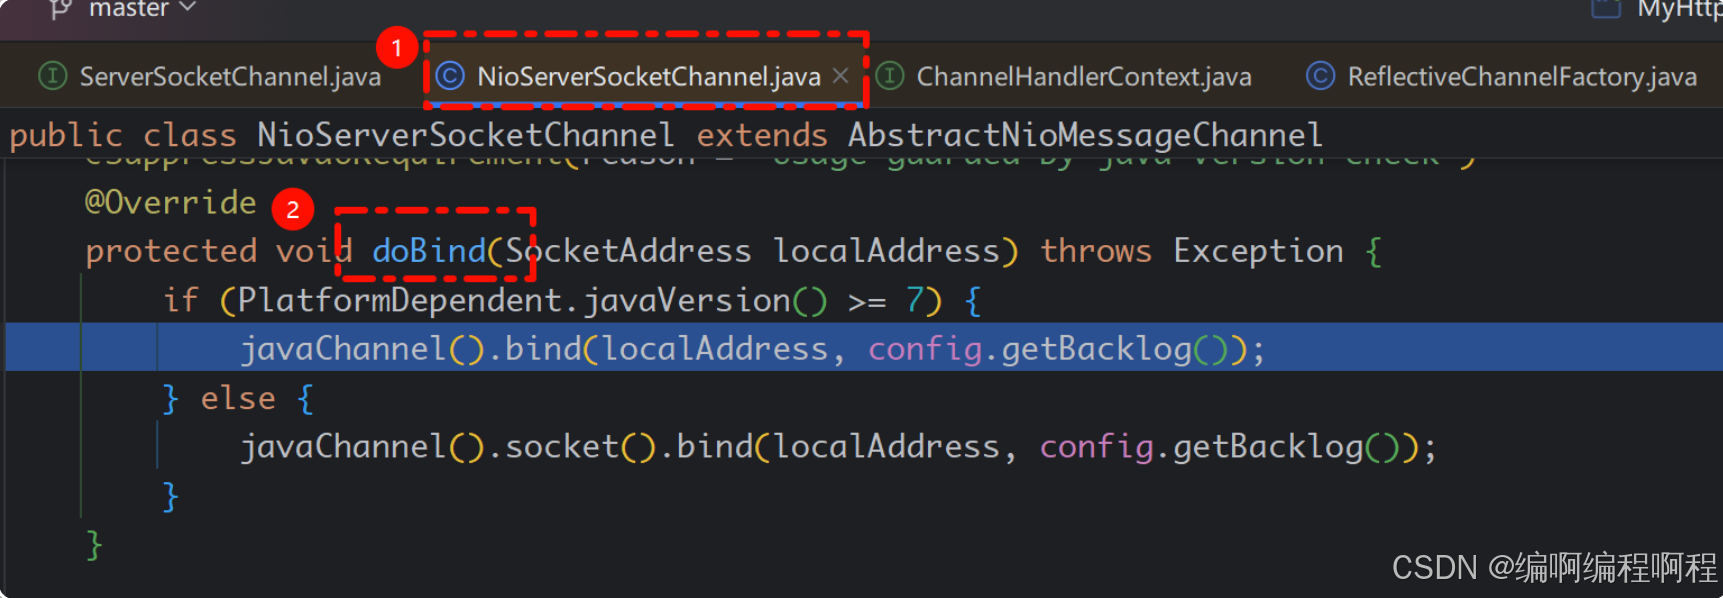
EventLoop線程中,調用doBind()方法。 - 其內部最終會調用 JDK 的
ServerSocketChannel.bind(socketAddress, backlog)方法,真正地將套接字綁定到指定的端口。
- 注冊成功之后,進行綁定操作,調用
doBind
// Registration future is almost always fulfilled already, but just in case it's not.
final PendingRegistrationPromise promise = new PendingRegistrationPromise(channel);
regFuture.addListener(new ChannelFutureListener() {@Overridepublic void operationComplete(ChannelFuture future) throws Exception {Throwable cause = future.cause();if (cause != null) {// Registration on the EventLoop failed so fail the ChannelPromise directly to not cause an// IllegalStateException once we try to access the EventLoop of the Channel.promise.setFailure(cause);} else {// Registration was successful, so set the correct executor to use.// See https://github.com/netty/netty/issues/2586promise.registered();// 調用它doBind0(regFuture, channel, localAddress, promise);}}
});
1.5.2 標記 Channel 為激活狀態
- 綁定成功后,調用
setActive(true)將 Channel 標記為激活狀態。
1.5.3 觸發 Channel 激活事件
- 通過
Pipeline從Head開始向后傳播channelActive事件
1.5.4 自動注冊ACCEPT事件
- 這是一個精妙的設計!
channelActive事件最終會傳播到Pipeline的HeadContext。 HeadContext的channelActive方法中會調用readIfIsAutoRead()。- 這個方法調用會層層向下,最終到達底層的
AbstractNioChannel,其doBeginRead()方法會被調用。 - 最終操作:
doBeginRead()會修改之前注冊到Selector上的SelectionKey的興趣操作:selectionKey.interestOps(interestOps | OP_ACCEPT)。 - 至此,Netty 服務端才開始正式監聽
OP_ACCEPT事件,準備接收客戶端的連接。
1.6 接收連接 - ServerBootstrapAcceptor 的工作
當客戶端發起連接,BossGroup 的 EventLoop 輪詢到 OP_ACCEPT 事件時,真正的“魔法”開始了。
-
創建子 Channel:
EventLoop線程會調用NioServerSocketChannel的read()方法,其內部通過ServerSocketChannel.accept()創建一個 JDK 的SocketChannel,并同樣被包裝成 Netty 的NioSocketChannel。 -
“Acceptor” 接手: 這個新創建的
NioSocketChannel會作為入站數據,在Pipeline中傳播。它首先到達Head,然后流經ServerBootstrapAcceptor。 -
配置并注冊子 Channel:
ServerBootstrapAcceptor的channelRead方法被觸發,它負責:- 將
ServerBootstrap.childOptions()和childAttrs()設置到子 Channel 上。 - 將
ServerBootstrap.childHandler()中設置的ChannelInitializer添加到子 Channel 的 Pipeline 中。
- 將
-
移交完成: 自此,這個客戶端連接生命周期的所有后續 I/O 事件(讀、寫、斷開)都將由
WorkerGroup中的那個EventLoop全權負責。BossGroup的職責圓滿完成。
1.7 總結與精要分析
| 階段 | 核心操作 | 執行線程 | 關鍵細節 |
|---|---|---|---|
| 創建初始化 | 創建 NioServerSocketChannel | 主線程 | 配置非阻塞,創建 Pipeline,添加 ServerBootstrapAcceptor |
| 注冊 | 將 Channel 注冊到 Selector | BossGroup 線程 | 興趣操作為 0,附件為 Netty Channel,異步操作 |
| 綁定 | 調用 JDK bind | BossGroup 線程 | 綁定端口,觸發 channelActive 事件 |
| 激活監聽 | 注冊 OP_ACCEPT 事件 | BossGroup 線程 | 由 HeadContext 在 channelActive 事件中自動完成 |
| 接收連接 | ServerBootstrapAcceptor 工作 | BossGroup 線程 | 接收連接,配置子 Channel,將其轉交給 WorkerGroup |
設計理念與精妙之處:
- 職責分離 (Separation of Concerns):
BossGroup只管接收連接,WorkerGroup只管處理連接,架構清晰,易于理解和擴展。 - 完全異步: 從注冊到綁定,所有耗時操作都封裝成任務提交給
EventLoop,保證啟動過程不阻塞主線程。 - 惰性監聽: 先注冊(
interestOps=0),后綁定,再設置OP_ACCEPT。這是一個嚴謹的狀態管理流程,避免了在未準備好時接收到事件。 - 統一的抽象: 無論是服務端 Channel 還是客戶端 Channel,都通過
ChannelPipeline和EventLoop進行管理,提供了極其一致和靈活的編程模型。 - 高效的連接接收:
ServerBootstrapAcceptor內置于框架中,將接收連接和后續處理完美銜接,整個過程都在EventLoop線程內完成,無比高效。
Netty 的啟動過程是其 Reactor 線程模型的完美體現,每一個步驟都經過精心設計,以確保在高并發場景下能夠實現最高的性能和可靠性


![[論文閱讀] 人工智能 + 軟件工程(漏洞檢測)| 工業場景漏洞檢測新突破:CodeBERT跨領域泛化能力評估與AI-DO工具開發](http://pic.xiahunao.cn/[論文閱讀] 人工智能 + 軟件工程(漏洞檢測)| 工業場景漏洞檢測新突破:CodeBERT跨領域泛化能力評估與AI-DO工具開發)
)


