因為yolo的檢測/分割/姿態/旋轉/分類模型的環境配置、訓練、推理預測等命令非常類似,這里不再詳細敘述環境配置,主要參考【超詳細yolo8/11-detect目標檢測全流程概述:配置環境、數據標注、訓練、驗證/預測、onnx部署(c++/python)詳解】,下面有相關鏈接,這里主要針對旋轉框的數據標注、格式轉換、模型部署等不同細節部分詳細說明;
【YOLOv8/11-detect目標檢測全流程教程】超詳細yolo8/11-detect目標檢測全流程概述:配置環境、數據標注、訓練、驗證/預測、onnx部署(c++/python)詳解
【環境配置】Ubuntu/Debian小白從零開始配置深度學習環境和各種軟件庫(顯卡驅動、CUDA、CUDNN、Pytorch、OpenCv、PCL、Cmake …)【持續維護】
【yolo全家桶github官網】https://github.com/ultralytics/ultralytics
【yolo說明文檔】https://docs.ultralytics.com/zh/
文章目錄
- 一、數據準備(標注和轉換)
- 1.1手動畫框旋轉基礎標注
- 1.2分割大模型sam輔助標注
- 1.3預訓練模型onnx自動標注
- 1.4python腳本格式轉化和X-anylabeling軟件自帶轉換
- 二、模型部署
- c++版本
- python版本
一、數據準備(標注和轉換)
這里 【強烈推薦使用】 X-anylabeling, windows可以直接下載exe文件使用,linux下直接運行可執行文件,非常方便,而且后續可以加入分割大模型sam、sam2、自動標注等,可以實現快速標注;
官網鏈接:https://github.com/CVHub520/X-AnyLabeling
使用說明:https://blog.csdn.net/CVHub/article/details/144595664?spm=1001.2014.3001.5502
1.1手動畫框旋轉基礎標注
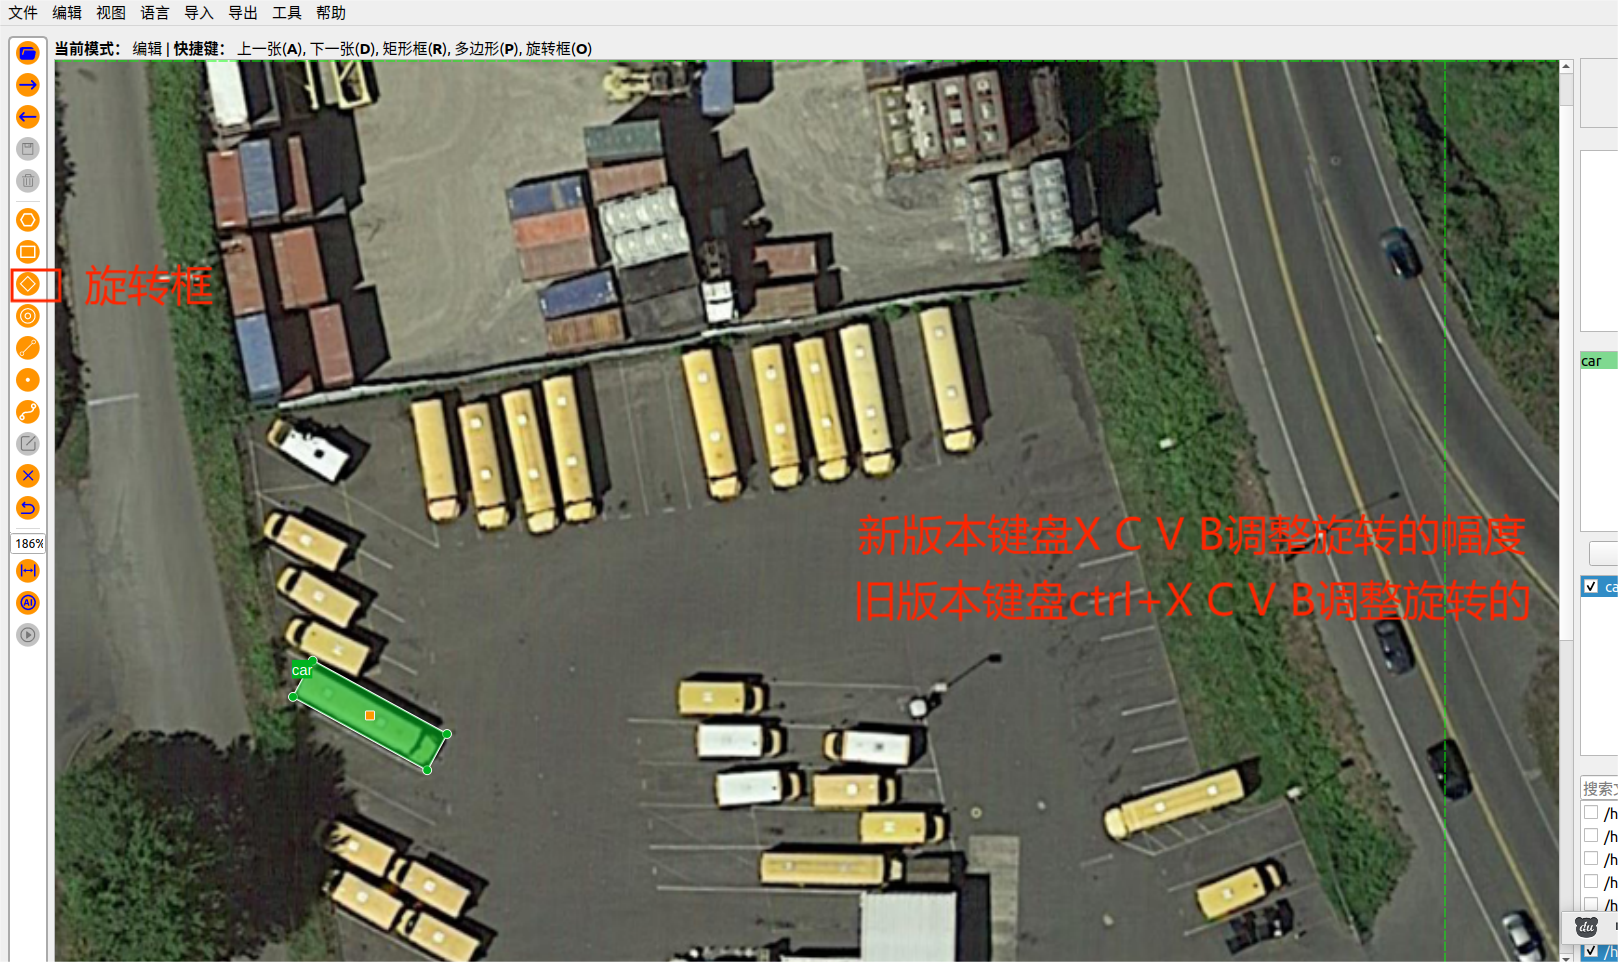
手動選擇旋轉框標注,鍵盤X C V B分別調整旋轉的大幅度和小幅度旋轉
1.2分割大模型sam輔助標注
可以加載分割大模型sam,標注速度要快很多,加載時候需要科學上網 會自動下載對應的onnx模型,若是界面上點擊會自動下載不用再配置;若不行需要手動下載onnx模型,并且需要寫配置模型yaml文件,并在選擇模型時候加載這個文件。這個.yaml文件主要修改模型路徑。給出sam的onnx模型
sam_vit_b_01ec64 的onnx模型,已包含編碼和解碼,【百度網盤】 【csdn免費資源文件】
配置的yaml文件
type: segment_anything
name: segment_anything_vit_b_quant-r20230520
display_name: Segment Anything (ViT-Base Quant)
# encoder_model_path: https://github.com/CVHub520/X-AnyLabeling/releases/download/v0.2.0/sam_vit_b_01ec64.encoder.quant.onnx
# decoder_model_path: https://github.com/CVHub520/X-AnyLabeling/releases/download/v0.2.0/sam_vit_b_01ec64.decoder.quant.onnx
encoder_model_path: D:\CvHub_YoLo_obb\sam_vit_h_4b8939.encoder.quant.onnx
decoder_model_path: D:\CvHub_YoLo_obb\sam_vit_h_4b8939.decoder.quant.onnx
input_size: 1024
max_width: 1024
max_height: 682

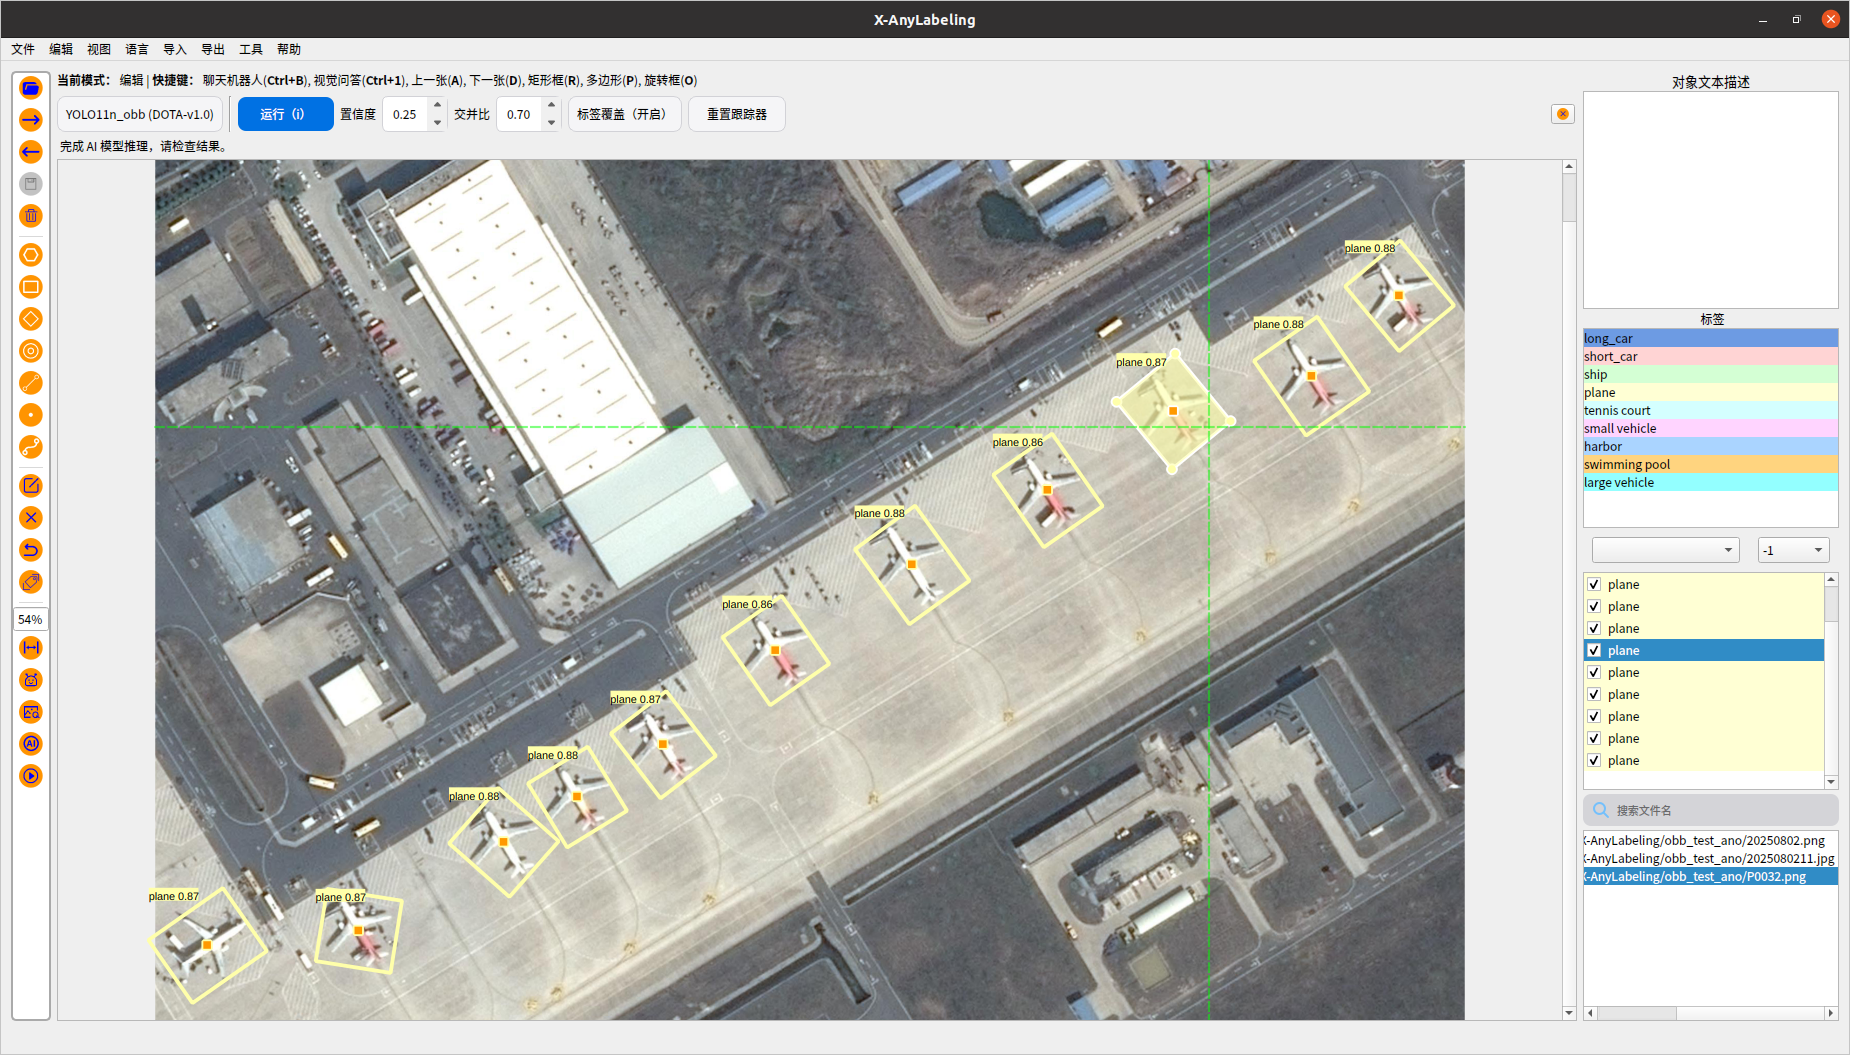
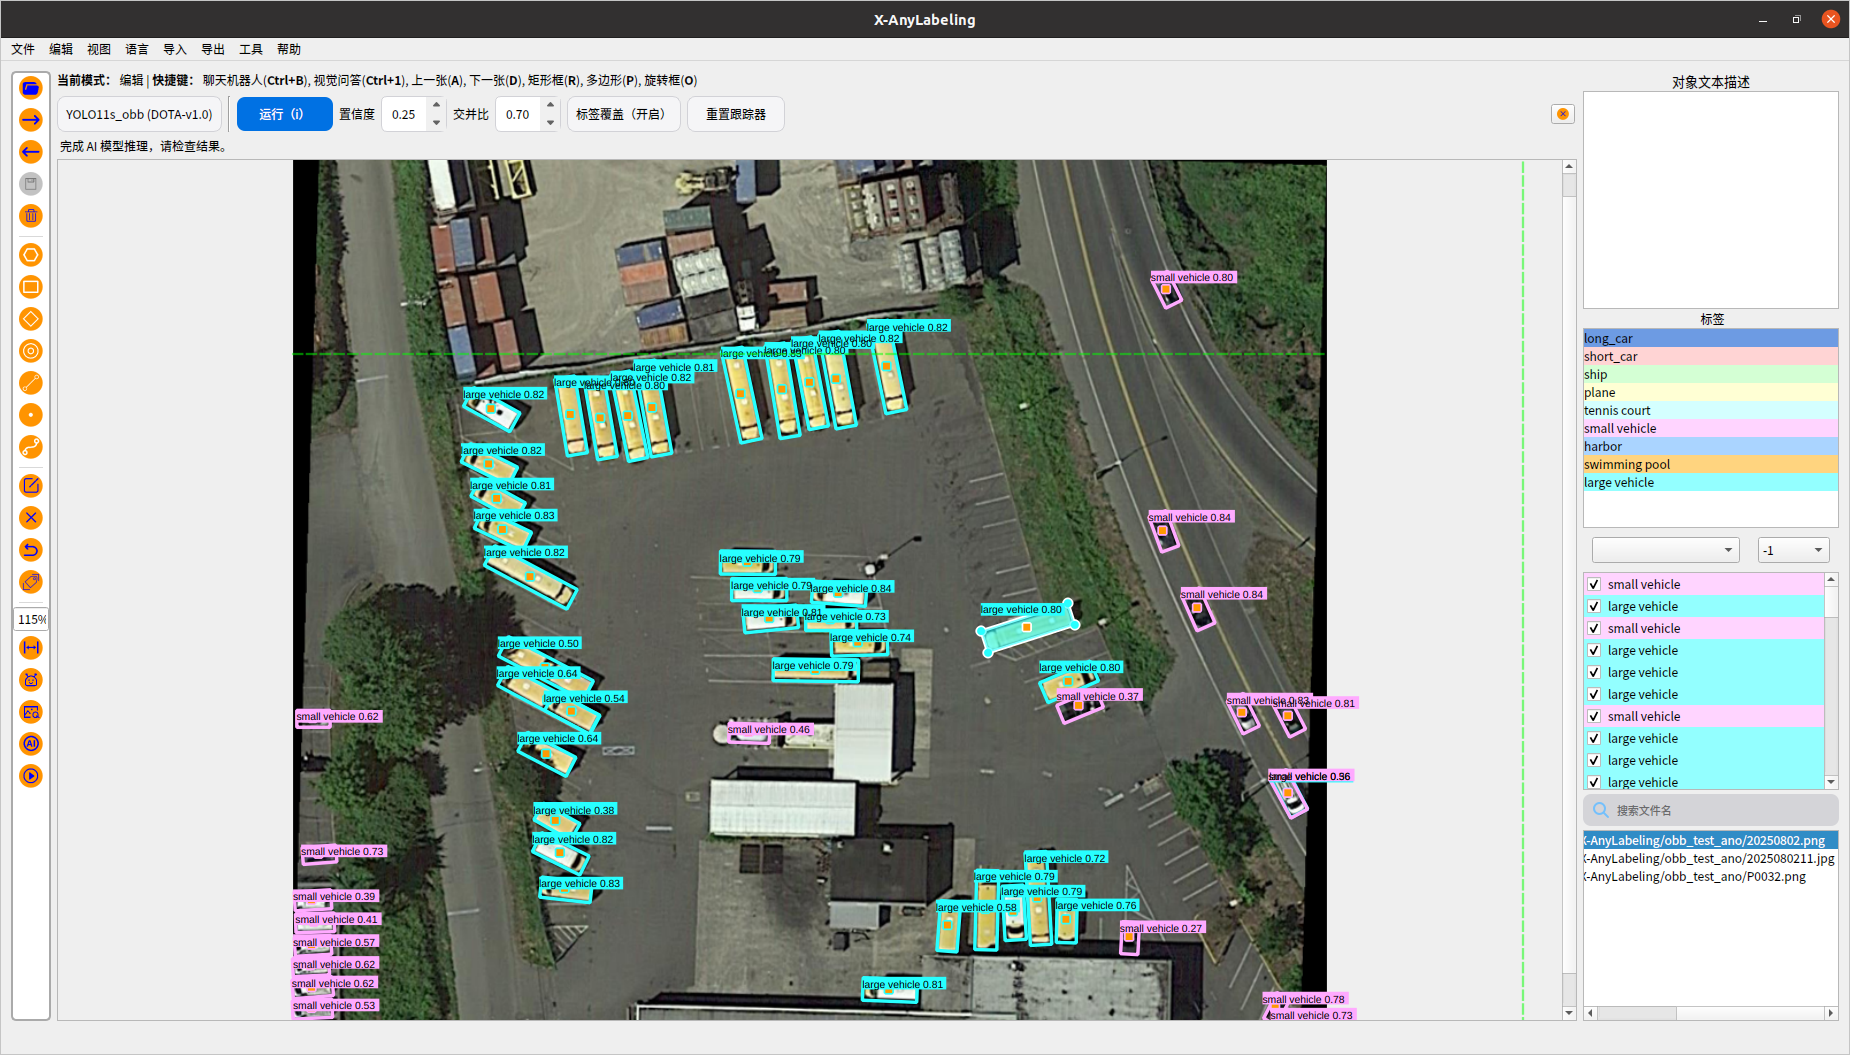
1.3預訓練模型onnx自動標注
需要寫yaml配置文件,主要是指定onnx模型的路徑、iou、conf、classes等;
type: yolo11_obb
name: yolo11n_obb-r20240930
provider: Ultralytics
display_name: YOLO11n_obb (DOTA-v1.0)
#model_path: https://github.com/CVHub520/X-AnyLabeling/releases/download/v2.4.4/yolo11s-obb.onnx
model_path: /home/xxx/yolov11/yolo_base_model/yolo11n-obb.onnx
iou_threshold: 0.7
conf_threshold: 0.25
classes: #就是label名稱- plane- ship- storage tank- baseball diamond- tennis court- basketball court- ground track field- harbor- bridge- large vehicle- small vehicle- helicopter- roundabout- soccer ball field- swimming pool
可以設置置信度 交并比 濾除或者保留多的旋轉目標
1.4python腳本格式轉化和X-anylabeling軟件自帶轉換
DOTAv1數據格式
x1, y1, x2, y2, x3, y3, x4, y4, category, difficult
x1, y1, x2, y2, x3, y3, x4, y4表示四個頂點的x坐標和y坐標。category表示物體的分類,difficult表示識別難度(1困難,0簡單);
YOLO-OBB數據格式
class_index x1 y1 x2 y2 x3 y3 x4 y4
#例子
0 0.780811 0.743961 0.782371 0.74686 0.777691 0.752174 0.776131 0.749758
class_index表示分類的索引,其他8項是4個頂點的坐標,坐標是歸一化后的;
python腳本轉換
json2txt_obb.py
import json
import os
import cv2
import numpy as npdef visualize_obb_annotations(txt_dir, img_dir, output_dir, class_colors):"""可視化YOLO OBB格式標注(優化版):param txt_dir: TXT標注文件目錄:param img_dir: 對應圖片目錄:param output_dir: 可視化結果輸出目錄:param class_colors: 類別顏色映射字典 {class_idx: (B,G,R)}"""os.makedirs(output_dir, exist_ok=True)# 支持的圖片格式supported_formats = ('.jpg', '.jpeg', '.png', '.bmp')for txt_name in os.listdir(txt_dir):if not txt_name.endswith('.txt'):continue# 嘗試查找對應圖片(支持多種格式)img_name_no_ext = os.path.splitext(txt_name)[0]img_path = Nonefor fmt in supported_formats:temp_path = os.path.join(img_dir, img_name_no_ext + fmt)if os.path.exists(temp_path):img_path = temp_pathbreakif img_path is None:print(f"Warning: No corresponding image found for {txt_name}")continueimg = cv2.imread(img_path)if img is None:print(f"Warning: Could not read image {img_path}")continueprint(f"Processing {txt_name}...")txt_path = os.path.join(txt_dir, txt_name)with open(txt_path, 'r') as f:lines = f.readlines()for line in lines:parts = line.strip().split()if len(parts) != 9:continueclass_idx = int(parts[0])# 反歸一化點坐標points = np.array([float(x) for x in parts[1:]], dtype=np.float32)img_h, img_w = img.shape[:2]abs_points = points.reshape(4, 2) * np.array([img_w, img_h])color = class_colors.get(class_idx, (0, 255, 0))# 繪制多邊形cv2.polylines(img, [abs_points.astype(np.int32)], isClosed=True, color=color, thickness=2)# 繪制點for (x, y) in abs_points:cv2.circle(img, (int(x), int(y)), 4, color, -1)cv2.circle(img, (50, 100), 4, color, -1)# 繪制類別標簽cv2.putText(img, str(class_idx), tuple(abs_points[0].astype(np.int32)),cv2.FONT_HERSHEY_SIMPLEX, 0.7, (255,255,255), 2)# 保持原圖片格式輸出output_ext = os.path.splitext(img_path)[1]output_name = img_name_no_ext + output_extoutput_path = os.path.join(output_dir, output_name)cv2.imwrite(output_path, img)import shutildef convert_json_to_txt(json_dir, output_dir, class_list, copy_dir=None):"""將Labelme生成的JSON標注文件轉換為YOLO OBB格式的TXT文件,并可選拷貝txt和圖片到指定文件夾:param json_dir: JSON文件目錄路徑:param output_dir: 輸出TXT文件目錄路徑:param class_list: 類別名稱列表:param copy_dir: 可選,拷貝txt和圖片的目標文件夾"""class_index = {name: idx for idx, name in enumerate(class_list)}os.makedirs(output_dir, exist_ok=True)if copy_dir:os.makedirs(copy_dir, exist_ok=True)for filename in os.listdir(json_dir):if not filename.endswith('.json'):continueprint(f"Processing {filename}...")json_path = os.path.join(json_dir, filename)with open(json_path, 'r') as f:data = json.load(f)img_width = data['imageWidth']img_height = data['imageHeight']txt_name = os.path.splitext(filename)[0] + '.txt'txt_path = os.path.join(output_dir, txt_name)with open(txt_path, 'w') as txt_file:for shape in data['shapes']:if len(shape['points']) != 4:  # 只處理4個點的標注continuelabel = shape['label']points = shape['points']class_idx = class_index.get(label, -1)if class_idx == -1:continue# 歸一化4個點坐標normalized_points = []for x, y in points:nx = x / img_widthny = y / img_heightnormalized_points.extend([nx, ny])# 確保有8個坐標值(4個點)if len(normalized_points) == 8:line = f"{class_idx} " + " ".join([f"{coord:.6f}" for coord in normalized_points])txt_file.write(line + '\n')# 拷貝txt和圖片到copy_dirif copy_dir:# 拷貝txtshutil.copy(txt_path, os.path.join(copy_dir, txt_name))# 拷貝圖片(假設圖片為jpg或png)img_base = os.path.splitext(filename)[0]for ext in ['.jpg', '.png', '.jpeg', '.bmp']:img_path = os.path.join(json_dir, img_base + ext)if os.path.exists(img_path):shutil.copy(img_path, os.path.join(copy_dir, img_base + ext))breakif __name__ == "__main__":# 使用示例#json_folder = "F:/Data/20250612"  # 替換為JSON文件目錄json_folder = "./obb_test_ano"  # 替換為JSON文件目錄output_folder = "./obb_test_ano"    # 替換為輸出txt目錄selected_folder = "./obb_test_result"  # 替換為可視化結果路徑 classes = ["long_car", "short_car","plane","ship","4"]  # 替換為實際類別列表# 調用轉換函數print("Converting JSON to TXT...")#convert_json_to_txt(json_folder, output_folder, classes)convert_json_to_txt(json_folder, output_folder, classes, copy_dir=selected_folder)class_colors = {0: (255,0,0), 1: (0,0,255),2:(0,255,0), 3:(0,125,255)}# 可視化標注# 這里假設輸出目錄和圖片目錄相同visualize_obb_annotations(output_folder, output_folder, selected_folder, class_colors)
里面添加了輔助驗證函數visualize_obb_annotations,把txt內容映射換源到原圖上,用于驗證轉換是否有問題;
X-anylabeling軟件自帶轉換
其實X-anylabeling這個軟件帶的有轉換格式的按鈕,需要創建一個 classes.txt 文件,用于存放所有標簽的索引信息;
因為在使用 X-AnyLabeling 導出YOLO格式標簽時,需要先選中一個描述類別的.txt文件,該文件按行列出所有類別(例如long_car、short_car、ship、plane)。然后選擇 導出->yolo旋轉框標簽->加載這個classt.txt->選擇標簽的導出的路徑,即可;會一次性導出所有標簽;


yolo-obb訓練、預測、導出命令
#obb的訓練、預測和導出onnx命令
yolo obb train data=dataset.yaml model=yolo11n-obb.pt epochs=300 imgsz=1920 amp=False batch=2 lr0=0.001 mosaic=0.05 patience=200
#模型預測
yolo obb predict model=runs/detect/train4/weights/best.pt source=/xxx/images/test save=true conf=0.4 iou=0.5
#模型導出
yolo export model=/xxx/yolov11/runs/obb/train4/weights/best.pt format=onnx opset=17 simplify=True
二、模型部署
c++版本
主要參考大佬github開源文件https://github.com/UNeedCryDear/yolov8-opencv-onnxruntime-cpp
和檢測相似,其中不管旋轉、分割、檢測啥的,都有yolov8_utils.h和yolov8_utils.cpp這兩個文件,和目標檢測里面的一樣,可以參考上面的大佬的,或者下面這篇文章
【超詳細yolo8/11-detect目標檢測全流程概述:配置環境、數據標注、訓練、驗證/預測、onnx部署(c++/python)詳解】
主要涉及五個文件,main.cpp yolov8_utils.h yolov8_obb_onnx.h yolov8_utils.cpp yolov8_obb_onnx.cpp,其中yolov8_utils.h和yolov8_utils.cpp和yolo8/11-detect目標檢測一樣,這里就不貼碼了; 把onnx初始化放到主程序里面,執行檢測時候不再初始化;
主要修改圖片和模型路徑,還有yolov8_obb_onnx.h里面的模型寬度和高度。
yolov8_obb_onnx.h 的頭文件,修改_netWidth和_netHidth大小,換成自己onnx模型輸入的大小。
#pragma once
#include <iostream>
#include<memory>
#include <opencv2/opencv.hpp>
#include "yolov8_utils.h"
#include<onnxruntime_cxx_api.h>//#include <tensorrt_provider_factory.h>  //if use OrtTensorRTProviderOptionsV2
//#include <onnxruntime_c_api.h>class Yolov8ObbOnnx {
public:Yolov8ObbOnnx() :_OrtMemoryInfo(Ort::MemoryInfo::CreateCpu(OrtAllocatorType::OrtDeviceAllocator, OrtMemType::OrtMemTypeCPUOutput)) {};~Yolov8ObbOnnx() {if (_OrtSession != nullptr)delete _OrtSession;};// delete _OrtMemoryInfo;public:/** \brief Read onnx-model* \param[in] modelPath:onnx-model path* \param[in] isCuda:if true,use Ort-GPU,else run it on cpu.* \param[in] cudaID:if isCuda==true,run Ort-GPU on cudaID.* \param[in] warmUp:if isCuda==true,warm up GPU-model.*/bool ReadModel(const std::string& modelPath, bool isCuda = false, int cudaID = 0, bool warmUp = true);/** \brief  detect.* \param[in] srcImg:a 3-channels image.* \param[out] output:detection results of input image.*/bool OnnxDetect(cv::Mat& srcImg, std::vector<OutputParams>& output);/** \brief  detect,batch size= _batchSize* \param[in] srcImg:A batch of images.* \param[out] output:detection results of input images.*/bool OnnxBatchDetect(std::vector<cv::Mat>& srcImg, std::vector<std::vector<OutputParams>>& output);private:template <typename T>T VectorProduct(const std::vector<T>& v){return std::accumulate(v.begin(), v.end(), 1, std::multiplies<T>());};int Preprocessing(const std::vector<cv::Mat>& srcImgs, std::vector<cv::Mat>& outSrcImgs, std::vector<cv::Vec4d>& params);const int _netWidth = 1024;   //ONNX-net-input-widthconst int _netHeight = 1024;  //ONNX-net-input-heightint _batchSize = 1;  //if multi-batch,set thisbool _isDynamicShape = false;//onnx support dynamic shapefloat _classThreshold = 0.25;float _nmsThreshold = 0.45;float _maskThreshold = 0.5;//ONNXRUNTIME	Ort::Env _OrtEnv = Ort::Env(OrtLoggingLevel::ORT_LOGGING_LEVEL_ERROR, "Yolov8");Ort::SessionOptions _OrtSessionOptions = Ort::SessionOptions();Ort::Session* _OrtSession = nullptr;Ort::MemoryInfo _OrtMemoryInfo;
#if ORT_API_VERSION < ORT_OLD_VISONchar* _inputName, * _output_name0;
#elsestd::shared_ptr<char> _inputName, _output_name0;
#endifstd::vector<char*> _inputNodeNames; //����?���std::vector<char*> _outputNodeNames;//����?���size_t _inputNodesNum = 0;        //����?���size_t _outputNodesNum = 0;       //����?���ONNXTensorElementDataType _inputNodeDataType; //��������ONNXTensorElementDataType _outputNodeDataType;std::vector<int64_t> _inputTensorShape; //��������shapestd::vector<int64_t> _outputTensorShape;public:std::vector<std::string> _className = {  "plane",  "ship", "storage tank","baseball diamond",  "tennis court",   "basketball court","ground track field", "harbor",  "bridge","large vehicle",  "small vehicle",  "helicopter","roundabout",  "soccer ball field",  "swimming pool"};std::vector<std::string> bm_Name = {"bengdai",  "label", "label_color"};
};
yolov8_obb_onnx.cpp
#include "yolov8_obb_onnx.h"
//using namespace std;
//using namespace cv;
//using namespace cv::dnn;
using namespace Ort;bool Yolov8ObbOnnx::ReadModel(const std::string& modelPath, bool isCuda, int cudaID, bool warmUp) {if (_batchSize < 1) _batchSize = 1;try{if (!CheckModelPath(modelPath))return false;std::vector<std::string> available_providers = GetAvailableProviders();auto cuda_available = std::find(available_providers.begin(), available_providers.end(), "CUDAExecutionProvider");if (isCuda && (cuda_available == available_providers.end())){std::cout << "Your ORT build without GPU. Change to CPU." << std::endl;std::cout << "************* Infer model on CPU! *************" << std::endl;}else if (isCuda && (cuda_available != available_providers.end())){std::cout << "************* Infer model on GPU! *************" << std::endl;
#if ORT_API_VERSION < ORT_OLD_VISONOrtCUDAProviderOptions cudaOption;cudaOption.device_id = cudaID;_OrtSessionOptions.AppendExecutionProvider_CUDA(cudaOption);
#elseOrtStatus* status = OrtSessionOptionsAppendExecutionProvider_CUDA(_OrtSessionOptions, cudaID);
#endif}else{std::cout << "************* Infer model on CPU! *************" << std::endl;}//_OrtSessionOptions.SetGraphOptimizationLevel(GraphOptimizationLevel::ORT_ENABLE_EXTENDED);#ifdef _WIN32std::wstring model_path(modelPath.begin(), modelPath.end());_OrtSession = new Ort::Session(_OrtEnv, model_path.c_str(), _OrtSessionOptions);
#else_OrtSession = new Ort::Session(_OrtEnv, modelPath.c_str(), _OrtSessionOptions);
#endifOrt::AllocatorWithDefaultOptions allocator;//init input_inputNodesNum = _OrtSession->GetInputCount();
#if ORT_API_VERSION < ORT_OLD_VISON_inputName = _OrtSession->GetInputName(0, allocator);_inputNodeNames.push_back(_inputName);
#else_inputName = std::move(_OrtSession->GetInputNameAllocated(0, allocator));_inputNodeNames.push_back(_inputName.get());
#endif//std::cout << _inputNodeNames[0] << std::endl;Ort::TypeInfo inputTypeInfo = _OrtSession->GetInputTypeInfo(0);auto input_tensor_info = inputTypeInfo.GetTensorTypeAndShapeInfo();_inputNodeDataType = input_tensor_info.GetElementType();_inputTensorShape = input_tensor_info.GetShape();if (_inputTensorShape[0] == -1){_isDynamicShape = true;_inputTensorShape[0] = _batchSize;}if (_inputTensorShape[2] == -1 || _inputTensorShape[3] == -1) {_isDynamicShape = true;_inputTensorShape[2] = _netHeight;_inputTensorShape[3] = _netWidth;}//init output_outputNodesNum = _OrtSession->GetOutputCount();
#if ORT_API_VERSION < ORT_OLD_VISON_output_name0 = _OrtSession->GetOutputName(0, allocator);_outputNodeNames.push_back(_output_name0);
#else_output_name0 = std::move(_OrtSession->GetOutputNameAllocated(0, allocator));_outputNodeNames.push_back(_output_name0.get());
#endifOrt::TypeInfo type_info_output0(nullptr);type_info_output0 = _OrtSession->GetOutputTypeInfo(0);  //output0auto tensor_info_output0 = type_info_output0.GetTensorTypeAndShapeInfo();_outputNodeDataType = tensor_info_output0.GetElementType();_outputTensorShape = tensor_info_output0.GetShape();//_outputMaskNodeDataType = tensor_info_output1.GetElementType(); //the same as output0//_outputMaskTensorShape = tensor_info_output1.GetShape();//if (_outputTensorShape[0] == -1)//{//	_outputTensorShape[0] = _batchSize;//	_outputMaskTensorShape[0] = _batchSize;//}//if (_outputMaskTensorShape[2] == -1) {//	//size_t ouput_rows = 0;//	//for (int i = 0; i < _strideSize; ++i) {//	//	ouput_rows += 3 * (_netWidth / _netStride[i]) * _netHeight / _netStride[i];//	//}//	//_outputTensorShape[1] = ouput_rows;//	_outputMaskTensorShape[2] = _segHeight;//	_outputMaskTensorShape[3] = _segWidth;//}//warm upif (isCuda && warmUp) {//draw runstd::cout << "Start warming up" << std::endl;size_t input_tensor_length = VectorProduct(_inputTensorShape);float* temp = new float[input_tensor_length];std::vector<Ort::Value> input_tensors;std::vector<Ort::Value> output_tensors;input_tensors.push_back(Ort::Value::CreateTensor<float>(_OrtMemoryInfo, temp, input_tensor_length, _inputTensorShape.data(),_inputTensorShape.size()));for (int i = 0; i < 3; ++i) {output_tensors = _OrtSession->Run(Ort::RunOptions{ nullptr },_inputNodeNames.data(),input_tensors.data(),_inputNodeNames.size(),_outputNodeNames.data(),_outputNodeNames.size());}delete[]temp;}}catch (const std::exception&) {return false;}return true;}int Yolov8ObbOnnx::Preprocessing(const std::vector<cv::Mat>& srcImgs, std::vector<cv::Mat>& outSrcImgs, std::vector<cv::Vec4d>& params) {outSrcImgs.clear();cv::Size input_size = cv::Size(_netWidth, _netHeight);for (int i = 0; i < srcImgs.size(); ++i) {cv::Mat temp_img = srcImgs[i];cv::Vec4d temp_param = {1,1,0,0};if (temp_img.size() != input_size) {cv::Mat borderImg;LetterBox(temp_img, borderImg, temp_param, input_size, false, false, true, 32);//std::cout << borderImg.size() << std::endl;outSrcImgs.push_back(borderImg);params.push_back(temp_param);}else {outSrcImgs.push_back(temp_img);params.push_back(temp_param);}}int lack_num =  _batchSize- srcImgs.size();if (lack_num > 0) {for (int i = 0; i < lack_num; ++i) {cv::Mat temp_img = cv::Mat::zeros(input_size, CV_8UC3);cv::Vec4d temp_param = { 1,1,0,0 };outSrcImgs.push_back(temp_img);params.push_back(temp_param);}}return 0;
}
bool Yolov8ObbOnnx::OnnxDetect(cv::Mat& srcImg, std::vector<OutputParams>& output) {std::vector<cv::Mat> input_data = { srcImg };std::vector<std::vector<OutputParams>> tenp_output;if (OnnxBatchDetect(input_data, tenp_output)) {output = tenp_output[0];return true;}else return false;
}
bool Yolov8ObbOnnx::OnnxBatchDetect(std::vector<cv::Mat>& srcImgs, std::vector<std::vector<OutputParams>>& output) {std::vector<cv::Vec4d> params;std::vector<cv::Mat> input_images;cv::Size input_size(_netWidth, _netHeight);//preprocessingPreprocessing(srcImgs, input_images, params);// long long startTime = std::chrono::system_clock::now().time_since_epoch().count(); //ns// long long timeNow = std::chrono::system_clock::now().time_since_epoch().count();// std::cout <<"img preprocess time: " <<(timeNow - startTime) * 0.000001 << "ms\n";cv::Mat blob = cv::dnn::blobFromImages(input_images, 1 / 255.0, input_size, cv::Scalar(0, 0, 0), true, false);int64_t input_tensor_length = VectorProduct(_inputTensorShape);std::vector<Ort::Value> input_tensors;std::vector<Ort::Value> output_tensors;input_tensors.push_back(Ort::Value::CreateTensor<float>(_OrtMemoryInfo, (float*)blob.data, input_tensor_length, _inputTensorShape.data(), _inputTensorShape.size()));long long startTime = std::chrono::system_clock::now().time_since_epoch().count(); //nsoutput_tensors = _OrtSession->Run(Ort::RunOptions{ nullptr },_inputNodeNames.data(),input_tensors.data(),_inputNodeNames.size(),_outputNodeNames.data(),_outputNodeNames.size());long long timeNow = std::chrono::system_clock::now().time_since_epoch().count();std::cout <<"onnx run time: " <<(timeNow - startTime) * 0.000001 << "ms\n";//post-processfloat* all_data = output_tensors[0].GetTensorMutableData<float>();_outputTensorShape = output_tensors[0].GetTensorTypeAndShapeInfo().GetShape();int net_width = _outputTensorShape[1];int socre_array_length = net_width - 5;int angle_index = net_width - 1;int64_t one_output_length = VectorProduct(_outputTensorShape) / _outputTensorShape[0];for (int img_index = 0; img_index < srcImgs.size(); ++img_index) {cv::Mat output0 = cv::Mat(cv::Size((int)_outputTensorShape[2], (int)_outputTensorShape[1]), CV_32F, all_data).t();  //[bs,116,8400]=>[bs,8400,116]all_data += one_output_length;float* pdata = (float*)output0.data;int rows = output0.rows;std::vector<int> class_ids;//���id����std::vector<float> confidences;//���?��id��?���?�����std::vector<cv::RotatedRect> boxes;//?��id���ο�for (int r = 0; r < rows; ++r) {    //stridecv::Mat scores(1, socre_array_length, CV_32F, pdata + 4);cv::Point classIdPoint;double max_class_socre;minMaxLoc(scores, 0, &max_class_socre, 0, &classIdPoint);max_class_socre = (float)max_class_socre;if (max_class_socre >= _classThreshold) {//rect [x,y,w,h]float x = (pdata[0] - params[img_index][2]) / params[img_index][0];  //xfloat y = (pdata[1] - params[img_index][3]) / params[img_index][1];  //yfloat w = pdata[2] / params[img_index][0];  //wfloat h = pdata[3] / params[img_index][1];  //hfloat angle = pdata[angle_index] / CV_PI * 180.0;class_ids.push_back(classIdPoint.x);confidences.push_back(max_class_socre);//cv::RotatedRect temp_rotated;//BBox2Obb(x, y, w, h, angle, temp_rotated);//boxes.push_back(temp_rotated);boxes.push_back(cv::RotatedRect(cv::Point2f(x, y), cv::Size(w, h), angle));}pdata += net_width;//��?��}std::vector<int> nms_result;cv::dnn::NMSBoxes(boxes, confidences, _classThreshold, _nmsThreshold, nms_result);std::vector<std::vector<float>> temp_mask_proposals;std::vector<OutputParams> temp_output;for (int i = 0; i < nms_result.size(); ++i) {int idx = nms_result[i];OutputParams result;result.id = class_ids[idx];result.confidence = confidences[idx];result.rotatedBox = boxes[idx];temp_output.push_back(result);}output.push_back(temp_output);}if (output.size())return true;elsereturn false;
}
main.cpp 使用方法
#include <iostream>
#include<opencv2/opencv.hpp>
#include<math.h>
#include"yolov8_obb_onnx.h"
#include<time.h>
//#define  VIDEO_OPENCV //if define, use opencv for video.using namespace std;
using namespace cv;
using namespace dnn;template<typename _Tp>
std::vector<OutputParams> yolov8_onnx(_Tp& task, cv::Mat& img, std::string& model_path)
{// if (task.ReadModel(model_path, false,0,true)) {// 	std::cout << "read net ok!" << std::endl;// }//生成隨機顏色 std::vector<cv::Scalar> color;srand(time(0));for (int i = 0; i < 80; i++) {int b = rand() % 256;int g = rand() % 256;int r = rand() % 256;color.push_back(cv::Scalar(b, g, r));}std::vector<OutputParams> result;PoseParams pose_detect;if (task.OnnxDetect(img, result)) {//std::cout<<"111"<<std::endl;DrawPred(img, result, task._className, color,false);//DrawPredPose(img, result, pose_detect, false);// 遍歷所有檢測結果// cv::Mat combinedMask = cv::Mat::zeros(img.size(), CV_8UC1);// for (const auto& output : result) {// 	// 獲取當前檢測框的ROI// 	cv::Mat roi = combinedMask(output.box);// 	cv::Mat boxMaskBinary;// 	output.boxMask.convertTo(boxMaskBinary, CV_8UC1);// 	// 將當前mask合并到總mask上// 	// 這里使用OR操作,可以根據需要改為其他合并方式// 	cv::bitwise_or(roi, boxMaskBinary, roi);// }// cv::imwrite("combinedMask.png", combinedMask);}else {std::cout << "Detect Failed!" << std::endl;}//system("pause");return result;
}
int main(){std::string img_path = "./P0032.png";std::string model_path_detect = "./model/yolo11n-obb.onnx";cv::Mat src = imread(img_path); cv::Mat img = src.clone(); Yolov8ObbOnnx		task_obb_ort;;if (task_obb_ort.ReadModel(model_path_detect, false,0,true)) {std::cout << "read net ok!" << std::endl;}std::vector<OutputParams> results_detect;long long startTime = std::chrono::system_clock::now().time_since_epoch().count(); //nsresults_detect=yolov8_onnx(task_obb_ort, img, model_path_detect); //yolov8 onnxruntime long long timeNow = std::chrono::system_clock::now().time_since_epoch().count();double timeuse = (timeNow - startTime) * 0.000001;//std::cout<<"end detect"<<endl;std::cout << (timeNow - startTime) * 0.000001 << "ms\n";OutputParams& output = results_detect[0];//第一個線纜信息std::cout<<"---- conf: "<<output.confidence<<std::endl;std::vector<cv::Point2f> getPoints;cv::waitKey(0);return 0;
}

CmakeLists.txt
CMAKE_MINIMUM_REQUIRED(VERSION 3.0.0)
project(YOLOv8)SET (ONNXRUNTIME_DIR /home/xxx/onnxruntime-linux-x64-gpu-1.17.1)find_package(OpenCV REQUIRED)
include_directories(${OpenCV_INCLUDE_DIRS})
# 打印opencv信息
message(STATUS "OpenCV library status:")
message(STATUS "    config: ${OpenCV_DIR}")
message(STATUS "    version: ${OpenCV_VERSION}")
message(STATUS "    libraries: ${OpenCV_LIBS}")
message(STATUS "    include path: ${OpenCV_INCLUDE_DIRS}")# 添加PCL環境
find_package(PCL REQUIRED)
add_definitions(${PCL_DEFINITIONS})
include_directories(${PCL_INCLUDE_DIRS})
link_directories(${PCL_LIBRARY_DIRS})
find_package(VTK REQUIRED)ADD_EXECUTABLE(YOLOv8  yolov8_utils.h yolov8_obb_onnx.hmain.cpp  yolov8_utils.cpp yolov8_obb_onnx.cpp )
SET(CMAKE_CXX_STANDARD 14)
SET(CMAKE_CXX_STANDARD_REQUIRED ON)TARGET_INCLUDE_DIRECTORIES(YOLOv8 PRIVATE "${ONNXRUNTIME_DIR}/include")
TARGET_COMPILE_FEATURES(YOLOv8 PRIVATE cxx_std_14)
TARGET_LINK_LIBRARIES(YOLOv8 ${OpenCV_LIBS}
)
# TARGET_LINK_LIBRARIES(YOLOv8 "${ONNXRUNTIME_DIR}/lib/libonnxruntime.so")
# TARGET_LINK_LIBRARIES(YOLOv8 "${ONNXRUNTIME_DIR}/lib/libonnxruntime.so.1.13.1")
if (WIN32)TARGET_LINK_LIBRARIES(YOLOv8 "${ONNXRUNTIME_DIR}/lib/onnxruntime.lib")
endif(WIN32)if (UNIX)TARGET_LINK_LIBRARIES(YOLOv8 "${ONNXRUNTIME_DIR}/lib/libonnxruntime.so")
endif(UNIX)
python版本
import cv2
import onnxruntime as ort
from PIL import Image
import numpy as np
import time
import math
# 置信度
confidence_thres = 0.7
# iou閾值
iou_thres = 0.7
# 類別
CLASSES = ['plane', 'ship', 'storage tank', 'baseball diamond', 'tennis court', 'basketball court','ground track field', 'harbor', 'bridge', 'large vehicle', 'small vehicle', 'helicopter', 'roundabout','soccer ball field', 'swimming pool']
classes = {0: 'plane', 1: 'ship', 2: 'storage tank', 3: 'baseball diamond',4: 'tennis court', 5: 'basketball court', 6: 'ground track field',7: 'harbor', 8: 'bridge', 9: 'large vehicle', 10: 'small vehicle',11: 'helicopter', 12: 'roundabout', 13: 'soccer ball field',14: 'swimming pool'
}
# 隨機顏色
color_palette = np.random.uniform(100, 255, size=(len(classes), 3))# 判斷是使用GPU或CPU
providers = [('CUDAExecutionProvider', {'device_id': 0,}),'CPUExecutionProvider',
]
def letterbox(im, new_shape=(1024, 1024), color=(114, 114, 114), auto=True, scaleFill=False, scaleup=True, stride=32):# Resize and pad image while meeting stride-multiple constraintsshape = im.shape[:2] # current shape [height, width]if isinstance(new_shape, int):new_shape = (new_shape, new_shape)# Scale ratio (new / old)r = min(new_shape[0] / shape[0], new_shape[1] / shape[1])if not scaleup: # only scale down, do not scale up (for better val mAP)r = min(r, 1.0)# Compute paddingratio = r, r # width, height ratiosnew_unpad = int(round(shape[1] * r)), int(round(shape[0] * r))dw, dh = new_shape[1] - new_unpad[0], new_shape[0] - new_unpad[1] # wh paddingif auto: # minimum rectangledw, dh = np.mod(dw, stride), np.mod(dh, stride) # wh paddingelif scaleFill: # stretchdw, dh = 0.0, 0.0new_unpad = (new_shape[1], new_shape[0])ratio = new_shape[1] / shape[1], new_shape[0] / shape[0] # width, height ratiosdw /= 2 # divide padding into 2 sidesdh /= 2if shape[::-1] != new_unpad: # resizeim = cv2.resize(im, new_unpad, interpolation=cv2.INTER_LINEAR)top, bottom = int(round(dh - 0.1)), int(round(dh + 0.1))left, right = int(round(dw - 0.1)), int(round(dw + 0.1))im = cv2.copyMakeBorder(im, top, bottom, left, right, cv2.BORDER_CONSTANT, value=color) # add borderreturn im, ratio, (dw, dh)
def preprocess_me(img0s,new_shape):"""Preprocesses the input image before performing inference.Returns:image_data: Preprocessed image data ready for inference."""# Set Dataprocess & Run inferenceimg, _, delta_wh = letterbox(img0s, new_shape, auto=True)print('++++img_shape', img.shape)# Convertimg = img.transpose((2, 0, 1))[::-1] # HWC to CHW, BGR to RGBimg = np.ascontiguousarray(img)img = img.astype(dtype=np.float32)img /= 255 # 0 - 255 to 0.0 - 1.0if len(img.shape) == 3:img = img[None] # expand for batch dim if len(img.shape) == 3:img = img[None] # expand for batch dim# Return the preprocessed image datareturn img, delta_wh
#一種計算旋轉框IOU的方法
class CSXYWHR:def __init__(self, classId, score, x, y, w, h, angle):self.classId = classIdself.score = scoreself.x = xself.y = yself.w = wself.h = hself.angle = angle
class DetectBox:def __init__(self, classId, score, pt1x, pt1y, pt2x, pt2y, pt3x, pt3y, pt4x, pt4y, angle):self.classId = classIdself.score = scoreself.pt1x = pt1xself.pt1y = pt1yself.pt2x = pt2xself.pt2y = pt2yself.pt3x = pt3xself.pt3y = pt3yself.pt4x = pt4xself.pt4y = pt4yself.angle = angledef get_covariance_matrix(boxes):a, b, c = boxes.w, boxes.h, boxes.anglecos = math.cos(c)sin = math.sin(c)cos2 = math.pow(cos, 2)sin2 = math.pow(sin, 2)return a * cos2 + b * sin2, a * sin2 + b * cos2, (a - b) * cos * sindef probiou(obb1, obb2, eps=1e-7):x1, y1 = obb1.x, obb1.yx2, y2 = obb2.x, obb2.ya1, b1, c1 = get_covariance_matrix(obb1)a2, b2, c2 = get_covariance_matrix(obb2)t1 = (((a1 + a2) * math.pow((y1 - y2), 2) + (b1 + b2) * math.pow((x1 - x2), 2)) / ((a1 + a2) * (b1 + b2) - math.pow((c1 + c2), 2) + eps)) * 0.25t2 = (((c1 + c2) * (x2 - x1) * (y1 - y2)) / ((a1 + a2) * (b1 + b2) - math.pow((c1 + c2), 2) + eps)) * 0.5temp1 = (a1 * b1 - math.pow(c1, 2)) if (a1 * b1 - math.pow(c1, 2)) > 0 else 0temp2 = (a2 * b2 - math.pow(c2, 2)) if (a2 * b2 - math.pow(c2, 2)) > 0 else 0t3 = math.log((((a1 + a2) * (b1 + b2) - math.pow((c1 + c2), 2)) / (4 * math.sqrt((temp1 * temp2)) + eps)+ eps)) * 0.5if (t1 + t2 + t3) > 100:bd = 100elif (t1 + t2 + t3) < eps:bd = epselse:bd = t1 + t2 + t3hd = math.sqrt((1.0 - math.exp(-bd) + eps))return 1 - hddef nms_rotated(boxes, nms_thresh):pred_boxes = []sort_boxes = sorted(boxes, key=lambda x: x.score, reverse=True)for i in range(len(sort_boxes)):if sort_boxes[i].classId != -1:pred_boxes.append(sort_boxes[i])for j in range(i + 1, len(sort_boxes), 1):ious = probiou(sort_boxes[i], sort_boxes[j])if ious > nms_thresh:sort_boxes[j].classId = -1return pred_boxes
def xywhr2xyxyxyxy(x, y, w, h, angle):cos_value = math.cos(angle)sin_value = math.sin(angle)vec1x= w / 2 * cos_valuevec1y = w / 2 * sin_valuevec2x = -h / 2 * sin_valuevec2y = h / 2 * cos_valuept1x = x + vec1x + vec2xpt1y = y + vec1y + vec2ypt2x = x + vec1x - vec2xpt2y = y + vec1y - vec2ypt3x = x - vec1x - vec2xpt3y = y - vec1y - vec2ypt4x = x - vec1x + vec2xpt4y = y - vec1y + vec2yreturn pt1x, pt1y, pt2x, pt2y, pt3x, pt3y, pt4x, pt4y#接下來是另一種
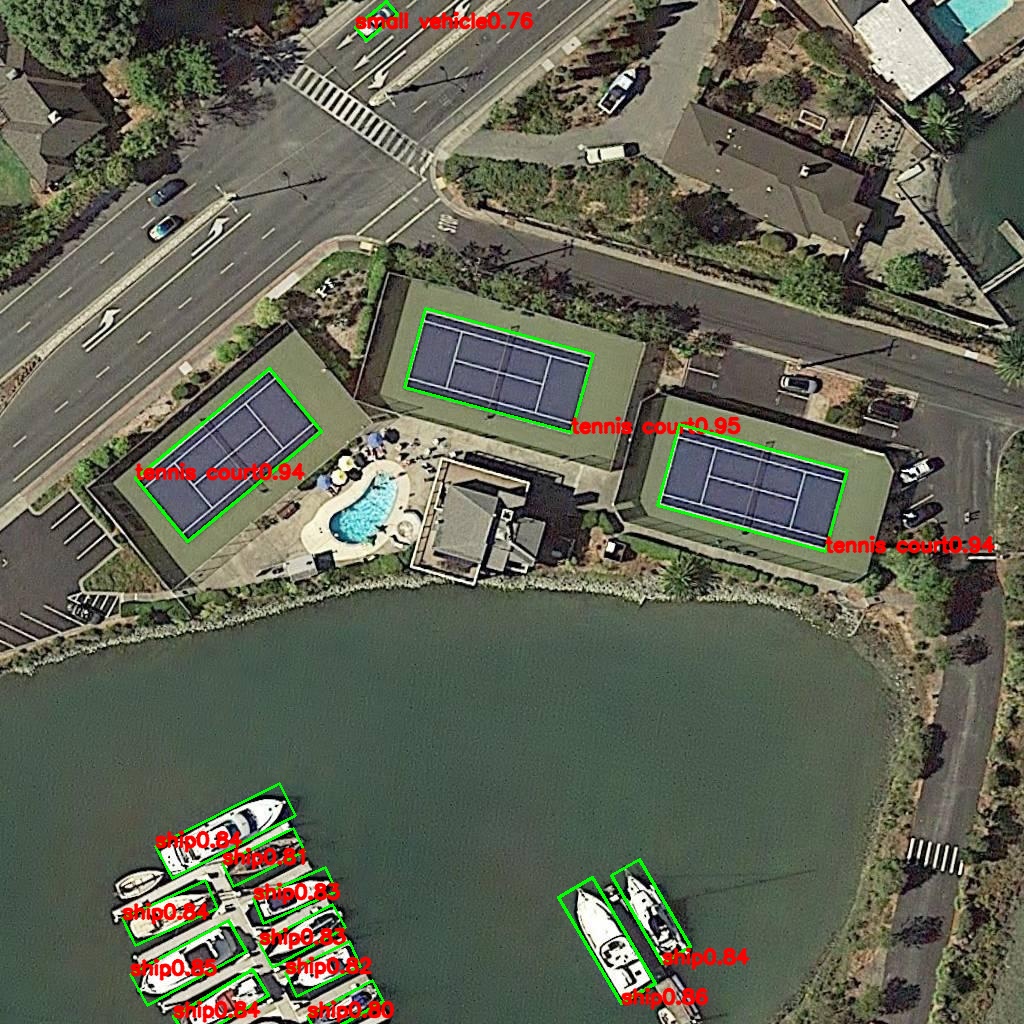
def calculate_obb_iou(box1, box2):"""計算兩個旋轉矩形框的交并比(IoU)參數:box1: 第一個旋轉框的4個角點坐標,格式為[x1,y1,x2,y2,x3,y3,x4,y4]box2: 第二個旋轉框的4個角點坐標,格式同上返回:兩個旋轉框的交并比,范圍[0,1]"""# 將輸入的坐標列表轉換為OpenCV所需的輪廓格式# 每個輪廓是4個點的數組,每個點是(x,y)坐標contour1 = np.array(box1[:8]).reshape(4, 2).astype(np.float32) # 轉換為4x2矩陣contour2 = np.array(box2[:8]).reshape(4, 2).astype(np.float32) # 轉換為4x2矩陣# 計算兩個旋轉矩形的相交區域面積# cv2.intersectConvexConvex返回兩個值:相交面積和相交區域輪廓intersection_area, _ = cv2.intersectConvexConvex(contour1, contour2)# 分別計算兩個旋轉矩形的面積area1 = cv2.contourArea(contour1) # 第一個框的面積area2 = cv2.contourArea(contour2) # 第二個框的面積# 計算并集面積 = 面積1 + 面積2 - 相交面積union_area = area1 + area2 - intersection_area# 處理除零情況并返回IoU值return intersection_area / union_area if union_area > 0 else 0def custom_NMSBoxesRotated(boxes, scores, confidence_threshold, iou_threshold):"""旋轉框非極大值抑制(NMS)算法參數:boxes: 所有旋轉框的列表,每個框格式為[x1,y1,x2,y2,x3,y3,x4,y4]scores: 每個框對應的置信度分數confidence_threshold: 置信度閾值,低于此值的框將被過濾iou_threshold: IoU閾值,高于此值的框將被視為重疊返回:保留的框的索引列表"""# 處理空輸入情況if len(boxes) == 0:return []# 將輸入轉換為numpy數組以便處理scores = np.array(scores)boxes = np.array(boxes)# 第一步:根據置信度閾值過濾低質量檢測框keep_mask = scores > confidence_threshold # 創建布爾掩碼filtered_boxes = boxes[keep_mask] # 保留高置信度框filtered_scores = scores[keep_mask] # 對應的分數# 如果沒有框通過閾值過濾,直接返回空列表if len(filtered_boxes) == 0:return []# 第二步:按置信度分數從高到低排序# argsort默認升序,[::-1]變為降序sorted_indices = np.argsort(filtered_scores)[::-1]selected_indices = [] # 最終保留的框索引# 第三步:NMS主循環while len(sorted_indices) > 0:# 取出當前最高分的框current_idx = sorted_indices[0]selected_indices.append(current_idx) # 保留這個框# 如果只剩最后一個框,直接結束if len(sorted_indices) == 1:break# 獲取當前框和剩余所有框current_box = filtered_boxes[current_idx]remaining_boxes = filtered_boxes[sorted_indices[1:]]# 計算當前框與所有剩余框的IoUiou_values = []for box in remaining_boxes:iou_values.append(calculate_obb_iou(current_box, box))iou_values = np.array(iou_values)# 找出IoU低于閾值的框(不重疊的框)non_overlap_mask = iou_values <= iou_threshold# 更新待處理框列表(跳過當前框和重疊框)# +1是因為remaining_boxes相對于sorted_indices[1:]偏移了一位sorted_indices = sorted_indices[1:][non_overlap_mask]return selected_indicesdef draw_rotated_detections(img, box, score, class_id):"""繪制旋轉框檢測結果box: [x1,y1,x2,y2,x3,y3,x4,y4]"""points = np.array(box[:8]).reshape(-1, 2).astype(np.int32)color = color_palette[class_id].tolist()# 繪制旋轉框cv2.drawContours(img, [points], 0, color, 2)# 繪制標簽label = f'{classes[class_id]}: {score:.2f}'(label_width, label_height), _ = cv2.getTextSize(label, cv2.FONT_HERSHEY_SIMPLEX, 0.5, 1)# 找到合適的標簽位置text_origin = tuple(points[0])label_x = text_origin[0]label_y = text_origin[1] - 10 if text_origin[1] - 10 > label_height else text_origin[1] + 10# 繪制標簽背景cv2.rectangle(img, (label_x, label_y - label_height), (label_x + label_width, label_y + label_height), color, cv2.FILLED)# 繪制標簽文本cv2.putText(img, label, (label_x, label_y), cv2.FONT_HERSHEY_SIMPLEX, 0.5, (0, 0, 0), 1, cv2.LINE_AA)def preprocess(img, input_width, input_height):"""在執行推理之前預處理輸入圖像。返回:image_data: 為推理準備好的預處理后的圖像數據。"""# 獲取輸入圖像的高度和寬度img_height, img_width = img.shape[:2]# 將圖像顏色空間從BGR轉換為RGBimg = cv2.cvtColor(img, cv2.COLOR_BGR2RGB)# 將圖像大小調整為匹配輸入形狀img = cv2.resize(img, (input_width, input_height))# 通過除以255.0來歸一化圖像數據image_data = np.array(img) / 255.0# 轉置圖像,使通道維度為第一維image_data = np.transpose(image_data, (2, 0, 1)) # 通道首# 擴展圖像數據的維度以匹配預期的輸入形狀image_data = np.expand_dims(image_data, axis=0).astype(np.float32)# 返回預處理后的圖像數據return image_data, img_height, img_width
def postprocess(input_image, output, input_width, input_height, img_width, img_height,delta_wh):"""后處理旋轉框輸出"""# 假設模型輸出格式為 [cx,cy,w,h,angle,conf,cls0,cls1,...]pred = np.transpose(np.squeeze(output[0]))#pred = output[0].squeeze(0) # 移除批次維度# 調試信息print(f"模型輸出形狀: {pred.shape}, 檢測框數量: {pred.shape[0]}")for i in range(min(20, len(pred))):i+=1000print(f"Box {i}: center=({pred[i][0]:.2f},{pred[i][1]:.2f}), size=({pred[i][2]:.2f},{pred[i][3]:.2f}), "f"angle={pred[i][4]:.2f}rad, conf={pred[i][5]:.2f}, class_scores={np.max(pred[i][6:]):.2f}")detect_result=[]boxes = []scores = []class_ids = []rows = pred.shape[0]print(rows)# 計算縮放因子# x_factor = img_width / input_width# y_factor = img_height / input_height# x_factor = img_width / (input_width - 2*dw)# y_factor = img_height / (input_height - 2*dh)x_factor = img_width / input_widthy_factor = img_height / input_height# x_factor = img_width / input_width# y_factor = img_height / input_heightfor i in range(rows):# 從當前行提取類別得分classes_scores = pred[i][4:(pred.shape[1]-1)]#classes_scores = pred[:, 4]# 找到類別得分中的最大得分max_score = np.amax(classes_scores)#print(max_score)# 如果最大得分高于置信度閾值if max_score >= confidence_thres:# 獲取得分最高的類別IDclass_id = np.argmax(classes_scores)# 從當前行提取邊界框坐標,輸出是cx cy w h 還是 x y w h #x, y, w, h = pred[i][0], pred[i][1], pred[i][2], pred[i][3]# 計算邊界框的縮放坐標# left = int((x - w / 2) * x_factor)# top = int((y - h / 2) * y_factor)# width = int(w * x_factor)# height = int(h * y_factor)cx, cy, w, h,angle = pred[i][0], pred[i][1], pred[i][2], pred[i][3], pred[i][19]#print("cx %d ,cy %d, w %d, h %d, angle %d\n",cx, cy, w, h,angle)# 轉換為圖像坐標cx = cx * x_factorcy = cy * y_factorw = w * x_factorh = h * y_factor# 轉換為旋轉矩形rect = ((cx, cy), (w, h), -np.degrees(angle))# 獲取四個頂點box = cv2.boxPoints(rect)box = box.reshape(-1).tolist()#print(-angle * 180 / np.pi)# 將類別ID、得分和框坐標添加到各自的列表中class_ids.append(class_id)scores.append(max_score)boxes.append(box)box_ = CSXYWHR(class_id, max_score, cx, cy, w, h, angle)detect_result.append(box_)# NMSprint('before nms num is:', len(detect_result))pred_boxes = nms_rotated(detect_result, 0.5)print('after nms num is:', len(pred_boxes))resutl = []for i in range(len(pred_boxes)):classid = pred_boxes[i].classIdscore = pred_boxes[i].scorecx = pred_boxes[i].xcy = pred_boxes[i].ycw = pred_boxes[i].wch = pred_boxes[i].hangle = pred_boxes[i].anglebw_ = cw if cw > ch else chbh_ = ch if cw > ch else cwbt = angle % math.pi if cw > ch else (angle + math.pi / 2) % math.pipt1x, pt1y, pt2x, pt2y, pt3x, pt3y, pt4x, pt4y = xywhr2xyxyxyxy(cx, cy, bw_, bh_, bt)bbox = DetectBox(classid, score, pt1x, pt1y, pt2x, pt2y, pt3x, pt3y, pt4x, pt4y, angle)resutl.append(bbox)return resutl# # 應用旋轉NMS# print("開始nms")# #indices = custom_NMSBoxesRotated(boxes, scores, confidence_thres, iou_thres)# print("檢測出個數:", len(indices))# # 繪制結果# for i in indices:# draw_rotated_detections(input_image, boxes[i], scores[i], class_ids[i])# return input_imagedef init_detect_model(model_path):session = ort.InferenceSession(model_path, providers=providers)model_inputs = session.get_inputs()input_shape = model_inputs[0].shapeinput_width = input_shape[2]input_height = input_shape[3]return session, model_inputs, input_width, input_heightdef detect_object(image, session, model_inputs, input_width, input_height):if isinstance(image, Image.Image):result_image = np.array(image)else:result_image = image.copy()img_data, img_height, img_width = preprocess(result_image, input_width, input_height)delta_wh = (0,0)#img_data ,delta_wh = preprocess_me(result_image,new_shape=(input_width,input_height))print("pre_img_shape: ")outputs = session.run(None, {model_inputs[0].name: img_data})#output_image = postprocess(result_image, outputs, input_width, input_height, img_width, img_height)pred_boxes = postprocess(result_image, outputs, input_width, input_height, img_width, img_height,delta_wh)print('obj num is :', len(pred_boxes))for i in range(len(pred_boxes)):classId = pred_boxes[i].classIdscore = pred_boxes[i].score#pt1x = int(pred_boxes[i].pt1x / input_width * image_w)pt1x = int(pred_boxes[i].pt1x )pt1y = int(pred_boxes[i].pt1y )pt2x = int(pred_boxes[i].pt2x )pt2y = int(pred_boxes[i].pt2y )pt3x = int(pred_boxes[i].pt3x )pt3y = int(pred_boxes[i].pt3y )pt4x = int(pred_boxes[i].pt4x )pt4y = int(pred_boxes[i].pt4y )angle = pred_boxes[i].anglecv2.line(image, (pt1x, pt1y), (pt2x, pt2y), (0, 255, 0), 2)cv2.line(image, (pt2x, pt2y), (pt3x, pt3y), (0, 255, 0), 2)cv2.line(image, (pt3x, pt3y), (pt4x, pt4y), (0, 255, 0), 2)cv2.line(image, (pt4x, pt4y), (pt1x, pt1y), (0, 255, 0), 2)title = CLASSES[classId] + "%.2f" % scorecv2.putText(image, title, (pt1x, pt1y), cv2.FONT_HERSHEY_SIMPLEX, 0.65, (0, 0, 255), 2, cv2.LINE_AA)cv2.imwrite('./test_onnx_result11.jpg', image)return imageif __name__ == '__main__':#只需修改模型和圖片的路徑即可model_path = "/home/xxx/yolov11/yolo_base_model/yolo11n-obb.onnx" # 替換為你的模型路徑session, model_inputs, input_width, input_height = init_detect_model(model_path)image_data = cv2.imread("./obb_test_ano/P0032.png")result_image = detect_object(image_data, session, model_inputs, input_width, input_height)#cv2.imwrite("output.jpg", result_image)#cv2.imshow('Result', result_image)#cv2.waitKey(0)


)


![[ java 基礎 ] 了解編程語言的第一步](http://pic.xiahunao.cn/[ java 基礎 ] 了解編程語言的第一步)


)
---并發編程篇)


)

