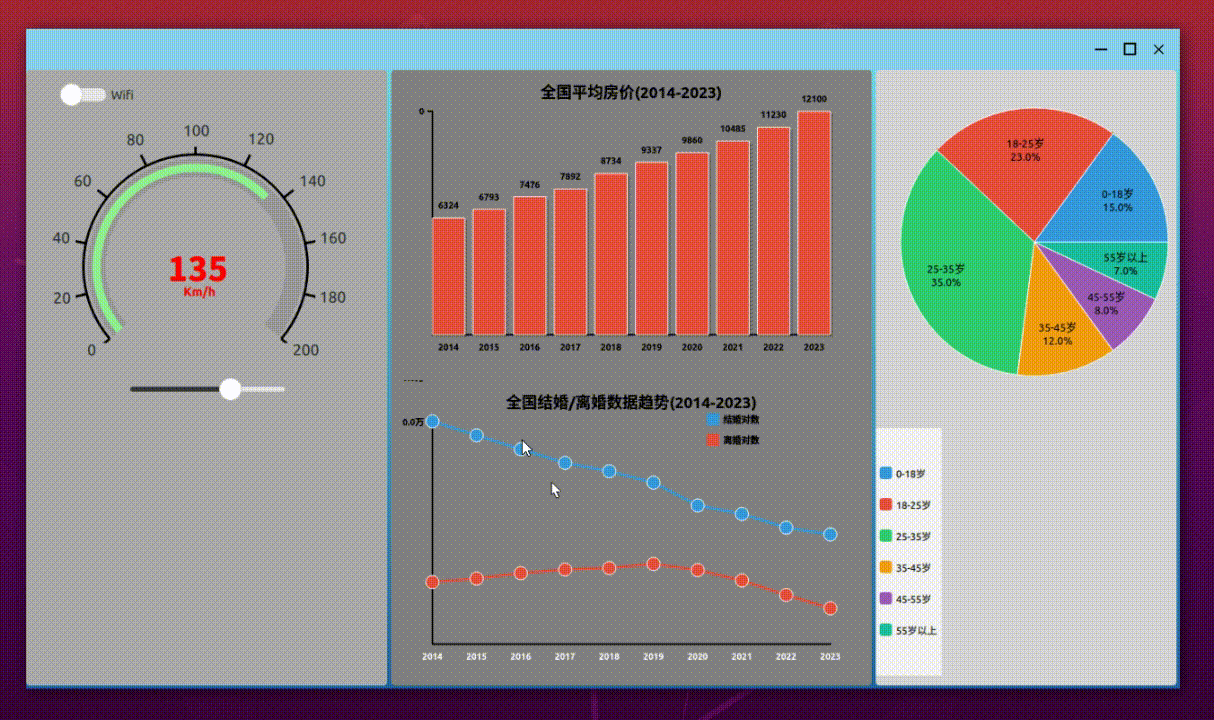
界面樣式
項目開發流程
1.通過QtCreator創建一個Qt Quick插件,插件命名為CarPanMod;
2.通過QtCreator創建一個Qt Quick Application,命名為QmlPro;
3.在插件CarPanMod中實現條形圖,折線圖和餅狀圖的繪制;
4.在應用程序QmlPro中,添加插件的導入路徑;
5.在應用程序中,通過import CarPanMod 1.0導入Qml文件即可訪問插件中實現的各種圖表.
C++代碼實現
條形圖實現
barchartitem.h
#ifndef BARCHARTITEM_H
#define BARCHARTITEM_H#include <QQuickPaintedItem>
#include <QVector>
#include <QPropertyAnimation>class BarChartItem : public QQuickPaintedItem {Q_OBJECTQ_PROPERTY(QVariantList data READ data WRITE setData NOTIFY dataChanged)Q_PROPERTY(QStringList labels READ labels WRITE setLabels NOTIFY labelsChanged)Q_PROPERTY(QString title READ title WRITE setTitle NOTIFY titleChanged)Q_PROPERTY(QColor barColor READ barColor WRITE setBarColor NOTIFY barColorChanged)public:explicit BarChartItem(QQuickItem *parent = nullptr);void paint(QPainter *painter) override;// 屬性訪問器QVariantList data() const;void setData(const QVariantList &data);QStringList labels() const;void setLabels(const QStringList &labels);QString title() const;void setTitle(const QString &title);QColor barColor() const;void setBarColor(const QColor &color);protected:void hoverMoveEvent(QHoverEvent *event) override;void hoverLeaveEvent(QHoverEvent *event) override;signals:void dataChanged();void labelsChanged();void titleChanged();void barColorChanged();private:struct BarItem {QRectF rect;qreal value;bool highlighted = false;QColor color;};void updateChartLayout();void animateBar(int index, bool highlight);QVariantList m_data = {6324, 6793, 7476, 7892,8734, 9337, 9860, 10485,11230, 12100};QStringList m_labels = {"2014", "2015", "2016", "2017","2018", "2019", "2020", "2021","2022", "2023"};QString m_title = "全國平均房價(元/㎡)";QColor m_barColor = QColor("#3498db");QVector<BarItem> m_bars;int m_hoveredIndex = -1;QPropertyAnimation *m_animation;
};#endif // BARCHARTITEM_H
barchartitem.cpp
#include "barchartitem.h"#include <QPainter>
#include <QFontMetrics>BarChartItem::BarChartItem(QQuickItem *parent): QQuickPaintedItem(parent), m_animation(new QPropertyAnimation(this)) {setAcceptHoverEvents(true);setFlag(ItemHasContents, true);setAntialiasing(true);m_animation->setPropertyName("barColor");m_animation->setDuration(300);
}void BarChartItem::paint(QPainter *painter) {painter->setRenderHint(QPainter::Antialiasing);// 繪制背景
//    painter->fillRect(boundingRect(), QColor("#f5f5f5"));painter->fillRect(boundingRect(),QColor("transparent"));// 計算布局updateChartLayout();// 繪制標題QFont titleFont = painter->font();titleFont.setPointSize(14);titleFont.setBold(true);painter->setFont(titleFont);painter->setPen(Qt::black);painter->drawText(QRectF(0, 10, width(), 30), Qt::AlignCenter, m_title);// 繪制坐標軸const qreal axisMargin = 50;const QLineF xAxis(axisMargin, height() - axisMargin, width() - axisMargin, height() - axisMargin);const QLineF yAxis(axisMargin, axisMargin, axisMargin, height() - axisMargin);painter->setPen(QPen(Qt::black, 2));painter->drawLine(xAxis);painter->drawLine(yAxis);// 繪制刻度QFont tickFont = painter->font();tickFont.setPointSize(8);painter->setFont(tickFont);// Y軸刻度qreal maxValue = 0;for (const auto &v : m_data) {maxValue = qMax(maxValue, v.toReal());}const int yTicks = 5;for (int i = 0; i <= yTicks; ++i) {qreal y = yAxis.y1() - (yAxis.length() / yTicks) * i;qreal value = maxValue / yTicks * i;painter->drawLine(QPointF(yAxis.x1() - 5, y), QPointF(yAxis.x1(), y));painter->drawText(QRectF(0, y - 10, yAxis.x1() - 10, 20),Qt::AlignRight | Qt::AlignVCenter,QString::number(value, 'f', 0));}// 繪制條形for (int i = 0; i < m_bars.size(); ++i) {const BarItem &bar = m_bars[i];QColor color = bar.highlighted ? bar.color.lighter(130) : bar.color;// 條形陰影painter->setPen(Qt::NoPen);painter->setBrush(QColor(0, 0, 0, 50));painter->drawRect(bar.rect.adjusted(3, 3, 3, 3));// 條形主體painter->setBrush(color);painter->setPen(QPen(Qt::white, 1));painter->drawRect(bar.rect);// 數值標簽painter->setPen(Qt::black);painter->drawText(QRectF(bar.rect.x(), bar.rect.y() - 25,bar.rect.width(), 20),Qt::AlignCenter,QString::number(bar.value, 'f', 0));// X軸標簽if (i < m_labels.size()) {painter->drawText(QRectF(bar.rect.x(), height() - axisMargin + 5,bar.rect.width(), 20),Qt::AlignCenter, m_labels[i]);}}#if 0// 繪制圖例if (!m_labels.isEmpty()) {QRectF legendRect(width() - 150, 40, 140, 30);painter->setBrush(m_barColor);painter->drawRect(legendRect.adjusted(0, 0, -110, 0));painter->drawText(legendRect, Qt::AlignRight | Qt::AlignVCenter, "房價趨勢");}
#endif
}QVariantList BarChartItem::data() const
{return  m_data;
}void BarChartItem::setData(const QVariantList &data)
{if(m_data != data){m_data = data;update();emit dataChanged();}
}QStringList BarChartItem::labels() const
{return m_labels;
}void BarChartItem::setLabels(const QStringList &labels)
{if (m_labels != labels) {m_labels = labels;update();emit labelsChanged();}
}QString BarChartItem::title() const
{return m_title;
}void BarChartItem::setTitle(const QString &title)
{if(m_title != title){m_title = title;update();emit titleChanged();}
}QColor BarChartItem::barColor() const
{return m_barColor;
}void BarChartItem::setBarColor(const QColor &color)
{if(m_barColor != color){m_barColor = color;update();emit barColorChanged();}
}void BarChartItem::updateChartLayout() {if (m_data.isEmpty()) return;const qreal axisMargin = 50;const qreal chartWidth = width() - axisMargin * 2;const qreal chartHeight = height() - axisMargin * 2;const qreal barSpacing = 10;const qreal barWidth = (chartWidth - barSpacing * (m_data.size() - 1)) / m_data.size();qreal maxValue = 0;for (const auto &v : m_data) {maxValue = qMax(maxValue, v.toReal());}m_bars.resize(m_data.size());for (int i = 0; i < m_data.size(); ++i) {qreal value = m_data[i].toReal();qreal barHeight = (value / maxValue) * chartHeight;m_bars[i].rect = QRectF(axisMargin + i * (barWidth + barSpacing),height() - axisMargin - barHeight,barWidth,barHeight);m_bars[i].value = value;m_bars[i].color = m_barColor;m_bars[i].highlighted = (i == m_hoveredIndex);}
}void BarChartItem::animateBar(int index, bool highlight) {if (index < 0 || index >= m_bars.size()) return;m_animation->setStartValue(m_bars[index].color);m_animation->setEndValue(highlight ? m_barColor.lighter(130) : m_barColor);m_animation->setDuration(1000);m_animation->start();
}void BarChartItem::hoverMoveEvent(QHoverEvent *event) {const QPointF pos = event->pos();for (int i = 0; i < m_bars.size(); ++i) {if (m_bars[i].rect.contains(pos)) {if (m_hoveredIndex != i) {m_hoveredIndex = i;
//                animateBar(i, true);update();}return;}}if (m_hoveredIndex != -1) {m_hoveredIndex = -1;update();}
}void BarChartItem::hoverLeaveEvent(QHoverEvent *) {if (m_hoveredIndex != -1) {
//        animateBar(m_hoveredIndex, false);m_hoveredIndex = -1;update();}
}
折線圖實現
linechartitem.h


)


:基礎操作與核心用法》)
![[安洵杯 2019]Attack](http://pic.xiahunao.cn/[安洵杯 2019]Attack)


