系統初始化
1、安裝基礎軟件
apt-get update
apt-get -y install openssh-server openssh-client apt-utils freeipmi ipmitool sshpass  ethtool zip unzip nano less git netplan.io iputils-ping mtr ipvsadm smartmontools python3-pip socat conntrack libvirt-clients libnuma-dev ctorrent nvme-cli
apt-get -y install vim wget apt git unzip zip ntp ntpdate lrzsz lftp tree bash-completion  elinks dos2unix tmux jq
apt-get -y install  nmap net-tools  mtr traceroute tcptraceroute aptitude htop iftop hping3 fping nethogs sshuttle tcpdump figlet  stress iperf iperf3 dnsutils curlcurl -s https://packagecloud.io/install/repositories/github/git-lfs/script.deb.sh | sudo bash
sudo apt-get install git-lfs
git lfs install
2,調整文件描述符
echo "ulimit -SHn 655350" >>/etc/profile
echo "fs.file-max = 655350" >>/etc/sysctl.conf
echo "root soft nofile 655350" >>/etc/security/limits.conf
echo "root hard nofile 655350" >>/etc/security/limits.conf
echo "* soft nofile 655350" >>/etc/security/limits.conf
echo "* hard nofile 655350" >>/etc/security/limits.conf
echo "session required pam_limits.so" >>/etc/pam.d/common-session
source /etc/profile
3,優化history
cat /etc/profile
export HISTTIMEFORMAT="%Y-%m-%d %H:%M:%S  `whoami` "
export HISTFILESIZE=50000
export HISTSIZE=50000
source /etc/profile
4,檢查防火墻和設置journalctl日志大小避免把系統盤占滿
apt list --installed | grep ufw
如果ufw默認安裝則需要關閉
ufw disablejournalctl 命令自動維護文件大小
只保留近一周的日志
journalctl --vacuum-time=1w只保留500MB的日志
journalctl --vacuum-size=500M
5,優化內核參數
cp /etc/sysctl.conf /etc/sysctl.conf.bakvi /etc/sysctl.conf
net.ipv4.tcp_syncookies = 1
net.ipv4.tcp_abort_on_overflow = 1
net.ipv4.tcp_max_tw_buckets = 6000
net.ipv4.tcp_sack = 1
net.ipv4.tcp_window_scaling = 1
net.ipv4.tcp_rmem = 4096        87380  4194304
net.ipv4.tcp_wmem = 4096        66384  4194304
net.ipv4.tcp_mem = 94500000 915000000 927000000
net.core.optmem_max = 81920
net.core.wmem_default = 8388608
net.core.wmem_max = 16777216
net.core.rmem_default = 8388608
net.core.rmem_max = 16777216
net.ipv4.tcp_max_syn_backlog = 1020000
net.core.netdev_max_backlog = 862144
net.core.somaxconn = 262144
net.ipv4.tcp_max_orphans = 327680
net.ipv4.tcp_timestamps = 0
net.ipv4.tcp_synack_retries = 1
net.ipv4.tcp_syn_retries = 1
net.ipv4.tcp_tw_reuse = 1
net.ipv4.tcp_fin_timeout = 15
net.ipv4.tcp_keepalive_time = 30
net.ipv4.ip_local_port_range = 1024    65535
net.netfilter.nf_conntrack_tcp_timeout_established = 180
net.netfilter.nf_conntrack_max = 1048576
net.nf_conntrack_max = 1048576
fs.file-max = 655350
modprobe nf_conntrack
sysctl -p /etc/sysctl.conf
sysctl -w net.ipv4.route.flush=1
關閉ubuntu更新
rm -rf /etc/apt/apt.conf.d/20auto-upgrades
cat << EOF > /etc/apt/apt.conf.d/20auto-upgrades
APT::Periodic::Update-Package-Lists "0";
APT::Periodic::Download-Upgradeable-Packages "0";
APT::Periodic::AutocleanInterval "0";
APT::Periodic::Unattended-Upgrade "0";
EOFsed -i "/^Unattended-Upgrade::Allowed-Origins {/,/^};/s/^/\/\//" /etc/apt/apt.conf.d/50unattended-upgrades
systemctl restart unattended-upgrades
systemctl status unattended-upgradesmv /etc/update-motd.d /etc/update-motd.d.backup
mkdir -p /etc/update-motd.d
7,關閉swap
swapoff -a
刪除 /etc/fstab內swap的行systemctl list-unit-files|grep swap
systemctl disable dev-nvme0n1p2.swap
systemctl status dev-nvme0n1p2.swapsystemctl status swap.target
systemctl stop swap.target//防止 systemd-gpt-auto-generator 在啟動時自動激活 Swap。需要在 /etc/fstab 中添加一個 noauto 選項的 swap 行
cat /etc/fstab
/dev/nvme0n1p2 none swap noauto
8、開啟root 用戶ssh并優化ssh
sed -i 's/#PermitRootLogin prohibit-password/PermitRootLogin yes/g' /etc/ssh/sshd_config
sed -i 's/#ClientAliveInterval 0/ClientAliveInterval 15/g' /etc/ssh/sshd_config
sed -i 's/#ClientAliveCountMax 3/ClientAliveCountMax 30/g' /etc/ssh/sshd_config
systemctl enable ssh.service
systemctl restart sshd
9、配置時區并同步時間
timedatectl set-timezone Asia/Shanghaintpdate ntp1.aliyun.com
systemctl restart ntp
systemctl enable ntp
10、配置pip源
mkdir -p /root/.pip
cat /root/.pip/pip.conf
[global]
timeout = 60
index-url = http://pypi.douban.com/simple
trusted-host = pypi.douban.compip3 install virtualenv
11、配置靜態IP地址
root@duanshuaixing:~# cat /etc/netplan/01-network-manager-all.yaml
## Let NetworkManager manage all devices on this system
#network:
#  version: 2
#  renderer: NetworkManager
## Let NetworkManager manage all devices on this system
network:ethernets:wlp0s20f3:   # 配置的網卡的名稱addresses: [192.168.31.45/24]   # 配置的靜態ip地址和掩碼dhcp4: false   # 關閉dhcp4optional: trueroutes:- to: defaultvia: 192.168.31.1/24nameservers:addresses: [192.168.31.1,114.114.114.114]  # DNS服務器地址,多個DNS服務器地址需要用英文逗號分>隔開,可不配置version: 2renderer: NetworkManagerroot@duanshuaixing:~# sudo netplan apply
安裝nvidia驅動
安裝基礎軟件
apt-get -y install openssh-server openssh-client apt-utils freeipmi ipmitool sshpass  ethtool zip unzip nano less git netplan.io iputils-ping mtr ipvsadm smartmontools python3-pip socat conntrack libvirt-clients libnuma-dev ctorrent nvme-cli
apt-get -y install vim wget apt git unzip zip ntp ntpdate lrzsz lftp tree bash-completion  elinks dos2unix tmux jq
apt-get -y install  nmap net-tools  mtr traceroute tcptraceroute aptitude htop iftop hping3 fping nethogs sshuttle tcpdump figlet  stress iperf iperf3 dnsutils curl
apt install build-essential dkms linux-headers-$(uname -r)安裝git-lfs
curl -s https://packagecloud.io/install/repositories/github/git-lfs/script.deb.sh | sudo bash
sudo apt-get install git-lfs
git lfs install
禁用ubuntu自帶的nouveau驅動
cat << EOF >  /etc/modprobe.d/blacklist-nouveau.conf
blacklist nouveau
blacklist lbm-nouveau
options nouveau modeset=0
alias nouveau off
alias lbm-nouveau off
EOF
執行以下命令關閉nouveau
echo options nouveau modeset=0 | tee -a /etc/modprobe.d/nouveau-kms.conf
update-initramfs -u
執行行完上述兩條命令后必須重啟系統
重啟后執行   lsmod | grep nouveau
沒有回顯表示關閉成功。
安裝nvidia驅動(https://download.nvidia.com/XFree86/Linux-x86_64)
獲取推薦安裝版本
add-apt-repository ppa:graphics-drivers/ppa
apt-get update
ubuntu-drivers devices
顯示推薦版本(recommended那項)wget https://download.nvidia.com/XFree86/Linux-x86_64/575.57.08/NVIDIA-Linux-x86_64-575.57.08.run
chmod a+x NVIDIA-Linux-x86_64-575.57.08.run
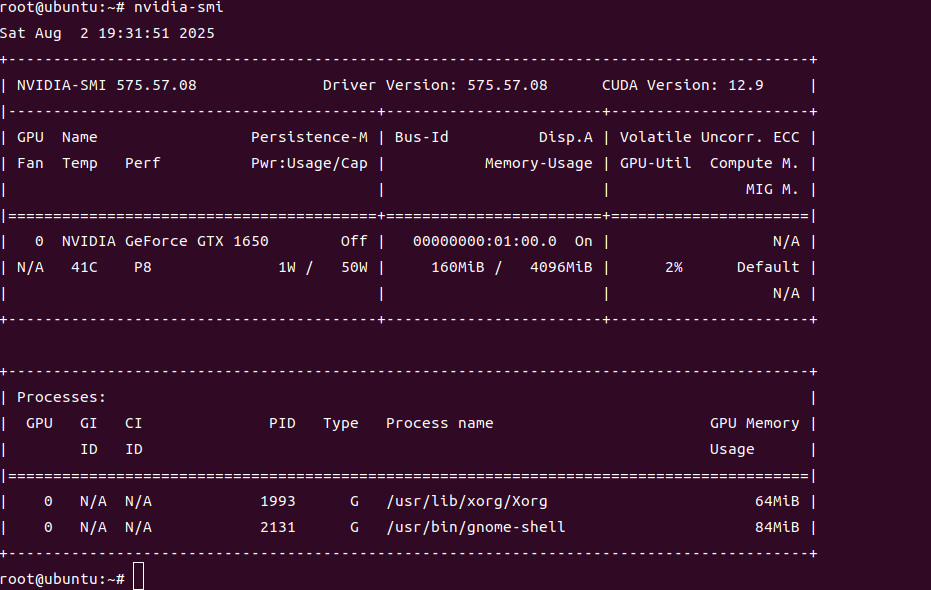
bash NVIDIA-Linux-x86_64-575.57.08.run
執行nvidia-smi 顯示下圖表示安裝成功
安裝cuda
根據上面步驟可以看到cuda支持最新可用的cuda版本是12.9,登錄訪問https://developer.nvidia.com/cuda-toolkit-archive 并下載12.9版本的cuda
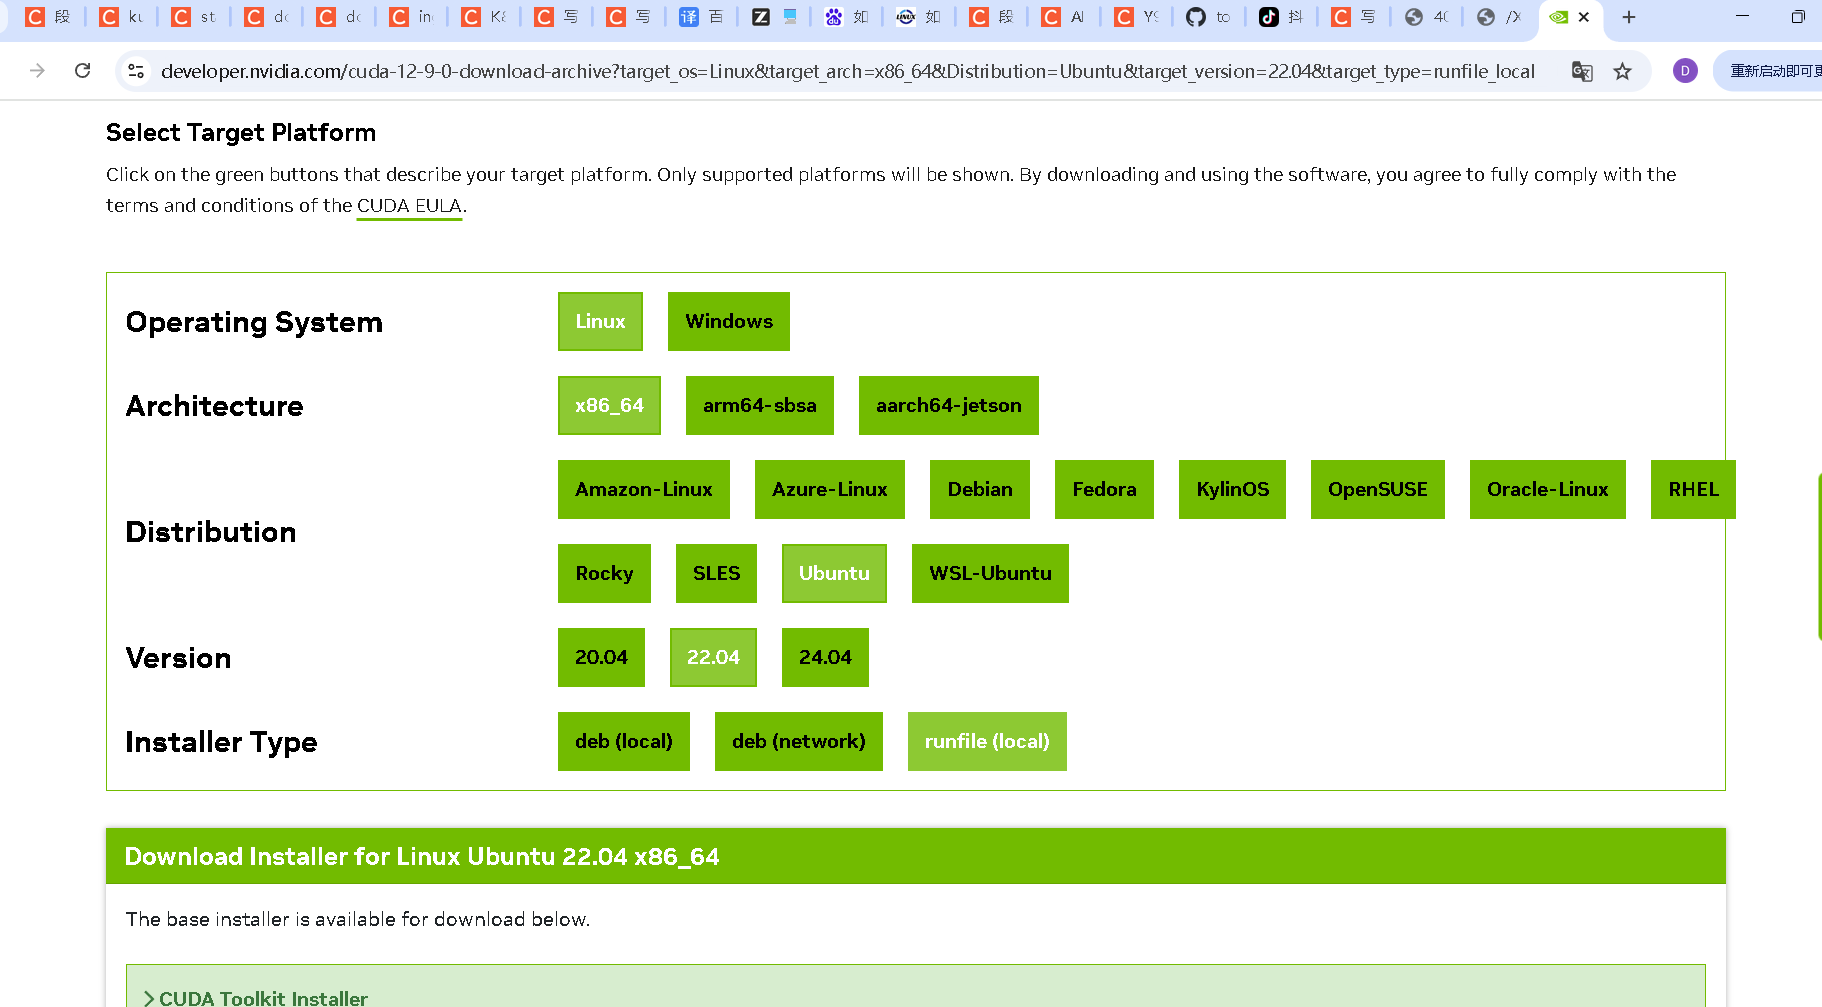
wget https://developer.download.nvidia.com/compute/cuda/12.9.0/local_installers/cuda_12.9.0_575.51.03_linux.run
chmoad a+x cuda_12.9.0_575.51.03_linux.run
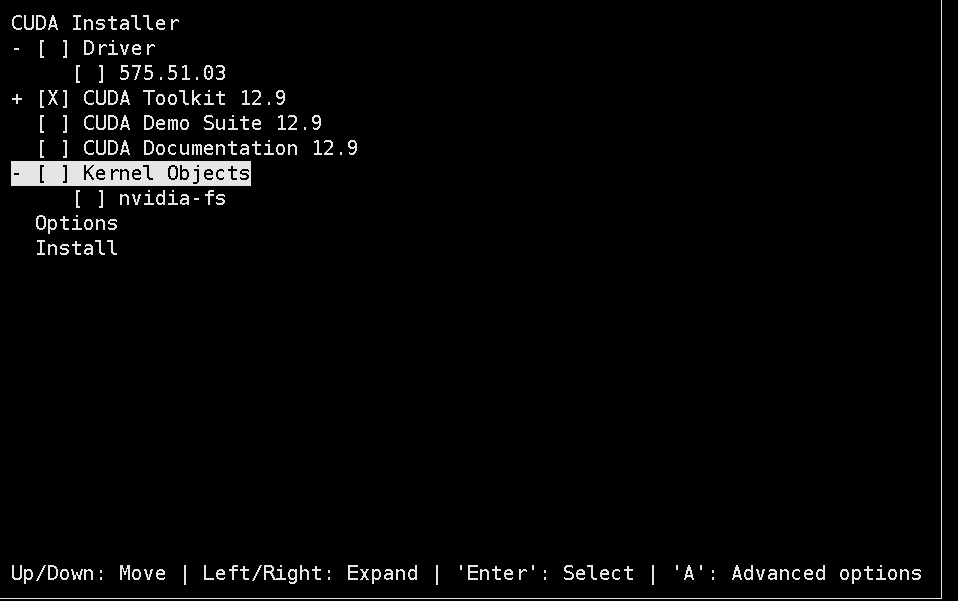
bash cuda_12.9.0_575.51.03_linux.run選擇continue->accept-->取消Driver安裝-->Install在pofile內添加cuda環境變量
cat /etc/profile
export PATH=$PATH:/usr/local/cuda/bin
export LD_LIBRARY_PATH=$LD_LIBRARY_PATH:/usr/local/cuda/lib64
export LIBRARY_PATH=$LIBRARY_PATH:/usr/local/cuda/lib64source /etc/profile
nvcc -V 驗證
安裝docker
wget https://download.docker.com/linux/static/stable/x86_64/docker-28.3.0.tgztar xf docker-28.3.0.tgz
cp docker/* /usr/bin/
vi /etc/systemd/system/docker.service
[Unit]
Description=Docker Application Container Engine
Documentation=https://docs.docker.com
After=network-online.target firewalld.service
Wants=network-online.target
[Service]
Type=notify
ExecStart=/usr/bin/dockerd --selinux-enabled=false
ExecReload=/bin/kill -s HUP $MAINPID
LimitNOFILE=infinity
LimitNPROC=infinity
LimitCORE=infinity
TimeoutStartSec=0
Delegate=yes
KillMode=process
Restart=on-failure
StartLimitBurst=3
StartLimitInterval=60s
[Install]
WantedBy=multi-user.targetchmod 777 /etc/systemd/system/docker.service
systemctl daemon-reload && systemctl enable docker.service
systemctl restart docker
docker info
mkdir -p /etc/dockervi /etc/docker/daemon.json
{"registry-mirrors": ["https://t3xbrfwz.mirror.aliyuncs.com","https://docker.unsee.tech","https://dockerpull.org","https://docker.1panel.live","https://dockerhub.icu","https://docker.m.daocloud.io","https://docker.nju.edu.cn"],"exec-opts": ["native.cgroupdriver=systemd"],"log-driver": "json-file","log-opts": {"max-size": "100m"},"max-concurrent-downloads": 30,"max-concurrent-uploads": 15,"live-restore": true
}
安裝nvidiaDocker
使用中科大鏡像源安裝 NVIDIA Container Toolkit
1. 下載 GPG 密鑰并保存
curl -fsSL https://mirrors.ustc.edu.cn/libnvidia-container/gpgkey | \sudo gpg --dearmor -o /usr/share/keyrings/nvidia-container-toolkit-keyring.gpg
2. 配置 APT 源列表curl -s -L https://mirrors.ustc.edu.cn/libnvidia-container/stable/deb/nvidia-container-toolkit.list | \sed 's#deb https://nvidia.github.io#deb [signed-by=/usr/share/keyrings/nvidia-container-toolkit-keyring.gpg] https://mirrors.ustc.edu.cn#g' | \sudo tee /etc/apt/sources.list.d/nvidia-container-toolkit.list
3. 更新包列表并安裝
sudo apt-get update
sudo apt-get install -y nvidia-container-toolkit
4. 驗證安裝
nvidia-container-cli --versiondocker-nvidia json加速配置
cat /etc/docker/daemon.json
{"runtimes": {"nvidia": { "path": "/usr/bin/nvidia-container-runtime","runtimeArgs": []}}
}

GPU優化
1.固定軟件版本
#固定nvidia相關包的版本
dpkg -l | awk '{print $2}' | grep -E '^nvidia-'|xargs -n 1 apt-mark hold
#固化系統內核版本
dpkg -l | awk '{print $2}' | grep -E '^linux-'|xargs -n 1 apt-mark holddpkg-query -W --showformat='${Package} ${Status}\n' | \
grep -v deinstall | \
awk '{ print $1 }' | \
grep -E 'nvidia.*-[0-9]+$' | \
xargs -r -L 1 sudo apt-mark hold
2,開啟Persistence Mode模式
作用:將 NVIDIA GPU 卡的 Persistence Mode 設置為 enable 狀態。Persistence mode 被設計為在 GPU 長時間無活動時,把 GPU 驅動保持在活動狀態。開啟這個模式可以提高例如 CUDA 內核的啟動時間,因為不需要在每次執行 CUDA 應用時再去喚醒 GPU。
命令:
nvidia-smi -pm ENABLED
或者
nvidia-smi -pm 1
3、允許ECC內存模式下模擬錯誤
作用:允許 GPU 在 ECC(Error Correction Code)內存模式下模擬錯誤。但是請注意,這個選項只在某些特定型號的 Tesla 和 Quadro 設備上有效
命令:
nvidia-smi -e ENABLED
4、CPU鎖頻
# 鎖定CPU頻率可提升性能,部分機型可能會設置失敗先忽略其報錯
sudo apt-get -y  install linux-tools-5.15.0-67-generic linux-cloud-tools-5.15.0-67-generic
cpupower idle-set -D 0 || true
cpupower -c all frequency-set -g performance || true
————————————————
5、GPU鎖頻
# 鎖定GPU頻率1410
nvidia-smi -lgc 1410 || true
6、PCI設備中查支持ACS設備并關閉ACS
遍歷系統中的所有PCI設備,并嘗試禁用那些支持ACS功能的設備的ACS特性。禁用ACS通常是為了避免在多GPU系統中可能出現的帶寬限制問題,確保所有GPU間能更有效地共享總線資源
lspci -vvv | grep "PCI bridge" | cut -d" " -f 1 | xargs -I{} setpci -s {} ECAP_ACS+06.w=0000
7、cpu性能模式
cpupower frequency-set -g performance
cpupower idle-set -D 0
8,安裝nvidia-fabricmanager(必須和驅動版本保持一致),非必需需要有NVSwitch硬件支持
1.查看驅動版本
root@ubuntu:~# nvidia-smi|grep 'Driver Version'
| NVIDIA-SMI 575.57.08              Driver Version: 575.57.08      CUDA Version: 12.9     |
2.下載安裝
wget https://developer.download.nvidia.cn/compute/cuda/repos/ubuntu2204/x86_64/nvidia-fabricmanager-575_575.57.08-1_amd64.deb
dpkg -i nvidia-fabricmanager-575_575.57.08-1_amd64.debsystemctl enable nvidia-fabricmanager.service
systemctl restart nvidia-fabricmanager.service
systemctl status nvidia-fabricmanager.service
9、啟用 GPU P2P 功能
echo "nvidia_peermem" >>/etc/modules-load.d/nvidia.conf
modprobe nvidia_peermem && lsmod | grep nvidia_peermem
nvidia-smi nvlink --status
10、部署HPC-X(https://developer.nvidia.com/networking/hpc-x 頁面最下選擇下載版本
apt-get -y install lbzip2
wget https://content.mellanox.com/hpc/hpc-x/v2.18/hpcx-v2.18-gcc-mlnx_ofed-ubuntu20.04-cuda12-x86_64.tbz
tar -xf hpcx-v2.18-gcc-mlnx_ofed-ubuntu20.04-cuda12-x86_64.tbz -C /opt/
ln -s /opt/hpcx-v2.18-gcc-mlnx_ofed-ubuntu20.04-cuda12-x86_64 /opt/hpcxubuntu2204用這個
wget https://content.mellanox.com/hpc/hpc-x/v2.18/hpcx-v2.18-gcc-mlnx_ofed-ubuntu22.04-cuda12-x86_64.tbztar -xf hpcx-v2.18-gcc-mlnx_ofed-ubuntu22.04-cuda12-x86_64.tbz -C /opt/ln -s /opt/hpcx-v2.18-gcc-mlnx_ofed-ubuntu22.04-cuda12-x86_64 /opt/hpcx#激活hpc-x
export HPCX_HOME=/opt/hpcx
. $HPCX_HOME/hpcx-init.sh
hpcx_load
11、安裝nccl(靜態編譯)
mkdir -p /root/nccl/ && cd /root/nccl
git clone https://github.com/NVIDIA/nccl.git
cd nccl
make src.build CUDA_HOME=/usr/local/cuda PATH=$PATH:/usr/local/cuda/bin LD_LIBRARY_PATH=/usr/local/cuda/lib64:$LD_LIBRARY_PATH
12,安裝nccl-test(靜態編譯)
mkdir -p /root/nccl/ && cd /root/nccl
git clone https://github.com/NVIDIA/nccl-tests.git
cd nccl-tests
which mpirun
# /opt/hpcx/ompi/bin/mpirun 截取 MPI_HOME=/opt/hpcx/ompiPATH=$PATH:/usr/local/cuda/bin LD_LIBRARY_PATH=$LD_LIBRARY_PATH:/usr/local/cuda/lib64 LIBRARY_PATH=$LIBRARY_PATH:/usr/local/cuda/lib64 make -j 8 CUDA_HOME=/usr/local/cuda NCCL_HOME=/root/nccl/nccl/build NCCL_LIBDIR=/root/nccl/nccl/build/lib NCCL_STATIC=1以MPI方式構建
PATH=$PATH:/usr/local/cuda/bin LD_LIBRARY_PATH=$LD_LIBRARY_PATH:/usr/local/cuda/lib64 LIBRARY_PATH=$LIBRARY_PATH:/usr/local/cuda/lib64 make -j 32  MPI=1  MPI_HOME=/opt/hpcx/ompi CUDA_HOME=/usr/local/cuda NCCL_HOME=/root/nccl/nccl/build NCCL_LIBDIR=/root/nccl/nccl/build/lib NCCL_STATIC=1多機MPI方式運行, 在hostfile內添加對應文件,并且在同一個目錄存放nccl、nccl-test、mpi這些文件,需要多機保持一致
mpirun --allow-run-as-root --hostfile /root/hostfile -oversubscribe -map-by ppr:8:node -mca pml ob1 -mca btl ^openib -x OMPI_MCA_btl_tcp_if_include="eth0" -x NCCL_NET_GDR_LEVEL=4 -x NCCL_PXN_DISABLE=1 -x NCCL_IB_GID_INDEX=3 -x NCCL_NVLS_ENABLE=1 -x LD_LIBRARY_PATH=$LD_LIBRARY_PATH:/root/nccl/nccl/build/lib -x NCCL_DEBUG=VERSION /root/nccl/nccl-tests/build/all_reduce_perf -b 128M -e 8G -g 1 -f 2 -i 0cat /root/hostfile #要求node01和node02免密ssh,包括ssh 自己
node01 slots=8
node02 slots=8
13,測試
export LD_LIBRARY_PATH=$LD_LIBRARY_PATH:/root/nccl/nccl/build/lib./build/all_reduce_perf -b 8 -e 128M -f 2 -g 1#以MPI方式執行
mpirun --allow-run-as-root --host localhost -oversubscribe -map-by ppr:8:node -mca pml ob1 -mca btl ^openib -x OMPI_MCA_btl_tcp_if_include="eth0" -x NCCL_NET_GDR_LEVEL=4 -x NCCL_PXN_DISABLE=1 -x NCCL_IB_GID_INDEX=3 -x NCCL_NVLS_ENABLE=1 -x NCCL_DEBUG=INFO /root/nccl/nccl-tests/build/all_reduce_perf -b 4G -e 4G -g 1 -f 2 -i 0mpirun --allow-run-as-root --host localhost -oversubscribe -map-by ppr:8:node -mca pml ob1 -mca btl ^openib -x OMPI_MCA_btl_tcp_if_include="eth0" -x NCCL_NET_GDR_LEVEL=4 -x NCCL_PXN_DISABLE=1 -x NCCL_IB_GID_INDEX=3 -x NCCL_NVLS_ENABLE=1 /root/nccl/nccl-tests/build/reduce_scatter_perf -b 4G -e 4G -g 1 -f 2 -i 0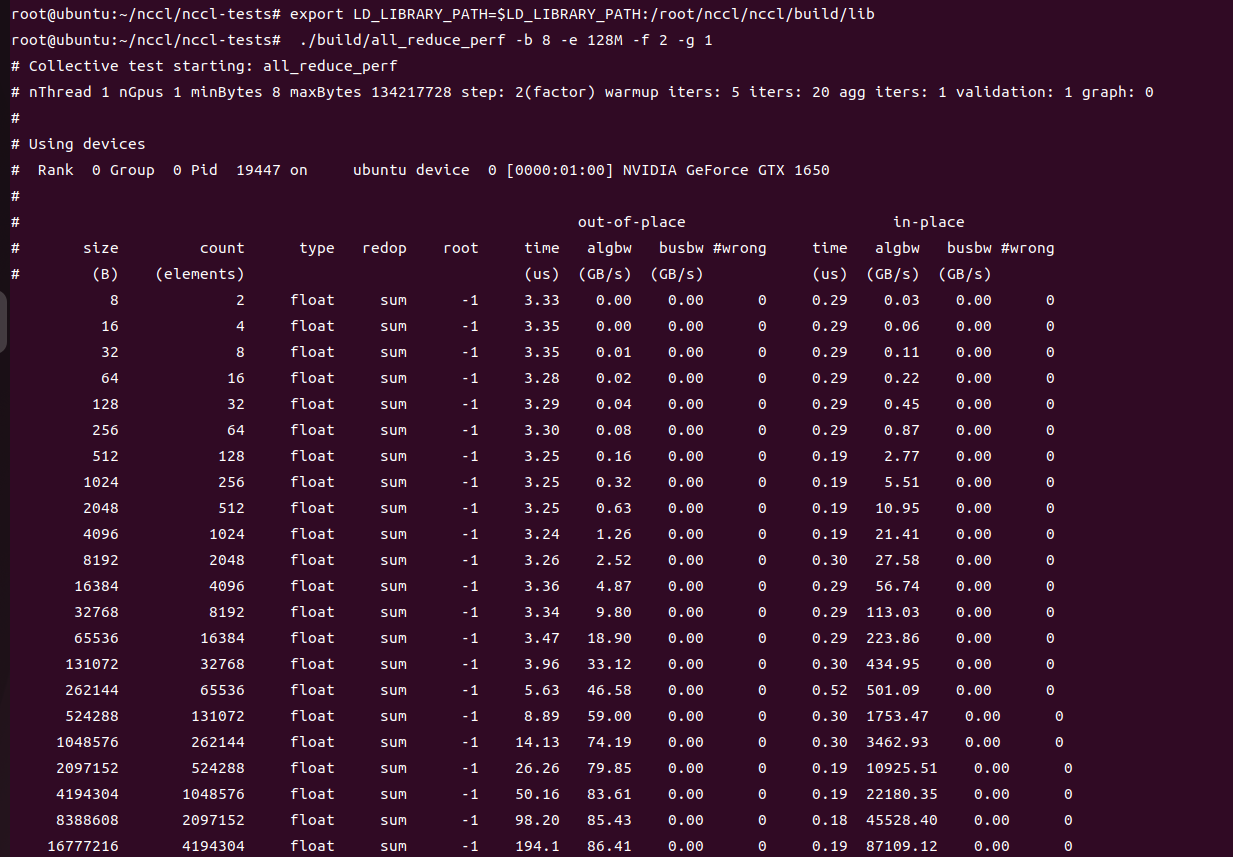 以MPI方式測試
#查找libnccl.so.2位置
find / -name "libnccl.so.2" 2>/dev/nullexport LD_LIBRARY_PATH=/root/backup/nccl/nccl/build/lib:$LD_LIBRARY_PATH#運行測試用例
mpirun --allow-run-as-root --host 192.168.31.139 -np 1 --mca btl_tcp_if_include wlp0s20f3 --mca oob_tcp_if_include wlp0s20f3 -x NCCL_IB_GID_INDEX=3 -x NCCL_DEBUG=INFO -x NCCL_DEBUG_SUBSYS=INIT,NET,GRAPH  -x LD_LIBRARY_PATH=/usr/local/lib:$LD_LIBRARY_PATH -x NCCL_PXN_DISABL=0   -x NCCL_NET_PLUGIN=none /root/backup/nccl/nccl-tests/build/alltoall_perf -b 256 -e 4G -g 1 -i 104857600這個輸出信息表示NCCL alltoall_perf 測試用例已經成功運行。開始的部分是 NCCL 初始化過程的調試信息,最后的部分表示執行結果。本次性能測試主要進行了浮點數的各種具有不同大小的全交換(alltoall)操作,首先進行了一個 out-of-place 操作,然后進行了一個 in-place 操作。下面是這些輸出結果的一些解釋:size:數據包的字節大小;
count:需要進行傳輸的元素數;
type:數據類型,這里都是 float;
redop:歸約運算類型,這里都是 'none' 表示無歸約運算;
root:歸約運算的根節點,這里都是 '-1' 表示無對應的根節點;
time:操作完成的時間,單位是微秒;
algbw:“算法帶寬”,即傳輸數據的帶寬;
busbw:跨 GPU 或者跨節點間接口數據傳輸帶寬;
#wrong:錯誤數,0 表示沒有錯誤。
從這里可以看出,所有的全交換測試都成功完成,沒有任何錯誤,并且測試的帶寬值可以被算出來。輸出的最后幾行表明,所有的測試參數都未超出預期范圍,總的平均帶寬是 0(這個應該會在測試多個節點時有其他值,單節點測試為0),且整個測試流程結束后已經清理完所有資源。
all_reduce_perf測試
mpirun --allow-run-as-root --host 192.168.31.139  -np 1 -oversubscribe -map-by ppr:8:node -mca pml ob1 -mca btl ^openib -x OMPI_MCA_btl_tcp_if_include="wlp0s20f3" -x NCCL_IB_GID_INDEX=3 -x NCCL_ALGO=RING -x NCCL_COLLNET_ENABLE=0 -x LD_LIBRARY_PATH=/usr/local/lib:$LD_LIBRARY_PATH /root/backup/nccl/nccl-tests//build/all_reduce_perf -b 1G -e 2G -g 1 -f 2 -i 0
以下是上述測試命令的具體解釋:1. `mpirun`:這是一個用于在分布式系統上啟動 MPI 程序的命令。
2. `--allow-run-as-root`:這個選項允許作為 root 用戶運行 mpi 程序。
3. `--host 192.168.31.45 -np 1`:這表示在 IP 地址為 192.168.31.45 的節點上啟動 1 個進程。
4. `-oversubscribe`:允許在一個進程上運行的 MPI 進程數超過內核數。
5. `-map-by ppr:8:node`:設置每個節點上進程的分布模式。這里表示,每個節點上有 8 個進程進行循環放置。
6. `-mca pml ob1 -mca btl ^openib`:選擇 MPI 的通信模式和傳輸層。這里表示,使用 `ob1` 這種點對點的通信模式,使用除了 'openib' 以外的所有可用傳輸層協議。
7. `-x OMPI_MCA_btl_tcp_if_include="eth0" -x NCCL_IB_GID_INDEX=3`:指定運行環境變量。這里表示,MPI 通信使用 'eth0' 這個網絡接口,并將 InfiniBand 的 GID 索引設置為 3。
8. `-x NCCL_ALGO=RING -x NCCL_COLLNET_ENABLE=0`:指定 NCCL 的環境變量。這里表示,使用 'RING' 這種算法,并關閉 Collective 跨網絡功能。
9. `-x LD_LIBRARY_PATH=/usr/local/lib:$LD_LIBRARY_PATH`:添加運行庫的搜索路徑。
10. `/root/backup/nccl/nccl-tests//build/all_reduce_perf -b 1G -e 2G -g 1 -f 2 -i 0`:運行的 NCCL 性能測試和參數。輸出結果中,先記錄了基本參數信息,然后記錄了 NCCL 使用的設備信息。接下來,程序提示最大字節數由于內存限制被自動減小到 1708916736。然后是性能測試結果,表明了 out-of-place 和 in-place 測試在 1GB 數據包下的性能表現。在這次測試結束后,沒有任何錯誤提示,不過由于迭代次數 `-i` 參數設為了0,因此這個測試實際上沒有進行任何數據傳輸,只是進行了創建連接和相應的資源準備。總的來說,這次的 NCCL 性能測試在設備的硬件和配置條件下運行正常,沒有出現任何錯誤。

:Python 的函數——函數概述)
)


- 標幺值計算與變壓器建模)


)


