文章目錄
- 前言
- 備份與停止服務
- nginx安裝與配置
- nginx 編譯安裝
- 配置服務
- php-fpm多站點配置
- phf-fpm介紹
- 多站點配置
- nginx 多站點配置
- nginx ssl 配置
- 參考
前言
之前服務器使用的是 LAMP環境,想充分利用服務器資源,再運行另外一個站點
在LAMP環境下應該是也可以實現多站點,
但考慮到nginx輕量性,以及當前主要開發生產用到nginx比較多,配置好后也方便學習
于是決定進行更換
這里面有一個多用戶權限的問題,最好統一基于已有的用戶進行設置如www用戶;目前下面的方案能夠實現想要的效果,但可能在規范和安全上做的并不好
備份與停止服務
備份,備份網站,備份配置文件
# 備份網站目錄(假設默認路徑是 /var/www/html)
sudo cp -r /var/www/html /var/www/html_backup# 備份 Apache 配置文件
sudo cp -r /etc/apache2 /etc/apache2_backup   # Debian/Ubuntu
sudo cp -r /etc/httpd /etc/httpd_backup       # CentOS/RHEL
停止 apache 服務
# 停止 apache服務
sudo systemctl stop apache2     # Ubuntu/Debian
sudo systemctl stop httpd       # CentOS# 禁止開機自啟
sudo systemctl disable apache2    # Ubuntu/Debian
sudo systemctl disable httpd      # CentOS# 更老版本centos 會提示 httpd,service is not a native service, redirecting to sbin/chkconfid Executing /sbin/chkconfid httpd off
# 也是執行成功了# 檢查是否禁用
/sbin/chkconfig --list httpd# httpd           0:off   1:off   2:off   3:off   4:off   5:off   6:off 全是off 禁止開機自啟動成功# 如需卸載 可執行
# ubuntu/debian
sudo apt remove --purge apache2
sudo apt autoremove# centos
sudo yum remove httpd
nginx安裝與配置
nginx 編譯安裝
下載源代碼 nginx: download ;然后解壓
geoip 安裝 ;參考
configure
配置很多 自行搜索添加
./configure --prefix=/www/server/nginx --conf-path=/www/server/nginx/conf/nginx.conf --error-log-path=/var/log/nginx/error.log --http-log-path=/var/log/nginx/access.log --with-select_module --with-poll_module --with-threads --with-file-aio --with-http_ssl_module --with-http_v2_module --with-http_realip_module --with-http_addition_module --with-http_xslt_module --with-http_image_filter_module --with-http_geoip_module --with-http_sub_module --with-http_dav_module --with-http_flv_module --with-http_mp4_module --with-http_gunzip_module --with-http_gzip_static_module --with-http_auth_request_module --with-http_random_index_module --with-http_secure_link_module --with-http_degradation_module --with-http_slice_module --with-http_stub_status_module --with-http_sub_module --with-pcre --with-pcre-jit --with-stream --with-stream_ssl_module --with-stream_realip_module --with-cc-opt="-O2 -pipe -fPIC" --with-ld-opt="-Wl,-Bsymbolic-functions -Wl,--as-needed"
configuring 完成后 會輸出 configuration summary
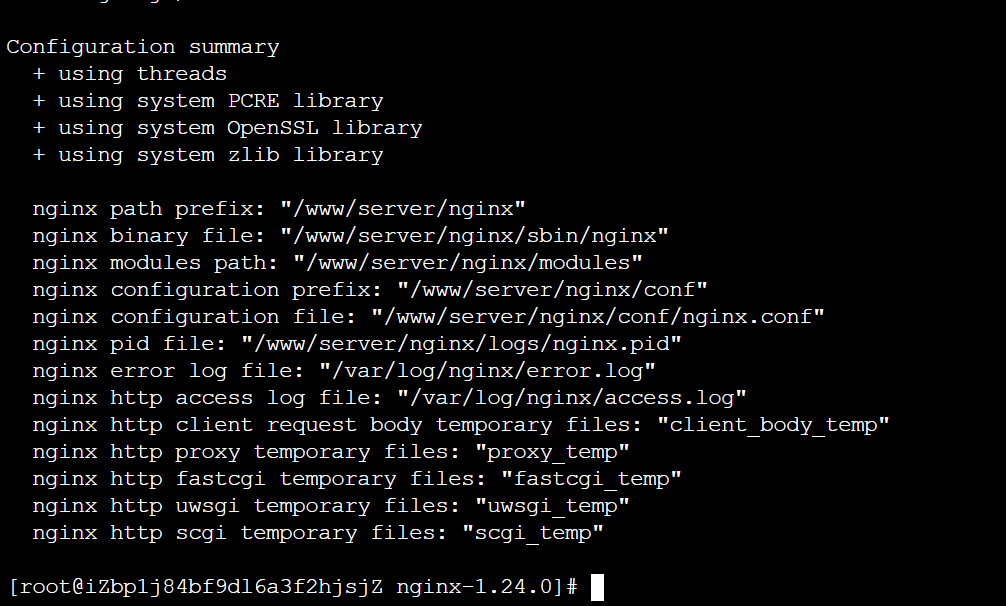
然后 構建安裝
make
make install
配置服務
配置服務 nginx.service 放到 /etc/systemd/system 下
[Unit]
Description=nginx
After=network.target[Service]
Type=forking
PIDFile=/www/server/nginx/logs/nginx.pid
ExecStartPre=/www/server/nginx/sbin/nginx -t
ExecStart=/www/server/nginx/sbin/nginx
ExecReload=/www/server/nginx/sbin/nginx -s reload
ExecStop=/www/server/nginx/sbin/nginx -s stop
AmbientCapabilities=CAP_NET_BIND_SERVICE
PrivateTmp=true
User=root
Group=root[Install]
WantedBy=multi-user.target
注意修改路徑 根據你的安裝路徑進行調整
注意這里的 user group 都使用的 root,后面的 nginx 主配置中 設置 user www;
服務以root用戶啟動,后面設置 user www; 才能生效
注意 AmbientCapabilities=CAP_NET_BIND_SERVICE ;沒添加會提示 nginx 綁定端口失敗;更多處理方法見 下面參考博客;
啟動服務
systemctl daemon-reloadsystemctl start nginxps -aux | grep nginx
下面展示是基于后面的 nginx 配置【設置了 user www;】啟動的效果
一個主進程 root用戶,一個工作線程 www 用戶

后續過程涉及多次 nginx 配置修改,需要重啟驗證,下面的命令會多次用到
nginx -tsystemctl status nginxsystemctl reload nginxsystemctl stop nginxsystemctl start nginxps -aux | grep nginx
php-fpm多站點配置
phf-fpm介紹
php-fpm 是 PHP FastCGI Process Manager 的縮寫,是 PHP 提供的一種高性能的 FastCGI 實現 ,專門用于處理 PHP 請求。
在 Web 開發中,Web 服務器(如 Nginx、Apache)本身無法直接解析和執行 PHP 文件。為了讓 Web 服務器能夠運行 PHP 腳本,就需要一個中間程序來處理這些請求 —— 這就是 FastCGI 的作用。
FastCGI 是一種協議標準,用于 Web 服務器與后端應用服務器之間的通信。
php-fpm 是實現這個協議的工具,主要功能有
| 功能 | 描述 |
|---|---|
| 接收 PHP 請求 | 從 Nginx 或 Apache 接收 PHP 腳本請求 |
| 解析并執行 PHP 腳本 | 把 PHP 代碼轉換為 HTML 頁面或 JSON 數據 |
| 管理進程池 | 控制 PHP 進程數量,提高并發性能 |
| 支持多站點配置 | 每個網站可以使用不同的用戶、權限和配置 |
| 支持 Unix Socket 和 TCP | 更靈活地與 Web 服務器通信 |
| 日志記錄與錯誤監控 | 記錄慢腳本、錯誤日志等信息 |
[瀏覽器] → [Nginx] → [PHP-FPM] → [MySQL / Redis / 其他服務]
用戶發出訪問,nginx接收請求,nginx通過fastcgi_pass 轉發給 php-fpm,php-fpm執行php腳本,連接數據庫,生成html內容,php-fpm 返回結果給nginx,由nginx返回給瀏覽器。
多站點配置
php-fpm.conf.default
全局配置 php-fpm.conf
[global]
pid = /www/server/php/74/var/run/php-fpm.pid
error_log = /www/server/php/74/var/log/php-fpm.log
log_level = notice
include = /www/server/php/74/etc/php-fpm.d/*.conf[www]
listen = /tmp/php-cgi-74.sock
listen.backlog = 8192
listen.allowed_clients = 127.0.0.1
listen.owner = www
listen.group = www
listen.mode = 0666
user = www
group = www
pm = dynamic
pm.status_path = /phpfpm_74_status
pm.max_children = 50
pm.start_servers = 5
pm.min_spare_servers = 5
pm.max_spare_servers = 10
request_terminate_timeout = 100
request_slowlog_timeout = 30
slowlog = var/log/slow.log
在這里加入了一條 include
include = /www/server/php/74/etc/php-fpm.d/*.conf
用于加載各個站點配置
A站點 php-fpm.d/a.conf
[a]
listen = /var/run/php/a.sock
listen.owner = www
listen.group = www
listen.mode = 0666
user = www
group = www
B站點 php-fpm.d/b.conf
[b]
listen = /var/run/php/b.sock
listen.owner = www
listen.group = www
listen.mode = 0666
user = www
group = www
上面給出的是主要配置,其中最重要的是 listen 對應一個站點應用建立的 sock 通信文件
這里的 listen 也支持
; ‘ip.add.re.ss:port’ - to listen on a TCP socket to a specific IPv4 address on
; a specific port;
; ‘[ip:6:addr:ess]:port’ - to listen on a TCP socket to a specific IPv6 address on
; a specific port;
; ‘port’ - to listen on a TCP socket to all addresses
; (IPv6 and IPv4-mapped) on a specific port;
; ‘/path/to/unix/socket’ - to listen on a unix socket.
其他完整的配置 可以參考提供的 xxx.conf.default ,然后進行設置;建議直接拷貝后重命名為站點配置 在里面修改就行了
錯誤排查 主要通過查看日志 php-fpm.log 、slow.log
php-fpm 執行
pkill php-fpm/www/server/php/74/sbin/php-fpm -y /www/server/php/74/etc/php-fpm.conf -c /www/server/php/74/etc/php.ini
創建的 sock

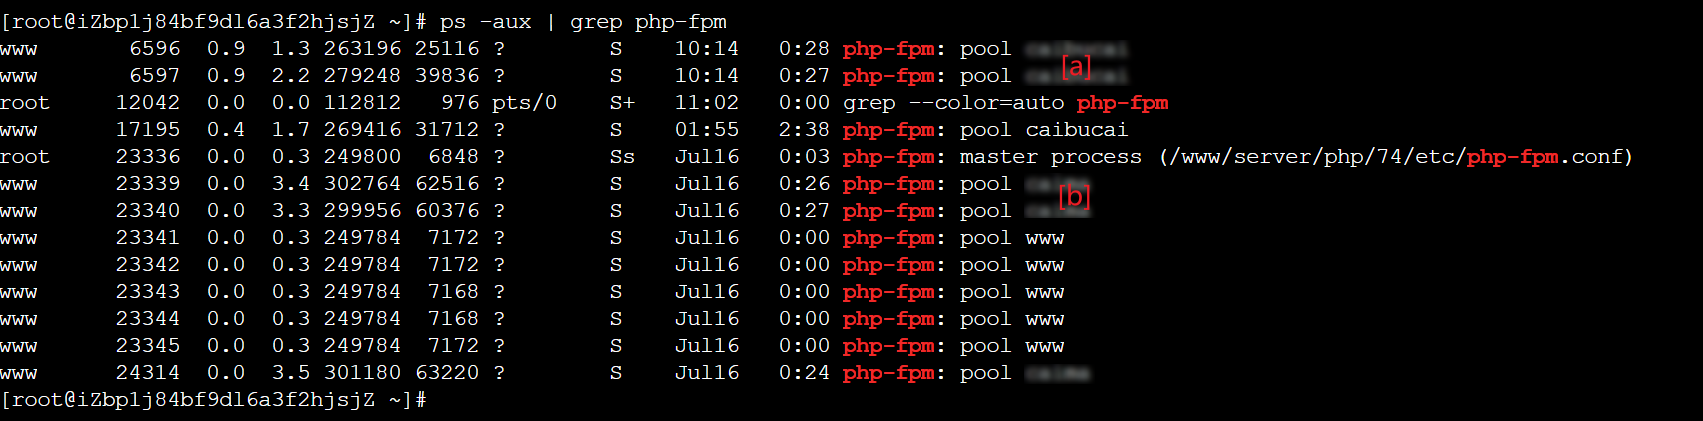
主進程 master process
加載全局配置;監聽sock文件或端口;管理子進程池 pool;
子進程池 pool
每個 pool 對應一個 PHP 應用(這里也就是 WordPress);每個 pool 可以設置不同用戶、監聽地址、資源限制等;子進程負責實際執行 PHP 腳本
nginx 多站點配置
nginx 安裝路徑 /www/server/nginx
conf/nginx.conf
#user  nobody;
user www;
worker_processes  1;#error_log  logs/error.log;
#error_log  logs/error.log  notice;
#error_log  logs/error.log  info;#pid        logs/nginx.pid;events {worker_connections  1024;
}http {include       mime.types;default_type  application/octet-stream;#log_format  main  '$remote_addr - $remote_user [$time_local] "$request" '#                  '$status $body_bytes_sent "$http_referer" '#                  '"$http_user_agent" "$http_x_forwarded_for"';#access_log  logs/access.log  main;sendfile        on;#tcp_nopush     on;#keepalive_timeout  0;keepalive_timeout  65;#gzip  on;include /www/server/nginx/conf/site-enabled/*.conf;}
原有的配置基本被刪除掉
通過
include /www/server/nginx/conf/site-enabled/*.conf;
將啟用的 站點引入起來
site-available\
A站點配置 a.conf
server {listen 443 ssl;server_name a.top www.a.top;root /www/wwwroot/a.top;index index.php index.html;access_log /var/log/nginx/a.top.access.log;error_log /var/log/nginx/a.top.error.log;ssl_certificate /www/server/panel/vhost/cert/a.top/fullchain.pem;ssl_certificate_key /www/server/panel/vhost/cert/a.top/privkey.pem;ssl_protocols TLSv1.2 TLSv1.3;ssl_ciphers HIGH:!aNULL:!MD5;ssl_prefer_server_ciphers on;ssl_session_cache shared:SSL:10m;ssl_session_timeout 10m;location / {try_files $uri $uri/ /index.php?$query_string;}location ~ \.php$ {fastcgi_pass unix:/var/run/php/a.sock;fastcgi_index index.php;include fastcgi_params;fastcgi_param SCRIPT_FILENAME $document_root$fastcgi_script_name;include fastcgi.conf;}location ~ /\.ht {deny all;}location ~ ^/wp-config\.php$ {deny all;}# 防止上傳目錄執行php文件location ~ ^/wp-content/uploads/.*\.php$ {deny all;}
}server {listen 80;server_name a.top www.a.top;return 301 https://$host$request_uri;
}
B站點配置 b.conf
server {listen 80;server_name b.top;root /www/wwwroot/b.top;index index.php index.html;access_log /var/log/nginx/b.access.log;error_log /var/log/nginx/b.error.log;location / {try_files $uri $uri/ /index.php?$query_string;}location ~ \.php$ {fastcgi_pass unix:/var/run/php/b.sock;fastcgi_index index.php;include fastcgi_params;fastcgi_param SCRIPT_FILENAME $document_root$fastcgi_script_name;include fastcgi.conf;}location ~ /\.ht {deny all;}location ~ ^/(uploads|files)/.*\.php$ {deny all;}
}
注意配置文件中 fastcgi_pass 使用的 sock 要 和 php-fpm 中站點使用的sock文件 一致
conf/site-enabled
ln /www/server/nginx/site-avaiable/a.conf /www/server/nginx/conf/site-enabled/ln /www/server/nginx/site-avaiable/b.conf /www/server/nginx/conf/site-enabled/
會在 conf/site-enabled 建立兩個軟鏈接 指向 我們 需要管理的網站 nginx 配置,在nginx.conf 主配置那里通過 include 進行了引入
這種分離式配置,可以分別設置不同網站的配置,通過軟鏈接進行啟用 方便管理,無需全都放在nginx.conf 主配置中 變得很長難以查詢管理
nginx ssl 配置
具體參考 A站點 a.conf
ssl_certificate /www/server/panel/vhost/cert/a.top/fullchain.pem;
ssl_certificate_key /www/server/panel/vhost/cert/a.top/privkey.pem;ssl_protocols TLSv1.2 TLSv1.3;
ssl_ciphers HIGH:!aNULL:!MD5;
ssl_prefer_server_ciphers on;
ssl_session_cache shared:SSL:10m;
ssl_session_timeout 10m;
ssl_certificate
ssl_certificate_key
設置 ssl 證書和私鑰 文件路徑
這里要確保 nginx 能夠對 證書和私鑰有讀取權限
ssl_protocols TLSv1.2 TLSv1.3;
ssl_ciphers HIGH:!aNULL:!MD5;
ssl_prefer_server_ciphers on;
ssl_session_cache shared:SSL:10m;
ssl_session_timeout 10m;
是 ssl 相關配置 協議版本, 套件,緩存,超時等
然后
listen 443 ssl;
啟用 ssl
如果通過瀏覽器測試 提示 502 或 curl 測試 提示 curl: (35) SSL received a record that exceeded the maximum permissible length
檢查是不是listen忘記添加了 ssl;
nginx 安全策略
針對 wordpress 添加的規則
# 禁止 /wp-content/uploads/ *.php
location ~ ^/wp-content/uploads/.*\.php$ {deny all;
}
AI提供的更細致的規則 可控參考設置
# 1. 禁止訪問 .php 文件
location ~ ^/wp-content/uploads/.*\.php$ {deny all;
}# 2. 禁止訪問敏感擴展名
location ~ ^/wp-content/uploads/.*\.(sh|pl|exe|bat|cgi|phps|phar)$ {deny all;
}# 3. 圖片等資源正常訪問
location ~ ^/wp-content/uploads/.*\.(jpg|jpeg|png|gif|webp|mp4|ogg|ogv|webm)$ {expires 30d;add_header Cache-Control "public";
}# 4. 禁止訪問 wp-config.php
location ~ ^/wp-config\.php$ {deny all;
}# 5. 禁止訪問 .htaccess 等隱藏文件
location ~ /\. {deny all;
}
參考
-
CentOS下為Nginx安裝GeoIP擴展
-
nginx常見問題(四):端口無權限_nginx: emerg bind() to 0.0.0.0:80 failed (13: pe
-
nginx多站點獨立配置 Include引入
-
www.sock failed (13: Permission denied)
-
從零手寫實現 nginx-16-nginx.conf 支持配置多個 server


-day23)


)

)


)
