今天,我們探討一下 Vue 中的組件傳值問題。這不僅是我們在日常開發中經常遇到的核心問題,也是面試過程中經常被問到的重要知識點。無論你是初學者還是有一定經驗的開發者,掌握這些傳值方式都將幫助你更高效地構建和維護 Vue 應用

目錄
1. 父子組件通信
2. 事件總線通信
3. 路由傳參
?4. Vuex 狀態管理
1. 父子組件通信
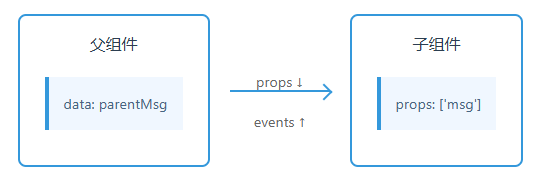
// 父組件
<child-component :msg="parentMsg"@update="handleUpdate"
/>// 子組件
props: ['msg'],
methods: {updateParent() {this.$emit('update', newValue)}
}
一、完整實現流程
1. 父組件傳遞數據
核心機制:通過?props?向下傳遞數據
<template><!-- 綁定 props 與事件監聽 --><child-component :msg="parentMsg" @update="handleUpdate"/>
</template><script>
export default {data() {return {parentMsg: "來自父組件的消息" // 初始數據}},methods: {handleUpdate(newValue) {this.parentMsg = newValue // 更新父組件數據}}
}
</script>
2. 子組件接收與響應
核心機制:通過?props?接收數據,通過?$emit?觸發事件
<script>
export default {props: {msg: {type: String,    // 類型校驗default: ''      // 默認值}},methods: {updateParent() {const newValue = "修改后的消息"this.$emit('update', newValue) // 觸發自定義事件}}
}
</script>
3、數據流向示意圖
父組件                    子組件
[parentMsg]  --props-->  (msg)↑                     ||-- event update <----
4、關鍵特性說明
-
?單向數據流
-
數據只能通過 props 從父級流向子級
-
禁止在子組件中直接修改 props(需通過事件觸發父級修改)
-
?事件觸發規范
-
推薦使用 kebab-case 事件名(如?
update-data) -
可通過對象形式傳遞復雜數據
this.$emit('update', { value: newValue,timestamp: Date.now()
})-
?生命周期影響
-
父組件的 data 更新會觸發子組件的重新渲染
-
可通過?
watch?監聽 props 變化
watch: {msg(newVal) {// 響應父組件數據更新}
}
二、進階實現模式
1. 雙向綁定簡化(v-model)
<!-- 父組件 -->
<child-component v-model="parentMsg" /><!-- 子組件 -->
<script>
export default {model: {prop: 'msg',event: 'update'},props: ['msg']
}
</script>
2. 跨層級通信
-
使用 provide/inject(需謹慎設計)
-
使用 Vuex/Pinia 狀態管理(復雜場景推薦)
三、常見問題處理
1.Prop 驗證失敗
props: {msg: {type: String,required: true,validator: value => value.length > 5}
}2.?異步更新處理
this.$nextTick(() => {this.$emit('update', asyncData)
})3.?事件解綁建議
// 父組件銷毀時自動解綁
// 需要手動解綁的特殊場景:
beforeDestroy() {this.$off('update')
}
四、最佳實踐建議
-
保持 props 的純凈性(僅用于顯示/基礎邏輯)
-
復雜交互建議使用 Vuex 進行狀態管理
-
大型項目推薦使用 TypeScript 定義 props 接口
-
使用自定義事件時添加命名空間(如?
user:updated)
2. 事件總線通信

// 組件 A
this.$root.$emit('event-name', data)// 組件 B
created() {this.$root.$on('event-name', this.handler)
}
beforeDestroy() {this.$root.$off('event-name', this.handler)
}
一、核心概念
事件總線:一個中央事件處理中心,用于組件間跨層級通信?(父子/兄弟/任意組件)。
通信原理:
組件A --emit()--> EventBus --on()--> 組件B二、完整實現流程
1. 創建事件總線
// event-bus.js
import Vue from 'vue'
export const EventBus = new Vue()
2. 組件A發送事件
<!-- ComponentA.vue -->
<script>
import { EventBus } from './event-bus.js'export default {methods: {sendData() {// 觸發事件并傳遞數據EventBus.$emit('custom-event', {message: '來自組件A的數據',timestamp: Date.now()})}}
}
</script>
3. 組件B監聽事件
<!-- ComponentB.vue -->
<script>
import { EventBus } from './event-bus.js'export default {created() {// 注冊事件監聽EventBus.$on('custom-event', this.handleEvent)},beforeDestroy() {// 必須!銷毀前移除監聽EventBus.$off('custom-event', this.handleEvent)},methods: {handleEvent(payload) {console.log('收到數據:', payload)// 可在此處更新組件狀態或觸發其他操作}}
}
</script>
三、關鍵代碼解析
| 方法 | 作用 | 參數說明 |
|---|---|---|
|
| 觸發自定義事件 |
|
|
| 監聽指定事件 |
|
|
| 移除指定事件監聽 |
|
四、高級用法
1. 一次性監聽
EventBus.$once('one-time-event', this.handleOnce)2. 全局事件總線(使用根實例)
// 組件內發送事件
this.$root.$emit('global-event', data)// 組件內監聽事件
this.$root.$on('global-event', callback)
3. 事件命名規范
// 推薦格式:領域/操作
EventBus.$emit('user/profile-updated', userData)
五、生命周期管理
-
?必須在
beforeDestroy中移除監聽,避免:-
內存泄漏
-
重復觸發僵尸監聽器
-
-
自動移除方案:
// 使用 hook API 自動解綁
mounted() {this.$eventBus.$on('event', callback)this.$once('hook:beforeDestroy', () => {this.$eventBus.$off('event', callback)})
}
六、注意事項
1.數據不可變性
傳遞的數據應為副本而非引用:
EventBus.$emit('event', { ...originalObject })2.調試技巧
查看所有事件監聽:
console.log(EventBus._events)3.性能優化
高頻事件建議添加防抖:
import _ from 'lodash'
EventBus.$on('scroll', _.debounce(this.handleScroll, 200))
七、與Vuex的對比
| EventBus | Vuex | |
|---|---|---|
| ?適用場景 | 簡單通信/臨時交互 | 復雜狀態管理 |
| ?數據存儲 | 無中心化存儲 | 集中式狀態存儲 |
| ?調試支持 | 無Devtools集成 | 完整時間旅行調試 |
| ?推薦使用 | 小型項目/簡單交互 | 中大型項目 |
八、完整代碼示例
// 組件A:發送方
methods: {notify() {this.$root.$emit('notify', { type: 'alert',content: '重要通知' })}
}// 組件B:接收方
created() {this.$root.$on('notify', this.showNotification)
},
beforeDestroy() {this.$root.$off('notify', this.showNotification)
},
methods: {showNotification(payload) {if(payload.type === 'alert') {alert(payload.content)}}
}
流程圖解
組件A                           EventBus                           組件B
[點擊按鈕] --> $emit('event') --> 事件隊列 --> 匹配監聽器 --> $on('event') --> 執行回調↖---------------------------數據載荷---------------------------↙
最佳實踐
-
為事件總線創建獨立模塊
- 使用TypeScript定義事件類型
// event-types.d.ts declare module 'vue/types/vue' {interface Vue {$eventBus: {$on(event: 'user-login', callback: (user: User) => void): void$emit(event: 'user-login', user: User): void}} } -
大型項目建議封裝為可追蹤的EventService
-
重要事件添加錯誤邊界處理
3. 路由傳參
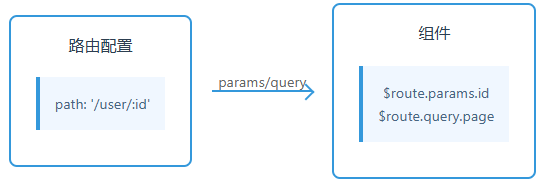
// 路由跳轉
this.$router.push({name: 'User',params: { id: 123 },query: { page: 1 }
})// 組件中獲取
created() {const userId = this.$route.params.idconst page = this.$route.query.page
}
一、完整實現流程
1. 路由配置(核心配置)
// router/index.js
{path: "/user/:id",      // 動態路由參數(注意冒號語法)name: "UserDetail",     // 推薦使用命名路由(非圖片中的"I','user"錯誤寫法)component: UserComponent
}
2. 路由跳轉
// 正確寫法(修正圖片中的符號錯誤和拼寫錯誤)
this.$router.push({name: 'UserDetail',     // 使用路由名稱更安全(而非圖片中的"I','user"錯誤寫法)params: { id: 123 },    // 路徑參數(對應:id)query: { page: 1 }      // 查詢參數(URL顯示為?page=1)
})
3. 組件參數獲取
created() {// 正確獲取方式(修正圖片中的符號錯誤)const userId = this.$route.params.id  // 獲取路徑參數(非圖片中的"parc�名"錯誤)const page = this.$route.query.page   // 獲取查詢參數(非圖片中的".php"錯誤)console.log(`用戶ID: ${userId}, 當前頁: ${page}`)
}
二、核心概念解析
1. 參數類型對比
| params | query | |
|---|---|---|
| ?URL顯示 |
|
|
| ?參數位置 | 路徑中 | URL問號后 |
| ?路由配置 | 需要預定義 | 無需預先聲明 |
| ?參數類型 | 自動轉為字符串 | 自動轉為字符串 |
| ?刷新保留 | 是(需配合命名路由使用) | 是 |
2. 生命周期響應
watch: {// 監聽路由參數變化(圖片未展示的重要功能)'$route'(to, from) {if (to.params.id !== from.params.id) {this.loadUserData(to.params.id)}}
}
三、代碼優化建議
1. 類型轉換處理
// 將字符串參數轉為數字(圖片未展示)
created() {this.userId = parseInt(this.$route.params.id)this.page = Number(this.$route.query.page) || 1
}
2. 使用Props接收參數(推薦方式
// 路由配置增加(圖片未展示)
props: true// 組件接收(更規范的寫法)
props: {id: {type: [Number, String],required: true}
}
四、常見問題處理
1. params失效問題
// 錯誤寫法(圖片中寫法會導致params丟失)
this.$router.push({path: '/user/123',     // 使用path時params會失效params: { id: 456 }    // 此參數不會被傳遞
})// 正確寫法(必須使用name)
this.$router.push({name: 'UserDetail',params: { id: 456 }
})
2. 參數繼承方案
// 保持現有查詢參數(圖片未展示)
this.$router.push({params: { id: 789 },query: { ...this.$route.query } // 保留原有查詢參數
})
五、完整代碼示例
路由配置
// router/index.js
{path: '/user/:id',name: 'UserDetail',component: () => import('./views/UserDetail.vue'),props: true  // 啟用props接收參數
}
路由跳轉
methods: {navigate() {this.$router.push({name: 'UserDetail',params: { id: 2023 },query: { page: 2,sort: 'desc'}})}
}
組件實現
<template><div><h2>用戶ID: {{ formattedId }}</h2><p>當前頁碼: {{ page }}</p></div>
</template><script>
export default {props: {id: {type: Number,required: true}},computed: {formattedId() {return `UID-${this.id.toString().padStart(6, '0')}`},page() {return Number(this.$route.query.page) || 1}},watch: {id(newVal) {this.loadUserData(newVal)}},methods: {loadUserData(id) {// 加載用戶數據...}}
}
</script>
六、最佳實踐建議
-
?參數驗證:
// 路由配置添加正則約束
path: '/user/:id(\\d+)'  // 只接受數字ID// 組件內驗證
beforeRouteEnter(to, from, next) {if (!/^\d+$/.test(to.params.id)) {next({ name: 'ErrorPage' })} else {next()}
}-
?編碼規范:
-
始終使用命名路由(避免路徑硬編碼)
-
敏感參數使用params傳遞(不在URL暴露)
-
復雜參數使用JSON序列化:
this.$router.push({name: 'Search',query: {filters: JSON.stringify({ status: ['active', 'pending'],dateRange: '2023-01/2023-12'})}
})
流程圖解
[路由跳轉]│├── params → /user/:id│ └──→ 組件通過 $route.params 或 props 接收│└── query → ?key=value└──→ 組件通過 $route.query 接收常見錯誤排查表
| 現象 | 原因 | 解決方案 |
|---|---|---|
| params參數未傳遞 | 使用了path而非name進行跳轉 | 改用命名路由 |
| 參數丟失 | 未處理路由守衛中的中斷 | 添加路由守衛參數驗證 |
| 參數類型錯誤 | 未進行類型轉換 | 使用Number()或parseInt轉換 |
| 組件未響應參數變化 | 缺少watch監聽 | 添加$route監聽 |
?4. Vuex 狀態管理

// 組件中使用
export default {computed: {...mapState(['data']),...mapGetters(['processedData'])},methods: {updateData() {this.$store.dispatch('updateAction', payload)}}
}
一、完整實現流程
1. 安裝與配置
npm install vuex --save// store/index.js
import Vue from 'vue'
import Vuex from 'vuex'Vue.use(Vuex)export default new Vuex.Store({state: { offers: [], data: [] },mutations: { /* 同步修改方法 */ },actions: { /* 異步操作方法 */ },getters: { /* 計算屬性方法 */ },modules: { /* 模塊劃分 */ }
})2. 核心流程
組件 → dispatch → Actions → commit → Mutations → 修改 State → 觸發視圖更新二、核心概念詳解
1. State(應用狀態)
state: {offers: [],data: []
}// 組件訪問
this.$store.state.offers
2. Mutations(同步修改)
mutations: {SET_OFFERS(state, payload) {state.offers = payload}
}// 組件觸發(禁止直接調用)
this.$store.commit('SET_OFFERS', newData)
3. Actions(異步操作)
actions: {async fetchOffers({ commit }) {const res = await axios.get('/api/offers')commit('SET_OFFERS', res.data)}
}// 組件觸發
this.$store.dispatch('fetchOffers')
4. Getters(計算屬性)
getters: {processedData: state => {return state.data.filter(item => item.status === 1)}
}// 組件訪問
this.$store.getters.processedData
三、組件集成方案
1. mapState/mapGetters
import { mapState, mapGetters } from 'vuex'export default {computed: {...mapState({data: state => state.data}),...mapGetters(['processedData'])}
}
2. Action分發
methods: {updateData() {// 修正原圖片中的拼寫錯誤this.$store.dispatch('updateAction', payload)}
}
四、模塊化實現
// store/modules/user.js
export default {namespaced: true,state: { profile: null },mutations: { SET_PROFILE(state, val) {...} },actions: { fetchProfile({ commit }) {...} }
}// 組件訪問
this.$store.dispatch('user/fetchProfile')
五、完整代碼示例
// 組件完整實現
export default {computed: {...mapState({offers: state => state.offers}),...mapGetters(['filteredOffers'])},methods: {refreshData() {this.$store.dispatch('fetchOffers')},updateOffer(payload) {this.$store.commit('UPDATE_OFFER', payload)}}
}
六、數據流向示意圖
Component → dispatch → Action → commit → Mutation → State → Getter → Component↑ ↓└─────── API 請求/異步操作 ────────────┘七、高級特性
1. 嚴格模式
const store = new Vuex.Store({strict: process.env.NODE_ENV !== 'production'
})
2. 插件開發
// 狀態快照插件
const snapshotPlugin = store => {let prevState = JSON.parse(JSON.stringify(store.state))store.subscribe((mutation, state) => {console.log('狀態變化:', mutation.type)console.log('舊狀態:', prevState)console.log('新狀態:', state)prevState = JSON.parse(JSON.stringify(state))})
}
八、常見問題處理
1. 異步操作錯誤處理
actions: {async fetchData({ commit }) {try {const res = await api.getData()commit('SET_DATA', res.data)} catch (error) {commit('SET_ERROR', error.message)}}
}
2. 動態模塊注冊
store.registerModule('dynamicModule', {state: {...},mutations: {...}
})
九、最佳實踐建議
-
?命名規范:
-
Mutation類型使用全大寫(SET_DATA)
-
Action名稱使用駝峰命名(fetchUserInfo)
-
-
?模塊組織:
/store├── index.js├── modules│ ├── user.js│ └── product.js└── plugins -
?TypeScript集成:
// store/types.ts
interface RootState {user: UserStateproducts: ProductState
}// 組件使用
@Action
public async updateProfile(payload: UserProfile) {this.context.commit('SET_PROFILE', payload)
}-
?性能優化:
-
避免在getter中進行重計算
-
使用Vuex的持久化插件(vuex-persistedstate)
-
十、調試技巧
-
?DevTools時間旅行:
-
查看狀態快照
-
回退/重做mutation
-
-
?狀態快照輸出:
console.log(JSON.stringify(this.$store.state, null, 2))完整流程圖解
[Component] │ dispatch(action) ↓
[Action] → 發起API請求 → commit(mutation)│                      ↓└─────────────→ [Mutation] → 修改State↓[Getter] → 派生狀態↓[Component] 響應式更新
好了這一期就到這里,希望能夠幫助到大家,咱們下下期見!


:DMP與DSP對接及數據統計原理剖析)
)
【本期題目:砍柴,回文字符串】)
)


)


