黑馬程序員視頻地址:
黑馬程序員——數據管理平臺
前言?
功能:
1.登錄和權限判斷
2.查看文章內容列表(篩選,分頁)
3.編輯文章(數據回顯)
4.刪除文章
5.發布文章(圖片上傳,富文本編輯器)
技術:
1.基于Bootstrap 搭建網站標簽和樣式
2.集成wangEditor 插件實現富文本編輯器
3.使用原生JS 完成增刪改查等業務
4.基于axios 與黑馬頭條線上接口交互
5.使用axios 攔截器進行權限判斷
項目準備:
準備配套的素材代碼
包含:html,css,js,靜態圖片,第三方插件等等數據管理平臺模板代碼.zip文件大小:13.5 M|https://user-a001.lanzouv.com/ijtSu2mp9i9ghttps://user-a001.lanzouv.com/ijtSu2mp9i9ghttps://user-a001.lanzouv.com/ijtSu2mp9i9ghttps://user-a001.lanzouv.com/ijtSu2mp9i9ghttps://user-a001.lanzouv.com/ijtSu2mp9i9ghttps://user-a001.lanzouv.com/ijtSu2mp9i9g
https://user-a001.lanzouv.com/ijtSu2mp9i9g
接口文檔:
歡迎使用 - B站-AJAX和黑馬頭條-數據管理平臺?
目錄管理:
? assets:資源文件夾(圖片,字體等)
? lib:資料文件夾(第三方插件,例如:form-serialize)
? page:頁面文件夾
? utils:實用程序文件夾(工具插件)
驗證碼登錄
1.在utils/request.js中配置基地址
// axios 公共配置
// 基地址
axios.defaults.baseURL = "http://geek.itheima.net"
2.登錄按鈕代碼
document.querySelector(".btn").addEventListener("click", () => {const form = document.querySelector(".login-form")const data = serialize(form, {hash: true, empty: true})axios({url: "/v1_0/authorizations",method: "POST",data}).then(result => {myAlert(true, "登錄成功!")}).catch(error => {myAlert(false, error.response.data.message)})
})
token
token 的介紹
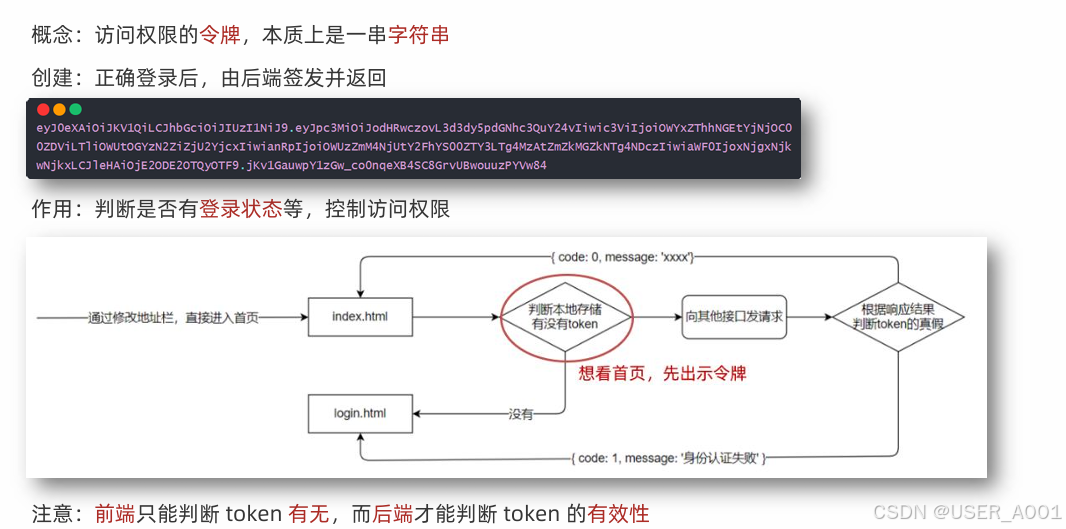
token 的使用
1. 在utils/auth.js 中判斷無 token 令牌字符串,則強制跳轉到登錄頁(手動修改地址欄測試)
/*** 目標1:訪問權限控制* 1.1 判斷無 token 令牌字符串,則強制跳轉到登錄頁* 1.2 登錄成功后,保存 token 令牌字符串到本地,并跳轉到內容列表頁面*/
const token = localStorage.getItem("token")
if(!token)
{alert("請先登錄!")setTimeout(() => {location.href = "../login/index.html"}, 1500)
}
2. 在登錄成功后,保存token 令牌字符串到本地,再跳轉到首頁(手動修改地址欄測試)
then(result => {//存入tokenlocalStorage.setItem("token", result.data.data.token)//提示框myAlert(true, "登錄成功!")//1.5s后跳轉新頁面setTimeout(() => {location.href = "../content/index.html"}, 1500)})axios 請求攔截器和個人信息設置
1. 什么是axios 請求攔截器?
? 發起請求之前,調用的一個函數,對請求參數進行設置
2. axios 請求攔截器,什么時候使用?
? 有公共配置和設置時,統一設置在請求攔截器中
官方文檔:
攔截器 | Axios中文文檔 | Axios中文網https://www.axios-http.cn/docs/interceptorshttps://www.axios-http.cn/docs/interceptorshttps://www.axios-http.cn/docs/interceptorshttps://www.axios-http.cn/docs/interceptorshttps://www.axios-http.cn/docs/interceptorshttps://www.axios-http.cn/docs/interceptors
1.在utils/request.js文件中配置
// 添加請求攔截器
axios.interceptors.request.use(function (config) {// 在發送請求之前做些什么const token = localStorage.getItem("token")token && (config.headers.Authorization = `Bearer ${token}`)return config
}, function (error) {// 對請求錯誤做些什么return Promise.reject(error);
})
2.在utils/auth.js 中請求個人信息并設置到頁面
/*** 目標2:設置個人信息* 2.1 在 utils/request.js 設置請求攔截器,統一攜帶 token* 2.2 請求個人信息并設置到頁面*/
axios({url: "/v1_0/user/profile"
}).then(result => {const username = result.data.data.namedocument.querySelector(".nick-name").innerText = username
}).catch(error => {console.log(error)
})
axios 響應攔截器和身份驗證失敗
1. 什么是axios 響應攔截器?
? 響應回到then/catch 之前,觸發的攔截函數,對響應結果統一處理
2. axios 響應攔截器,什么時候觸發成功/失敗的回調函數?
? 狀態為2xx觸發成功回調,其他則觸發失敗的回調函數
// 添加響應攔截器
axios.interceptors.response.use(function (response) {// 2xx 范圍內的狀態碼都會觸發該函數。// 對響應數據做點什么response = response.data    //??數據優化,得到的response是服務器數據+axios修飾后的代碼,//而response.data是服務器返回的數據,將服務器返回的數據直接返回給then中//如上文代碼中的result.data.data.name,如果此處返回response,則調用result.data.data.name//如果此處返回response.data,則調用result.data.namereturn response    //??response會傳進.then(result => {})中,由result接收
}, function (error) {// 超出 2xx 范圍的狀態碼都會觸發該函數。// 對響應錯誤做點什么??if(error?.response?.status === 401){alert("身份驗證過期,請重新登錄!")localStorage.clear()location.href = "../login/index.html"}return Promise.reject(error)    //??error會傳進.catch(error => {})中,由error接收
})
發布文章
富文本編輯器
官方手冊:
wangEditor 5https://www.wangeditor.com/v5/getting-started.htmlhttps://www.wangeditor.com/v5/getting-started.htmlhttps://www.wangeditor.com/v5/getting-started.htmlhttps://www.wangeditor.com/v5/getting-started.htmlhttps://www.wangeditor.com/v5/getting-started.htmlhttps://www.wangeditor.com/v5/getting-started.html
1.引入CSS:在相應頁面(publish/index.css)引入CSS
/* 富文本編輯器 */
#editor—wrapper {border: 1px solid #ccc;z-index: 100; /* 按需定義 */}#toolbar-container {border-bottom: 1px solid #ccc;}#editor-container {height: 500px;}
2.定義HTML:在需要部署的頁面(publish/index.html)放置HTML代碼
<!-- 富文本編輯器位置 -->
<div id="editor—wrapper"><div id="toolbar-container"><!-- 工具欄 --></div><div id="editor-container"><!-- 編輯器 --></div>
</div>
<!-- 記錄富文本內容-用于表單收集 -->
<textarea name="content" class="publish-content" hidden></textarea>3.引入 JS 創建編輯器:在utils/editor.js中放入代碼
// 富文本編輯器
// 創建編輯器函數,創建工具欄函數
const { createEditor, createToolbar } = window.wangEditor// 編輯器配置對象
const editorConfig = {// 占位提示文字placeholder: '發布文章內容...',// 編輯器變化時回調函數onChange(editor) {// 獲取富文本內容const html = editor.getHtml()// 也可以同步到 <textarea>// 為了后續快速收集整個表單內容做鋪墊document.querySelector('.publish-content').value = html}
}// 創建編輯器
const editor = createEditor({// 創建位置selector: '#editor-container',// 默認內容html: '<p><br></p>',// 配置項config: editorConfig,// 配置集成模式(default 全部)(simple 簡潔)mode: 'default', // or 'simple'
})// 工具欄配置對象
const toolbarConfig = {}// 創建工具欄
const toolbar = createToolbar({// 為指定編輯器創建工具欄editor,// 工具欄創建的位置selector: '#toolbar-container',// 工具欄配置對象config: toolbarConfig,// 配置集成模式mode: 'default', // or 'simple'
})
4.引入文件:在publish/index.html中引入script(黑馬程序員已經幫我們引入過了)
<!--引入 CSS 定義樣式-->
<linkhref="https://unpkg.com/@wangeditor/editor@latest/dist/css/style.css"rel="stylesheet"
/><!--引入 JS 創建編輯器-->
<script src="https://unpkg.com/@wangeditor/editor@latest/dist/index.js"></script>
頻道列表
目標1:設置頻道下拉菜單
1.1 獲取頻道列表數據
1.2 展示到下拉菜單中?
//publish/index.jsasync function getChannels()
{//請求數據const channelsData  = await axios({url: "/v1_0/channels"})//拼接數據const channelsHTML = `<option value="" selected="">請選擇文章頻道</option>` + channelsData.data.data.channels.map(item => `<option value="${item.id}" >${item.name}</option>`).join("")//渲染數據document.querySelector(".form-select").innerHTML = channelsHTML
}
getChannels()
封面設置
目標2:文章封面設置
2.1 準備標簽結構和樣式
2.2 選擇文件并保存在 FormData
2.3 單獨上傳圖片并得到圖片 URL 網址
2.4 回顯并切換 img 標簽展示(隱藏 + 號上傳標簽)?
document.querySelector(".img-file").addEventListener("change", async e => {//獲取本地上傳照片數據const file = e.target.files[0]//實例化表單對象const fd = new FormData()//添加image屬性,并放入圖片數據fd.append("image", file)//上傳數據,返回照片地址const res = await axios({url: "/v1_0/upload",method: "POST",data: fd})const imgUrl = res.data.data.url//渲染到本地document.querySelector(".rounded").src = imgUrl  //照片回顯document.querySelector(".rounded").classList.add("show") //顯示照片盒子document.querySelector(".place").classList.add("hide")  //隱藏加號盒子
})//??點擊圖片,模擬點擊上傳圖片按鈕,從而再次調用代碼
document.querySelector(".rounded").addEventListener("click", () => {document.querySelector(".img-file").click()
})
收集并保存
目標3:發布文章保存
3.1 基于 form-serialize 插件收集表單數據對象
3.2 基于 axios 提交到服務器保存
3.3 調用 Alert 警告框反饋結果給用戶
3.4 重置表單并跳轉到列表頁?
document.querySelector(".send").addEventListener("click", async e => {//??編輯功能留空1//獲取表單const form = document.querySelector(".art-form")//獲取表單數據const data = serialize(form, {hash: true, empty: true})//??刪除id字段數據delete data.id//獲取圖片數據data.cover = {type: 1, images: [document.querySelector(".rounded").src]}//上傳數據try{const result = await axios({url: "/v1_0/mp/articles",method: "POST", data})//調用 Alert 警告框反饋結果給用戶myAlert(true, "發布成功!")//清除表單form.reset()//清除圖片document.querySelector(".rounded").src = `` //清除圖片數據document.querySelector(".rounded").classList.remove("show") //隱藏照片盒子document.querySelector(".place").classList.remove("hide") //顯示加號盒子//??清除富文本框內容editor.setHtml('')//跳轉文章列表頁面setTimeout(() => {location.href = "../content/index.html"}, 1500)}catch(error){//調用 Alert 警告框反饋結果給用戶myAlert(false, error.response.data.message)}})內容管理
文章列表展示
目標1:獲取文章列表并展示
1.1 準備查詢參數對象
1.2 獲取文章列表數據
1.3 展示到指定的標簽結構中?
標??為代碼留空區域,在對應功能模塊編寫時會添加?
// 1.準備查詢參數對象
const queryObj = {status: '', // 文章狀態(1-待審核,2-審核通過)空字符串-全部channel_id: '', // 文章頻道 id,空字符串-全部page: 1, // 當前頁碼per_page: 10 // 當前頁面條數
}//??分頁功能留空1async function getArtileList() {//2.獲取文章列表數據const res = await axios({url: '/v1_0/mp/articles',params: queryObj})//3.展示到指定的標簽結構中const htmlStr = res.data.data.results.map(item => `<tr><td><img src="${item.cover.type === 0 ? `https://img2.baidu.com/it/u=2640406343,1419332367&fm=253&fmt=auto&app=138&f=JPEG?w=708&h=500`: item.cover.images[0]}" alt=""></td><td>${item.title}</td><td>${item.status === 1 ? `<span class="badge text-bg-primary">待審核</span>` : `<span class="badge text-bg-success">審核通過</span>`}</td><td><span>${item.pubdate}</span></td><td><span>${item.read_count}</span></td><td><span>${item.comment_count}</span></td><td><span>${item.like_count}</span></td><td "??刪除功能留空1"><i class="bi bi-pencil-square edit"></i><i class="bi bi-trash3 del"></i></td>
</tr>`).join('')document.querySelector('.art-list').innerHTML = htmlStr//??分頁功能留空2}
getArtileList()篩選功能
目標2:篩選文章列表
2.1 設置頻道列表數據
2.2 監聽篩選條件改變,保存查詢信息到查詢參數對象
2.3 點擊篩選時,傳遞查詢參數對象到服務器
2.4 獲取匹配數據,覆蓋到頁面展示?
//1.設置頻道列表數據
async function getChannels()
{//請求數據const channelsData  = await axios({url: "/v1_0/channels"})//拼接數據const channelsHTML = `<option value="" selected="">請選擇文章頻道</option>` + channelsData.data.data.channels.map(item => `<option value="${item.id}" >${item.name}</option>`).join("")//渲染數據document.querySelector(".form-select").innerHTML = channelsHTML
}
getChannels()//2.監聽篩選條件改變,保存查詢信息到查詢參數對象
//狀態
document.querySelectorAll(".form-check").forEach(item => {item.addEventListener("change", e => {queryObj.status = e.target.value})
})//頻道
document.querySelector(".form-select").addEventListener("change", e => {queryObj.channel_id = e.target.value
})
//3.點擊篩選時,傳遞查詢參數對象到服務器,并獲取匹配數據,覆蓋到頁面展示
document.querySelector(".sel-btn").addEventListener("click", () => {getArtileList()
})
分頁功能
目標3:分頁功能
3.1 保存并設置文章總條數
3.2 點擊下一頁,做臨界值判斷,并切換頁碼參數并請求最新數據
3.3 點擊上一頁,做臨界值判斷,并切換頁碼參數并請求最新數據?
//————————————————————————1.代碼寫在文章列表展示中——————————————————————————————//1.1保存文章總條數(對應留空1)let totalCount = 0 //1.2獲取文章總條數(對應留空2)totalCount = res.data.total_countdocument.querySelector('.total-count').innerHTML = `共 ${totalCount} 條`
//————————————————————————————————————————————————————————————————————————————//2.點擊下一頁
document.querySelector(".next").addEventListener("click", () => {//判斷是否可以進行下一頁:當前頁碼小于總頁碼(總頁碼=(總條數/每一頁最大條數)向上取整)if(queryObj.page < Math.ceil(totalCount / queryObj.per_page)){      //頁碼自增queryObj.page++ //頁面顯示當前頁碼document.querySelector(".page-now").innerHTML = `第 ${queryObj.page} 頁`  //更新數據getArtileList() }
})//3.點擊上一頁
document.querySelector('.last').addEventListener('click', e => {// 大于 1 的時候,才能翻到上一頁if (queryObj.page > 1) {//頁碼自減queryObj.page--//頁面顯示當前頁碼document.querySelector('.page-now').innerHTML = `第 ${queryObj.page} 頁`//更新數據getArtileList()}
})
刪除功能
目標4:刪除功能
4.1 關聯文章 id 到刪除圖標
4.2 點擊刪除時,獲取文章 id
4.3 調用刪除接口,傳遞文章 id 到服務器
4.4 刪除最后一頁的最后一條,需要自動向前翻頁?
4.5 重新獲取文章列表,并覆蓋展示
//————————————————————————1.關聯文章 id————————————————————————//留空1補自定義屬性data-id="${item.id}"//——————————————————————————————————————————————————————————————————————
//2.點擊刪除時,獲取文章 id
document.querySelector(".art-list").addEventListener("click", async e => {if(e.target.classList.contains("del")){//2.獲取idconst delId = e.target.parentNode.dataset.id//3.調用刪除接口,傳遞文章 id 到服務器const res = await axios({url: `/v1_0/mp/articles/${delId}`,method: "DELETE"})//4.刪除最后一頁的最后一條,需要自動向前翻頁//獲取子元素數組const children = document.querySelector(".art-list").children//判斷子元素數組長度等于1并且當前頁碼數不等于1if(children.length === 1 && queryObj.page !== 1){//頁碼自減queryObj.page--//頁面顯示當前頁碼document.querySelector('.page-now').innerHTML = `第 ${queryObj.page} 頁`}//5.重新獲取并渲染數據getArtileList()}
})
編輯功能
回顯文章?
目標4:編輯-回顯文章
4.1 頁面跳轉傳參(URL 查詢參數方式)
4.2 發布文章頁面接收參數判斷(共用同一套表單)
4.3 修改標題和按鈕文字
4.4 獲取文章詳情數據并回顯表單
//content/index.js//1.點擊編輯時,獲取文章 id,跳轉到發布文章頁面傳遞文章 id 過去
document.querySelector(".art-list").addEventListener("click", e => {//判斷是否點擊編輯按鈕if(e.target.classList.contains("edit")){//獲取idconst editId = e.target.parentNode.dataset.id//跳轉到發布頁面,并傳遞idlocation.href = `../publish/index.html?id=${editId}`}})
//publish/index.js
//使用立即執行函數(IIFE)創建一個獨立的作用域,避免變量污染全局作用域
;(function(){//??獲取網頁中攜帶的參數const paramsStr = location.search//??實例化內置對象(用來處理?后面內容的對象)const params = new URLSearchParams(paramsStr)params.forEach(async (value, key) => {//判斷是否含有id參數if(key === "id"){//修改頁面文字document.querySelector(".title span").innerHTML = "修改文章"document.querySelector(".send").innerHTML = "修改"//獲取文章詳情const res = await axios({url: `/v1_0/mp/articles/${value}`})//整理需要用的值//方法一:解構// const {channel_id, title, cover:{images:[image]}, content, id} = res.data.data//方法二:創立新對象挨個賦值(本篇選擇此方法)const dataObj = {channel_id: res.data.data.channel_id,title: res.data.data.title,image: res.data.data.cover.images[0],content: res.data.data.content,id: res.data.data.id}console.log(dataObj)//數據渲染Object.keys(dataObj).forEach(key => {if(key === "image"){document.querySelector(".rounded").src = dataObj[key] //照片回顯document.querySelector(".rounded").classList.add("show") //顯示照片盒子document.querySelector(".place").classList.add("hide") //隱藏加號盒子}else if(key === "content"){//設置富文本編輯框內容editor.setHtml(dataObj[key])}else{//利用name選擇器賦值document.querySelector(`[name=${key}]`).value = dataObj[key]}}) }})
})();保存文章?
目標5:編輯-保存文章
5.1 判斷按鈕文字,區分業務(因為共用一套表單)
5.2 調用編輯文章接口,保存信息到服務器
5.3 基于 Alert 反饋結果消息給用戶
//區分發布按鈕與修改按鈕
//——————————————————————發布文章/收集并保存中的留空1代碼————————————————————————————//判斷是否為發布按鈕if(e.target.innerHTML != "發布") return
//————————————————————————————————————————————————————————————————————————————————
document.querySelector(".send").addEventListener("click", async e => {//判斷是否為修改按鈕if(e.target.innerHTML !== "修改") return//獲取表單對象const form = document.querySelector(".art-form")//使用serialize插件獲取表單數據const data = serialize(form, {hash: true, empty: true})//提交數據try{const res = await axios({url: `/v1_0/mp/articles/${data.id}`,method: "PUT",data:{...data,cover:{type: document.querySelector(".rounded").src ? 1 : 0,images: [document.querySelector(".rounded").src]}}})//成功彈窗myAlert(true, "修改成功!")//返回內容管理頁面setTimeout(() =>{location.href = "../content/index.html"}, 1500)}catch(error){//異常彈窗myAlert(false, error.response.data.message)}
})退出登錄?
目標3:退出登錄
3.1 綁定點擊事件
3.2 清空本地緩存,跳轉到登錄頁面
//utils/auth.js//綁定事件
document.querySelector(".quit").addEventListener("click", () => {//清空本地緩存localStorage.clear()//提示框myAlert(true, "退出成功!即將返回登陸頁面!")//跳轉登錄頁面setTimeout(() => {location.href ="../login/index.html"}, 1500)
}))


)


)


)


