3.2日學習打卡
目錄:
- 3.2日學習打卡
- SpringBoot整合FastDFS
- 實戰開發
- 文件上傳
- FastDFS集成Nginx
- 環境搭建

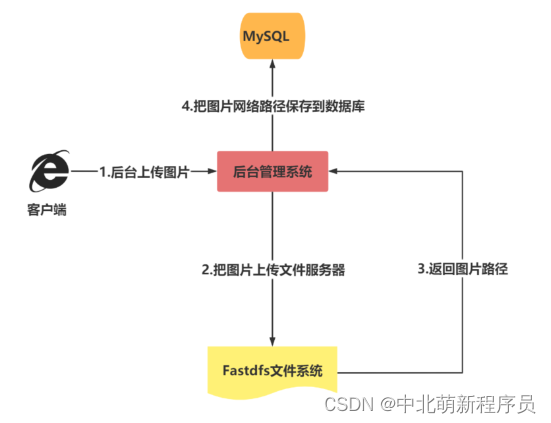
SpringBoot整合FastDFS
由GitHub大牛tobato在原作者YuQing與yuqih發布的JAVA客戶端基礎上進行了大量重構工作,并于GitHub上發布了FastDFS-Client1.26.5。
主要特性
- 對關鍵部分代碼加入了單元測試,便于理解與服務端的接口交易,提高接口質量
- 將以前對byte硬解析風格重構為使用對象+注解的形式,盡量增強了代碼的可讀性
- 支持對服務端的連接池管理
- 支持上傳圖片時候檢查圖片格式,并且自動生成縮略圖
- 在SpringBoot當中自動導入依賴
實戰開發
導入FastDFS依賴jar
<dependency><groupId>com.github.tobato</groupId><artifactId>fastdfs-client</artifactId><version>1.26.5</version>
</dependency>
配置application.yml
# 分布式文件系統FDFS配置
fdfs:#連接時間so-timeout: 1501#超時時間connect-timeout: 601thumb-image:       #縮略圖生成參數width: 150height: 150tracker-list:       #TrackerList參數,支持多個- 192.168.66.100:22122- 192.168.66.101:22122
上傳文件操作
package com.jjy.fastdfsemo;import com.github.tobato.fastdfs.domain.fdfs.StorePath;
import com.github.tobato.fastdfs.domain.proto.storage.DownloadByteArray;
import com.github.tobato.fastdfs.service.FastFileStorageClient;
import org.junit.jupiter.api.Test;
import org.springframework.beans.factory.annotation.Autowired;
import org.springframework.boot.test.context.SpringBootTest;import java.io.*;@SpringBootTest
class FastDfSemoApplicationTests {@Autowiredprivate FastFileStorageClient fastFileStorageClient;/*** 測試springboot環境下javaapi對分布式會問你系統上傳文件的操作**/@Testpublic void testupload() throws FileNotFoundException {//獲取本地文件File file = new File("C:\\Users\\SF\\Pictures\\聯想鎖屏壁紙\\2.jpg");//創建文件輸入流FileInputStream fileInputStream = new FileInputStream(file);//文件上傳/***文件上傳:參數一:傳輸文件內容的輸入流;* 參數二:文件的size;* 參數三:文件擴展名;* 參數四:描述文件的元數據;返回值:上傳文件在存儲節點的唯一標識(卷名+文件名)*/StorePath storePath = fastFileStorageClient.uploadFile(fileInputStream, file.length(), "jpg", null);//將卷名與文件名一起打印System.out.println(storePath.getFullPath());//將卷名與文件名分別打印System.out.println(storePath.getGroup()+" | "+storePath.getPath());}}
配置SpringBoot的入口類
package com.jjy.fastdfsemo;import com.github.tobato.fastdfs.FdfsClientConfig;
import org.springframework.boot.SpringApplication;
import org.springframework.boot.autoconfigure.SpringBootApplication;
import org.springframework.context.annotation.EnableMBeanExport;
import org.springframework.context.annotation.Import;
import org.springframework.jmx.support.RegistrationPolicy;//獲取帶有連接池的FastDFS Java客戶端
@Import(FdfsClientConfig.class)
// 解決jmx重復注冊bean的問題
@EnableMBeanExport(registration = RegistrationPolicy.IGNORE_EXISTING)
@SpringBootApplication
public class FastDfSemoApplication {public static void main(String[] args) {SpringApplication.run(FastDfSemoApplication.class, args);}}
文件下載的操作
package com.jjy.fastdfsemo;import com.github.tobato.fastdfs.domain.fdfs.StorePath;
import com.github.tobato.fastdfs.domain.proto.storage.DownloadByteArray;
import com.github.tobato.fastdfs.service.FastFileStorageClient;
import org.junit.jupiter.api.Test;
import org.springframework.beans.factory.annotation.Autowired;
import org.springframework.boot.test.context.SpringBootTest;import java.io.*;@SpringBootTest
class FastDfSemoApplicationTests {@Autowiredprivate FastFileStorageClient fastFileStorageClient;/*** 測試springboot環境下javaapi對分布式會問你系統上傳文件的操作**//*** 測試springboot環境下的javaAPI對分布式文件系統的下載文件的操作* @throws IOException*/@Testpublic void testDownload() throws IOException {/*** 參數一:文件處于存儲節點的卷名;* 參數二:文件在存儲節點的文件名;* 參數三:下載的回調函數;返回值:文件內容的字節數組*/byte[] bytes = fastFileStorageClient.downloadFile("group1", "M00/00/00/wKhCZGXi97mAK1ciAAJgIQIm2Ts043.jpg", new DownloadByteArray());//創建文件輸出流,指定輸出位置及文件名FileOutputStream fileOutputStream = new FileOutputStream("C:\\Users\\SF\\Pictures\\聯想鎖屏壁紙\\66.jpg");//使用文件輸出流將文件內容字節數組寫出fileOutputStream.write(bytes);//刷新輸出流fileOutputStream.flush();//關閉輸出流fileOutputStream.close();}}
文件上傳
引入Thymeleaf視圖解析器
<dependency><groupId>org.springframework.boot</groupId><artifactId>spring-boot-starter-thymeleaf</artifactId>
</dependency><dependency><groupId>org.springframework.boot</groupId><artifactId>spring-boot-starter-web</artifactId>
</dependency>
下載wangEditor富文本編輯器
wangEditor4 —— 輕量級 web 富文本編輯器,配置方便,使用簡單。
官網:www.wangeditor.com
文檔:www.wangeditor.com/v4
使用CDN的形式引入
<scripttype="text/javascript"src="https://cdn.jsdelivr.net/npm/wangeditor@latest/dist/wangEditor.min.js"
></script>
<script type="text/javascript">const E = window.wangEditorconst editor = new E("#div1")// 或者 const editor = new E(document.getElementById('div1'))editor.create()
</script>
編寫index頁面
<!DOCTYPE html>
<html lang="en">
<head><meta charset="UTF-8"><title>wangEditor demo</title>
</head>
<body><div id="div1"><p>歡迎使用 <b>wangEditor</b> 富文本編輯器</p>
</div></body><scripttype="text/javascript"src="https://cdn.jsdelivr.net/npm/wangeditor@latest/dist/wangEditor.min.js"
></script>
<!-- 引入 wangEditor.min.js -->
<script type="text/javascript">const E = window.wangEditorconst editor = new E('#div1')// 或者 const editor = new E( document.getElementById('div1') )//設置文件上傳的參數名稱editor.config.uploadFileName = 'files'// 配置 server 接口地址editor.config.uploadImgServer = '/upload'// 2Meditor.config.uploadImgMaxSize = 2 * 1024 * 1024editor.config.uploadImgAccept = ['jpg', 'jpeg', 'png', 'gif', 'bmp', 'webp']// 一次最多上傳 5 個圖片editor.config.uploadImgMaxLength = 5editor.create()
</script></html>
編寫Controller接口
package com.jjy.fastdfsemo.controller;import com.github.tobato.fastdfs.domain.fdfs.StorePath;
import com.github.tobato.fastdfs.service.FastFileStorageClient;
import org.springframework.beans.factory.annotation.Autowired;
import org.springframework.web.bind.annotation.PostMapping;
import org.springframework.web.bind.annotation.RestController;
import org.springframework.web.multipart.MultipartFile;import java.io.IOException;@RestController
public class UploadController {//fastdfs存儲節點的客戶端對象@Autowiredprivate FastFileStorageClient fastFileStorageClient;/*** 圖片的上傳* @param files*/@PostMapping("/upload")public void upload(MultipartFile[] files){//判斷是否上傳圖片if(files != null && files.length != 0 ){for (MultipartFile multipartFile : files){//獲取上傳文件名String filename = multipartFile.getOriginalFilename();//獲取最后一個“.”的下標,并獲取從這個下標的下一個下標開始后的字符作為文件后綴String fileSuffix = filename.substring(filename.lastIndexOf(".") + 1);StorePath storePath = null;try {//上傳文件storePath = fastFileStorageClient.uploadFile(multipartFile.getInputStream(), multipartFile.getSize(), fileSuffix, null);} catch (IOException e) {e.printStackTrace();}//打印返回的文件在存儲節點的唯一標識System.out.println(storePath.getFullPath());}}}}
FastDFS集成Nginx

FastDFS集成Nginx的2個原因
-
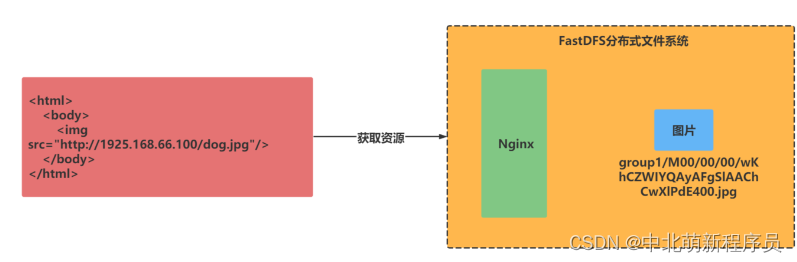
為分布式文件系統提供Http服務支持
通過Nginx的web服務代理訪問分布式文件系統的存儲節點,從而實現通過http請求訪問存儲節點資源。
注意:
src 屬性值圖像文件的 URL。也就是引用該圖像的文件的的絕對路徑或相對路徑。
-
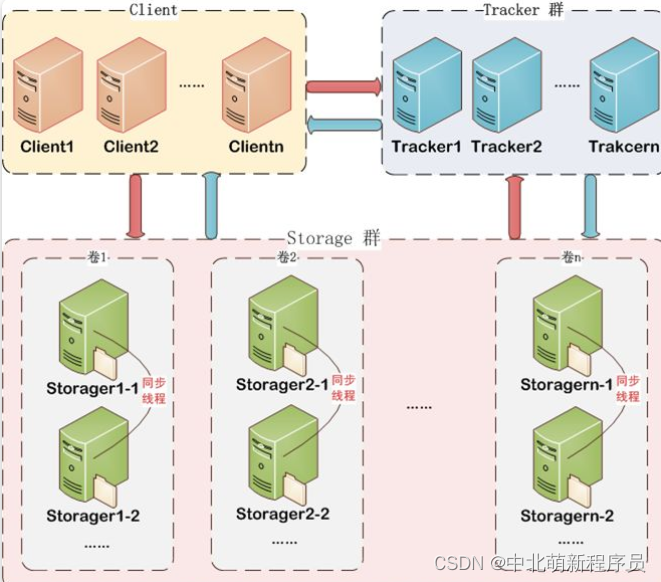
解決復制延遲問題
由于FastDFS的同卷的存儲節點之間需要同步,當文件尚未同步完成時,訪問請求到達改節點,獲取的數據將是未同步完的不完整數據,即為復制延遲問題。通過Nginx檢測請求的存儲節點的數據,若該存儲節點的數據尚未同步完成,則將請求轉發至數據的原存儲節點,從而解決復制延遲問題。
環境搭建
下載Fastdfs的Nginx模塊包
cd /usr/local
wget https://github.com/happyfish100/fastdfs-nginx-module/archive/V1.22.tar.gz
tar -zxvf V1.22.tar.gz
安裝Nginx依賴文件
yum install -y gcc gcc-c++ zlib zlib-devel openssl openssl-devel pcre pcre-devel gd-devel epel-release
下載Nginx軟件包
wget https://nginx.org/download/nginx-1.19.2.tar.gz
cd nginx-1.19.2/
配置Nginx服務器
#建立Makefile文件,檢查Linux系統環境以及相關的關鍵屬性。
./configure --add-module=/usr/local/fastdfs-nginx-module-1.22/src/
#編譯項目,主要將gcc源代碼編譯成可執行的目標文件
make
#根據上一步驟編譯完成的數據安裝到預定的目錄中。
make install
注意:
–add-module:為nginx添加一個fastdfs-nginx-module模塊,值為該模塊在當前系統的路徑
–prefix:指定nginx安裝位置
將Fastdfs軟件包里面的http.conf和mime.types拷貝到/etc/fdfs目錄下
cp /usr/local/src/fastdfs-6.06/conf/mime.types /etc/fdfs/
cp /usr/local/src/fastdfs-6.06/conf/http.conf /etc/fdfs/
配置Nginx的fastdfs模塊,并編輯文件
#拷貝文件
[root@localhost opt]cp /usr/local/fastdfs-nginx-module-1.22/src/mod_fastdfs.conf /etc/fdfs/
[root@localhost fdfs] vim mod_fastdfs.conf
#保存日志目錄
base_path=/data/fastdfs/storage
#tracker 服務器的 IP 地址以及端口號
tracker_server=192.168.66.100:22122
#文件url中是否有group 名
url_have_group_name = true
#存儲路徑
store_path0=/data/fastdfs/storage
group_count = 1            #設置組的個數
#然后在末尾添加分組信息,目前只有一個分組,就只寫一個
[group1]
group_name=group1
storage_server_port=23000
store_path_count=1
store_path0=/data/fastdfs/storage
配置Nginx
server {listen    80;server_name  localhost;location ~ /group[1-3]/M00 {alias /data/fastdfs/storage/data;ngx_fastdfs_module;}# 根目錄下返回403location = / {return 403;}# log fileaccess_log  logs/img_access.log access;
}
啟動Ningx服務
# 進入sbin目錄
[root@tracker nginx]# cd sbin/
# 啟動服務 -c:指定配置文件
[root@tracker sbin]# ./nginx -c /usr/local/nginx/conf/nginx.conf
查看服務啟動情況
[root@tracker sbin]# ps -ef | grep nginx
啟動追蹤服務與存儲節點服務
[root@tracker sbin]# fdfs_trackerd /etc/fdfs/tracker.conf start
[root@tracker sbin]# fdfs_storaged /etc/fdfs/storage.conf start
上傳圖片測試
將圖片上傳至linux系統后,使用指令上傳至分布式文件系統
[root@tracker fdfs]# fdfs_upload_file /etc/fdfs/client.conf /root/xxxxx.png
group1/M00/00/00/wKhyj1wrIUWAL5ASAAAfA8PiO7Y493.png
通過瀏覽器遠程訪問
http://192.168.66.100/group1/M00/00/00/wKhyj1wrIfqAD3NFAAn1fNRE8_M976.png
如果我的內容對你有幫助,請點贊,評論,收藏。創作不易,大家的支持就是我堅持下去的動力


)


、事件源、常用事件)
)
(19-21,卷積層、填充padding、步幅stride、多輸入多輸出通道))


