一、讀寫分離工作原理
讀寫分離的工作原理:在大型網站業務中,當單臺數據庫無法滿足并發需求時,通過主從同步方式同步數據。設置一臺主服務器負責增、刪、改,多臺從服務器負責查詢,從服務器從主服務器同步數據以保持一致性,從而提高數據庫的并發和負載能力。

簡單來說,讀寫分離就是將數據庫操作分為“讀”和“寫”兩部分,分別由不同的服務器處理。主服務器(通常是單臺)主要負責處理寫操作(如插入、更新、刪除),而從服務器(通常是多臺)則主要負責處理讀操作(如查詢)。主從服務器之間通過主從同步機制保持數據的一致性。通過這種方式,可以顯著提高數據庫的并發處理能力和負載能力,從而減輕單臺服務器的壓力。
二、通過ProxySQL對讀寫分離進行淺層面的理解和運用
1、實驗環境:
| 機器名稱 | IP配置 | 服務角色 | 備注 |
|---|---|---|---|
| proxy | 192.168.20.149 | proxysql控制器 | 用于監控管理 |
| master | 192.168.20.150 | 數據庫主服務器 | |
| slave1 | 192.168.20.146 | 數據庫從服務器 | |
| slave2 | 192.168.20.148 | 數據庫從服務器 |
?2、實現數據庫主從復制
基于GTID實現mysql8.0主從同步,配置過程略。
基本命令:
開啟gtid,并設置server_id值
gtid_mode=ON
enforce-gtid-consistency=ON建立主從同步
mysql> CHANGE MASTER TO
? ? ?> ? ? MASTER_HOST = host,
? ? ?> ? ? MASTER_PORT = port,
? ? ?> ? ? MASTER_USER = user,
? ? ?> ? ? MASTER_PASSWORD = password,
? ? ?> ? ? MASTER_AUTO_POSITION = 1;mysql> START SLAVE;
mysql> show slave status \G
........
? ? ? ? ? ? ?Slave_IO_Running: Yes
? ? ? ? ? ? Slave_SQL_Running: Yes..........
?查看slave,雙yes就代表成功
3、安裝ProxySQL
本人博客另外一篇文章可以直接拿
yum install -y proxysql啟動 ProxySQL
[root@proxy ~]# systemctl enable --now proxysql
#先啟服務,只需要mysql客戶端,直接下mariadb就行了
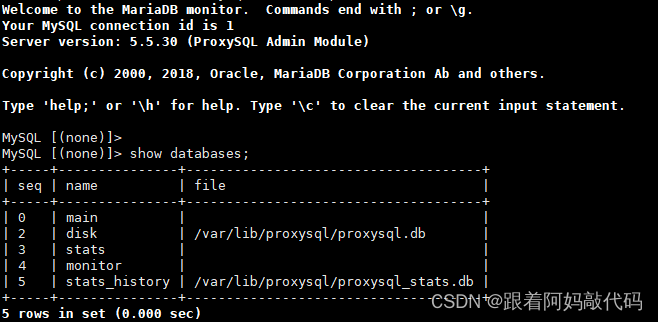
# 管理員登錄
[root@proxy ~]# mysql -uadmin -padmin -h 127.0.0.1 -P 6032?成功登錄后可以查看一下庫看看是否正常
4、配置 ProxySQL 所需賬戶
在 Master (192.168.20.150) 的MySQL 上創建 ProxySQL 的監控賬戶和對外訪問賬戶
create user 'monitor'@'192.168.%.%' identified with mysql_native_password by 'Monitor@123.com';
grant all privileges on *.* to 'monitor'@'192.168.%.%' with grant option;#proxysql 的對外訪問賬戶
create user 'proxysql'@'192.168.%.%' identified with mysql_native_password by '123456';
grant all privileges on *.* to 'proxysql'@'192.168.%.%' with grant option;
5、配置proxySQL
創建組:(定義寫為1,讀為0)
MySQL [(none)]> insert into mysql_replication_hostgroups (writer_hostgroup,reader_hostgroup,comment) values (1,0,'proxy');
Query OK, 1 row affected (0.00 sec)MySQL [(none)]> load mysql servers to runtime;
Query OK, 0 rows affected (0.01 sec)MySQL [(none)]> save mysql servers to disk;
Query OK, 0 rows affected (0.02 sec)
注意:ProxySQL會根據server的read_only的取值將服務器進行分組。read_only=0的server,master被分到編號為1的寫組,read_only=1的server,slave則分到編號為0的讀組
所以創建完成之后需要在兩個從服務器配置文件(/etc/my.cnf)添加read_noly=1。
MySQL [(none)]> select * from mysql_replication_hostgroups;
+------------------+------------------+------------+---------+
| writer_hostgroup | reader_hostgroup | check_type | comment |
+------------------+------------------+------------+---------+
| 1                | 0                | read_only  | proxy   |
+------------------+------------------+------------+---------+
1 row in set (0.00 sec)
通過查詢我們可以清晰的看到我們所分的組
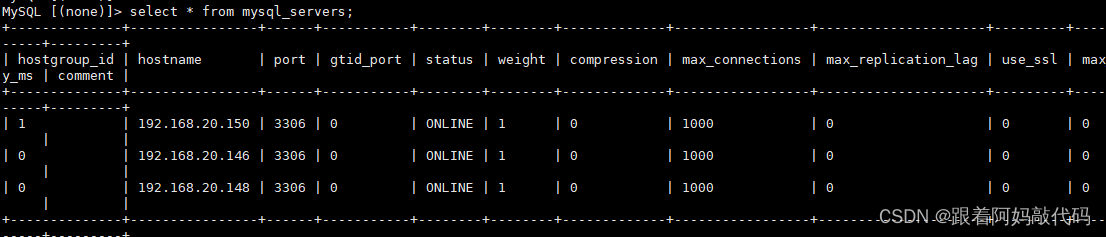
添加主從服務器節點:
在proxySQL端添加主從服務器的節點,并保存
MySQL [(none)]> insert into mysql_servers(hostgroup_id,hostname,port) values (1,'192.168.20.150',3306);
Query OK, 1 row affected (0.00 sec)MySQL [(none)]> insert into mysql_servers(hostgroup_id,hostname,port) values (0,'192.168.20.146',3306);
Query OK, 1 row affected (0.00 sec)MySQL [(none)]> insert into mysql_servers(hostgroup_id,hostname,port) values (0,'192.168.20.148',3306);
Query OK, 1 row affected (0.00 sec)MySQL [(none)]> load mysql servers to runtime;
Query OK, 0 rows affected (0.01 sec)MySQL [(none)]> save mysql servers to disk;
Query OK, 0 rows affected (0.00 sec)
?重要的信息是要保證主從服務器都是online狀態
為ProxySQL監控MySQL后端節點
MySQL [(none)]> use monitor
Reading table information for completion of table and column names
You can turn off this feature to get a quicker startup with -ADatabase changed
MySQL [monitor]> set mysql-monitor_username='monitor';
Query OK, 1 row affected (0.00 sec)MySQL [monitor]> set mysql-monitor_password='Monitor@123.com';
Query OK, 1 row affected (0.00 sec)修改后,保存到runtime和disk
MySQL [monitor]> load mysql variables to runtime;
MySQL [monitor]> save mysql variables to disk;查看監控賬號【ProxySQL】
SELECT * FROM global_variables WHERE variable_name LIKE 'mysql-monitor_%';
//也可以這樣快速定位
MySQL [(none)]> select @@mysql-monitor_username;
+--------------------------+
| @@mysql-monitor_username |
+--------------------------+
| monitor                  |
+--------------------------+
1 row in set (0.00 sec)
MySQL [(none)]> select @@mysql-monitor_password;
+--------------------------+
| @@mysql-monitor_password |
+--------------------------+
| Monitor@123.com          |
+--------------------------+
1 row in set (0.00 sec)
驗證監控信息
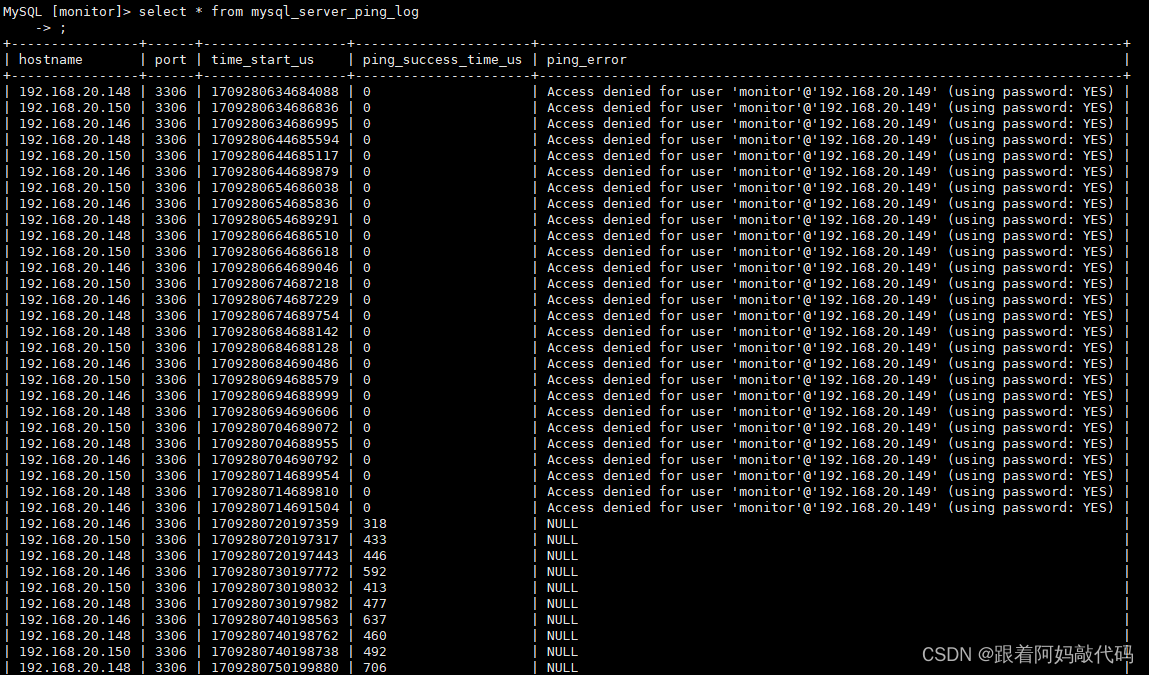
ProxySQL 監控模塊的指標都保存在monitor庫的log表中?以下是連接是否正常的監控,對connect指標的監控 ,在前面可能會有很多connect_error,這是因為沒有配置監控信息時的錯誤,配置后如果connect_error的結果為NULL則表示正常

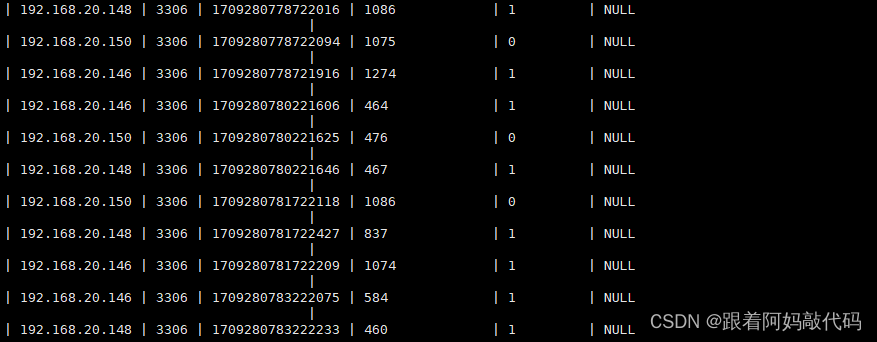
心跳信息的監控
?
?查看read_only日志監控:
MySQL [(none)]> select * from mysql_server_read_only_log;
Monitor 模塊就會開始監控后端的read_only值,當監控到read_only值,就會按照read_only的值將某些節點自動移到讀寫組?
一些監控的狀態斗志在log相關,都在monitor庫下面的 global_variables 變量。?
?ProxySQL配置對外訪問賬號
前面已經配置:配置ProxySQL 賬戶,我創建的對外訪問賬戶是:用戶:proxysql,密碼:123456
將對外訪問賬號添加到mysql_users表中:
MySQL [monitor]> insert into mysql_users (username,password,default_hostgroup,transaction_persistent) values ('proxysql','123456',1,1);
Query OK, 1 row affected (0.000 sec)MySQL [monitor]> load mysql users to runtime;
Query OK, 0 rows affected (0.000 sec)MySQL [monitor]> save mysql users to disk;
Query OK, 0 rows affected (0.007 sec)MySQL [monitor]> select * from mysql_users\G
*************************** 1. row ***************************username: proxysqlpassword: 123456active: 1use_ssl: 0default_hostgroup: 1default_schema: NULLschema_locked: 0
transaction_persistent: 1fast_forward: 0backend: 1frontend: 1max_connections: 10000attributes: comment:
1 row in set (0.000 sec)
注:transaction_persistent 如果為1,則一個完整的SQL只可能路由到一個節點;這點非常重要,主要解決這種情況:一個事務有混合的讀操作和寫操作組成,事務未提交前,如果事務中的讀操作和寫操作路由到不同節點,那么讀取到的結果必然是臟數據。所以一般情況下,該值應該設置為1,尤其是業務中使用到事務機制的情況(默認為0)
6、測試主從同步
[root@slave1 ~]# mysql -h192.168.20.149 -uproxysql -p'123456' -P 6033
mysql: [Warning] Using a password on the command line interface can be insecure.
Welcome to the MySQL monitor. Commands end with ; or \g.
Your MySQL connection id is 3
Server version: 5.5.30 (ProxySQL)Copyright (c) 2000, 2022, Oracle and/or its affiliates.Oracle is a registered trademark of Oracle Corporation and/or its
affiliates. Other names may be trademarks of their respective
owners.Type 'help;' or '\h' for help. Type '\c' to clear the current input statement.mysql> show databases;
+--------------------+
| Database |
+--------------------+
| db1 |
| information_schema |
| mysql |
| performance_schema |
| sys |
+--------------------+
5 rows in set (0.01 sec)mysql> select @@server_id;
+-------------+
| @@server_id |
+-------------+
| 21 |
+-------------+
1 row in set (0.00 sec)#通過proxysql用戶,創建一個keme庫
mysql> create database keme;
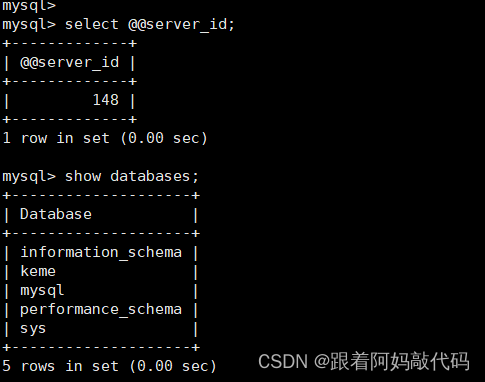
Query OK, 1 row affected (0.00 sec)在slave2:192.168.20.148上去驗證一下,是否同步過去keme這個庫
7、添加簡單的讀寫分離規則
MySQL [monitor]> insertintomysql_query_rules(rule_id,active,match_pattern,destination_hostgroup,apply) values(1,1,'^select .* for update$',1,1);
l query rules to runtime;
save mysql query rulQuery OK, 1 row affected (0.000 sec)es to disk;MySQL
[monitor]>
MySQL [monitor]> insert into  values(2,1,'^select',0,1);mysql_query_rules(rule_id,active,match_pattern,destination_hostgroup,apply)
Query OK, 1 row affected (0.000 sec)MySQL [monitor]> load mysql query rules to runtime;
Query OK, 0 rows affected (0.000 sec)MySQL [monitor]> save mysql query rules to disk;
Query OK, 0 rows affected (0.006 sec)
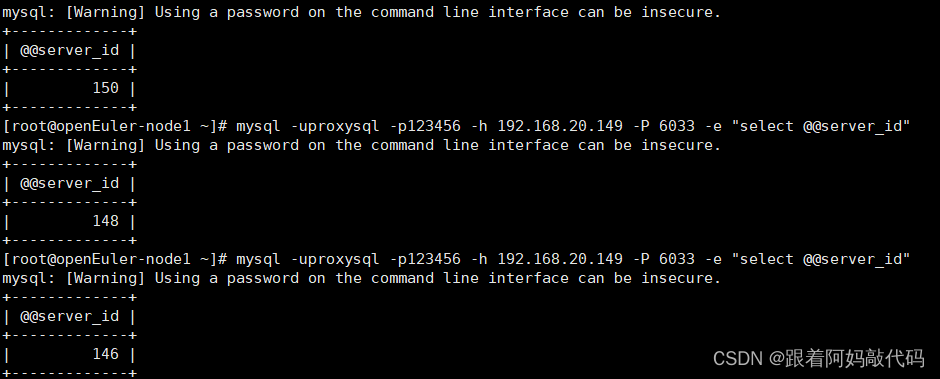
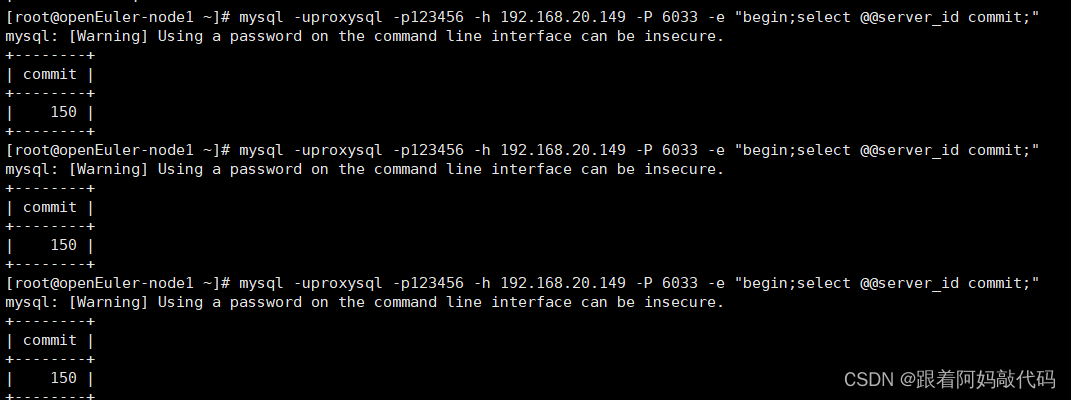
8.測試讀寫分離
讀操作:
?寫操作:
簡單的讀寫分離實驗就結束了。?


![LeetCode 刷題 [C++] 第226題.翻轉二叉樹](http://pic.xiahunao.cn/LeetCode 刷題 [C++] 第226題.翻轉二叉樹)


)

)


