一、介紹
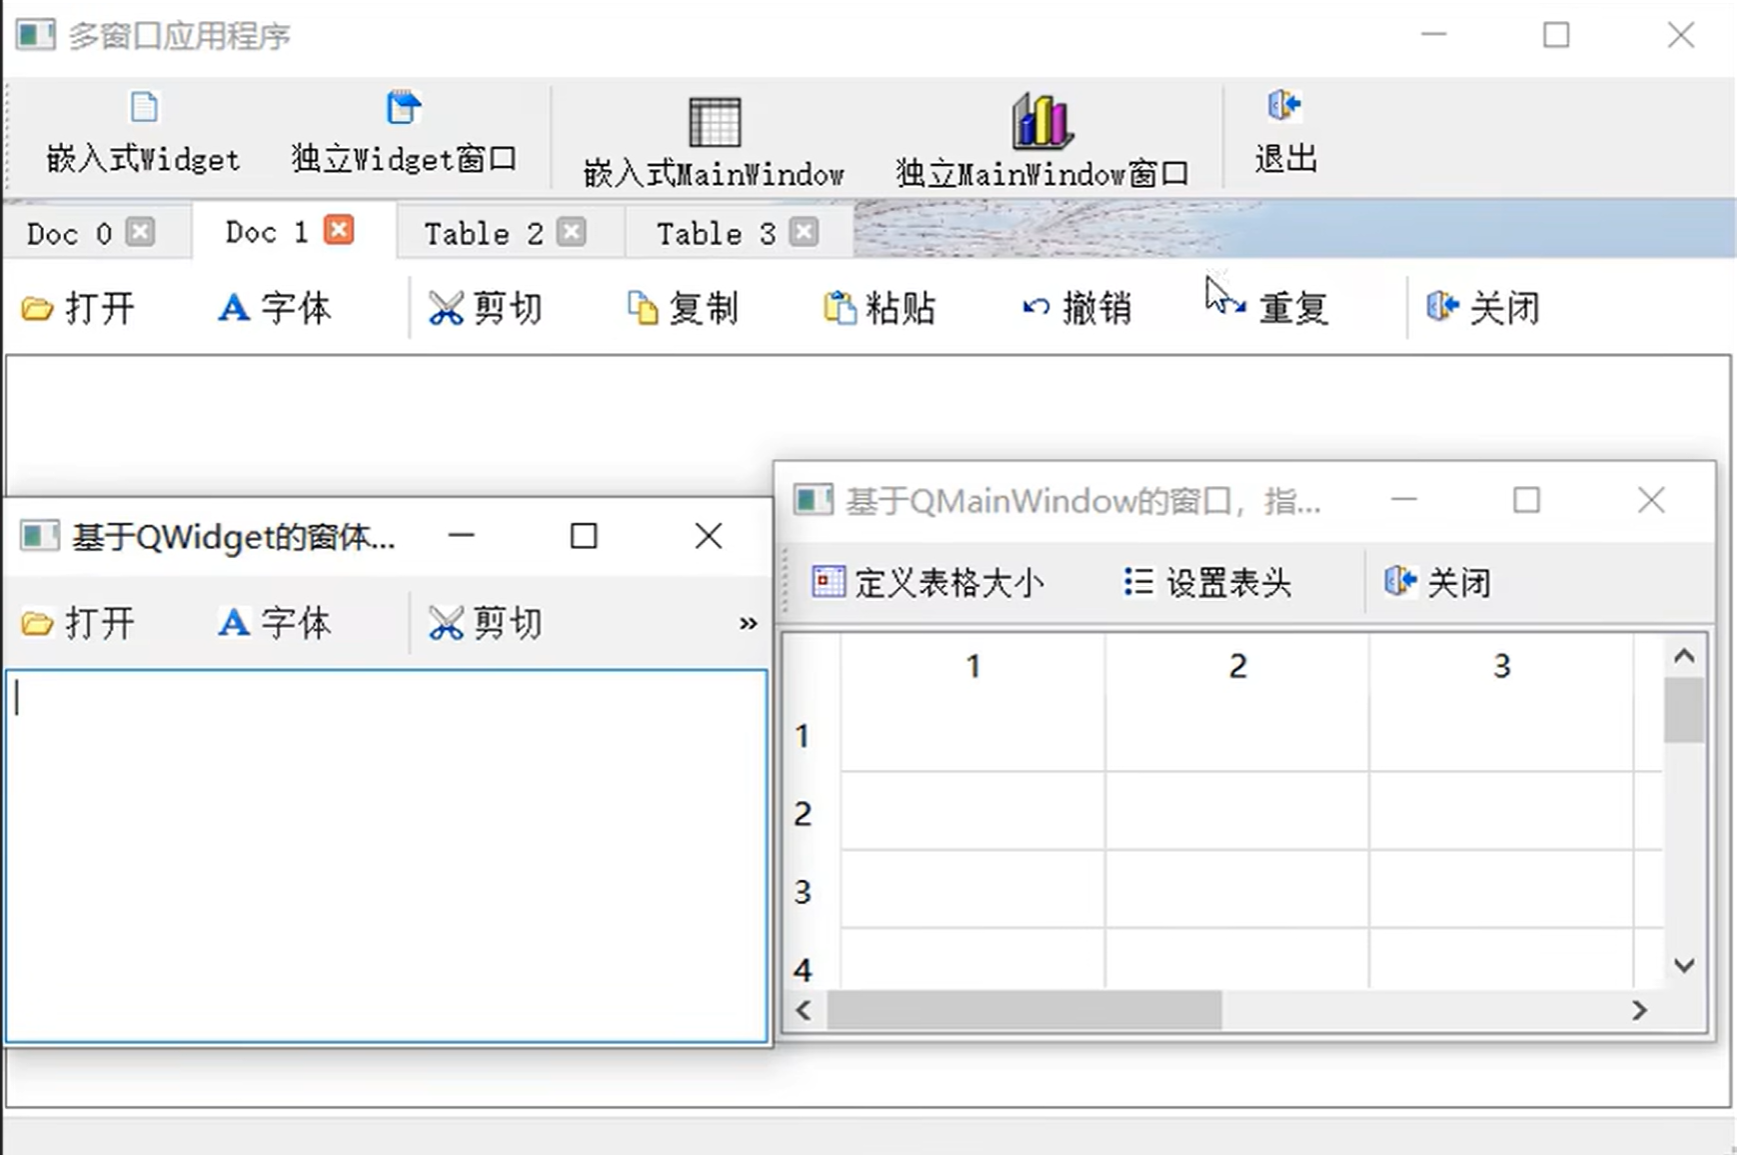
首先,QT界面開發中主要大體分為2種多窗口的形式:
- 嵌入式:
新生成的窗口嵌入在主窗口內部 - 獨立窗口:
以彈窗形式的新窗口生成和展示
這里就講解最簡單的:點擊案件后,跳出一個新窗口
二、代碼實現
要在Qt C++中實現點擊按鈕后顯示新窗口,并在新窗口中顯示由主程序生成的圖片,你需要創建兩個窗口類:主窗口類和圖片顯示窗口類。下面是一個簡單的示例,展示了如何實現這一功能:
創建一個新的Qt Widgets Application。
添加兩個窗口類,一個是主窗口類 MainWindow,另一個是顯示圖片的窗口類 ImageWindow。
一般用vs2019開發,創建Qt Widgets Application之后,會自帶一個和項目名同名的主窗口類。這個時候需要手動創建另外一個,即新窗口類。創建方法可以參考這篇博客:Qt5.12.6 + VS2019 點擊按鈕彈出新窗口
首先是 ImageWindow 類的實現(假設圖片使用 QLabel 來顯示):
imagewindow.h:
#ifndef IMAGEWINDOW_H
#define IMAGEWINDOW_H#include <QWidget>
#include <QLabel>class ImageWindow : public QWidget
{Q_OBJECTpublic:explicit ImageWindow(QWidget *parent = nullptr);void displayImage(const QPixmap &pixmap);private:QLabel *imageLabel;};#endif // IMAGEWINDOW_H
imagewindow.cpp:
#include "imagewindow.h"
#include <QVBoxLayout>ImageWindow::ImageWindow(QWidget *parent) : QWidget(parent)
{imageLabel = new QLabel;QVBoxLayout *layout = new QVBoxLayout(this);layout->addWidget(imageLabel);setLayout(layout);
}void ImageWindow::displayImage(const QPixmap &pixmap)
{imageLabel->setPixmap(pixmap);
}
然后是主窗口類 MainWindow,當點擊按鈕時,將創建圖片顯示窗口的實例,并顯示圖片:
mainwindow.h:
#ifndef MAINWINDOW_H
#define MAINWINDOW_H#include <QMainWindow>
#include <QPushButton>
#include "imagewindow.h"class MainWindow : public QMainWindow
{Q_OBJECTpublic:MainWindow(QWidget *parent = nullptr);private slots:void on_showImageButton_clicked();private:QPushButton *showImageButton;ImageWindow *imageWindow;
};#endif // MAINWINDOW_H
mainwindow.cpp:
#include "imagewindow.h"ImageWindow::ImageWindow(QWidget *parent) : QWidget(parent)
{imageLabel = new QLabel(this); // 使用 this 作為父對象初始化 QLabelQVBoxLayout *layout = new QVBoxLayout(this);layout->addWidget(imageLabel);setLayout(layout);
}void ImageWindow::displayImage(const QPixmap &pixmap)
{imageLabel->setPixmap(pixmap);
}
三、實戰+經驗分享
這里我的項目的情況是:
- 主窗口的cpp文件
new_QT_python.cpp:中主要運行項目主體代碼,其中開設子線程(視頻檢測線程,會把事實的檢測結果以圖片的形式傳回主線程) - 需求:當按下開始檢測的按鈕后,立即彈出新窗口,將主線程(主窗口)中接受到檢測線程傳過來的結果圖片在新窗口中進行顯示。
Tips:為了突出多窗口的實現,省略了與此無關的代碼
new_QT_python.h:
#include <QtWidgets/QMainWindow>
#include "ui_new_QT_python.h"
#include <opencv2/opencv.hpp>
#include "DetectionWindow.h"
//#include "inference.h"#pragma execution_character_set("utf-8")
#ifdef Q_OS_WIN
#pragma execution_character_set("utf-8") //解決 VS編譯器下中文亂碼
#endifclass new_QT_python : public QMainWindow
{Q_OBJECTpublic:new_QT_python(QWidget *parent = nullptr);~new_QT_python();
private:Ui::new_QT_pythonClass ui;VideoDetectionWorker m_detectionWorker1;QThread m_detectionThread1;DetectionWindow *imageWindow;private slots:void onDetectionResult1(const QImage& img);};new_QT_python.cpp:
#include "new_QT_python.h"
#include <QTimer.h>
#include <QFileDialog>
#include <iostream>
#include <iomanip>
#include <filesystem>
#include <fstream>
#include <random>
#include <iostream>
#include <vector>
#include <opencv2/opencv.hpp>
#include "DetectionWindow.h"#pragma execution_character_set("utf-8")
#ifdef Q_OS_WIN
#pragma execution_character_set("utf-8") //解決 VS編譯器下中文亂碼
#endif#define ORT_API_MANUAL_INITnew_QT_python::new_QT_python(QWidget *parent): QMainWindow(parent)
{ui.setupUi(this);// 連接子線程的檢測結果信號connect(&m_detectionWorker1, &VideoDetectionWorker::detectionResult, this, &new_QT_python::onDetectionResult1);imageWindow = new DetectionWindow; // Create the image window but don't show it yet// 將自定義線程對象移動到子線程中m_detectionWorker1.moveToThread(&m_detectionThread1);
}new_QT_python::~new_QT_python()
{m_detectionThread1.quit();m_detectionThread1.wait();
}void new_QT_python::onStartDetectionClicked()
{//顯示檢測過程的窗口imageWindow->show();// 啟動子線程m_detectionThread1.start();// 檢查子線程是否成功啟動if (m_detectionThread1.isRunning()){// 子線程已成功啟動// 在這里添加你的邏輯ui.status->setText(" m_detectionThread1 OK");}// 保存視頻路徑到子線程對象的成員變量m_detectionWorker1.m_videoPath = videoPath1;// 向子線程發送開始檢測的信號QMetaObject::invokeMethod(&m_detectionWorker1, "startDetection", Qt::QueuedConnection);// 禁用按鈕ui.startToDetect->setEnabled(false);
}void new_QT_python::onDetectionResult1(const QImage& img)
{imageWindow->displayImage(img);
}
DetectionWindow.h
#pragma once#include <QMainWindow>
#include "ui_DetectionWindow.h"class DetectionWindow : public QMainWindow
{Q_OBJECTpublic:DetectionWindow(QWidget *parent = nullptr);void displayImage(const QImage& img);~DetectionWindow();private:Ui::DetectionWindowClass ui;
};
DetectionWindow.cpp
#include "DetectionWindow.h"
#include <QVBoxLayout>DetectionWindow::DetectionWindow(QWidget *parent): QMainWindow(parent)
{	ui.setupUi(this);
}
void DetectionWindow::displayImage(const QImage& img)
{//使圖片能和label尺寸相適應ui.imageLabel->setPixmap(QPixmap::fromImage(img).scaled(ui.imageLabel->size(), Qt::KeepAspectRatio, Qt::SmoothTransformation));ui.imageLabel->setAlignment(Qt::AlignCenter);
}
DetectionWindow::~DetectionWindow()
{}
四、結果展示
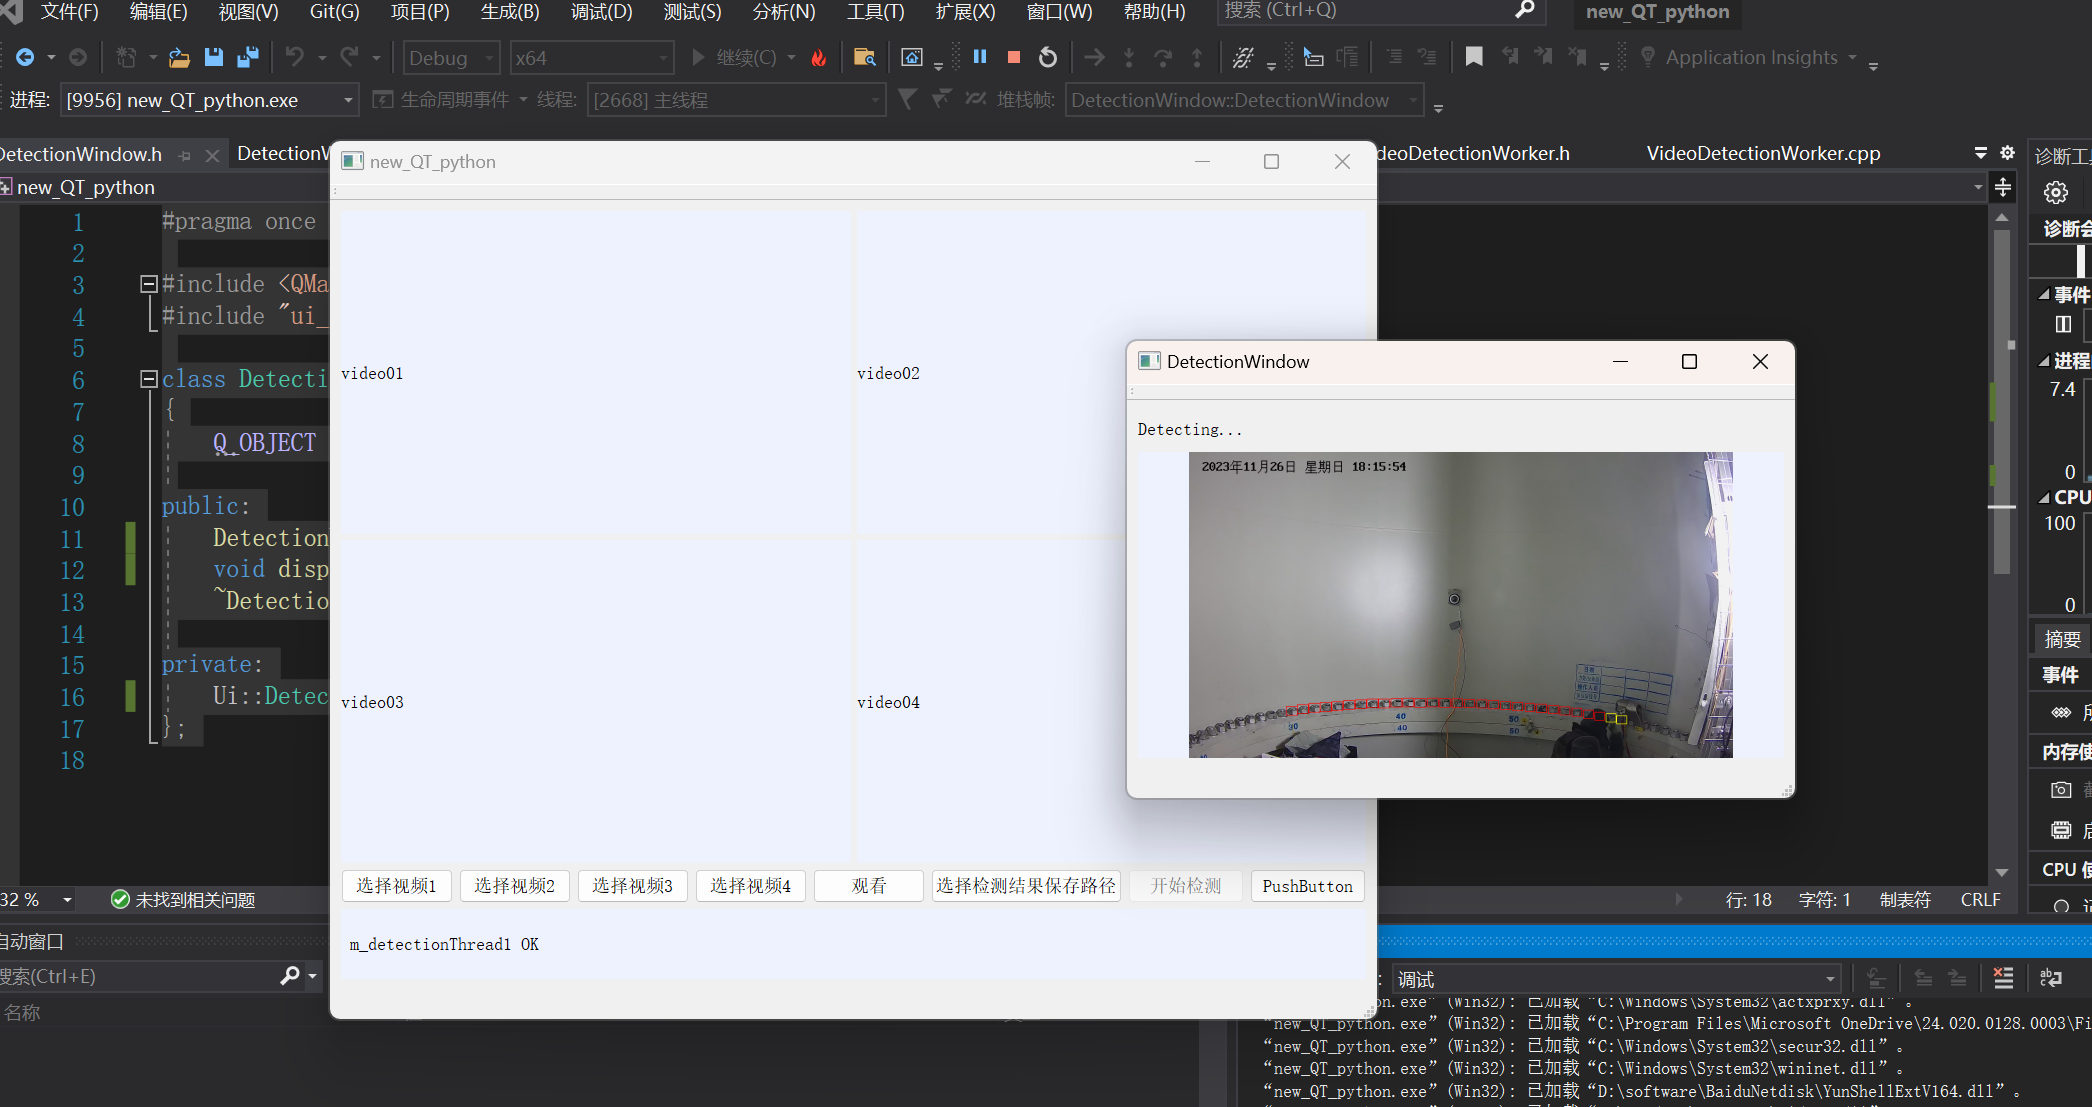
點擊“開始檢測”按鈕,觸發void new_QT_python::onStartDetectionClicked()函數,檢測子線程啟動,像主線程發送圖片結果信號,onDetectionResult1函數負責讓子窗口對象將圖片在其窗口內展示。


![[法規規劃|方案實操]數據資產入表,城投將獲融資新渠道](http://pic.xiahunao.cn/[法規規劃|方案實操]數據資產入表,城投將獲融資新渠道)


)


)


--分組背包DP)
