Telerik UI for ASP.NET Core是用于跨平臺響應式Web和云開發的最完整的UI工具集,擁有超過60個由Kendo UI支持的ASP.NET核心組件。它的響應式和自適應的HTML5網格,提供從過濾、排序數據到分頁和分層數據分組等100多項高級功能。
上下文菜單允許開發者為應用程序的最終用戶提供額外的功能和選項,本文將帶領大家看看如何在 ASP. NET Core 網格中使用它。
Telerik UI for ASP. NET Core Grid組件是一個非常受歡迎的功能,它使您可以自定義用戶體驗并創建對所呈現的數據有意義的選項。上下文菜單是應用程序很好的功能選擇,無論是桌面還是web端,都能直接從屏幕上顯示的數據為用戶添加額外的功能和選項,從而為您的產品增加價值!
Telerik UI for ASP. NET Core新版下載(Q技術交流:726377843)
您熟悉Telerik UI for ASP. NET Core Grid嗎?
Telerik UI for ASP. NET Core是一個健壯的UI組件庫,以其卓越的質量和性能而聞名,數據網格是該套件的突出特性之一。
嘗試網格上下文菜單
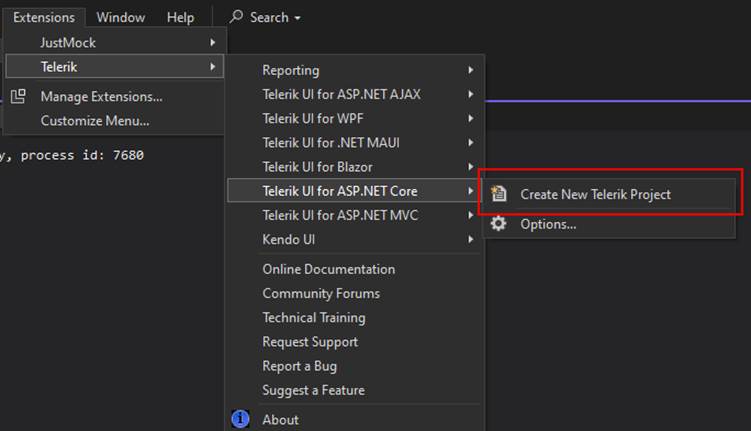
使用進度控制面板應用程序或從VS擴展安裝Telerik后,開始創建您的項目類型為Telerik UI for ASP. NET Core:
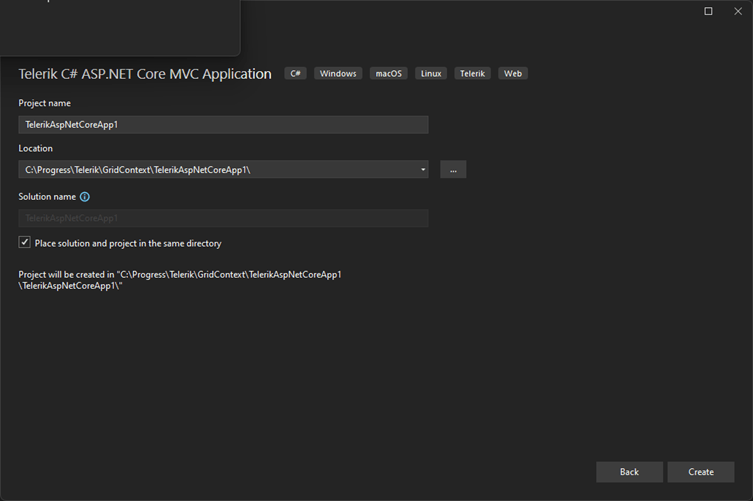
為項目選擇一個路徑:
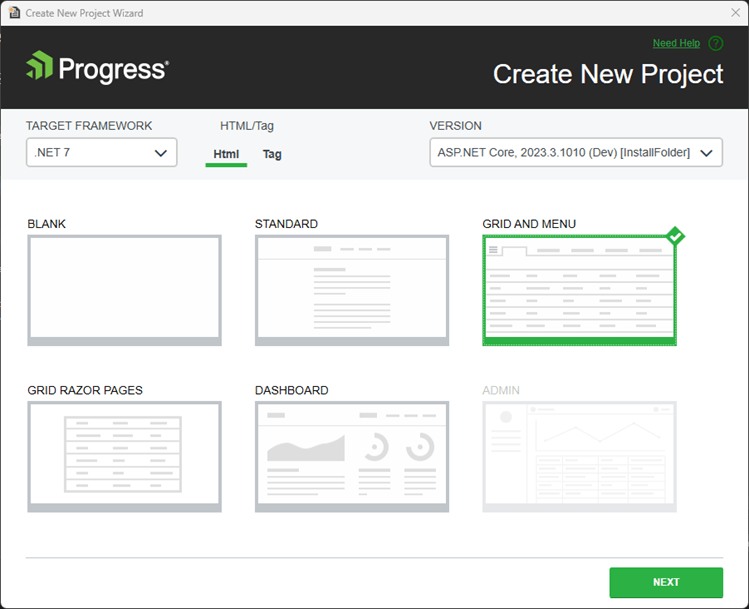
選擇更適合您項目的技術:HTML 或 Tag Helpers,對于這個例子,我選擇了Grid and Menu模板。
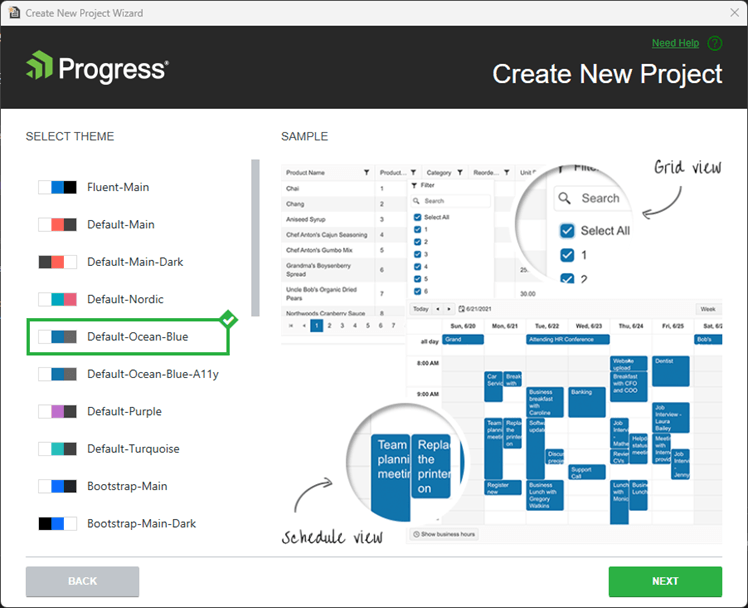
為項目選擇一個主題。
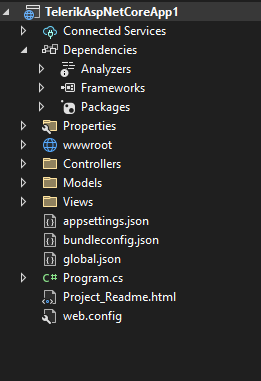
確認下一個屏幕,項目看起來像這樣:
網格上下文菜單
Grid組件中的ContextMenu選項公開了許多復雜的特性,使開發人員能夠更有效、更直觀地與網格材料進行交互。
下面是一些網格的ContextMenu特性和功能的描述:
1. Header上下文菜單
排序:在標題上下文菜單中,用戶可以直接從上下文菜單中對網格列進行排序,從而改善用戶體驗。
導出:它支持將網格數據導出為多種格式,如PDF、Excel和其他格式,允許數據共享和報告。
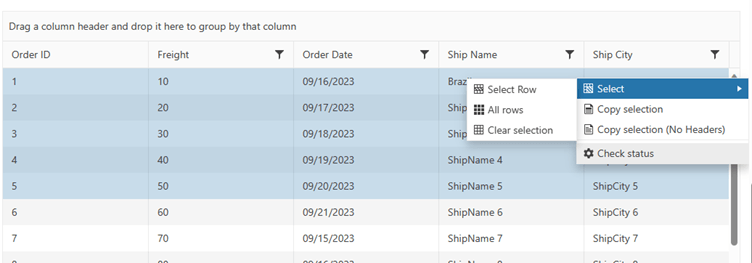
2. Body上下文菜單
選擇:此功能允許您在網格中選擇單個行或單元格。
編輯:現在可以直接編輯網格內容,簡化了數據更新的用戶交互。
復制選擇:用戶可以復制選定的單元格或行,以便在其他地方更容易地使用數據。
不帶headers的復制選擇:它允許您在不帶標頭的情況下復制所選數據,從而在數據使用方面提供更大的靈活性。
重新排序行:重新排序工具允許用戶根據他們的選擇或需要重新排列行。
3. 數據驅動的自定義操作
條件操作:開發人員可以設置上下文菜單,根據網格中的數據顯示不同的選項。例如,可以根據行或單元格中的值顯示或隱藏特定的菜單選項。
動態菜單選項:上下文菜單的選項可以動態調整,允許對網格數據做出更靈敏和智能的反應。
4. 可擴展性
自定義菜單項:開發人員可以添加觸發特定操作的自定義菜單項,根據項目需求擴展網格的功能。
代碼是如何工作的?
在GridController上,更改了代碼以返回想要的數據:
1. using Kendo.Mvc.Extensions;
2. using Kendo.Mvc.UI;
3. using Microsoft.AspNetCore.Mvc;
4. using TelerikAspNetCoreApp1.Models;
5.
6. namespace TelerikAspNetCoreApp1.Controllers;
7. public class GridController : Controller
8. {
9. public ActionResult Orders_Read([DataSourceRequest] DataSourceRequest request)
10. {
11. var result = Enumerable.Range(2, 51).Select(i => new OrderViewModel
12. {
13. OrderID = i,
14. Freight = i * 10,
15. OrderDate = new DateTime(2023, 9, 15).AddDays(i % 7),
16. ShipName = "ShipName " + i,
17. ShipCity = "ShipCity " + i
18. });
19.
20. var customRet = result.ToList();
21.
22. customRet.Insert(0, new OrderViewModel
23. {
24. OrderID = 1,
25. Freight = 1 * 10,
26. OrderDate = new DateTime(2023, 9, 15).AddDays(1 % 7),
27. ShipName = "Brazil",
28. ShipCity = "Porto Alegre"
29. });
30.
31.
32. var dsResult = customRet.ToDataSourceResult(request);
33. return Json(dsResult);
34. }
35. }
現在,第一行包含上下文菜單中的選項將監視的特定數據。
在Index.cshtml中,添加了兩個通知:
1. @(Html.Kendo().Notification()
2. .Name("notification")
3. .Position(p => p.Pinned(true).Top(60).Left(30))
4. .AutoHideAfter(3000)
5. )
6.
7. @(Html.Kendo().Notification()
8. .Name("notificationOk")
9. .Position(p => p.Pinned(true).Top(30).Left(30))
10. .AutoHideAfter(2500)
11. )
將ContextMenu方法添加到Grid組件中:
1. @(Html.Kendo().Grid<TelerikAspNetCoreApp1.Models.OrderViewModel>()
2. .Name("grid")
3. .ContextMenu(
添加Head方法和需求的選項:
1. @(Html.Kendo().Grid<TelerikAspNetCoreApp1.Models.OrderViewModel>()
2. .Name("grid")
3. .ContextMenu(menu => menu
4. .Head(head =>
5. {
6. head.Create();
7. head.Separator();
8. head.SortAsc();
9. head.SortDesc();
10. head.Separator();
11. head.ExportPDF().Text("Generate Pdf File").Icon("file");
12. head.ExportExcel();
13. })
在這個示例中,向ExportPDF()添加了一個自定義文本。
在Body方法中添加需要的選項:
1. @(Html.Kendo().Grid<TelerikAspNetCoreApp1.Models.OrderViewModel>()
2. .Name("grid")
3. .ContextMenu(menu => menu
4. .Head(head =>
5. {
6. head.Create();
7. head.Separator();
8. head.SortAsc();
9. head.SortDesc();
10. head.Separator();
11. head.ExportPDF().Text("Generate Pdf File").Icon("file");
12. head.ExportExcel();
13. })
14. .Body(body =>
15. {
16. body.Edit();
17. body.Destroy();
18. body.Separator();
19. body.Select();
20. body.CopySelection();
21. body.CopySelectionNoHeaders();
22. body.Separator();
23. body.ReorderRow();
24. body.Custom("myTool").Text("Check status").Icon("gear");
25.
26. })
27. )
在Body方法上添加了一個自定義命令“Check status”,注意自定義名稱“myTool”。
在Index.cshtml上添加腳本:
1. <script>
2.
3. kendo.ui.grid.commands["myToolCommand"] = kendo.ui.grid.GridCommand.extend({
4. exec: function () {
5.
6. var selectedItems = $("#grid").data("kendoGrid").selectedKeyNames();
7. var actualItems = [];
8.
9. if (selectedItems.length > 0) {
10. selectedItems.forEach(function (key) {
11.
12. var item = grid.dataSource.get(key);
13. if (item.ShipCity == "Porto Alegre") {
14. var popupNotification = $("#notification").data("kendoNotification");
15. popupNotification.show(`This city ’${item.ShipCity}’ is temporary blocked!`, "error")
16. }
17. else {
18. actualItems.push(item);
19. }
20. });
21. }
22. if (actualItems.length > 0) {
23. var popupNotification = $("#notificationOk").data("kendoNotification");
24. popupNotification.show(`’${actualItems.length}’ cities available!`, "info")
25. }
26. }
27. });
28.
29. </script>
通過在網格命令的名稱中添加“command”,名稱“myTool”成為命令:
1. kendo.ui.grid.commands["myToolCommand"] = kendo.ui.grid.GridCommand.extend({
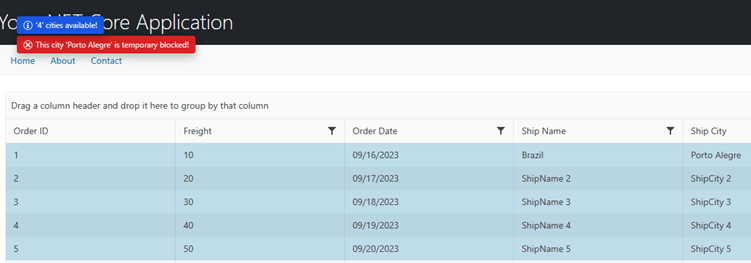
2. ...下圖顯示了工作演示:
現在當點擊“Check status”時,它將執行如下驗證:
1. var selectedItems = $("#grid").data("kendoGrid").selectedKeyNames();
2. var actualItems = [];
3.
4. if (selectedItems.length > 0) {
5. selectedItems.forEach(function (key) {
6.
7. var item = grid.dataSource.get(key);
8. if (item.ShipCity == "Porto Alegre") {
9. var popupNotification = $("#notification").data("kendoNotification");
10. popupNotification.show(`This city ’${item.ShipCity}’ is temporary blocked!`, "error")
11. }
12. else {
13. actualItems.push(item);
14. }
15. });
16. }
17. if (actualItems.length > 0) {
18. var popupNotification = $("#notificationOk").data("kendoNotification");
19. popupNotification.show(`’${actualItems.length}’ cities available!`, "info")
20. }
下面一行接收所有選定的鍵值:
1. var selectedItems = $("#grid").data("kendoGrid").selectedKeyNames();下面一行通過鍵獲取數據記錄:
1. var item = grid.dataSource.get(key);下面這一行分析了模型中的屬性/列ShipCity:
1. if (item.ShipCity == "Porto Alegre")通知將顯示如下內容:
1. if (actualItems.length > 0) {
2. var popupNotification = $("#notificationOk").data("kendoNotification");
3. popupNotification.show(`’${actualItems.length}’ cities available!`, "info")
4. }
你需要做一些額外的配置才能使這個示例正常工作:
添加Model方法并并定義網格的唯一Id,使用.Model(model => model. Id(p => p.**OrderID**)):
1. .DataSource(dataSource => dataSource
2. .Ajax()
3. .Model(model => model.Id(p => p.OrderID))
4. .PageSize(20)
5. .Read(read => read.Action("Orders_Read", "Grid"))
6. )
7. )
在OrderViewModel上,為OrderID定義[Key]:
1. [Key]
2. public int OrderID
3. {
4. get;
5. set;
6. }
下面是Grid組件的完整定義:
1. @(Html.Kendo().Grid<TelerikAspNetCoreApp1.Models.OrderViewModel>()
2. .Name("grid")
3. .ContextMenu(menu => menu
4. .Head(head =>
5. {
6. head.Create();
7. head.Separator();
8. head.SortAsc();
9. head.SortDesc();
10. head.Separator();
11. head.ExportPDF().Text("Generate Pdf File").Icon("file");
12. head.ExportExcel();
13. })
14. .Body(body =>
15. {
16. body.Edit();
17. body.Destroy();
18. body.Separator();
19. body.Select();
20. body.CopySelection();
21. body.CopySelectionNoHeaders();
22. body.Separator();
23. body.ReorderRow();
24. body.Custom("myTool").Text("Check status").Icon("gear");
25.
26. })
27. )
28. .Columns(columns =>
29. {
30. columns.Bound(p => p.OrderID).Filterable(false);
31. columns.Bound(p => p.Freight);
32. columns.Bound(p => p.OrderDate).Format("{0:MM/dd/yyyy}");
33. columns.Bound(p => p.ShipName);
34. columns.Bound(p => p.ShipCity);
35. })
36. .Selectable(selectable => selectable
37. .Mode(GridSelectionMode.Multiple))
38. .Pageable()
39. .Sortable()
40. .Scrollable()
41. .Groupable()
42. .Filterable()
43. .HtmlAttributes(new { style = "height:550px;" })
44. .DataSource(dataSource => dataSource
45. .Ajax()
46. .Model(model => model.Id(p => p.OrderID))
47. .PageSize(20)
48. .Read(read => read.Action("Orders_Read", "Grid"))
49. )
50. )![[unity] c# 擴展知識點其一 【個人復習筆記/有不足之處歡迎斧正/侵刪】](http://pic.xiahunao.cn/[unity] c# 擴展知識點其一 【個人復習筆記/有不足之處歡迎斧正/侵刪】)


)


