???Android minigbm框架普法
引言
假設存在這么一個場景,我的GPU的上層實現走的不是標準的Mesa接口,且GPU也沒有提專門配套的gralloc和hwcompoer實現。那么我們的Android要怎么使用到EGL和GLES庫呢,并且此GPU驅動是支持drm實現的,也有video overlay層。這個就是我們這個博客準備或者是探索要解決的。這里無意中發現mingbm + hwcompoer的組合可能解決,這里我就花費一定的時間來分析這個模塊!
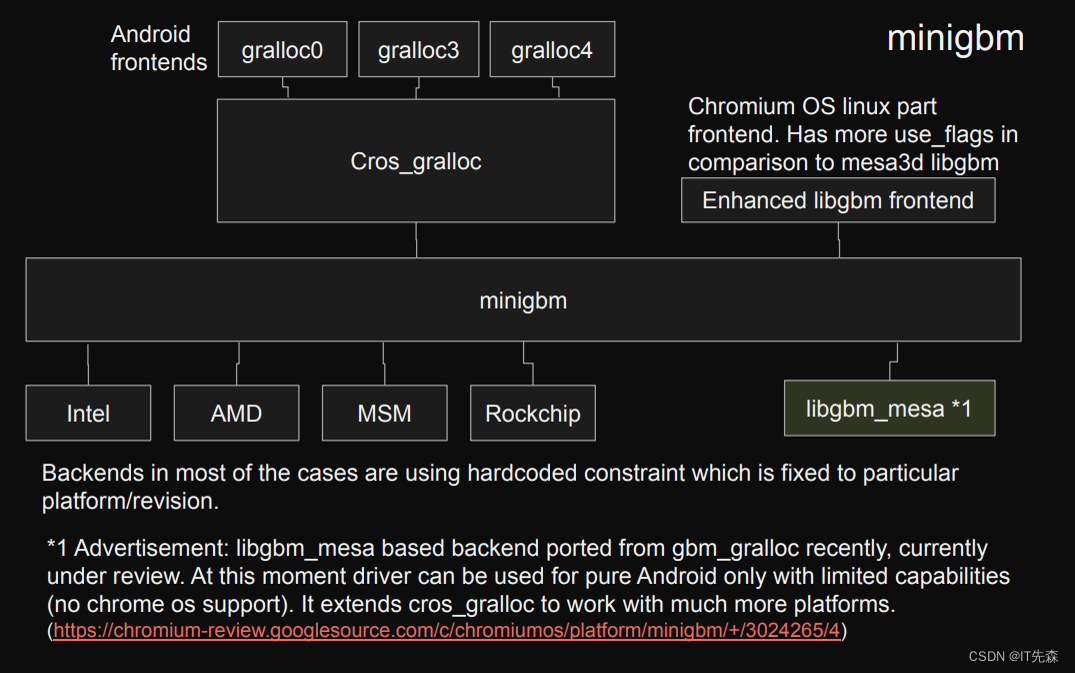
一.minigbm結構
1.1 minigbm目錄結構
minigbm├── amdgpu.c├── Android.bp├── Android.gralloc.mk├── common.mk├── cros_gralloc├── dri.c├── dri.h├── drv.c├── drv.h├── drv_priv.h├── evdi.c├── exynos.c├── gbm.c├── gbm.h├── gbm_helpers.c├── gbm_helpers.h├── gbm.pc├── gbm_priv.h├── helpers_array.c├── helpers_array.h├── helpers.c├── helpers.h├── i915.c├── LICENSE├── Makefile├── marvell.c├── mediatek.c├── meson.c├── METADATA├── MODULE_LICENSE_BSD├── msm.c├── nouveau.c├── OWNERS├── OWNERS.android├── PRESUBMIT.cfg├── presubmit.sh├── radeon.c├── rockchip.c├── synaptics.c├── tegra.c├── udl.c├── util.h├── vc4.c├── vgem.c├── virgl_hw.h├── virtgpu_drm.h└── virtio_gpu.c1 directory, 46 files
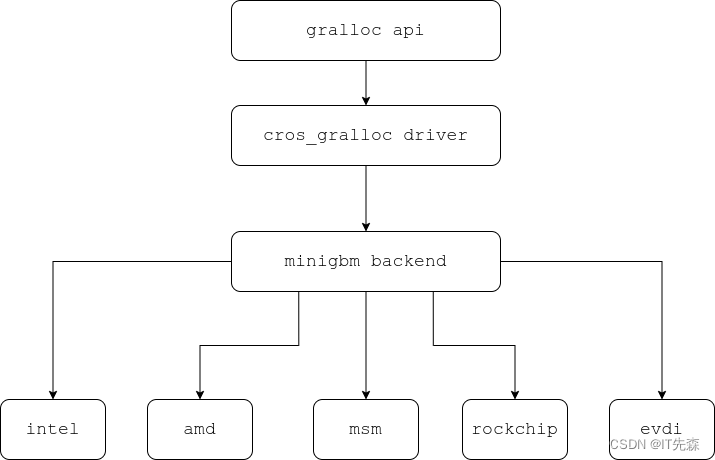
1.2 minigbm框架結構
Minigbm的整個組織結構,可以用下面的框圖來表示!
Generic Android Buffer Allocator - Linaro
二. minigbm源碼分析
minig的核心主要是提供gralloc的HAL實現,但是我看它也提供了私有的HIDL service實現,關于HIDL的實現這個暫時不在我們考慮的范圍之內。我們重點分析minigbm作為gralloc hal的實現的代碼!
注意我這里分析的minigbm的版本如下:
commit aa65a6a67cd41390d4e8a0f87e20d3191db2994d (HEAD, tag: android-11.0.0_r46, tag: android-11.0.0_r43, tag: android-11.0.0_r40, tag: android-11.0.0_r39, tag: android-11.0.0_r38, tag: android-11.0.0_r37, tag: android-11.0.0_r36, tag: android-11.0.0_r35, tag: android-11.0.0_r34, tag: android-11.0.0_r33, tag: android-11.0.0_r32, tag: android-11.0.0_r30, tag: m/android-11.0.0_r37, aosp/android11-qpr3-s1-release, aosp/android11-qpr3-release, aosp/android11-qpr2-release, aosp/android11-qpr1-c-release)
Author: Jason Macnak <natsu@google.com>
Date:   Sat Jul 25 06:02:22 2020 -0700cros_gralloc: map custom drm fourcc back to standard fourccMinigbm uses a custom fourcc DRM_FORMAT_YVU420_ANDROID tospecify a DRM_FORMAT_YVU420 format with the extra Androidspecific alignment requirement. Mapper should map thiscustom code back into the standard one for metadata get().Bug: b/146515640Test: launch_cvd, open youtube video, observe no hwc warningChange-Id: Id9ac2bb233837b6c7aa093eddbea81da0bdf3c1b
2.1 minigbm注冊gralloc hal
肯定mingbm作為gralloc的hal的實現,我們肯定得重點分析了。地球人都知道HAL的實現的入口HAL_MODULE_INFO_SYM,我們來看看minigbm是怎么實現的:
//cros_gralloc/gralloc0/gralloc0.cc
struct gralloc0_module {gralloc_module_t base;std::unique_ptr<alloc_device_t> alloc;std::unique_ptr<cros_gralloc_driver> driver;bool initialized;std::mutex initialization_mutex;
};// clang-format off
static struct hw_module_methods_t gralloc0_module_methods = { .open = gralloc0_open };
// clang-format onstruct gralloc0_module HAL_MODULE_INFO_SYM = {.base ={.common ={.tag = HARDWARE_MODULE_TAG,.module_api_version = GRALLOC_MODULE_API_VERSION_0_3,.hal_api_version = 0,.id = GRALLOC_HARDWARE_MODULE_ID,.name = "CrOS Gralloc",.author = "Chrome OS",.methods = &gralloc0_module_methods,},/*** @brief * 當其他進程分配的GraphicBuffer傳遞到當前進程后,需要通過該方法映射到當前進程,* 為后續的lock做好準備*/.registerBuffer = gralloc0_register_buffer,/*** @brief * 取消GraphicBuffer在當前進程的映射,后續不能調用lock了*/.unregisterBuffer = gralloc0_unregister_buffer,/*** @brief * 調用lock后,才能訪問圖形buffer,假如usage指定了GRALLOC_USAGE_SW_* flag,* vaddr將被填充成圖形Buffer在虛擬內存中的地址*/.lock = gralloc0_lock,.unlock = gralloc0_unlock,.perform = gralloc0_perform,.lock_ycbcr = gralloc0_lock_ycbcr,.lockAsync = gralloc0_lock_async,.unlockAsync = gralloc0_unlock_async,.lockAsync_ycbcr = gralloc0_lock_async_ycbcr,.validateBufferSize = NULL,.getTransportSize = NULL,},/*** @brief * 是不是這個地方感覺有點奇怪,咋alloc的實現為null* 好戲在后頭*/.alloc = nullptr,.driver = nullptr,.initialized = false,
};
2.2 minigbm下HAL hw_module open函數實現
沒有啥文字可以描述的,我們直接上源碼!
static int gralloc0_open(const struct hw_module_t *mod, const char *name, struct hw_device_t **dev)
{auto const_module = reinterpret_cast<const struct gralloc0_module *>(mod);auto module = const_cast<struct gralloc0_module *>(const_module);if (module->initialized) {*dev = &module->alloc->common;return 0;}/*** @brief Construct a new if object* libhardware/include/hardware/gralloc.h* #define GRALLOC_HARDWARE_GPU0 "gpu0"*/if (strcmp(name, GRALLOC_HARDWARE_GPU0)) {drv_log("Incorrect device name - %s.\n", name);return -EINVAL;}if (gralloc0_init(module, true))return -ENODEV;*dev = &module->alloc->common;return 0;
}
我們接著看下核心的函數gralloc0_init的實現,不能停,一口氣炫下去:
//cros_gralloc/cros_gralloc_driver.h
class cros_gralloc_driver
{public:cros_gralloc_driver();~cros_gralloc_driver();int32_t init();bool is_supported(const struct cros_gralloc_buffer_descriptor *descriptor);int32_t allocate(const struct cros_gralloc_buffer_descriptor *descriptor,buffer_handle_t *out_handle);int32_t retain(buffer_handle_t handle);int32_t release(buffer_handle_t handle);int32_t lock(buffer_handle_t handle, int32_t acquire_fence, bool close_acquire_fence,const struct rectangle *rect, uint32_t map_flags,uint8_t *addr[DRV_MAX_PLANES]);int32_t unlock(buffer_handle_t handle, int32_t *release_fence);int32_t invalidate(buffer_handle_t handle);int32_t flush(buffer_handle_t handle, int32_t *release_fence);int32_t get_backing_store(buffer_handle_t handle, uint64_t *out_store);int32_t resource_info(buffer_handle_t handle, uint32_t strides[DRV_MAX_PLANES],uint32_t offsets[DRV_MAX_PLANES]);int32_t get_reserved_region(buffer_handle_t handle, void **reserved_region_addr,uint64_t *reserved_region_size);uint32_t get_resolved_drm_format(uint32_t drm_format, uint64_t usage);void for_each_handle(const std::function<void(cros_gralloc_handle_t)> &function);private:cros_gralloc_driver(cros_gralloc_driver const &);cros_gralloc_driver operator=(cros_gralloc_driver const &);cros_gralloc_buffer *get_buffer(cros_gralloc_handle_t hnd);struct driver *drv_;std::mutex mutex_;std::unordered_map<uint32_t, cros_gralloc_buffer *> buffers_;std::unordered_map<cros_gralloc_handle_t, std::pair<cros_gralloc_buffer *, int32_t>>handles_;
};//cros_gralloc/gralloc0/gralloc0.cc
static int gralloc0_init(struct gralloc0_module *mod, bool initialize_alloc)
{std::lock_guard<std::mutex> lock(mod->initialization_mutex);if (mod->initialized)return 0;mod->driver = std::make_unique<cros_gralloc_driver>();/*** @brief * 根據vendor,初始化不同驅動模型,實現在cros_gralloc_driver.cc里面* 如果要擴展的話,就得實現phy自己的邏輯*/if (mod->driver->init()) {drv_log("Failed to initialize driver.\n");return -ENODEV;}if (initialize_alloc) {mod->alloc = std::make_unique<alloc_device_t>();/*** @brief * alloc在此處被賦值**/mod->alloc->alloc = gralloc0_alloc;mod->alloc->free = gralloc0_free;mod->alloc->common.tag = HARDWARE_DEVICE_TAG;mod->alloc->common.version = 0;mod->alloc->common.module = (hw_module_t *)mod;mod->alloc->common.close = gralloc0_close;}mod->initialized = true;return 0;
}
2.3 cros_gralloc_driver的init實現
我們接著看下cros_gralloc_driver的init是如何被初始的:
//cros_gralloc/cros_gralloc_driver.cc
int32_t cros_gralloc_driver::init()
{/** Create a driver from rendernode while filtering out* the specified undesired driver.** TODO(gsingh): Enable render nodes on udl/evdi.*/int fd;drmVersionPtr version;char const *str = "%s/renderD%d";const char *undesired[2] = { "vgem", nullptr };uint32_t num_nodes = 63;uint32_t min_node = 128;uint32_t max_node = (min_node + num_nodes);for (uint32_t i = 0; i < ARRAY_SIZE(undesired); i++) {for (uint32_t j = min_node; j < max_node; j++) {char *node;/*** @brief * 打開/dev/dri/renderD0-renderD128*/if (asprintf(&node, str, DRM_DIR_NAME, j) < 0)continue;fd = open(node, O_RDWR, 0);free(node);if (fd < 0)continue;version = drmGetVersion(fd);if (!version) {close(fd);continue;}if (undesired[i] && !strcmp(version->name, undesired[i])) {close(fd);drmFreeVersion(version);continue;}drmFreeVersion(version);/*** @brief * 加載不同的driver*/drv_ = drv_create(fd);if (drv_)return 0;close(fd);}}return -ENODEV;
}
我們接著玩下看drv_create的實現,這個是根絕實際驅動情況,決定backend后端:
//drv.c
struct driver *drv_create(int fd)
{struct driver *drv;int ret;drv = (struct driver *)calloc(1, sizeof(*drv));if (!drv)return NULL;drv->fd = fd;/*** @brief * 獲取不同的后端,譬如i915,amdgpu,msm等* 或者闊以構建一個通用的backend,譬如xxx后端,但是是根據drm的驅動名稱進行匹配的,* 所以那怕是通用的,也需要進行相關的擴展*/drv->backend = drv_get_backend(fd);if (!drv->backend)goto free_driver;if (pthread_mutex_init(&drv->driver_lock, NULL))goto free_driver;//drmHashCreate這個API不知道是用來干啥的drv->buffer_table = drmHashCreate();if (!drv->buffer_table)goto free_lock;drv->mappings = drv_array_init(sizeof(struct mapping));if (!drv->mappings)goto free_buffer_table;drv->combos = drv_array_init(sizeof(struct combination));if (!drv->combos)goto free_mappings;if (drv->backend->init) {ret = drv->backend->init(drv);if (ret) {drv_array_destroy(drv->combos);goto free_mappings;}}return drv;free_mappings:drv_array_destroy(drv->mappings);
free_buffer_table:drmHashDestroy(drv->buffer_table);
free_lock:pthread_mutex_destroy(&drv->driver_lock);
free_driver:free(drv);return NULL;
}
2.4 minigbm的backend以及backend的初始化
這里的backend,我把它理解它為minigbm對各種gpu抽象出來的一種能力的統稱。因為前端就是gralloc hal的接口定義,都是一致的,然后后端backend抽象出來,然后根據實際的情況,調用具體的gpu用戶層接口實現!我們來看backend是如何抽象和初始化的。
#ifdef DRV_AMDGPU
extern const struct backend backend_amdgpu;
#endif
/*** @brief * 可擴展虛擬顯示接口(EVDI)*/
extern const struct backend backend_evdi;
#ifdef DRV_EXYNOS
extern const struct backend backend_exynos;
#endif
#ifdef DRV_I915
extern const struct backend backend_i915;
#endif
#ifdef DRV_MARVELL
extern const struct backend backend_marvell;
#endif
#ifdef DRV_MEDIATEK
extern const struct backend backend_mediatek;
#endif
#ifdef DRV_MESON
extern const struct backend backend_meson;
#endif
#ifdef DRV_MSM
extern const struct backend backend_msm;
#endif
extern const struct backend backend_nouveau;
#ifdef DRV_RADEON
extern const struct backend backend_radeon;
#endif
#ifdef DRV_ROCKCHIP
extern const struct backend backend_rockchip;
#endif
#ifdef DRV_SYNAPTICS
extern const struct backend backend_synaptics;
#endif
#ifdef DRV_TEGRA
extern const struct backend backend_tegra;
#endif
extern const struct backend backend_udl;
#ifdef DRV_VC4
extern const struct backend backend_vc4;
#endif
extern const struct backend backend_vgem;
extern const struct backend backend_virtio_gpu;static const struct backend *drv_get_backend(int fd)
{drmVersionPtr drm_version;unsigned int i;drm_version = drmGetVersion(fd);if (!drm_version)return NULL;/*** @brief * 后面如果要擴展,則是在backend_list中* 添加backend_phy*/const struct backend *backend_list[] = {
#ifdef DRV_AMDGPU&backend_amdgpu,
#endif&backend_evdi,
#ifdef DRV_EXYNOS&backend_exynos,
#endif
#ifdef DRV_I915&backend_i915,
#endif
#ifdef DRV_MARVELL&backend_marvell,
#endif
#ifdef DRV_MEDIATEK&backend_mediatek,
#endif
#ifdef DRV_MESON&backend_meson,
#endif
#ifdef DRV_MSM&backend_msm,
#endif&backend_nouveau,
#ifdef DRV_RADEON&backend_radeon,
#endif
#ifdef DRV_ROCKCHIP&backend_rockchip,
#endif
#ifdef DRV_SYNAPTICS&backend_synaptics,
#endif
#ifdef DRV_TEGRA&backend_tegra,
#endif&backend_udl,
#ifdef DRV_VC4&backend_vc4,
#endif&backend_vgem,	    &backend_virtio_gpu,};for (i = 0; i < ARRAY_SIZE(backend_list); i++) {const struct backend *b = backend_list[i];// Exactly one of the main create functions must be defined.assert((b->bo_create != NULL) ^ (b->bo_create_from_metadata != NULL));// Either both or neither must be implemented.assert((b->bo_compute_metadata != NULL) == (b->bo_create_from_metadata != NULL));// Both can't be defined, but it's okay for neither to be (i.e. only bo_create).assert((b->bo_create_with_modifiers == NULL) ||(b->bo_create_from_metadata == NULL));if (!strcmp(drm_version->name, b->name)) {drmFreeVersion(drm_version);return b;}}drmFreeVersion(drm_version);return NULL;
}
這里我們可以看到這里抽象出來了幾種典型的GPU的backend,然后再根據前面獲取到的drm的驅動名稱進行匹配,匹配到了則返回合適的backend,沒有則返回NULL。這里我們以evdi為例子來進行相關的分析。我么來看evdi backend的init。
//helpers.c
int drv_modify_linear_combinations(struct driver *drv)
{/** All current drivers can scanout linear XRGB8888/ARGB8888 as a primary* plane and as a cursor.*/drv_modify_combination(drv, DRM_FORMAT_XRGB8888, &LINEAR_METADATA,BO_USE_CURSOR | BO_USE_SCANOUT);drv_modify_combination(drv, DRM_FORMAT_ARGB8888, &LINEAR_METADATA,BO_USE_CURSOR | BO_USE_SCANOUT);return 0;
}static const uint32_t render_target_formats[] = { DRM_FORMAT_ARGB8888, DRM_FORMAT_XRGB8888 };static int evdi_init(struct driver *drv)
{/*** @brief Construct a new drv add combinations object* add default  render_target_formats*/drv_add_combinations(drv, render_target_formats, ARRAY_SIZE(render_target_formats),&LINEAR_METADATA, BO_USE_RENDER_MASK);return drv_modify_linear_combinations(drv);
}const struct backend backend_evdi = {.name = "evdi",.init = evdi_init,.bo_create = drv_dumb_bo_create,.bo_destroy = drv_dumb_bo_destroy,.bo_import = drv_prime_bo_import,.bo_map = drv_dumb_bo_map,.bo_unmap = drv_bo_munmap,
};
到這里gralloc hal也注冊OK了,cross_gralloc_driver和backend也構建初始化OK了,后面就是上層通過grallc api來進行相關調用了。我們接著繼續往下看。
2.5 minigbm的graloc hal下alloc的實現
Android通過alloc開構建GraphicBuffer,我們來看看minigbm是如何實現的。
static int gralloc0_alloc(alloc_device_t *dev, int w, int h, int format, int usage,buffer_handle_t *handle, int *stride)
{int32_t ret;bool supported;struct cros_gralloc_buffer_descriptor descriptor;auto mod = (struct gralloc0_module const *)dev->common.module;descriptor.width = w;descriptor.height = h;descriptor.droid_format = format;descriptor.droid_usage = usage;descriptor.drm_format = cros_gralloc_convert_format(format);descriptor.use_flags = gralloc0_convert_usage(usage);descriptor.reserved_region_size = 0;/*** @brief * judge driver is support descriptor or not*/supported = mod->driver->is_supported(&descriptor);if (!supported && (usage & GRALLOC_USAGE_HW_COMPOSER)) {descriptor.use_flags &= ~BO_USE_SCANOUT;supported = mod->driver->is_supported(&descriptor);}if (!supported && (usage & GRALLOC_USAGE_HW_VIDEO_ENCODER) &&!gralloc0_droid_yuv_format(format)) {// Unmask BO_USE_HW_VIDEO_ENCODER in the case of non-yuv formats// because they are not input to a hw encoder but used as an// intermediate format (e.g. camera).descriptor.use_flags &= ~BO_USE_HW_VIDEO_ENCODER;supported = mod->driver->is_supported(&descriptor);}if (!supported) {drv_log("Unsupported combination -- HAL format: %u, HAL usage: %u, ""drv_format: %4.4s, use_flags: %llu\n",format, usage, reinterpret_cast<char *>(&descriptor.drm_format),static_cast<unsigned long long>(descriptor.use_flags));return -EINVAL;}ret = mod->driver->allocate(&descriptor, handle);if (ret)return ret;auto hnd = cros_gralloc_convert_handle(*handle);*stride = hnd->pixel_stride;return 0;
}
這塊我們先從整體概括下該部分的核心邏輯:
- 判斷是否支持申請buffer的format
- 如支持則通過driver的allocate申請buffer
- 然后將申請的buffer返回
我們接著往下看driver是如何allocate的:
//cros_gralloc/cros_gralloc_driver.cc
int32_t cros_gralloc_driver::allocate(const struct cros_gralloc_buffer_descriptor *descriptor,buffer_handle_t *out_handle)
{uint32_t id;size_t num_planes;size_t num_fds;size_t num_ints;size_t num_bytes;uint32_t resolved_format;uint32_t bytes_per_pixel;uint64_t use_flags;int32_t reserved_region_fd;char *name;struct bo *bo;struct cros_gralloc_handle *hnd;resolved_format = drv_resolve_format(drv_, descriptor->drm_format, descriptor->use_flags);use_flags = descriptor->use_flags;/** TODO(b/79682290): ARC++ assumes NV12 is always linear and doesn't* send modifiers across Wayland protocol, so we or in the* BO_USE_LINEAR flag here. We need to fix ARC++ to allocate and work* with tiled buffers.*/if (resolved_format == DRM_FORMAT_NV12)use_flags |= BO_USE_LINEAR;/** This unmask is a backup in the case DRM_FORMAT_FLEX_IMPLEMENTATION_DEFINED is resolved* to non-YUV formats.*/if (descriptor->drm_format == DRM_FORMAT_FLEX_IMPLEMENTATION_DEFINED &&(resolved_format == DRM_FORMAT_XBGR8888 || resolved_format == DRM_FORMAT_ABGR8888)) {use_flags &= ~BO_USE_HW_VIDEO_ENCODER;}/*** @brief * construct struct bo*/bo = drv_bo_create(drv_, descriptor->width, descriptor->height, resolved_format, use_flags);if (!bo) {drv_log("Failed to create bo.\n");return -ENOMEM;}/** If there is a desire for more than one kernel buffer, this can be* removed once the ArcCodec and Wayland service have the ability to* send more than one fd. GL/Vulkan drivers may also have to modified.*/if (drv_num_buffers_per_bo(bo) != 1) {drv_bo_destroy(bo);drv_log("Can only support one buffer per bo.\n");return -EINVAL;}num_planes = drv_bo_get_num_planes(bo);num_fds = num_planes;if (descriptor->reserved_region_size > 0) {reserved_region_fd =create_reserved_region(descriptor->name, descriptor->reserved_region_size);if (reserved_region_fd < 0) {drv_bo_destroy(bo);return reserved_region_fd;}num_fds += 1;} else {reserved_region_fd = -1;}num_bytes = sizeof(struct cros_gralloc_handle);num_bytes += (descriptor->name.size() + 1);/** Ensure that the total number of bytes is a multiple of sizeof(int) as* native_handle_clone() copies data based on hnd->base.numInts.*/num_bytes = ALIGN(num_bytes, sizeof(int));num_ints = num_bytes - sizeof(native_handle_t) - num_fds;/** malloc is used as handles are ultimetly destroyed via free in* native_handle_delete().*/hnd = static_cast<struct cros_gralloc_handle *>(malloc(num_bytes));hnd->base.version = sizeof(hnd->base);hnd->base.numFds = num_fds;hnd->base.numInts = num_ints;hnd->num_planes = num_planes;for (size_t plane = 0; plane < num_planes; plane++) {/*** @brief * use drmPrimeHandleToFD get fd, so can binder  transation* 將handle轉換fd,方便后續通過binder跨進程傳輸fd*/hnd->fds[plane] = drv_bo_get_plane_fd(bo, plane);hnd->strides[plane] = drv_bo_get_plane_stride(bo, plane);hnd->offsets[plane] = drv_bo_get_plane_offset(bo, plane);hnd->sizes[plane] = drv_bo_get_plane_size(bo, plane);}hnd->fds[hnd->num_planes] = reserved_region_fd;hnd->reserved_region_size = descriptor->reserved_region_size;static std::atomic<uint32_t> next_buffer_id{ 1 };hnd->id = next_buffer_id++;hnd->width = drv_bo_get_width(bo);hnd->height = drv_bo_get_height(bo);hnd->format = drv_bo_get_format(bo);hnd->format_modifier = drv_bo_get_plane_format_modifier(bo, 0);hnd->use_flags = descriptor->use_flags;bytes_per_pixel = drv_bytes_per_pixel_from_format(hnd->format, 0);hnd->pixel_stride = DIV_ROUND_UP(hnd->strides[0], bytes_per_pixel);hnd->magic = cros_gralloc_magic;hnd->droid_format = descriptor->droid_format;hnd->usage = descriptor->droid_usage;hnd->total_size = descriptor->reserved_region_size + bo->meta.total_size;hnd->name_offset = handle_data_size;name = (char *)(&hnd->base.data[hnd->name_offset]);snprintf(name, descriptor->name.size() + 1, "%s", descriptor->name.c_str());id = drv_bo_get_plane_handle(bo, 0).u32;/*** @brief * new class cros_gralloc_buffer*/auto buffer = new cros_gralloc_buffer(id, bo, hnd, hnd->fds[hnd->num_planes],hnd->reserved_region_size);std::lock_guard<std::mutex> lock(mutex_);buffers_.emplace(id, buffer);handles_.emplace(hnd, std::make_pair(buffer, 1));/*** @brief * return buffer_handle_t*/*out_handle = reinterpret_cast<buffer_handle_t>(hnd);return 0;
}
代碼量比較多,但是我們是有原則的,不能啥都啃,不然咋下嘴不是。上面的代碼核心邏輯主要為:
- 構建struct bo對象
- 然后通過博對象,填充cros_gralloc_handle
- 然后繼續將前面構建出來的相關對象填充cros_gralloc_buffer
- 然后將buffer和handle以一定的結構保存
我們對前面的分開展開,繼續分析,先看drv_bo_create的實現:
//drv.c
struct bo *drv_bo_create(struct driver *drv, uint32_t width, uint32_t height, uint32_t format,uint64_t use_flags)
{int ret;size_t plane;struct bo *bo;bool is_test_alloc;is_test_alloc = use_flags & BO_USE_TEST_ALLOC;use_flags &= ~BO_USE_TEST_ALLOC;/*** @brief * new struct bo*/bo = drv_bo_new(drv, width, height, format, use_flags, is_test_alloc);if (!bo)return NULL;ret = -EINVAL;if (drv->backend->bo_compute_metadata) {ret = drv->backend->bo_compute_metadata(bo, width, height, format, use_flags, NULL,0);if (!is_test_alloc && ret == 0)ret = drv->backend->bo_create_from_metadata(bo);} else if (!is_test_alloc) {/*** @brief * use backend bo_create*/ret = drv->backend->bo_create(bo, width, height, format, use_flags);}if (ret) {free(bo);return NULL;}pthread_mutex_lock(&drv->driver_lock);for (plane = 0; plane < bo->meta.num_planes; plane++) {if (plane > 0)assert(bo->meta.offsets[plane] >= bo->meta.offsets[plane - 1]);drv_increment_reference_count(drv, bo, plane);}pthread_mutex_unlock(&drv->driver_lock);return bo;
}
上面代碼的核心邏輯主要是通過backend的bo_create函數繼續填充struct bo,戰斗還沒有完,我們接著繼續往下看:
bo_createdrv_dumb_bo_create()drv_dumb_bo_create_ex()// helpers.c
int drv_dumb_bo_create_ex(struct bo *bo, uint32_t width, uint32_t height, uint32_t format,uint64_t use_flags, uint64_t quirks)
{int ret;size_t plane;uint32_t aligned_width, aligned_height;struct drm_mode_create_dumb create_dumb;aligned_width = width;aligned_height = height;switch (format) {case DRM_FORMAT_R16:/* HAL_PIXEL_FORMAT_Y16 requires that the buffer's width be 16 pixel* aligned. See hardware/interfaces/graphics/common/1.0/types.hal. */aligned_width = ALIGN(width, 16);break;case DRM_FORMAT_YVU420_ANDROID:/* HAL_PIXEL_FORMAT_YV12 requires that the buffer's height not* be aligned. Update 'height' so that drv_bo_from_format below* uses the non-aligned height. */height = bo->meta.height;/* Align width to 32 pixels, so chroma strides are 16 bytes as* Android requires. */aligned_width = ALIGN(width, 32);/* Adjust the height to include room for chroma planes. */aligned_height = 3 * DIV_ROUND_UP(height, 2);break;case DRM_FORMAT_YVU420:case DRM_FORMAT_NV12:case DRM_FORMAT_NV21:/* Adjust the height to include room for chroma planes */aligned_height = 3 * DIV_ROUND_UP(height, 2);break;default:break;}memset(&create_dumb, 0, sizeof(create_dumb));if (quirks & BO_QUIRK_DUMB32BPP) {aligned_width =DIV_ROUND_UP(aligned_width * layout_from_format(format)->bytes_per_pixel[0], 4);create_dumb.bpp = 32;} else {create_dumb.bpp = layout_from_format(format)->bytes_per_pixel[0] * 8;}create_dumb.width = aligned_width;create_dumb.height = aligned_height;create_dumb.flags = 0;ret = drmIoctl(bo->drv->fd, DRM_IOCTL_MODE_CREATE_DUMB, &create_dumb);if (ret) {drv_log("DRM_IOCTL_MODE_CREATE_DUMB failed (%d, %d)\n", bo->drv->fd, errno);return -errno;}drv_bo_from_format(bo, create_dumb.pitch, height, format);/*** @brief * store obj_gem handle*/for (plane = 0; plane < bo->meta.num_planes; plane++)bo->handles[plane].u32 = create_dumb.handle;bo->meta.total_size = create_dumb.size;return 0;
}
對于libdrm比較熟悉的小伙伴來說,上面就比較簡單了通過ioctl的DRM_IOCTL_MODE_CREATE_DUMB指令,申請構建GEM buffer。我們知道gem_obj的handle是不同跨進程傳輸的,必須轉換成fd才行,這個是在那個地方執行的呢?
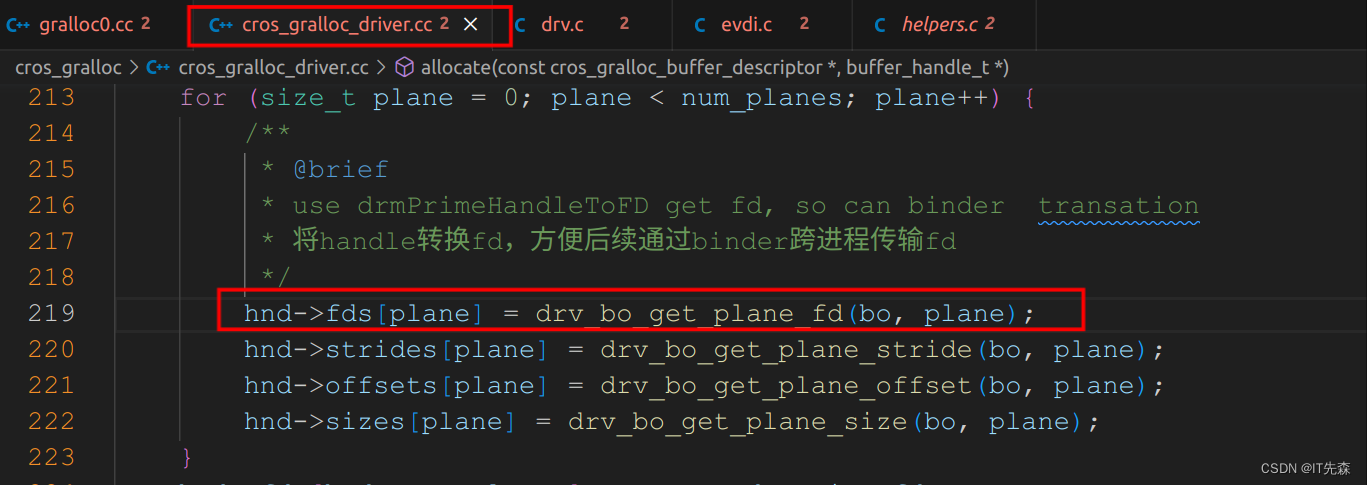
//drv.c
int drv_bo_get_plane_fd(struct bo *bo, size_t plane)
{int ret, fd;assert(plane < bo->meta.num_planes);if (bo->is_test_buffer) {return -EINVAL;}/*** @brief * handle是每個gem context擁有的,不能跨進程傳輸。要跨進程傳輸可以將handle和fd聯系起來。* fd可以跨進程傳輸,android大部分buffer都是通過binder傳遞fd,所以這里調用drmPrimeHandleToFD* 將gem_obj的句柄handle轉換成fd以便于傳輸*/ret = drmPrimeHandleToFD(bo->drv->fd, bo->handles[plane].u32, DRM_CLOEXEC | DRM_RDWR, &fd);// Older DRM implementations blocked DRM_RDWR, but gave a read/write mapping anywaysif (ret)ret = drmPrimeHandleToFD(bo->drv->fd, bo->handles[plane].u32, DRM_CLOEXEC, &fd);return (ret) ? ret : fd;
}
到這里基allocate的流程就基本就結尾了,其核心邏輯用偽代碼表示就是
drmIoctl(bo->drv->fd, DRM_IOCTL_MODE_CREATE_DUMB, &create_dumb)
drmPrimeHandleToFD
2.6 minigbm的graloc hal下import的實現
我們知道當進程通過sf申請到GraphicBuffer之后,并不能立馬使用必須通過import映射到申請的進程才行,這里我們看看底下import是如何實現的。我們通過前面gralloc的hal注冊可知,registerBuffer指向了gralloc0_register_buffer,所以我們只需要看它的實現邏輯即可:
//cros_gralloc/gralloc0/gralloc0.cc
gralloc0_register_buffer()mod->driver->retain(handle)int32_t cros_gralloc_driver::retain(buffer_handle_t handle)
{uint32_t id;std::lock_guard<std::mutex> lock(mutex_);auto hnd = cros_gralloc_convert_handle(handle);if (!hnd) {drv_log("Invalid handle.\n");return -EINVAL;}auto buffer = get_buffer(hnd);if (buffer) {handles_[hnd].second++;buffer->increase_refcount();return 0;}/*** @brief Construct a new if object* https://juejin.cn/post/7184685220158210107* 從fd導入bo* gem都是通過handle去查找一個bo,要通過fd轉換成一個bo,首先要將fd轉換成handle。drm提供了* drmPrimeFDToHandle 接口,獲得fd 對應的handle。* 對應的handle 轉fd函數是drmPrimeHandleToFD*/if (drmPrimeFDToHandle(drv_get_fd(drv_), hnd->fds[0], &id)) {drv_log("drmPrimeFDToHandle failed.\n");return -errno;}/*** @brief * */if (buffers_.count(id)) {buffer = buffers_[id];buffer->increase_refcount();} else {struct bo *bo;struct drv_import_fd_data data;data.format = hnd->format;data.width = hnd->width;data.height = hnd->height;data.use_flags = hnd->use_flags;memcpy(data.fds, hnd->fds, sizeof(data.fds));memcpy(data.strides, hnd->strides, sizeof(data.strides));memcpy(data.offsets, hnd->offsets, sizeof(data.offsets));for (uint32_t plane = 0; plane < DRV_MAX_PLANES; plane++) {data.format_modifiers[plane] = hnd->format_modifier;}/*** @brief * It's not going to be this way.* DRM_IOCTL_PRIME_FD_TO_HANDLE*/bo = drv_bo_import(drv_, &data);if (!bo)return -EFAULT;id = drv_bo_get_plane_handle(bo, 0).u32;buffer = new cros_gralloc_buffer(id, bo, nullptr, hnd->fds[hnd->num_planes],hnd->reserved_region_size);buffers_.emplace(id, buffer);}handles_.emplace(hnd, std::make_pair(buffer, 1));return 0;
}
這塊的邏輯比較簡單,就是取出前面aallocate中構建的buffer,看是否存在存在取出,沒有則繼續后續邏輯。
2.7 minigbm的graloc hal下lock的實現
當我們上層創建出來的GraphicBuffer被創建出來后,在正式被使用前還必須要lock鎖定這塊,才能被正式使用,我們看看mingi是如何實現的。
.lockAsync = gralloc0_lock_async
lock = gralloc0_lockmodule->lockAsyncgralloc0_lock_asyncauto hnd = cros_gralloc_convert_handle(handle)map_flags = gralloc0_convert_map_usage(usage)mod->driver->lock()cros_gralloc_driver::lockhnd = cros_gralloc_convert_handle(handle)auto buffer = get_buffer(hnd)buffer->lock()//cros_gralloc_buffer::lock
這里我們展開來看下cros_gralloc_buffer::lock的實現:
//cros_gralloc/cros_gralloc_buffer.cc
int32_t cros_gralloc_buffer::lock(const struct rectangle *rect, uint32_t map_flags,uint8_t *addr[DRV_MAX_PLANES])
{void *vaddr = nullptr;memset(addr, 0, DRV_MAX_PLANES * sizeof(*addr));/** Gralloc consumers don't support more than one kernel buffer per buffer object yet, so* just use the first kernel buffer.*/if (drv_num_buffers_per_bo(bo_) != 1) {drv_log("Can only support one buffer per bo.\n");return -EINVAL;}if (map_flags) {if (lock_data_[0]) {drv_bo_invalidate(bo_, lock_data_[0]);vaddr = lock_data_[0]->vma->addr;} else {struct rectangle r = *rect;if (!r.width && !r.height && !r.x && !r.y) {/** Android IMapper.hal: An accessRegion of all-zeros means the* entire buffer.*/r.width = drv_bo_get_width(bo_);r.height = drv_bo_get_height(bo_);}vaddr = drv_bo_map(bo_, &r, map_flags, &lock_data_[0], 0);}if (vaddr == MAP_FAILED) {drv_log("Mapping failed.\n");return -EFAULT;}}for (uint32_t plane = 0; plane < num_planes_; plane++)addr[plane] = static_cast<uint8_t *>(vaddr) + drv_bo_get_plane_offset(bo_, plane);lockcount_++;return 0;
}
里面核心的邏輯就是drv_bo_map,我們看看他的邏輯是什么:
.bo_map = drv_dumb_bo_map,
//drv.caddr = bo->drv->backend->bo_map(bo, mapping.vma, plane, map_flags)
//helpers.c
void *drv_dumb_bo_map(struct bo *bo, struct vma *vma, size_t plane, uint32_t map_flags)
{int ret;size_t i;struct drm_mode_map_dumb map_dumb;memset(&map_dumb, 0, sizeof(map_dumb));map_dumb.handle = bo->handles[plane].u32;/*** @brief * map kerne space to user space*/ret = drmIoctl(bo->drv->fd, DRM_IOCTL_MODE_MAP_DUMB, &map_dumb);if (ret) {drv_log("DRM_IOCTL_MODE_MAP_DUMB failed\n");return MAP_FAILED;}for (i = 0; i < bo->meta.num_planes; i++)if (bo->handles[i].u32 == bo->handles[plane].u32)vma->length += bo->meta.sizes[i];return mmap(0, vma->length, drv_get_prot(map_flags), MAP_SHARED, bo->drv->fd,map_dumb.offset);
}
三.總結
通過前面的分析,我們可以知道minigbm將libdrm的操作剝離出Mesa架構,然后調用libdrm的用戶層接口申請dumb buffer,然后封裝成GraphicBuffer給上層使用。關于DRM入門的知識重點推薦何小龍大神的DRM(Direct Rendering Manager)學習簡介。好了今天的博客Android minigbm框架普法就到這里了。總之,青山不改綠水長流先到這里了。如果本博客對你有所幫助,麻煩關注或者點個贊,如果覺得很爛也可以踩一腳!謝謝各位了!!


)


