文章目錄
- 1 分類品牌管理
- 1.1 菜單添加
- 1.2 表結構介紹
- 1.3 頁面制作
- 1.4 品牌列表加載
- 1.4.1 后端接口
- BrandController
- BrandService
- BrandMapper
- BrandMapper.xml
- 1.4.2 前端對接
- brand.js
- categoryBrand.vue
- 1.5 分類數據加載
- 1.6 列表查詢
- 1.6.1 需求說明
- 1.6.2 后端接口
- 需求分析
- CategoryBrandDto
- CategoryBrand
- CategoryBrandController
- CategoryBrandService
- CategoryBrandMapper
- CategoryBrandMapper.xml
- 1.6.3 前端對接
- categoryBrand.js
- categoryBrand.vue
- 1.7 添加功能
- 1.7.1 需求說明
- 1.7.2 頁面制作
- 1.7.3 后端接口
- CategoryBrandController
- CategoryBrandService
- CategoryBrandMapper
- CategoryBrandMapper.xml
- 1.7.4 前端對接
- 實現思路
- categoryBrand.js
- categoryBrand.vue
- 1.8 修改功能
- 1.8.1 需求說明
- 1.8.2 數據回顯
- 1.8.3 提交修改
- 后端接口
- CategoryBrandController
- CategoryBrandService
- CategoryBrandMapper
- CategoryBrandMapper.xml
- 前端對接
- categoryBrand.js
- categoryBrand.vue
- 1.9 刪除功能
- 1.9.1 需求說明
- 1.9.2 后端接口
- CategoryBrandController
- CategoryBrandService
- CategoryBrandMapper
- CategoryBrandMapper.xml
- 1.9.3 前端對接
- categoryBrand.js
- categoryBrand.vue
- 2 商品規格管理
- 2.1 商品規格介紹
- 2.2 菜單添加
- 2.3 表結構介紹
- 2.4 頁面制作
- 2.5 列表查詢
- 2.5.1 后端接口
- ProductSpec
- ProductSpecController
- ProductSpecService
- ProductSpecMapper
- ProductSpecMapper.xml
- 2.5.2 前端對接
- productSpec.js
- productSpec.vue
- 2.6 添加功能
- 2.6.1 需求說明
- 2.6.2 頁面制作
- 2.6.3 后端接口
- ProductSpecController
- ProductSpecService
- ProductSpecMapper
- ProductSpecMapper.xml
- 2.6.4 前端對接
- 實現思路
- productSpec.js
- productSpec.vue
- 2.7 修改功能
- 2.7.1 需求說明
- 2.7.2 數據回顯
- 2.7.4 后端接口
- ProductSpecController
- ProductSpecService
- ProductSpecMapper
- ProductSpecMapper.xml
- 2.7.5 前端對接
- productSpec.js
- productSpec.vue
- 2.8 刪除功能
- 2.8.1 需求說明
- 2.8.2 后端接口
- ProductSpecController
- ProductSpecService
- ProductSpecMapper
- ProductSpecMapper.xml
- 2.8.2 前端對接
- productSpec.js
- productSpec.vue
- 3 商品管理
- 3.1 菜單添加
- 3.2 表結構介紹
- 3.3 頁面制作
- 3.4 列表查詢
- 3.4.1 需求說明
- 3.4.2 后端接口
- 需求分析
- ProductDto
- Product
- ProductController
- ProductService
- ProductMapper
- ProductMapper.xml
- ProductMapper.xml
1 分類品牌管理
分類品牌管理就是將分類的數據和品牌的數據進行關聯,分類數據和品牌數據之間的關系是多對多的關系,因此需要單獨使用一張數據表來存儲該數據。
1.1 菜單添加
首先在系統中分類品牌管理的菜單,具體步驟如下所示:
1、在后臺管理系統中通過系統管理的菜單管理添加分類品牌管理的相關菜單,如下所示:

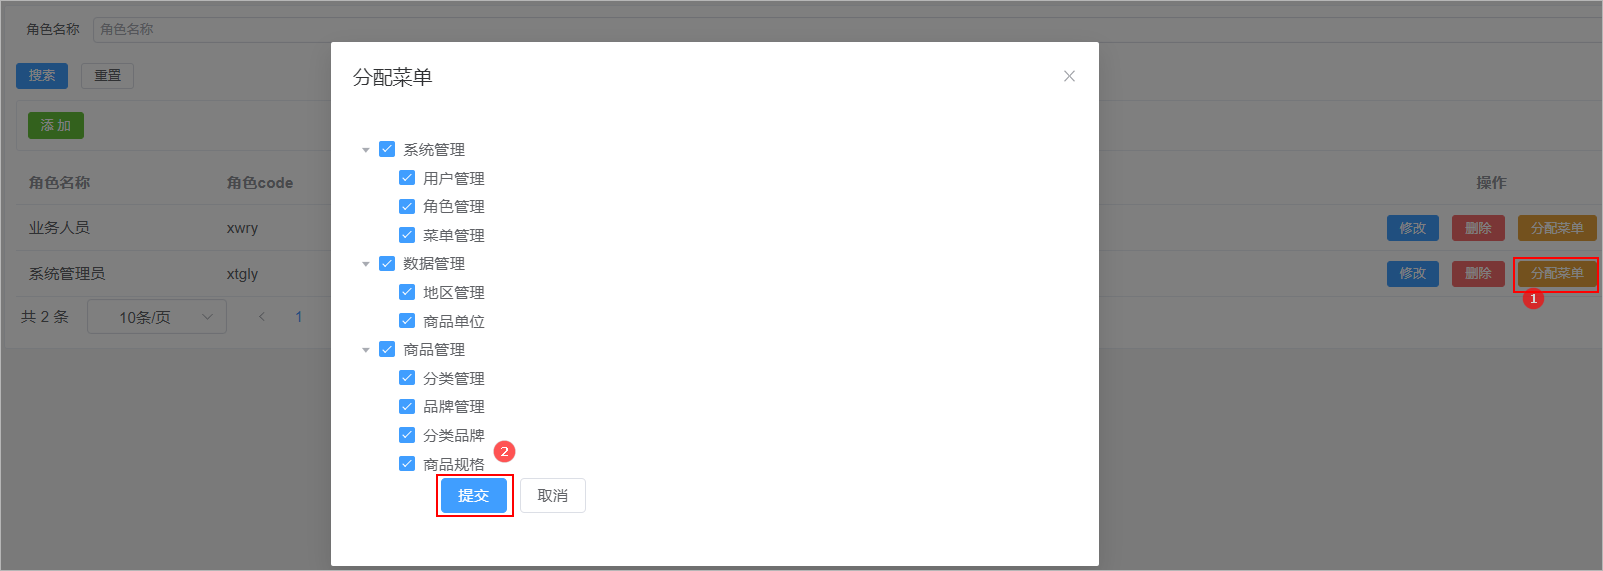
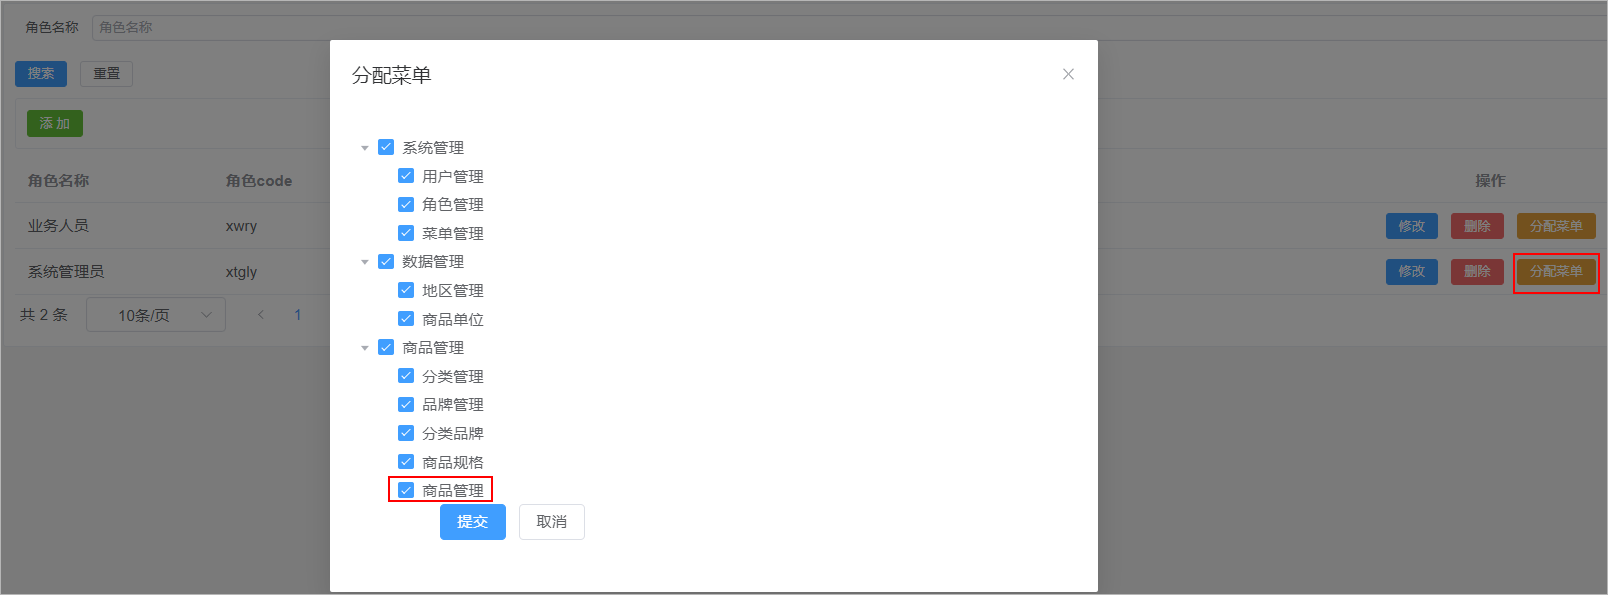
2、給系統管理員角色分配分類品牌管理菜單訪問權限:

3、在前端項目中創建對應的頁面,以及配置對應的異步路由
在src/views/product的文件夾,在該文件夾中加入分類管理頁面文件,如下所示

在src/router/modules文件夾下創建product.js路由文件,文件內容如下所示:
const Layout = () => import('@/layout/index.vue')
const category = () => import('@/views/product/category.vue')
const brand = () => import('@/views/product/brand.vue')
const categoryBrand = () => import('@/views/product/categoryBrand.vue')export default [{path: '/product',component: Layout,name: 'product',meta: {title: '商品管理',},icon: 'Histogram',children: [{path: '/category',name: 'category',component: category,meta: {title: '分類管理',},},{path: '/brand',name: 'brand',component: brand,meta: {title: '品牌管理',},},{path: '/categoryBrand',name: 'categoryBrand',component: categoryBrand,meta: {title: '分類品牌',},},],},
]
1.2 表結構介紹
分類品牌數據所對應的表結構如下所示:
CREATE TABLE `category_brand` (`id` bigint NOT NULL AUTO_INCREMENT COMMENT 'ID',`brand_id` bigint DEFAULT NULL COMMENT '品牌ID',`category_id` bigint DEFAULT NULL COMMENT '分類ID',`create_time` timestamp NOT NULL DEFAULT CURRENT_TIMESTAMP COMMENT '創建時間',`update_time` timestamp NOT NULL DEFAULT CURRENT_TIMESTAMP ON UPDATE CURRENT_TIMESTAMP COMMENT '更新時間',`is_deleted` tinyint NOT NULL DEFAULT '0' COMMENT '刪除標記(0:不可用 1:可用)',PRIMARY KEY (`id`)
) ENGINE=InnoDB AUTO_INCREMENT=3 DEFAULT CHARSET=utf8mb4 COLLATE=utf8mb4_0900_ai_ci COMMENT='分類品牌';
1.3 頁面制作
對比如下頁面結構,使用Element Plus制作出對應的頁面,數據可以暫時使用假數據。
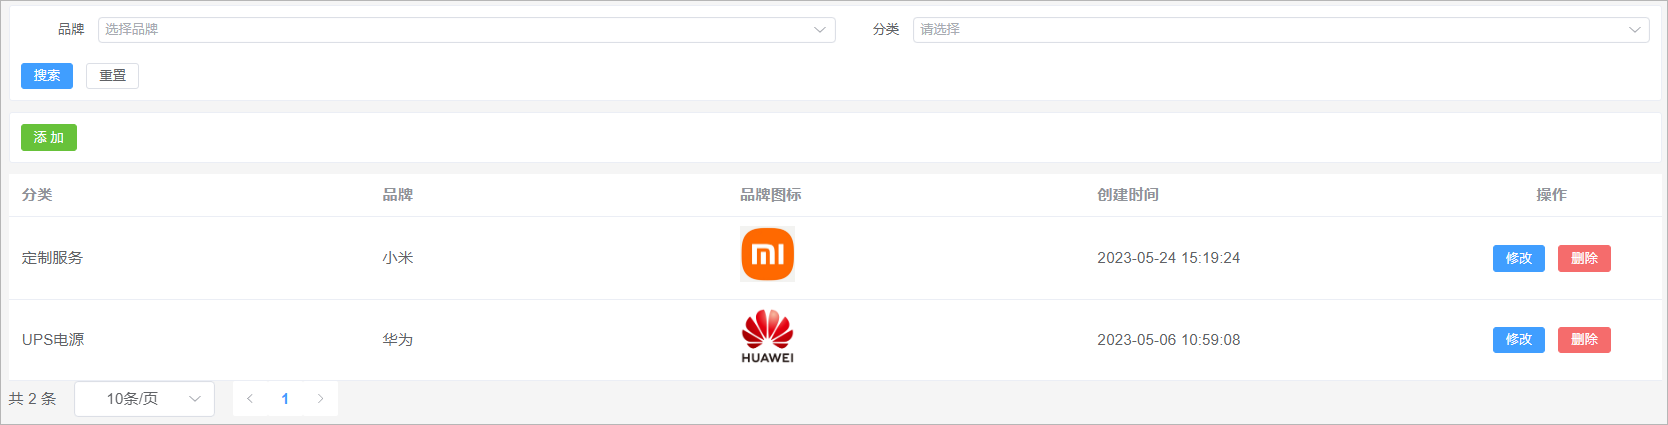
該頁面可以將其分為4部分:
1、搜索表單
2、添加按鈕
2、數據表格
3、分頁組件
代碼實現如下所示:
<template><div class="search-div"><el-form label-width="70px" size="small"><el-row><el-col :span="12"><el-form-item label="品牌"><el-selectclass="m-2"placeholder="選擇品牌"size="small"style="width: 100%"><el-optionv-for="item in brandList":key="item.id":label="item.name":value="item.id"/></el-select></el-form-item></el-col><el-col :span="12"><el-form-item label="分類"><el-cascader:props="categoryProps"style="width: 100%"/></el-form-item></el-col></el-row><el-row style="display:flex"><el-button type="primary" size="small">搜索</el-button><el-button size="small">重置</el-button></el-row></el-form></div><div class="tools-div"><el-button type="success" size="small">添 加</el-button></div><el-table :data="list" style="width: 100%"><el-table-column prop="categoryName" label="分類" /><el-table-column prop="brandName" label="品牌" /><el-table-column prop="logo" label="品牌圖標" #default="scope"><img :src="scope.row.logo" width="50" /></el-table-column><el-table-column prop="createTime" label="創建時間" /><el-table-column label="操作" align="center" width="200" ><el-button type="primary" size="small" >修改</el-button><el-button type="danger" size="small">刪除</el-button></el-table-column></el-table><el-pagination:page-sizes="[10, 20, 50, 100]"layout="total, sizes, prev, pager, next":total="total"/></template><script setup>
import { ref } from 'vue'// ================數據模型定義  start ===============================================// 定義搜索表單數據模型
const brandList = ref([{"id": 2,"createTime": "2023-05-06 09:31:19","name": "華為","logo": "http://139.198.127.41:9000/sph/20230506/華為.png"},{"id": 1,"createTime": "2023-05-06 09:30:27","name": "小米","logo": "http://139.198.127.41:9000/sph/20230506/小米.png"}
])const props = {lazy: true,value: 'id',label: 'name',leaf: 'leaf',lazyLoad(node, resolve) {   // 加載數據的方法const data = [{"id": 643,"createTime": "2023-05-22 15:31:18","name": "玩具樂器","imageUrl": "https://lilishop-oss.oss-cn-beijing.aliyuncs.com/0f423fb60f084b2caade164fae25a9a0.png","parentId": 0,"status": 1,"orderNum": 10,"hasChildren": true,"children": null},{"id": 576,"createTime": "2023-05-22 15:31:13","name": "汽車用品","imageUrl": "https://lilishop-oss.oss-cn-beijing.aliyuncs.com/665dd952b54e4911b99b5e1eba4b164f.png","parentId": 0,"status": 1,"orderNum": 10,"hasChildren": true,"children": null},]resolve(data)  // 返回數據}
};
const categoryProps = ref(props)// 定義表格數據模型
const list = ref([{"id": 2,"createTime": "2023-05-24 15:19:24","brandId": 1,"categoryId": 99,"categoryName": "定制服務","brandName": "小米","logo": "http://139.198.127.41:9000/sph/20230506/小米.png"},{"id": 1,"createTime": "2023-05-06 10:59:08","brandId": 2,"categoryId": 76,"categoryName": "UPS電源\t","brandName": "華為","logo": "http://139.198.127.41:9000/sph/20230506/華為.png"}
])// 分頁條數據模型
const total = ref(0)// =========   數據模型定義 end======================================================================</script><style scoped>
.search-div {margin-bottom: 10px;padding: 10px;border: 1px solid #ebeef5;border-radius: 3px;background-color: #fff;
}
.tools-div {margin: 10px 0;padding: 10px;border: 1px solid #ebeef5;border-radius: 3px;background-color: #fff;
}
</style>
1.4 品牌列表加載
需求:當頁面加載完畢以后需要請求后端接口查詢出系統中所有的品牌數據,將品牌數據在搜索表單的品牌下拉框中進行展示
1.4.1 后端接口
BrandController
表現層代碼實現:
// com.atguigu.spzx.manager.controller
@GetMapping("/findAll")
public Result findAll() {List<Brand> list = brandService.findAll();return Result.build(list , ResultCodeEnum.SUCCESS) ;
}
BrandService
業務層代碼實現:
// com.atguigu.spzx.manager.service.impl;
@Override
public List<Brand> findAll() {return brandMapper.findAll();
}
BrandMapper
持久層代碼實現:
// com.atguigu.spzx.manager.mapper
@Mapper
public interface BrandMapper {public abstract List<Brand> findAll();
}
BrandMapper.xml
在BrandMapper.xml映射文件中添加如下的sql語句:
<select id="findAll" resultMap="brandMap">select <include refid="columns" />from brandwhere is_deleted = 0order by id desc
</select>
1.4.2 前端對接
brand.js
在src/api目錄下添加brand.js文件,內容如下所示:
// 查詢所有的品牌數據
export const FindAllBrand = () => {return request({url: `${api_name}/findAll`,method: 'get',})
}
categoryBrand.vue
修改categoryBrand.vue文件內容,如下所示:
<script setup>
import { ref , onMounted } from 'vue'
import { FindAllBrand } from '@/api/brand.js'// onMounted鉤子函數
onMounted(() => {selectAllBrandList() // 查詢所有的品牌數據
})const selectAllBrandList = async () => {const { data } = await FindAllBrand()brandList.value = data
}</script>
1.5 分類數據加載
需求:當頁面加載完畢以后需要查詢出系統中所對應的所有的一級分類數據,將一級分類數據在搜索表單的分類下拉框中進行展示,當用戶選擇某一個一級分類的時候,需要將該一級分類下所對應的二級分類查詢出來…
分析:根據一個分類的id查詢該分類下所對應的子分類數據該接口已經編寫過了,因此只需要針對前端頁面進行修改接口
代碼實現:
<script setup>
import { FindCategoryByParentId } from '@/api/category.js'const props = {lazy: true,value: 'id',label: 'name',leaf: 'leaf',async lazyLoad(node, resolve) {   // 加載數據的方法if (typeof node.value == 'undefined') node.value = 0const { data } = await FindCategoryByParentId(node.value)data.forEach(function(item) {       //hasChildren判斷是否有子節點item.leaf = !item.hasChildren})resolve(data)  // 返回數據  }
};const categoryProps = ref(props)
</script>
1.6 列表查詢
1.6.1 需求說明
需求說明:
1、如果在搜索表單中選擇了某一個品牌以及分類,那么此時就需要按照品牌id和分類id進行查詢
2、搜索的時候需要進行分頁搜索
1.6.2 后端接口
需求分析
1、前端提交請求參數的時候包含了兩部分的參數:搜索條件參數、分頁參數。搜索條件參數可以通過?拼接到請求路徑后面,分頁參數【當前頁碼、每頁顯示的數據條數】可以讓前端通過請求路徑傳遞過來
2、后端查詢完畢以后需要給前端返回一個分頁對象,分頁對象中就封裝了分頁相關的參數(當前頁數據、總記錄數、總頁數…)
3、前端進行參數傳遞的時候,不一定會傳遞搜索條件,因此sql語句的編寫需要使用到動態sql
CategoryBrandDto
定義一個用來封裝搜索條件的實體類:
// com.atguigu.spzx.model.dto.product
@Data
public class CategoryBrandDto {private Long brandId;private Long categoryId;
}
CategoryBrand
針對當前要操作的數據庫表定義一個與之對應的實體類:
// com.atguigu.spzx.model.entity.product
@Data
public class CategoryBrand extends BaseEntity {private Long brandId;private Long categoryId;// 擴展的屬性用來封裝前端所需要的數據private String categoryName;private String brandName;private String logo;}
CategoryBrandController
表現層代碼實現:
// com.atguigu.spzx.manager.controller
@RestController
@RequestMapping(value = "/admin/product/categoryBrand")
public class CategoryBrandController {@Autowiredprivate CategoryBrandService categoryBrandService ;@GetMapping("{/page}/{limit}")public Result<PageInfo<CategoryBrand>> findByPage(@PathVariable Integer page, @PathVariable Integer limit, CategoryBrandDto CategoryBrandDto) {PageInfo<CategoryBrand> pageInfo = categoryBrandService.findByPage(page, limit, CategoryBrandDto);return Result.build(pageInfo , ResultCodeEnum.SUCCESS) ;}}
CategoryBrandService
業務層代碼實現:
// com.atguigu.spzx.manager.service.impl;
@Service
public class CategoryBrandServiceImpl implements CategoryBrandService {@Autowiredprivate CategoryBrandMapper categoryBrandMapper ;@Overridepublic PageInfo<CategoryBrand> findByPage(Integer page, Integer limit, CategoryBrandDto CategoryBrandDto) {PageHelper.startPage(page , limit) ;List<CategoryBrand> categoryBrandList = categoryBrandMapper.findByPage(CategoryBrandDto) ;return new PageInfo<>(categoryBrandList);}}
CategoryBrandMapper
持久層代碼實現:
// com.atguigu.spzx.manager.mapper;
@Mapper
public interface CategoryBrandMapper {public abstract List<CategoryBrand> findByPage(CategoryBrandDto CategoryBrandDto);
}
CategoryBrandMapper.xml
在CategoryBrandMapper映射文件中添加如下sql語句:
<?xml version="1.0" encoding="UTF-8" ?>
<!DOCTYPE mapper PUBLIC "-//mybatis.org//DTD Mapper 3.0//EN" "http://mybatis.org/dtd/mybatis-3-mapper.dtd">
<mapper namespace="com.atguigu.spzx.manager.mapper.CategoryBrandMapper"><resultMap id="categoryBrandMap" type="com.atguigu.spzx.model.entity.product.CategoryBrand" autoMapping="true"></resultMap><!-- 用于select查詢公用抽取的列 --><sql id="columns">id,brand_id,category_id,create_time,update_time,is_deleted</sql><sql id="findPageWhere"><where><if test="brandId != null and brandId != ''">and cb.brand_id = #{brandId}</if><if test="categoryId != null and categoryId != ''">and cb.category_id = #{categoryId}</if>and cb.is_deleted = 0</where></sql><select id="findByPage" resultMap="categoryBrandMap">selectcb.id,cb.brand_id,cb.category_id,cb.create_time,cb.update_time,c.name as categoryName,b.name as brandName, b.logofrom category_brand cbleft join category c on c.id = cb.category_idleft join brand b  on b.id = cb.brand_id<include refid="findPageWhere"/>order by cb.id desc</select></mapper>
1.6.3 前端對接
categoryBrand.js
在src/api文件夾下創建categoryBrand.js文件,如下所示:
import request from '@/utils/request'const api_name = '/admin/product/categoryBrand'// 分頁列表
export const GetCategoryBrandPageList = (page, limit, searchObj) => {return request({url: `${api_name}/${page}/${limit}`,method: 'get',params: searchObj,})
}
categoryBrand.vue
修改categoryBrand.vue文件中的內容,如下所示:
<div class="search-div"><el-form label-width="70px" size="small"><el-row><el-col :span="12"><el-form-item label="品牌"><el-selectclass="m-2"placeholder="選擇品牌"size="small"style="width: 100%"v-model="queryDto.brandId"><el-optionv-for="item in brandList":key="item.id":label="item.name":value="item.id"/></el-select></el-form-item></el-col><el-col :span="12"><el-form-item label="分類"><el-cascader:props="categoryProps"style="width: 100%"v-model="searchCategoryIdList"/></el-form-item></el-col></el-row><el-row style="display:flex"><el-button type="primary" size="small" @click="fetchData()">搜索</el-button><el-button size="small" @click="resetData">重置</el-button></el-row></el-form>
</div><script setup>
import { GetCategoryBrandPageList } from '@/api/categoryBrand.js'// 搜索表單數據模型
const queryDto = ref({ brandId: '', categoryId: '' })
const searchCategoryIdList = ref([])//分頁條數據模型
const pageParamsForm = {page: 1,   // 頁碼limit: 10, // 每頁記錄數
}
const pageParams = ref(pageParamsForm)    // onMounted鉤子函數
onMounted(() => {selectAllBrandList() // 查詢所有的品牌數據fetchData()
})//重置
const resetData = () => {queryDto.value = { brandId: '', categoryId: '' }fetchData()
}//頁面變化
const handleSizeChange = size => {pageParams.value.limit = sizefetchData()
}
const handleCurrentChange = number => {pageParams.value.page = numberfetchData()
}// 分頁列表查詢
//分頁列表
const fetchData = async () => {if (searchCategoryIdList.value.length == 3) {queryDto.value.categoryId = searchCategoryIdList.value[2]}const { data } = await GetCategoryBrandPageList( pageParams.value.page, pageParams.value.limit, queryDto.value)list.value = data.listtotal.value = data.total
}</script>
1.7 添加功能
1.7.1 需求說明
當用戶點擊添加按鈕的時候,那么此時就彈出對話框,在該對話框中需要展示添加分類品牌表單。當用戶在該表單中點擊提交按鈕的時候那么此時就需要將表單進行提交,在后端需要將提交過來的表單數據保存到數據庫中即可。
如下所示:
1.7.2 頁面制作
具體代碼如下所示:
<div class="tools-div"><el-button type="success" size="small" @click="addShow">添 加</el-button>
</div><el-dialog v-model="dialogVisible" title="添加或修改" width="30%"><el-form label-width="120px"><el-form-item label="品牌"><el-selectclass="m-2"placeholder="選擇品牌"size="small"><el-optionv-for="item in brandList":key="item.id":label="item.name":value="item.id"/></el-select></el-form-item><el-form-item label="分類"><el-cascader:props="categoryProps"/></el-form-item><el-form-item><el-button type="primary">提交</el-button><el-button @click="dialogVisible = false">取消</el-button></el-form-item></el-form>
</el-dialog><script setup>//進入添加
const addShow = () => {dialogVisible.value = true
}</script>
1.7.3 后端接口
CategoryBrandController
表現層代碼實現:
// com.atguigu.spzx.manager.controller
@PostMapping("/save")
public Result save(@RequestBody CategoryBrand categoryBrand) {categoryBrandService.save(categoryBrand);return Result.build(null , ResultCodeEnum.SUCCESS) ;
}
CategoryBrandService
業務層代碼實現:
// com.atguigu.spzx.manager.service.impl;
@Override
public void save(CategoryBrand categoryBrand) {categoryBrandMapper.save(categoryBrand) ;
}
CategoryBrandMapper
持久層代碼實現:
// com.atguigu.spzx.manager.mapper;
@Mapper
public interface CategoryBrandMapper {public abstract void save(CategoryBrand categoryBrand);
}
CategoryBrandMapper.xml
在CategoryBrandMapper映射文件中添加如下sql語句:
<insert id="save">insert into category_brand (id,brand_id,category_id,create_time,update_time ,is_deleted) values (#{id},#{brandId},#{categoryId},now(),now(),0)
</insert>
1.7.4 前端對接
實現思路
1、給表單綁定數據模型
2、給提交按鈕綁定點擊事件
3、點擊按鈕請求后端地址
categoryBrand.js
在src/api文件夾下創建categoryBrand.js文件,如下所示:
// 保存信息
export const SaveCategoryBrand = categoryBrand => {return request({url: `${api_name}/save`,method: 'post',data: categoryBrand,})
}
categoryBrand.vue
修改categoryBrand.vue文件中的內容,如下所示:
<el-dialog v-model="dialogVisible" title="添加或修改" width="30%"><el-form label-width="120px"><el-form-item label="品牌"><el-selectclass="m-2"placeholder="選擇品牌"size="small"v-model="categoryBrand.brandId"><el-optionv-for="item in brandList":key="item.id":label="item.name":value="item.id"/></el-select></el-form-item><el-form-item label="分類"><el-cascader:props="categoryProps"v-model="categoryBrand.categoryId"/></el-form-item><el-form-item><el-button type="primary" @click="saveOrUpdate">提交</el-button><el-button @click="dialogVisible = false">取消</el-button></el-form-item></el-form>
</el-dialog><script setup>
import { SaveCategoryBrand } from '@/api/categoryBrand.js'
import { ElMessage, ElMessageBox } from 'element-plus'const defaultForm = {       //頁面表單數據id: '',brandId: '',categoryId: '',
}
const categoryBrand = ref(defaultForm)    //提交保存與修改
const saveOrUpdate = () => {if (categoryBrand.value.brandId == '') {ElMessage.info('品牌信息必須選擇')return}//categoryId為數組:[1,2,3]if (categoryBrand.value.categoryId.length != 3) {ElMessage.info('分類信息必須選擇')return}//系統只需要三級分類idcategoryBrand.value.categoryId = categoryBrand.value.categoryId[2]if (!categoryBrand.value.id) {saveData()}
}// 新增
const saveData = async () => {await SaveCategoryBrand(categoryBrand.value)dialogVisible.value = falseElMessage.success('操作成功')fetchData()
}
</script>
1.8 修改功能
1.8.1 需求說明
當用戶點擊修改按鈕的時候,那么此時就彈出對話框,在該對話框中需要將當前行所對應的分類品牌數據在該表單頁面進行展示。當用戶在該表單中點擊提交按鈕的時候那么此時就需要將表單進行提交,在后端需要提交過來的表單數據修改數據庫中的即可。
效果如下所示:
1.8.2 數據回顯
分析:
1、使用添加數據的表單即可
2、要將當前操作行的數據展示在表單中,那么此時需要用到插槽
代碼如下所示:
<el-table-column label="操作" align="center" width="200" ><el-button type="primary" size="small" @click="editShow(scope.row)">修改</el-button>
</el-table-column><script setup>//進入修改
const editShow = row => {// ????categoryBrand.value = rowdialogVisible.value = true
}</script>
1.8.3 提交修改
后端接口
CategoryBrandController
表現層代碼實現:
// com.atguigu.spzx.manager.controller
@PutMapping("updateById")
public Result updateById(@RequestBody CategoryBrand categoryBrand) {categoryBrandService.updateById(categoryBrand);return Result.build(null , ResultCodeEnum.SUCCESS) ;
}
CategoryBrandService
業務層代碼實現:
// com.atguigu.spzx.manager.service.impl;
@Override
public void updateById(CategoryBrand categoryBrand) {categoryBrandMapper.updateById(categoryBrand) ;
}
CategoryBrandMapper
持久層代碼實現:
// com.atguigu.spzx.manager.mapper;
@Mapper
public interface CategoryBrandMapper {public abstract void updateById(CategoryBrand categoryBrand);
}
CategoryBrandMapper.xml
在CategoryBrandMapper映射文件中添加如下sql語句:
<update id="updateById" >update category_brand set<if test="brandId != null and brandId != ''">brand_id = #{brandId},</if><if test="categoryId != null and categoryId != ''">category_id = #{categoryId},</if>update_time =  now()whereid = #{id}
</update>
前端對接
categoryBrand.js
在src/api文件夾下創建categoryBrand.js文件,如下所示:
// 修改信息
export const UpdateCategoryBrandById = categoryBrand => {return request({url: `${api_name}/updateById`,method: 'put',data: categoryBrand,})
}
categoryBrand.vue
修改categoryBrand.vue文件中的內容,如下所示:
<script setup>
import { UpdateCategoryBrandById } from '@/api/categoryBrand.js'//提交保存與修改
const saveOrUpdate = () => {...//系統只需要三級分類idcategoryBrand.value.categoryId = categoryBrand.value.categoryId[2]if (!categoryBrand.value.id) {saveData()} else {updateData() }
}// 修改
const updateData = async () => {await UpdateCategoryBrandById(categoryBrand.value)dialogVisible.value = falseElMessage.success('操作成功')fetchData()
}
</script>
1.9 刪除功能
1.9.1 需求說明
當點擊刪除按鈕的時候此時需要彈出一個提示框,詢問是否需要刪除數據?如果用戶點擊是,那么此時向后端發送請求傳遞id參數,后端接收id參數進行邏輯刪除。
效果如下所示:
1.9.2 后端接口
CategoryBrandController
表現層代碼實現:
// com.atguigu.spzx.manager.controller
@DeleteMapping("/deleteById/{id}")
public Result deleteById(@PathVariable Long id) {categoryBrandService.deleteById(id);return Result.build(null , ResultCodeEnum.SUCCESS) ;
}
CategoryBrandService
業務層代碼實現:
// com.atguigu.spzx.manager.service.impl;
@Override
public void deleteById(Long id) {categoryBrandMapper.deleteById(id) ;
}
CategoryBrandMapper
持久層代碼實現:
// com.atguigu.spzx.manager.mapper;
@Mapper
public interface CategoryBrandMapper {public abstract void deleteById(Long id);
}
CategoryBrandMapper.xml
在CategoryBrandMapper映射文件中添加如下sql語句:
<update id="deleteById">update category_brand setupdate_time = now() ,is_deleted = 1whereid = #{id}
</update>
1.9.3 前端對接
categoryBrand.js
在src/api文件夾下創建categoryBrand.js文件,如下所示:
// 根據id刪除數據
export const DeleteCategoryBrandById = id => {return request({url: `${api_name}/deleteById/${id}`,method: 'delete',})
}
categoryBrand.vue
修改categoryBrand.vue文件中的內容,如下所示:
<el-table-column label="操作" align="center" width="200" #default="scope"><el-button type="danger" size="small" @click="remove(scope.row.id)">刪除</el-button>
</el-table-column><script setup>
import { DeleteCategoryBrandById } from '@/api/categoryBrand.js'
import { ElMessage, ElMessageBox } from 'element-plus'//刪除
const remove = async id => {ElMessageBox.confirm('此操作將永久刪除該記錄, 是否繼續?', 'Warning', {confirmButtonText: '確定',cancelButtonText: '取消',type: 'warning',}).then(async () => {await DeleteCategoryBrandById(id)ElMessage.success('刪除成功')fetchData()}).catch(() => {ElMessage.info('取消刪除')})
}
</script>
2 商品規格管理
2.1 商品規格介紹
在電商項目中,商品規格指的是商品屬性、型號、尺寸、顏色等具體描述商品特點和屬性的標準化信息。
以手機為例子,它的規格可能包括以下幾個方面:
1、操作系統:Android、iOS、HarmonyOS 等。
2、屏幕尺寸:5.5 吋、6.7 吋等。
3、分辨率:1920x1080、2960x1440、2532x1170 等。
4、運行內存:6GB、8GB、12GB 等。
5、存儲容量:64GB、128GB、256GB 等。
6、攝像頭:單攝、雙攝、四攝等。
7、電池容量:3500mAh、4500mAh、5000mAh 等。
以T恤衫舉例子,它的規格可能包括以下幾個方面:
1、顏色:白色
2、尺碼:S、M、L、XL等
3、款式:圓領、V領、印花等
2.2 菜單添加
首先在系統中添加商品規格管理的菜單,具體步驟如下所示:
1、在后臺管理系統中通過系統管理的菜單管理添加商品規格管理的相關菜單,如下所示:

2、給系統管理員角色分配商品規格管理菜單訪問權限:
3、在前端項目中創建對應的頁面,以及配置對應的異步路由
在src/views/product的文件夾中加入商品規格管理頁面文件,如下所示:

在src/router/modules文件夾下創建product.js路由文件,文件內容如下所示:
const Layout = () => import('@/layout/index.vue')
const category = () => import('@/views/product/category.vue')
const brand = () => import('@/views/product/brand.vue')
const categoryBrand = () => import('@/views/product/categoryBrand.vue')
const productSpec = () => import('@/views/product/productSpec.vue')export default [{path: '/product',component: Layout,name: 'product',meta: {title: '商品管理',},icon: 'Histogram',children: [{path: '/category',name: 'category',component: category,meta: {title: '分類管理',},},{path: '/brand',name: 'brand',component: brand,meta: {title: '品牌管理',},},{path: '/categoryBrand',name: 'categoryBrand',component: categoryBrand,meta: {title: '分類品牌',},},{path: '/productSpec',name: 'productSpec',component: productSpec,meta: {title: '商品規格',},},],},
]
2.3 表結構介紹
產品規格數據所對應的表結構如下所示:
CREATE TABLE `product_spec` (`id` bigint NOT NULL AUTO_INCREMENT COMMENT 'ID',`spec_name` varchar(100) CHARACTER SET utf8mb3 COLLATE utf8_general_ci DEFAULT NULL COMMENT '規格名稱',`spec_value` text CHARACTER SET utf8mb3 COLLATE utf8_general_ci COMMENT '規格值:"[{"key":"顏色","valueList":["藍","白","紅"]]"',`create_time` timestamp NOT NULL DEFAULT CURRENT_TIMESTAMP COMMENT '創建時間',`update_time` timestamp NOT NULL DEFAULT CURRENT_TIMESTAMP ON UPDATE CURRENT_TIMESTAMP COMMENT '更新時間',`is_deleted` tinyint NOT NULL DEFAULT '0' COMMENT '刪除標記(0:不可用 1:可用)',PRIMARY KEY (`id`)
) ENGINE=InnoDB AUTO_INCREMENT=4 DEFAULT CHARSET=utf8mb4 COLLATE=utf8mb4_0900_ai_ci COMMENT='商品規格';
2.4 頁面制作
對比如下頁面結構,使用Element Plus制作出對應的頁面,數據可以暫時使用假數據。

該頁面可以將其分為3部分:
1、添加按鈕
2、數據表格
3、分頁條
代碼實現如下所示:
<template><div class="tools-div"><el-button type="success" size="small">添 加</el-button></div><el-table :data="list" style="width: 100%"><el-table-column prop="specName" label="規格名稱" /><el-table-column label="規格值" #default="scope"><divv-for="(item1, index1) in scope.row.specValue":key="index1"style="padding: 5px; margin: 0;width: 100%;">{{ item1.key }}:<spanv-for="(item2, index2) in item1.valueList":key="index2"class="div-atrr">{{ item2 }}</span></div></el-table-column><el-table-column prop="createTime" label="創建時間" /><el-table-column label="操作" align="center" width="200"><el-button type="primary" size="small" >修改</el-button><el-button type="danger" size="small">刪除</el-button></el-table-column></el-table><el-pagination:page-sizes="[10, 20, 50, 100]"layout="total, sizes, prev, pager, next":total="total"/></template><script setup>
import { ref } from 'vue'// 表格數據模型
const list = ref([{"id": 2,"createTime": "2023-05-06 12:56:08","specName": "筆記本電腦","specValue": [{"key":"內存","valueList":["8G","18G","32G"]}]},{"id": 1,"createTime": "2023-05-06 12:40:22","specName": "小米手機","specValue": [{"key":"顏色","valueList":["白色","紅色","黑色"]},{"key":"內存","valueList":["8G","18G"]}]}
])// 分頁條數據模型
const total = ref(0)</script><style scoped>
.tools-div {margin: 10px 0;padding: 10px;border: 1px solid #ebeef5;border-radius: 3px;background-color: #fff;
}.div-atrr {padding: 5px 10px;margin: 0 10px;background-color: powderblue;border-radius: 10px;
}</style>
2.5 列表查詢
需求說明:當產品規格管理頁面加載完畢以后就向后端發送分頁查詢請求,后端進行分頁查詢,返回分頁結果數據。
2.5.1 后端接口
ProductSpec
創建一個與數據庫表相對應的實體類,如下所示:
// com.atguigu.spzx.model.entity.product
@Data
public class ProductSpec extends BaseEntity {private String specName;   // 規格名稱private String specValue;  // 規格值}
ProductSpecController
表現層代碼實現:
// com.atguigu.spzx.manager.controller
@RestController
@RequestMapping(value="/admin/product/productSpec")
public class ProductSpecController {@Autowiredprivate ProductSpecService productSpecService ;@GetMapping("/{page}/{limit}")public Result<PageInfo<ProductSpec>> findByPage( @PathVariable Integer page, @PathVariable Integer limit) {PageInfo<ProductSpec> pageInfo = productSpecService.findByPage(page, limit);return Result.build(pageInfo , ResultCodeEnum.SUCCESS) ;}}
ProductSpecService
業務層代碼實現:
// com.atguigu.spzx.manager.service.impl;
@Service
public class ProductSpecServiceImpl implements ProductSpecService {@Autowiredprivate ProductSpecMapper productSpecMapper ;@Overridepublic PageInfo<ProductSpec> findByPage(Integer page, Integer limit) {PageHelper.startPage(page , limit) ;List<ProductSpec> productSpecList = productSpecMapper.findByPage() ;return new PageInfo<>(productSpecList);}}
ProductSpecMapper
持久層代碼實現:
// com.atguigu.spzx.manager.mapper
@Mapper
public interface ProductSpecMapper {public abstract List<ProductSpec> findByPage();
}
ProductSpecMapper.xml
在ProductSpecMapper.xml映射文件中添加如下sql語句:
<?xml version="1.0" encoding="UTF-8" ?>
<!DOCTYPE mapper PUBLIC "-//mybatis.org//DTD Mapper 3.0//EN" "http://mybatis.org/dtd/mybatis-3-mapper.dtd">
<mapper namespace="com.atguigu.spzx.manager.mapper.ProductSpecMapper"><resultMap id="productSpecMap" type="com.atguigu.spzx.model.entity.product.ProductSpec" autoMapping="true"></resultMap><!-- 用于select查詢公用抽取的列 --><sql id="columns">id,spec_name,spec_value,create_time,update_time,is_deleted</sql><select id="findByPage" resultMap="productSpecMap">select <include refid="columns" />from product_specwhere is_deleted = 0order by id desc</select></mapper>
2.5.2 前端對接
productSpec.js
在src/api目錄下添加productSpec.js文件,內容如下所示:
import request from '@/utils/request'const api_name = '/admin/product/productSpec'// 分頁列表
export const GetProductSpecPageList = (page, limit) => {return request({url: `${api_name}/${page}/${limit}`,method: 'get'})
}
productSpec.vue
修改productSpec.vue文件,內容如下所示:
<el-paginationv-model:current-page="pageParams.page"v-model:page-size="pageParams.limit":page-sizes="[10, 20, 50, 100]"layout="total, sizes, prev, pager, next":total="total"@size-change="handleSizeChange"@current-change="handleCurrentChange"
/><script setup>
import { ref , onMounted } from 'vue'
import { GetProductSpecPageList } from '@/api/productSpec.js'//分頁條數據模型
const pageParamsForm = {page: 1, // 頁碼limit: 10, // 每頁記錄數
}
const pageParams = ref(pageParamsForm)// 鉤子函數
onMounted(()=> {fetchData()
})//頁面變化
const handleSizeChange = size => {pageParams.value.limit = sizefetchData()
}
const handleCurrentChange = number => {pageParams.value.page = numberfetchData()
}// 分頁查詢
const fetchData = async () => {const { data } = await GetProductSpecPageList(pageParams.value.page , pageParams.value.limit) data.list.forEach(item => {item.specValue = JSON.parse(item.specValue)       // 將規格字符串轉換成規格js對象});list.value = data.listtotal.value = data.total
}</script>
2.6 添加功能
2.6.1 需求說明
用戶點擊添加按鈕,此時需要展示一個添加數據的表單對話框,用戶填寫表單數據,點擊提交按鈕,請求后端接口完成數據的保存操作。效果如下所示:
2.6.2 頁面制作
頁面代碼如下所示:
<div class="tools-div"><el-button type="success" size="small" @click="addShow">添 加</el-button>
</div><el-dialog v-model="dialogVisible" title="添加或修改" width="40%"><el-form label-width="120px"><el-form-item label="規格名稱"><el-input /></el-form-item><el-form-item><el-button size="default" type="success">添加新規格</el-button></el-form-item><el-form-item label="" v-for="(item , index) in productSpec.specValue" :key="index"><el-row><el-col :span="10"><el-inputv-model="item.key"placeholder="規格"style="width: 90%;"/></el-col><el-col :span="10"><el-inputv-model="item.valueList"placeholder="規格值(如:白色,紅色)"style="width: 90%;"/></el-col><el-col :span="4"><el-button size="default" type="danger">刪除</el-button></el-col></el-row>  </el-form-item><el-form-item align="right"><el-button type="primary">提交</el-button><el-button @click="dialogVisible = false">取消</el-button></el-form-item></el-form>
</el-dialog><script setup>
// 定義數據模型
const dialogVisible = ref(false)// 添加表單數據模型
const defaultForm = {id: '',specName: '',specValue: [{"key": "顏色","valueList": ["白色","紅色","黑色"]},{"key": "內存","valueList": ["8G","18G"]}]
}
const productSpec = ref(defaultForm)//進入添加
const addShow = () => {dialogVisible.value = true
}</script>
2.6.3 后端接口
ProductSpecController
表現層代碼實現:
// com.atguigu.spzx.manager.controller
@PostMapping("save")
public Result save(@RequestBody ProductSpec productSpec) {productSpecService.save(productSpec);return Result.build(null , ResultCodeEnum.SUCCESS) ;
}
ProductSpecService
業務層代碼實現:
// com.atguigu.spzx.manager.service.impl;
@Override
public void save(ProductSpec productSpec) {productSpecMapper.save(productSpec) ;
}
ProductSpecMapper
持久層代碼實現:
// com.atguigu.spzx.manager.mapper
@Mapper
public interface ProductSpecMapper {public abstract void save(ProductSpec productSpec);
}
ProductSpecMapper.xml
在ProductSpecMapper.xml映射文件中添加如下sql語句:
<insert id="save">insert into product_spec (id,spec_name,spec_value,create_time,update_time,is_deleted) values (#{id},#{specName},#{specValue},now(),now(),0)
</insert>
2.6.4 前端對接
實現思路
1、給表單綁定數據模型
2、給提交按鈕綁定點擊事件
3、點擊按鈕請求后端地址
productSpec.js
在src/api目錄下添加productSpec.js文件,內容如下所示:
// 保存信息
export const SaveProductSpec = productSpec => {return request({url: `${api_name}/save`,method: 'post',data: productSpec,})
}
productSpec.vue
修改productSpec.vue文件,內容如下所示:
<el-dialog v-model="dialogVisible" title="添加或修改" width="40%"><el-form label-width="120px"><el-form-item label="規格名稱"><el-input v-model="productSpec.specName"/></el-form-item><el-form-item><el-button size="default" type="success" @click="addSpec">添加新規格</el-button></el-form-item><el-form-item label="" v-for="(item , index) in productSpec.specValue" :key="index"><el-row><el-col :span="10"><el-inputv-model="item.key"placeholder="規格"style="width: 90%;"/></el-col><el-col :span="10"><el-inputv-model="item.valueList"placeholder="規格值(如:白色,紅色)"style="width: 90%;"/></el-col><el-col :span="4"><el-button size="default" type="danger" @click="delSpec(index)">刪除</el-button></el-col></el-row>  </el-form-item><el-form-item align="right"><el-button type="primary" @click="saveOrUpdate">提交</el-button><el-button @click="dialogVisible = false">取消</el-button></el-form-item></el-form>
</el-dialog><script setup>
import { SaveProductSpec } from '@/api/productSpec.js'
import { ElMessage, ElMessageBox } from 'element-plus'//進入添加
const addShow = () => {dialogVisible.value = trueproductSpec.value = {id: '',specName: '',specValue: []}
}// 頁面添加規格操作
const addSpec = () => {productSpec.value.specValue.push({})
}// 頁面刪除規格元素
const delSpec = (index) => {productSpec.value.specValue.splice(index , 1)
} // 提交表單
const saveOrUpdate = async () => {if(!productSpec.value.id)  {saveData()}}// 保存數據
const saveData = async () => {// 需要將productSpec.value.specValue轉換成json字符串提交到后端,通過clone一個新的對象進行實現const productSpecClone = JSON.parse(JSON.stringify(productSpec.value))// 將productSpecClone.specValue.valueList轉換成數組,因為后端需要的數組格式的數據[{"key":"內存","valueList":["8G","18G","32G"]}]// v-model綁定的數據模型為字符串productSpecClone.specValue.forEach(item => {     item.valueList = item.valueList.split(",")})productSpecClone.specValue = JSON.stringify(productSpecClone.specValue)console.log(productSpecClone);// 提交表單await SaveProductSpec(productSpecClone)dialogVisible.value = falseElMessage.success('操作成功')fetchData()}
</script>
2.7 修改功能
2.7.1 需求說明
當用戶點擊修改按鈕的時候,那么此時就彈出對話框,在該對話框中需要將當前行所對應的產品規格數據在該表單頁面進行展示。當用戶在該表單中點擊提交按鈕的時候那么此時就需要將表單進行提交,在后端需要提交過來的表單數據修改數據庫中的即可。
效果如下所示:
2.7.2 數據回顯
分析:
1、使用添加數據的表單即可
2、要將當前操作行的數據展示在表單中,那么此時需要用到插槽
代碼如下所示:
<el-table-column label="操作" align="center" width="200" #default="scope"><el-button type="primary" size="small" @click="editShow(scope.row)">修改</el-button>
</el-table-column><script setup>//進入修改
const editShow = row => {productSpec.value = row dialogVisible.value = true
}</script>
2.7.4 后端接口
ProductSpecController
表現層代碼實現:
// com.atguigu.spzx.manager.controller
@PutMapping("updateById")
public Result updateById(@RequestBody ProductSpec productSpec) {productSpecService.updateById(productSpec);return Result.build(null , ResultCodeEnum.SUCCESS) ;
}
ProductSpecService
業務層代碼實現:
// com.atguigu.spzx.manager.service.impl;
@Override
public void updateById(ProductSpec productSpec) {productSpecMapper.updateById(productSpec);
}
ProductSpecMapper
持久層代碼實現:
// com.atguigu.spzx.manager.mapper
@Mapper
public interface ProductSpecMapper {public abstract void updateById(ProductSpec productSpec);
}
ProductSpecMapper.xml
在ProductSpecMapper.xml映射文件中添加如下sql語句:
<update id="updateById" >update product_spec set<if test="specName != null and specName != ''">spec_name = #{specName},</if><if test="specValue != null and specValue != ''">spec_value = #{specValue},</if>update_time =  now()whereid = #{id}
</update>
2.7.5 前端對接
productSpec.js
在src/api目錄下添加productSpec.js文件,內容如下所示:
// 修改信息
export const UpdateProductSpecById = productSpec => {return request({url: `${api_name}/updateById`,method: 'put',data: productSpec,})
}
productSpec.vue
修改productSpec.vue文件,內容如下所示:
<script setup>
import { UpdateProductSpecById } from '@/api/productSpec.js'// 提交表單
const saveOrUpdate = async () => {if(!productSpec.value.id)  {saveData()}else {updateData()}}// 保存修改
const updateData = async () => {// 需要將productSpec.value.specValue轉換成json字符串提交到后端,通過clone一個新的對象進行實現const productSpecClone = JSON.parse(JSON.stringify(productSpec.value))// 將productSpecClone.specValue.valueList轉換成數組,因為后端需要的數組格式的數據[{"key":"內存","valueList":["8G","18G","32G"]}]// v-model綁定的數據模型為字符串productSpecClone.specValue.forEach(item => {  console.log(typeof item.valueList)if(typeof item.valueList === 'string') {   // 針對規格數據修改完畢以后數據類型有可能會變成string,針對string類型的數據將其轉換成數組item.valueList = item.valueList.split(",")}   })productSpecClone.specValue = JSON.stringify(productSpecClone.specValue)// 提交表單await UpdateProductSpecById(productSpecClone)dialogVisible.value = falseElMessage.success('操作成功')fetchData()}
</script>
2.8 刪除功能
2.8.1 需求說明
當點擊刪除按鈕的時候此時需要彈出一個提示框,詢問是否需要刪除數據?如果用戶點擊是,那么此時向后端發送請求傳遞id參數,后端接收id參數進行邏輯刪除。
效果如下所示:
2.8.2 后端接口
ProductSpecController
表現層代碼實現:
// com.atguigu.spzx.manager.controller
@DeleteMapping("/deleteById/{id}")
public Result removeById(@PathVariable Long id) {productSpecService.deleteById(id);return Result.build(null , ResultCodeEnum.SUCCESS) ;
}
ProductSpecService
業務層代碼實現:
// com.atguigu.spzx.manager.service.impl;
@Override
public void deleteById(Long id) {productSpecMapper.deleteById(id);
}
ProductSpecMapper
持久層代碼實現:
// com.atguigu.spzx.manager.mapper
@Mapper
public interface ProductSpecMapper {public abstract void deleteById(Long id);
}
ProductSpecMapper.xml
在ProductSpecMapper.xml映射文件中添加如下sql語句:
<update id="deleteById">update product_spec setupdate_time = now() ,is_deleted = 1whereid = #{id}
</update>
2.8.2 前端對接
productSpec.js
在src/api目錄下添加productSpec.js文件,內容如下所示:
// 根據id刪除數據
export const DeleteProductSpecById = id => {return request({url: `${api_name}/deleteById/${id}`,method: 'delete',})
}
productSpec.vue
修改productSpec.vue文件,內容如下所示:
<el-table-column label="操作" align="center" width="200" #default="scope"><el-button type="danger" size="small" @click="remove(scope.row.id)">刪除</el-button>
</el-table-column><script setup>
import { DeleteProductSpecById } from '@/api/productSpec.js'//刪除
const remove = async id => {ElMessageBox.confirm('此操作將永久刪除該記錄, 是否繼續?', 'Warning', {confirmButtonText: '確定',cancelButtonText: '取消',type: 'warning',}).then(async () => {await DeleteProductSpecById(id)ElMessage.success('刪除成功')fetchData()}).catch(() => {ElMessage.info('取消刪除')})
}</script>
3 商品管理
商品管理就是對電商項目中所涉及到的商品數據進行維護。
3.1 菜單添加
首先在系統中添加商品管理的菜單,具體步驟如下所示:
1、在后臺管理系統中通過系統管理的菜單管理添加商品管理的相關菜單,如下所示:

2、給系統管理員角色分配商品商品管理菜單訪問權限:
3、在前端項目中創建對應的頁面,以及配置對應的異步路由
在src/views/product的文件夾中加入商品管理頁面文件,如下所示:

在src/router/modules文件夾下創建product.js路由文件,文件內容如下所示:
const Layout = () => import('@/layout/index.vue')
const category = () => import('@/views/product/category.vue')
const brand = () => import('@/views/product/brand.vue')
const categoryBrand = () => import('@/views/product/categoryBrand.vue')
const productSpec = () => import('@/views/product/productSpec.vue')
const product = () => import('@/views/product/product.vue')export default [{path: '/product',component: Layout,name: 'product',meta: {title: '商品管理',},icon: 'Histogram',children: [{path: '/category',name: 'category',component: category,meta: {title: '分類管理',},},{path: '/brand',name: 'brand',component: brand,meta: {title: '品牌管理',},},{path: '/categoryBrand',name: 'categoryBrand',component: categoryBrand,meta: {title: '分類品牌',},},{path: '/productSpec',name: 'productSpec',component: productSpec,meta: {title: '商品規格',},},{path: '/product',name: 'product',component: product,meta: {title: '商品管理',},},],},
]
3.2 表結構介紹
商品數據所對應的表結構如下所示:
CREATE TABLE `product` (`id` bigint NOT NULL AUTO_INCREMENT COMMENT 'ID',`name` varchar(255) CHARACTER SET utf8mb3 COLLATE utf8_general_ci DEFAULT NULL COMMENT '商品名稱',`brand_id` bigint DEFAULT NULL COMMENT '品牌ID',`category1_id` bigint DEFAULT NULL COMMENT '一級分類id',`category2_id` bigint DEFAULT NULL COMMENT '二級分類id',`category3_id` bigint DEFAULT NULL COMMENT '三級分類id',`unit_name` varchar(50) CHARACTER SET utf8mb3 COLLATE utf8_general_ci DEFAULT NULL COMMENT '計量單位',`slider_urls` text COMMENT '輪播圖',`spec_value` varchar(255) DEFAULT NULL COMMENT '商品規格json',`status` tinyint NOT NULL DEFAULT '0' COMMENT '線上狀態:0-初始值,1-上架,-1-自主下架',`audit_status` tinyint NOT NULL DEFAULT '0' COMMENT '審核狀態:0-初始值,1-通過,-1-未通過',`audit_message` varchar(255) CHARACTER SET utf8mb3 COLLATE utf8_general_ci DEFAULT NULL COMMENT '審核信息',`create_time` timestamp NOT NULL DEFAULT CURRENT_TIMESTAMP COMMENT '創建時間',`update_time` timestamp NOT NULL DEFAULT CURRENT_TIMESTAMP ON UPDATE CURRENT_TIMESTAMP COMMENT '更新時間',`is_deleted` tinyint NOT NULL DEFAULT '0' COMMENT '刪除標記(0:不可用 1:可用)',PRIMARY KEY (`id`)
) ENGINE=InnoDB AUTO_INCREMENT=2 DEFAULT CHARSET=utf8mb4 COLLATE=utf8mb4_0900_ai_ci COMMENT='商品';
3.3 頁面制作
直接導入資料中所提供的product.vue頁面,以及對應的product.js
3.4 列表查詢
3.4.1 需求說明
需求說明:
1、如果在搜索表單中選擇了某一個品牌以及分類,那么此時就需要按照品牌id和分類id進行查詢
2、搜索的時候需要進行分頁搜索
3.4.2 后端接口
需求分析
1、前端提交請求參數的時候包含了兩部分的參數:搜索條件參數、分頁參數。搜索條件參數可以通過?拼接到請求路徑后面,分頁參數【當前頁碼、每頁顯示的數據條數】可以讓前端通過請求路徑傳遞過來
2、后端查詢完畢以后需要給前端返回一個分頁對象,分頁對象中就封裝了分頁相關的參數(當前頁數據、總記錄數、總頁數…)
3、前端進行參數傳遞的時候,不一定會傳遞搜索條件,因此sql語句的編寫需要使用到動態sql
ProductDto
定義一個用來封裝請求參數的Dto對象,如下所示:
// com.atguigu.spzx.model.dto.product;
@Data
public class ProductDto extends BaseEntity {private Long brandId;private Long category1Id;private Long category2Id;private Long category3Id;}
Product
針對當前要操作的數據庫表定義一個與之對應的實體類:
// com.atguigu.spzx.model.entity.product
@Data
public class Product extends BaseEntity {private String name;					// 商品名稱private Long brandId;					// 品牌IDprivate Long category1Id;				// 一級分類idprivate Long category2Id;				// 二級分類idprivate Long category3Id;				// 三級分類idprivate String unitName;				// 計量單位private String sliderUrls;				// 輪播圖private String specValue;				// 商品規格值json串private Integer status;					// 線上狀態:0-初始值,1-上架,-1-自主下架private Integer auditStatus;			// 審核狀態private String auditMessage;			// 審核信息// 擴展的屬性,用來封裝響應的數據private String brandName;				// 品牌private String category1Name;			// 一級分類private String category2Name;			// 二級分類private String category3Name;			// 三級分類}
ProductController
表現層代碼實現
// com.atguigu.spzx.manager.controller;
@RestController
@RequestMapping(value="/admin/product/product")
public class ProductController {@Autowiredprivate ProductService productService ;@GetMapping(value = "/{page}/{limit}")public Result<PageInfo<Product>> findByPage(@PathVariable Integer page, @PathVariable Integer limit, ProductDto productDto) {PageInfo<Product> pageInfo = productService.findByPage(page, limit, productDto);return Result.build(pageInfo , ResultCodeEnum.SUCCESS) ;}}
ProductService
業務層代碼實現
//  com.atguigu.spzx.manager.service.impl;
@Service
public class ProductServiceImpl implements ProductService {@Autowiredprivate ProductMapper productMapper ;@Overridepublic PageInfo<Product> findByPage(Integer page, Integer limit, ProductDto productDto) {PageHelper.startPage(page , limit) ;List<Product> productList =  productMapper.findByPage(productDto) ;return new PageInfo<>(productList);}}
ProductMapper
持久層代碼實現
@Mapper
public interface ProductMapper {public abstract List<Product> findByPage(ProductDto productDto);
}
ProductMapper.xml
在ProductMapper.xml映射文件中添加如下的sql語句:
<?xml version="1.0" encoding="UTF-8" ?>
<!DOCTYPE mapper PUBLIC "-//mybatis.org//DTD Mapper 3.0//EN" "http://mybatis.org/dtd/mybatis-3-mapper.dtd">
<mapper namespace="com.atguigu.spzx.manager.mapper.ProductMapper"><resultMap id="productMap" type="com.atguigu.spzx.model.entity.product.Product" autoMapping="true"></resultMap><!-- 用于select查詢公用抽取的列 --><sql id="columns">id,name,brand_id,category1_id,category2_id,category3_id,unit_name,slider_urls,spec_value,status,audit_status,audit_message,create_time,update_time,is_deleted</sql><sql id="findPageWhere"><where><if test="brandId != null and brandId != ''">and p.brand_id = #{brandId}</if><if test="category1Id != null and category1Id != ''">and p.category1_id = #{category1Id}</if><if test="category2Id != null and category2Id != ''">and p.category2_id = #{category2Id}</if><if test="category3Id != null and category3Id != ''">and p.category3_id = #{category3Id}</if>and p.is_deleted = 0</where></sql><select id="findByPage" resultMap="productMap">selectp.id, p.name , p.brand_id , p.category1_id , p.category2_id , p.category3_id, p.unit_name,p.slider_urls , p.spec_value , p.status , p.audit_status , p.audit_message , p.create_time , p.update_time , p.is_deleted ,b.name brandName , c1.name category1Name , c2.name category2Name , c2.name category3Namefrom product pLEFT JOIN brand b on b.id = p.brand_idLEFT JOIN category c1 on c1.id = p.category1_idLEFT JOIN category c2 on c2.id = p.category2_idLEFT JOIN category c3 on c3.id = p.category2_id<include refid="findPageWhere"/>order by id desc</select></mapper>
age , limit) ;
List productList = productMapper.findByPage(productDto) ;
return new PageInfo<>(productList);
}
}
#### ProductMapper持久層代碼實現```java
@Mapper
public interface ProductMapper {public abstract List<Product> findByPage(ProductDto productDto);
}
ProductMapper.xml
在ProductMapper.xml映射文件中添加如下的sql語句:
<?xml version="1.0" encoding="UTF-8" ?>
<!DOCTYPE mapper PUBLIC "-//mybatis.org//DTD Mapper 3.0//EN" "http://mybatis.org/dtd/mybatis-3-mapper.dtd">
<mapper namespace="com.atguigu.spzx.manager.mapper.ProductMapper"><resultMap id="productMap" type="com.atguigu.spzx.model.entity.product.Product" autoMapping="true"></resultMap><!-- 用于select查詢公用抽取的列 --><sql id="columns">id,name,brand_id,category1_id,category2_id,category3_id,unit_name,slider_urls,spec_value,status,audit_status,audit_message,create_time,update_time,is_deleted</sql><sql id="findPageWhere"><where><if test="brandId != null and brandId != ''">and p.brand_id = #{brandId}</if><if test="category1Id != null and category1Id != ''">and p.category1_id = #{category1Id}</if><if test="category2Id != null and category2Id != ''">and p.category2_id = #{category2Id}</if><if test="category3Id != null and category3Id != ''">and p.category3_id = #{category3Id}</if>and p.is_deleted = 0</where></sql><select id="findByPage" resultMap="productMap">selectp.id, p.name , p.brand_id , p.category1_id , p.category2_id , p.category3_id, p.unit_name,p.slider_urls , p.spec_value , p.status , p.audit_status , p.audit_message , p.create_time , p.update_time , p.is_deleted ,b.name brandName , c1.name category1Name , c2.name category2Name , c2.name category3Namefrom product pLEFT JOIN brand b on b.id = p.brand_idLEFT JOIN category c1 on c1.id = p.category1_idLEFT JOIN category c2 on c2.id = p.category2_idLEFT JOIN category c3 on c3.id = p.category2_id<include refid="findPageWhere"/>order by id desc</select></mapper>
)


)


 -- 異常類型和生命周期)
