- ansible playbook劇本介紹:
- playbook 是ansible用于配置,部署和管理被節點的劇本
- 由一個或多個模塊組成,完成統一的目的,實現自動化操作
- 劇本編寫需遵循yaml語法
- yaml的三要素:
- 縮進:兩個字符,默認的tab鍵是四個字符,所以要使用tab鍵,需要修改/root/.vimrc文件。添加:set tabstop=2
- 冒號:冒號后面需要空格,除非以冒號結尾
- 短橫杠:列表項,后面跟空格
- yaml的三要素:
- playbook的語法結構:
- ansible-playbook 選項 文件路徑
- 選項:-C 模擬預運行
- --list-hosts:列出清單
- --list-tasks:列出任務
- --list-tags:列出標簽
- --syntax-check:語法檢查
- 選項:-C 模擬預運行
- ansible-playbook 選項 文件路徑
- Ansible playbook使用場景:
- 執行一些簡單的任務可以使用ad-hoc命令,過于復雜時就需要使用playbook劇本
- playbook劇本就像執行shell命令與寫shell腳本一樣,也可以理解為批量處理任務
- 使用playbook可以方便的重復使用這些代碼,可以移植到不同機器上,像函數一樣反復使用
- 實驗場景:
- 拓撲:
- ansible:192.168.8.5
- web:192.168.8.6
- nfs:192.168.8.7
- rsync:192.168.8.8
- 實驗說明:在第一臺機器上部署ansible,編寫playbook劇本,完成一鍵部署web,nfs,rsync架構的環境
- 實驗步驟:
- 1.在ansible上修改hosts文件
- vim /etc/hosts
- 192.168.8.5 ansible
- 192.168.8.6 web
- 192.168.8.7 nfs
- 192.168.8.8 rsync
- vim /etc/hosts
- 2.將每臺服務器的主機名稱修改為對應的服務名:
- hostnamectl set-hostname ansible
- hostnamectl set-hostname web
- hostnamectl set-hostname nfs
- hostnamectl set-hostname rsync
- 3.在ansible服務器上修改tab鍵=2
- vim /root/.vimrc
- set tabstop=2
- vim /root/.vimrc
- 4.在8.5主機安裝ansible和epel-release(提供額外軟件包)
- ymm -y install ansible
- yum -y install epel-release
- 5.ssh免密登錄8.6、8.7、8.8
- ssh-keygen -t rsa
- ssh-copy-id root@web
- ssh-copy-id root@nfs
- ssh-copy-id root@rsync
- 6.創建ansible劇本中所需的目錄
- mkdir -p /etc/ansible/ansible_playbook/{conf,file,scripts,tools}
- 7.編輯ansible清單:
- vim /etc/ansible/hosts
- 添加:
- [web]
- 192.168.8.6
- [nfs]
- 192.168.8.7
- [rsync]
- 192.168.8.8
- 添加:
- vim /etc/ansible/hosts
- 8.使用ansible的copy模塊 覆蓋另外三臺的hosts文件
- ansible all -m copy -a "src=/etc/hosts dest=/etc"
- 9.編寫playbook劇本部署基本環境:
- 關閉防火墻
- 配置yum倉庫
- 安裝rsync、nfs-utils
- 創建組、用戶
- 創建目錄,修改權限
- 推送腳本
- 推送rsync客戶端所需的密碼文件,修改權限
- 計劃任務
- vim /etc/ansible/ansible_playbook/base.yaml
- - hosts: all
- tasks:
- - name: stop firewalld
- shell: systemctl stop firewalld
- - name: stop selinux
- shell: setenforce 0
- - name: clear repos.d
- file: path=/etc/yum.repos.d/ state=absent
- - name: create repos.d
- file: path=/etc/yum.repos.d/ recurse=yes
- - name: install base repo
- get_url: url=http://mirrors.aliyun.com/repo/Centos-7.repo dest=/etc/yum.repos.d/CentOS-Base.repo
- - name: install epel repo
- get_url: url=http://mirrors.aliyun.com/repo/epel-7.repo dest=/etc/yum.repos.d/epel.repo
- - name: install rsync nfs-utils
- yum: name=rsync,nfs-utils state=installed
- - name: create group www
- group: name=www gid=666
- - name: create user www
- user: name=www uid=666 create_home=no shell=/sbin/nologin
- - name: create rsync client password
- copy: content='1' dest=/etc/rsync.pass mode=600
- - name: create scripts directory
- file: path=/server/scripts/ recurse=yes state=directory
- - name: push scripts
- copy: src=./scripts/rsync_backup.sh dest=/server/scripts
- - name: crontab
- cron: name="backup scripts" hour=01 minute=00 job="/usr/bin/bash /server/scripts/rsync_backup.sh &> /dev/null"
- - name: stop firewalld
- tasks:
- 進入到腳本目錄,將需要的腳本拖拽至目錄下
- cd /etc/ansible/ansible_playbook/scripts
- 預先運行腳本,檢查語法有沒有錯誤
- ansible-playbook -C base.yaml
- - hosts: all
- 10.編輯對rsync主機進行配置的劇本
- 劇本流程:
- 安裝rsync
- 配置
- 啟動
- 腳本
- 計劃任務
- vim /etc/ansible/ansible_playbook/rsync.yaml
- - hosts: rsync
- tasks:
- - name: install rsync
- yum: name=rsync state=installed
- - name: config rsync
- copy: src=./conf/rsyncd.conf dest=/etc/rsyncd.conf
- notify: restart rsync
- - name: create rsync local user
- copy: content='rsync_backup:1' dest=/etc/rsync.password mode=600
- - name: create data
- file: path=/data state=directory recurse=yes owner=www group=www mode=755
- - name: create backup
- file: path=/backup state=directory recurse=yes owner=www group=www mode=755
- - name: start rsync
- service: name=rsyncd state=started enabled=yes
- - name: push check scripts
- copy: src=./scripts/rsync_check.sh dest=/server/scripts
- - name: crond check scripts
- cron: name="check scripts" hour=05 minute=00 job="/usr/bin/bash /server/scripts/rsync_check.sh &> /dev/null"
- handlers:
- - name: restart rsync
- service: name=rsyncd state=restarted
- 將所需配置文件拖至conf目錄下
- cd /etc/ansible/ansible_playbook/conf
- 運行腳本,檢查是否有錯誤
- ansible-playbook -C rsync.yaml
- 劇本流程:
- 11.編寫部署nfs服務的劇本:
- vim nfs.yaml
- - hosts: nfs
- tasks:
- - name: install nfs
- yum: name=nfs-utils,rpcbind state=installed
- - name: config nfs
- copy: src=./conf/exports dest=/etc/exports
- notify: restart nfs
- - name: create data
- file: path=/data state=directory recurse=yes owner=www group=www mode=755
- - name: start nfs
- service: name=nfs-server state=started enabled=yes
- handlers:
- - name: restart nfs
- service: name=nfs-server state=restarted
- 預運行檢查語法:
- ansible-playbook -C nfs.yaml
- vim nfs.yaml
- 12.部署sersync服務,實現及時監控
- 劇本流程:
- (1)在ansible服務器先下載sersync
- (2)解壓到/etc/ansible/ansible_playbook/并修改配置文件
- (3)推送到nfs
- (4)啟動sersync
- 進入tools目錄 將存放及時監控的軟件目錄 拖拽至tools目錄下
- cd /etc/ansible/ansible_playbook/tools
- 拖拽
- cd /etc/ansible/ansible_playbook/tools
- 編輯劇本:
- vim sersync.yaml
- - hosts: nfs
- tasks:
- - name: scp sersync
- copy: src=./tools/sersync/ dest=/usr/local/sersync owner=www group=www mode=755
- - name: start sersync
- shell: pgrep sersync;
- [ $? -eq 0 ] || /usr/local/sersync/sersync2 -dro /usr/local/sersync/confxml.xml
- vim sersync.yaml
- 劇本流程:
- 13.編寫部署web服務的劇本:
- 劇本流程:
- (1)本地安裝httpd
- (2)修改配置文件,復制到/etc/ansible/ansible_playbook/conf
- (3)掛載
- (4)啟動
- vim web.yaml
- - hosts: web
- tasks:
- - name: install httpd
- yum: name=httpd state=installed
- - name: mount nfs
- mount: src=nfs:/data path=/var/www/html fstype=nfs state=mounted
- - name: config httpd
- copy: src=./conf/httpd.conf dest=/etc/httpd/conf/httpd.conf
- notify: restart httpd
- - name: start httpd
- service: name=httpd state=started enabled=yes
- handlers:
- - name: restart httpd
- service: name=httpd state=restarted
- 預運行檢查語法:
- ansible-playbook -C web.yaml
- 劇本流程:
- 至此所有劇本已編寫好了,現在將這幾個劇本依次匯總 集中來進行實際運行
- vim main.yaml
- - import_playbook: base.yaml
- - import_playbook: rsync.yaml
- - import_playbook: nfs.yaml
- - import_playbook: sersync.yaml
- - import_playbook: web.yaml
- 預檢測:ansible-playbook -C main.yaml
- 執行:ansible-playbook main.yaml
- 1.在ansible上修改hosts文件
- 測試:在nfs的/data目錄下編寫一個網頁 查看web服務器上的網頁根目錄是否同步到了網頁
- 再查看及時同步:nfs服務器中的/data目錄下的文件,是否及時的自動備份到了 rsync服務器的/backup目錄下
- 拓撲:
- 易錯的地方:
- 如果rsync服務器的rsync服務起不來,可能需要從新在nfs服務器執行一下此命令:
- /usr/local/sersync/sersync2 -dro /usr/local/sersync/confxml.xml
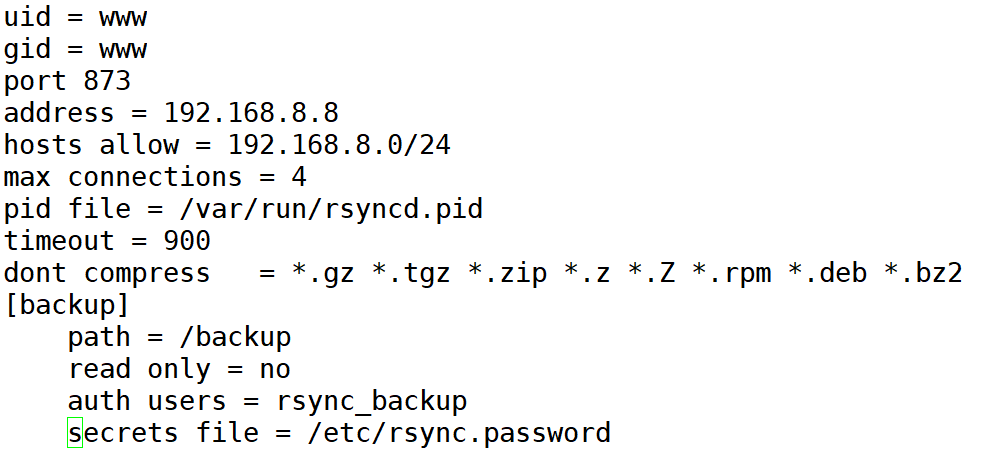
- 或者是rsync服務器的配置文件沒有修改:
- vim /etc/rsyncd.conf
-
- vim /etc/rsyncd.conf
- 也可能或是有了pid鎖文件,導致服務被鎖死
- rsyncd --daemon 此命令也可以啟動rsync
- 如果rsync服務器的rsync服務起不來,可能需要從新在nfs服務器執行一下此命令:
Ansible playbook 劇本部署WEB NFS rsync sersync(及時監控)架構
本文來自互聯網用戶投稿,該文觀點僅代表作者本人,不代表本站立場。本站僅提供信息存儲空間服務,不擁有所有權,不承擔相關法律責任。 如若轉載,請注明出處:http://www.pswp.cn/news/696428.shtml 繁體地址,請注明出處:http://hk.pswp.cn/news/696428.shtml 英文地址,請注明出處:http://en.pswp.cn/news/696428.shtml
如若內容造成侵權/違法違規/事實不符,請聯系多彩編程網進行投訴反饋email:809451989@qq.com,一經查實,立即刪除!相關文章

【Vue3】toRefs和toRef在reactive中的一些應用
💗💗💗歡迎來到我的博客,你將找到有關如何使用技術解決問題的文章,也會找到某個技術的學習路線。無論你是何種職業,我都希望我的博客對你有所幫助。最后不要忘記訂閱我的博客以獲取最新文章,也歡…


【Qt】實現 Ctrl + 鼠標滾輪 縮放文本功能
【Qt】實現 Ctrl 鼠標滾輪 縮放文本功能 文章目錄 I - 實現自定義控件II - 完整代碼III - 參考鏈接 I - 實現自定義控件
主要原理 繼承 QTextEdit 或者 QPlainTextEdit 類,重寫滾輪事件 wheelEvent, QTextEdit 和 QPlainTextEdit 中均包含此函數
頭文件 TextEdit…

學習springMVC第二天
REST簡介 REST(Representational State Transfer),表現形式狀態轉換 傳統風格資源描述形式 http://localhost/user/getById?id1 http://localhost/user/saveUser REST風格描述形式 http://localhost/user/1 http://localhost/user
優點: 隱藏資源的訪問…

C++模板->模板的概念、函數模板基本語法、函數模板注意事項、普通函數與函數模板區別、普通函數與函數模板調用規則、模板的局限性
#include<iostream> using namespace std;
//交換兩個整型函數 void swapInt(int& a, int& b) { int temp a; a b; b temp; }
//交換兩個浮點型函數 void swapDouble(double& a, double& b) { double temp a; a b; b te…

MATLAB中gtext函數用法
目錄
語法
說明
示例
使用鼠標將文本添加到圖窗
指定字體大小和顏色
在創建后修改文本 gtext函數的功能是使用鼠標將文本添加到圖窗。
語法
gtext(str)
gtext(str,Name,Value)
t gtext(___)
說明 gtext(str) 在使用鼠標選擇的位置插入文本 str。當將鼠標指針懸停在圖…

Oracle普通用戶啟停JOB報錯ORA 27486權限不足
Oracle普通用戶啟停JOB報錯ORA 27486權限不足 問題與現象原因與對策 問題與現象
應用用戶通過DBMS_SCHEDULER啟停自己的JOB需要的權限:
grant execute on dbms_scheduler to appuser;該普通用戶有CREATE JOB的權限。通過DBMS_SCHEDULER停止自己的JOB時:…

3個wordpress中文企業主題模板
農業畜牧養殖wordpress主題
簡潔大氣的農業畜牧養殖wordpress主題,農業農村現代化,離不開新農人、新技術。
https://www.jianzhanpress.com/?p3051 老年公寓wordpress主題
淺綠色簡潔實用的老年公寓wordpress主題,適合做養老業務的老年公…


SouthLeetCode-打卡24年02月第3周
SouthLeetCode-打卡24年02月第3周
// Date : 2024/02/12 ~ 202X/02/18
049.反轉字符串
(1) 題目描述
049#LeetCode.344.簡單題目鏈接#Monday2024/02/12
編寫一個函數,其作用是將輸入的字符串反轉過來。輸入字符串以字符數組 s 的形式給出。
不要給另外的數組分…


計算機網絡--物理層練習題
習題
下列說法正確的是(D)
A 信道與通信電路類似,一條可通信的電路往往包含一個信道 信道不等于通信電路,一條可雙向通信的電路往往包含兩個信道:一個是發送信道,一條是接收信道。另外,多個通…

【國際化】用JQuery-i18next的國際化demo,引入json
參考: 使用 i18next 的 jQuery 國際化 (i18n) 漸進式指南 (locize.com) i18next-http-backend/example/jquery/index.html at master i18next/i18next-http-backend (github.com) 文檔 可能需要解決一下跨域問題,因為瀏覽器讀取本…

Unity學習之Unity中的MVC思想
文章目錄 1 前言2 MVC的基本概念3 不使用MVC思想制作UI邏輯3.1 拼面板3.2 面板腳本3.3 角色面板邏輯3.4 角色升級 4 使用MVC思想制作UI邏輯4.1 Model數據腳本4.2 View界面腳本4.2.1 MainView主界面4.2.2 RoleView 角色面板界面 4.3 Controller業務邏輯腳本4.3.1 MainController…

【開源軟件????】
開源軟件的影響力在當今的科技領域越來越顯著,它已經成為軟件開發的主流趨勢之一。開源軟件具有開放源代碼、可免費使用、可自由分發等特點,這使得它在全球范圍內得到了廣泛的應用和支持。本文將圍繞開源軟件如何推動技術創新、開源軟件的商業模式、開源…

phaseDNN文章解讀
文章DOI: https://doi.org/10.48550/arXiv.1905.01389 作者是 Southern Methodist University 的Wei Cai 教授
A Parallel Phase Shift Deep Neural Network for Adaptive Wideband Learning 一種并行移相深度神經網絡來自適應學習寬帶頻率信號 20190514 核心思想:…
-day05)
跟著pink老師前端入門教程(JavaScript)-day05
六、語句
(一)表達式和語句
1、表達式
表達式是可以被求值的代碼,JavaScript 引擎會將其計算出一個結果。
2、語句
語句是一段可以執行的代碼。
比如: prompt() 可以彈出一個輸入框,還有 if語句 for 循環語句等…

h5 js監聽手機切到后臺和切回
在H5中可以使用JavaScript來監聽手機從前臺切換到后臺或者從后臺切換回前臺的事件。
監聽頁面進入/退出后臺(切換到其他應用):
document.addEventListener(visibilitychange, function() {if (document.hidden) { // 當頁面被切換至后臺時c…
)
C# 類型的默認值(C# 參考)
C# 類型的默認值 - C# 參考 - C# | Microsoft Learn
EntityFrameworkQueryableExtensions.FirstOrDefaultAsync 方法 (Microsoft.EntityFrameworkCore) | Microsoft Learn
當使用EFCore的FirstOrDefaultAsync方法時,需清楚當查詢不到數據返回null還是什么…
