CentOS 7
基本信息
系統版本: CentOS 7.3 64bit
系統配置: 4vCPUs | 8GB
磁盤空間:
[root@ecs-ce5a-0001 ~]# df -h
Filesystem Size Used Avail Use% Mounted on
/dev/vda1 40G 17G 22G 44% /
devtmpfs 3.9G 0 3.9G 0% /dev
tmpfs 3.9G 0 3.9G 0% /dev/shm
tmpfs 3.9G 25M 3.8G 1% /run
tmpfs 3.9G 0 3.9G 0% /sys/fs/cgroup
tmpfs 783M 0 783M 0% /run/user/0
/dev/vdb1 493G 70M 467G 1% /data
[root@ecs-ce5a-0001 ~]#
檢查歷史殘留
使用rpm查詢功能,查詢本機是否有安裝過MySQL(由于安裝事后若是不完全卸載的話,會致使后續安裝出現一些異常問題,因此為了保險起見仍是先檢查一下為好):html
# 沒有裝過MySQL的主機
[root@ecs-ce5a-0001 ~]# rpm -qa|grep -i mysql
[root@ecs-ce5a-0001 ~]#
# 以前裝過MySQL的主機
[root@mserver0002 img]# rpm -qa|grep -i mysql
mysql-community-common-5.7.24-1.el6.x86_64
mysql-community-client-5.7.24-1.el6.x86_64
mysql-community-libs-5.7.24-1.el6.x86_64
mysql-community-server-5.7.24-1.el6.x86_64
[root@mserver0002 img]#
若發現有歷史安裝痕跡,那么就要進行下一步的清理操做來清除歷史垃圾了,挨個將全部的安裝包清理完畢(若出現卸載不掉的能夠嘗試使用rpm -ev):mysql
[root@mserver0002 img]# yum -y remove mysql-community-common-5.7.24-1.el6.x86_64
[root@mserver0002 img]# yum -y remove xxx
下載安裝源
MySQL有個安裝源倉庫站: http://repo.mysql.com/ ;里面有一大排的安裝源連接,這時候可不能找錯了,對應于咱們這次安裝的CentOS7.3版本咱們選用帶el7的源: http://repo.mysql.com/mysql57-community-release-el7-9.noarch.rpm ;這一步切記千萬不能大意,下載的版本一旦和系統沒法對應,那么接下來的全部操做都是白費工夫,并且還有可能遇到一些意想不到的問題。c++
[root@ecs-ce5a-0001 ~]# cd tmp/
[root@ecs-ce5a-0001 tmp]# ls
[root@ecs-ce5a-0001 tmp]# wget http://repo.mysql.com/mysql57-community-release-el7-9.noarch.rpm
--2018-11-14 10:29:03-- http://repo.mysql.com/mysql57-community-release-el7-9.noarch.rpm
......
2018-11-14 10:29:04 (253 MB/s) - ‘mysql57-community-release-el7-9.noarch.rpm’ saved [9224/9224]
[root@ecs-ce5a-0001 tmp]#
安裝mysql-server
在通過上一步將安裝源下載到本地以后,接下來就是安裝了;先經過rpm將安裝源安裝后,就能夠正式使用yum進行mysql-server的安裝了(聽說也能夠在安裝時指定installroot,沒有嘗試過,通常都是默認安裝的),有須要確認的地方之間y就能夠了;直至出現“Complete!”意味著安裝順利完成了。sql
[root@ecs-ce5a-0001 tmp]# rpm -ivh mysql57-community-release-el7-9.noarch.rpm
warning: mysql57-community-release-el7-9.noarch.rpm: Header V3 DSA/SHA1 Signature, key ID 5072e1f5: NOKEY
Preparing... ################################## [100%]
Updating / installing...
1:mysql57-community-release-el7-9 ################################# [100%]
[root@ecs-ce5a-0001 tmp]#
[root@ecs-ce5a-0001 tmp]# yum -y install mysql-server
Loaded plugins: fastestmirror
Determining fastest mirrors
......
Replaced:
mariadb-libs.x86_64 1:5.5.60-1.el7_5
Complete!
[root@ecs-ce5a-0001 tmp]#
默認配置查看
默認狀況下,安裝后的配置文件是下面這樣子的(咱們能夠根據本身的須要將相應的配置補充或者進行修改,好比datadir通常都會設置到專屬的數據目錄下面去):數據庫
[root@ecs-ce5a-0001 tmp]# vim /etc/my.cnf
[mysqld]
# ... some comments
datadir=/var/lib/mysql
socket=/var/lib/mysql/mysql.sock
# Disabling symbolic-links is recommended to prevent assorted security risks
symbolic-links=0
log-error=/var/log/mysqld.log
pid-file=/var/run/mysqld/mysqld.pid
啟動服務
啟動MySQL服務,當前版本的MySQL在啟動時會默認生成一個root用戶并提供默認密碼,咱們能夠在/var/log/mysqld.log文件中獲取到默認密碼,至此服務正常啟動完成,并獲取到了默認的root密碼。ubuntu
[root@ecs-ce5a-0001 tmp]# service mysqld restart
Redirecting to /bin/systemctl restart mysqld.service
[root@ecs-ce5a-0001 tmp]#
[root@ecs-ce5a-0001 tmp]# grep password /var/log/mysqld.log
2018-11-14T03:07:28.036081Z 1 [Note] A temporary password is generated for root@localhost: 8-8br-HfR4J9
[root@ecs-ce5a-0001 tmp]#
修改密碼和賦權
使用默認密碼登陸后,發現啥也作不了,必須修改密碼,因此使用了alter來進行密碼修改(密碼要求比早版本的嚴格了不少,長度、特殊字符、字母和數字都有要求),關于賦權,后面的補充知識里面會專門稍微詳細的說明一下。vim
[root@ecs-ce5a-0001 tmp]# mysql -uroot -p8-8br-HfR4J9
mysql: [Warning] Using a password on the command line interface can be insecure.
......
mysql> use mysql
ERROR 1820 (HY000): You must reset your password using ALTER USER statement before executing this statement.
mysql> alter user 'root'@'localhost' identified by 'smart';
ERROR 1819 (HY000): Your password does not satisfy the current policy requirements
mysql> alter user 'root'@'localhost' identified by 'Smart@123';
Query OK, 0 rows affected (0.00 sec)
mysql> flush privileges;
Query OK, 0 rows affected (0.00 sec)
mysql>
CentOS 6
無果的嘗試
理論上來講,CentOS6和CentOS7安裝MySQL的步驟應該是一致的,起碼大部分的步驟都應該是一致的,可是事實上卻并不如此。
按照傳統的安裝方式,即便在下載repo時選擇了正確的平臺版本,最后發現仍是在yum -y install mysql-server這一步遇到了缺GLIBC_2.14的問題(相似下面這種),也曾經嘗試過本身編譯安裝這個庫,可是沒有成功,既然此路不通,那何不另覓新法呢!windows
Error: Package: mysql-community-libs-5.7.17-1.el7.x86_64 (mysql57-community-dmr)
Requires: libc.so.6(GLIBC_2.14)(64bit)
Error: Package: mysql-community-client-5.7.17-1.el7.x86_64 (mysql57-community-dmr)
Requires: libc.so.6(GLIBC_2.14)(64bit)
Error: Package: mysql-community-client-5.7.17-1.el7.x86_64 (mysql57-community-dmr)
Requires: libstdc++.so.6(GLIBCXX_3.4.15)(64bit)
You could try using --skip-broken to work around the problem
另謀出路
既然在線安裝會出問題,那么不妨試試傳統的安裝方式,把安裝包下載到本地再手動安裝呢?
因而就找到知足咱們系統要求的版本(下載地址: https://dev.mysql.com/downloads/file/?id=481078 ),下載到本地(文件名:mysql-5.7.24-1.el6.x86_64.rpm-bundle.tar,這里的el6就是適配CentOS6的);壓縮包里有以下一堆文件:centos
Administrator@IVF21BBAA9XWLKD MINGW64 /e/暫時存放/mysql-5.7.24-1.el6.x86_64.rpm-bundle
$ ls
mysql-community-client-5.7.24-1.el6.x86_64.rpm
mysql-community-common-5.7.24-1.el6.x86_64.rpm
mysql-community-devel-5.7.24-1.el6.x86_64.rpm
mysql-community-embedded-5.7.24-1.el6.x86_64.rpm
mysql-community-embedded-devel-5.7.24-1.el6.x86_64.rpm
mysql-community-libs-5.7.24-1.el6.x86_64.rpm
mysql-community-libs-compat-5.7.24-1.el6.x86_64.rpm
mysql-community-server-5.7.24-1.el6.x86_64.rpm
mysql-community-test-5.7.24-1.el6.x86_64.rpm
接下來就分別按順序安裝common、libs、client、server四個包(其余工具包能夠視狀況決定是否安裝);這里的四個包也是能夠一次性安裝的(命令如:rpm -ivh pkg1 pkg2 pkg3 pkg4):安全
[root@mserver0002 img]# rpm -ivh mysql-community-common-5.7.24-1.el6.x86_64.rpm
[root@mserver0002 img]# rpm -ivh mysql-community-libs-5.7.24-1.el6.x86_64.rpm
[root@mserver0002 img]# rpm -ivh mysql-community-client-5.7.24-1.el6.x86_64.rpm
[root@mserver0002 img]# rpm -ivh mysql-community-server-5.7.24-1.el6.x86_64.rpm
安裝完成后,后面的操做步驟就和CentOS7沒什么差別了,無非是改改配置文件,設置密碼和權限之類的操做了。
Ubuntu 16
先說兩句
早幾年Ubuntu的系統使用的仍是挺多的,可是現在不少應用默認都是使用CentOS了,其實孰優孰劣我還真沒詳細比較過,不過一個比較明顯的感受呢,Ubuntu安裝軟件比起CentOS好像是比較簡便一些,更傻瓜式一點,因此都了解一下也沒什么壞處。
實際操做
鑒于下載安裝個系統仍是要耗費很多精力,因此此次也就偷個小懶,沒有實際去驗證這個操做了,可是以前由于已經裝過不少次Ubuntu環境的MySQL了,結合網上的一些博客說明,大體也就如下幾個步驟:
# 先經過以下3條命令完成安裝
sudo apt-get install mysql-server
sudo apt install mysql-client
sudo apt install libmysqlclient-dev
# 而后查看一下mysql的端口監聽確認服務是否正常啟動
sudo netstat -tap | grep mysql
安裝到這里就已經算成功了,后面的步驟又是老調重彈了(配置、密碼、權限等等),因此也就很少說了。
Windows 10
安裝版
貌似在5.5或以前的版本還挺流行安裝的,無非是一步步next,到最后設置個root密碼,而后就萬事大吉;到如今比較新的發行版好像都流行使用免安裝的方式了,并且安裝版的操做實際上也是小學生級的,只要稍微熟悉電腦操做的,估計裝起來都不會遇到啥問題,因此這里就很少說了。
安裝版(MSI)的下載地址: https://dev.mysql.com/downloads/windows/installer/8.0.html 。
免安裝版
下載安裝源
解壓安裝
將壓縮包解壓到某個目錄下(這里我是在虛擬機里面安裝的,因此直接放在C盤根目錄下了);而后以管理員權限運行CMD,進入mysql解壓目錄的bin。
到這里理論上來講是要配置一下my.ini文件的(也就是Linux版的my.cnf文件),鑒于此次只是作簡單的安裝實驗,因此就略去這一步操做。
接下來在dos窗口運行mysqld --initialize-insecure(注意:這里有坑,參考文章最后的常見錯誤提供了解決方法)
而后就能夠install和start了,出現下面的成功日志即表示服務已經成功啟動了。
Microsoft Windows [版本 10.0.10240]
(c) 2015 Microsoft Corporation. All rights reserved.
C:\Windows\system32>cd ../../
C:\>cd mysql-8.0.13-winx64
C:\mysql-8.0.13-winx64>cd bin
C:\mysql-8.0.13-winx64\bin>mysqld --initialize-insecure
C:\mysql-8.0.13-winx64\bin>mysqld -install
Service successfully installed.
C:\mysql-8.0.13-winx64\bin>net start mysql
MySQL 服務正在啟動 ..
MySQL 服務已經啟動成功。
C:\mysql-8.0.13-winx64\bin>
安裝結果驗證
在前面的安裝操做中咱們一直沒有設置root密碼,因此在驗證以前咱們要設置一下root密碼,按照下面的步驟操做便可;密碼設置完成后便可登陸進行常規操做,以下即表示安裝成功。
C:\mysql-8.0.13-winx64\bin>mysqladmin -u root password Smart@123
mysqladmin: [Warning] Using a password on the command line interface can be insecure.
Warning: Since password will be sent to server in plain text, use ssl connection to ensure password safety.
C:\mysql-8.0.13-winx64\bin>mysql -uroot -p
Enter password: *********
Welcome to the MySQL monitor. Commands end with ; or \g.
Your MySQL connection id is 10
Server version: 8.0.13 MySQL Community Server - GPL
Copyright (c) 2000, 2018, Oracle and/or its affiliates. All rights reserved.
Oracle is a registered trademark of Oracle Corporation and/or its
affiliates. Other names may be trademarks of their respective
owners.
Type 'help;' or '\h' for help. Type '\c' to clear the current input statement.
mysql> show databases ;
+--------------------+
| Database |
+--------------------+
| information_schema |
| mysql |
| performance_schema |
| sys |
+--------------------+
4 rows in set (0.01 sec)
mysql>
補充內容
實際上這種免安裝模式是將MySQL注冊為Windows的一個服務了,經過查看服務列表咱們能發現這個MySQL服務,也能夠控制服務的啟動方式、運行狀態等等。
怎么卸載?
首先要中止當前正在運行的服務,而后刪除mysql目錄
而后打開注冊表編輯器(regedit),找到并清除如下項:
HKEY_LOCAL_MACHINE/SYSTEM/ControlSet001/Services/Eventlog/Application/MySQLD Service
HKEY_LOCAL_MACHINE/SYSTEM/CurrentControlSet/Services/Eventlog/Application/MySQLD Service
最后須要刪除已注冊到系統中的MySQL服務
C:\Windows\system32>sc delete MySQL
[SC] DeleteService 成功
C:\Windows\system32>
小葵花補充知識點
關于密碼規則
MySQL的密碼設置有不一樣的規則等級,具體說來是跟validate_password_policy這個配置相關的(默認是1,即MEDIUM,因此剛開始設置的密碼必須符合長度,且必須含有數字,小寫或大寫字母,特殊字符。):
Policy
Tests Performed
0 or LOW
Length
1 or MEDIUM
Length; numeric, lowercase/uppercase, and special characters
2 or STRONG
Length; numeric, lowercase/uppercase, and special characters; dictionary file
忘記密碼了怎么辦?
有時長時間不用某服務器了,猛地有一天想去看看數據卻發現密碼忘了,非常尷尬吧?這時候就須要用到了skip-grant-tables 這個配置了,在my.cnf中將這個配置項打開而后restart一下服務,就能夠不用校驗密碼登陸mysql服務器了,登陸進去以后再給本身的root從新設置一下密碼update mysql.user set authentication_string=password('Smart@123') where user='root' ;,大功告成!
[root@mserver0002 img]# cat /etc/my.cnf
[mysqld]
####basic settings####
#skip-grant-tables
default-storage-engine=INNODB
......
# 修改完配置文件后可使用空密碼登陸(在Enter password:出現后直接敲enter鍵)
[root@ecs-ce5a-0001 etc]# mysql -uroot -p
Enter password:
Welcome to the MySQL monitor. Commands end with ; or \g.
......
mysql> use mysql
Database changed
mysql> SET PASSWORD = PASSWORD('Smart@123');
ERROR 1290 (HY000): The MySQL server is running with the --skip-grant-tables option so it cannot execute this statement
mysql> ALTER USER 'root'@'localhost' IDENTIFIED BY 'Smart@123';
ERROR 1290 (HY000): The MySQL server is running with the --skip-grant-tables option so it cannot execute this statement
mysql> update mysql.user set password=password('Smart@123') where user= 'root';
ERROR 1054 (42S22): Unknown column 'password' in 'field list'
mysql> desc mysql.user
-> ;
+------------------------+-----------------------------------+------+-----+-----------------------+-------+
| Field | Type | Null | Key | Default | Extra |
+------------------------+-----------------------------------+------+-----+-----------------------+-------+
| Host | char(60) | NO | PRI | | |
......
| authentication_string | text | YES | | NULL | |
| password_expired | enum('N','Y') | NO | | N | |
| password_last_changed | timestamp | YES | | NULL | |
| password_lifetime | smallint(5) unsigned | YES | | NULL | |
| account_locked | enum('N','Y') | NO | | N | |
+------------------------+-----------------------------------+------+-----+-----------------------+-------+
45 rows in set (0.00 sec)
mysql> update mysql.user set authentication_string=password('Smart@123') where user= 'root';
Query OK, 1 row affected, 1 warning (0.00 sec)
Rows matched: 1 Changed: 1 Warnings: 1
mysql> FLUSH PRIVILEGES;
Query OK, 0 rows affected (0.01 sec)
mysql> exit
Bye
[root@ecs-ce5a-0001 etc]# mysql -uroot -p
# 在這里輸入新設置的密碼Smart@123
Enter password:
Welcome to the MySQL monitor. Commands end with ; or \g.
......
mysql>
關于賦權的說明
首先說說改密碼,其實有下面兩種途徑均可以;而賦權則會涉及的比較多,能夠參考下面的操做樣例(關于用戶權限管理,這么小小的一段是說不清楚的,后面會單獨開新的章節進行詳細說明):
ALTER USER 'root'@'localhost' IDENTIFIED BY 'Smart@123';
flush privileges;
SET PASSWORD = PASSWORD('Smart@123');
ALTER USER 'root'@'localhost' PASSWORD EXPIRE NEVER;
flush privileges;
-- root所有賦權
grant all privileges on *.* to root@"%" identified by "Smart@123";
flush privileges;
-- 普通用戶部分賦權
grant select,insert,update,delete on db_test.* to test@"%" identified by "Smart@2018";
flush privileges;
查看MySQL版本
有時候不免會有須要查看MySQL版本的需求(好比作庫同步時要查看兩個服務的版本是否是一致能不能同步之類的),下面提供了4中經常使用的數據庫版本查看的方法:
# 方法1
[root@ecs-ce5a-0001 ~]# mysql -V
mysql Ver 14.14 Distrib 5.7.24, for Linux (x86_64) using EditLine wrapper
# 方法2
[root@ecs-ce5a-0001 ~]# mysql --help |grep Distrib
mysql Ver 14.14 Distrib 5.7.24, for Linux (x86_64) using EditLine wrapper
# 方法3
[root@ecs-ce5a-0001 ~]# mysql -uroot -pKoncendy@123
mysql: [Warning] Using a password on the command line interface can be insecure.
Welcome to the MySQL monitor. Commands end with ; or \g.
Your MySQL connection id is 12
Server version: 5.7.24-log MySQL Community Server (GPL)
Copyright (c) 2000, 2018, Oracle and/or its affiliates. All rights reserved.
Oracle is a registered trademark of Oracle Corporation and/or its
affiliates. Other names may be trademarks of their respective
owners.
Type 'help;' or '\h' for help. Type '\c' to clear the current input statement.
mysql> select version();
+------------+
| version() |
+------------+
| 5.7.24-log |
+------------+
1 row in set (0.00 sec)
# 方法4
mysql> status
--------------
mysql Ver 14.14 Distrib 5.7.24, for Linux (x86_64) using EditLine wrapper
Connection id:12
Current database:
Current user:root@
SSL:Not in use
Current pager:stdout
Using outfile:''
Using delimiter:;
Server version:5.7.24-log MySQL Community Server (GPL)
Protocol version:10
Connection:Localhost via UNIX socket
Server characterset:utf8
Db characterset:utf8
Client characterset:utf8
Conn. characterset:utf8
UNIX socket:/data/mysql/mysql.sock
Uptime:5 min 21 sec
Threads: 6 Questions: 293 Slow queries: 6 Opens: 195 Flush tables: 1 Open tables: 156 Queries per second avg: 0.912
--------------
mysql>
常見的錯誤
遠程沒法訪問
一般狀況下,有兩個可能性比較大的緣由:
bind-address沒設置對,端口綁定到127.0.0.1上面去了
云服務器的3306端口沒有作安全組規則開放(這個在本地服務器安裝不會出現)
目錄初始化問題
啟動時失敗經過journalctl -xe查看發現以下的錯入日志,通常出現這個錯誤表示my.cnf里指定的datadir不是一個空目錄(有垃圾文件或者有以前初始化殘留的文件);已經初始化,但沒有成功,想再次初始化報錯;這時須要清理這個目錄以后從新嘗試啟動服務。
...: 2018-11-14T13:43:11.806347+08:00 0 [ERROR] --initialize specified but the data directory has files in it. Aborting.
日志權限的問題
啟動時失敗經過journalctl -xe查看發現以下的錯入日志,實際上就是寫日志文件沒有權限致使的錯誤。可是我在執行了[root@ecs-ce5a-0001 etc]# chmod -R 766 /var/log/mysql以后發現啟動服務后仍是會報下面的錯誤,很奇怪(由于766已經對應的是-rwxrw-rw-這個權限級別,能夠讀寫了);后來將766調整為777才能夠正常啟動服務。(沒徹底弄明白為何對日志目錄要執行權限?)
...: 2018-11-14T13:44:17.230008+08:00 0 [ERROR] Could not open file '/var/log/mysql/error.log' for error logging: Permission denied
MSVCP140.dll缺失
windows下出現的,在dos窗口運行mysqld --initialize-insecure,這時出現以下提示:
---------------------------
mysqld.exe - 系統錯誤
---------------------------
沒法啟動此程序,由于計算機中丟失 MSVCP140.dll。嘗試從新安裝該程序以解決此問題。
---------------------------
肯定
---------------------------
實際上這個問題是由于沒有安裝VC++2015版運行庫致使的(Microsoft Visual C++ 2015 Redistributable),到以下下載地址 https://www.microsoft.com/en-us/download/details.aspx?id=53587 ,按照本機操做系統的位數肯定下載的包,安裝后便可解決此問題。
客戶端鏈接MySQL 8報1251
經過SQLyog或者Navicat鏈接MySQL發現報1251以下錯誤提示:
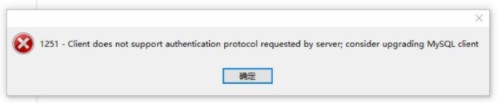
百度了一下,緣由是mysql8以前的版本中加密規則是mysql_native_password,在mysql8以后加密規則改為了caching_sha2_password;解決的方法有兩種,一種是升級客戶端驅動,一種是把mysql用戶登陸密碼加密規則還原成mysql_native_password;由于我們大多數都是本身想辦法搞得客戶端,因此就選擇第二條路了;操做以下:
# Login
mysqladmin -u root -p
......
# Execute SQL
ALTER USER 'root'@'localhost' IDENTIFIED BY 'password' PASSWORD EXPIRE NEVER;
ALTER USER 'root'@'localhost' IDENTIFIED WITH mysql_native_password BY 'admin123';
FLUSH PRIVILEGES;


示例)

![28、清華大學腦機接口實驗組SSVEP數據集:通過視覺觸發BCI[飛一般的趕腳!]](http://pic.xiahunao.cn/28、清華大學腦機接口實驗組SSVEP數據集:通過視覺觸發BCI[飛一般的趕腳!])


讀取內存地址并在C中打印其值)
