1.背景
在使用Spring MVC時候大部分同學都會定義兩個配置文件,一個是Spring的配置文件spring.xml,另一個是Spring MVC的配置文件spring-mvc.xml。
在這里給大家拋個問題,如果在spring.xml和spring-mvc.xml文件中同時定義一個相同id的單例bean會怎樣呢?大家可以先思考一下再繼續往下看。
我做了個實驗,結論是:容器中會同時存在兩個相同id 的bean,而且使用起來互不干擾。
這是為什么呢?學過Spring的同學肯定會質疑,眾所周知id是bean的唯一標示,怎么可能同時存在兩個相同id的bean呢?是不是我在胡扯呢?
原諒我在這和大家賣了個關子,其實大家說的都沒錯,因為這里涉及到Spring MVC父子容器的知識點。
這個知識點是:在使用Spring MVC過程中會存在Spring MVC 、Spring兩個IOC容器,且Spring MVC是Spring的子容器。
那這個父子容器到底是什么呢?
為了保證我所說的權威性,而不是知識的二道販子,我將從Spring 官方文檔和源碼兩方面展開介紹。
2.Spring MVC父子容器
2.1 web.xml配置
還是先找程序入口,查看web.xml配置文件,找到Spring MVC相關配置。
<servlet><servlet-name>spring-mvc</servlet-name><servlet-class>org.springframework.web.servlet.DispatcherServlet</servlet-class><init-param><param-name>contextConfigLocation</param-name><param-value>classpath:spring-mvc.xml</param-value></init-param><load-on-startup>1</load-on-startup>
</servlet>
配置很簡單,只是配置了一個類型為DispatcherServlet類型的Servlet,并設置了初始化參數。那DispatcherServlet是什么呢?
2.2 DispatcherServlet類介紹
查看API文檔
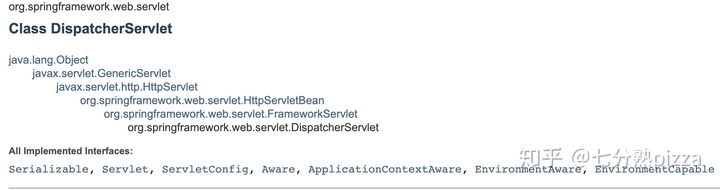
從繼承圖看出最終繼承自HttpServlet,其實就是一個普通的Servlet。那為什么這個Servlet就能完成Spring MVC一系列復雜的功能呢?繼續往下看。
2.3 DispatcherServlet工作流程
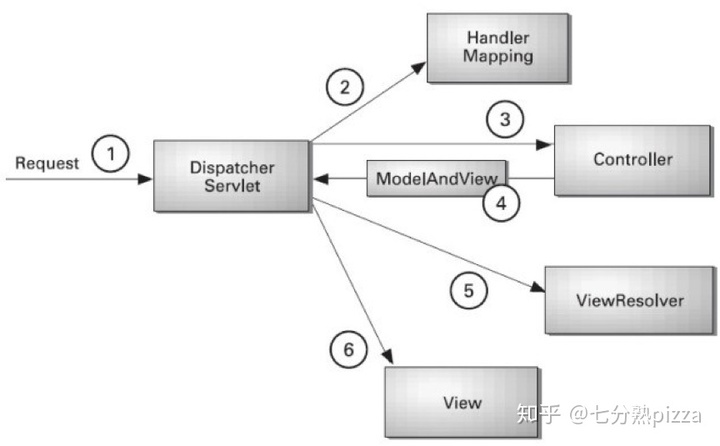
DispatcherServlet工作流程如下:
(1) 所有請求先發到DispacherServlet 。
(2) DispacherServlet根據請求地址去查詢相應的Controller,然后返回給DispacherServlet。
(3) DispacherServlet得到Controller后,讓Controler處理相應的業務邏輯。
(4) Controler處理處理完后將結果返回給DispacherServlet。
(5) DispacherServlet把得到的結果用視圖解析器解析后獲得對應的頁面。
(6) DispacherServlet跳轉到解析后的頁面。
在整個過程中DispatcherServlet承當了一個中心控制器的角色來處理各種請求。
2.4 DispatcherServlet上下文繼承關系
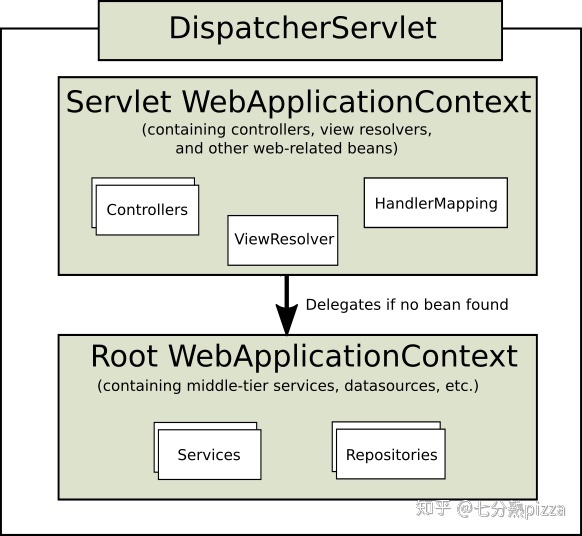
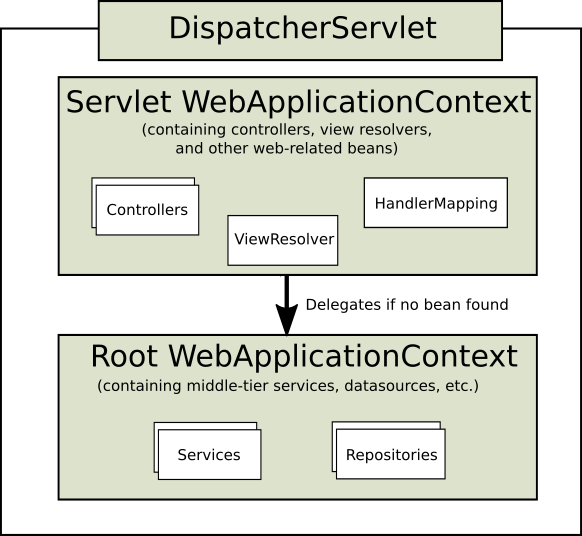
上圖來自Spring官網:
https://docs.spring.io/spring/docs/current/spring-framework-reference/web.html從圖中可以看到DispatcherServlet里面有一個 Servlet WebApplicationContext,繼承自 Root WebApplicationContext。
從上篇文章中我們知道WebApplicationContext其實就是一個IOC容器,root WebApplicationContext是Spring容器。
這說明DispatcherServlet中里創建了一個IOC容器并且這個容器繼承了Spring 容器,也就是Spring的子容器。
而且官方文檔中還有如下一段文字描述:
For many applications, having a single WebApplicationContext is simple and suffices. It is also possible to have a context hierarchy where one root WebApplicationContext is shared across multiple DispatcherServlet (or other Servlet) instances, each with its own child WebApplicationContext configuration. See Additional Capabilities of the ApplicationContext for more on the context hierarchy feature.The root WebApplicationContext typically contains infrastructure beans, such as data repositories and business services that need to be shared across multiple Servlet instances.
Those beans are effectively inherited and can be overridden (that is, re-declared) in the Servlet-specific child WebApplicationContext, which typically contains beans local to the given Servlet.
結合圖和上述文字我們可以得出以下信息:
- 應用中可以包含多個IOC容器。
- DispatcherServlet的創建的子容器主要包含Controller、view resolvers等和web相關的一些bean。
- 父容器root WebApplicationContex主要包含包含一些基礎的bean,比如一些需要在多個servlet共享的dao、service等bean。
- 如果在子容器中找不到bean的時候可以去父容器查找bean。
看到這里也許大家心中也許就明白文章開頭中我說的Spring MVC中的父子容器了,對那個問題也有了自己的判斷和答案。
當然文章還沒有結束,畢竟這還僅限于對官方文檔的理解,為了進一步驗證,我們拿出終極武器:
閱讀源碼!
2.5 DispatcherServlet源碼分析
本小節我們分為Spring MVC容器的創建和bean的獲取兩部分進行分析。
2.5.1 Spring MVC容器的創建
前面分析到DispatcherServlet本質上還是一個Servlet ,既然是Servlet ,了解Servlet生命周期的同學都知道Web 容器裝載Servlet第一步是執行init()函數,因此以DispatcherServlet 的init函數為突破口進行分析。
@Override
public final void init() throws ServletException {// 1.讀取init parameters 等參數,其中就包括設置contextConfigLocation PropertyValues pvs = new ServletConfigPropertyValues(getServletConfig(), this.requiredProperties);//2.初始化servlet中使用的beaninitServletBean();
}
在第1步讀取init parameter的函數最終會調用setContextConfigLocation()設置配置文件路徑。此處重點介紹initServletBean(),繼續跟蹤。
Override
protected final void initServletBean() throws ServletException {//初始化webApplicationContextthis.webApplicationContext = initWebApplicationContext();
}
protected WebApplicationContext initWebApplicationContext() {//1.獲得rootWebApplicationContextWebApplicationContext rootContext =WebApplicationContextUtils.getWebApplicationContext(getServletContext());WebApplicationContext wac = null;//2.如果還沒有webApplicatioinContext,創建webApplicationContextif (wac == null) {//創建webApplicationContextwac = createWebApplicationContext(rootContext);}return wac;
}
可以看到上面初始化webApplicationContext分為2步。
(1)獲取父容器rootWebApplicationContext。
(2)創建子容器。
我們先看看rootWebApplicationContext是如何獲取的。
public static WebApplicationContext getWebApplicationContext(ServletContext sc) {return getWebApplicationContext(sc, WebApplicationContext.ROOT_WEB_APPLICATION_CONTEXT_ATTRIBUTE);
}public static WebApplicationContext getWebApplicationContext(ServletContext sc, String attrName) {Object attr = sc.getAttribute(attrName);return (WebApplicationContext) attr;
}
從上面代碼中我沒看到是從ServletContext獲取了名為“WebApplicationContext.ROOT_WEB_APPLICATION_CONTEXT_ATTRIBUTE”的webApplicationContext。
認真看過上篇文章的同學應該記得這個屬性是在Spring初始化 容器initWebApplicationContext()函數中的第3步設置進去的,取得的值即Spring IOC容器。
繼續看如何創建webApplicationContext。
protected WebApplicationContext createWebApplicationContext(WebApplicationContext parent) {return createWebApplicationContext((ApplicationContext) parent);
}
createWebApplicationContext(ApplicationContext parent) {//1.獲取WebApplicationContext實現類,此處其實就是XmlWebApplicationContextClass<?> contextClass = getContextClass();//生成XmlWebApplicationContext實例ConfigurableWebApplicationContext wac =(ConfigurableWebApplicationContext) BeanUtils.instantiateClass(contextClass);//2.設置rootWebApplicationContext為父容器 wac.setParent(parent);//3.設置配置文件wac.setConfigLocation(getContextConfigLocation());//4.配置webApplicationContext.configureAndRefreshWebApplicationContext(wac);return wac;
}
protected void configureAndRefreshWebApplicationContext(ConfigurableWebApplicationContext wac) {//開始處理beanwac.refresh();
}
看到這里同學們有沒有是曾相識的感覺。是的,這段邏輯和上篇文章創建Spring IOC的邏輯類似。
唯一不同的是在第2步會把Spring容器設置為自己的父容器。至于新建容器中bean的注冊、解析、實例化等流程和Spring IOC容器一樣都是交給XmlWebApplicationContext類處理,還沒有掌握的同學可以看上篇文章。
2.5.2 Spring MVC Bean的獲取
Spring MVC bean的獲取其實我們在上篇文章已經介紹過,這次再單拎出來介紹一下,加深記憶。
protected <T> T doGetBean(// 獲取父BeanFactoryBeanFactory parentBeanFactory = getParentBeanFactory();//如果父容器不為空,且本容器沒有注冊此bean就去父容器中獲取beanif (parentBeanFactory != null && !containsBeanDefinition(beanName)) {// 如果父容器有該bean,則調用父beanFactory的方法獲得該beanreturn (T) parentBeanFactory.getBean(nameToLookup,args);}//如果子容器注冊了bean,執行一系列實例化bean操作后返回bean.//此處省略實例化過程.....return (T) bean;
}
上面代碼就可以對應官方文檔中“如果子容器中找不到bean,就去父容器找”的解釋了。
3.小結
看完上面的介紹,相信大家對Spring MVC父子容器的概念都有所了解,現在我們分析文章開頭的問題。
如果spring.xml和spring-mvc.xml定義了相同id的bean會怎樣?假設id=test。
1.首先Spring 初始化,Spring IOC 容器中生成一個id為test bean實例。
2.Spring MVC開始初始化,生成一個id為test bean實例。
此時,兩個容器分別有一個相同id的bean。那用起來會不會混淆?
答案是不會。
當你在Spring MVC業務邏輯中使用該bean時,Spring MVC會直接返回自己容器的bean。
當你在Spring業務邏輯中使用該bean時,因為子容器的bean對父親是不可見的,因此會直接返回Spring容器中的bean。
雖然上面的寫法不會造成問題。但是在實際使用過程中,建議大家都把bean定義都寫在spring.xml文件中。
因為使用單例bean的初衷是在IOC容器中只存在一個實例,如果兩個配置文件都定義,會產生兩個相同的實例,造成資源的浪費,也容易在某些場景下引發缺陷。
4.尾聲
現在大家基本都不使用在xml文件中定義bean的形式,而是用注解來定義bean,然后在xml文件中定義掃描包。如下:
<context:component-scan base-package="xx.xx.xx"/>那如果在spring.xml和spring-mvc.xml配置了重復的包會怎樣呢?
如果本文看明白的同學此時已經知道了答案。
答案是會在兩個父子IOC容器中生成大量的相同bean,這就會造成內存資源的浪費。
也許有同學想到,那只在spring.xml中設置掃描包不就能避免這種問題發生了嗎,答案是這樣嗎?
大家可以試試,這樣會有什么問題。如果不行,那是為什么呢?
欲知分曉,敬請期待下篇分解!
如果想獲得更多,歡迎關注公眾號:七分熟pizza
公眾號里我會分享更多技術以及職場方面的經驗,大家有什么問題也可以直接在公眾號向我提問交流。


根。A.32B.20C.16D.30 - 試題答案網問答...)


