原文:http://blog.csdn.net/u012702547/article/details/52077515
---------------------------------------------------------
MVP可以結合android的DataBinding
-------------------------以下轉載---------------
C# 很早就有了MVVM的開發模式,Android手機中的MVVM一直到去年Google的I\O大會上才推出,姍姍來遲。MVVM這中開發模式的優點自不必多說,可以實現視圖和邏輯代碼的解耦,而且,按照Google的說法,使用了MVVM的開發模式,還可以提高布局文件的解析速度,個人覺得這一點非常重要。我們在安卓開發中經常需要寫很多個findViewById,讓人心煩,很多人不想寫這個于是用了一些注解框架,可是注解框架無論性能多好,效率總是要低于findViewById的,因此,Android中的MVVM也即databinding可以幫助我們徹底解決這個問題。OK,廢話不多說,我們來看看具體要怎么在Android開發中使用MVVM。
在低版本的AndroidStudio中使用DataBinding稍微有點麻煩,這里不做介紹。我這里以AndroidStuido2.1為例來介紹DataBinding。本文主要包含以下幾方面內容:
1.基本使用
2.綁定ImageView
3.綁定ListView
4.點擊事件處理
5.數據更新處理
好了,那就開始吧!
1.基本使用
創建好一個Android Project之后,在gradle文件中添加如下幾行代碼,表示開啟databinding:
- android?{??
- ????...??
- ????...??
- ????...??
- ????dataBinding{??
- ????????enabled?true??
- ????}??
- }??
就是這么簡單,一個簡單的databinding配置之后,就可以開始使用數據綁定了。
要使用數據綁定,我們得首先創建一個實體類,比如User實體類,如下:
- ?
- ?
- ??
- public?class?UserEntity?{??
- ????private?String?username;??
- ????private?String?nickname;??
- ????private?int?age;??
- ??
- ????public?UserEntity()?{??
- ????}??
- ??
- ????public?int?getAge()?{??
- ????????return?age;??
- ????}??
- ??
- ????public?void?setAge(int?age)?{??
- ????????this.age?=?age;??
- ????}??
- ??
- ????public?String?getNickname()?{??
- ????????return?nickname;??
- ????}??
- ??
- ????public?void?setNickname(String?nickname)?{??
- ????????this.nickname?=?nickname;??
- ????}??
- ??
- ????public?String?getUsername()?{??
- ????????return?username;??
- ????}??
- ??
- ????public?void?setUsername(String?username)?{??
- ????????this.username?=?username;??
- ????}??
- ??
- ????public?UserEntity(int?age,?String?nickname,?String?username)?{??
- ????????this.age?=?age;??
- ????????this.nickname?=?nickname;??
- ????????this.username?=?username;??
- ????}??
- }??
然后我們來看看布局文件該怎么寫,首先布局文件不再是以傳統的某一個容器作為根節點,而是使用<layout></layout>作為根節點,在<layout>節點中我們可以通過<data>節點來引入我們要使用的數據源,如下:
- <?xml?version="1.0"?encoding="utf-8"?>??
- <layout??
- ????xmlns:android="http://schemas.android.com/apk/res/android"??
- ????>??
- ??
- ????<data>??
- ??
- ????????<variable??
- ????????????name="user"??
- ????????????type="org.lenve.databinding1.UserEntity"/>??
- ????</data>??
- ??
- ????<LinearLayout??
- ????????xmlns:tools="http://schemas.android.com/tools"??
- ????????android:layout_width="match_parent"??
- ????????android:layout_height="match_parent"??
- ????????android:orientation="vertical"??
- ????????tools:context="org.lenve.databinding1.MainActivity">??
- ??
- ????????<TextView??
- ????????????android:layout_width="wrap_content"??
- ????????????android:layout_height="wrap_content"??
- ????????????android:text="@{user.username}"/>??
- ??
- ????????<TextView??
- ????????????android:layout_width="wrap_content"??
- ????????????android:layout_height="wrap_content"??
- ????????????android:text="@{user.nickname}"/>??
- ??
- ????????<TextView??
- ????????????android:layout_width="wrap_content"??
- ????????????android:layout_height="wrap_content"??
- ????????????android:text="@{String.valueOf(user.age)}"/>??
- ????</LinearLayout>??
- </layout>??
在data中定義的variable節點,name屬性表示變量的名稱,type表示這個變量的類型,實例就是我們實體類的位置,當然,這里你也可以換一種寫法,如下:
- <data>??
- ??
- ????<import?type="org.lenve.databinding1.UserEntity"/>??
- ????<variable??
- ????????name="user"??
- ????????type="UserEntity"/>??
- </data>??
先使用import節點將UserEntity導入,然后直接使用即可。但是如果這樣的話又會有另外一個問題,假如我有兩個類都是UserEntity,這兩個UserEntity分屬于不同的包中,又該如何?看下面:
- <data>??
- ??
- ????<import?type="org.lenve.databinding1.UserEntity"?alias="Lenve"/>??
- ????<variable??
- ????????name="user"??
- ????????type="Lenve"/>??
- </data>??
在import節點中還有一個屬性叫做alias,這個屬性表示我可以給該類取一個別名,我給UserEntity這個實體類取一個別名叫做Lenve,這樣我就可以在variable節點中直接寫Lenve了。
看完data節點我們再來看看布局文件,TextView的text屬性被我直接設置為了@{user.username},這樣,該TextView一會直接將UserEntity實體類的username屬性的值顯示出來,對于顯示age的TextView,我用了String.valueOf來顯示,因為大家知道TextView并不能直接顯示int型數據,所以需要一個簡單的轉換,事實上,我們還可以在{}里邊進行一些簡單的運算,這些我一會再說。
最后,我們來看看Activity中該怎么寫,setContentView方法不能夠再像以前那樣來寫了,換成下面的方式:
- DataBindingUtil.setContentView(this,?R.layout.activity_main)??
該方法有一個返回值,這個返回值就是系統根據我們的activity_main.xml布局生成的一個ViewModel類,所以完整寫法如下:
- ActivityMainBinding?activityMainBinding?=?DataBindingUtil.setContentView(this,?R.layout.activity_main);??
有了ViewModel,再把數據綁定上去就可以了,如下:
- @Override??
- protected?void?onCreate(Bundle?savedInstanceState)?{??
- ????super.onCreate(savedInstanceState);??
- ????ActivityMainBinding?activityMainBinding?=?DataBindingUtil.setContentView(this,?R.layout.activity_main);??
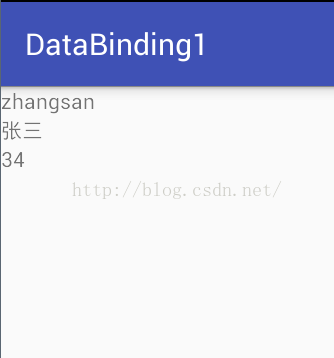
- ????UserEntity?user?=?new?UserEntity();??
- ????user.setAge(34);??
- ????user.setUsername("zhangsan");??
- ????user.setNickname("張三");??
- ????activityMainBinding.setUser(user);??
- }??
運行,顯示效果如下:
OK,那我們剛才還說到可以在@{}進行簡單的計算,都有哪些計算呢?我們來看看:
1.基本的三目運算
- <TextView??
- ????android:layout_width="wrap_content"??
- ????android:layout_height="wrap_content"??
- ????android:text="@{user.username??user.nickname}"/>??
兩個??表示如果username屬性為null則顯示nickname屬性,否則顯示username屬性。
2.字符拼接
- <TextView??
- ????android:layout_width="wrap_content"??
- ????android:layout_height="wrap_content"??
- ????android:text="@{`username?is?:`+user.username}"/>??
大家注意,這里的字符拼接不是用單引號哦,用的是ESC按鍵下面那個按鍵按出來的。目前DataBinding中的字符拼接還不支持中文。
3.根據數據來決定顯示樣式
- <TextView??
- ????android:layout_width="wrap_content"??
- ????android:layout_height="wrap_content"??
- ????android:background="@{user.age?<?30???0xFF0000FF:0xFFFF0000}"??
- ????android:text="@{String.valueOf(user.age)}"/>??
我在這里給TextView設置背景的時候,做了一個簡單的判斷,如果用戶的年齡小于30,背景就顯示為藍色,否則背景就顯示為紅色,DataBinding里支持小于號但是不支持大于號,索性,大于小于號我都用轉義字符來表示。
另外,DataBinding對于基本的四則運算、邏輯與、邏輯或、取反位移等都是支持的,我這里不再舉例。
2.綁定ImageView
OK,上文只是一個簡單的綁定文本,下面我們來看看怎么樣綁定圖片,這里我們還得介紹DataBinding的另一項新功能,就是關于DataBinding自定義屬性的問題,事實上,在我們使用DataBinding的時候,可以給一個控件自定義一個屬性,比如我們下面即將說的這個綁定ImageView的案例。假設我現在想要通過Picasso顯示一張網絡圖片,正常情況下這個顯示很簡單,可是如果我要通過DataBinding來實現,該怎么做呢?我們可以使用
注解來創建一個自定義屬性,同時還要有一個配套的注解的方法。當我們在布局文件中使用這個自定義屬性的時候,會觸發這個被我們注解的方法,這樣說大家可能還有一點模糊,我們來看看新的實體類:
- ?
- ?
- ??
- public?class?User?{??
- ????private?String?username;??
- ????private?String?userface;??
- ??
- ????public?User()?{??
- ????}??
- ??
- ????public?User(String?userface,?String?username)?{??
- ????????this.userface?=?userface;??
- ????????this.username?=?username;??
- ????}??
- ??
- ????@BindingAdapter("bind:userface")??
- ????public?static?void?getInternetImage(ImageView?iv,?String?userface)?{??
- ????????Picasso.with(iv.getContext()).load(userface).into(iv);??
- ????}??
- ??
- ????public?String?getUserface()?{??
- ????????return?userface;??
- ????}??
- ??
- ????public?void?setUserface(String?userface)?{??
- ????????this.userface?=?userface;??
- ????}??
- ??
- ????public?String?getUsername()?{??
- ????????return?username;??
- ????}??
- ??
- ????public?void?setUsername(String?username)?{??
- ????????this.username?=?username;??
- ????}??
- }??
新類里邊只有兩個屬性,分別是用戶名和用戶圖像,用戶圖像中存儲的實際上是一個網絡圖片地址,這里除了基本的get/set方法之外還多了一個叫做getInternetImage的網絡方法,這個方法有一個注解@BindAdapter("bind:userface"),該注解表示當用戶在ImageView中使用自定義屬性userface的時候,會觸發這個方法,我在這個方法中來為這個ImageView加載一張圖片,這里有一點需要注意,就是該方法必須為靜態方法。OK,我們再來看看這次的布局文件:
- <?xml?version="1.0"?encoding="utf-8"?>??
- <layout??
- ????xmlns:android="http://schemas.android.com/apk/res/android"??
- ????xmlns:app="http://schemas.android.com/apk/res-auto"??
- ????>??
- ??
- ????<data>??
- ??
- ????????<variable??
- ????????????name="user"??
- ????????????type="org.lenve.databinding2.User"/>??
- ????</data>??
- ??
- ????<LinearLayout??
- ????????xmlns:tools="http://schemas.android.com/tools"??
- ????????android:layout_width="match_parent"??
- ????????android:layout_height="match_parent"??
- ????????android:orientation="vertical"??
- ????????tools:context="org.lenve.databinding2.MainActivity">??
- ??
- ????????<ImageView??
- ????????????android:id="@+id/iv"??
- ????????????android:layout_width="wrap_content"??
- ????????????android:layout_height="wrap_content"??
- ????????????app:userface="@{user.userface}"></ImageView>??
- ??
- ????????<TextView??
- ????????????android:layout_width="wrap_content"??
- ????????????android:layout_height="wrap_content"??
- ????????????android:text="@{user.username}"/>??
- ????</LinearLayout>??
- </layout>??
大家注意我在ImageView控件中使用userface屬性的時候,使用的前綴不是android而是app哦。再來看看Activity中的代碼:
- @Override??
- protected?void?onCreate(Bundle?savedInstanceState)?{??
- ????super.onCreate(savedInstanceState);??
- ????ActivityMainBinding?dataBinding?=?DataBindingUtil.setContentView(this,?R.layout.activity_main);??
- ????dataBinding.setUser(new?User("http://img2.cache.netease.com/auto/2016/7/28/201607282215432cd8a.jpg",?"張三"));??
- }??
就是這么簡單,加上網絡權限就可以運行了,運行效果如下:

3.綁定ListView
好了,看完了簡單使用之后,不知道你有沒有喜歡上DataBinding,如果還沒有,那就再來看看使用DataBinding來給ListView綁定數據吧,這個你一定會喜歡上的。因為使用這中方式來綁定太簡單了。
先來看看我們要做的效果吧:
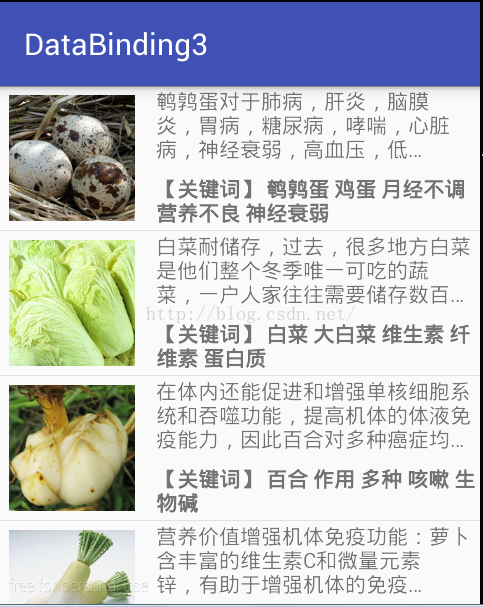
就是一個ListView,左邊顯示圖片,右邊顯示文本,這樣一個效果。OK,那就一步一步來吧,先是主布局:
- <?xml?version="1.0"?encoding="utf-8"?>??
- <RelativeLayout??
- ????xmlns:android="http://schemas.android.com/apk/res/android"??
- ????xmlns:tools="http://schemas.android.com/tools"??
- ????android:layout_width="match_parent"??
- ????android:layout_height="match_parent"??
- ????tools:context="org.lenve.databinding3.MainActivity">??
- ??
- ????<ListView??
- ????????android:id="@+id/lv"??
- ????????android:layout_width="match_parent"??
- ????????android:layout_height="match_parent"></ListView>??
- </RelativeLayout>??
主布局很簡單,就是一個ListView,再來看看ListView的item布局:
- <?xml?version="1.0"?encoding="utf-8"?>??
- <layout??
- ????xmlns:android="http://schemas.android.com/apk/res/android"??
- ????xmlns:app="http://schemas.android.com/apk/res-auto"??
- ????>??
- ??
- ????<data>??
- ??
- ????????<variable??
- ????????????name="food"??
- ????????????type="org.lenve.databinding3.Food"/>??
- ????</data>??
- ??
- ????<RelativeLayout??
- ????????android:layout_width="match_parent"??
- ????????android:layout_height="96dp"??
- ????????android:orientation="vertical">??
- ??
- ????????<ImageView??
- ????????????android:id="@+id/iv"??
- ????????????android:layout_width="96dp"??
- ????????????android:layout_height="96dp"??
- ????????????android:padding="6dp"??
- ????????????app:img="@{food.img}"/>??
- ??
- ????????<TextView??
- ????????????android:id="@+id/description"??
- ????????????android:layout_width="match_parent"??
- ????????????android:layout_height="wrap_content"??
- ????????????android:layout_marginLeft="8dp"??
- ????????????android:layout_toRightOf="@id/iv"??
- ????????????android:ellipsize="end"??
- ????????????android:maxLines="3"??
- ????????????android:text="@{food.description}"/>??
- ??
- ????????<TextView??
- ????????????android:layout_width="wrap_content"??
- ????????????android:layout_height="wrap_content"??
- ????????????android:layout_marginLeft="8dp"??
- ????????????android:layout_toRightOf="@id/iv"??
- ????????????android:layout_alignParentBottom="true"??
- ????????????android:layout_marginBottom="2dp"??
- ????????????android:text="@{food.keywords}"??
- ????????????android:textStyle="bold"/>??
- ????</RelativeLayout>??
- </layout>??
圖片加載、文本加載前兩節都已經說過了,這里的東西就沒有什么難度了,我們再來看看實體類Food:
- ?
- ?
- ??
- public?class?Food?{??
- ????private?String?description;??
- ????private?String?img;??
- ????private?String?keywords;??
- ????private?String?summary;??
- ??
- ????public?Food()?{??
- ????}??
- ??
- ????public?Food(String?description,?String?img,?String?keywords,?String?summary)?{??
- ????????this.description?=?description;??
- ????????this.img?=?img;??
- ????????this.keywords?=?keywords;??
- ????????this.summary?=?summary;??
- ????}??
- ??
- ????@BindingAdapter("bind:img")??
- ????public?static?void?loadInternetImage(ImageView?iv,?String?img)?{??
- ????????Picasso.with(iv.getContext()).load(img).into(iv);??
- ????}??
- ??
- ????public?String?getDescription()?{??
- ????????return?description;??
- ????}??
- ??
- ????public?void?setDescription(String?description)?{??
- ????????this.description?=?description;??
- ????}??
- ??
- ????public?String?getImg()?{??
- ????????return?img;??
- ????}??
- ??
- ????public?void?setImg(String?img)?{??
- ????????this.img?=?img;??
- ????}??
- ??
- ????public?String?getKeywords()?{??
- ????????return?keywords;??
- ????}??
- ??
- ????public?void?setKeywords(String?keywords)?{??
- ????????this.keywords?=?keywords;??
- ????}??
- ??
- ????public?String?getSummary()?{??
- ????????return?summary;??
- ????}??
- ??
- ????public?void?setSummary(String?summary)?{??
- ????????this.summary?=?summary;??
- ????}??
- }??
這個實體類中有一個加載圖片的方法,加載方式我們上文都已經介紹過了,不多說。好了,再來看看我們的終極Adapter類:
- ?
- ?
- ??
- public?class?MyBaseAdapter<T>?extends?BaseAdapter?{??
- ????private?Context?context;??
- ????private?LayoutInflater?inflater;??
- ????private?int?layoutId;??
- ????private?int?variableId;??
- ????private?List<T>?list;??
- ??
- ????public?MyBaseAdapter(Context?context,?int?layoutId,?List<T>?list,?int?resId)?{??
- ????????this.context?=?context;??
- ????????this.layoutId?=?layoutId;??
- ????????this.list?=?list;??
- ????????this.variableId?=?resId;??
- ????????inflater?=?LayoutInflater.from(context);??
- ????}??
- ??
- ????@Override??
- ??
- ????public?int?getCount()?{??
- ????????return?list.size();??
- ????}??
- ??
- ????@Override??
- ????public?Object?getItem(int?position)?{??
- ????????return?list.get(position);??
- ????}??
- ??
- ????@Override??
- ????public?long?getItemId(int?position)?{??
- ????????return?position;??
- ????}??
- ??
- ????@Override??
- ????public?View?getView(int?position,?View?convertView,?ViewGroup?parent)?{??
- ????????ViewDataBinding?dataBinding;??
- ????????if?(convertView?==?null)?{??
- ????????????dataBinding?=?DataBindingUtil.inflate(inflater,?layoutId,?parent,?false);??
- ????????}else{??
- ????????????dataBinding?=?DataBindingUtil.getBinding(convertView);??
- ????????}??
- ????????dataBinding.setVariable(variableId,?list.get(position));??
- ????????return?dataBinding.getRoot();??
- ????}??
- }??
這個大概算是Adapter的終極寫法了,如果你按這種方式來寫Adapter,那么如果沒有非常奇葩的需求,你這個App中可能就只有這一個給ListView使用的Adapter了,為什么這么說呢?因為這個Adapter中沒有一個變量和我們的ListView沾邊,解釋一下幾個變量吧:layoutId這個表示item布局的資源id,variableId是系統自動生成的,根據我們的實體類,直接從外部傳入即可。另外注意布局加載方式為DataBindingUtil類中的inflate方法。OK,最后再來看看Activity:
- public?class?MainActivity?extends?AppCompatActivity?{??
- ??
- ????private?Handler?mHandler?=?new?Handler(){??
- ????????@Override??
- ????????public?void?handleMessage(Message?msg)?{??
- ????????????MyBaseAdapter<Food>?adapter?=?new?MyBaseAdapter<>(MainActivity.this,?R.layout.listview_item,?foods,?org.lenve.databinding3.BR.food);??
- ????????????lv.setAdapter(adapter);??
- ????????}??
- ????};??
- ????private?List<Food>?foods;??
- ????private?ListView?lv;??
- ??
- ????@Override??
- ????protected?void?onCreate(Bundle?savedInstanceState)?{??
- ????????super.onCreate(savedInstanceState);??
- ????????setContentView(R.layout.activity_main);??
- ????????lv?=?((ListView)?findViewById(R.id.lv));??
- ????????initData();??
- ????}??
- ??
- ????private?void?initData()?{??
- ????????OkHttpClient?client?=?new?OkHttpClient.Builder().build();??
- ????????Request?request?=?new?Request.Builder().url("http://www.tngou.net/api/food/list?id=1").build();??
- ????????client.newCall(request).enqueue(new?Callback()?{??
- ????????????@Override??
- ????????????public?void?onFailure(Call?call,?IOException?e)?{??
- ??
- ????????????}??
- ??
- ????????????@Override??
- ????????????public?void?onResponse(Call?call,?Response?response)?throws?IOException?{??
- ????????????????if?(response.isSuccessful())?{??
- ????????????????????parseJson(response.body().string());??
- ????????????????}??
- ????????????}??
- ????????});??
- ????}??
- ??
- ????private?void?parseJson(String?jsonStr)?{??
- ????????foods?=?new?ArrayList<>();??
- ????????try?{??
- ????????????JSONObject?jo?=?new?JSONObject(jsonStr);??
- ????????????JSONArray?tngou?=?jo.getJSONArray("tngou");??
- ????????????for?(int?i?=?0;?i?<?tngou.length();?i++)?{??
- ????????????????JSONObject?item?=?tngou.getJSONObject(i);??
- ????????????????String?description?=?item.getString("description");??
- ????????????????String?img?=?"http://tnfs.tngou.net/image"+item.getString("img");??
- ????????????????String?keywords?=?"【關鍵詞】?"+item.getString("keywords");??
- ????????????????String?summary?=?item.getString("summary");??
- ????????????????foods.add(new?Food(description,?img,?keywords,?summary));??
- ????????????}??
- ????????????mHandler.sendEmptyMessage(0);??
- ????????}?catch?(JSONException?e)?{??
- ????????????e.printStackTrace();??
- ????????}??
- ????}??
- }??
OkHttp下載數據和Json解析自不用多說,在構造MyAdapter的時候傳入的最后一個參數,是BR中的,這個BR和我們項目中的R文件類似,都是系統自動生成的。
至此,我們使用DataBinding的方式來給ListView加載數據就算完成了。so easy~~~
4.點擊事件處理
如果你使用DataBinding,我們的點擊事件也會有新的處理方式,首先以ListView為例來說說如何綁定點擊事件,在listview_item布局文件中每一個item的根節點添加如下代碼:
- <?xml?version="1.0"?encoding="utf-8"?>??
- <layout??
- ????xmlns:android="http://schemas.android.com/apk/res/android"??
- ????xmlns:app="http://schemas.android.com/apk/res-auto"??
- ????>??
- ????....??
- ????....??
- ????<RelativeLayout??
- ????????android:layout_width="match_parent"??
- ????????android:layout_height="96dp"??
- ????????android:onClick="@{food.onItemClick}"??
- ????????android:orientation="vertical">??
- ??
- ????????<ImageView??
- ????????????android:id="@+id/iv"??
- ????????????android:layout_width="96dp"??
- ????????????android:layout_height="96dp"??
- ????????????android:padding="6dp"??
- ????????????app:img="@{food.img}"/>??
- ????????....??
- ????????....??
- ????????....??
- ????</RelativeLayout>??
- </layout>??
OK,我給RelativeLayout容器添了onClick屬性,屬性的值為food.onItemClick,那么這個onItemClick到底是什么呢?其實就是在實體類Food中定義的一個方法,如下:
- public?void?onItemClick(View?view)?{??
- ????Toast.makeText(view.getContext(),?getDescription(),?Toast.LENGTH_SHORT).show();??
- }??
點擊item獲取當前position的數據,獲取方式也是非常簡單,直接get方法獲取即可,比傳統的ListView的點擊事件通過position來獲取數據方便多了。如果我想為關鍵字這個TextView添加點擊事件也很簡單,和上面一樣,這里我就不再貼代碼了,文末可以下載源碼。
5. 數據更新處理
單純的更新Food對象并不能改變ListView的UI顯示效果,那該怎么做呢?Google給我們提供了三種解決方案,分別如下:
1.讓實體類繼承自BaseObservable
讓實體類繼承自BaseObservable,然后給需要改變的字段的get方法添加上@Bindable注解,然后給需要改變的字段的set方法加上notifyPropertyChanged(org.lenve.databinding3.BR.description);一句即可,比如我想點擊item的時候把description字段的數據全部改為111,我可以修改Food類變為下面的樣子:
- public?class?Food?extends?BaseObservable?{??
- ????private?String?description;??
- ????private?String?img;??
- ????private?String?keywords;??
- ????private?String?summary;??
- ??
- ????public?Food()?{??
- ????}??
- ??
- ????public?Food(String?description,?String?img,?String?keywords,?String?summary)?{??
- ????????this.description?=?description;??
- ????????this.img?=?img;??
- ????????this.keywords?=?keywords;??
- ????????this.summary?=?summary;??
- ????}??
- ??
- ????@BindingAdapter("bind:img")??
- ????public?static?void?loadInternetImage(ImageView?iv,?String?img)?{??
- ????????Picasso.with(iv.getContext()).load(img).into(iv);??
- ????}??
- ??
- ????public?void?onItemClick(View?view)?{??
- ??
- ????????setDescription("111");??
- ????}??
- ??
- ????public?void?clickKeywords(View?view)?{??
- ????????Toast.makeText(view.getContext(),?getKeywords(),?Toast.LENGTH_SHORT).show();??
- ????}??
- ??
- ??
- ????@Bindable??
- ????public?String?getDescription()?{??
- ????????return?description;??
- ????}??
- ??
- ????public?void?setDescription(String?description)?{??
- ????????this.description?=?description;??
- ????????notifyPropertyChanged(org.lenve.databinding3.BR.description);??
- ????}??
- ??
- ????public?String?getImg()?{??
- ????????return?img;??
- ????}??
- ??
- ????public?void?setImg(String?img)?{??
- ????????this.img?=?img;??
- ????}??
- ??
- ????public?String?getKeywords()?{??
- ????????return?keywords;??
- ????}??
- ??
- ????public?void?setKeywords(String?keywords)?{??
- ????????this.keywords?=?keywords;??
- ????}??
- ??
- ????public?String?getSummary()?{??
- ????????return?summary;??
- ????}??
- ??
- ????public?void?setSummary(String?summary)?{??
- ????????this.summary?=?summary;??
- ????}??
- }??
OK,這是第一種解決方案,也是比較簡單常用的一種。
2.使用DataBinding提供的ObservableFields來創建實體類
這種方式使用起來略微麻煩,除了繼承BaseObservable之外,創建屬性的方式也變成下面這種:
- private?final?ObservableField<String>?description?=?new?ObservableField<>();??
屬性的讀寫方式也變了,讀取方式如下:
寫入方式如下:
- this.description.set(description);??
OK,依據上面幾個規則,我新定義的實體類如下:
- ?
- ?
- ??
- public?class?Food?extends?BaseObservable?{??
- ????private?final?ObservableField<String>?description?=?new?ObservableField<>();??
- ????private?final?ObservableField<String>?img?=?new?ObservableField<>();??
- ????private?final?ObservableField<String>?keywords?=?new?ObservableField<>();??
- ????private?final?ObservableField<String>?summary?=?new?ObservableField<>();??
- ????public?Food()?{??
- ????}??
- ??
- ????public?Food(String?description,?String?img,?String?keywords,?String?summary)?{??
- ????????this.description.set(description);??
- ????????this.keywords.set(keywords);??
- ????????this.img.set(img);??
- ????????this.summary.set(summary);??
- ????}??
- ??
- ????@BindingAdapter("bind:img")??
- ????public?static?void?loadInternetImage(ImageView?iv,?String?img)?{??
- ????????Picasso.with(iv.getContext()).load(img).into(iv);??
- ????}??
- ??
- ????public?void?onItemClick(View?view)?{??
- ??
- ????????setDescription("111");??
- ????}??
- ??
- ????public?void?clickKeywords(View?view)?{??
- ????????Toast.makeText(view.getContext(),?getKeywords(),?Toast.LENGTH_SHORT).show();??
- ????}??
- ??
- ??
- ????@Bindable??
- ????public?String?getDescription()?{??
- ????????return?description.get();??
- ????}??
- ??
- ????public?void?setDescription(String?description)?{??
- ????????this.description.set(description);??
- ????????notifyPropertyChanged(org.lenve.databinding3.BR.description);??
- ????}??
- ??
- ????public?String?getImg()?{??
- ????????return?img.get();??
- ????}??
- ??
- ????public?void?setImg(String?img)?{??
- ????????this.img.set(img);??
- ????}??
- ??
- ????public?String?getKeywords()?{??
- ????????return?keywords.get();??
- ????}??
- ??
- ????public?void?setKeywords(String?keywords)?{??
- ????????this.keywords.set(keywords);??
- ????}??
- ??
- ????public?String?getSummary()?{??
- ????????return?summary.get();??
- ????}??
- ??
- ????public?void?setSummary(String?summary)?{??
- ????????this.summary.set(summary);??
- ????}??
- }??
這種方式實現的功能和第一個實體類實現的功能一模一樣。
3.使用DataBinding中提供的集合來存儲數據即可
DataBinding中給我們提供了一些現成的集合,用來存儲數據,比如ObservableArrayList,ObservableArrayMap,因為這些用的少,我這里就不做介紹了。
本文共涉及到三個Demo,由于CSDN對上傳文件大小的限制,我分三次上傳,下載地址如下:
1.http://download.csdn.net/detail/u012702547/9591142
2.http://download.csdn.net/detail/u012702547/9591150
3.http://download.csdn.net/detail/u012702547/9591160
以上。
-------------
更多的Java,Angular,Android,大數據,J2EE,Python,數據庫,Linux,Java架構師,:
http://www.cnblogs.com/zengmiaogen/p/7083694.html


)


