這篇文章準備來記錄一下一個restful風格小項目的流程,上篇文章為它做了一個基礎,如果有什么錯誤希望大家能夠指出。
目錄
- 首頁
- 國際化
- 登錄
- 攔截器
- CRUD
一、首頁
- 在訪問localhost:8080/的時候,默認訪問首頁
- 在自己配置的SpringMVC的配置類中
@Configuration
public class MyMvcConfig implements WebMvcConfigurer {@Bean//將這個組件注冊到容器中public WebMvcConfigurer webMvcConfigurer(){WebMvcConfigurer webMvcConfigurer = new WebMvcConfigurer() {@Overridepublic void addViewControllers(ViewControllerRegistry registry) {registry.addViewController("/").setViewName("login");registry.addViewController("/login.html").setViewName("login");}};return webMvcConfigurer;}
}
二、國際化
- 步驟
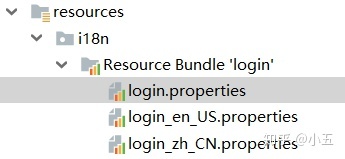
- 編寫國際化配置文件,抽取頁面需要顯示的國際化消息
目錄結構
login.properties代表默認的;下面的兩個分別代表英文和中文的
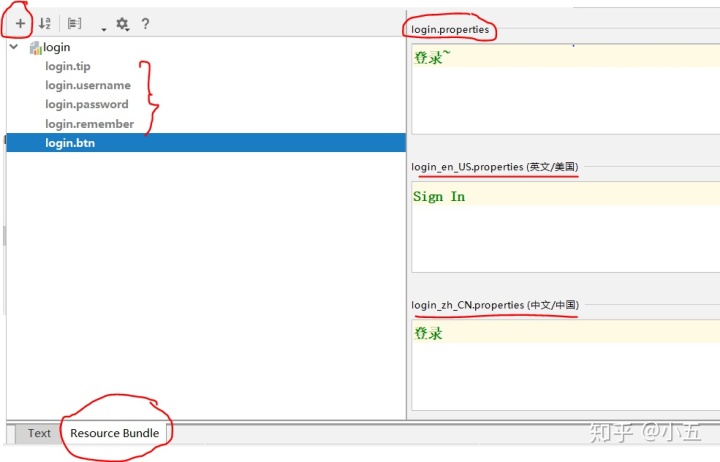
在編寫頁面需要的國際化消息時,可以點擊任意的一個properties文件,然后切換到Resource Bundle視圖,然后使用+進行每個消息的編寫
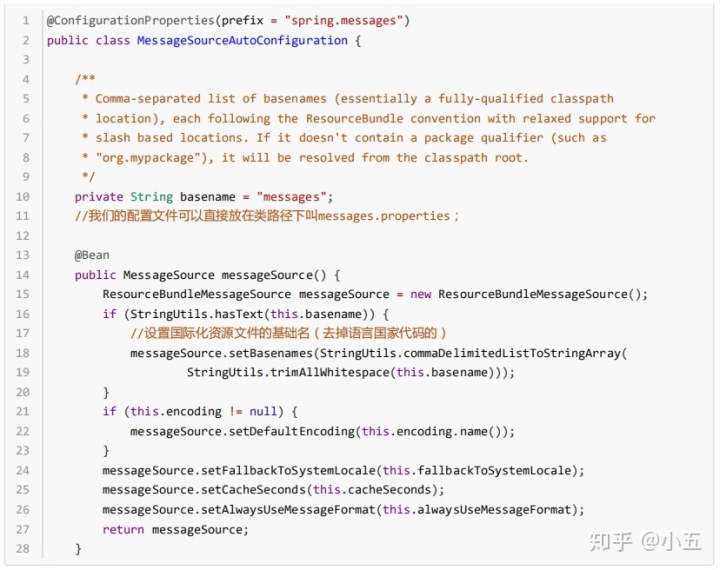
- 使用ResourceBundleMessageSource管理國際化資源文件
如果是在SpringMVC中使用的時候,需要我們自己去編寫;但是在SpringBoot中是給自動配置好了的
我們在編寫的時候是在resourses目錄下的i18n文件夾下寫了配置文件,但是在觀察源碼發現他表示配置文件是放在類路徑下的message.properties中,所以我們需要在application.propertis中去修改一下

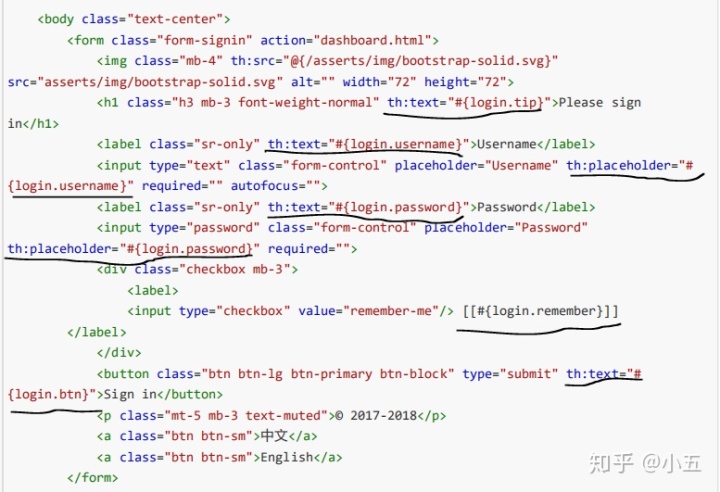
- 去頁面獲取國際化的值
效果:根據瀏覽器語言設置的信息切換了國際化;
2. 用按鈕去實現切換國際化
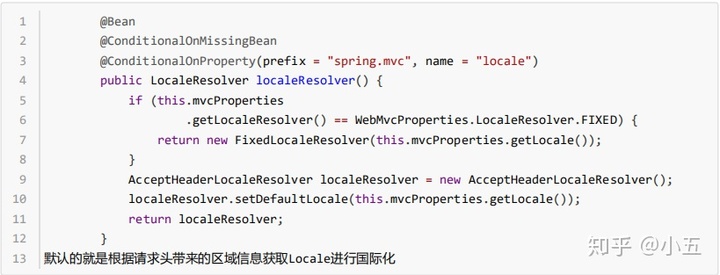
- 原理
國際化Locale(區域信息對象);LocaleResolver(獲取區域信息對象);
- 步驟
在頁面上添加超鏈接

編寫自定義的LocaleResolver
public class MyLocalResolver implements LocaleResolver {@Overridepublic Locale resolveLocale(HttpServletRequest httpServletRequest) {String l = httpServletRequest.getParameter("l");//使用默認的Locale locale = Locale.getDefault();if(!StringUtils.isEmpty(l)){String[] s = l.split("_");locale = new Locale("s[0]","s[1]");}return locale;}@Overridepublic void setLocale(HttpServletRequest httpServletRequest, HttpServletResponse httpServletResponse, Locale locale) {}
}
在MyMvcConfig中將我們自己編寫的LocaleResolver添加到容器中;
@Bean
public LocaleResolver localeResolver(){return new MyLocalResolver();
}
三、登錄
1.不連接數據庫,只要用戶名不為空和密碼等于123456就可以成功登錄并且跳轉到首頁
@Controller
public class LoginController {//可以使用Restful風格的注解// @RequestMapping(value = "/user/login",method = RequestMethod.POST)@PostMapping(value="/user/login")public String login(@RequestParam("username") String username,@RequestParam("password") String password, Map<String,Object> map){if(!StringUtils.isEmpty(username) && "123456".equals(password)){//登錄成功,為了防止表單重復提交,將重定向到dashboardreturn "redirect:/main.html";}else{//登錄失敗map.put("msg","用戶名密碼錯誤");}return "login";}
}
2. 開發期間模板引擎頁面修改以后,為了保證他能實時生效,需要執行以下步驟:
- 禁用模板引擎的緩存
#禁用模板引擎的緩存
spring.thymeleaf.cache=false- idea中用Ctrl+f9:重新編譯
3. 登錄錯誤信息的顯示
<p th:text="${msg}" th:if="${not #strings.isEmpty(msg)}"></p>4. 為了防止表單重復提交,將重定向進首頁,所以在自己的MvcConfig配置類中再添加一個視圖渲染;但是我們在設置了這個之后,會發現直接在地址欄中輸入跳到首頁的網址是可以直接進去的,那么我們的登錄功能就不是擺設了嗎?所以需要使用攔截器
registry.addViewController("/main.html").setViewName("dashboard");return "redirect:/main.html";四、攔截器
1.自定義攔截器
/*** 這個攔截器的作用就是:進行登錄的檢查,如果不通過的話是不能進行主頁的訪問和一些增刪改查功能的*/
public class LoginHandlerInterceptor implements HandlerInterceptor {//目標方法執行之前@Overridepublic boolean preHandle(HttpServletRequest request, HttpServletResponse response, Object handler) throws Exception {Object loginUser = request.getSession().getAttribute("loginUser");if (loginUser==null){//在頁面顯示錯誤信息request.setAttribute("msg","沒有權限");//未登錄,返回登錄頁面request.getRequestDispatcher("/login.html").forward(request,response);return false;}else{//已登錄return true;}}@Overridepublic void postHandle(HttpServletRequest request, HttpServletResponse response, Object handler, ModelAndView modelAndView) throws Exception {}@Overridepublic void afterCompletion(HttpServletRequest request, HttpServletResponse response, Object handler, Exception ex) throws Exception {}
}
2. 將攔截器注入到容器中
@Configuration
public class MyMvcConfig implements WebMvcConfigurer {@Bean//將這個組件注冊到容器中public WebMvcConfigurer webMvcConfigurer(){WebMvcConfigurer webMvcConfigurer = new WebMvcConfigurer() {//注冊攔截器@Overridepublic void addInterceptors(InterceptorRegistry registry) {//由于SpringBoot已經做好了靜態資源的映射,攔截器不會攔截靜態資源//addPathPatterns()表示會對那種類型的映射進行攔截,"/**"表示/全部攔截//excludePathPatterns()表示排除一些不攔截的registry.addInterceptor(new LoginHandlerInterceptor()).addPathPatterns("/**").excludePathPatterns("/login.html","/","/user/login");}@Overridepublic void addViewControllers(ViewControllerRegistry registry) {registry.addViewController("/").setViewName("login");registry.addViewController("/login.html").setViewName("login");registry.addViewController("/main.html").setViewName("dashboard");}};return webMvcConfigurer;}
3. 在Controller中是利用了session來進行用戶名的存儲,然后在攔截器中判斷用戶名是否為空
@Controller
public class LoginController {//可以使用Restful風格的注解// @RequestMapping(value = "/user/login",method = RequestMethod.POST)@PostMapping(value="/user/login")public String login(@RequestParam("username") String username,@RequestParam("password") String password,Map<String,Object> map,HttpSession session){if(!StringUtils.isEmpty(username) && "123456".equals(password)){session.setAttribute("loginUser",username);//登錄成功,為了防止表單重復提交,將重定向到dashboardreturn "redirect:/main.html";}else{//登錄失敗map.put("msg","用戶名密碼錯誤");}return "login";}
}
五、CRUD
1.員工列表
- 實驗要求
CRUD滿足rest風格;
URI:/資源名稱、資源標識;
HTTP請求方式區分對資源CRUD操作;
- Controller代碼實現
@Controller
public class EmployeeController {@AutowiredEmployeeDao employeeDao;//獲取所有員工@GetMapping("/emps")public String list(Model model){//獲取所有員工Collection<Employee> all = employeeDao.getAll();//將獲取到的員工存進session域中model.addAttribute("emps",all); //thymeleaf默認就會進行拼串;前綴是classpath:/templates/xxxx.htmlreturn "emp/list";}
}
- Thymeleaf公共頁面元素抽取
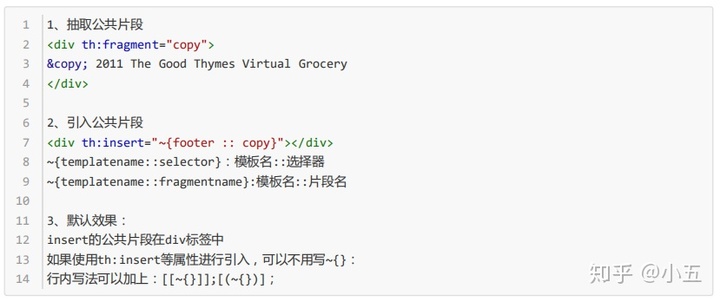
三種引入功能片段的th屬性:
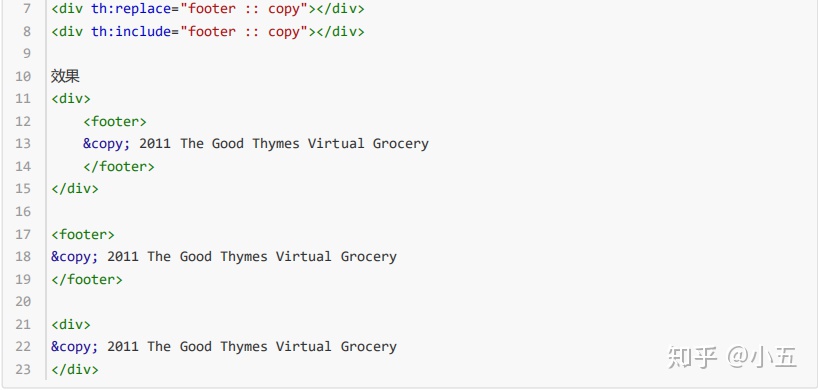
th:insert----將公共片段整個插入聲明引入元素中;
th:replace---將聲明引入的元素替換為公共片段;
th:include----將被引入的片段的內容包含進這個標簽中;

- 鏈接高亮
thymeleaf實現只有在點擊側邊欄某個按鈕時,只有點擊的按鈕高亮;將之前的側邊欄和頂部欄代碼抽取出來放在一個新的HTML文件里
側邊欄---dashboard
<a class="nav-link active" href="http://getbootstrap.com/docs/4.0/examples/dashboard/#"th:class="${activeUri=='main.html'}?'nav-link active':'nav-link '">
側邊欄----員工管理<a class="nav-link active" href="#"th:href="@{/emps}" th:class="${activeUri=='emps'?'nav-link active':'nav-link '}">
dashboard.html(將activeUri的值傳遞到引用的側邊欄里,進行判斷)
<div th:replace="commens/bar::#sidebar(activeUri='main.html')"></div>
list.html
<div th:replace="commens/bar::#sidebar(activeUri='emps')"></div>- 員工列表顯示
<thead><tr><th>#</th><th>lastName</th><th>gender</th><th>department</th><th>birth</th><th>操作</th></tr>
</thead>
<tbody><tr th:each="emp:${emps}"><td th:text="${emp.lastName}"></td><td th:text="${emp.lastName}"></td><td th:text="${emp.gender}==0?'男':'女'"></td><td th:text="${emp.department.departmentName}"></td><td th:text="${#dates.format(emp.birth,'yyyy--MM-dd:HH:mm')}"></td><td><button class="btn btn-sm btn-primary">修改</button><button class="btn btn-sm btn-danger">刪除</button></td></tr>
2.添加員工
- Controller
@GetMapping("/addEmp")
public String toAddPage(Model model){Collection<Department> departments = departmentDao.getDepartments();model.addAttribute("depts",departments);//返回到添加頁面return "emp/add";
}
@PostMapping("/addEmp")public String addEmp(Employee employee){System.out.println("保存的員工是:"+employee);employeeDao.save(employee);//來到員工列表頁面//redirect:重定向到一個地址//forward:轉發到一個地址return "redirect:/emps";}- 前臺頁面
跳轉請求
<a href="addEmp" class="btn btn-sm btn-success">添加</a>
add.html
<form th:action="addEmp" method="post"><div class="form‐group"><label>LastName</label><input name="lastName" type="text" class="form‐control" placeholder="zhangsan"></div><div class="form‐group"><label>Email</label><input name="email" type="email" class="form‐control" placeholder="zhangsan@atguigu.com"></div><div class="form‐group"><label>Gender</label><br/><div class="form‐check form‐check‐inline"><input class="form‐check‐input" type="radio" name="gender" value="1"><label class="form‐check‐label">男</label></div><div class="form‐check form‐check‐inline"><input class="form‐check‐input" type="radio" name="gender" value="0"><label class="form‐check‐label">女</label></div></div><div class="form‐group"><label>department</label><select class="form‐control"name="department.id"><option th:value="${dept.id}" th:each="dept:${depts}" th:text="${dept.departmentName}">1</option></select></div><div class="form‐group"><label>Birth</label><input name="birth" type="text" class="form‐control" placeholder="zhangsan"></div><button type="submit" class="btn btn‐primary">添加</button>
</form>- 使用添加功能主要會出現的錯誤是400錯誤,前臺輸入的格式不匹配導致
我們這個功能這邊主要是日期的格式會導致錯誤
填寫的日期格式主要有:2017/01/01 2017-01-01 2017.01.01
日期的格式話:SpringMVC需要將頁面提取的值轉化為指定的類型;
默認的日期格式是按照/的格式
可以在application.properties配置文件中修改
spring.mvc.date-format=yyyy-MM-dd
3.修改員工
- 在做員工修改的時候發現修改頁面和新增頁面是差不多的,只需要通過判斷去判定執行的是添加功能還是修改功能
add.html
<!--對功能的判定就是通過emp是否為空,不為空則是修改-->
<form th:action="@{/addEmp}" method="post"><input type="hidden" name="_method" value="put" th:if="${emp!=null}"/><!--在傳遞到Controller的時候也要把id傳過去(修改功能的時候)--><input type="hidden" th:if="${emp!=null}" th:value="${emp.id}"/><div class="form‐group"><label>LastName</label><input th:value="${emp!=null}?${emp.lastName}" name="lastName" type="text" class="form‐control" placeholder="zhangsan"></div><div class="form‐group"><label>Email</label><input th:value="${emp!=null}?${emp.email}" name="email" type="email" class="form‐control" placeholder="zhangsan@atguigu.com"></div><div class="form‐group"><label>Gender</label><br/><div class="form‐check form‐check‐inline"><input class="form‐check‐input" type="radio" name="gender" value="1"th:checked="${emp!=null}?${emp.gender==1}"><label class="form‐check‐label">男</label></div><div class="form‐check form‐check‐inline"><input class="form‐check‐input" type="radio" name="gender" value="0"th:checked="${emp!=null}?${emp.gender==0}"><label class="form‐check‐label">女</label></div></div><div class="form‐group"><label>department</label><select class="form‐control"name="department.id"><option th:selected="${emp!=null}?${dept.id==emp.department.id}" th:value="${dept.id}" th:each="dept:${depts}" th:text="${dept.departmentName}"></option></select></div><div class="form‐group"><label>Birth</label><input th:value="${emp!=null}?${emp.birth}" name="birth" type="text" class="form‐control" placeholder="zhangsan"></div><button type="submit" class="btn btn‐primary"th:text="${emp!=null}?'修改':'添加'"></button>
</form>- Controller
//來到修改頁面,查出當前員工,并進行回顯
@GetMapping("/editEmp/{id}")
public String toEditPage( @PathVariable("id") Integer id, Model model){Employee employee = employeeDao.get(id);model.addAttribute("emp",employee);//頁面顯示所有的部門信息Collection<Department> departments = departmentDao.getDepartments();model.addAttribute("departments",departments);return "emp/add";
}
//進行員工修改,需要傳遞該員工的id
@PutMapping("/addEmp")
public String updateEmp(Employee employee){System.out.println("收到的員工信息:"+employee);System.out.println(employeeDao);employeeDao.save(employee);return "redirect:/emps";
}- 這里重點提一下在寫這段代碼會出現的一個錯誤:如果使用的是較高版本的SpringBoot,在修改的時候使用的是put請求,SpringBoot是為我們配置好了hiddenFilter,但是他默認是不開啟的,需要在application.properties中進行開啟
#開啟過濾器
spring.mvc.hiddenmethod.filter.enabled=true@Bean
@ConditionalOnMissingBean({FormContentFilter.class})
@ConditionalOnProperty(prefix = "spring.mvc.formcontent.filter",name = {"enabled"},matchIfMissing = true
)
public OrderedFormContentFilter formContentFilter() {return new OrderedFormContentFilter();
}
4.刪除員工
- Controller
//員工刪除方法
@DeleteMapping("/deleteEmp/{id}")
public String deleteEmp(@PathVariable("id") Integer id){employeeDao.delete(id);return "redirect:/emps";
}- 前臺頁面最簡單的編寫就是將刪除按鈕用form表單包起來,然后發送delete請求,再傳遞id;但是這樣的頁面就不太美觀,所以可以使用js點擊事件來進行編寫
 <form th:action="@{/deleteEmp/}+${emp.id}" method="post"><input type="hidden" name="_method" value="delete"><button type="submit" class="btn btn-sm btn-danger">刪除</button>
</form>
點擊事件:
<button th:attr="del_uri=@{/emp/}+${emp.id}" class="btn btn‐sm btn‐danger deleteBtn">刪除</button></td> </tr><script>$(".deleteBtn").click(function(){//刪除當前員工的$("#deleteEmpForm").attr("action",$(this).attr("del_uri")).submit();return false; });
</script>
這個小實驗到這里就寫的差不多了,和Spring的框架差不多,只是在寫的過程中可以知道一些技巧和thymeleaf的標簽的使用,這里只貼了一部分代碼,完整代碼可以進入我的GitHub:https://github.com/rainbow-dan/SpringBoot-rest-crud;如果你喜歡我的文章,就關注我吧!


安裝過程及問題解決)


