前面我們學習了雜項設備驅動模型、早期經典字符設備驅動模型,這一小節來講解Linux中的標準字符設備驅動。
目錄
- (一)為什么引入標準字符設備驅動模型
- (二)相關接口
- (三)注冊流程
- (四)程序示例
(一)為什么引入標準字符設備驅動模型
前面講解了雜項設備驅動模型和早期經典設備驅動模型,但是他們都存在不足之處
雜項設備存在的不足: 主設備號固定為10,最多設備為0-255個次設備號,設備號有限
早期經典驅動模型不足: 早期經典的字符設備主設備號為0-255除10外,但是申請一次主設備號,該設備號下的所有次設備號(0-255)均屬于同一設備,且不會在申請同時創建節點文件,需要手動創建
出于以上的不足之處,內核中對驅動模型進行了升級,引入了標準字符設備驅動模型
標準字符設備驅動模型: 標準字符設備驅動模型中對設備號進行了數據的規定,規定設備號為一個32位的無符號整型數據
(二)相關接口
(1)int cdev_add(struct cdev *p, dev_t dev, unsigned count)這個函數是添加到字符設備系統中,注冊標準字符設備驅動。
int cdev_add(struct cdev *p, dev_t dev, unsigned count)
{p->dev = dev;p->count = count;return kobj_map(cdev_map, dev, count, NULL, exact_match, exact_lock, p);
}//第一個參數結構體原型
struct cdev {struct kobject kobj;   //不關心struct module *owner;  //一般賦值為THIS_MODULEconst struct file_operations *ops;     //文件操作結構體struct list_head list;     //dev_t dev;           //設備號unsigned int count;   //表示申請設備號的數量
};
(2)struct cdev 結構體可以手動靜態初始化,但是我們通常使用動態申請,本篇文章主要介紹動態相關的函數。
struct cdev *cdev_alloc(void);//動態申請struct cdev結構體 的內存void cdev_init(struct cdev *, const struct file_operations *);//初始化struct cdev結構體(3)刪除標準字符設備接口
void cdev_del(struct cdev *);
(4)設備號合成相關的接口
1.自己指定主次設備號,通過MKDEV合成dev_t dev=MKDEV(major,minor);2.靜態申請int register_chrdev_region(dev_t from, unsigned count, const char *name)3.動態申請
int alloc_chrdev_region(dev_t *dev, unsigned baseminor, unsigned count,const char *name)
{struct char_device_struct *cd;cd = __register_chrdev_region(0, baseminor, count, name);if (IS_ERR(cd))return PTR_ERR(cd);*dev = MKDEV(cd->major, cd->baseminor);return 0;
}
(5)創建設備節點 device_create
struct device *device_create(struct class *class, struct device *parent,dev_t devt, void *drvdata, const char *fmt, ...)
{va_list vargs;struct device *dev;va_start(vargs, fmt);dev = device_create_vargs(class, parent, devt, drvdata, fmt, vargs);va_end(vargs);return dev;
}
(6)設備類struct class 創建
#define class_create(owner, name)		\
({						\static struct lock_class_key __key;	\__class_create(owner, name, &__key);	\
})
(7)標準字符設備驅動注銷cdev_del
void cdev_del(struct cdev *p)
{cdev_unmap(p->dev, p->count);kobject_put(&p->kobj);
}
(8)注銷設備號unregister_chrdev_region()
void unregister_chrdev_region(dev_t from, unsigned count)
{dev_t to = from + count;dev_t n, next;for (n = from; n < to; n = next) {next = MKDEV(MAJOR(n)+1, 0);if (next > to)next = to;kfree(__unregister_chrdev_region(MAJOR(n), MINOR(n), next - n));}
}
(9)銷毀設備類:
void class_destroy(struct class *cls)
{if ((cls == NULL) || (IS_ERR(cls)))return;class_unregister(cls);
}
(10)銷毀設備節點: device_destroy(struct class *class, dev_t devt)
void device_destroy(struct class *class, dev_t devt)
{struct device *dev;dev = class_find_device(class, NULL, &devt, __match_devt);if (dev) {put_device(dev);device_unregister(dev);}
}
(11)釋放cdev空間:
static inline void kfree(void *p)
{free(p);
}
(三)注冊流程
(1)定義struct cdev 結構體指針
struct cdev *cdev =NULL
(2)申請cdev結構體空間并初始化
cdev = cdev_alloc();//動態申請空間
cdev_init(cdev,&fop);//fop為struct file_operations類型的結構體
(3)申請設備號–動態
dev_t dev=0;
int ret =alloc_chrdev_region(&dev,0, CDEVCOUNT, CDEVNAME);
(4)將字符設備添加到系統
ret =cdev_add(cdev,dev, CDEVCOUNT);
(5)創建設備類
struct class * cdevclass =NULL;//定義設備節點類接構體cdevclass = class_create(THIS_MODULE, INODENAME)
(6)添加設備節點
reate(cdevclass, NULL, dev, NULL, "mydevice",);
(四)程序示例
chrdev.c
#include <linux/kernel.h>
#include <linux/module.h>
#include <linux/fs.h>
#include <linux/cdev.h>
#include <linux/device.h>
#include <linux/slab.h>#define CDEVCOUNT 5
#define CDEVNAME "cdevdevice"
#define INODENAME "mycdev"
int i=0;
dev_t dev=0;
struct cdev * cdev =NULL;
struct class * cdevclass =NULL;int cdev_open (struct inode *node, struct file *file)
{printk("cdev_open is install\n");return 0;
}
ssize_t cdev_read (struct file *fp, char __user *buf, size_t size, loff_t *offset)
{printk("cdev_read is install\n");return 0;
}
ssize_t cdev_write (struct file *fp, const char __user * buf, size_t size, loff_t *offset)
{printk("cdev_write is install\n");return 0;
}
int cdev_release (struct inode *node, struct file *fp)
{printk("cdev_release is install\n");return 0;
}
struct file_operations fop={.open=cdev_open,.read=cdev_read,.write=cdev_write,.release=cdev_release,
};void mycdev_add()
{//1.申請設備號--動態int ret =alloc_chrdev_region(&dev,0, CDEVCOUNT, CDEVNAME);if(ret)return ;//初始化cdev結構體cdev = cdev_alloc();if(!cdev){goto out;   }cdev_init(cdev,&fop);//添加字符設備到系統中ret =cdev_add(cdev,dev, CDEVCOUNT);if(ret){goto out1;}//創建設備類cdevclass = class_create(THIS_MODULE, INODENAME);if(IS_ERR(cdevclass)){goto out2;}
for (i=0;i<CDEVCOUNT;i++)device_create(cdevclass, NULL, dev+i, NULL, "mydevice%d",i);out:unregister_chrdev_region(dev,CDEVCOUNT);	return ;out1:unregister_chrdev_region(dev,CDEVCOUNT);kfree(cdev);return ;
out2:cdev_del(cdev);unregister_chrdev_region(dev,CDEVCOUNT);kfree(cdev);return ;
}static int __init  dev_module_init(void)
{mycdev_add();printk("this is dev_module_init \n");return 0;
}static void __exit dev_module_cleanup(void)
{device_destroy(cdevclass, dev);class_destroy(cdevclass);cdev_del(cdev);unregister_chrdev_region(dev, CDEVCOUNT);kfree(cdev);printk("this is dev_module_cleanup\n");
}module_init(dev_module_init);
module_exit(dev_module_cleanup);
MODULE_LICENSE("GPL");
Makefile
CFLAG =-C
TARGET = chrdev
TARGET1 = chr_app
KERNEL = /mydriver/linux-3.5
obj-m += $(TARGET).oall:make $(CFLAG)  $(KERNEL) M=$(PWD)arm-linux-gcc -o $(TARGET1) $(TARGET1).c
clean:make $(CFLAG)  $(KERNEL) M=$(PWD) clean
chr_app.c
#include<stdio.h>
#include <sys/types.h>
#include <sys/stat.h>
#include <fcntl.h>int main(int argc, char *argv[])
{int fd= open(argv[1],O_RDWR);if(fd== -1){perror("open");return -1;}write(fd,"hell",4);close(fd);return 0;
}
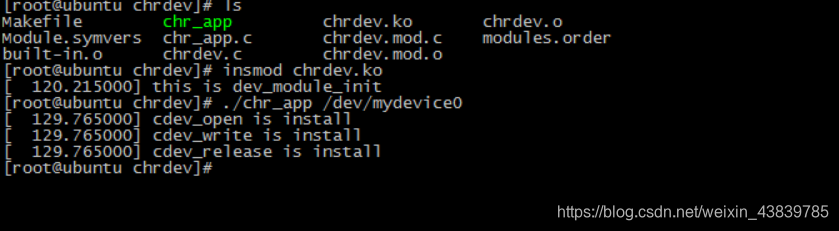
關于上面的驅動程序都是建立在前面的模塊化編程的基礎上編寫的,不懂的往前看前面的博客就行了,演示一下效果
本文章僅供學習交流用禁止用作商業用途,文中內容來水枂編輯,如需轉載請告知,謝謝合作
微信公眾號:zhjj0729
微博:文藝to青年

linux函數接口的使用)
linux驅動之ioctl的使用)
linux中斷編程)
)
Linux之等待隊列)
linux之poll輪詢)
)
linux內核定時器)
)
linux中斷底半部分處理機制)
 B. Pasha and Phone C. Duff and Weight Lifting)

與 $()區別)


)
)