最近在研究OCR識別相關的東西,最終目標是能識別身份證上的所有中文漢字+數字,不過本文先設定一個小目標,先識別定長為18的身份證號,當然本文的思路也是可以復用來識別定長的驗證碼識別的。 本文實現思路主要來源于Xlvector的博客,采用基于CNN實現端到端的OCR,下面引用博文介紹目前基于深度學習的兩種OCR識別方法:
- 把OCR的問題當做一個多標簽學習的問題。4個數字組成的驗證碼就相當于有4個標簽的圖片識別問題(這里的標簽還是有序的),用CNN來解決。
- 把OCR的問題當做一個語音識別的問題,語音識別是把連續的音頻轉化為文本,驗證碼識別就是把連續的圖片轉化為文本,用CNN+LSTM+CTC來解決。
這里方法1主要用來解決固定長度標簽的圖片識別問題,而方法2主要用來解決不定長度標簽的圖片識別問題,本文實現方法1識別固定18個數字字符的身份證號。
環境依賴
- 本文基于tensorflow框架實現,依賴于tensorflow環境,建議使用anaconda進行python包管理及環境管理
- 本文使用freetype-py 進行訓練集圖片的實時生成,同時后續也可擴展為能生成中文字符圖片的訓練集,建議使用pip安裝
pip install freetype-py
- 同時本文還依賴于numpy和opencv等常用庫
pip install numpy cv2
知識準備
- 本文不具體介紹CNN (卷積神經網絡)具體實現原理,不熟悉的建議參看集智博文卷積:如何成為一個很厲害的神經網絡,這篇文章寫得很
- 本文實現思路很容易理解,就是把一個有序排列18個數字組成的圖片當做一個多標簽學習的問題,標簽的長度可以任意改變,只要是固定長度的,這個訓練方法都是適用的,當然現實中很多情況是需要識別不定長度的標簽的,這部分就需要使用方法2(CNN+lSTM+CTC)來解決了。
訓練數據集生成
首先先完成訓練數據集圖片的生成,主要依賴于freetype-py庫生成數字/中文的圖片。其中要注意的一點是就是生成圖片的大小,本文經過多次嘗試后,生成的圖片是32 x 256大小的,如果圖片太大,則可能導致訓練不收斂
生成出來的示例圖片如下:

gen_image()方法返回 image_data:圖片像素數據 (32,256) label: 圖片標簽 18位數字字符 477081933151463759 vec : 圖片標簽轉成向量表示 (180,) 代表每個數字所處的列,總長度 18 * 10
#!/usr/bin/env python2
# -*- coding: utf-8 -*-
"""
身份證文字+數字生成類
@author: pengyuanjie
"""
import numpy as np
import freetype
import copy
import random
import cv2
class put_chinese_text(object):def __init__(self, ttf):self._face = freetype.Face(ttf)def draw_text(self, image, pos, text, text_size, text_color):'''draw chinese(or not) text with ttf:param image: image(numpy.ndarray) to draw text:param pos: where to draw text:param text: the context, for chinese should be unicode type:param text_size: text size:param text_color:text color:return: image'''self._face.set_char_size(text_size * 64)metrics = self._face.sizeascender = metrics.ascender/64.0#descender = metrics.descender/64.0#height = metrics.height/64.0#linegap = height - ascender + descenderypos = int(ascender)if not isinstance(text, unicode):text = text.decode('utf-8')img = self.draw_string(image, pos[0], pos[1]+ypos, text, text_color)return imgdef draw_string(self, img, x_pos, y_pos, text, color):'''draw string:param x_pos: text x-postion on img:param y_pos: text y-postion on img:param text: text (unicode):param color: text color:return: image'''prev_char = 0pen = freetype.Vector()pen.x = x_pos << 6 # div 64pen.y = y_pos << 6hscale = 1.0matrix = freetype.Matrix(int(hscale)*0x10000L, int(0.2*0x10000L),int(0.0*0x10000L), int(1.1*0x10000L))cur_pen = freetype.Vector()pen_translate = freetype.Vector()image = copy.deepcopy(img)for cur_char in text:self._face.set_transform(matrix, pen_translate)self._face.load_char(cur_char)kerning = self._face.get_kerning(prev_char, cur_char)pen.x += kerning.xslot = self._face.glyphbitmap = slot.bitmapcur_pen.x = pen.xcur_pen.y = pen.y - slot.bitmap_top * 64self.draw_ft_bitmap(image, bitmap, cur_pen, color)pen.x += slot.advance.xprev_char = cur_charreturn imagedef draw_ft_bitmap(self, img, bitmap, pen, color):'''draw each char:param bitmap: bitmap:param pen: pen:param color: pen color e.g.(0,0,255) - red:return: image'''x_pos = pen.x >> 6y_pos = pen.y >> 6cols = bitmap.widthrows = bitmap.rowsglyph_pixels = bitmap.bufferfor row in range(rows):for col in range(cols):if glyph_pixels[row*cols + col] != 0:img[y_pos + row][x_pos + col][0] = color[0]img[y_pos + row][x_pos + col][1] = color[1]img[y_pos + row][x_pos + col][2] = color[2]
class gen_id_card(object):def __init__(self):#self.words = open('AllWords.txt', 'r').read().split(' ')self.number = ['0', '1', '2', '3', '4', '5', '6', '7', '8', '9']self.char_set = self.number#self.char_set = self.words + self.numberself.len = len(self.char_set)self.max_size = 18self.ft = put_chinese_text('fonts/OCR-B.ttf')#隨機生成字串,長度固定#返回text,及對應的向量def random_text(self):text = ''vecs = np.zeros((self.max_size * self.len))#size = random.randint(1, self.max_size)size = self.max_sizefor i in range(size):c = random.choice(self.char_set)vec = self.char2vec(c)text = text + cvecs[i*self.len:(i+1)*self.len] = np.copy(vec)return text,vecs#根據生成的text,生成image,返回標簽和圖片元素數據def gen_image(self):text,vec = self.random_text()img = np.zeros([32,256,3])color_ = (255,255,255) # Writepos = (0, 0)text_size = 21image = self.ft.draw_text(img, pos, text, text_size, color_)#僅返回單通道值,顏色對于漢字識別沒有什么意義return image[:,:,2],text,vec#單字轉向量def char2vec(self, c):vec = np.zeros((self.len))for j in range(self.len):if self.char_set[j] == c:vec[j] = 1return vec#向量轉文本def vec2text(self, vecs):text = ''v_len = len(vecs)for i in range(v_len):if(vecs[i] == 1):text = text + self.char_set[i % self.len]return text
if __name__ == '__main__':genObj = gen_id_card()image_data,label,vec = genObj.gen_image()cv2.imshow('image', image_data)cv2.waitKey(0)
構建網絡,開始訓練
首先定義生成一個batch的方法:
# 生成一個訓練batch
def get_next_batch(batch_size=128):obj = gen_id_card()batch_x = np.zeros([batch_size, IMAGE_HEIGHT*IMAGE_WIDTH])batch_y = np.zeros([batch_size, MAX_CAPTCHA*CHAR_SET_LEN])for i in range(batch_size):image, text, vec = obj.gen_image()batch_x[i,:] = image.reshape((IMAGE_HEIGHT*IMAGE_WIDTH))batch_y[i,:] = vecreturn batch_x, batch_y
用了Batch Normalization,個人還不是很理解,讀者可自行百度,代碼來源于參考博文
#Batch Normalization? 有空再理解,tflearn or slim都有封裝
## http://stackoverflow.com/a/34634291/2267819
def batch_norm(x, beta, gamma, phase_train, scope='bn', decay=0.9, eps=1e-5):with tf.variable_scope(scope):#beta = tf.get_variable(name='beta', shape=[n_out], initializer=tf.constant_initializer(0.0), trainable=True)#gamma = tf.get_variable(name='gamma', shape=[n_out], initializer=tf.random_normal_initializer(1.0, stddev), trainable=True)batch_mean, batch_var = tf.nn.moments(x, [0, 1, 2], name='moments')ema = tf.train.ExponentialMovingAverage(decay=decay)def mean_var_with_update():ema_apply_op = ema.apply([batch_mean, batch_var])with tf.control_dependencies([ema_apply_op]):return tf.identity(batch_mean), tf.identity(batch_var)mean, var = tf.cond(phase_train, mean_var_with_update, lambda: (ema.average(batch_mean), ema.average(batch_var)))normed = tf.nn.batch_normalization(x, mean, var, beta, gamma, eps)return normed
定義4層CNN和一層全連接層,卷積核分別是2層5x5、2層3x3,每層均使用tf.nn.relu非線性化,并使用max_pool,網絡結構讀者可自行調參優化
# 定義CNN
def crack_captcha_cnn(w_alpha=0.01, b_alpha=0.1):x = tf.reshape(X, shape=[-1, IMAGE_HEIGHT, IMAGE_WIDTH, 1])# 4 conv layerw_c1 = tf.Variable(w_alpha*tf.random_normal([5, 5, 1, 32]))b_c1 = tf.Variable(b_alpha*tf.random_normal([32]))conv1 = tf.nn.bias_add(tf.nn.conv2d(x, w_c1, strides=[1, 1, 1, 1], padding='SAME'), b_c1)conv1 = batch_norm(conv1, tf.constant(0.0, shape=[32]), tf.random_normal(shape=[32], mean=1.0, stddev=0.02), train_phase, scope='bn_1')conv1 = tf.nn.relu(conv1)conv1 = tf.nn.max_pool(conv1, ksize=[1, 2, 2, 1], strides=[1, 2, 2, 1], padding='SAME')conv1 = tf.nn.dropout(conv1, keep_prob)w_c2 = tf.Variable(w_alpha*tf.random_normal([5, 5, 32, 64]))b_c2 = tf.Variable(b_alpha*tf.random_normal([64]))conv2 = tf.nn.bias_add(tf.nn.conv2d(conv1, w_c2, strides=[1, 1, 1, 1], padding='SAME'), b_c2)conv2 = batch_norm(conv2, tf.constant(0.0, shape=[64]), tf.random_normal(shape=[64], mean=1.0, stddev=0.02), train_phase, scope='bn_2')conv2 = tf.nn.relu(conv2)conv2 = tf.nn.max_pool(conv2, ksize=[1, 2, 2, 1], strides=[1, 2, 2, 1], padding='SAME')conv2 = tf.nn.dropout(conv2, keep_prob)w_c3 = tf.Variable(w_alpha*tf.random_normal([3, 3, 64, 64]))b_c3 = tf.Variable(b_alpha*tf.random_normal([64]))conv3 = tf.nn.bias_add(tf.nn.conv2d(conv2, w_c3, strides=[1, 1, 1, 1], padding='SAME'), b_c3)conv3 = batch_norm(conv3, tf.constant(0.0, shape=[64]), tf.random_normal(shape=[64], mean=1.0, stddev=0.02), train_phase, scope='bn_3')conv3 = tf.nn.relu(conv3)conv3 = tf.nn.max_pool(conv3, ksize=[1, 2, 2, 1], strides=[1, 2, 2, 1], padding='SAME')conv3 = tf.nn.dropout(conv3, keep_prob)w_c4 = tf.Variable(w_alpha*tf.random_normal([3, 3, 64, 64]))b_c4 = tf.Variable(b_alpha*tf.random_normal([64]))conv4 = tf.nn.bias_add(tf.nn.conv2d(conv3, w_c4, strides=[1, 1, 1, 1], padding='SAME'), b_c4)conv4 = batch_norm(conv4, tf.constant(0.0, shape=[64]), tf.random_normal(shape=[64], mean=1.0, stddev=0.02), train_phase, scope='bn_4')conv4 = tf.nn.relu(conv4)conv4 = tf.nn.max_pool(conv4, ksize=[1, 2, 2, 1], strides=[1, 2, 2, 1], padding='SAME')conv4 = tf.nn.dropout(conv4, keep_prob)# Fully connected layerw_d = tf.Variable(w_alpha*tf.random_normal([2*16*64, 1024]))b_d = tf.Variable(b_alpha*tf.random_normal([1024]))dense = tf.reshape(conv4, [-1, w_d.get_shape().as_list()[0]])dense = tf.nn.relu(tf.add(tf.matmul(dense, w_d), b_d))dense = tf.nn.dropout(dense, keep_prob)w_out = tf.Variable(w_alpha*tf.random_normal([1024, MAX_CAPTCHA*CHAR_SET_LEN]))b_out = tf.Variable(b_alpha*tf.random_normal([MAX_CAPTCHA*CHAR_SET_LEN]))out = tf.add(tf.matmul(dense, w_out), b_out)return out
最后執行訓練,使用sigmoid分類,每100次計算一次準確率,如果準確率超過80%,則保存模型并結束訓練
# 訓練
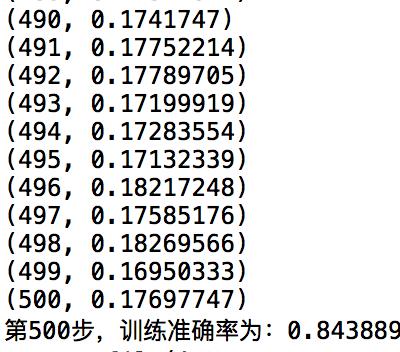
def train_crack_captcha_cnn():output = crack_captcha_cnn()# loss#loss = tf.reduce_mean(tf.nn.softmax_cross_entropy_with_logits(logits=output, labels=Y))loss = tf.reduce_mean(tf.nn.sigmoid_cross_entropy_with_logits(logits=output, labels=Y))# 最后一層用來分類的softmax和sigmoid有什么不同?# optimizer 為了加快訓練 learning_rate應該開始大,然后慢慢衰optimizer = tf.train.AdamOptimizer(learning_rate=0.002).minimize(loss)predict = tf.reshape(output, [-1, MAX_CAPTCHA, CHAR_SET_LEN])max_idx_p = tf.argmax(predict, 2)max_idx_l = tf.argmax(tf.reshape(Y, [-1, MAX_CAPTCHA, CHAR_SET_LEN]), 2)correct_pred = tf.equal(max_idx_p, max_idx_l)accuracy = tf.reduce_mean(tf.cast(correct_pred, tf.float32))saver = tf.train.Saver()with tf.Session() as sess:sess.run(tf.global_variables_initializer())step = 0while True:batch_x, batch_y = get_next_batch(64)_, loss_ = sess.run([optimizer, loss], feed_dict={X: batch_x, Y: batch_y, keep_prob: 0.75, train_phase:True})print(step, loss_)# 每100 step計算一次準確率if step % 100 == 0 and step != 0:batch_x_test, batch_y_test = get_next_batch(100)acc = sess.run(accuracy, feed_dict={X: batch_x_test, Y: batch_y_test, keep_prob: 1., train_phase:False})print "第%s步,訓練準確率為:%s" % (step, acc)# 如果準確率大80%,保存模型,完成訓練if acc > 0.8:saver.save(sess, "crack_capcha.model", global_step=step)breakstep += 1
執行結果,筆者在大概500次訓練后,得到準確率84.3%的結果
筆者在一開始訓練的時候圖片大小是64 x 512的,訓練的時候發現訓練速度很慢,而且訓練的loss不收斂一直保持在33左右,縮小圖片為32 x 256后解決,不知道為啥,猜測要么是網絡層級不夠,或者特征層數不夠吧。
小目標完成后,為了最終目標的完成,后續可能嘗試方法2,去識別不定長的中文字符圖片,不過要先去理解LSTM網絡和 CTC模型了。
下載地址:https://github.com/jimmyleaf/ocr_tensorflow_cnn/archive/master.zip


的python虛擬環境(Hyper-V演示)...)


