網絡爬蟲(又被稱為網頁蜘蛛,網絡機器人,在FOAF社區中間,更經常的稱為網頁追逐者),是一種按照一定的規則,自動地抓取萬維網信息的程序或者腳本。另外一些不常使用的名字還有螞蟻、自動索引、模擬程序或者蠕蟲。
Requests
Python標準庫中提供了:urllib、urllib2、httplib等模塊以供Http請求,但是,它的 API 太渣了。它是為另一個時代、另一個互聯網所創建的。它需要巨量的工作,甚至包括各種方法覆蓋,來完成最簡單的任務。


import urllib2
import json
import cookielibdef urllib2_request(url, method="GET", cookie="", headers={}, data=None):""":param url: 要請求的url:param cookie: 請求方式,GET、POST、DELETE、PUT..:param cookie: 要傳入的cookie,cookie= 'k1=v1;k1=v2':param headers: 發送數據時攜帶的請求頭,headers = {'ContentType':'application/json; charset=UTF-8'}:param data: 要發送的數據GET方式需要傳入參數,data={'d1': 'v1'}:return: 返回元祖,響應的字符串內容 和 cookiejar對象對于cookiejar對象,可以使用for循環訪問:for item in cookiejar:print item.name,item.value"""if data:data = json.dumps(data)cookie_jar = cookielib.CookieJar()handler = urllib2.HTTPCookieProcessor(cookie_jar)opener = urllib2.build_opener(handler)opener.addheaders.append(['Cookie', 'k1=v1;k1=v2'])request = urllib2.Request(url=url, data=data, headers=headers)request.get_method = lambda: methodresponse = opener.open(request)origin = response.read()return origin, cookie_jar# GET
result = urllib2_request('http://127.0.0.1:8001/index/', method="GET")# POST
result = urllib2_request('http://127.0.0.1:8001/index/',  method="POST", data= {'k1': 'v1'})# PUT
result = urllib2_request('http://127.0.0.1:8001/index/',  method="PUT", data= {'k1': 'v1'})
Requests 是使用 Apache2 Licensed 許可證的 基于Python開發的HTTP 庫,其在Python內置模塊的基礎上進行了高度的封裝,從而使得Pythoner進行網絡請求時,變得美好了許多,使用Requests可以輕而易舉的完成瀏覽器可有的任何操作。
1、GET請求
# 1、無參數實例import requestsret = requests.get('https://github.com/timeline.json')print ret.url
print ret.text# 2、有參數實例import requestspayload = {'key1': 'value1', 'key2': 'value2'}
ret = requests.get("http://httpbin.org/get", params=payload)print ret.url
print ret.text
向 https://github.com/timeline.json 發送一個GET請求,將請求和響應相關均封裝在 ret 對象中。
2、POST請求
# 1、基本POST實例import requestspayload = {'key1': 'value1', 'key2': 'value2'}
ret = requests.post("http://httpbin.org/post", data=payload)print ret.text# 2、發送請求頭和數據實例import requests
import jsonurl = 'https://api.github.com/some/endpoint'
payload = {'some': 'data'}
headers = {'content-type': 'application/json'}ret = requests.post(url, data=json.dumps(payload), headers=headers)print ret.text
print ret.cookies
向https://api.github.com/some/endpoint發送一個POST請求,將請求和相應相關的內容封裝在 ret 對象中。
3、其他請求
requests.get(url, params=None, **kwargs)
requests.post(url, data=None, json=None, **kwargs)
requests.put(url, data=None, **kwargs)
requests.head(url, **kwargs)
requests.delete(url, **kwargs)
requests.patch(url, data=None, **kwargs)
requests.options(url, **kwargs)# 以上方法均是在此方法的基礎上構建
requests.request(method, url, **kwargs)
requests模塊已經將常用的Http請求方法為用戶封裝完成,用戶直接調用其提供的相應方法即可,其中方法的所有參數有:
def request(method, url, **kwargs):"""Constructs and sends a :class:`Request <Request>`.:param method: method for the new :class:`Request` object.:param url: URL for the new :class:`Request` object.:param params: (optional) Dictionary or bytes to be sent in the query string for the :class:`Request`.:param data: (optional) Dictionary, bytes, or file-like object to send in the body of the :class:`Request`.:param json: (optional) json data to send in the body of the :class:`Request`.:param headers: (optional) Dictionary of HTTP Headers to send with the :class:`Request`.:param cookies: (optional) Dict or CookieJar object to send with the :class:`Request`.:param files: (optional) Dictionary of ``'name': file-like-objects`` (or ``{'name': ('filename', fileobj)}``) for multipart encoding upload.:param auth: (optional) Auth tuple to enable Basic/Digest/Custom HTTP Auth.:param timeout: (optional) How long to wait for the server to send databefore giving up, as a float, or a :ref:`(connect timeout, readtimeout) <timeouts>` tuple.:type timeout: float or tuple:param allow_redirects: (optional) Boolean. Set to True if POST/PUT/DELETE redirect following is allowed.:type allow_redirects: bool:param proxies: (optional) Dictionary mapping protocol to the URL of the proxy.:param verify: (optional) whether the SSL cert will be verified. A CA_BUNDLE path can also be provided. Defaults to ``True``.:param stream: (optional) if ``False``, the response content will be immediately downloaded.:param cert: (optional) if String, path to ssl client cert file (.pem). If Tuple, ('cert', 'key') pair.:return: :class:`Response <Response>` object:rtype: requests.ResponseUsage::>>> import requests>>> req = requests.request('GET', 'http://httpbin.org/get')<Response [200]>"""# By using the 'with' statement we are sure the session is closed, thus we# avoid leaving sockets open which can trigger a ResourceWarning in some# cases, and look like a memory leak in others.
    with sessions.Session() as session:return session.request(method=method, url=url, **kwargs)
### 1、首先登陸任何頁面,獲取cookie

i1 = requests.get(url= "http://dig.chouti.com/help/service")### 2、用戶登陸,攜帶上一次的cookie,后臺對cookie中的 gpsd 進行授權
i2 = requests.post(url= "http://dig.chouti.com/login",data= {'phone': "86手機號",'password': "密碼",'oneMonth': ""},cookies = i1.cookies.get_dict()
)### 3、點贊(只需要攜帶已經被授權的gpsd即可)
gpsd = i1.cookies.get_dict()['gpsd']
i3 = requests.post(url="http://dig.chouti.com/link/vote?linksId=8589523",cookies={'gpsd': gpsd}
)
print(i3.text)
“破解”微信公眾號
“破解”微信公眾號其實就是使用Python代碼自動實現【登陸公眾號】->【獲取觀眾用戶】-> 【向關注用戶發送消息】。
注:只能向48小時內有互動的粉絲主動推送消息
1、自動登陸

分析對于Web登陸頁面,用戶登陸驗證時僅做了如下操作:
- 登陸的URL:https://mp.weixin.qq.com/cgi-bin/login?lang=zh_CN
- POST的數據為:
? ? {
? ? ? ? ?'username': 用戶名,
? ? ? ? ?'pwd': 密碼的MD5值,
? ? ? ? ?'imgcode': "",?
? ? ? ? ?'f': 'json'
? ? }
注:imgcode是需要提供的驗證碼,默認無需驗證碼,只有在多次登陸未成功時,才需要用戶提供驗證碼才能登陸 - POST的請求頭的Referer值,微信后臺用次來檢查是誰發送來的請求
- 請求發送并登陸成功后,獲取用戶響應的cookie,以后操作其他頁面時需要攜帶此cookie?
- 請求發送并登陸成功后,獲取用戶相應的內容中的token
import requests
import time
import hashlibdef _password(pwd):ha = hashlib.md5()ha.update(pwd)return ha.hexdigest()def login():login_dict = {'username': "用戶名",'pwd': _password("密碼"),'imgcode': "",'f': 'json'}login_res = requests.post(url= "https://mp.weixin.qq.com/cgi-bin/login?lang=zh_CN",data=login_dict,headers={'Referer': 'https://mp.weixin.qq.com/cgi-bin/login?lang=zh_CN'})# 登陸成功之后獲取服務器響應的cookieresp_cookies_dict = login_res.cookies.get_dict()# 登陸成功后,獲取服務器響應的內容resp_text = login_res.text# 登陸成功后,獲取tokentoken = re.findall(".*token=(\d+)", resp_text)[0]print resp_textprint tokenprint resp_cookies_dictlogin()
登陸成功獲取的相應內容如下:
響應內容:
{"base_resp":{"ret":0,"err_msg":"ok"},"redirect_url":"\/cgi-bin\/home?t=home\/index&lang=zh_CN&token=537908795"}響應cookie:
{'data_bizuin': '3016804678', 'bizuin': '3016804678', 'data_ticket': 'CaoX+QA0ZA9LRZ4YM3zZkvedyCY8mZi0XlLonPwvBGkX0/jY/FZgmGTq6xGuQk4H', 'slave_user': 'gh_5abeaed48d10', 'slave_sid': 'elNLbU1TZHRPWDNXSWdNc2FjckUxalM0Y000amtTamlJOUliSnRnWGRCdjFseV9uQkl5cUpHYkxqaGJNcERtYnM2WjdFT1pQckNwMFNfUW5fUzVZZnFlWGpSRFlVRF9obThtZlBwYnRIVGt6cnNGbUJsNTNIdTlIc2JJU29QM2FPaHZjcTcya0F6UWRhQkhO'}
2、訪問其他頁面獲取用戶信息
分析用戶管理頁面,通過Pyhton代碼以Get方式訪問此頁面,分析響應到的 HTML 代碼,從中獲取用戶信息:
- 獲取用戶的URL:https://mp.weixin.qq.com/cgi-bin/user_tag?action=get_all_data&lang=zh_CN&token=登陸時獲取的token
- 發送GET請求時,需要攜帶登陸成功后獲取的cookie
-
{'data_bizuin': '3016804678', 'bizuin': '3016804678', 'data_ticket': 'C4YM3zZ... - 獲取當前請求的響應的html代碼
- 通過正則表達式獲取html中的指定內容(Python的模塊Beautiful Soup)
- 獲取html中每個用戶的 data-fakeid屬性,該值是用戶的唯一標識,通過它可向用戶推送消息
- 代碼實現
import requests
import time
import hashlib
import json
import reLOGIN_COOKIES_DICT = {}def _password(pwd):ha = hashlib.md5()ha.update(pwd)return ha.hexdigest()def login():login_dict = {'username': "用戶名",'pwd': _password("密碼"),'imgcode': "",'f': 'json'}login_res = requests.post(url= "https://mp.weixin.qq.com/cgi-bin/login?lang=zh_CN",data=login_dict,headers={'Referer': 'https://mp.weixin.qq.com/cgi-bin/login?lang=zh_CN'})# 登陸成功之后獲取服務器響應的cookieresp_cookies_dict = login_res.cookies.get_dict()# 登陸成功后,獲取服務器響應的內容resp_text = login_res.text# 登陸成功后,獲取tokentoken = re.findall(".*token=(\d+)", resp_text)[0]return {'token': token, 'cookies': resp_cookies_dict}def standard_user_list(content):content = re.sub('\s*', '', content)content = re.sub('\n*', '', content)data = re.findall("""cgiData=(.*);seajs""", content)[0]data = data.strip()while True:temp = re.split('({)(\w+)(:)', data, 1)if len(temp) == 5:temp[2] = '"' + temp[2] + '"'data = ''.join(temp)else:breakwhile True:temp = re.split('(,)(\w+)(:)', data, 1)if len(temp) == 5:temp[2] = '"' + temp[2] + '"'data = ''.join(temp)else:breakdata = re.sub('\*\d+', "", data)ret = json.loads(data)return retdef get_user_list():login_dict = login()LOGIN_COOKIES_DICT.update(login_dict)login_cookie_dict = login_dict['cookies']res_user_list = requests.get(url= "https://mp.weixin.qq.com/cgi-bin/user_tag",params = {"action": "get_all_data", "lang": "zh_CN", "token": login_dict['token']},cookies = login_cookie_dict,headers={'Referer': 'https://mp.weixin.qq.com/cgi-bin/login?lang=zh_CN'})user_info = standard_user_list(res_user_list.text)for item in user_info['user_list']:print "%s %s " % (item['nick_name'],item['id'],)get_user_list()
3、發送消息
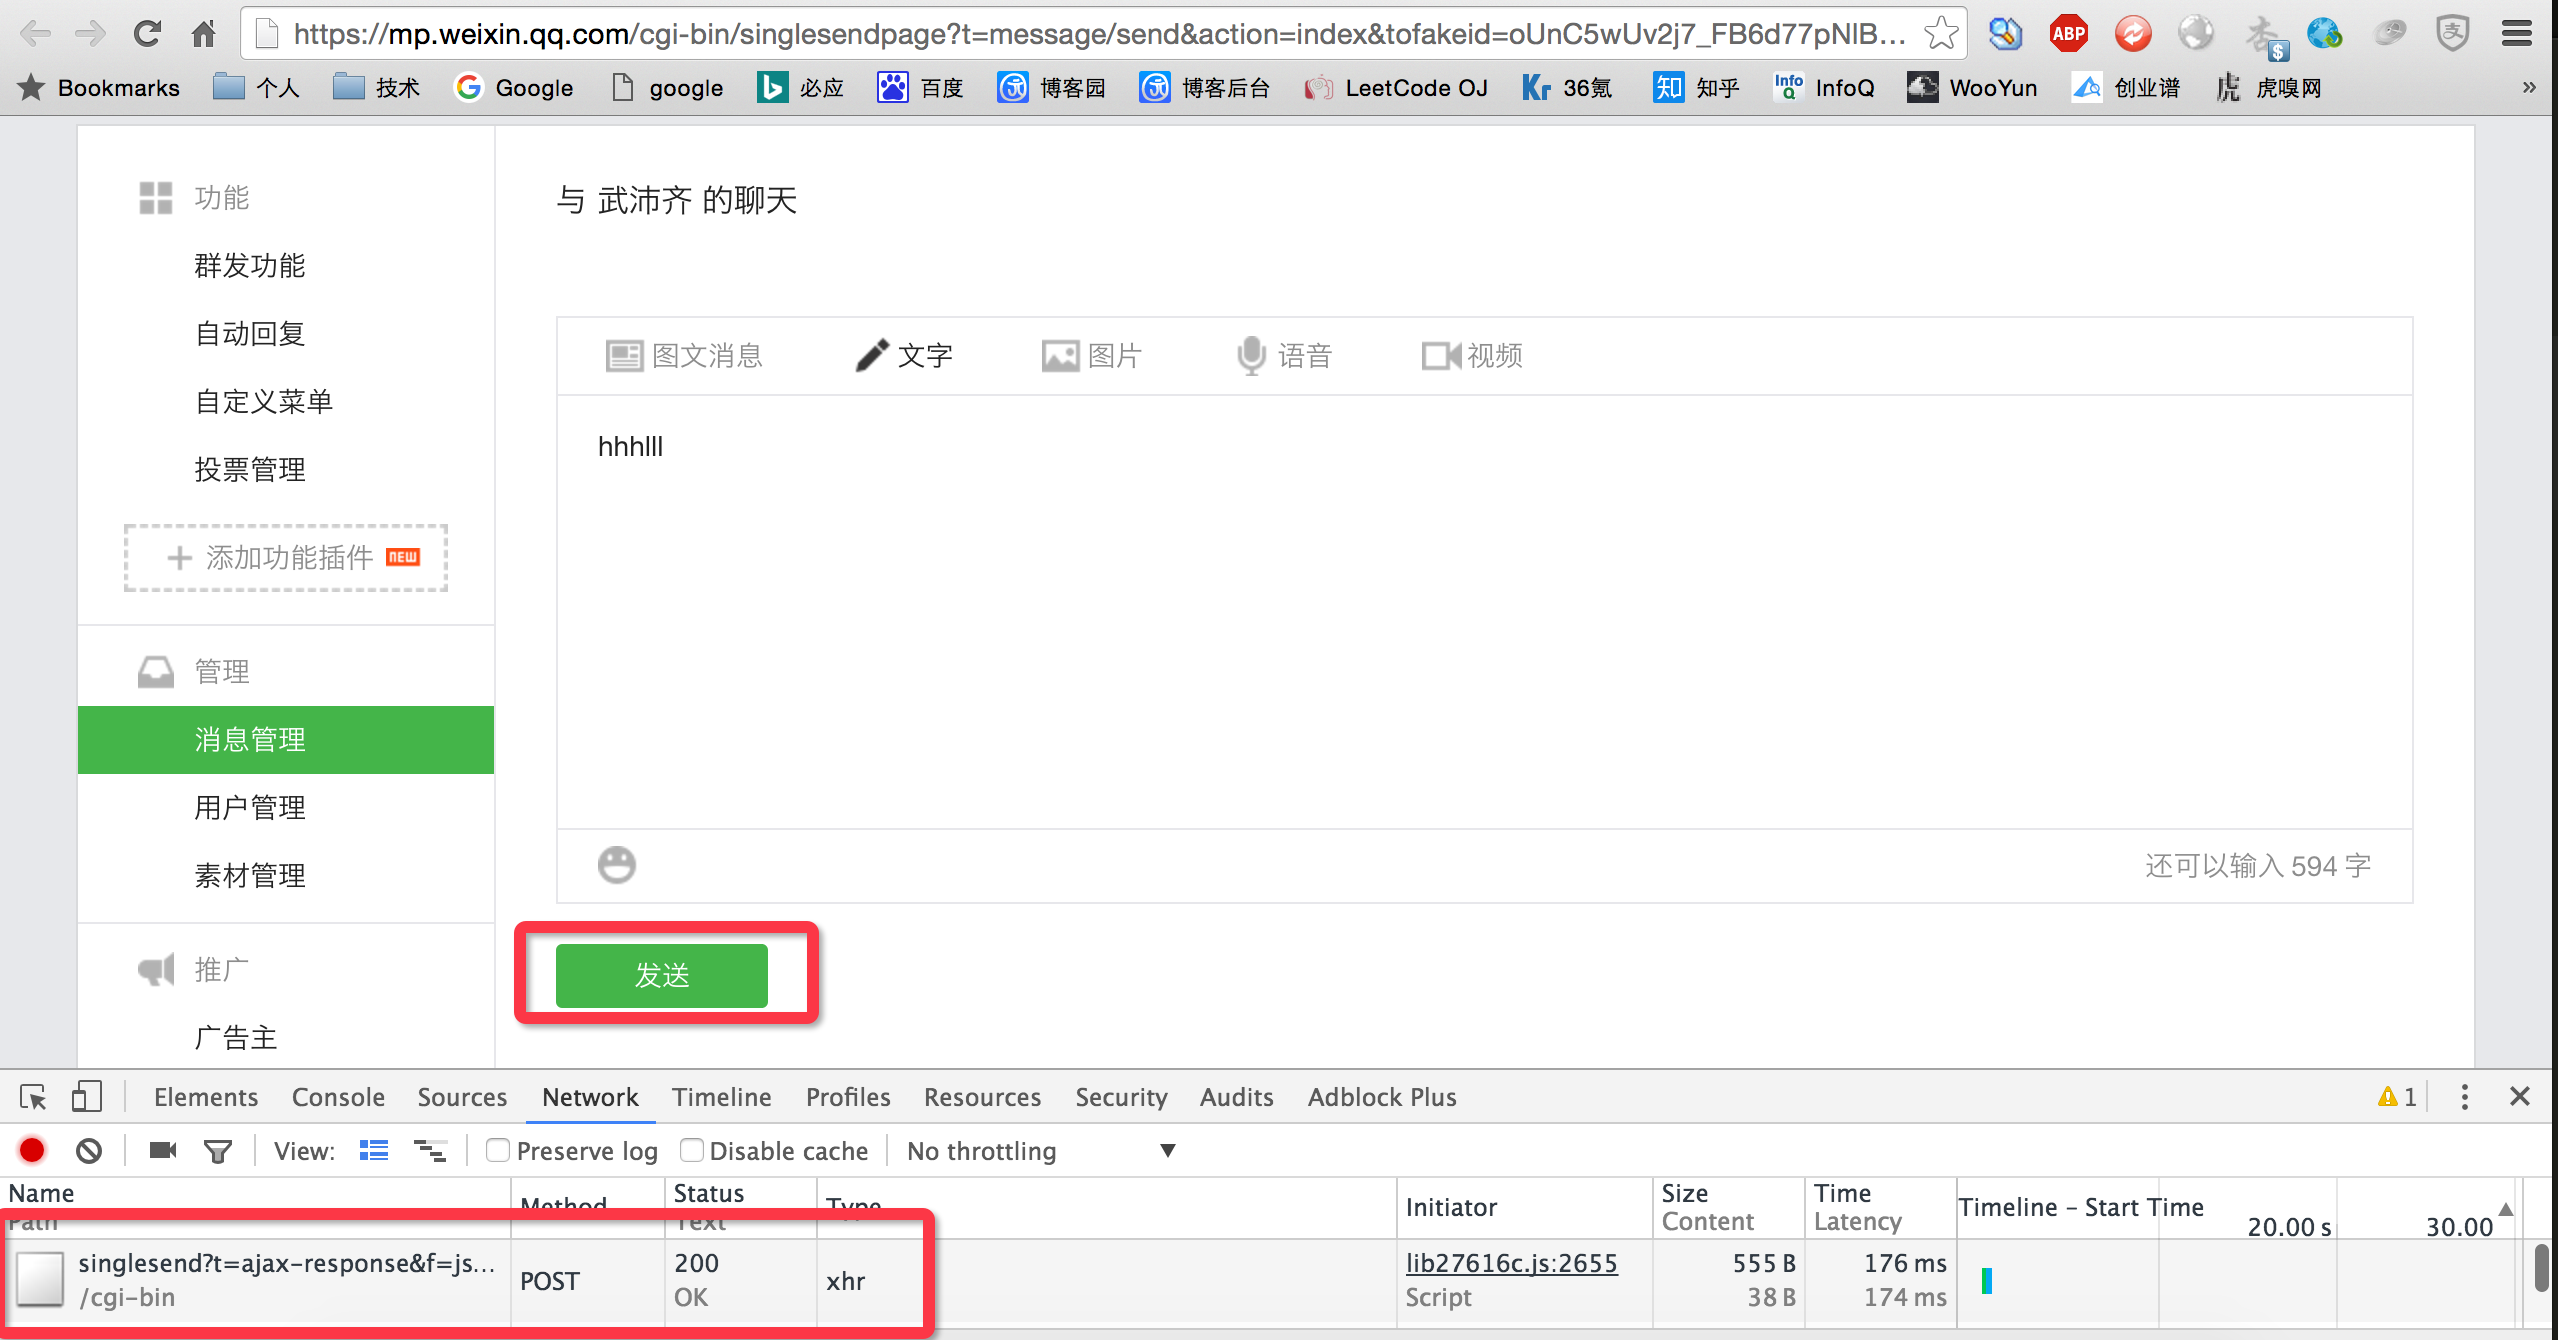
分析給用戶發送消息的頁面,從網絡請求中剖析得到發送消息的URL,從而使用Python代碼發送消息:
- 發送消息的URL:https://mp.weixin.qq.com/cgi-bin/singlesend?t=ajax-response&f=json&token=登陸時獲取的token放在此處&lang=zh_CN
- 從登陸時相應的內容中獲取:token和cookie
- 從用戶列表中獲取某個用戶唯一標識: fake_id
- 封裝消息,并發送POST請求
-
send_dict = {'token': 登陸時獲取的token,'lang': "zh_CN",'f': 'json','ajax': 1,'random': "0.5322618900912392",'type': 1,'content': 要發送的內容,'tofakeid': 用戶列表中獲取的用戶的ID,'imgcode': ''
}
發送消息代碼import requests import time import hashlib import json import reLOGIN_COOKIES_DICT = {}def _password(pwd):ha = hashlib.md5()ha.update(pwd)return ha.hexdigest()def login():login_dict = {'username': "用戶名",'pwd': _password("密碼"),'imgcode': "",'f': 'json'}login_res = requests.post(url= "https://mp.weixin.qq.com/cgi-bin/login?lang=zh_CN",data=login_dict,headers={'Referer': 'https://mp.weixin.qq.com/cgi-bin/login?lang=zh_CN'})# 登陸成功之后獲取服務器響應的cookieresp_cookies_dict = login_res.cookies.get_dict()# 登陸成功后,獲取服務器響應的內容resp_text = login_res.text# 登陸成功后,獲取tokentoken = re.findall(".*token=(\d+)", resp_text)[0]return {'token': token, 'cookies': resp_cookies_dict}def standard_user_list(content):content = re.sub('\s*', '', content)content = re.sub('\n*', '', content)data = re.findall("""cgiData=(.*);seajs""", content)[0]data = data.strip()while True:temp = re.split('({)(\w+)(:)', data, 1)if len(temp) == 5:temp[2] = '"' + temp[2] + '"'data = ''.join(temp)else:breakwhile True:temp = re.split('(,)(\w+)(:)', data, 1)if len(temp) == 5:temp[2] = '"' + temp[2] + '"'data = ''.join(temp)else:breakdata = re.sub('\*\d+', "", data)ret = json.loads(data)return retdef get_user_list():login_dict = login()LOGIN_COOKIES_DICT.update(login_dict)login_cookie_dict = login_dict['cookies']res_user_list = requests.get(url= "https://mp.weixin.qq.com/cgi-bin/user_tag",params = {"action": "get_all_data", "lang": "zh_CN", "token": login_dict['token']},cookies = login_cookie_dict,headers={'Referer': 'https://mp.weixin.qq.com/cgi-bin/login?lang=zh_CN'})user_info = standard_user_list(res_user_list.text)for item in user_info['user_list']:print "%s %s " % (item['nick_name'],item['id'],)def send_msg(user_fake_id, content='啥也沒發'):login_dict = LOGIN_COOKIES_DICTtoken = login_dict['token']login_cookie_dict = login_dict['cookies']send_dict = {'token': token,'lang': "zh_CN",'f': 'json','ajax': 1,'random': "0.5322618900912392",'type': 1,'content': content,'tofakeid': user_fake_id,'imgcode': ''}send_url = "https://mp.weixin.qq.com/cgi-bin/singlesend?t=ajax-response&f=json&token=%s&lang=zh_CN" % (token,)message_list = requests.post(url=send_url, data=send_dict, cookies=login_cookie_dict, headers={'Referer': 'https://mp.weixin.qq.com/cgi-bin/login?lang=zh_CN'})get_user_list() fake_id = raw_input('請輸入用戶ID:') content = raw_input('請輸入消息內容:') send_msg(fake_id, content)
以上就是“破解”微信公眾號的整個過程,通過Python代碼實現了自動【登陸微信公眾號平臺】【獲取用戶列表】【指定用戶發送消息】。
Scrapy
Scrapy是一個為了爬取網站數據,提取結構性數據而編寫的應用框架。 其可以應用在數據挖掘,信息處理或存儲歷史數據等一系列的程序中。
其最初是為了頁面抓取 (更確切來說, 網絡抓取 )所設計的, 也可以應用在獲取API所返回的數據(例如 Amazon Associates Web Services ) 或者通用的網絡爬蟲。Scrapy用途廣泛,可以用于數據挖掘、監測和自動化測試。
Scrapy 使用了 Twisted異步網絡庫來處理網絡通訊。整體架構大致如下
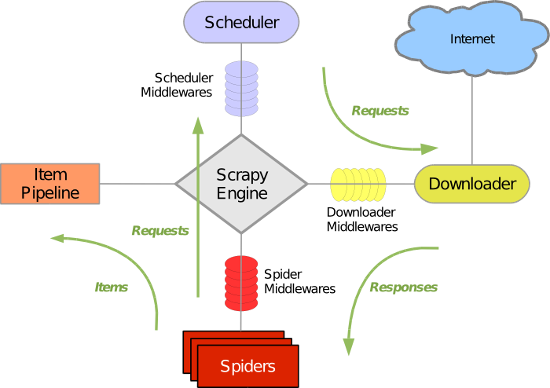
Scrapy主要包括了以下組件:
- 引擎(Scrapy)
用來處理整個系統的數據流處理, 觸發事務(框架核心) - 調度器(Scheduler)
用來接受引擎發過來的請求, 壓入隊列中, 并在引擎再次請求的時候返回. 可以想像成一個URL(抓取網頁的網址或者說是鏈接)的優先隊列, 由它來決定下一個要抓取的網址是什么, 同時去除重復的網址 - 下載器(Downloader)
用于下載網頁內容, 并將網頁內容返回給蜘蛛(Scrapy下載器是建立在twisted這個高效的異步模型上的) - 爬蟲(Spiders)
爬蟲是主要干活的, 用于從特定的網頁中提取自己需要的信息, 即所謂的實體(Item)。用戶也可以從中提取出鏈接,讓Scrapy繼續抓取下一個頁面 - 項目管道(Pipeline)
負責處理爬蟲從網頁中抽取的實體,主要的功能是持久化實體、驗證實體的有效性、清除不需要的信息。當頁面被爬蟲解析后,將被發送到項目管道,并經過幾個特定的次序處理數據。 - 下載器中間件(Downloader Middlewares)
位于Scrapy引擎和下載器之間的框架,主要是處理Scrapy引擎與下載器之間的請求及響應。 - 爬蟲中間件(Spider Middlewares)
介于Scrapy引擎和爬蟲之間的框架,主要工作是處理蜘蛛的響應輸入和請求輸出。 - 調度中間件(Scheduler Middewares)
介于Scrapy引擎和調度之間的中間件,從Scrapy引擎發送到調度的請求和響應。
Scrapy運行流程大概如下:
- 引擎從調度器中取出一個鏈接(URL)用于接下來的抓取
- 引擎把URL封裝成一個請求(Request)傳給下載器
- 下載器把資源下載下來,并封裝成應答包(Response)
- 爬蟲解析Response
- 解析出實體(Item),則交給實體管道進行進一步的處理
- 解析出的是鏈接(URL),則把URL交給調度器等待抓取
一、安裝
pip install Scrapy
注:windows平臺需要依賴pywin32,請根據自己系統32/64位選擇下載安裝,https://sourceforge.net/projects/pywin32/
二、基本使用
1、創建項目
運行命令:
scrapy startproject your_project_name
自動創建目錄:
project_name/scrapy.cfgproject_name/__init__.pyitems.pypipelines.pysettings.pyspiders/__init__.py
文件說明:
- scrapy.cfg ?項目的配置信息,主要為Scrapy命令行工具提供一個基礎的配置信息。(真正爬蟲相關的配置信息在settings.py文件中)
- items.py ? ?設置數據存儲模板,用于結構化數據,如:Django的Model
- pipelines ? ?數據處理行為,如:一般結構化的數據持久化
- settings.py 配置文件,如:遞歸的層數、并發數,延遲下載等
- spiders ? ? ?爬蟲目錄,如:創建文件,編寫爬蟲規則
注意:一般創建爬蟲文件時,以網站域名命名
2、編寫爬蟲
在spiders目錄中新建 xiaohuar_spider.py 文件
import scrapyclass XiaoHuarSpider(scrapy.spiders.Spider):name = "xiaohuar"allowed_domains = ["xiaohuar.com"]start_urls = ["http://www.xiaohuar.com/hua/",]def parse(self, response):# print(response, type(response))# from scrapy.http.response.html import HtmlResponse# print(response.body_as_unicode())
 current_url = response.urlbody = response.bodyunicode_body = response.body_as_unicode()
3、運行
進入project_name目錄,運行命令
scrapy crawl spider_name --nolog
4、遞歸的訪問
以上的爬蟲僅僅是爬去初始頁,而我們爬蟲是需要源源不斷的執行下去,直到所有的網頁被執行完畢
import scrapy
from scrapy.http import Request
from scrapy.selector import HtmlXPathSelector
import re
import urllib
import osclass XiaoHuarSpider(scrapy.spiders.Spider):name = "xiaohuar"allowed_domains = ["xiaohuar.com"]start_urls = ["http://www.xiaohuar.com/list-1-1.html",]def parse(self, response):# 分析頁面# 找到頁面中符合規則的內容(校花圖片),保存# 找到所有的a標簽,再訪問其他a標簽,一層一層的搞下去
 hxs = HtmlXPathSelector(response)# 如果url是 http://www.xiaohuar.com/list-1-\d+.htmlif re.match('http://www.xiaohuar.com/list-1-\d+.html', response.url):items = hxs.select('//div[@class="item_list infinite_scroll"]/div')for i in range(len(items)):src = hxs.select('//div[@class="item_list infinite_scroll"]/div[%d]//div[@class="img"]/a/img/@src' % i).extract()name = hxs.select('//div[@class="item_list infinite_scroll"]/div[%d]//div[@class="img"]/span/text()' % i).extract()school = hxs.select('//div[@class="item_list infinite_scroll"]/div[%d]//div[@class="img"]/div[@class="btns"]/a/text()' % i).extract()if src:ab_src = "http://www.xiaohuar.com" + src[0]file_name = "%s_%s.jpg" % (school[0].encode('utf-8'), name[0].encode('utf-8'))file_path = os.path.join("/Users/wupeiqi/PycharmProjects/beauty/pic", file_name)urllib.urlretrieve(ab_src, file_path)# 獲取所有的url,繼續訪問,并在其中尋找相同的urlall_urls = hxs.select('//a/@href').extract()for url in all_urls:if url.startswith('http://www.xiaohuar.com/list-1-'):yield Request(url, callback=self.parse)
以上代碼將符合規則的頁面中的圖片保存在指定目錄,并且在HTML源碼中找到所有的其他 a 標簽的href屬性,從而“遞歸”的執行下去,直到所有的頁面都被訪問過為止。以上代碼之所以可以進行“遞歸”的訪問相關URL,關鍵在于parse方法使用了 yield Request對象。
注:可以修改settings.py 中的配置文件,以此來指定“遞歸”的層數,如:?DEPTH_LIMIT = 1
from scrapy.selector import Selector
from scrapy.http import HtmlResponse
html = """<!DOCTYPE html>
<html>
<head lang="en"><meta charset="UTF-8"><title></title>
</head>
<body><li class="item-"><a href="link.html">first item</a></li><li class="item-0"><a href="link1.html">first item</a></li><li class="item-1"><a href="link2.html">second item</a></li>
</body>
</html>
"""
response = HtmlResponse(url='http://example.com', body=html,encoding='utf-8')
ret = Selector(response=response).xpath('//li[re:test(@class, "item-\d*")]//@href').extract()
print(ret)
import scrapy
import hashlib
from tutorial.items import JinLuoSiItem
from scrapy.http import Request
from scrapy.selector import HtmlXPathSelectorclass JinLuoSiSpider(scrapy.spiders.Spider):count = 0url_set = set()name = "jluosi"domain = 'http://www.jluosi.com'allowed_domains = ["jluosi.com"]start_urls = ["http://www.jluosi.com:80/ec/goodsDetail.action?jls=QjRDNEIzMzAzOEZFNEE3NQ==",]def parse(self, response):md5_obj = hashlib.md5()md5_obj.update(response.url)md5_url = md5_obj.hexdigest()if md5_url in JinLuoSiSpider.url_set:passelse:JinLuoSiSpider.url_set.add(md5_url)hxs = HtmlXPathSelector(response)if response.url.startswith('http://www.jluosi.com:80/ec/goodsDetail.action'):item = JinLuoSiItem()item['company'] = hxs.select('//div[@class="ShopAddress"]/ul/li[1]/text()').extract()item['link'] = hxs.select('//div[@class="ShopAddress"]/ul/li[2]/text()').extract()item['qq'] = hxs.select('//div[@class="ShopAddress"]//a/@href').re('.*uin=(?P<qq>\d*)&')item['address'] = hxs.select('//div[@class="ShopAddress"]/ul/li[4]/text()').extract()item['title'] = hxs.select('//h1[@class="goodsDetail_goodsName"]/text()').extract()item['unit'] = hxs.select('//table[@class="R_WebDetail_content_tab"]//tr[1]//td[3]/text()').extract()product_list = []product_tr = hxs.select('//table[@class="R_WebDetail_content_tab"]//tr')for i in range(2,len(product_tr)):temp = {'standard':hxs.select('//table[@class="R_WebDetail_content_tab"]//tr[%d]//td[2]/text()' %i).extract()[0].strip(),'price':hxs.select('//table[@class="R_WebDetail_content_tab"]//tr[%d]//td[3]/text()' %i).extract()[0].strip(),}product_list.append(temp)item['product_list'] = product_listyield itemcurrent_page_urls = hxs.select('//a/@href').extract()for i in range(len(current_page_urls)):url = current_page_urls[i]if url.startswith('http://www.jluosi.com'):url_ab = urlyield Request(url_ab, callback=self.parse)
def parse(self, response):from scrapy.http.cookies import CookieJarcookieJar = CookieJar()cookieJar.extract_cookies(response, response.request)print(cookieJar._cookies)
5、格式化處理
上述實例只是簡單的圖片處理,所以在parse方法中直接處理。如果對于想要獲取更多的數據(獲取頁面的價格、商品名稱、QQ等),則可以利用Scrapy的items將數據格式化,然后統一交由pipelines來處理。
在items.py中創建類:
# Define here the models for your scraped items
#
# See documentation in:
# http://doc.scrapy.org/en/latest/topics/items.htmlimport scrapyclass JieYiCaiItem(scrapy.Item):company = scrapy.Field()title = scrapy.Field()qq = scrapy.Field()info = scrapy.Field()more = scrapy.Field()
上述定義模板,以后對于從請求的源碼中獲取的數據同意按照此結構來獲取,所以在spider中需要有一下操作:
import scrapy
import hashlib
from beauty.items import JieYiCaiItem
from scrapy.http import Request
from scrapy.selector import HtmlXPathSelector
from scrapy.spiders import CrawlSpider, Rule
from scrapy.linkextractors import LinkExtractorclass JieYiCaiSpider(scrapy.spiders.Spider):count = 0url_set = set()name = "jieyicai"domain = 'http://www.jieyicai.com'allowed_domains = ["jieyicai.com"]start_urls = ["http://www.jieyicai.com",]rules = [#下面是符合規則的網址,但是不抓取內容,只是提取該頁的鏈接(這里網址是虛構的,實際使用時請替換)#Rule(SgmlLinkExtractor(allow=(r'http://test_url/test?page_index=\d+'))),#下面是符合規則的網址,提取內容,(這里網址是虛構的,實際使用時請替換)#Rule(LinkExtractor(allow=(r'http://www.jieyicai.com/Product/Detail.aspx?pid=\d+')), callback="parse"),
    ]def parse(self, response):md5_obj = hashlib.md5()md5_obj.update(response.url)md5_url = md5_obj.hexdigest()if md5_url in JieYiCaiSpider.url_set:passelse:JieYiCaiSpider.url_set.add(md5_url)hxs = HtmlXPathSelector(response)if response.url.startswith('http://www.jieyicai.com/Product/Detail.aspx'):item = JieYiCaiItem()item['company'] = hxs.select('//span[@class="username g-fs-14"]/text()').extract()item['qq'] = hxs.select('//span[@class="g-left bor1qq"]/a/@href').re('.*uin=(?P<qq>\d*)&')item['info'] = hxs.select('//div[@class="padd20 bor1 comard"]/text()').extract()item['more'] = hxs.select('//li[@class="style4"]/a/@href').extract()item['title'] = hxs.select('//div[@class="g-left prodetail-text"]/h2/text()').extract()yield itemcurrent_page_urls = hxs.select('//a/@href').extract()for i in range(len(current_page_urls)):url = current_page_urls[i]if url.startswith('/'):url_ab = JieYiCaiSpider.domain + urlyield Request(url_ab, callback=self.parse)
此處代碼的關鍵在于:
- 將獲取的數據封裝在了Item對象中
- yield Item對象 (一旦parse中執行yield Item對象,則自動將該對象交個pipelines的類來處理)
Define your item pipelines here
#
# Don't forget to add your pipeline to the ITEM_PIPELINES setting
# See: http://doc.scrapy.org/en/latest/topics/item-pipeline.htmlimport json
from twisted.enterprise import adbapi
import MySQLdb.cursors
import remobile_re = re.compile(r'(13[0-9]|15[012356789]|17[678]|18[0-9]|14[57])[0-9]{8}')
phone_re = re.compile(r'(\d+-\d+|\d+)')class JsonPipeline(object):def __init__(self):self.file = open('/Users/wupeiqi/PycharmProjects/beauty/beauty/jieyicai.json', 'wb')def process_item(self, item, spider):line = "%s  %s\n" % (item['company'][0].encode('utf-8'), item['title'][0].encode('utf-8'))self.file.write(line)return itemclass DBPipeline(object):def __init__(self):self.db_pool = adbapi.ConnectionPool('MySQLdb',db='DbCenter',user='root',passwd='123',cursorclass=MySQLdb.cursors.DictCursor,use_unicode=True)def process_item(self, item, spider):query = self.db_pool.runInteraction(self._conditional_insert, item)query.addErrback(self.handle_error)return itemdef _conditional_insert(self, tx, item):tx.execute("select nid from company where company = %s", (item['company'][0], ))result = tx.fetchone()if result:passelse:phone_obj = phone_re.search(item['info'][0].strip())phone = phone_obj.group() if phone_obj else ' 'mobile_obj = mobile_re.search(item['info'][1].strip())mobile = mobile_obj.group() if mobile_obj else ' 'values = (item['company'][0],item['qq'][0],phone,mobile,item['info'][2].strip(),item['more'][0])tx.execute("insert into company(company,qq,phone,mobile,address,more) values(%s,%s,%s,%s,%s,%s)", values)def handle_error(self, e):print('error',e)
上述中的pipelines中有多個類,到底Scapy會自動執行那個?哈哈哈哈,當然需要先配置了,不然Scapy就蒙逼了。。。
在settings.py中做如下配置:
ITEM_PIPELINES = {'beauty.pipelines.DBPipeline': 300,'beauty.pipelines.JsonPipeline': 100,
}
# 每行后面的整型值,確定了他們運行的順序,item按數字從低到高的順序,通過pipeline,通常將這些數字定義在0-1000范圍內。
?


)


)

的問題)
類軟件收集(偶爾更新列表))

)
)