舊代碼
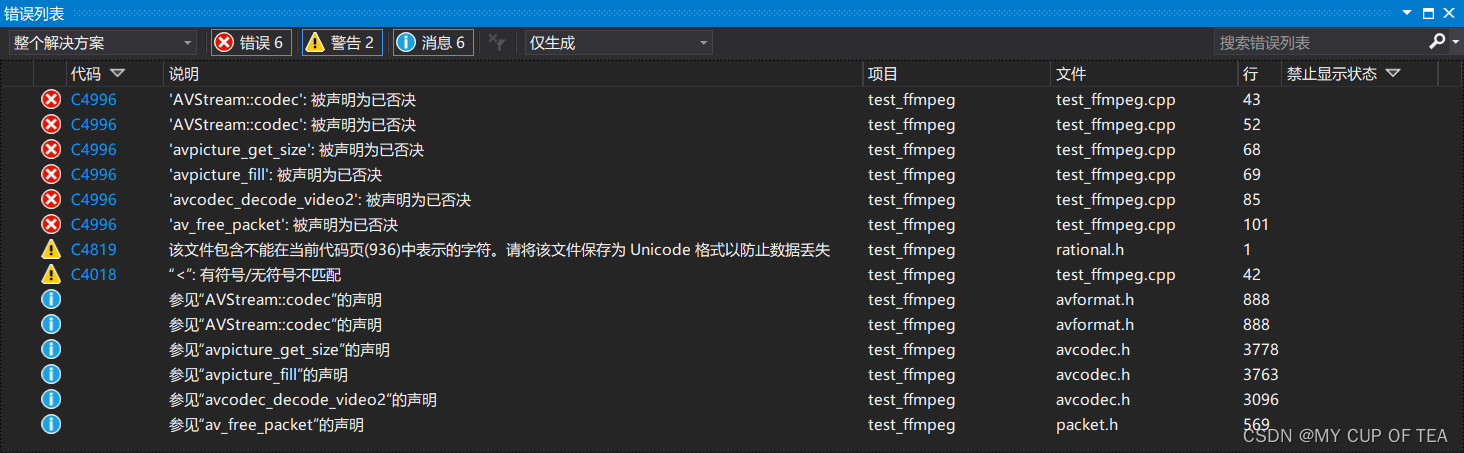
- 舊代碼使用了很多過時的API,這些API使用后,vs會報編譯器警告 (級別 3) C4996的錯誤
- 即?函數被聲明為已否決 報?C4996的錯誤
// test_ffmpeg.cpp : 此文件包含 "main" 函數。程序執行將在此處開始并結束。
//
#define SDL_MAIN_HANDLED
#define __STDC_CONSTANT_MACROS
#pragma warning(disable: 4996)#include <iostream>
#include <SDL2/SDL.h>extern "C" {
#include "libavcodec/avcodec.h"
#include "libavformat/avformat.h"
#include "libswscale/swscale.h"
}int main(int argc,char* argv[])
{AVFormatContext *pFormatCtx;int i, videoindex;AVCodecContext* pCodeCtx;AVCodec* pCodec;AVFrame* pFrame, *pFrameYUV;uint8_t* out_buffer;AVPacket* packet;//int y_size;int ret, got_picture;struct SwsContext* img_convert_ctx;//輸入文件的路徑char filepath[] = "Titanic.ts";int frame_cnt;avformat_network_init();pFormatCtx = avformat_alloc_context();if (avformat_open_input(&pFormatCtx, filepath, NULL, NULL) != 0) {std::cout << "Couldn't open input stream." << std::endl;return -1;}if (avformat_find_stream_info(pFormatCtx, NULL) < 0) {std::cout << "Couldn't find stream information." << std::endl;return -1;}videoindex = -1;for (i = 0;i < pFormatCtx->nb_streams;i++) {if (pFormatCtx->streams[i]->codec->codec_type == AVMEDIA_TYPE_VIDEO) {videoindex = i;break;}}if (videoindex == -1) {std::cout << "Didn't find a video stream." << std::endl;return -1;}pCodeCtx = pFormatCtx->streams[videoindex]->codec;pCodec = avcodec_find_decoder(pCodeCtx->codec_id);if (pCodec == NULL) {std::cout << "Codec not find!" << std::endl;return -1;}if (avcodec_open2(pCodeCtx, pCodec, NULL) < 0) {std::cout << "Could not open codec!" << std::endl;return -1;}/*此處添加輸出視頻信息的代碼取自于pFormatCtx,使用std::cout輸出*/pFrame = av_frame_alloc();pFrameYUV = av_frame_alloc();out_buffer = (uint8_t*)av_malloc(avpicture_get_size(AV_PIX_FMT_YUV420P, pCodeCtx->width, pCodeCtx->height));avpicture_fill((AVPicture*)pFrameYUV, out_buffer, AV_PIX_FMT_YUV420P, pCodeCtx->width, pCodeCtx->height);packet = (AVPacket*)av_malloc(sizeof(AVPacket));//Output Infostd::cout << "--------------------File Information--------------------" << std::endl;av_dump_format(pFormatCtx, 0, filepath, 0);std::cout << "--------------------------------------------------------" << std::endl;img_convert_ctx = sws_getContext(pCodeCtx->width, pCodeCtx->height, pCodeCtx->sw_pix_fmt,pCodeCtx->width, pCodeCtx->height, AV_PIX_FMT_YUV420P, SWS_BICUBIC, NULL, NULL, NULL);frame_cnt = 0;while (av_read_frame(pFormatCtx,packet)>=0){if (packet->stream_index == videoindex) {/*在此處添加輸出H264碼流的代碼取自于packet,使用fwrite()輸出*/ret = avcodec_decode_video2(pCodeCtx, pFrame, &got_picture, packet);if (ret < 0) {std::cout << "Decode Frror!" << std::endl;return -1;}if (got_picture) {sws_scale(img_convert_ctx, (const uint8_t* const*)pFrame->data, pFrame->linesize, 0, pCodeCtx->height,pFrameYUV->data, pFrameYUV->linesize);std::cout << "Decoded frame index"<< frame_cnt << std::endl;/*在此處添加輸出H264碼流的代碼取自于packet,使用fwrite()輸出*/frame_cnt++;}}av_free_packet(packet);}sws_freeContext(img_convert_ctx);av_frame_free(&pFrameYUV);av_frame_free(&pFrame);avcodec_close(pCodeCtx);avformat_close_input(&pFormatCtx);return 0;
}// 運行程序: Ctrl + F5 或調試 >“開始執行(不調試)”菜單
// 調試程序: F5 或調試 >“開始調試”菜單// 入門使用技巧:
//   1. 使用解決方案資源管理器窗口添加/管理文件
//   2. 使用團隊資源管理器窗口連接到源代碼管理
//   3. 使用輸出窗口查看生成輸出和其他消息
//   4. 使用錯誤列表窗口查看錯誤
//   5. 轉到“項目”>“添加新項”以創建新的代碼文件,或轉到“項目”>“添加現有項”以將現有代碼文件添加到項目
//   6. 將來,若要再次打開此項目,請轉到“文件”>“打開”>“項目”并選擇 .sln 文件
- 編譯器警告 (級別 3) C4996 | Microsoft Docs
- 在代碼頭部添加#pragma warning(disable: 4996) 即可屏蔽這個錯誤
- windows API 函數被聲明為已否決_或許可能028的博客-CSDN博客
- 但是 代碼啟動之后,因為存在隱患,仍然存在問題
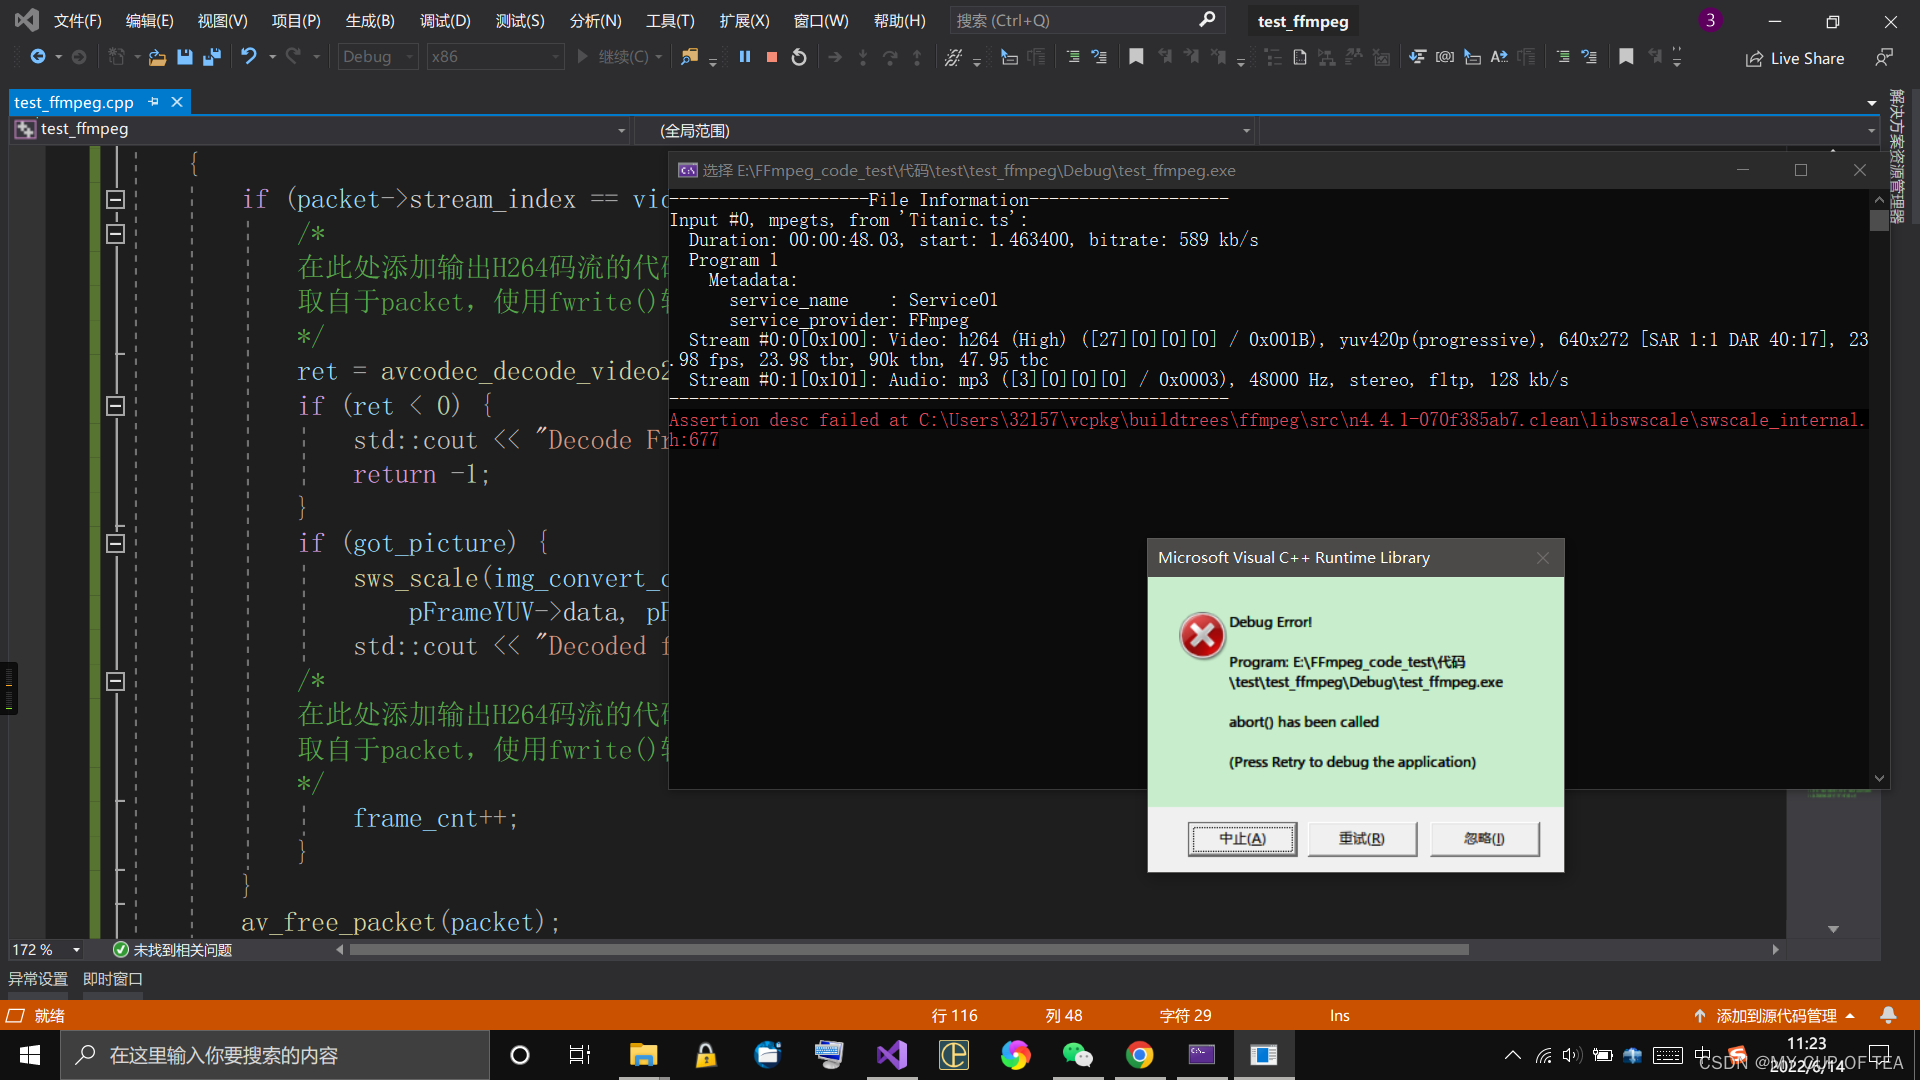
- ?Assertion desc failed at C:\Users\32157\vcpkg\buildtrees\ffmpeg\src\n4.4.1-070f385ab7.clean\libswscale\swscale_internal.h:677
- c++ - Assertion desc failed at src/libswscale/swscale_internal.h:668 - Stack Overflow
- 錯誤原因:在FFmpeg該斷言的最新版本中,說明outCodecContext->pix_fmt設置不正確。并且也avpicture_fill已棄用,請av_image_fill_arrays改用。
- 因此 需要使用新版的API對舊版API進行更新迭代
- 去除?#pragma warning(disable: 4996)?
- 顯示過時的API如下
對應修改
- FFmpeg 被聲明為已否決 deprecated_Louis_815的博客-CSDN博客
- api函數替換,在里面搜索ctrl+F,會有英文說明的
- PIX_FMT_YUV420P -> AV_PIX_FMT_YUV420P
- 'AVStream::codec': 被聲明為已否決:
- if(pFormatCtx->streams[i]->codec->codec_type==AVMEDIA_TYPE_VIDEO){
- =>
- if(pFormatCtx->streams[i]->codecpar->codec_type==AVMEDIA_TYPE_VIDEO){
- 'AVStream::codec': 被聲明為已否決:
- pCodecCtx = pFormatCtx->streams[videoindex]->codec;
- =>
- pCodecCtx = avcodec_alloc_context3(NULL);
- avcodec_parameters_to_context(pCodecCtx, pFormatCtx->streams[videoindex]->codecpar);
- 'avpicture_get_size': 被聲明為已否決:
- avpicture_get_size(AV_PIX_FMT_YUV420P, pCodecCtx->width, pCodecCtx->height)
- =>
- #include "libavutil/imgutils.h"
- av_image_get_buffer_size(AV_PIX_FMT_YUV420P, pCodecCtx->width, pCodecCtx->height, 1)
- 'avpicture_fill': 被聲明為已否決:
- avpicture_fill((AVPicture *)pFrameYUV, out_buffer, AV_PIX_FMT_YUV420P, pCodecCtx->width, pCodecCtx->height);
- =>
- av_image_fill_arrays(pFrameYUV->data, pFrameYUV->linesize, out_buffer, AV_PIX_FMT_YUV420P, pCodecCtx->width, pCodecCtx->height, 1);
- 'avcodec_decode_video2': 被聲明為已否決:
- ret = avcodec_decode_video2(pCodecCtx, pFrame, &got_picture, packet); //got_picture_ptr Zero if no frame could be decompressed
- =>
- ret = avcodec_send_packet(pCodecCtx, packet);
- got_picture = avcodec_receive_frame(pCodecCtx, pFrame); //got_picture = 0 success, a frame was returned
- //注意:got_picture含義相反
- 或者:
- int ret = avcodec_send_packet(aCodecCtx, &pkt);
- if (ret != 0)
- {
- prinitf("%s/n","error");
- return;
- }
- while( avcodec_receive_frame(aCodecCtx, &frame) == 0){
- //讀取到一幀音頻或者視頻
- //處理解碼后音視頻 frame
- }
- 'av_free_packet': 被聲明為已否決:
- av_free_packet(packet);
- =>
- av_packet_unref(packet);
- 本文代碼 未涉及
- avcodec_decode_audio4:被聲明為已否決:
- int ret = avcodec_send_packet(aCodecCtx, &pkt);
- if (ret != 0){prinitf("%s/n","error");}
- while( avcodec_receive_frame(aCodecCtx, &frame) == 0){
- //讀取到一幀音頻或者視頻
- //處理解碼后音視頻 frame
- }
修改后的代碼
// test_ffmpeg.cpp : 此文件包含 "main" 函數。程序執行將在此處開始并結束。
//
#define SDL_MAIN_HANDLED
#define __STDC_CONSTANT_MACROS
#pragma warning(disable: 4819)#include <iostream>
#include <SDL2/SDL.h>extern "C" {
#include "libavcodec/avcodec.h"
#include "libavformat/avformat.h"
#include "libswscale/swscale.h"
#include "libavutil/imgutils.h"
}int main(int argc,char* argv[])
{AVFormatContext *pFormatCtx;int i, videoindex;AVCodecContext* pCodeCtx;AVCodec* pCodec;AVFrame* pFrame, *pFrameYUV;uint8_t* out_buffer;AVPacket* packet;//int y_size;int ret, got_picture;struct SwsContext* img_convert_ctx;//輸入文件的路徑char filepath[] = "Titanic.ts";int frame_cnt;avformat_network_init();pFormatCtx = avformat_alloc_context();if (avformat_open_input(&pFormatCtx, filepath, NULL, NULL) != 0) {std::cout << "Couldn't open input stream." << std::endl;return -1;}if (avformat_find_stream_info(pFormatCtx, NULL) < 0) {std::cout << "Couldn't find stream information." << std::endl;return -1;}videoindex = -1;for (i = 0;i < pFormatCtx->nb_streams;i++) {if (pFormatCtx->streams[i]->codecpar->codec_type == AVMEDIA_TYPE_VIDEO) {videoindex = i;break;}}if (videoindex == -1) {std::cout << "Didn't find a video stream." << std::endl;return -1;}pCodeCtx = avcodec_alloc_context3(NULL);avcodec_parameters_to_context(pCodeCtx, pFormatCtx->streams[videoindex]->codecpar);pCodec = avcodec_find_decoder(pCodeCtx->codec_id);if (pCodec == NULL) {std::cout << "Codec not find!" << std::endl;return -1;}if (avcodec_open2(pCodeCtx, pCodec, NULL) < 0) {std::cout << "Could not open codec!" << std::endl;return -1;}/*此處添加輸出視頻信息的代碼取自于pFormatCtx,使用std::cout輸出*/pFrame = av_frame_alloc();pFrameYUV = av_frame_alloc();out_buffer = (uint8_t*)av_malloc(av_image_get_buffer_size(AV_PIX_FMT_YUV420P, pCodeCtx->width, pCodeCtx->height,1));av_image_fill_arrays(pFrameYUV->data,pFrameYUV->linesize,out_buffer,AV_PIX_FMT_YUV420P,pCodeCtx->width,pCodeCtx->height,1);packet = (AVPacket*)av_malloc(sizeof(AVPacket));//Output Infostd::cout << "--------------------File Information--------------------" << std::endl;av_dump_format(pFormatCtx, 0, filepath, 0);std::cout << "--------------------------------------------------------" << std::endl;img_convert_ctx = sws_getContext(pCodeCtx->width, pCodeCtx->height, pCodeCtx->sw_pix_fmt,pCodeCtx->width, pCodeCtx->height, AV_PIX_FMT_YUV420P, SWS_BICUBIC, NULL, NULL, NULL);frame_cnt = 0;while (av_read_frame(pFormatCtx,packet)>=0){if (packet->stream_index == videoindex) {/*在此處添加輸出H264碼流的代碼取自于packet,使用fwrite()輸出*/ret = avcodec_send_packet(pCodeCtx, packet);//注意 got_picture=0 success,a frame was returned got_picture = avcodec_receive_frame(pCodeCtx, pFrame);if (ret < 0) {std::cout << "Decode Frror!" << std::endl;return -1;}if (got_picture) {sws_scale(img_convert_ctx, (const uint8_t* const*)pFrame->data, pFrame->linesize, 0, pCodeCtx->height,pFrameYUV->data, pFrameYUV->linesize);std::cout << "Decoded frame index"<< frame_cnt << std::endl;/*在此處添加輸出H264碼流的代碼取自于packet,使用fwrite()輸出*/frame_cnt++;}}av_packet_unref(packet);}sws_freeContext(img_convert_ctx);av_frame_free(&pFrameYUV);av_frame_free(&pFrame);avcodec_close(pCodeCtx);avformat_close_input(&pFormatCtx);return 0;
}// 運行程序: Ctrl + F5 或調試 >“開始執行(不調試)”菜單
// 調試程序: F5 或調試 >“開始調試”菜單// 入門使用技巧:
//   1. 使用解決方案資源管理器窗口添加/管理文件
//   2. 使用團隊資源管理器窗口連接到源代碼管理
//   3. 使用輸出窗口查看生成輸出和其他消息
//   4. 使用錯誤列表窗口查看錯誤
//   5. 轉到“項目”>“添加新項”以創建新的代碼文件,或轉到“項目”>“添加現有項”以將現有代碼文件添加到項目
//   6. 將來,若要再次打開此項目,請轉到“文件”>“打開”>“項目”并選擇 .sln 文件
?問題仍未解決
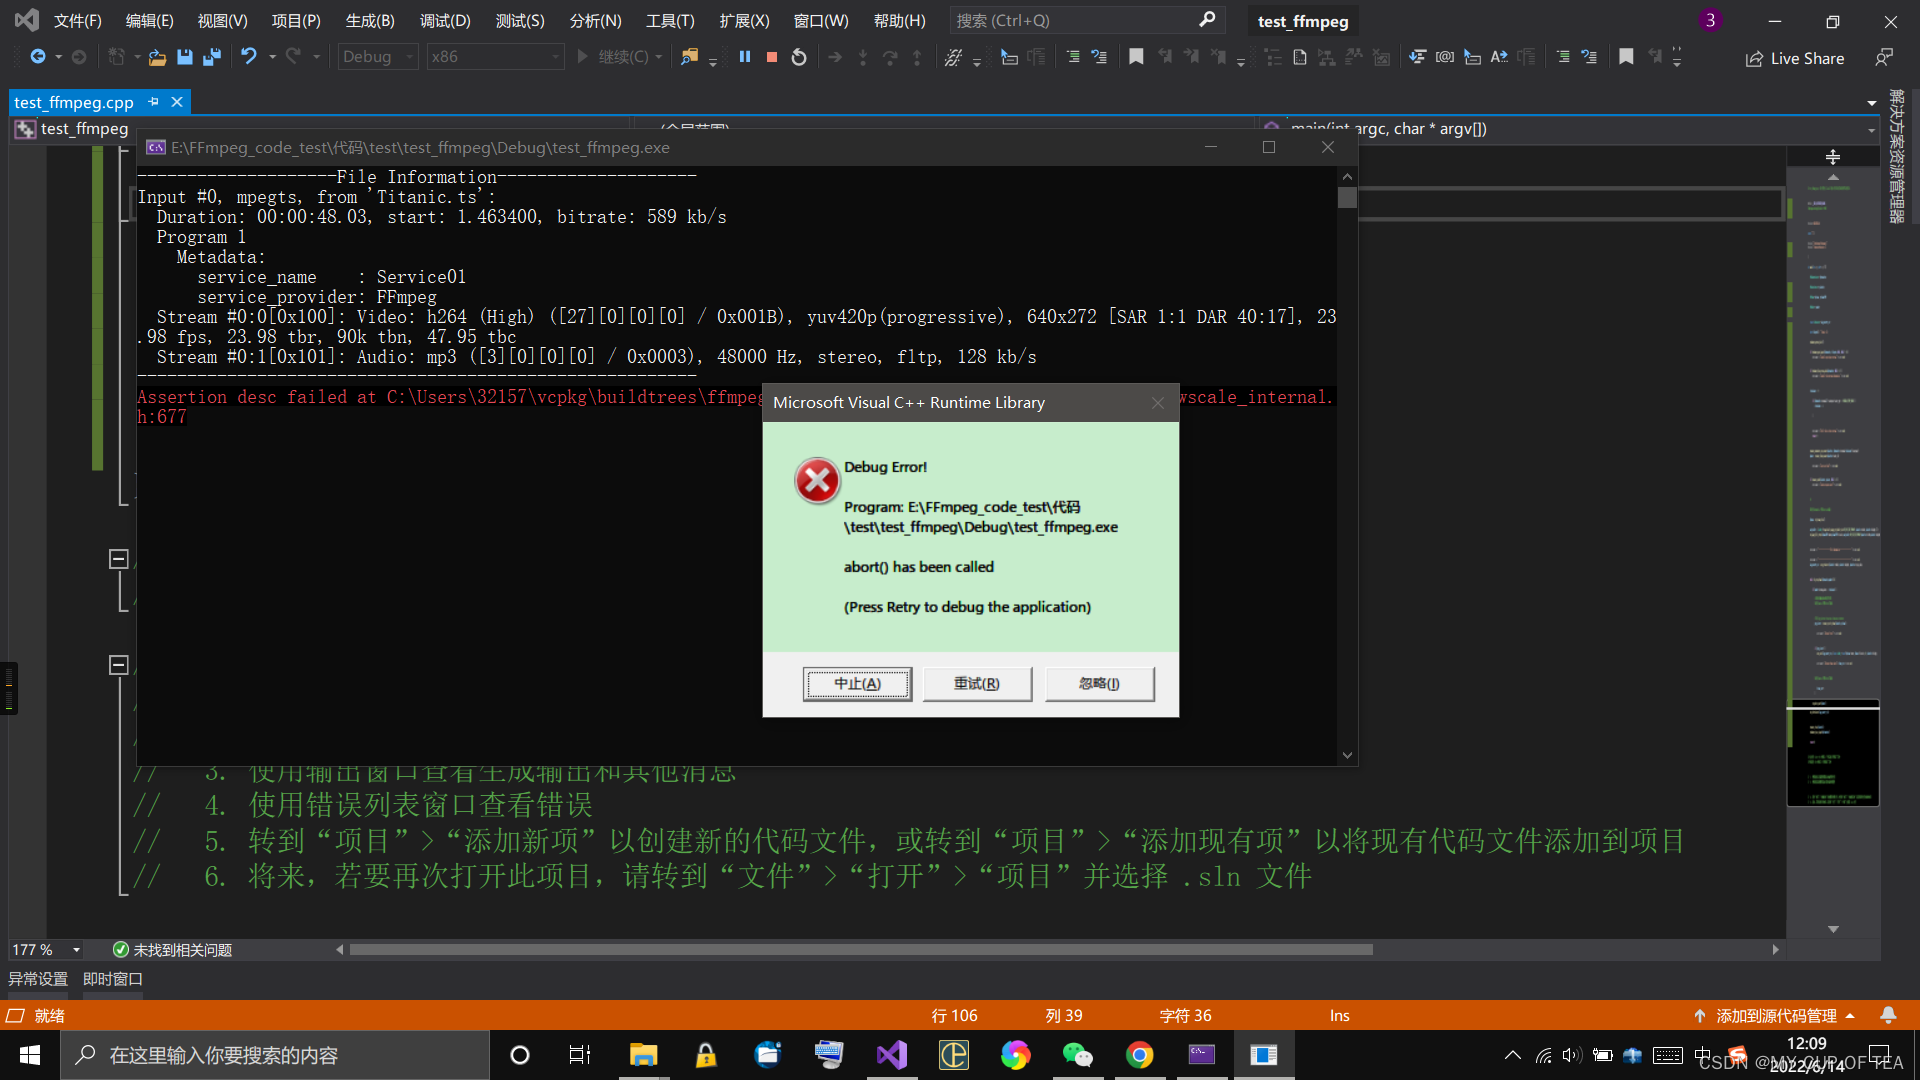
- ?還是同一個錯誤
- ?Assertion desc failed at C:\Users\32157\vcpkg\buildtrees\ffmpeg\src\n4.4.1-070f385ab7.clean\libswscale\swscale_internal.h:677
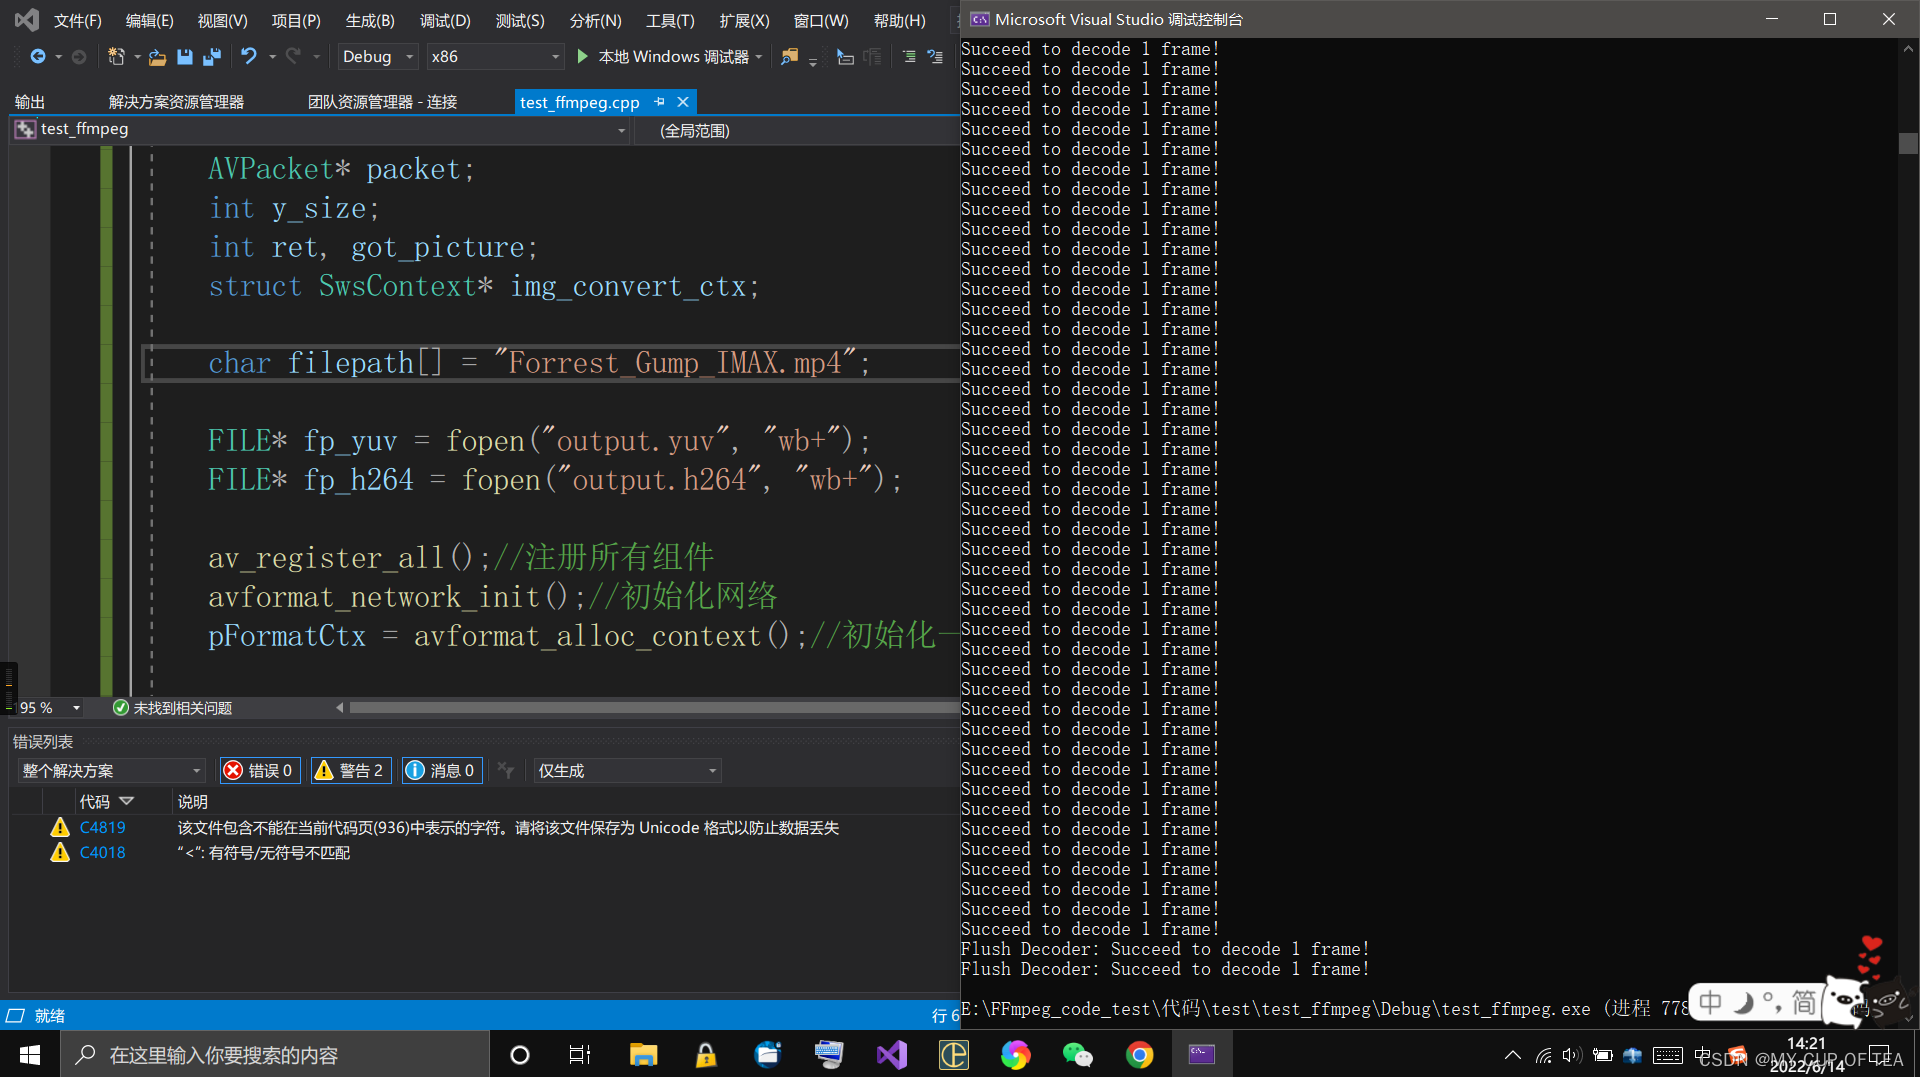
再次修改代碼
- 在代碼頭部添加#pragma warning(disable: 4996) 即可屏蔽這個錯誤
- 用FFmpeg實現Mp4,mkv等格式的解碼。解碼為h264和YUV數據并存在文件中
- 參考鏈接:ffmpeg實戰教程(一)Mp4,mkv等格式解碼為h264和yuv數據_Louis_815的博客-CSDN博客
// test_ffmpeg.cpp : 此文件包含 "main" 函數。程序執行將在此處開始并結束。
///*
#define SDL_MAIN_HANDLED
#define __STDC_CONSTANT_MACROS
#pragma warning(disable: 4819)#include <iostream>
#include <SDL2/SDL.h>extern "C" {
#include "libavcodec/avcodec.h"
#include "libavformat/avformat.h"
#include "libswscale/swscale.h"
#include "libavutil/imgutils.h"
}
*/#pragma warning(disable: 4996)#include <stdio.h>#define __STDC_CONSTANT_MACROS#ifdef _WIN32
//Windows
extern "C"
{
#include "libavcodec/avcodec.h"
#include "libavformat/avformat.h"
#include "libswscale/swscale.h"
};
#else
//Linux...
#ifdef __cplusplus
extern "C"
{
#endif
#include <libavcodec/avcodec.h>
#include <libavformat/avformat.h>
#include <libswscale/swscale.h>
#ifdef __cplusplus
};
#endif
#endifint main(int argc, char* argv[])
{AVFormatContext* pFormatCtx;int             i, videoindex;AVCodecContext* pCodecCtx;AVCodec* pCodec;AVFrame* pFrame, * pFrameYUV;uint8_t* out_buffer;AVPacket* packet;int y_size;int ret, got_picture;struct SwsContext* img_convert_ctx;char filepath[] = "Forrest_Gump_IMAX.mp4";FILE* fp_yuv = fopen("output.yuv", "wb+");FILE* fp_h264 = fopen("output.h264", "wb+");av_register_all();//注冊所有組件avformat_network_init();//初始化網絡pFormatCtx = avformat_alloc_context();//初始化一個AVFormatContextif (avformat_open_input(&pFormatCtx, filepath, NULL, NULL) != 0) {//打開輸入的視頻文件printf("Couldn't open input stream.\n");return -1;}if (avformat_find_stream_info(pFormatCtx, NULL) < 0) {//獲取視頻文件信息printf("Couldn't find stream information.\n");return -1;}videoindex = -1;for (i = 0; i < pFormatCtx->nb_streams; i++)if (pFormatCtx->streams[i]->codec->codec_type == AVMEDIA_TYPE_VIDEO) {videoindex = i;break;}if (videoindex == -1) {printf("Didn't find a video stream.\n");return -1;}pCodecCtx = pFormatCtx->streams[videoindex]->codec;pCodec = avcodec_find_decoder(pCodecCtx->codec_id);//查找解碼器if (pCodec == NULL) {printf("Codec not found.\n");return -1;}if (avcodec_open2(pCodecCtx, pCodec, NULL) < 0) {//打開解碼器printf("Could not open codec.\n");return -1;}pFrame = av_frame_alloc();pFrameYUV = av_frame_alloc();out_buffer = (uint8_t*)av_malloc(avpicture_get_size(AV_PIX_FMT_YUV420P, pCodecCtx->width, pCodecCtx->height));avpicture_fill((AVPicture*)pFrameYUV, out_buffer, AV_PIX_FMT_YUV420P, pCodecCtx->width, pCodecCtx->height);packet = (AVPacket*)av_malloc(sizeof(AVPacket));//Output Info-----------------------------printf("--------------- File Information ----------------\n");av_dump_format(pFormatCtx, 0, filepath, 0);printf("-------------------------------------------------\n");img_convert_ctx = sws_getContext(pCodecCtx->width, pCodecCtx->height, pCodecCtx->pix_fmt,pCodecCtx->width, pCodecCtx->height, AV_PIX_FMT_YUV420P, SWS_BICUBIC, NULL, NULL, NULL);while (av_read_frame(pFormatCtx, packet) >= 0) {//讀取一幀壓縮數據if (packet->stream_index == videoindex) {fwrite(packet->data, 1, packet->size, fp_h264); //把H264數據寫入fp_h264文件ret = avcodec_decode_video2(pCodecCtx, pFrame, &got_picture, packet);//解碼一幀壓縮數據if (ret < 0) {printf("Decode Error.\n");return -1;}if (got_picture) {sws_scale(img_convert_ctx, (const uint8_t* const*)pFrame->data, pFrame->linesize, 0, pCodecCtx->height,pFrameYUV->data, pFrameYUV->linesize);y_size = pCodecCtx->width * pCodecCtx->height;fwrite(pFrameYUV->data[0], 1, y_size, fp_yuv);    //Y fwrite(pFrameYUV->data[1], 1, y_size / 4, fp_yuv);  //Ufwrite(pFrameYUV->data[2], 1, y_size / 4, fp_yuv);  //Vprintf("Succeed to decode 1 frame!\n");}}av_free_packet(packet);}//flush decoder/*當av_read_frame()循環退出的時候,實際上解碼器中可能還包含剩余的幾幀數據。因此需要通過“flush_decoder”將這幾幀數據輸出。“flush_decoder”功能簡而言之即直接調用avcodec_decode_video2()獲得AVFrame,而不再向解碼器傳遞AVPacket。*/while (1) {ret = avcodec_decode_video2(pCodecCtx, pFrame, &got_picture, packet);if (ret < 0)break;if (!got_picture)break;sws_scale(img_convert_ctx, (const uint8_t* const*)pFrame->data, pFrame->linesize, 0, pCodecCtx->height,pFrameYUV->data, pFrameYUV->linesize);int y_size = pCodecCtx->width * pCodecCtx->height;fwrite(pFrameYUV->data[0], 1, y_size, fp_yuv);    //Y fwrite(pFrameYUV->data[1], 1, y_size / 4, fp_yuv);  //Ufwrite(pFrameYUV->data[2], 1, y_size / 4, fp_yuv);  //Vprintf("Flush Decoder: Succeed to decode 1 frame!\n");}sws_freeContext(img_convert_ctx);//關閉文件以及釋放內存fclose(fp_yuv);fclose(fp_h264);av_frame_free(&pFrameYUV);av_frame_free(&pFrame);avcodec_close(pCodecCtx);avformat_close_input(&pFormatCtx);return 0;
}// 運行程序: Ctrl + F5 或調試 >“開始執行(不調試)”菜單
// 調試程序: F5 或調試 >“開始調試”菜單// 入門使用技巧:
//   1. 使用解決方案資源管理器窗口添加/管理文件
//   2. 使用團隊資源管理器窗口連接到源代碼管理
//   3. 使用輸出窗口查看生成輸出和其他消息
//   4. 使用錯誤列表窗口查看錯誤
//   5. 轉到“項目”>“添加新項”以創建新的代碼文件,或轉到“項目”>“添加現有項”以將現有代碼文件添加到項目
//   6. 將來,若要再次打開此項目,請轉到“文件”>“打開”>“項目”并選擇 .sln 文件
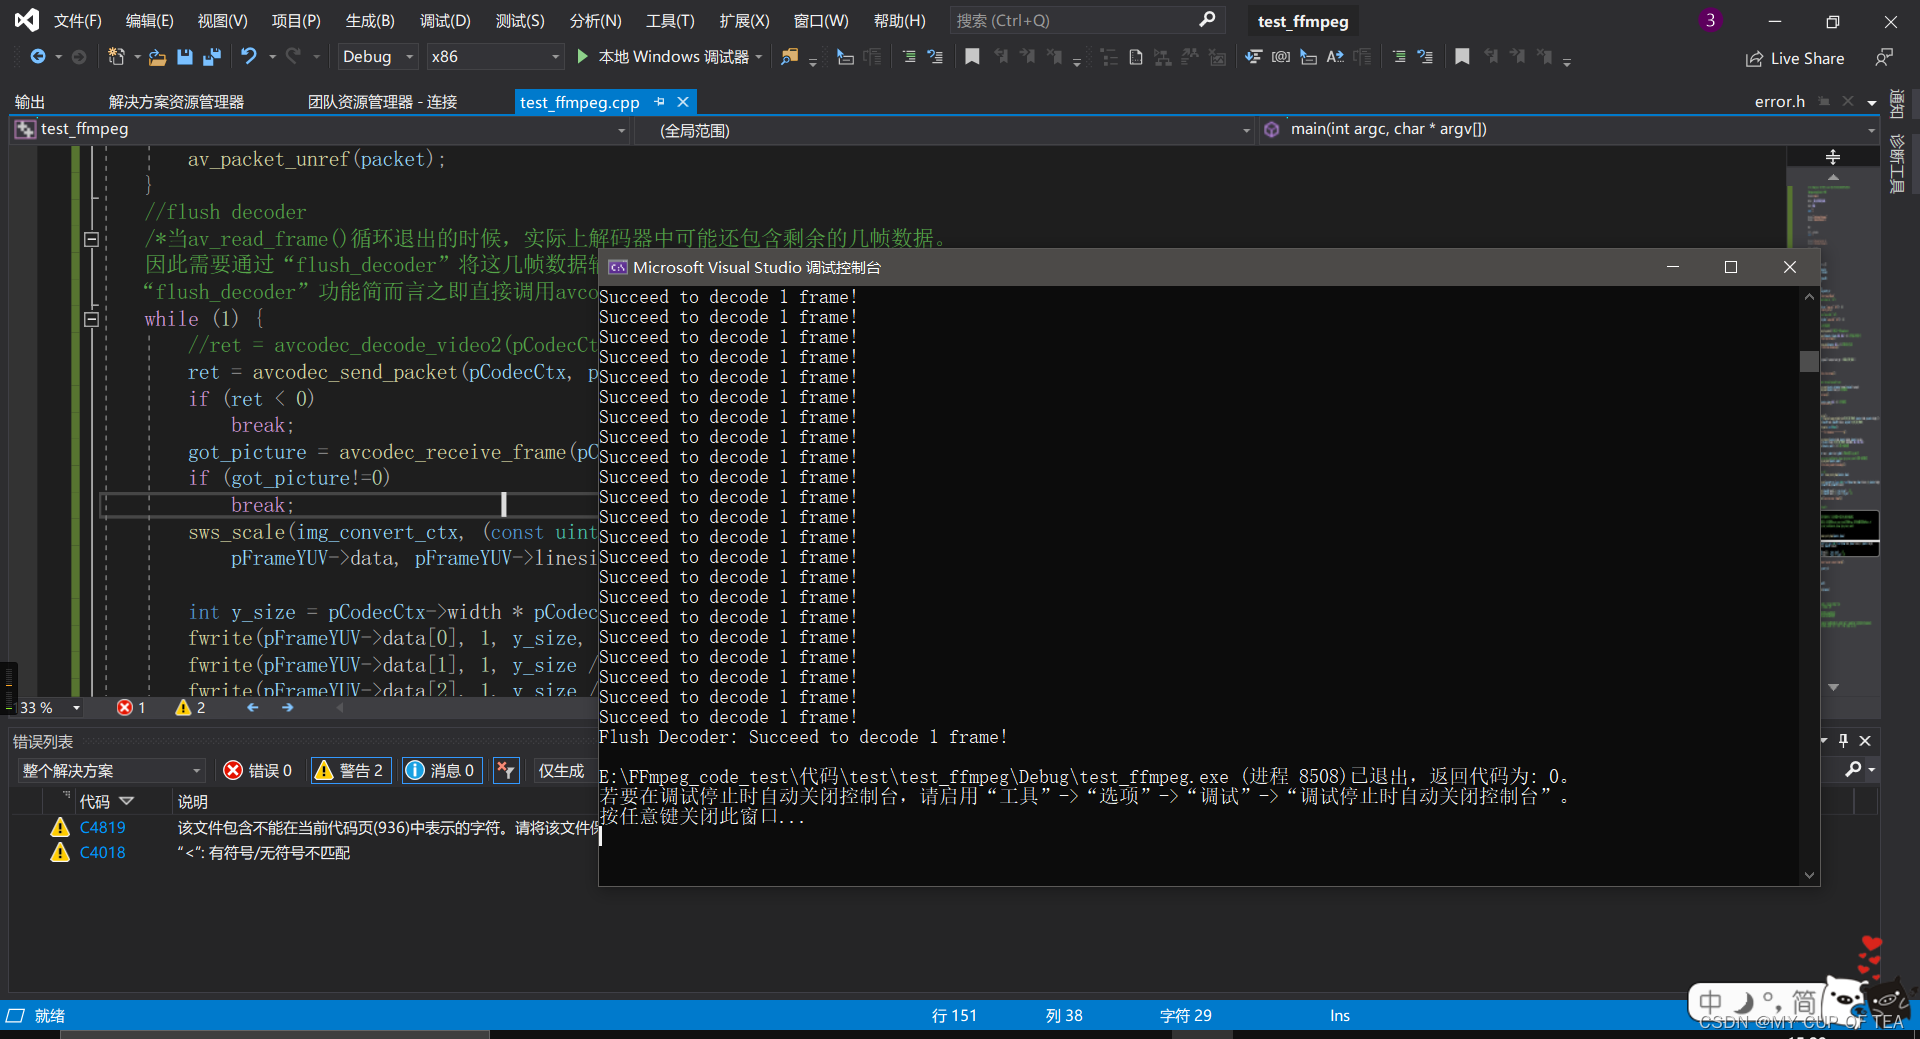
?最后修改代碼
- fopen 和 fopen_s 之間的差異
- fopen和fopen_s用法的比較_xingcen的博客-CSDN博客_c++ fopen_s
- fopen_s、_wfopen_s | Microsoft Docs
- avcodec_send_packet 和?avcodec_receive_frame 替代 avcodec_decode_video2
- ffmpeg 新版本avcodec_send_packet 和avcodec_receive_frame實現解碼_Lammyzp的博客-CSDN博客_avcodec_send_packet
- FFmpeg: decode_video.c
- FFmpeg: Decoding
- FFMPEG開發快速入坑——音視頻解碼處理 - 知乎
// test_ffmpeg.cpp : 此文件包含 "main" 函數。程序執行將在此處開始并結束。
//
//#pragma warning(disable: 4996)#include <stdio.h>#define __STDC_CONSTANT_MACROS#ifdef _WIN32
//Windows
extern "C"
{
#include "libavcodec/avcodec.h"
#include "libavformat/avformat.h"
#include "libswscale/swscale.h"
#include "libavutil/imgutils.h"
};
#else
//Linux...
#ifdef __cplusplus
extern "C"
{
#endif
#include <libavcodec/avcodec.h>
#include <libavformat/avformat.h>
#include <libswscale/swscale.h>
#ifdef __cplusplus
};
#endif
#include <cerrno>
#endifint main(int argc, char* argv[])
{AVFormatContext* pFormatCtx;int             i, videoindex;AVCodecContext* pCodecCtx;AVCodec* pCodec;AVFrame* pFrame, * pFrameYUV;uint8_t* out_buffer;AVPacket* packet;int y_size;int ret, got_picture;struct SwsContext* img_convert_ctx;char filepath[] = "Forrest_Gump_IMAX.mp4";//FILE* fp_yuv = fopen("output.yuv", "wb+");errno_t err;FILE* fp_yuv = NULL;if ((err = fopen_s(&fp_yuv, "output.yuv", "wb+")) != 0) {printf("Couldn't open fp_yuv.\n");}//FILE* fp_h264 = fopen("output.h264", "wb+");FILE* fp_h264 = NULL;if ((err = fopen_s(&fp_h264, "output.h264", "wb+")) != 0) {printf("Couldn't open fp_h264.\n");}//av_register_all();//注冊所有組件avformat_network_init();//初始化網絡pFormatCtx = avformat_alloc_context();//初始化一個AVFormatContextif (avformat_open_input(&pFormatCtx, filepath, NULL, NULL) != 0) {//打開輸入的視頻文件printf("Couldn't open input stream.\n");return -1;}if (avformat_find_stream_info(pFormatCtx, NULL) < 0) {//獲取視頻文件信息printf("Couldn't find stream information.\n");return -1;}videoindex = -1;for (i = 0; i < pFormatCtx->nb_streams; i++)if (pFormatCtx->streams[i]->codecpar->codec_type == AVMEDIA_TYPE_VIDEO) {videoindex = i;break;}if (videoindex == -1) {printf("Didn't find a video stream.\n");return -1;}//pCodecCtx = pFormatCtx->streams[videoindex]->codec;pCodecCtx = avcodec_alloc_context3(NULL);avcodec_parameters_to_context(pCodecCtx, pFormatCtx->streams[videoindex]->codecpar);pCodec = avcodec_find_decoder(pCodecCtx->codec_id);//查找解碼器if (pCodec == NULL) {printf("Codec not found.\n");return -1;}if (avcodec_open2(pCodecCtx, pCodec, NULL) < 0) {//打開解碼器printf("Could not open codec.\n");return -1;}pFrame = av_frame_alloc();pFrameYUV = av_frame_alloc();out_buffer = (uint8_t*)av_malloc(av_image_get_buffer_size(AV_PIX_FMT_YUV420P, pCodecCtx->width, pCodecCtx->height,1));//avpicture_fill((AVPicture*)pFrameYUV, out_buffer, AV_PIX_FMT_YUV420P, pCodecCtx->width, pCodecCtx->height);av_image_fill_arrays(pFrameYUV->data, pFrameYUV->linesize, out_buffer, AV_PIX_FMT_YUV420P,pCodecCtx->width, pCodecCtx->height, 1);packet = (AVPacket*)av_malloc(sizeof(AVPacket));//Output Info-----------------------------printf("--------------- File Information ----------------\n");av_dump_format(pFormatCtx, 0, filepath, 0);printf("-------------------------------------------------\n");img_convert_ctx = sws_getContext(pCodecCtx->width, pCodecCtx->height, pCodecCtx->pix_fmt,pCodecCtx->width, pCodecCtx->height, AV_PIX_FMT_YUV420P, SWS_BICUBIC, NULL, NULL, NULL);while (av_read_frame(pFormatCtx, packet) >= 0) {//讀取一幀壓縮數據if (packet->stream_index == videoindex) {fwrite(packet->data, 1, packet->size, fp_h264); //把H264數據寫入fp_h264文件//ret = avcodec_decode_video2(pCodecCtx, pFrame, &got_picture, packet);//解碼一幀壓縮數據ret = avcodec_send_packet(pCodecCtx, packet);if (ret < 0) {printf("Error sending a packet for decoding.\n");return -1;}//while (ret >= 0) {got_picture = avcodec_receive_frame(pCodecCtx, pFrame);//缺失錯誤處理和檢測if (got_picture==0) {sws_scale(img_convert_ctx, (const uint8_t* const*)pFrame->data, pFrame->linesize, 0, pCodecCtx->height,pFrameYUV->data, pFrameYUV->linesize);y_size = pCodecCtx->width * pCodecCtx->height;fwrite(pFrameYUV->data[0], 1, y_size, fp_yuv);    //Y fwrite(pFrameYUV->data[1], 1, y_size / 4, fp_yuv);  //Ufwrite(pFrameYUV->data[2], 1, y_size / 4, fp_yuv);  //Vprintf("Succeed to decode 1 frame!\n");}//}}//av_free_packet(packet);av_packet_unref(packet);}//flush decoder/*當av_read_frame()循環退出的時候,實際上解碼器中可能還包含剩余的幾幀數據。因此需要通過“flush_decoder”將這幾幀數據輸出。“flush_decoder”功能簡而言之即直接調用avcodec_decode_video2()獲得AVFrame,而不再向解碼器傳遞AVPacket。*/while (1) {//ret = avcodec_decode_video2(pCodecCtx, pFrame, &got_picture, packet);ret = avcodec_send_packet(pCodecCtx, packet);if (ret < 0)break;got_picture = avcodec_receive_frame(pCodecCtx, pFrame);if (got_picture!=0)break;sws_scale(img_convert_ctx, (const uint8_t* const*)pFrame->data, pFrame->linesize, 0, pCodecCtx->height,pFrameYUV->data, pFrameYUV->linesize);int y_size = pCodecCtx->width * pCodecCtx->height;fwrite(pFrameYUV->data[0], 1, y_size, fp_yuv);    //Y fwrite(pFrameYUV->data[1], 1, y_size / 4, fp_yuv);  //Ufwrite(pFrameYUV->data[2], 1, y_size / 4, fp_yuv);  //Vprintf("Flush Decoder: Succeed to decode 1 frame!\n");}sws_freeContext(img_convert_ctx);//關閉文件以及釋放內存fclose(fp_yuv);fclose(fp_h264);av_frame_free(&pFrameYUV);av_frame_free(&pFrame);avcodec_close(pCodecCtx);avformat_close_input(&pFormatCtx);return 0;
}// 運行程序: Ctrl + F5 或調試 >“開始執行(不調試)”菜單
// 調試程序: F5 或調試 >“開始調試”菜單// 入門使用技巧:
//   1. 使用解決方案資源管理器窗口添加/管理文件
//   2. 使用團隊資源管理器窗口連接到源代碼管理
//   3. 使用輸出窗口查看生成輸出和其他消息
//   4. 使用錯誤列表窗口查看錯誤
//   5. 轉到“項目”>“添加新項”以創建新的代碼文件,或轉到“項目”>“添加現有項”以將現有代碼文件添加到項目
//   6. 將來,若要再次打開此項目,請轉到“文件”>“打開”>“項目”并選擇 .sln 文件


)
及其相關屬性在Java中意思)
)

、av_free()等))


