1.創建SpringBoot項目
1.1.設置編碼
?1.4.導入已有的spring boot項目

2.快速搭建Restfull風格的項目
2.1.返回字符串
@RestController
public class IndexController {@RequestMapping("/demo1")public Object demo1() {System.out.println("demo1 ran....");System.out.println("demo1 ran%^*^&*)*(_*(*&)(&&*()&()");return "hello world!";}
}
效果:
控制臺: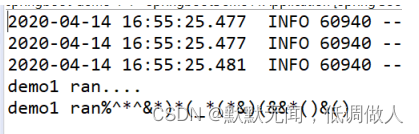
?2.2.返回自定義對象
@RequestMapping("/demo2/{userId}/{userName}")public Object demo2(@PathVariable("userId") Integer userId, @PathVariable("userName") String userName) {System.out.println("demo2 ran...");User user = new User();user.setUserId(userId);user.setUserName(userName);user.setUserDate(new Date());return user; }時間的配置,在屬性文件中application.properties中
# 配置時間輸出的pattern
spring.jackson.date-format=yyyy-MM-dd HH:mm:ss
# 配置時區
spring.jackson.time-zone=Asia/Chongqing
2.3.lombok.jar的引用
????????在pom.xml文件中添加
<dependency><groupId>org.projectlombok</groupId><artifactId>lombok</artifactId>
</dependency>
去本地庫,執行lombok.jar
?執行方式一:在路徑哪里點一下,地址會有背景色,無需刪除,直接鍵入cmd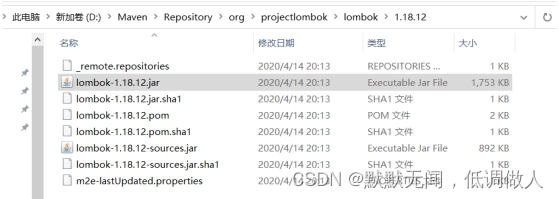
在DOS命令行輸入:java -jar jar 包的名字,我們可輸入:java -jar lombok-1.18.12.jar
按照想到掃描到你本地的開發軟件,點擊“Install/Update",安裝成功后,點擊"Quir Installer",完成安裝,重啟eclipse生效
生效
@Data
@AllArgsConstructor
@NoArgsConstructor
@ToString
public class Emp {private Integer empId;private String empName;private Date hiredate;
}
返回Map
@RequestMapping("/demo3")public Object demo3(@RequestParam(value="userName", defaultValue="老王") String userName) {Map<String, Object> map = new HashMap<String, Object>();List<Emp> empList = new ArrayList<Emp>();empList.add(new Emp(1001, "張三", new Date()));empList.add(new Emp(1002, "李四", new Date()));map.put("empList", empList);User user = new User();user.setUserId(11);user.setUserName(userName);// 對日期做個處理Calendar cal = Calendar.getInstance(); // 獲得日歷類cal.set(Calendar.YEAR, 1984);cal.set(Calendar.MONTH, 5);cal.set(Calendar.DATE, 28);user.setUserDate(cal.getTime());map.put("user", user);map.put("money", 888888888);return map;}2.4.打包
? ? ? ? 有一個要求,運行環境不能只是jre,要上到jdk
打包之前需要關閉服務,打包命令:clean package,先如圖方式倒灶彈窗
看到如下圖表示成功了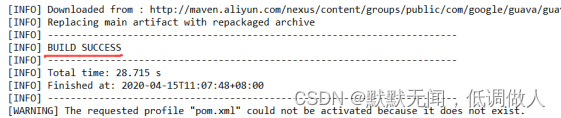
測試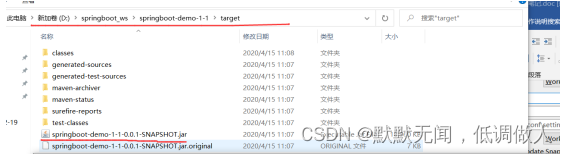

3.Properties和YML(YAML)
3.1.application屬性文件優先級
? ? ? ? 優先級高的會覆蓋優先級低的,優先級高低如下
? ? ? ? ? ? ? ? 當前目錄系的一個/config子目錄
? ? ? ? ? ? ? ? 當前目錄
? ? ? ? ? ? ? ? classpath下的/config子目錄
? ? ? ? ? ? ? ? classpath對應的root根路徑
3.2.創建的幾個配置?
# 配置時間輸出的pattern
spring.jackson.date-format=yyyy-MM-dd HH:mm:ss
# 配置時區
spring.jackson.time-zone=Asia/Chongqing# 配置服務綁定的端口
server.port=8081# 配置站點根目錄
server.servlet.context-path=/sd1.13.3?配置隨機值
# 32位的隨機字符串
my.msg=${random.value}
# 隨機整數(100以內的)
my.num=${random.int(100)}
# 隨機整數(10到100之間)
my.num.range=${random.int[10,100]}
如何在后代代碼訪問屬性文件中定義好的隨機值
    @Value(value="${my.msg}")private String msg;@Value(value="${my.num}")private Integer num;@Value(value="${my.num.range}")private Integer range;// 讀取時:使用注解 @Value(value=”${my.msg}”)
@RequestMapping("/demo4")
public Object demo4() {Map<String, Object> map = new HashMap<String, Object>();map.put("msg", msg);map.put("num", num);map.put("range", range);return map;
}
另一種讀取屬性文件中值的方式
?
// 先做一個配置類:說明從那個屬性文件中,映射哪幾個值
@Configuration
@ConfigurationProperties(prefix="my")
@PropertySource(value={"classpath:/application.properties"})
@Data
public class ConfigBean {private Integer num;private String name;private String engname;
}//要在XXXXAppliction這個入口類上寫一個注解進行注冊
@EnableConfigurationProperties(value={ConfigBean.class})
public class SpringbootDemo11Application {
}//在使用的某個Controller類中,先注入,在使用
@RequestMapping("/demo5")
public Object demo5() throws UnsupportedEncodingException {System.out.println("demo5 ran...");Map<String, Object> map = new HashMap<String, Object>();map.put("name", new String(configBean.getName().getBytes("ISO-8859-1"), "utf-8"));map.put("engname", configBean.getEngname());map.put("num", configBean.getNum());return map;
}@Autowired
private ConfigBean configBean;
4.環境配置
4.1.多環境配置的好處
? ? ? ? 不同網絡環境配置可以配置不同的參數,編譯部署,提高效率和減少出錯。
4.2.properties多環境配置
? ? ? ? 配置激活選項
? ? ? ? ? ? ? ? spring.profiles.active=dev
? ? ? ? 要分別添加不同網環境的properties文件
? ? ? ? ? ? ? ? application-dev.properties
????????????????application-test.properties
????????????????application-prod.properties
4.3.YML多環境配置
// 配置激活選項
spring: profiles: active: dev
// 在yml文件中添加三個英文狀態下的短橫線區分的塊
---
spring: profiles: dev
4.4.兩種配置方式的比較
? ? ? ? properties文件配置多環境,需要添加多個文件,yml配置多環境,只需要一個文件
? ? ? ? 書寫格式上:yml相對簡潔、優雅、層次清晰
4.5.打包后切換環境的命令
? ? ? ? java -jar springboot-demo-2-2-0.01-SNAPAHOT.jar -- spring.profiles.active=prod
5.日志配置
? ? ? ? springboot項目也支持日志框架:logback、Java Util Logging、log4j2,默認使用logback
5.1.引用外部配置文件
5.1.1.logback配置方式
SpringBOOT會默認加載classpath:logback-spring.xml,在配置文件中記得加上一個配置日志文件的語句:如果properties文件,寫法是:logging.config=classpath:logback-my.xml,如果是yml文件寫法是:
logging:
? ? ? ? config:classpath:logback-my.xml
5.1.2.log4j2配置
? ? ? ? 首先移除logback的依賴,然后添加log4j2的依賴
移除
<dependency><groupId>org.springframework.boot</groupId><artifactId>spring-boot-starter-web</artifactId><!-- 移除默認的logback依賴 --><exclusions><exclusion><groupId>org.springframework.boot</groupId><artifactId>spring-boot-starter-logging</artifactId></exclusion></exclusions></dependency>添加
<!-- 添加log4j2依賴 -->
<dependency><groupId>org.springframework.boot</groupId><artifactId>spring-boot-starter-log4j2</artifactId>
</dependency>如果需要第三方依賴,參考:mvnrepository.com
5.2.比較
? ? ? ? 性能:logback和log4j2都比log4j要好(不推薦使用log4j)
? ? ? ? 配置方式:logback方式更加簡潔
? ? ? ? 推薦:使用logback方式,Spring Boot默認。
6.Web應用開發—模板引擎
? ? ? ? Spring Boot的Web應用開發,是基于Spring MVC的。
6.1.SpringBoot特性
? ? ? ? SpringBoot在Spring默認的基礎上,自動配置添加了以下的特性:包含了ContentNegotiatingViewResolver和BeanNameViewResolver;對靜態資源的支持,包括對WebJars的支持;自動注冊Converter、GenericConverter、Formatter;對HttpMessageConverters的支持;自動注冊MessageCodeResolver;對靜態index.html的支持;對自定義的favicon的支持;對自定義的banner的支持;主動使用ConfigurableWebBindingInitializer。
6.2.模板引擎的選擇
? ? ? ? Freemarker;Thymeleaf;Groovy;Mustache
? ? ? ? 注意:盡量不要使用jsp
? ? ? ? 原因:jsp只能打war報,不支持jar,需要單獨部署(tomcat);內嵌的Jetty不支持jsp;Undertow不支持jsp;jsp中的自定義錯誤頁面不能覆蓋SpringBoot默認的錯誤頁的。
7.Web應用開發—模板引擎之ThyMeleaf
7.1.引入ThyMeleaf依賴
<dependency><groupId>org.springframework.boot</groupId><artifactId>spring-boot-starter-thymeleaf</artifactId>
</dependency>
7.2.添加Thymeleaf的相關配置
spring: thymeleaf:cache: false # 不使用緩存suffix: .html # 靜態頁面的后綴encoding: utf-8 # 頁面編碼mvc: static-path-pattern: /static/** # 配置靜態資源路徑????????在thymeleaf頁面中要訪問不同域的數據,寫法如下:
?
// 后臺代碼封裝數據:model.addAttribute(“name1”, “val1”);session.setAttribute(“name2”, “val2”);
application.setAttribute(“name2”, “val2”);
// 前臺代碼獲取數據${“name1”}        	//  能夠獲得 val1${“name2”}			//  什么也獲得不到,因為域不對${“session.name2”}	//  能夠獲得val2
${“application.name3”} 	// 能夠獲得val3
8.Web應用開發—模板引擎之FreeMarker
8.1.引入FreeMarker的依賴
<dependency><groupId>org.springframework.boot</groupId><artifactId>spring-boot-starter-freemarker</artifactId>
</dependency>
8.2.在配置文件中加入freemarker的相關配置
spring:freemarker: # 配置freemarker的相關信息suffix: .ftl # 配置模板后綴template-loader-path: classpath:/templates/ # 設置ftl文件路徑cache: false # 設置頁面不緩存content-type: text/html # 設置文檔類型charset: utf-8 # 設置頁面編碼格式 request-context-attribute: rc # 設置站點根目錄屬性 這樣設置以后,如果ftl頁面要獲取站點根目錄,可以使用${rc.contextPaht}9.Web應用開發—JSP
9.1.使用模板引擎jsp的依賴
<!-- Jsp模板引擎需要的兩個依賴  start -->
<dependency><groupId>org.apache.tomcat.embed</groupId><artictId>tomcat-embed-jasper</artifactId>
</dependency>
<dependency><groupId>javax.servlet</groupId><artifactId>jstl</artifactId>
</dependency>
<!-- Jsp模板引擎需要的兩個依賴  end -->
9.2.添加配置參數
spring:mvc: view: prefix: /WEB-INF/templates/suffix: .jsp9.3.入口類改寫
@SpringBootApplication
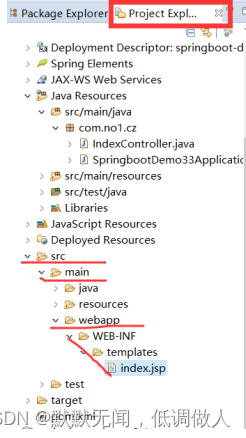
public class SpringbootDemo33Application extends SpringBootServletInitializer{@Overrideprotected SpringApplicationBuilder configure(SpringApplicationBuilder application) {return application.sources(SpringbootDemo33Application.class);}public static void main(String[] args) {SpringApplication.run(SpringbootDemo33Application.class, args);}}9.4.項目結構 ???
?9.5.jsp頁面編寫
<head><meta charset="UTF-8"><title>Insert title here</title><script type="text/javascript" src="${pageContext.request.contextPath }/webjars/jquery/3.2.1/dist/jquery.min.js"></script><script type="text/javascript" src="${pageContext.request.contextPath }/webjars/bootstrap/4.3.1/js/bootstrap.min.js"></script><link rel="stylesheet" type="text/css" href="${pageContext.request.contextPath }/webjars/bootstrap/4.3.1/css/bootstrap.min.css" /><script type="text/javascript">$(function(){alert("測試!");});
</script><link rel="stylesheet" type="text/css" href="${pageContext.request.contextPath }/static/css/common.css" />
</head>
<body class="bodybk">測試<br><c:url value="https://www.baidu.com" var="百度" /><a href="${百度}">去百度</a><spring:url value="https://www.sina.com.cn" var="新浪" /><a href="${新浪}">去新浪</a><br><spring:url value="<hello>" htmlEscape="true" var="測試用" /><h3>${測試用 }</h3><img src="${pageContext.request.contextPath }/static/imgs/a.png">
</body>10.Web應用開發—錯誤處理
10.1.錯誤處理方式一
? ? ? ? SpringBoot會將所用的錯誤默認映射到/error。所以,我們可以自定義一個錯誤處理的Controller,讓他實現ErrorController并配置他的訪問路徑是/error即可
?
@Controller
@RequestMapping("/error")
public class BaseErrorController implements ErrorController {private static final Logger LOG = LoggerFactory.getLogger(BaseErrorController.class);@Overridepublic String getErrorPath() {LOG.info("出錯了!進入自定義錯誤控制器。");return "error/error";}@RequestMapping()public String error() {return getErrorPath();}}????????錯誤頁的層級
?10.2.錯誤處理方式二—添加自定義的錯誤頁面
? ? ? ? html靜態頁面:在resources/public/error/下定義一個404.html頁面
? ? ? ? 模板引擎頁面:在templates/error下定義一個5xx.html頁面
10.3.錯誤處理方式三
? ? ? ? 定義一個處理錯誤的Handler類,使用注解@ControllerAdvice
@ControllerAdvice
public class MyErrorHandler {private static final Logger LOG = LoggerFactory.getLogger(MyErrorHandler.class);@ExceptionHandler({RuntimeException.class})@ResponseStatus(HttpStatus.OK)public ModelAndView processException(RuntimeException e) {LOG.info("自定義異常處理-RuntimeException!");ModelAndView mav = new ModelAndView();mav.addObject("myException", e.getMessage());mav.setViewName("error/500");return mav;}@ExceptionHandler({Exception.class})
@ResponseStatus(HttpStatus.OK)public String processException(Model model, Exception e) {LOG.info("統一異常處理-Exception!");model.addAttribute("myException", e.getMessage());return "error/500";}}
錯誤處理頁在項目中的層級: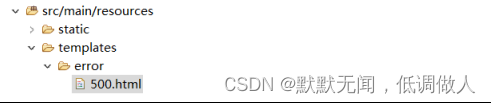
?錯誤處理頁的內容(帶上后臺拋過來的信息)
我是錯誤頁-錯誤信息是:<font?size="20px" th:text="${myException}"></font>
11.Web應用開發Servlert、Filter、Listener
? ? ? ? Web開發中,我們使用Controller基本上可以完成大部分需求,三實我們還可能會用到Servlet、Filter、Listener
11.1SpringBoot中的三種實現方式
????????方式一:通過注冊。ServletRegistrationBean、FiterRegistrationBean、ServletListenerRegistrationBean來獲取控制。
? ? ? ? Servlet的使用
public class AServlet extends HttpServlet{private static final long serialVersionUID = 1L;@Overrideprotected void doGet(HttpServletRequest req, HttpServletResponse resp) throws ServletException, IOException {System.out.println("a servlet get method ran...");doPost(req, resp);
}@Overrideprotected void doPost(HttpServletRequest req, HttpServletResponse resp) throws ServletException, IOException {System.out.println("a servlet post method ran...");resp.getWriter().print("hello world, I'm servlet A.");}}// 在程序啟動類中注冊Aservlet
@Bean
public ServletRegistrationBean<AServlet> aServletRegistrationBean() {return new ServletRegistrationBean<AServlet>(new AServlet(), "/a");
}
? ? ? ? ?Filter的使用
public class MyFilter implements Filter {@Overridepublic void doFilter(ServletRequest request, ServletResponse response, FilterChain chain)throws IOException, ServletException {System.out.println("放行!"); chain.doFilter(request, response);}}// 在入口類中注冊
@Bean
public FilterRegistrationBean<MyFilter> myFilterRegistrationBean() {return new FilterRegistrationBean<MyFilter>(new MyFilter(),aServletRegistrationBean());
}
Listener
public class MyListener implements ServletContextListener {@Overridepublic void contextInitialized(ServletContextEvent sce) {System.out.println("應用初始化。。。");}@Overridepublic void contextDestroyed(ServletContextEvent sce) {System.out.println("應用銷毀。");}}//注冊:
@Bean
public ServletListenerRegistrationBean<MyListener> myServletListenerRegistrationBean(){return new ServletListenerRegistrationBean<MyListener>(new MyListener());
}
? ? ? ? 方式二:(推薦)在入口類上添加一個注解@ServletComponentScan后,直接掃描帶有@WebServlet、@WebFilter、@WebListener注解的組件鏡像注冊
//在入口類上添加注解
@SpringBootApplication
@ServletComponentScan
public class SpringbootDemo31Application{public static void main(String[] args) {SpringApplication.run(SpringbootDemo31Application.class, args);}}//在各個組件上添加注解等待掃描
@WebServlet(urlPatterns = "/a", name="aServlet")
public class AServlet extends HttpServlet{@WebServlet(urlPatterns = "/b", name = "bServlet")
public class BServlet extends HttpServlet{@WebFilter(urlPatterns = {"/*"})
public class MyFilter implements Filter {@WebListener
public class MyListener implements ServletContextListener {
? ? ? ? 方式三:讓入口類實現ServletContextInitializer接口的方式鏡像注冊
public class SpringbootDemo31Application implements ServletContextInitializer{public static void main(String[] args) {SpringApplication.run(SpringbootDemo31Application.class, args);}@Overridepublic void onStartup(ServletContext sc) throws ServletException {sc.addServlet("aServlet", new AServlet()).addMapping("/a");sc.addServlet("bServlet", new BServlet()).addMapping("/b");sc.addFilter("myFilter", new MyFilter()).addMappingForServletNames(EnumSet.of(DispatcherType.REQUEST), true, new String[] {"aServlet", "bServlet"});sc.addListener(new MyListener());}}12.SpringBoot中的文件上傳
12.1.SpringBoot默認使用SpringMVC包裝好的解析器進行上傳
12.2.表單代碼
<form th:action="@{/file/upload}" method="POST"enctype="multipart/form-data">文件:<input type="file" name="myFile" /><br><input type="submit" value=" 上 傳 " />
</form>
12.3.Controller代碼
@RestController
@RequestMapping("/file")
@RestController
@RequestMapping("/file")
public class FileController {private static final Logger LOG = LoggerFactory.getLogger(FileController.class);@RequestMapping("upload")public String upload(@RequestParam("myFile") MultipartFile file) {if(file.isEmpty()) {return "未選擇文件!";}// 獲取文件名String fileName = file.getOriginalFilename();LOG.info("獲取到前臺傳來的文件名是:" + fileName);// 獲取文件的后綴名String suffixName = fileName.substring(fileName.lastIndexOf("."));LOG.info("上傳文件的后綴名是:" + suffixName);// 指定文件上傳路徑String filePath = "D://tmp/";// 使用隨機字符作為文件名稱String newFileName = UUID.randomUUID().toString().replace("-", "");String fullFileName = filePath + newFileName + suffixName;LOG.info("上傳文件路徑全名稱是:" + fullFileName);File dest = new File(fullFileName);// 檢測是否存在父級目錄if(!dest.getParentFile().exists()) {dest.getParentFile().mkdirs();}// 文件上傳try {file.transferTo(dest);return "上傳成功!";} catch(Exception e) {e.printStackTrace();System.err.println(e.getMessage());return "上傳失敗!";}}}
13.SpringBoot整合MyBatis
13.1.依賴
<dependencies><dependency><groupId>org.springframework.boot</groupId><artifactId>spring-boot-starter-thymeleaf</artifactId></dependency><dependency><groupId>org.springframework.boot</groupId><artifactId>spring-boot-starter-web</artifactId></dependency><dependency><groupId>org.mybatis.spring.boot</groupId><artifactId>mybatis-spring-boot-starter</artifactId><version>2.1.2</version></dependency><dependency><groupId>org.springframework.boot</groupId><artifactId>spring-boot-devtools</artifactId><scope>runtime</scope><optional>true</optional></dependency><dependency><groupId>mysql</groupId><artifactId>mysql-connector-java</artifactId><scope>runtime</scope></dependency><dependency><groupId>org.projectlombok</groupId><artifactId>lombok</artifactId><optional>true</optional></dependency><dependency><groupId>org.springframework.boot</groupId><artifactId>spring-boot-starter-test</artifactId><scope>test</scope><exclusions><exclusion><groupId>org.junit.vintage</groupId><artifactId>junit-vintage-engine</artifactId></exclusion></exclusions></dependency><dependency><groupId>org.webjars.bower</groupId><artifactId>jquery</artifactId><version>3.2.1</version></dependency><dependency><groupId>org.webjars</groupId><artifactId>bootstrap</artifactId><version>4.3.1</version></dependency></dependencies>13.2.配置
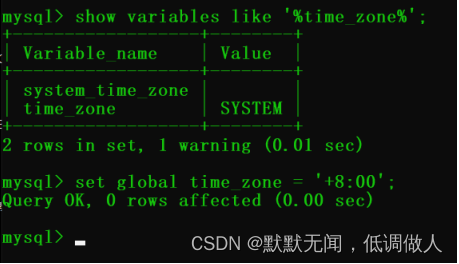
spring:datasource:   # mysql數據庫的配置信息driver-class-name: com.mysql.cj.jdbc.Driverurl: jdbc:mysql://localhost/mypro?&useSSL=false&serverTimezone=Asia/Chongqing&characterEncoding=utf8username: root
password: 123456mybatis: # 配置XXXXMapper.xml文件的路徑mapper-locations: classpath:mybatis/**/*.xml
//日志文件中加上一句配置:
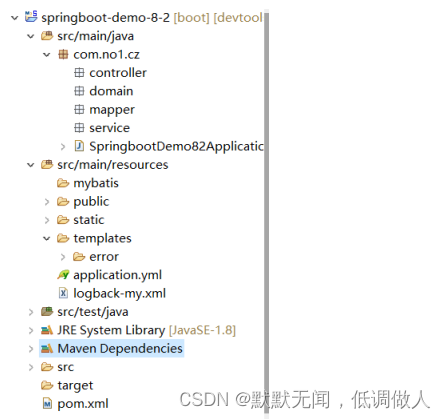
<logger name="org.springframework.jdbc.core.JdbcTemplate" level="debug"/>13.3.項目結構
13. 4.數據庫表設計&實體類設計

實體類代碼如下:
@Data
@AllArgsConstructor
@NoArgsConstructor
@ToString
public class User {
//	user_id	intprivate Integer userId;
//	user_name	varcharprivate String userName;
//	user_create_time	timestampprivate Date userCreateTime;
}
13.5.Mapper接口的編寫
13.5.1.注解處理方式
? ? ? ? 這種方式就不用在寫XXXMapper.xml文件
@Mapper
public interface UserMapper {/*** 新添用戶* @param user */@Insert(value = "insert into user(user_name, user_create_time) "+ "values(#{userName, jdbcType=VARCHAR}, #{userCreateTime, jdbcType=TIMESTAMP})")void insert(User user);/*** 根據id刪除指定用戶* @param userId*/@Delete(value = "delete from user where user_id = #{userId, jdbcType=INTEGER}")void deleteById(Integer userId);/*** 修改指定用戶信息* @param user*/@Update(value = "update user set user_name = #{userName, jdbcType=VARCHAR}, "+ "user_create_time = #{userCreateTime, jdbcType=TIMESTAMP} "+ "where user_id = #{userId, jdbcType=INTEGER}")void update(User user);/*** 根據用戶id查找用戶* @param userId* @return*/@Select(value = "select * from user where user_id = #{userId, jdbcType=INTEGER}")@Results(value = {@Result(column="user_id", property="userId", jdbcType=JdbcType.INTEGER),@Result(column="user_name", property="userName", jdbcType=JdbcType.VARCHAR),@Result(column="user_create_time", property="userCreateTime", jdbcType=JdbcType.TIMESTAMP)})User selectById(Integer userId);/*** 查全部* @return*/@Select(value = "select * from user")@Results(value = {@Result(column="user_id", property="userId", jdbcType=JdbcType.INTEGER),@Result(column="user_name", property="userName", jdbcType=JdbcType.VARCHAR),@Result(column="user_create_time", property="userCreateTime", jdbcType=JdbcType.TIMESTAMP)})List<User> selectAll();
}
測試:
@Autowiredprivate UserMapper userMapper;@Testpublic void userMapperInsert() {User user = new User(2, "張三", new Date());userMapper.insert(user);}@Testpublic void userMapperSelectById() {User user = userMapper.selectById(3);System.out.println(user);}@Testpublic void userMapperUpdate() {User user = new User(4, "老王", new Date());userMapper.update(user);}@Testpublic void userMapperDelete() {userMapper.deleteById(4);}@Testpublic void userMapperSelectAll() {List<User> userList = userMapper.selectAll();for (User user : userList) {System.out.println(user);}}
13.5.2..xml的處理方式
<?xml version="1.0" encoding="UTF-8" ?>
<!DOCTYPE mapper PUBLIC "-//mybatis.org//DTD Mapper 3.0//EN" "http://mybatis.org/dtd/mybatis-3-mapper.dtd">
<mapper namespace="com.no1.cz.mapper.GoodsTypeMapper"><resultMap type="com.no1.cz.domain.GoodsType" id="BaseResultMap"><id column="goods_type_id" property="goodsTypeId" jdbcType="INTEGER" /><result column="goods_type_name" property="goodsTypeName" jdbcType="VARCHAR" /></resultMap><sql id="Base_Column_List01">goods_type_id, goods_type_name</sql><!-- 新添一條商品類型數據 --><insert id="insert" parameterType="com.no1.cz.domain.GoodsType">insert into goods_type(goods_type_name) values (#{goodsTypeName})</insert><!-- 查單個商品 --><select id="selectById" resultMap="BaseResultMap" parameterType="java.lang.Integer">select * from goods_typewhere goods_type_id = #{goodsTypeId}</select><!-- 改、刪、查全部,自己先寫寫看 --></mapper>
13.6.mybatis-generator
13.6.1.在pom.xml文件中加上一段插件配置的代碼
<!-- mybatis的逆向生成插件 --><plugin><groupId>org.mybatis.generator</groupId><artifactId>mybatis-generator-maven-plugin</artifactId><configuration><configurationFile>src/main/resources/generator/generatorConfig.xml</configurationFile><overwrite>true</overwrite><verbose>true</verbose></configuration></plugin>13.6.2.創建逆向生成用的配置文件generatorConfig.xml
<?xml version="1.0" encoding="UTF-8"?>
<!DOCTYPE generatorConfigurationPUBLIC "-//mybatis.org//DTD MyBatis Generator Configuration 1.0//EN""http://mybatis.org/dtd/mybatis-generator-config_1_0.dtd">
<generatorConfiguration><!-- 數據庫驅動:選擇你的本地硬盤上面的數據庫驅動包--><classPathEntry location="D:\Maven\Repository\mysql\mysql-connector-java\8.0.15\mysql-connector-java-8.0.15.jar"/><context id="mypro"  targetRuntime="MyBatis3"><commentGenerator><property name="suppressDate" value="true"/><!-- 是否去除自動生成的注釋 true:是 : false:否 --><property name="suppressAllComments" value="true"/></commentGenerator><!--數據庫鏈接URL,用戶名、密碼 --><jdbcConnection driverClass="com.mysql.cj.jdbc.Driver" connectionURL="jdbc:mysql://127.0.0.1/mypro" userId="root" password="123456">
<property name="nullCatalogMeansCurrent" value="true"/></jdbcConnection><javaTypeResolver><property name="forceBigDecimals" value="false"/></javaTypeResolver><!-- 生成模型的包名和位置--><javaModelGenerator targetPackage="com.no1.cz.domain" targetProject="src/main/java"><property name="enableSubPackages" value="true"/><property name="trimStrings" value="true"/></javaModelGenerator><!-- 生成映射文件的包名和位置--><sqlMapGenerator targetPackage="mybatis" targetProject="src/main/resources"><property name="enableSubPackages" value="true"/></sqlMapGenerator><!-- 生成DAO的包名和位置--><javaClientGenerator type="XMLMAPPER" targetPackage="com.no1.cz.mapper" targetProject="src/main/java"><property name="enableSubPackages" value="true"/></javaClientGenerator><!-- 要生成的表 tableName是數據庫中的表名或視圖名 domainObjectName是實體類名--><!-- <table tableName="user" domainObjectName="User" enableCountByExample="false" enableUpdateByExample="false" enableDeleteByExample="false" enableSelectByExample="false" selectByExampleQueryId="false"></table> --><table tableName="goods" domainObjectName="Goods" enableCountByExample="false" enableUpdateByExample="false" enableDeleteByExample="false" enableSelectByExample="false" selectByExampleQueryId="false"></table><table tableName="goods_type" domainObjectName="GoodsType" enableCountByExample="false" enableUpdateByExample="false" enableDeleteByExample="false" enableSelectByExample="false" selectByExampleQueryId="false"></table>	</context>
</generatorConfiguration>
13.6.3.時區設置
13.6.4.你想生成用的命令mybatis-generator:generate
?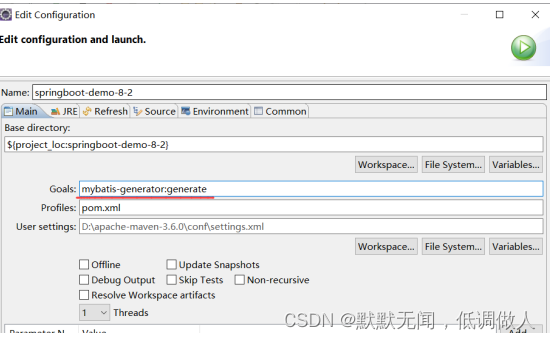
?13.7.分頁插件PageHelper的使用
依賴
<dependency><groupId>com.github.pagehelper</groupId><artifactId>pagehelper-spring-boot-starter</artifactId><version>1.2.10</version>
</dependency>
使用
@Testpublic void userMapperSelcetByPage() {// 要查詢第3頁的2條數據PageHelper.startPage(3, 2);List<User> userList = userMapper.selectAll();PageInfo<User> pageInfo = new PageInfo<>(userList);for (User user : pageInfo.getList()) {System.out.println(user);}System.out.println(pageInfo.getSize());System.out.println(pageInfo.getPrePage());System.out.println(pageInfo.getNextPage());System.out.println(pageInfo.getPages());System.out.println(pageInfo.getTotal());}13.8.業務層
public interface UserService {List<User> findAll();void add(User user);
}
@Service
public class UserServiceImpl implements UserService {@Autowiredprivate UserMapper userMapper;@Override@Transactional(propagation = Propagation.REQUIRED, readOnly = true)public List<User> findAll() {try {return userMapper.selectAll();} catch (Exception e) {e.printStackTrace();throw new RuntimeException(e);}}@Override@Transactional(propagation = Propagation.REQUIRED, rollbackFor = {Exception.class})public void add(User user) {try {userMapper.insert(user);} catch (Exception e) {e.printStackTrace();throw new RuntimeException(e);}}}
13.9.Controller層
@Controller
@RequestMapping("/user")
public class UserController {@Autowiredprivate UserService userService;@RequestMapping("showAll")public String showAll(Model model) {List<User> userList = userService.findAll();model.addAttribute("userList", userList);return "user/showAll";}}
13.10.View層
<!DOCTYPE html>
<html xmlns:th="http://www.thymeleaf.org">
<head><meta charset="UTF-8"><title>用戶信息展示頁</title><script type="text/javascript" th:src="@{/webjars/jquery/3.2.1/dist/jquery.min.js}"></script><script type="text/javascript" th:src="@{/webjars/bootstrap/4.3.1/js/bootstrap.min.js}"></script><link rel="stylesheet" type="text/css" th:href="@{/webjars/bootstrap/4.3.1/css/bootstrap.min.css}" />
</head>
<body><div class="container"><table class="table table-striped"><tr><th>序號</th><th>Id</th><th>姓名</th><th>日期</th></tr><tr th:each="user, var : ${userList}"><td th:text="${var.count}"></td><td th:text="${user.userId}"></td><td th:text="${user.userName}"></td><td th:text="${#dates.format(user.userCreateTime, 'yyyy-MM-dd')}"></td></tr></table></div>
</body>
</html>


)


)


