文章目錄
- 概要
- 消費位移
- __consumer_offsets主題
- 位移提交
概要
本文主要總結kafka的位移是如何管理的,在broker端如何通過命令行查看到位移信息,并從代碼層面總結了位移的提交方式。
消費位移
對于 Kafka 中的分區而言,它的每條消息都有唯一offset ,用來表示消息在分區中對應位置;對于消費者來說,它也有 offset 的概念,消費者使用 offse 來表示消費到分區中某個消息所在的位置。可通過命令行在查看到一個群組,在topic中兩者當前的位置
bin/kafka-consumer-groups.sh --bootstrap-server node1:9092 --describe --group kafka-boot
[root@node1 kafka_2.13-3.2.1]# bin/kafka-consumer-groups.sh --bootstrap-server node1:9092 --describe  --group kafka-bootConsumer group 'kafka-boot' has no active members.GROUP           TOPIC            PARTITION  CURRENT-OFFSET  LOG-END-OFFSET  LAG             CONSUMER-ID     HOST            CLIENT-ID
kafka-boot      test-error-topic 0          26              26              0               -               -               -
kafka-boot normal-test 0 23 24 1 - - -這里對offse 做些區分 對于消息在分區中的位置 CURRENT-OFFSET稱為“偏移量” 或消息位移;對于消費者消費到的位置,LOG-END-OFFSET稱為“位移 ,有時候也會更明確地稱之為“消費位移“。
生產者位移跟消費者位移的關系可以用下圖來說明:
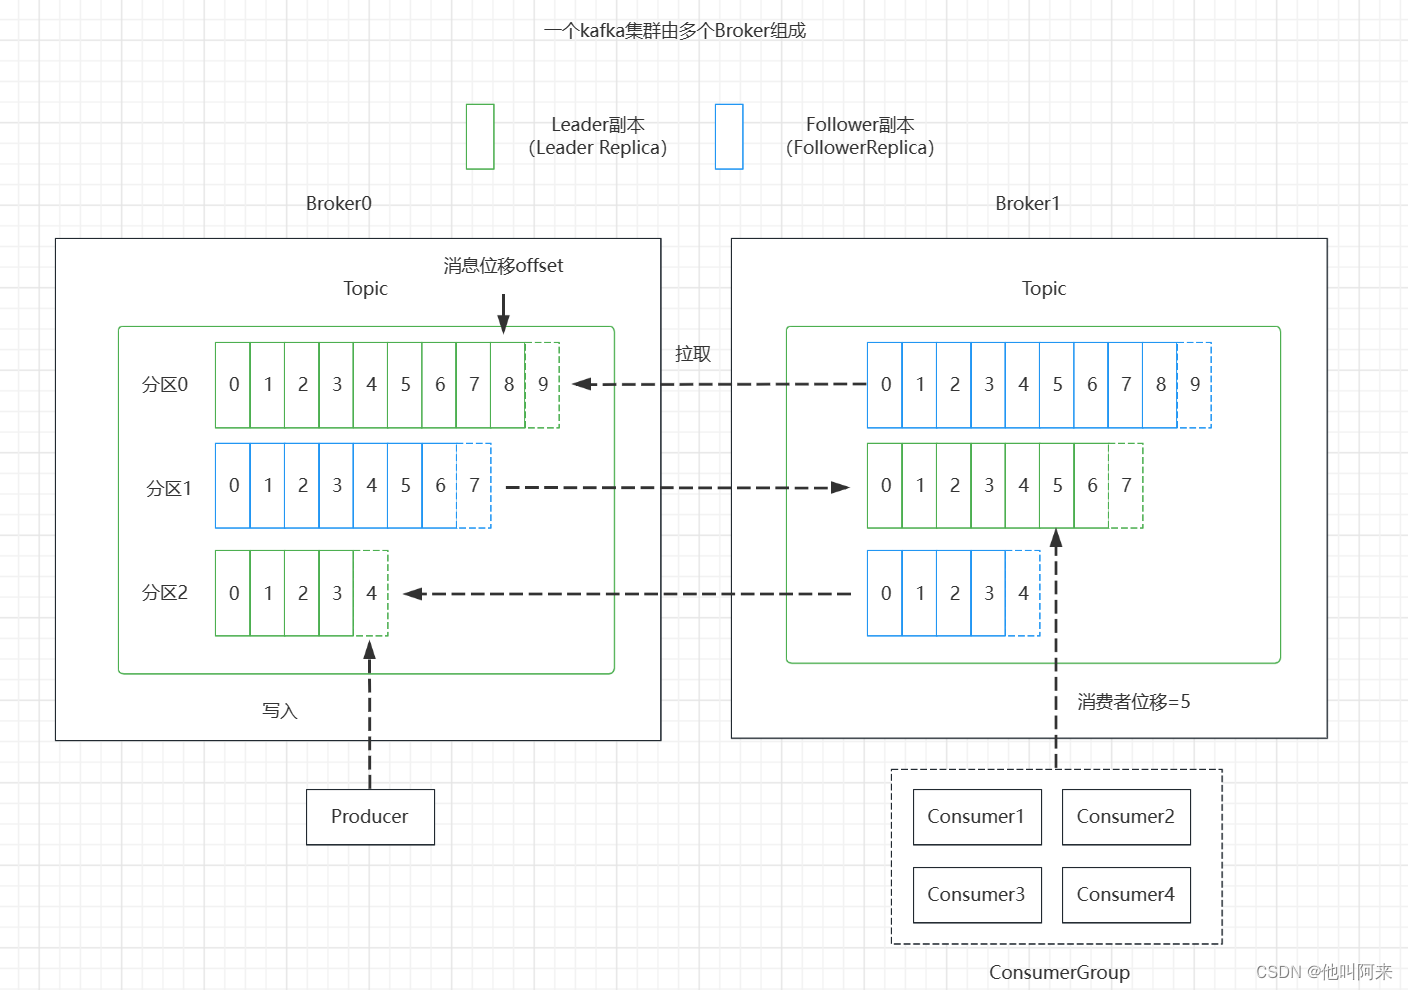
總結幾個需要注意的點:
- 分區副本有兩種類型
領導者副本:生產者跟消費者的請求都只會經過領導者副本;
跟隨者副本:首領之外的副本,不處理客戶端請求,從領導者副本那里通過拉取的方式同步消息 - 消費位移存儲在Zookeeper或Kafka中,新消費者客戶端,偏移量存儲咋Kafka內部主題
__consumer_offsets - 消費者提交的位移是當前消費消息位移的下一個位置,即:lastConsumeedOffset+1
__consumer_offsets主題
Consumer需要向Kafka記錄自己的位移數據,這個匯報過程稱為提交位移(Committing Offsets)。
老版本 Consumer 的位移是提交到 ZooKeeper 中保存的。當 Consumer 重啟后,它能自動從 ZooKeeper 中讀取位移數據,從而在上次消費截止的地方繼續消費。這種設計使得Kafka Broker 不需要保存位移數據,減少了 Broker 端需要持有的狀態空間,因而有利于實現高伸縮性。
但是,ZooKeeper 其實并不適用于這種高頻的寫操作,Kafka 社區自 0.8.2.x 版本開始推出了全新的位移管理
機制,將 Consumer 的位移數據作為一條條普通的 Kafka 消息,提交到 __consumer_offsets 中。可以這么說,
__consumer_offsets 的主要作用是保存 Kafka 消費者的位移信息。這種方式能夠滿足高頻的寫操作。
兩個相關參數:
offsets.topic.num.partitions : 設置 __consumer_offsets主題的分區數,默認是50個分區
offsets.topic.replication.factor : 設置__consumer_offsets主題的副本數,默認是3(下載安裝的包中此值可能為1 )
當Kafka 集群中的第一個 Consumer 程序啟動時,Kafka 會自動創建位移主題
一共有50個分區,那么消費者將位移提交到了哪個分區呢?
通過如下公式可以選出consumer消費的offset要提交到__consumer_offsets的哪個分區,這個分區leader對應的broker
就是這個consumer group的coordinator
公式:Math.abs(groupID.hashCode()) % numPartitions
Kafka 1.0.2及以后提供了kafka_consumer_groups.sh腳本供用戶查看consumer信息
1. 創建一個topic,分區數設置為1,副本數設置為1
[root@node1 kafka_2.13-3.2.1]# bin/kafka-topics.sh --bootstrap-server node1:9092 --create --topic test-offset --partitions 1 --replication-factor 1
Created topic test-offset.[root@node1 kafka_2.13-3.2.1]# bin/kafka-topics.sh --bootstrap-server node1:9092 --describe --topic test-offset
Topic: test-offset      TopicId: in6gxQ5OQS6x9R8V3oJ7AQ PartitionCount: 1       ReplicationFactor: 1    Configs: segment.bytes=1073741824Topic: test-offset      Partition: 0    Leader: 0       Replicas: 0     Isr: 0
2. 向主題test-offset中發送消息
[root@node1 kafka_2.13-3.2.1]# bin/kafka-console-producer.sh --broker-list node1:9092 --topic test-offset
>hello
3. 創建一個消費組,并從頭開始消費
[root@node1 kafka_2.13-3.2.1]# bin/kafka-console-consumer.sh --bootstrap-server node1:9092  --from-beginning --consumer-property group.id=testOffsetGroup   --topic test-offset
hello
4. 用代碼根據上面的公式計算消費組testOffsetGroup提交位移的分區數
@Test
void getCommitOffsetPartitionTest() {String groupId = "testOffsetGroup";// 運行結果為16System.out.println(Math.abs(groupId.hashCode() % 50));
}
- 將kafka配置文件consumer.properties中設置exclude.internal.topics=false,并重啟服務
6. 查看主題__consumer_offsets第16分區上的信息,可以看到消費組testOffsetGroup提交的位移確實保存在了16分區上
[root@node1 kafka_2.13-3.2.1]# bin/kafka-console-consumer.sh --topic __consumer_offsets --partition 16 --bootstrap-server node1:9092 --formatter "kafka.coordinator.group.GroupMetadataManager\$OffsetsMessageFormatter" --from-beginning
[testOffsetGroup,test-offset,0]::OffsetAndMetadata(offset=1, leaderEpoch=Optional.empty, metadata=, commitTimestamp=1691896116191, expireTimestamp=None)
[testOffsetGroup,test-offset,0]::OffsetAndMetadata(offset=1, leaderEpoch=Optional.empty, metadata=, commitTimestamp=1691896121189, expireTimestamp=None)
[testOffsetGroup,test-offset,0]::OffsetAndMetadata(offset=1, leaderEpoch=Optional.empty, metadata=, commitTimestamp=1691896126188, expireTimestamp=None)
[testOffsetGroup,test-offset,0]::OffsetAndMetadata(offset=1, leaderEpoch=Optional.empty, metadata=, commitTimestamp=1691896131188, expireTimestamp=None)
[testOffsetGroup,test-offset,0]::OffsetAndMetadata(offset=1, leaderEpoch=Optional.empty, metadata=, commitTimestamp=1691896133573, expireTimestamp=None)
[testOffsetGroup,test-offset,0]::OffsetAndMetadata(offset=1, leaderEpoch=Optional.empty, metadata=, commitTimestamp=1691896162124, expireTimestamp=None)
[testOffsetGroup,test-offset,0]::OffsetAndMetadata(offset=1, leaderEpoch=Optional.empty, metadata=, commitTimestamp=1691896167124, expireTimestamp=None)
[testOffsetGroup,test-offset,0]::OffsetAndMetadata(offset=1, leaderEpoch=Optional.empty, metadata=, commitTimestamp=1691896172123, expireTimestamp=None)
[testOffsetGroup,test-offset,0]::OffsetAndMetadata(offset=1, leaderEpoch=Optional.empty, metadata=, commitTimestamp=1691896177124, expireTimestamp=None)
[testOffsetGroup,test-offset,0]::OffsetAndMetadata(offset=1, leaderEpoch=Optional.empty, metadata=, commitTimestamp=1691896178781, expireTimestamp=None)
從上面也可看出__consumer_offsets topic的每一日志項的格式都是:
[Group, Topic, Partition]::[OffsetMetadata[Offset, Metadata], CommitTime, ExpirationTime]
客戶端提交消費位移是使用OffsetCommitRequest 請求實現的,其結構如下
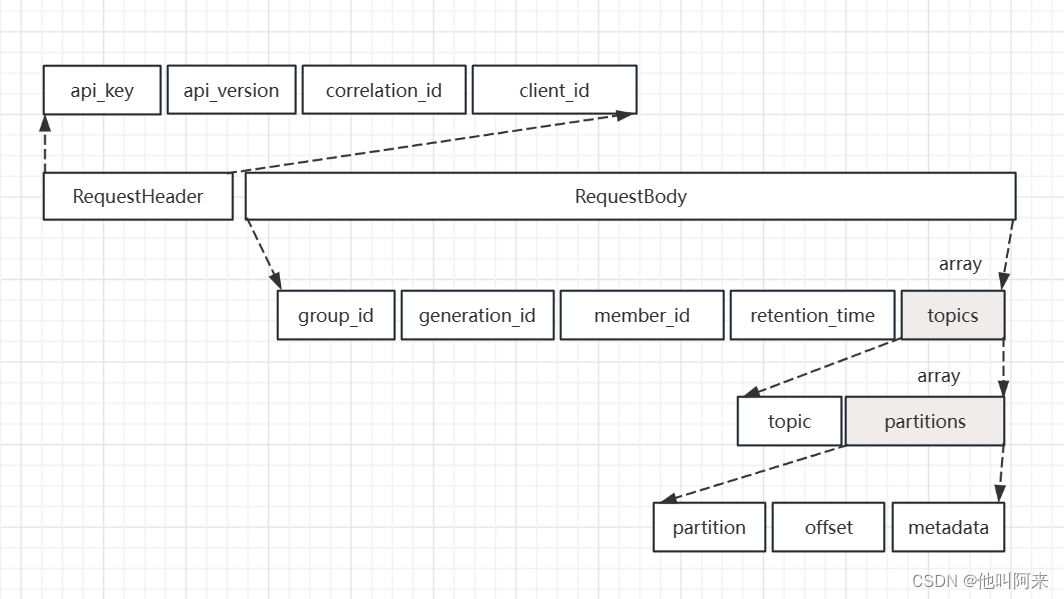
__consumer_offsets這個主題中的消息格式為KV對,key為[Group, Topic, Partition],value可以簡單理解為記錄了偏移量;這樣的記錄方式,使得broker端不需要關系group下有多少個消費者,新增消費者或者減少消費者發生重平衡時,都能準確地定位到對應地分區應該從哪個位置開始消費。
位移提交
鑒于位移提交甚至是位移管理對 Consumer 端的巨大影響,Kafka,特別是KafkaConsumer API,提供了多種提交位移的方法。從用戶的角度來說,位移提交分為自動提交和手動提交;從 Consumer 端的角度來說,位移提交分為同步提交和異步提交。
自動提交
自動提交,就是指 Kafka Consumer 在后臺默默地為你提交位移
兩個重要的參數
enable.auto.commit設置是否自動提交位移,默認是trueauto.commit.interval.ms:設置自動提交為true時,該參數生效,標識多久提交一次位移,默認5s,
public static void main(String[] args) {Map<String, Object> configs = new HashMap<>();configs.put(ConsumerConfig.BOOTSTRAP_SERVERS_CONFIG, "node1:9092");configs.put(ConsumerConfig.KEY_DESERIALIZER_CLASS_CONFIG, StringDeserializer.class);configs.put(ConsumerConfig.VALUE_DESERIALIZER_CLASS_CONFIG, UserDeserializer.class);configs.put(ConsumerConfig.GROUP_ID_CONFIG, "consumer1");configs.put(ConsumerConfig.AUTO_OFFSET_RESET_CONFIG, "earliest");configs.put(ConsumerConfig.CLIENT_ID_CONFIG, "con1");// 設置偏移量自動提交。自動提交是默認值。這里做示例。configs.put("enable.auto.commit", "true");// 偏移量自動提交的時間間隔configs.put("auto.commit.interval.ms", "2000");KafkaConsumer<String, String> consumer = new KafkaConsumer<String,String>(configs);consumer.subscribe(Collections.singleton("tp_demo_01"));while (true) {ConsumerRecords<String, String> records = consumer.poll(Duration.ofMillis(100));for (ConsumerRecord<String, String> record : records) {System.out.println(record.topic()+ "\t" + record.partition()+ "\t" + record.offset()+ "\t" + record.key()+ "\t" + record.value());}}}設置了 enable.auto.commit 為 true,Kafka 會保證在開始調用 poll 方法時,提交上次 poll 返回的所有消息。從順序上來說,poll 方法的邏輯是先提交上一批消息的位移,再處理下一批消息,因此它能保證不出現消費丟失的情況。但是會出現消息重復消費。
在默認情況下,Consumer 每 5 秒自動提交一次位移。現在,我們假設提交位移之后的 3秒發生了 Rebalance 操作。在 Rebalance 之后,所有 Consumer 從上一次提交的位移處繼續消費,但該位移已經是 3 秒前的位移數據了,故在Rebalance 發生前 3 秒消費的所有數據都要重新再消費一次。雖然你能夠通過減少 auto.commit.interval.ms 的值來提高提交頻率,但這么做只能縮小重復消費的時間窗口,不可能完全消除它。這是自動提交機制的一個缺陷。
手動同步提交
開啟手動提交位移的方法就是設置enable.auto.commit 為 false。但是,僅僅設置它為 false 還不夠,因為你只是告訴
Kafka Consumer 不要自動提交位移而已,你還需要調用相應的 API 手動提交位移。
public static void main(String[] args) {Map<String, Object> configs = new HashMap<>();configs.put(ConsumerConfig.BOOTSTRAP_SERVERS_CONFIG, "node1:9092");configs.put(ConsumerConfig.KEY_DESERIALIZER_CLASS_CONFIG, StringDeserializer.class);configs.put(ConsumerConfig.VALUE_DESERIALIZER_CLASS_CONFIG, UserDeserializer.class);configs.put(ConsumerConfig.GROUP_ID_CONFIG, "consumer1");configs.put(ConsumerConfig.AUTO_OFFSET_RESET_CONFIG, "earliest");configs.put(ConsumerConfig.CLIENT_ID_CONFIG, "con1");configs.put(ConsumerConfig.ENABLE_AUTO_COMMIT_CONFIG, "false");KafkaConsumer<String, String> consumer = new KafkaConsumer<String,String>(configs);consumer.subscribe(Collections.singleton("tp_demo_01"));while (true) {ConsumerRecords<String, String> records =consumer.poll(Duration.ofSeconds(1));process(records); // 處理消息try {consumer.commitSync();} catch (CommitFailedException e) {handle(e); // 處理提交失敗異常}}
}
調用 commitSync() 時,Consumer 程序會處于阻塞狀態,直到遠端的 Broker 返回提交結果,這個狀態才會結束,這樣就會影響TPS。
鑒于此問題,還有另外一個提交方式
手動異步提交
public static void main(String[] args) {Map<String, Object> configs = new HashMap<>();configs.put(ConsumerConfig.BOOTSTRAP_SERVERS_CONFIG, "node1:9092");configs.put(ConsumerConfig.KEY_DESERIALIZER_CLASS_CONFIG, StringDeserializer.class);configs.put(ConsumerConfig.VALUE_DESERIALIZER_CLASS_CONFIG, UserDeserializer.class);configs.put(ConsumerConfig.GROUP_ID_CONFIG, "consumer1");configs.put(ConsumerConfig.AUTO_OFFSET_RESET_CONFIG, "earliest");configs.put(ConsumerConfig.CLIENT_ID_CONFIG, "con1");configs.put(ConsumerConfig.ENABLE_AUTO_COMMIT_CONFIG, "false");KafkaConsumer<String, String> consumer = new KafkaConsumer<String,String>(configs);while (true) {ConsumerRecords<String, String> records = consumer.poll(Duration.ofMillis(100));process(records); // 處理消息consumer.commitAsync((offsets, exception) -> {if (exception != null) {handle(exception);}});}
}
commitAsync 是否能夠替代 commitSync 呢?答案是不能。commitAsync 的問題在于,出現問題時它不會自動重試。因為它是異步操作,倘若提交失敗后自動重試,那么它重試時提交的位移值可能早已經“過期”或不是最新值了。因此,異步提交的重試其實沒有意義,所以 commitAsync 是不會重試的。
是手動提交,需要將 commitSync 和 commitAsync 組合使用才能到達最理想的效果,原因有兩個:
- 利用 commitSync 的自動重試來規避那些瞬時錯誤,比如網絡的瞬時抖動,Broker 端 GC 等。這些問題都是短暫的,自動重試通常都會成功。
- 不希望程序總處于阻塞狀態,影響 TPS。
public static void main(String[] args) {Map<String, Object> configs = new HashMap<>();configs.put(ConsumerConfig.BOOTSTRAP_SERVERS_CONFIG, "node1:9092");configs.put(ConsumerConfig.KEY_DESERIALIZER_CLASS_CONFIG, StringDeserializer.class);configs.put(ConsumerConfig.VALUE_DESERIALIZER_CLASS_CONFIG, UserDeserializer.class);configs.put(ConsumerConfig.GROUP_ID_CONFIG, "consumer1");configs.put(ConsumerConfig.AUTO_OFFSET_RESET_CONFIG, "earliest");configs.put(ConsumerConfig.CLIENT_ID_CONFIG, "con1");configs.put(ConsumerConfig.ENABLE_AUTO_COMMIT_CONFIG, "false");KafkaConsumer<String, String> consumer = new KafkaConsumer<String,String>(configs);consumer.subscribe(Collections.singleton("tp_demo_01"));try {while (true) {ConsumerRecords<String, String> records =consumer.poll(Duration.ofSeconds(1));consumer.commitAsync();process(records); // 處理消息consumer.commitAsync(); // 異步提交}} catch (Exception e) {handle(e); // 處理異常} finally {try {consumer.commitSync();// 最后一次提交使用同步阻塞式提交} finally {consumer.close();}}
}


)


)


