簡述yolo1-yolo3
In the last part, we understood what YOLO is and how it works. In this section, let us understand how to apply it using pre-trained weights and obtaining the results. This article is greatly inspired by Andrew Ng’s Deep Learning Specialization course. I’ve also tried to gather information from various other articles/resources to make the concept easier to understand.
在最后一部分中,我們了解了YOLO是什么以及它如何工作。 在本節中,讓我們了解如何使用預先訓練的權重應用它并獲得結果。 本文的靈感來自Andrew Ng的深度學習專業課程。 我還嘗試從其他各種文章/資源中收集信息,以使該概念更易于理解。
Now it’s time to implement what we’ve understood using Python. You can do this with the help of a Jupyter Notebook (or any other IDE of your choice). The implementation of YOLO has been taken from Andrew Ng’s Github Repository. You’ll also have to download this zip file which contains the pre-trained weights and packages to implement YOLO. Here’s a link to my GitHub repository where you can find the Jupyter Notebook.
現在是時候使用Python來實現我們已經了解的內容了。 您可以在Jupyter Notebook(或您選擇的任何其他IDE)的幫助下執行此操作。 YOLO的實現取自Andrew Ng的Github存儲庫 。 您還必須下載此zip文件 ,其中包含用于實施YOLO的預先訓練的砝碼和軟件包。 這是我的GitHub存儲庫的鏈接 ,您可以在其中找到Jupyter Notebook。
I’ve tried to comment on as many lines of code as possible for better understanding.
我試圖評論盡可能多的代碼行,以便更好地理解。
導入庫: (Importing Libraries:)
Let us first import all the required libraries.
讓我們首先導入所有必需的庫。
import os
import imageio
import matplotlib.pyplot as plt
from matplotlib.pyplot import imshow
import scipy.io
import scipy.misc
import numpy as np
import pandas as pd
import PIL
import tensorflow as tf
from skimage.transform import resize
from keras import backend as K
from keras.layers import Input, Lambda, Conv2D
from keras.models import load_model, Model
from yolo_utils import read_classes, read_anchors, generate_colors, preprocess_image,draw_boxes, scale_boxes
from yad2k.models.keras_yolo import yolo_head, yolo_boxes_to_corners, preprocess_true_boxes, yolo_loss, yolo_body
%matplotlib inline
應用過濾器: (Applying Filter:)
First, we are going to apply a filter by thresholding. We can do this by getting rid of those boxes which have a score less than the chosen threshold.
首先,我們將通過閾值應用過濾器。 我們可以通過擺脫得分小于所選閾值的框來做到這一點。
The model contains 80 different classes for detection. It gives a total of 19x19x5x85 numbers where:
該模型包含80種不同的檢測類別。 它總共給出19x19x5x85個數字,其中:
19x19: the shape of the grid
19x19:網格的形狀
5: number of anchor boxes
5:錨框數量
85: each box containing 85 numbers (Pc, bx, by, bh, bw, c1,c2…..c80)
85:每個盒子包含85個數字(Pc,bx,by,bh,bw,c1,c2…..c80)
def yolo_filter_boxes(box_confidence, boxes, box_class_probs, threshold = .6):'''
box confidence: tensor of shape (19,19,5,1) containing Pc
boxes: tensor of shape (19,19,5,4)
box_class_probs: tensor of shape (19,19,5,80)
threshold: if Pc<threshold, get rid of that box
'''
    #Computing box scores
    box_scores = box_confidence*box_class_probs    #Finding the index of the class with maximum box score
    box_classes = K.argmax(box_scores, -1)    #Getting the corresponding box score
    box_class_scores = K.max(box_scores,-1)    #Creating a filtering mask. The mask will be true for all the boxes        we intend to keep (pc >= threshold) and false for the rest
    filtering_mask = box_class_scores>threshold    #Applying the mask to scores, boxes and classes
    scores = tf.boolean_mask(box_class_scores, filtering_mask)
    boxes = tf.boolean_mask(boxes, filtering_mask)
    classes = tf.boolean_mask(box_classes, filtering_mask)'''
scores: contains class probability score for the selected boxes
boxes: contains (bx,by,bh,bw) coordinates of selected boxes
classes: contains the index of class detected by the selected boxes
'''
    return scores, boxes, classes
實施交叉口聯盟(IoU): (Implementing Intersection Over Union (IoU):)
Now we are going to implement IoU. This will be used to evaluate the bounding boxes.
現在我們將實現IoU。 這將用于評估邊界框。
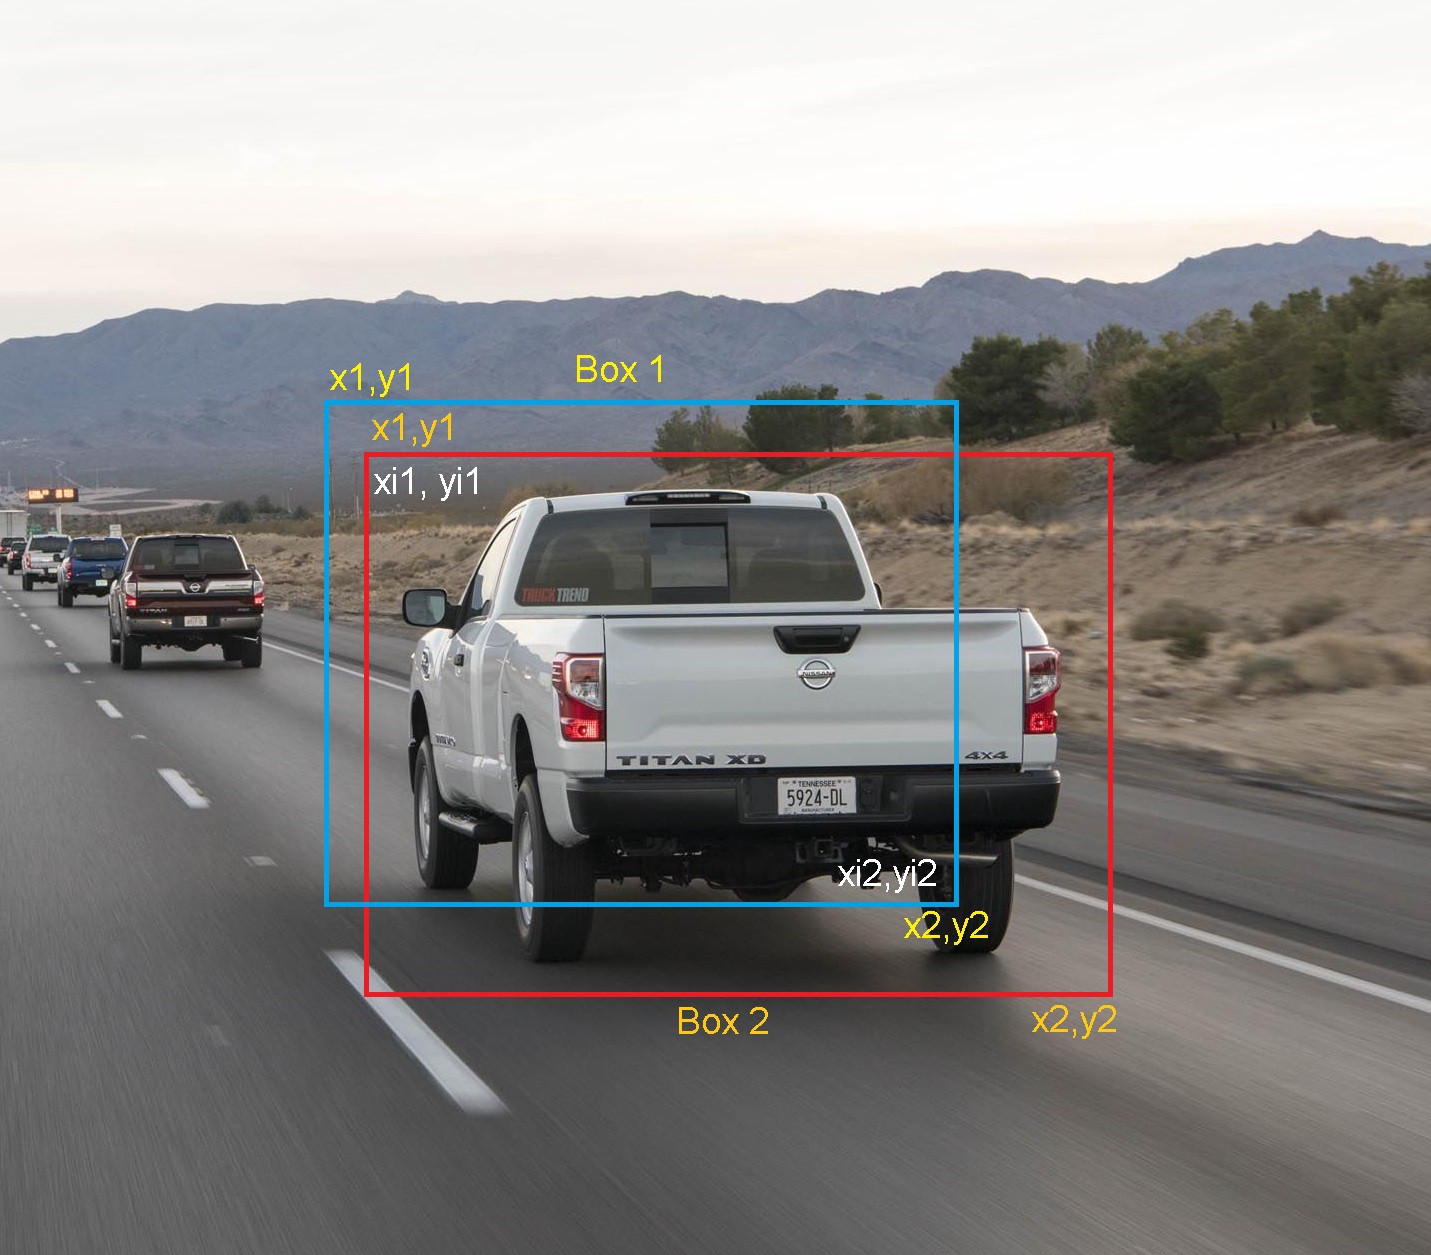
We will be defining a box using its two corners (upper left and lower right). The coordinates can be named as (x1,y1,x2,y2).
我們將使用兩個角(左上和右下)定義一個框。 坐標可以命名為(x1,y1,x2,y2)。
We will also have to find out the coordinates of the intersection of two boxes.
我們還必須找出兩個盒子相交的坐標。
xi1: maximum of the x1 coordinates of the two boxes.
xi1:兩個框的x1坐標的最大值。
yi1: maximum of the y1 coordinates of the two boxes.
yi1:兩個框的y1坐標的最大值。
xi2: minimum of the x2 coordinates of the two boxes.
xi2:兩個框的x2坐標的最小值。
yi2: minimum of the y2 coordinates of the two boxes.
yi2:兩個框的y2坐標的最小值。
The area of the rectangle formed after intersection can be calculated using the formula: (xi2 — xi1)*(yi2 — yi1)
交點后形成的矩形的面積可以使用以下公式計算:(xi2 — xi1)*(yi2 — yi1)
The formula for finding IoU is:
查找IoU的公式是:
(Intersection area)/(Union area)Now let us define a function to calculate IoU.
現在讓我們定義一個函數來計算IoU。
def iou(box1, box2):    #Calculating (xi1,yi1,xi2,yi2) of the intersection of box1 and box2
    xi1 = max(box1[0], box2[0])
    yi1 = max(box1[1], box2[1])
    xi2 = min(box1[2], box2[2])
    yi2 = min(box1[3], box2[3])
    #Calculating the area of intersection
    inter_area = (yi2-yi1)*(xi2-xi1)    #Calculating the areas of box1 and box2 using the same formula
    box1_area = (box1[3] - box1[1])*(box1[2] - box1[0])
    box2_area = (box2[3] - box2[1])*(box2[2] - box2[0])
    #Calculating the union area by using the formula: union(A,B) = A+B-Inter(A,B)
    union_area = box1_area + box2_area - inter_area    #Calculating iou
    iou = inter_area/union_area

    return iou
實施非最大抑制: (Implementing Non-Max Suppression:)
Next, we will be implementing non-max suppression to remove all the duplicate bounding boxes for the same object. The steps involved are:
接下來,我們將實現非最大抑制,以移除同一對象的所有重復的邊界框。 涉及的步驟是:
- Select the box with the highest score. 選擇得分最高的框。
- Compute its IoU with all other boxes and remove those boxes which have IoU greater than the threshold mentioned. 用其他所有框計算其IoU,并刪除IoU大于上述閾值的框。
- Repeat until there are no more boxes with a lower score than the selected box. 重復進行操作,直到沒有比所選框得分更低的框。
Let us define the function
讓我們定義功能
def yolo_non_max_suppression(scores, boxes, classes, max_boxes = 10, iou_threshold = 0.5):    #tensor used in tf.image.non_max_suppression()of size 'max_boxes'
    max_boxes_tensor = K.variable(max_boxes, dtype = 'int32')    #initiating the tensor
    K.get_session().run(tf.variables_initializer([max_boxes_tensor]))    #Using the tensorflow function tf.image.non_max_suppression to get the indices of boxes kept
    nms_indices = tf.image.non_max_suppression(boxes, scores, max_boxes, iou_threshold)    #Using K.gather to individually access scores, boxes and classes from nms_indices
    scores = K.gather(scores, nms_indices)
    boxes = K.gather(boxes, nms_indices)
    classes = K.gather(classes, nms_indices)

    return scores, boxes, classes
上面定義的調用函數: (Calling Functions Defined Above:)
Now it’s time to implement a function that takes the output of deep CNN and then filters the boxes using the above functions.
現在是時候實現一個功能,該功能獲取深層CNN的輸出,然后使用上述功能過濾框。
Note that there are a few ways by which a bounding box can be represented i.e via their corners or their midpoints and height/width. YOLO converts between a few such formats for which there is a function named “yolo_boxes_to_corners”.
請注意,有幾種表示邊界框的方法,即通過其角或中點和高度/寬度。 YOLO在幾種此類格式之間進行轉換,為此存在一個名為“ yolo_boxes_to_corners”的函數。
Also, YOLO was trained on images of 608 x 608 dimensions. If the images we provide have a dimension greater than or less than the original dimension (on which YOLO was trained) then we will have to rescale the bounding boxes accordingly to fit on the image. We will be using a function called “scale_boxes” for this purpose.
此外,YOLO還接受了608 x 608尺寸圖像的培訓。 如果我們提供的圖像的尺寸大于或小于原始尺寸(YOLO受其訓練),則我們將不得不相應地重新調整邊界框以適合圖像。 為此,我們將使用一個名為“ scale_boxes”的函數。
def yolo_eval(yolo_outputs, image_shape = (720., 1280.), max_boxes = 10, score_threshold = .6, iou_threshold = .5):    '''
    yolo_outputs contains:
    box_confidence, box_xy, box_wh, box_class_probs
    '''     #Retrieving output
    box_confidence, box_xy, box_wh, box_class_probs = yolo_outputs    #Converting the boxes for filtering functions
    boxes = yolo_boxes_to_corners(box_xy, box_wh)    #Using the function defined before to remove boxes with less confidence score
    scores, boxes, classes = yolo_filter_boxes(box_confidence, boxes, box_class_probs, threshold = score_threshold)    #Scaling the boxes
    boxes = scale_boxes(boxes, image_shape)    #Using the function defined before for non-max suppression
   scores, boxes, classes = yolo_non_max_suppression(scores, boxes, classes, max_boxes, iou_threshold)

    return scores, boxes, classes
加載預訓練模型: (Loading Pre-Trained Model:)
Now we’re going to test the YOLO pre-trained models on images. For this, we have to create a session. Also, remember that we’re trying to detect 80 classes and using 5 anchor boxes. We have all the class information in “coco_classes.txt” and “yolo_anchors.txt” which must be present in the zip file you downloaded before inside the folder “model_data”.
現在,我們將在圖像上測試YOLO預訓練模型。 為此,我們必須創建一個會話。 另外,請記住,我們正在嘗試檢測80個類別并使用5個定位框。 我們在“ coco_classes.txt”和“ yolo_anchors.txt”中具有所有類信息,這些信息必須出現在您下載的zip文件中之前,該文件位于“ model_data”文件夾中。
The training of the YOLO model takes a long time especially if you don’t have a high spec system. So we are going to load an existing pre-trained Keras YOLO model stored in “yolo.h5”. These are the pre-trained weights from the YOLOv2 model.
YOLO模型的訓練需要很長時間,特別是如果您沒有高規格的系統。 因此,我們將加載存儲在“ yolo.h5”中的現有預先訓練的Keras YOLO模型。 這些是來自YOLOv2模型的預訓練權重。
Let's create a session and load these files.
讓我們創建一個會話并加載這些文件。
sess = K.get_session()
class_names = read_classes("model_data/coco_classes.txt")
anchors = read_anchors("model_data/yolo_anchors.txt")
yolo_model = load_model("model_data/yolo.h5")
Note: In some cases, a warning pops up while loading the weights. If that’s the case then just ignore the warning.
注意: 在某些情況下,加載砝碼時會彈出警告。 如果是這種情況,請忽略警告。
#Converting the output of model into usable bounding box tensors
yolo_outputs = yolo_head(yolo_model.output, anchors, len(class_names))
#Filtering the boxes
scores, boxes, classes = yolo_eval(yolo_outputs, image_shape)
So far we have created a session graph that is given to yolo_model to compute output, processed by yolo_head, and goes through a filtering function yolo_eval.
到目前為止,我們已經創建了一個會話圖,該會話圖被賦予yolo_model以計算輸出,并由yolo_head處理,并經過過濾函數yolo_eval。
在圖像上應用YOLO: (Applying YOLO on an Image:)
Now we have to implement a function that runs the graph to test YOLO on an image.
現在,我們必須實現一個運行圖形的功能,以在圖像上測試YOLO。
def predict(sess, image_file):    #Preprocessing the image
    image, image_data = preprocess_image("images/"+image_file, model_image_size = (608,608))    #Running the session and feeding the input to it
   out_scores, out_boxes, out_classes = sess.run([scores, boxes, classes],feed_dict = {yolo_model.input: image_data, K.learning_phase(): 0})    #Prints the predicted information
    print('Found {} boxes for {}'.format(len(out_boxes), image_file))    #Generates color for drawing bounding boxes
    colors = generate_colors(class_names)    #Draws bounding boxes on the image file
    draw_boxes(image, out_scores, out_boxes, out_classes, class_names, colors)    #Saving the predicted bounding box on the image
    image.save(os.path.join("out", image_file), quality = 150)    #Displaying the results in notebook
    output_image = imageio.imread(os.path.join("out", image_file))
    plt.figure(figsize=(12,12))
    imshow(output_image)    return out_scores, out_boxes, out_classes
Run the following cell on your test image to see the results.
在測試圖像上運行以下單元格以查看結果。
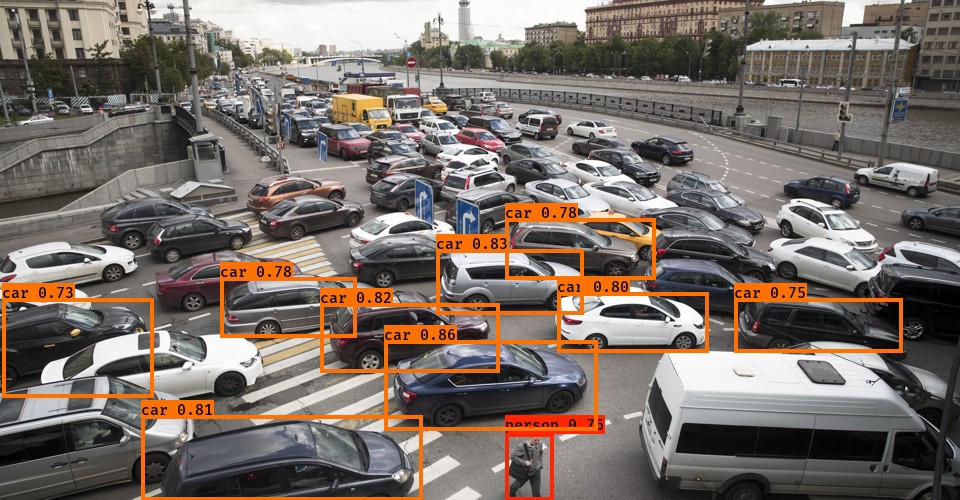
#Loading the image
img = plt.imread('images/traffic.jpeg')#Calculating the size of image and passing it as a parameter to yolo_eval
image_shape = float(img.shape[0]),float(img.shape[1])
scores, boxes, classes = yolo_eval(yolo_outputs, image_shape)#Predicts the output
out_scores, out_boxes, out_classes = predict(sess, "traffic.jpeg")
The output is:
輸出為:
結論: (Conclusion:)
Thanks a lot if you’ve made this far. Please do note that the results may or may not be the same if you use the same image for detection. You can further customize the maximum number of bounding boxes per image, threshold values, etc. to obtain better results.
非常感謝您所做的一切。 請注意,如果使用相同的圖像進行檢測,結果可能會有所不同。 您可以進一步自定義每個圖像的最大邊界框數量,閾值等,以獲得更好的結果。
If you have any suggestions to make this blog better, please do mention in the comments. I will try to make the changes.
如果您有任何建議可以改善此博客,請在評論中提及。 我將嘗試進行更改。
翻譯自: https://towardsdatascience.com/object-detection-part2-6a265827efe1
簡述yolo1-yolo3
本文來自互聯網用戶投稿,該文觀點僅代表作者本人,不代表本站立場。本站僅提供信息存儲空間服務,不擁有所有權,不承擔相關法律責任。 如若轉載,請注明出處:http://www.pswp.cn/news/392514.shtml 繁體地址,請注明出處:http://hk.pswp.cn/news/392514.shtml 英文地址,請注明出處:http://en.pswp.cn/news/392514.shtml
如若內容造成侵權/違法違規/事實不符,請聯系多彩編程網進行投訴反饋email:809451989@qq.com,一經查實,立即刪除!相關文章

ubuntu配置JDK環境

java cxf 調用wcf接口_JAVA 調用 WCF 服務流程

react第三方組件庫_如何自定義您的第三方React組件

gcp devops_將GCP AI平臺筆記本用作可重現的數據科學環境

迅為工業級iMX6Q開發板全新升級兼容PLUS版本|四核商業級|工業級|雙核商業級...

flume 中的 hdfs sink round 和roll
)
leetcode 649. Dota2 參議院(貪心算法)

電力現貨市場現貨需求_現貨與情緒:現貨銅市場中的自然語言處理與情緒評分
——字符串處理函數(2))
PHP學習系列(1)——字符串處理函數(2)

java做主成分分析_主成分分析PCA
)

什么叫靜態構建版本號碼_為什么要使用GatsbyJS構建靜態網站

leetcode 217. 存在重復元素

C#正則表達式提取HTML中IMG標簽的URL地址 .
)
java datarow 使用_DataRow中的鏈接(數據表)

mac、windows如何強制關閉tomcat進程

用python繪制箱線圖_用衛星圖像繪制世界海岸線圖-第一部分

vue 遞歸創建菜單_如何在Vue中創建類似中等的突出顯示菜單
)
leetcode 376. 擺動序列(dp)
...)