I am really fond of Hybrid App technologies – they help us achieve so much in a single codebase. Using the Ionic Framework, I developed a cross-platform mobile solution for tracking Coronavirus cases in just 3 days.
我真的很喜歡Hybrid App技術-它們可以幫助我們在一個單一的代碼庫中取得如此多的成就。 使用Ionic Framework,我開發了一種跨平臺移動解決方案,可在短短3天內跟蹤冠狀病毒病例。
In this tutorial, we are going to learn how to develop an Android, iOS, and Progressive Web App to track the cases around us with the latest related news, help, and feedback sections. Brace yourself for a new coding journey! 😃
在本教程中,我們將學習如何開發Android,iOS和Progressive Web App ,以通過最新的相關新聞,幫助和反饋部分來跟蹤我們周圍的案例。 為新的編碼之旅做好準備! 😃
先決條件 (Prerequisites)
The process of hybrid mobile app development is meant for all kinds of developers irrespective of their technology stack. Since we will be using three basic pillars of Web Development – HTML+CSS+JAVASCRIPT – at the core, you can easily understand the process and techniques.
混合移動應用程序開發的過程適用于各種開發人員,無論其技術堆棧如何。 由于我們將使用Web開發的三個基本Struts-HTML + CSS + JAVASCRIPT ,因此您可以輕松地理解其過程和技術。
Thus this tutorial is for everyone who has just a basic understanding of Web Fundamentals. So, let's begin.
因此,本教程適用于僅對Web基礎知識有基本了解的每個人。 所以,讓我們開始吧。
第0天-構思,計劃和工程 (Day 0 - Idea, Plan, and Engineering )
理念 (Idea)
Initially, I was looking for the latest Covid19 cases around me (in March 2020). I got several links that had little difference in numbers.
最初,我一直在尋找周圍的最新Covid19案例(2020年3月)。 我得到了幾個鏈接,它們的數量幾乎沒有差別。
Then, I realised that data from https://github.com/backtrackbaba/covid-api is regularly updated and more accurate. I decided to develop a universal, small, and handy mobile solution by using data provided by Johns Hopkins University.
然后,我意識到來自https://github.com/backtrackbaba/covid-ap i的數據會定期更新且更加準確。 我決定使用約翰·霍普金斯大學提供的數據來開發一種通用,小型且方便的移動解決方案。
計劃 (Plan)
I planned to develop a cross-platform mobile solution that could be universally accessed by everyone. I considered the Ionic framework which would allow me to develop an Android, iOS & Progressive Web App (PWA)📲 by just writing and maintaining a single codebase.
我計劃開發一種跨平臺的移動解決方案,每個人都可以普遍使用。 我考慮了Ionic框架,該框架將允許我通過編寫和維護單個代碼庫來開發Android ,iOS和漸進式Web應用程序 (PWA) 。
I also wanted to show the COVID19 virus cases across the world and individual countries through various illustrations.
我還想通過各種插圖展示全世界和各個國家的COVID19病毒病例。
工程 (Engineering)
The idea was to develop 5 separate tabs which would be there at the bottom of the app:
這個想法是要開發5個獨立的標簽,這些標簽將位于應用程序的底部:
World — would show the COVID19 Dashboard
世界 -將顯示COVID19信息中心
Country — would allow you to select a country to check the cases
國家(地區)—您可以選擇一個國家來檢查案件
News — would get the latest news regarding the Coronavirus Pandemic
新聞-將獲得有關冠狀病毒大流行的最新新聞
Guidelines — would allow you to read and watch all advisories and guidelines
準則-允許您閱讀和觀看所有建議和準則
Help — would provide help and feedback.
幫助 -將提供幫助和反饋。

技術棧 (Technology Stack)
I have developed several websites and apps through Angular and Ionic before. But this time, I wanted to learn and use React.js. The below libraries are required to install using the Node package manager (npm):
之前,我已經通過Angular和Ionic開發了多個網站和應用程序。 但是這次,我想學習和使用React.js。 使用Node軟件包管理器( npm )來安裝以下庫是必需的:
React.js includes the latest react-hooks
React.js包含最新的react-hooks
Ionic Framework (version 4) with Capacitor
帶有電容器的 離子框架 (版本4)
Node.js environment to support JavaScript and npm libraries
支持JavaScript和npm庫的Node.js環境
TypeScript language to write the actual code (.tsx files)
使用TypeScript語言編寫實際代碼(.tsx文件)
Chart.js for various illustrations
Chart.js的各種插圖
Firebase for hosting the content (Progressive Web App)
用于托管內容的Firebase ( 漸進式Web應用程序 )
工具類 (Tools)
- VS Code VS代碼
- Google Chrome 谷歌瀏覽器
- Android Studio for Android app 適用于Android應用的Android Studio
- Xcode for iOS app (Unfortunately only available in Apple computers) 適用于iOS應用程序的Xcode(不幸的是,僅適用于Apple計算機)
安裝及腳手架 (Installation & Scaffolding)
We need to install and configure all the above mentioned Software and Frameworks. So, let’s start with the first set of terminal commands (whether it's on Mac, Linux or Windows):
我們需要安裝和配置所有上述軟件和框架。 因此,讓我們從第一組終端命令開始(無論是在Mac,Linux還是Windows上):
Install ionic with global scope "npm install -g @ionic/cli native-run cordova-res"
在全局范圍內安裝ionic “ npm install -g @ ionic / cli native-run cordova-res”
Create react app with Capacitor "ionic start corona-tracker tabs — type=react — capacitor"
使用電容器“離子啟動電暈跟蹤器選項卡—類型=React—電容器”創建react應用
Add react hooks and pwa elements "npm install @ionic/react-hooks @ionic/pwa-elements"
添加react掛鉤和pwa元素“ npm install @ ionic / react-hooks @ ionic / pwa-elements”
Open the corona-tracker folder in your default workplace. You should have gotten all the default HTML, CSS and .tsx files with other sub-folders in the proper sequence. Now, go to your app folder and run these 2 commands
在默認工作場所中打開corona-tracker文件夾。 您應該已經按正確的順序獲取了所有其他子文件夾的默認HTML,CSS和.tsx文件。 現在,轉到您的應用程序文件夾并運行這兩個命令
cd corona-tracker ionic serve
cd電暈跟蹤儀 離子發球機
Voilà! 🎉 ?Your Ionic app is now running in a web browser. Click on the localhost option in the terminal to check. 🕺This is your basic app installation and scaffolding.
瞧! I您的Ionic應用程序現在正在網絡瀏覽器中運行。 單擊終端中的localhost選項進行檢查。 is這是您的基本應用安裝和腳手架。
So far, you should be running your ionic-react app in your local browser. Now index.html and index.tsx are your first pages for Single Page Applications (SPAs).
到目前為止,您應該在本地瀏覽器中運行離子React應用程序。 現在index.html和index.tsx是您的單頁應用程序(SPA)的第一頁。
應用程序路由 (App Routing)
Let’s add routing to our app which will allow us to visit all 5 different tabs explained above. Open your App.tsx file and add the below router inside <IonReactRouter></IonReactRouter>
讓我們將路由添加到我們的應用程序中,這將使我們能夠訪問上面說明的所有5個不同選項卡。 打開您的App.tsx文件,并在<IonReactRouter> </ IonReactRouter>中添加以下路由器
<IonTabs><IonRouterOutlet><Route path="/world" component={WorldTab} exact={true} /><Route path="/country" component={CountryTab} exact={true} /><Route path="/news" component={NewsTab} /><Route path="/guidelines" component={GuidelinesTab} /><Route path="/help" component={HelpTab} /><Route path="/" render={() => <Redirect to="/world" />} exact={true} /></IonRouterOutlet><IonTabBar slot="bottom" ><IonTabButton tab="WorldTab" href="/world"><IonIcon icon={planet} /><IonLabel>World</IonLabel></IonTabButton><IonTabButton tab="CountryTab" href="/country"><IonIcon icon={home} /><IonLabel> Country</IonLabel></IonTabButton><IonTabButton tab="NewsTab" href="/news"><IonIcon icon={newspaper} /><IonLabel> News</IonLabel></IonTabButton><IonTabButton tab="GuidelinesTab" href="/guidelines"><IonIcon icon={informationCircleOutline} /><IonLabel>Guidelines</IonLabel></IonTabButton><IonTabButton tab="HelpTab" href="/help"><IonIcon icon={call} /><IonLabel>Help</IonLabel></IonTabButton></IonTabBar></IonTabs>Check your app in the browser again, and you should see all these tabs with their respective pages. All tabs should be working smoothly with proper routing.
再次在瀏覽器中檢查您的應用程序,您應該看到所有這些標簽以及它們各自的頁面。 所有選項卡均應通過正確的路由順利運行。
Let me know in case you're stuck with any issues related to installation, compile-time, or run-time errors.如果您 遇到與安裝,編譯時 或運行時錯誤 相關的任何問題, 請告訴我。
This is it for Day 0.🧤
第 0 天就是這樣。🧤
第1天-開發COVID19的“控制臺”和“安全準則”選項卡 (Day 1 - Developing COVID19 Dashboard and Safety Guidelines tabs)
In this part of the process, we will develop the World and Guidelines tabs for our Ionic React hybrid app. So far, we have done the basic installation and scaffolding of the app. We have also added 5 different tabs to our app with routing.
在此過程的這一部分中,我們將為Ionic React混合應用程序開發“ 世界”和“指南”選項卡。 到目前為止,我們已經完成了該應用程序的基本安裝和腳手架。 我們還通過路由向我們的應用程序添加了5個不同的標簽。
世界標簽:設計 (World Tab: Design)
Let’s build our home page World tab now. I decided to have 4 different sections on this home tab:
讓我們現在構建主頁的“ 世界”選項卡。 我決定在此主頁選項卡上有4個不同的部分:
- 4 different boxes to show actual numbers: Total, Active, Recovered and Deaths 4個不同的框來顯示實際數字:總數,活動,已恢復和死亡
- A Pie Chart depicting the number of cases 描繪案件數量的餅圖
- Slideshows for basic health tips 基本健康提示的幻燈片顯示
- All countries listed with these categories in descending order. 所有國家/地區均以降序排列。
世界標簽:數據和API (World Tab: Data & API)
I have studied the open-source postman API source which contains all Application Programming Interfaces (APIs) related to Corona Cases https://documenter.getpostman.com/view/2568274/SzS8rjbe?version=latest.
我研究了開源的postman API來源,其中包含與Corona Cases相關的所有應用程序編程接口(API) https://documenter.getpostman.com/view/2568274/SzS8rjbe?version=latest 。
First, we will consume the global API with the Axios library to get the total global case count in the world using the useState & useEffect React-hooks.
首先,我們將使用Axios庫使用全局 API,以使用useState&useEffect React-hooks獲取世界上的總案例總數。
const [data, setData] = useState<IGLobalCount>();
const [showLoading, setShowLoading] = useState(true);useEffect(() => {const getGlobalData = async () => {//latest global countconst result = await axios('https://covidapi.info/api/v1/global');// console.log(result);setData(result.data);setShowLoading(false);};getGlobalData();}, []);Then set the data inside your return block using HTML:
然后使用HTML在返回塊內設置數據:
<IonRow class="casesBox"><IonCol class="totalCases">Total <AddNumFunc a={confirmed} b={recovered} c={deaths} /></IonCol><IonCol class="confirmedBox">Confirmed {confirmed?.toLocaleString()}</IonCol><IonCol class="recoveredBox">Recovered {recovered?.toLocaleString()}</IonCol><IonCol class="deathsBox">Deaths {deaths?.toLocaleString()}</IonCol>
</IonRow>Now, we have the first 4 responsive boxes containing total cases, confirmed cases, recovered, and deaths. Install chart.js in your project using npm install react-chartjs-2. Let’s make use of the same data to draw a PieChart.
現在,我們有前4個響應框,其中包含總病例數,確診病例數,康復病例和死亡人數。 使用npm install react-chartjs-2在您的項目中安裝chart.js 。 讓我們利用相同的數據繪制PieChart。
import axios from 'axios';
import { Pie } from 'react-chartjs-2';<IonCard class="pieCard"><Pie data={GlobalCasesPieChart}options={{legend: {display: true,position: 'bottom',},plugins: {datalabels: {anchor: 'end',clamp: 'true',align: 'bottom',color: 'black',labels: {title: {font: {weight: 'bold'}}}}}}} />
</IonCard>Now, we have 2 of the 4 sections in the World tab. So next, let’s add a slideshow depicting general health tips.
現在,“ 世界”選項卡中的4個部分中有2個。 接下來,讓我們添加一個幻燈片,描述一般的健康提示。
<IonSlides class="tipsSlides" options={slideOpts}><IonSlide class="slide">Maintain at least 1 metre (3 feet) distance between yourself and anyone who is coughing or sneezing.</IonSlide><IonSlide class="slide">Regularly and thoroughly clean your hands with an alcohol-based hand rub or wash them with soap and water.</IonSlide><IonSlide class="slide">If you have fever, cough and difficulty breathing, seek medical care early.</IonSlide><IonSlide class="slide">Avoid touching eyes, nose and mouth. #StayHomeStaySafe</IonSlide><IonSlide class="slide">WHO Health Alert brings COVID-19 facts to billions via WhatsApp.</IonSlide>
</IonSlides>Now, let’s make a data table for all countries in descending order to depict all kinds of cases. Again, we will consume the latest API with the Axios library to get the total global count for all the countries in the world using the useState & useEffect React-hooks.
現在,讓我們按降序排列所有國家的數據表,以描述各種情況。 同樣,我們將使用Axios庫使用最新的 API,以使用useState&useEffect React-hooks獲取世界上所有國家的全球總數。
const [countryWiseData, setCountryWiseData] = useState<ICountry[]>([]);useEffect(() => {const getGlobalCountryData = async () => {//latest global country wise countconst result = await axios('https://covidapi.info/api/v1/global/latest');//console.log(result.data.result);let sortedResult = result.data.result;sortedResult.sort((a: Object, b: Object) => {return (Object.values(a)[0].confirmed > Object.values(b)[0].confirmed ? -1 : (Object.values(a)[0].confirmed < Object.values(b)[0].confirmed ? 1 : 0));});setCountryWiseData(sortedResult);};getGlobalCountryData();}, []);We have completed the development for our home tab with all 4 sections described above. You can see them below:
我們已經完成了上面介紹的所有4個部分的主頁標簽的開發。 您可以在下面看到它們:
Now, let’s jump on to develop our next tab — the Guidelines Tab.
現在,讓我們繼續開發下一個選項卡- Guideline s Tab 。
This is just an informative and static tab for various Advisories and Guidelines given by WHO and State Governments. We have added various images and videos here in the HTML:
這只是世衛組織和州政府提供的各種咨詢 和指南的信息性和靜態選項卡。 我們在HTML中添加了各種圖像和視頻:
<IonList><IonCard><iframe title="WHO" width="100%" height="200" src="https://www.youtube.com/embed/5jD2xd3Cv80"allow="accelerometer; autoplay; encrypted-media; gyroscope; picture-in-picture"></iframe></IonCard><IonCard><IonCardHeader>Symptoms</IonCardHeader><IonImg class="guidlineImages" src="assets/images/Symptoms2.png"></IonImg></IonCard><IonCard><IonCardHeader>Diseases</IonCardHeader><IonImg class="guidlineImages" src="assets/images/Symptoms.png"></IonImg></IonCard><IonCard><IonCardHeader>Myths Busted</IonCardHeader><IonImg class="guidlineImages" src="assets/images/Myth.jpeg"></IonImg></IonCard><IonCard><IonCardHeader>Stress Distraction Tips</IonCardHeader><IonImg class="guidlineImages" src="assets/images/Stress.jpg"></IonImg></IonCard><IonCard><IonCardHeader>Stay Home</IonCardHeader><IonImg class="guidlineImages" src="assets/images/SafeHands.jpeg"></IonImg></IonCard>
</IonList>Let me know in case you get stuck with any issues related to installation, compile-time or run-time errors.
如果您遇到任何與安裝,編譯時或運行時錯誤有關的問題,請告訴我。
This is it for Day 1.🧤
這是第一天。🧤
第2天-發展中國家和新聞標簽 (Day 2 - Developing Country and News tabs)
In this section we will develop Country and News tabs for our Ionic React hybrid app. So far, we have built World and Guideline tabs in our ionic react app with basic app routing.
在本部分中,我們將為Ionic React混合應用程序開發“ 國家和地區 ”選項卡。 到目前為止,我們已經使用基本的應用程序路由在離子React應用程序中構建了“ 世界”和“準則”選項卡。
國家標簽:設計 (Country Tab: Design)
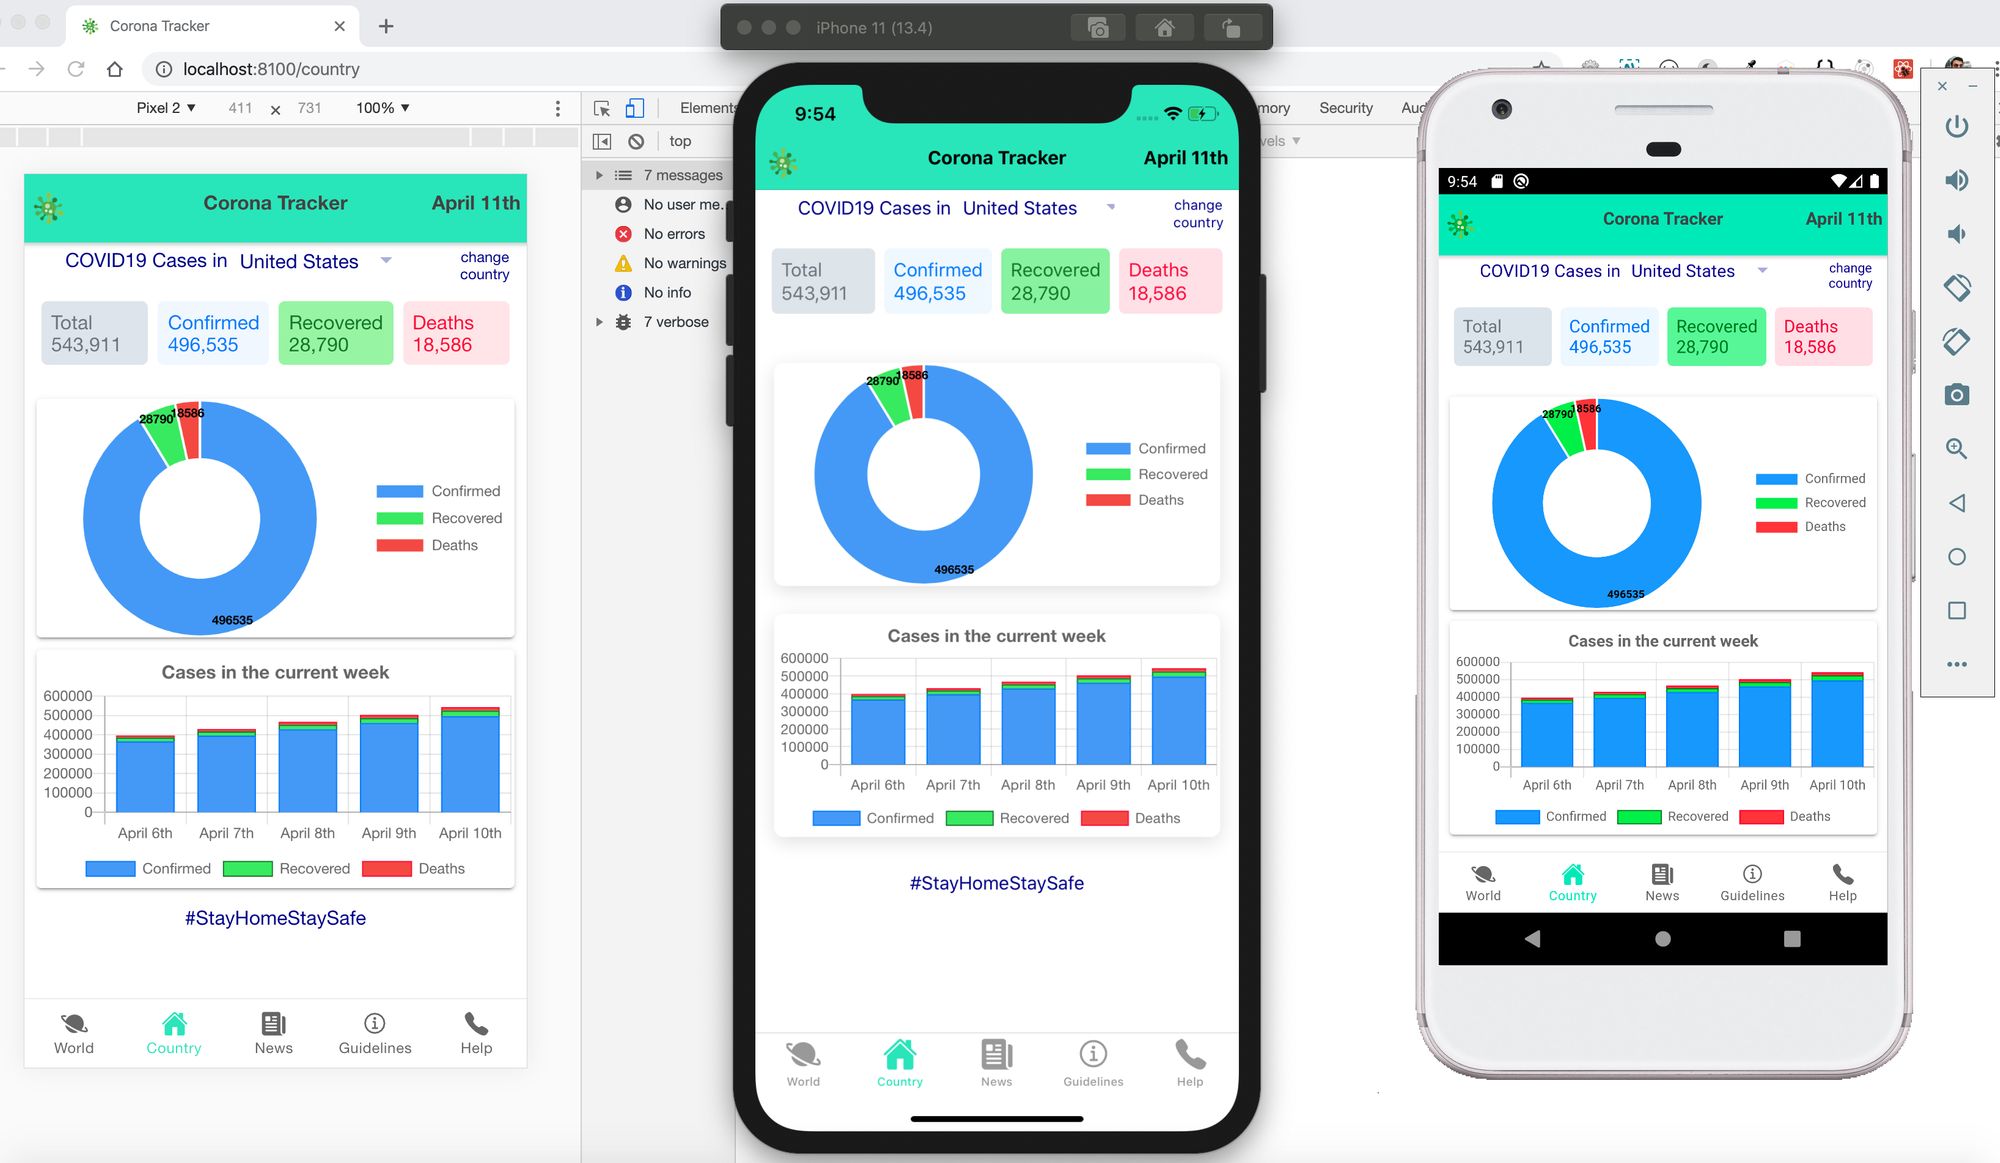
Let’s build our second page Country tab now. I decided to have 4 different sections on this second tab:
現在,我們來構建第二頁的“ 國家/地區”標簽。 我決定在第二個選項卡上有4個不同的部分:
- Country Dropdown to select the country of your choice 國家下拉菜單選擇您選擇的國家
- 4 different boxes to show actual numbers: Total, Active, Recovered and Deaths in the selected country 4個不同的框來顯示實際數字:所選國家/地區的總數,活躍,已恢復和死亡
- A Doughnut Chart depicting the number of cases in the selected country 甜甜圈圖,顯示所選國家/地區的病例數
- Weekly Trend for the cases in the selected country. 所選國家/地區案件的每周趨勢。
國家/地區標簽:數據和API (Country Tab: Data & API)
I have studied the open-source postman link which contains all Application Programming Interfaces (APIs) related to Corona Cases https://documenter.getpostman.com/view/2568274/SzS8rjbe?version=latest.
我研究了開源郵遞員鏈接,其中包含與Corona Cases相關的所有應用程序編程接口(API) https://documenter.getpostman.com/view/2568274/SzS8rjbe?version=latest 。
Here, we will consume the country API with the Axios library to get the total count in the selected country using the useState & useEffect React-hooks.
在這里,我們將使用Axios庫使用國家/地區 API,以使用useState&useEffect React-hooks獲取所選國家/地區的總數。
We will store the country the user has selected in local storage for other illustrations to update.
我們會將用戶選擇的國家/地區存儲在本地存儲中,以供其他插圖更新。
import moment from 'moment';
import axios from 'axios';
import { Doughnut, Bar } from 'react-chartjs-2';const [yourCountry, setYourCountry] = useState<string>('IND');Storage.set({ key: 'yourCountry', value: yourCountry });const [countryData, setcountryData] = useState<ICountryCount>();const [showLoading, setShowLoading] = useState(true);useEffect(() => {const getCountryData = async () => {let result: any = '';const { value } = await Storage.get({ key: 'yourCountry' });if (value) {result = await axios('https://covidapi.info/api/v1/country/' + value + '/latest');} else {result = await axios('https://covidapi.info/api/v1/country/' + yourCountry + '/latest');}// console.log(result);setcountryData(result.data.result);setShowLoading(false);};getCountryData();}, [yourCountry]);Now, consume the API to get the country-specific data:
現在,使用API??獲取特定國家/地區的數據:
const [countryTimeSeriesData, setcountryTimeSeriesData] = useState<ISeriesCases[]>([]);let endDate: string = new Date().toISOString().split('T')[0];let todaysDate = new Date();let startDate: string = new Date(todaysDate.getTime() - (5 * 24 * 60 * 60 * 1000)).toISOString().split('T')[0];useEffect(() => {const getCountryTimeSeriesData = async () => {const result = await axios('https://covidapi.info/api/v1/country/' + yourCountry + '/timeseries/' + startDate + '/' + endDate);// console.log(result);setcountryTimeSeriesData(result.data.result);setShowLoading(false);};getCountryTimeSeriesData();}, [yourCountry, endDate, startDate]);Now, design the Doughnut and Bar trend chart:
現在,設計“ Donut and Bar”趨勢圖:
<IonCard><Doughnutdata={CountryDoughnutChart}options={{legend: {display: true,position: 'right'},plugins: {datalabels: {anchor: 'bottom',clamp: 'true',align: 'end',color: 'black',labels: {title: {font: {weight: 'bold',size: 10}}}}}}} /></IonCard><Bardata={countryBarChart}options={{scales: {xAxes: [{stacked: true}],yAxes: [{stacked: true}]},title: {display: true,text: 'Cases in the current week',fontSize: 15},legend: {display: true,position: 'bottom'},plugins: {datalabels: { display: false }}}}/>Now save the file and check it out in the browser. So, finally, we should get the below design:
現在保存文件并在瀏覽器中簽出。 因此,最后,我們應該獲得以下設計:
Now, let’s keep going and develop our third tab — the News Tab.
現在,讓我們繼續開發第三個標簽- 新聞標簽。
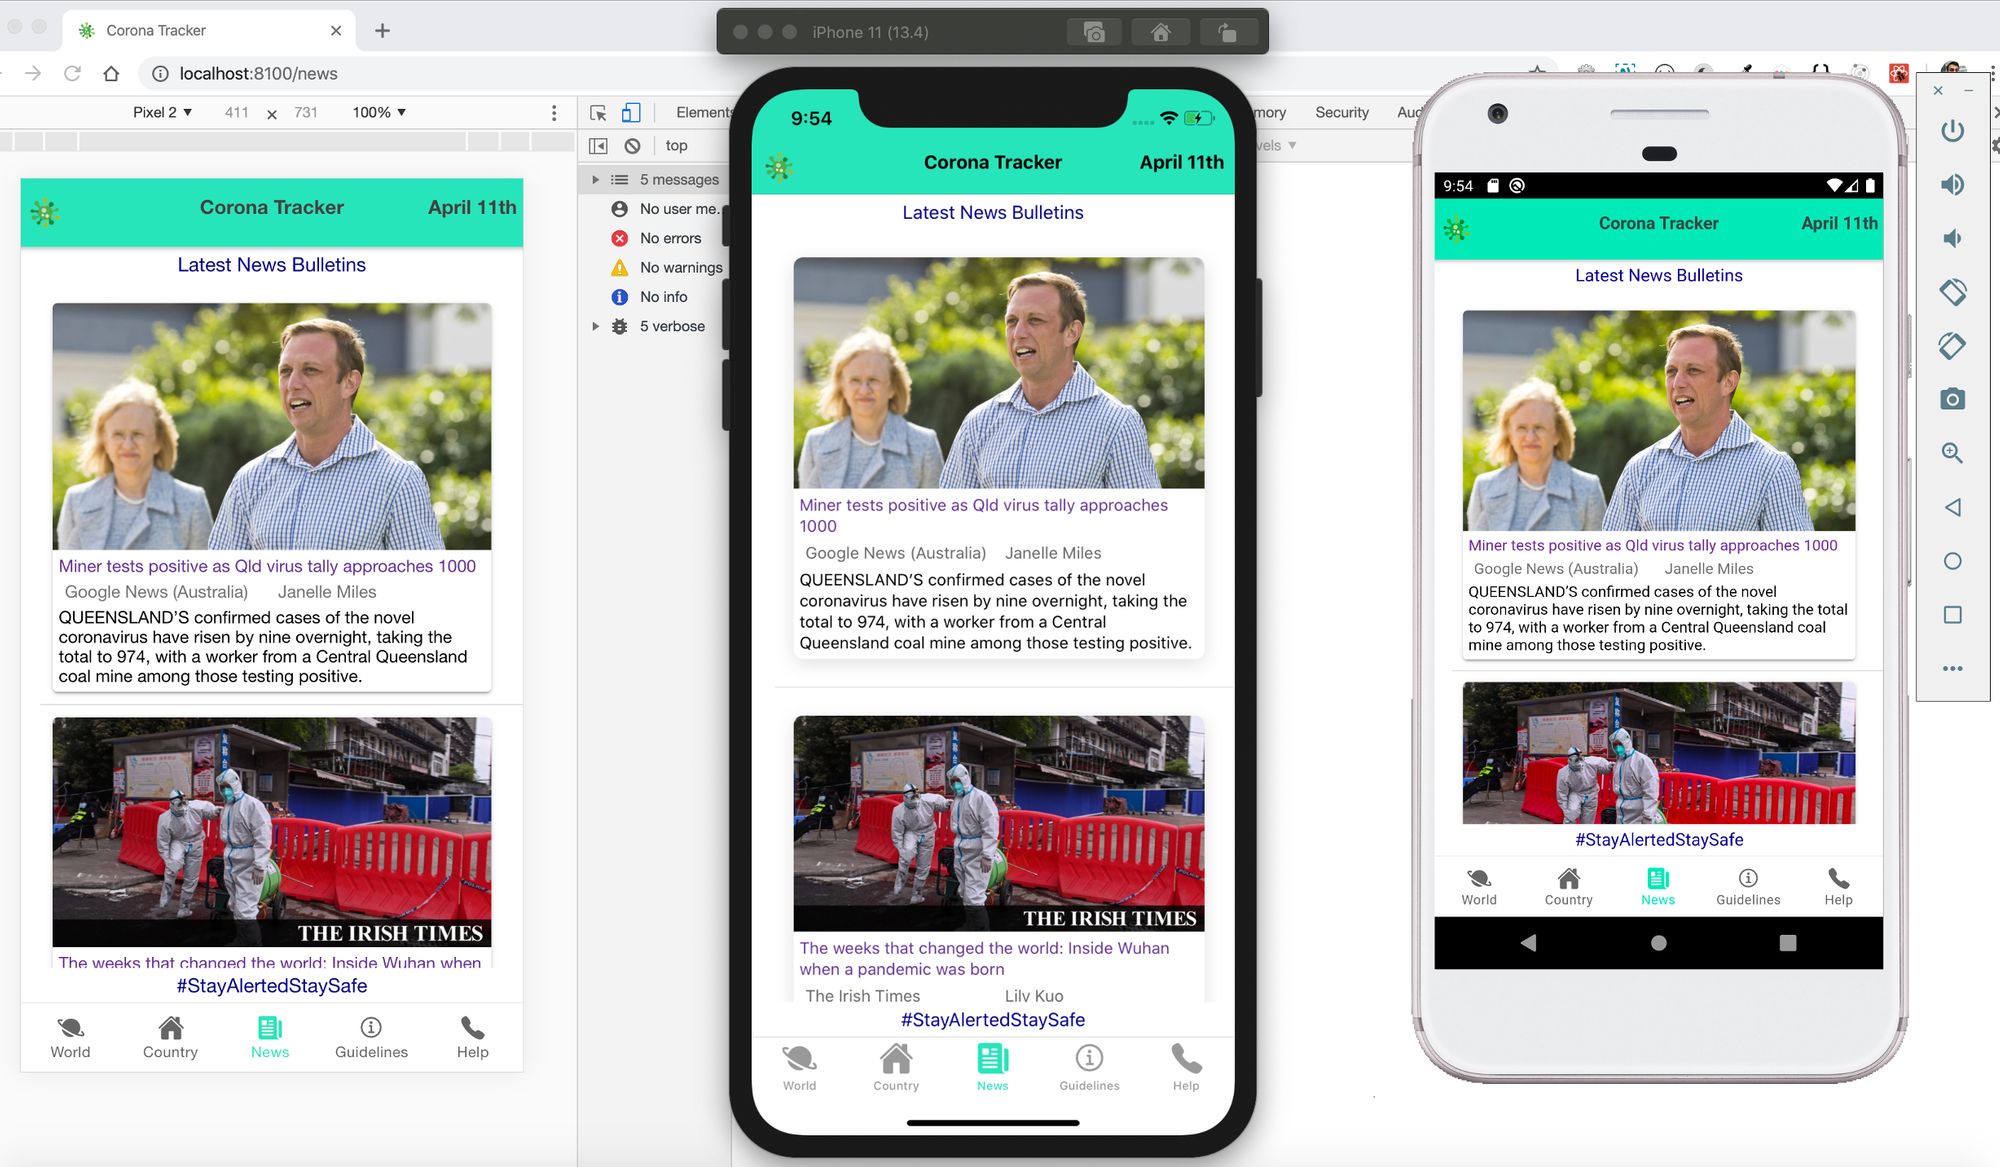
新聞標簽:設計 (News Tab: Design)
We have added a basic Ionic Card which contains various News resources such as URL, title, image, author and publisher’s details:
我們添加了基本的Ionic卡,其中包含各種新聞資源,例如URL,標題,圖像,作者和發布者的詳細信息:
<IonList>{data.map((news, idx) => (<IonItem key={idx}><IonCard><IonImg src={news?.urlToImage} class="newsImage" ></IonImg><IonGrid><IonRow class="newsTitle">{news?.title}</IonRow><IonRow class="newsSource"><IonCol>{news?.source?.name}</IonCol><IonCol>{trimSourceDetails(news?.author)}</IonCol>{/* <IonCol text-right>{moment(news?.publishedAt).format('DD MMM YYYY')}</IonCol> */}</IonRow><IonRow class="newsContent">{news?.description}</IonRow></IonGrid></IonCard></IonItem>))}
</IonList>新聞標簽:數據和API (News Tab: Data & API)
To get the news, I used Newsapi.org which is not an open-source 👻Application Programming Interface (API). But with a developer account, I searched news related to the Coronavirus. If you want to use other news APIs you can use them instead.
為了獲得新聞,我使用了Newsapi.org ,它不是開源的 👻ApplicationProgramming Interface(API)。 但是我用開發者帳戶搜索了與冠狀病毒有關的新聞。 如果要使用其他新聞API,則可以改用它們。
Here, we will consume the top-headlines API with the Axios library to get the total count in the selected country using the useState & useEffect React-hooks.
在這里,我們將使用Axios庫使用頭條新聞 API,以使用useState&useEffect React-hooks獲取所選國家/地區的總數。
const [data, setData] = useState<IArticles[]>([]);const [showLoading, setShowLoading] = useState(true);useEffect(() => {const getNewsData = async () => {const result = await axios('https://newsapi.org/v2/top-headlines?q=coronavirus&language=en&apiKey=YOUR_OWN_KEY');// console.log(result);setData(result.data.articles);setShowLoading(false);};getNewsData();}, []);Now, save the file and check in the browser. So, finally, we should get the below design:
現在,保存文件并在瀏覽器中簽入。 因此,最后,我們應該獲得以下設計:
Let me know in case you get stuck with any issues related to codes, compile-time or run-time errors.
如果您遇到任何與代碼,編譯時或運行時錯誤相關的問題,請告訴我。
This is it for Day 2.🧤
第二天就這樣了。🧤

第3天-開發幫助標簽和部署 (Day 3 - Developing the Help Tab and Deployment)
In this section - our last one - we will develop the Help tab and learn to use Capacitor to build Android and iOS apps.
在本節(也是最后一節)中,我們將開發“ 幫助”選項卡,并學習如何使用Capacitor構建 ndroid和iOS應用。
So far, we have built the World, Country, News, and Guideline tabs in our ionic react app. Also, will deploy our app to Firebase as a PWA. It is going to be most interesting now. Pull on your socks and be ready to actually see your own app in a real environment.
到目前為止,我們已經在離子React應用程序中構建了“ 世界”,“國家/地區”,“新聞 ” 和“準則”選項卡。 另外,還將我們的應用程序作為PWA部署到Firebase 。 現在將是最有趣的。 穿上襪子,準備好在真實環境中實際看到自己的應用程序。
幫助標簽:設計 (Help Tab: Design)
First, let’s create the Help and Feedback tab. This is just an informative and static tab for help from the World Health Organization (WHO) that gives feedback to the developer.
首先,讓我們創建“幫助和反饋”選項卡。 這只是世界衛生組織(WHO )的有用且靜態的選項卡,向開發人員提供反饋。
<IonCard><IonList><IonItem><IonLabel>Call WHO helpline Number</IonLabel><IonButton color='warning' href="tel:+41-22-7912111"><IonIcon slot="start" icon={callOutline} /> Call</IonButton></IonItem><IonItem><IonLabel>Email WHO Team</IonLabel><IonButton color='warning' href="mailto:mediainquiries@who.int"><IonIcon slot="start" icon={mailOutline} /> Email</IonButton></IonItem><IonItem><IonLabel>Text 'Hi' to WHO helpdesk</IonLabel><IonButton color='warning' href="https://api.whatsapp.com/send?phone=41798931892&text=hi&source=&data="><IonIcon slot="start" icon={logoWhatsapp} /> WhatsApp</IonButton></IonItem><IonItem><IonLabel>Donate via WHO website</IonLabel><IonButton color='warning' href="https://www.who.int/emergencies/diseases/novel-coronavirus-2019/donate"><IonIcon slot="start" icon={walletOutline} /> Donate</IonButton></IonItem></IonList></IonCard>環境安裝檢查 (Environment Installation Check)
As mentioned in our first (Day 0) section, we should have all the below Software installed in our system:
如第一部分(第0天)所述,我們應該在系統中安裝以下所有軟件:
- VS Code VS代碼
- Google Chrome 谷歌瀏覽器
- Android Studio for Android app 適用于Android應用的Android Studio
- Xcode for iOS app (Unfortunately only available in Apple computers) 適用于iOS應用程序的Xcode(不幸的是,僅適用于Apple計算機)
We need to set the required path, and install the targeted Android (such as Android 9 Pie) and iOS (such as iOS 11) operating system versions.
我們需要設置所需的路徑,并安裝目標Android(例如Android 9 Pie)和iOS(例如iOS 11)操作系統版本。
Wait, don’t worry if you are very new to this platform setup. Follow the next steps sequentially with all the provided important links in the coming sections.
請稍等,如果您不熟悉此平臺設置,請不要擔心。 按照后續步驟的順序執行后續步驟,并在接下來的部分中提供所有重要 鏈接 。
We have already installed Capacitor in our first terminal command while creating the ionic react app. (Check Day 0 for the installation section). Capacitor is the Native Bridge for Cross-Platform Web Apps. It invokes Native SDKs on iOS, Android, and the Web with one codebase.
在創建離子React應用程序時,我們已經在第一個終端命令中安裝了Capacitor 。 (檢查安裝部分的第0天)。 電容器是跨平臺Web應用程序的本機橋。 它使用一個代碼庫在iOS,Android和Web上調用Native SDK。
// Go to your project directory and run below commands to initialize Capacitor into your project and add the Android and iOS platforms to your app:
//轉到您的項目目錄并運行以下命令,以將Capacitor初始化到您的項目中,并將Android和iOS平臺添加到您的應用中:
npm install --save @capacitor/core @capacitor/cli npx cap init npx add android npx add ios
npm install --save @ capacitor / core @ capacitor / cli npx cap init npx添加android npx添加ios
應用程序圖標和啟動屏幕 (App icons and Splash screens)
For creating android and iOS icons and splash screens, I recommend using https://pgicons.abiro.com/. It will create varied sizes of icons and splashes for all the targeted mobile operating systems.
為了創建android和iOS圖標和啟動屏幕,我建議使用https://pgicons.abiro.com/ 。 它將為所有目標移動操作系統創建各種大小的圖標和啟動畫面。
After creating these, you can directly replace these icons with the default ionic icons and splashes in your targeted platforms folders.
創建這些圖標之后,您可以將這些圖標直接替換為默認的離子圖標,并在目標平臺文件夾中啟動。
漸進式Web應用程序(PWA) (Progressive Web App (PWA))
The two main requirements of a PWA are Service Workers and a Web Manifest. Once these files have been added, run ionic build and the build directory will be ready to deploy as a PWA to any hosting platform like Firebase.
PWA的兩個主要要求是服務人員和Web清單 。 添加這些文件后,運行ionic build ,即可將build目錄作為PWA部署到任何托管平臺(如Firebase)。
Follow the link 👉 https://ionicframework.com/docs/react/pwa for more details.
請訪問👉https : //ionicframework.com/docs/react/pwa以獲取更多詳細信息。
First, create the project in the Firebase Website. You can choose the free plan for now. Enable the hosting option from the left nav. Next, in a terminal, install the Firebase CLI:
首先,在Firebase網站上創建項目 。 您現在可以選擇免費計劃。 從左側導航欄中啟用托管選項。 接下來,在終端中,安裝Firebase CLI:
npm install -g firebase-tools
npm install -g firebase-tools
It will ask you some default name and folder options for firebase related files. Continue answering all the questions. Now, build your project again with the --prod flag as given below:
它將詢問您與Firebase相關的文件的一些默認名稱和文件夾選項。 繼續回答所有問題。 現在,使用--prod標志再次構建您的項目,如下所示:
ionic build --prod firebase deploy
ionic build --prod firebase部署
That’s it. 🎆 Go to the link provided by Firebase under the hosting section. It is very simple and straightforward to deploy your app on Firebase. Every time you push your code to your own GitHub repo, just follow those 2 commands to build and deploy the latest changes into your Firebase project.
而已。 to轉到Firebase在主機部分下提供的鏈接。 在Firebase上部署應用程序非常簡單明了。 每次將代碼推送到自己的GitHub存儲庫中時,只需遵循這兩個命令即可將最新更改構建并部署到Firebase項目中。
Android應用程式 (Android App)
Android Studio is the IDE for creating native Android apps. It includes the Android SDK, which will need to be configured for use in the command line.
Android Studio是用于創建本機Android應用程序的IDE。 它包含Android SDK ,需要對其進行配置以在命令行中使用。
Android Studio is also used to create Android virtual devices, which are required for the Android emulator. Ionic apps can also be launched to a device.
Android Studio還用于創建Android虛擬設備 ,這是Android仿真器所必需的。 離子應用程序也可以啟動到設備上 。
Use the link for complete setup and installation 👉https://ionicframework.com/docs/developing/android.
使用鏈接進行完整的設置和安裝👉https : //ionicframework.com/docs/developing/android。
// Run the below commands to sync native plugins and run the native apps: ionic cap copy ionic cap sync ionic capacitor run android ionic cap open android
//運行以下命令以同步本機插件并運行本機應用程序: ionic cap復制ionic cap同步ionic電容器運行android ionic cap打開android
Now, your app will be open in Android Studio where you can check the same folder, your project ID, and other default settings. Also, you can build icons and splash screens for your own app and replace the existing default ionic ones in the project.
現在,您的應用程序將在Android Studio中打開,您可以在其中檢查相同的文件夾,您的項目ID和其他默認設置。 另外,您可以為自己的應用程序構建圖標和啟動屏幕,并替換項目中現有的默認離子圖標。
Create an Emulator and run the app. You should see your Coronavirus-tracker app in the Android Emulator now. Go to the Build option in the top in Android Studio, and select the Build Bundle(s)/APK(s). For the first time, you need to create the signing key. Then, click next to build apk/bundle option.
創建一個模擬器并運行該應用程序。 您現在應該在Android模擬器中看到您的Coronavirus-tracker應用程序。 轉到Android Studio頂部的“ 構建”選項,然后選擇“ 構建包” /“ APK”。 第一次,您需要創建簽名密鑰。 然后,單擊下一步以構建apk /捆綁包選項。
Hurray! 🎉 You have your own Android app now in the build folder which is ready to deploy to Google Play Store (Developer accounts cost USD $25 with lifetime access) and Amazon App Store (free).
萬歲 ! 🎉您現在在build文件夾中擁有自己的Android應用程序,可以將其部署到Google Play商店 (開發者帳戶的終身使用費為25 美元 )和Amazon App Store (免費)。
iOS應用 (iOS App)
Xcode is the IDE for creating native iOS apps. It includes the iOS SDK and Xcode command-line tools. Xcode can be downloaded for free with an Apple account or it can be installed through the App Store.
Xcode是用于創建本機iOS應用程序的IDE。 它包括iOS SDK和Xcode命令行工具。 Xcode可以使用Apple帳戶免費下載,也可以通過App Store安裝。
Use the link for complete setup and installation 👉 https://ionicframework.com/docs/developing/ios.
使用該鏈接進行完整的設置和安裝👉https : //ionicframework.com/docs/developing/ios。
Unfortunately, iOS apps can only be built in Apple Computers with macOS operating systems.
不幸的是,iOS應用程序只能在具有macOS操作系統的Ap??ple計算機中構建。
// Run the below commands to sync native plugins and run the native apps: ionic cap copy ionic cap sync ionic capacitor run ios ionic cap open ios
//運行以下命令以同步本機插件并運行本機應用程序: ionic cap復制ionic cap同步ionic電容器運行ios ionic cap open ios
Now, your app will be open in Xcode where you can set your project ID and other default settings. Also, create icons and splash screens for your own app and replace the existing default ionic ones in the project.
現在,您的應用程序將在Xcode中打開,您可以在其中設置項目ID和其他默認設置。 另外,為您自己的應用程序創建圖標和啟動屏幕,并替換項目中現有的默認離子屏幕。
Create an Emulator and run the app. You should see your Coronavirus-tracker app in the iOS Emulator now. If you have an active Apple Developers Account which costs USD $99 annually, you can build your iOS app and deploy it to the App Store.
創建一個模擬器并運行該應用程序。 您現在應該在iOS模擬器中看到您的Coronavirus-tracker應用程序。 如果您有一個有效的Apple Developers帳戶(每年費用為99 美元) ,則可以構建iOS應用并將其部署到App Store 。
Due to policy issues of the epidemic, Google Play Store, Amazon App Store, and others are not accepting app packages related to the Coronavirus. So until and unless you have authenticity proofs from any Government, Hospitals, or any designated Health Institution, no stores are accepting these apps.
由于流行病的政策問題,Google Play商店,Amazon App Store和其他公司不接受與冠狀病毒有關的應用程序包。 因此,除非您有任何政府,醫院或任何指定的衛生機構提供的真實性證明,否則,沒有商店會接受這些應用程序。
However, the World Wide Web (WWW) is free to use. So we have deployed our app on the web only for now.
但是,萬維網( WWW )是免費使用的。 因此,我們目前僅在網絡上部署了我們的應用程序。
Finally, our Ionic React app is freely available on the internet for end users – ta-da!
最后,我們的Io??nic React應用程序可以在互聯網上免費提供給最終用戶– ta-da!
CoronaTracker (Use mobile devices for a smooth experience) https://coronatracker-20efc.web.app/world
CoronaTracker (使用移動設備獲得流暢的體驗) https://coronatracker-20efc.web.app/world
待處理的工作 (Pending Work)
Since writing this article, I have made this project open source on GitHub. You can contribute here by forking the below repo.
自撰寫本文以來,我已將該項目在GitHub上開源。 您可以在此處通過分叉以下存儲庫來做出貢獻。
- Desktop Responsiveness 💻 (Currently works well for Mobile and Tablets) 桌面響應度💻(當前適用于移動設備和平板電腦)
- Unit test cases. 單元測試用例。
- There is always formatting and indentation.😜 總是有格式和縮進。😜
For the complete code, jump into the GitHub repo. Don’t forget to star and fork in case you would like to add some more cool features to it. For the fork process, follow the steps given in README.MD file.
有關完整的代碼,請跳至GitHub存儲庫。 如果您想為其添加更多更酷的功能,請不要忘記加星標。 對于派生過程,請按照README.MD文件中給出的步驟進行操作。
I hope that you found this article useful and it was able to help you learn and build an awesome app today. If you really liked it, please do share it on all social media platforms.
希望本文對您有用,并且可以幫助您今天學習和構建出色的應用程序。 如果您真的喜歡它,請在所有社交媒體平臺上共享它。
Let’s be connected on LinkedIn (@kapilraghuwanshi) and Twitter (@techygeeeky) for more such tech stories.🤝
讓我們在LinkedIn( @kapilraghuwansh i)和Twitter( @techygeeek y)上建立聯系,了解更多此類技術故事。
翻譯自: https://www.freecodecamp.org/news/how-to-create-corona-tracker-app-in-3-days/
_封裝思想——this關鍵字)


通過示例進行解釋)


...)


