鴿子為什么喜歡盤旋
鴿子回避系統 (Pigeon Avoidance System)
Disclaimer: You are reading Part 2 that describes the technical setup. Part 1 gave an overview of the Pigeon Avoidance System and Part 3 provides details about the Pigeon Recognition Model.
免責聲明:您正在閱讀描述技術設置的第2部分。 第1部分 概述了鴿子避免系統, 第3部分 提供了有關鴿子識別模型的詳細信息。
Now that we are already familiar with the problem, let’s set up Raspberry Pi to collect images. In this part, I will be talking about the technical setup of the Pigeon Avoidance System. This article consists of three subparts:
現在我們已經熟悉了這個問題,讓我們設置Raspberry Pi來收集圖像。 在這一部分中,我將討論避免鴿子系統的技術設置。 本文包括三個子部分:
- Hardware setup 硬件設定
- Orchestration software 編排軟件
- Production installation 生產安裝
The general approach of how to set up a Raspberry Pi for the data collection could be adapted for your own Deep Learning project. All the code from this part is located on GitHub and can be reused.
如何為數據收集設置Raspberry Pi的一般方法可以適合您自己的深度學習項目。 這部分的所有代碼都位于GitHub上 ,可以重復使用。
Before I start, I would like to give credit to my friend and colleague Daniel, who helped me to set up the Raspberry and was my tech support when something suddenly didn't work in production.
在開始之前,我要感謝我的朋友和同事丹尼爾(Daniel) ,他幫助我建立了Raspberry,在生產突然失效的情況下,我還是我的技術支持。
硬件設定 (Hardware setup)
Recall the diagram from Part 1:
回顧第1部分中的圖:
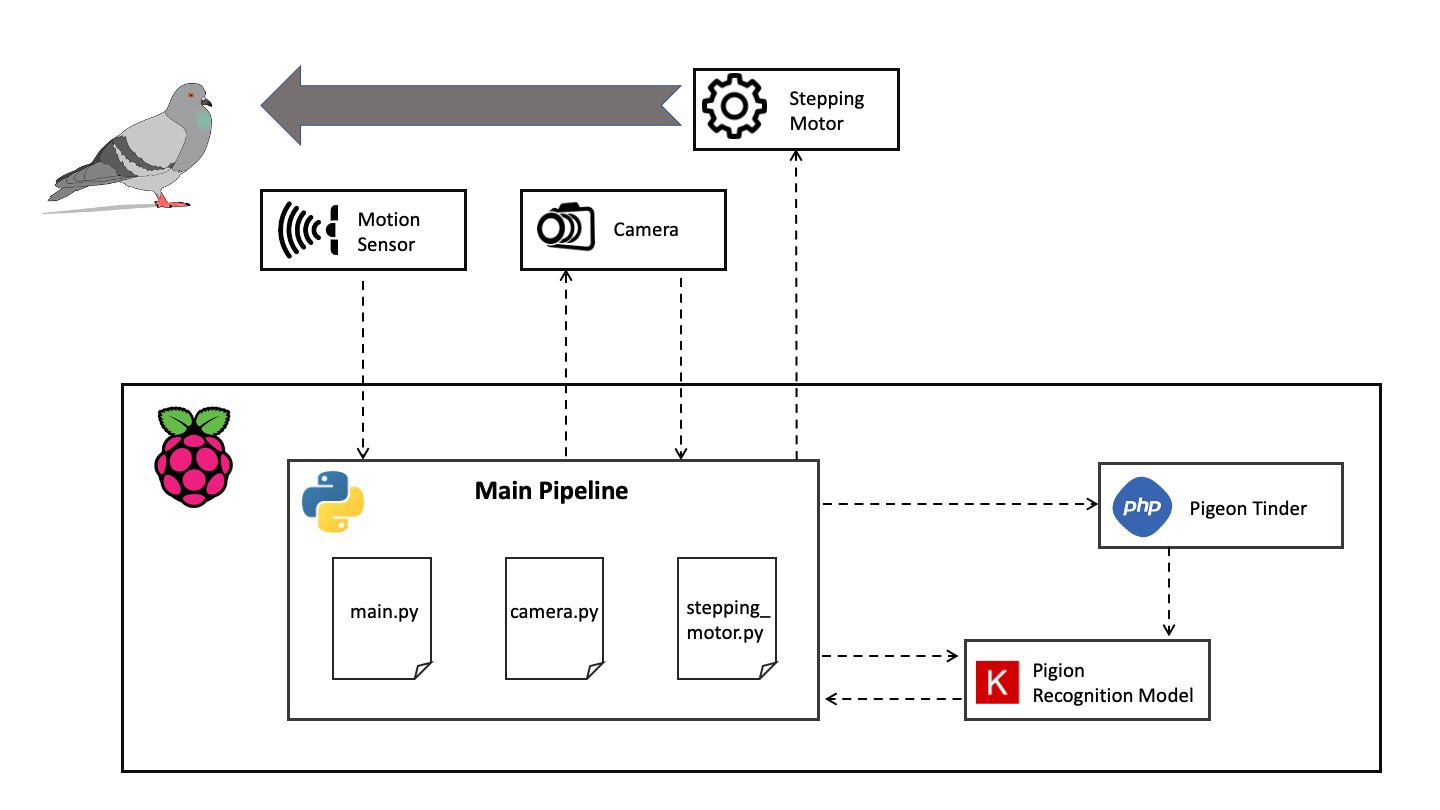
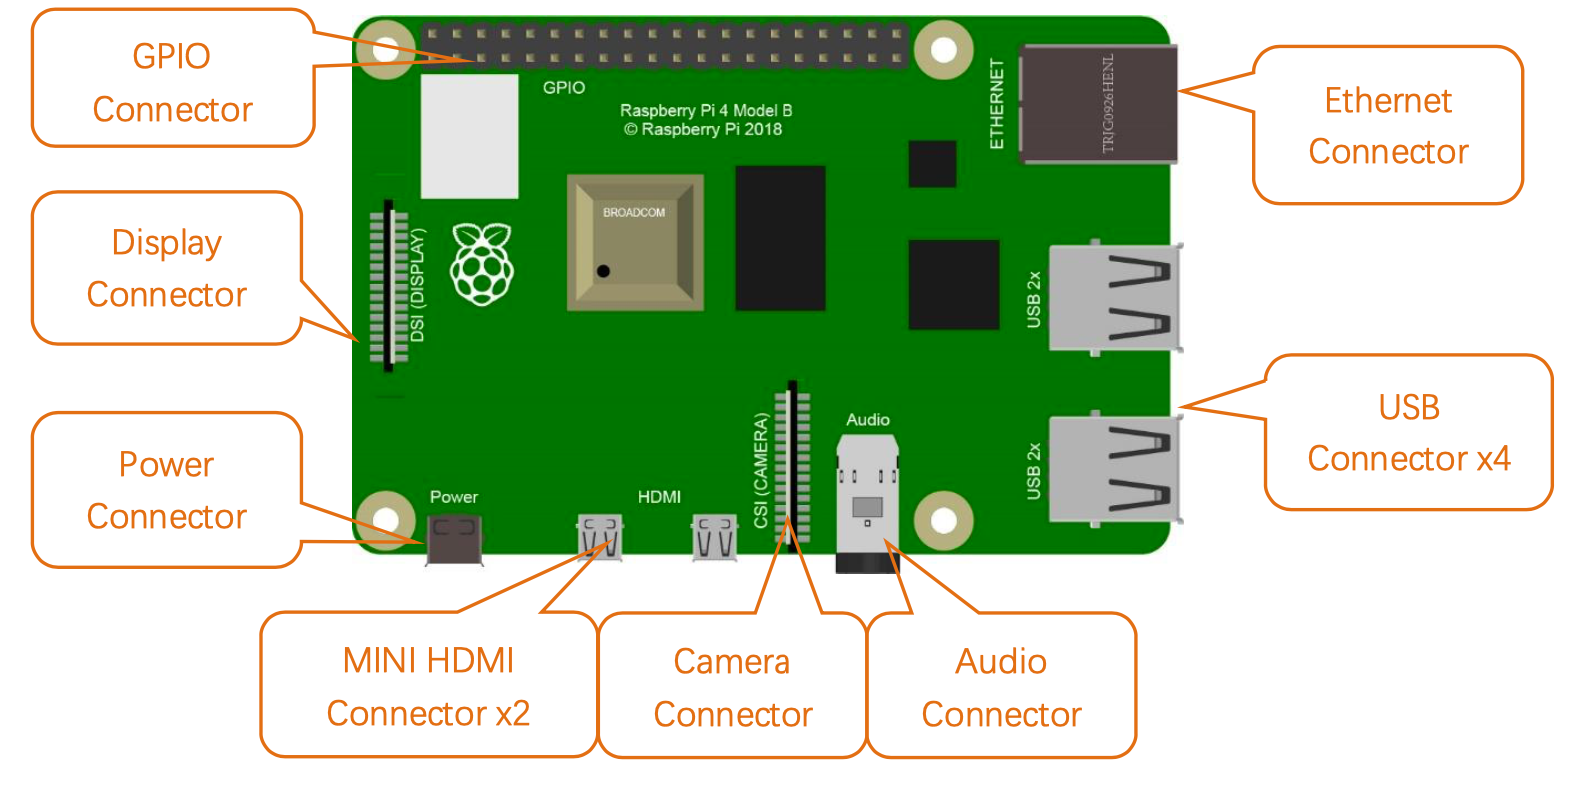
Hardware-wise the Pigeon Avoidance System includes a Raspberry Pi and three external components: motion sensor, camera, and stepping motor. All is orchestrated through the Main Pipeline. Main Pipeline is the most crucial piece of software that we need to write. Even before we have the Pigeon Recognition Model trained, we need to have it in place to collect the data. However, we first need to connect the external components to the Raspberry Pi. For that, we will need to use GPIO (general purpose input/output) pins, which can be accessed through a Python program. The pins are enumerated as it is shown on the picture:
在硬件方面,Pigeon躲避系統包括Raspberry Pi和三個外部組件:運動傳感器,攝像頭和步進電機。 所有內容均通過主管道進行編排。 Main Pipeline是我們需要編寫的最關鍵的軟件。 甚至在我們訓練鴿子識別模型之前,我們都需要準備好它來收集數據。 但是,我們首先需要將外部組件連接到Raspberry Pi。 為此,我們將需要使用GPIO(通用輸入/輸出)引腳,可以通過Python程序進行訪問。 引腳被枚舉,如圖所示:
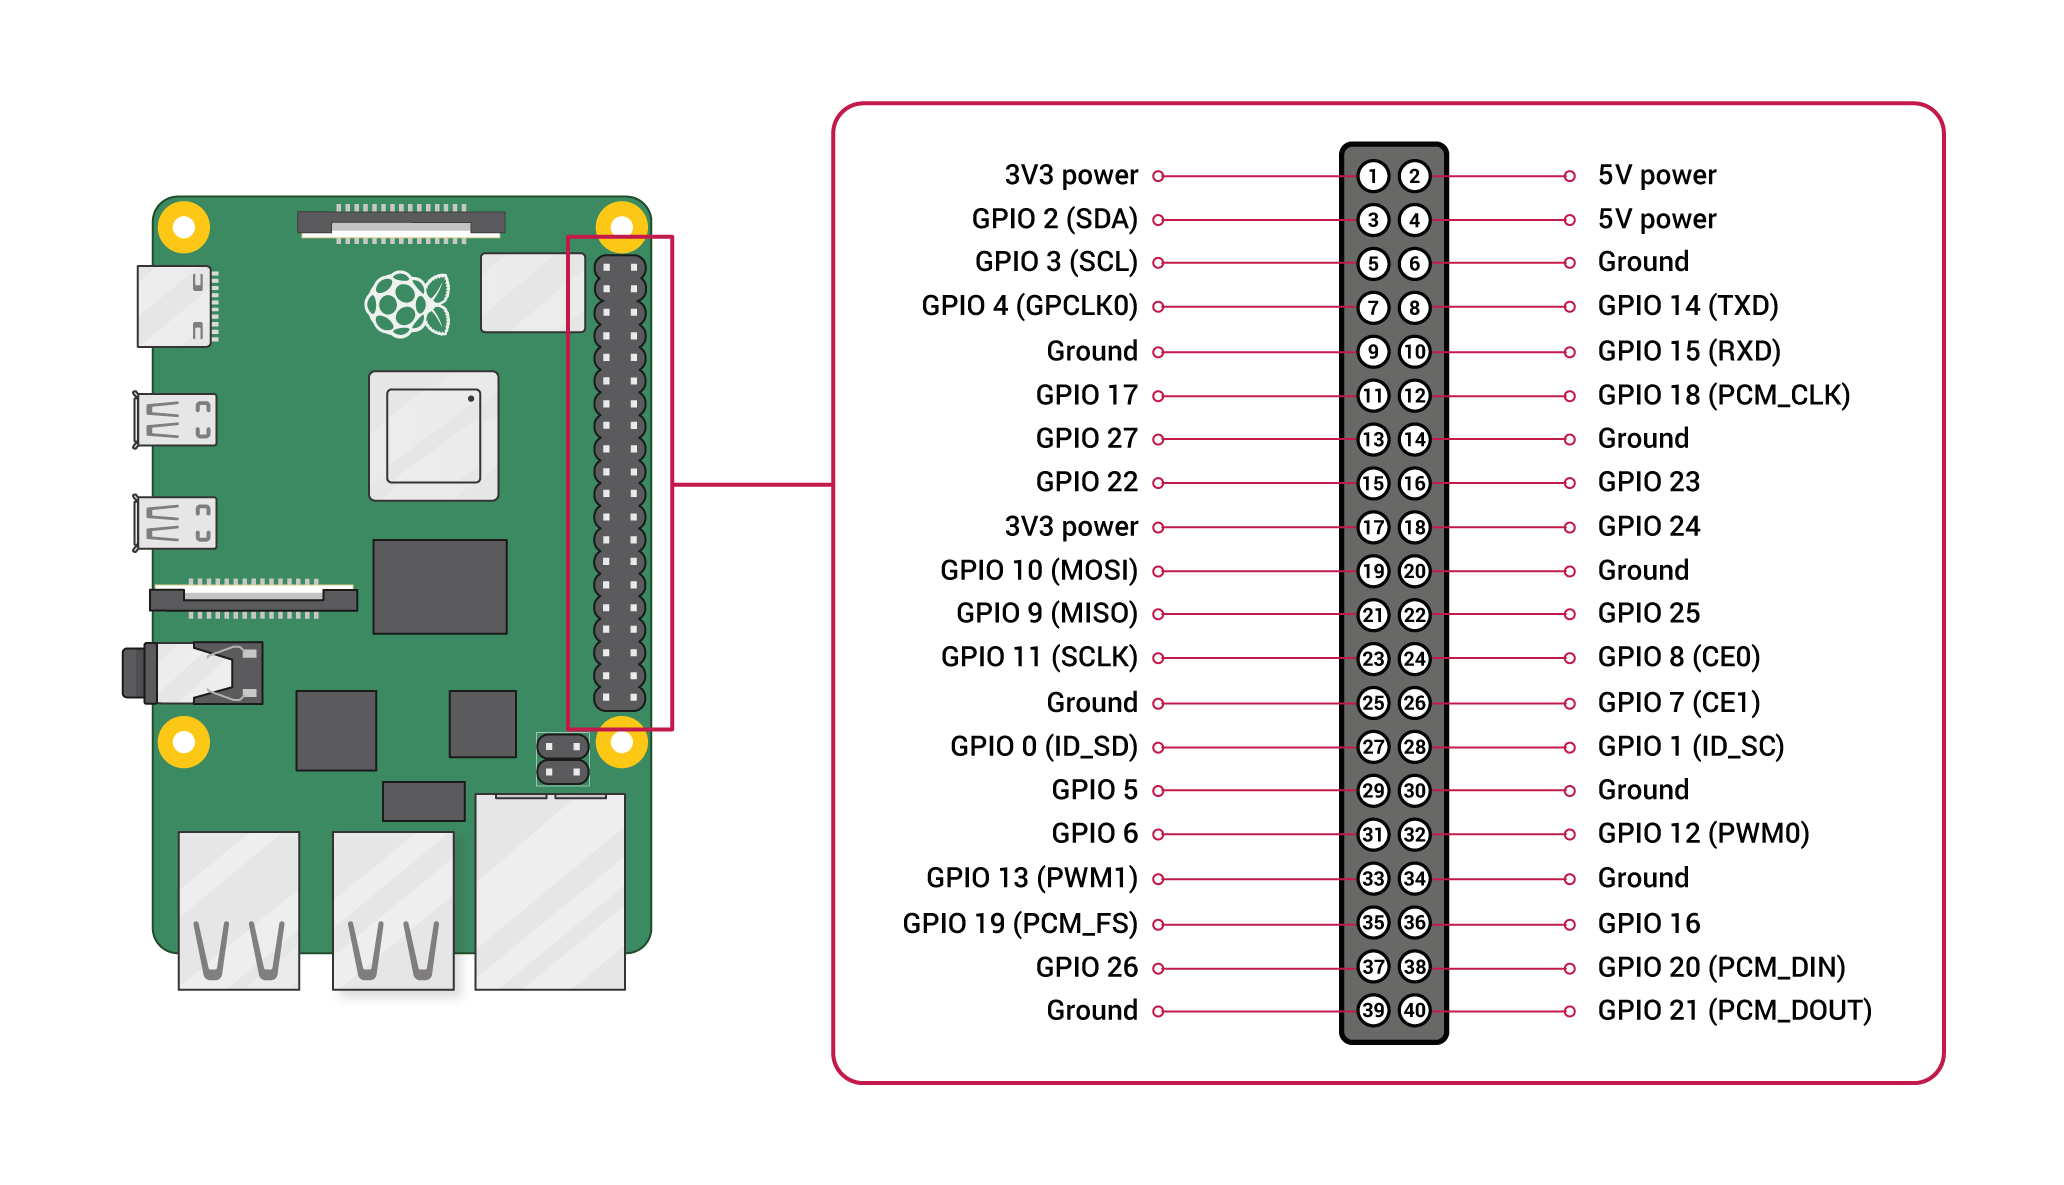
Any of the GPIO pins can be designated as an input or output pin and used for a wide range of purposes. There are also two 5V pins, two 3.3V pins, and several 0V ground pins that we will use to connect external Raspberry components.
任何GPIO引腳都可以指定為輸入或輸出引腳,并可以用于多種用途。 還有兩個5V引腳,兩個3.3V引腳和幾個0V接地引腳,我們將使用它們來連接外部Raspberry組件。
連接運動傳感器 (Connecting motion sensor)
The first component that should be connected is a motion sensor. I used an infrared motion sensor HC SR-501 that can detect the infrared reflected by humans or animals. The diagram of the sensor is shown below.
應該連接的第一個組件是運動傳感器。 我使用了紅外運動傳感器HC SR-501 ,它可以檢測人或動物反射的紅外光。 傳感器的示意圖如下所示。
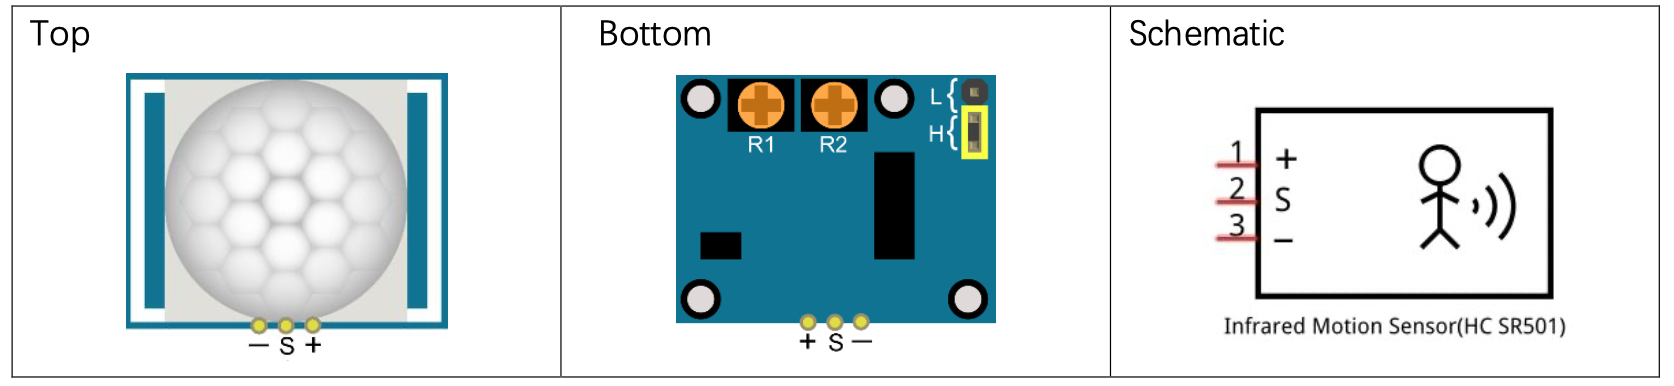
When a pigeon enters the active area of the sensor, it outputs a 3.3V signal to the GPIO pin it is connected to. The sensitive range of the motion detector is between two to seven meters and it can be calibrated by rotating the potentiometer R2. Potentiometer R1 calibrates the time delay between the high level outputs. There is also a jumper cap (yellow rectangle) that acts as a switch between two trigger modes:
當鴿子進入傳感器的活動區域時,它會向連接的GPIO引腳輸出3.3V信號。 運動探測器的敏感范圍在2到7米之間,可以通過旋轉電位計R2對其進行校準。 電位器R1校準高電平輸出之間的時間延遲。 還有一個跳線帽(黃色矩形),用作兩個觸發模式之間的切換:
L: non-repeatable trigger mode. The sensor will output a high level after sensing the pigeon first time. It will continue to output the high level for the delay which is configured by R1. During this time, the sensor can not sense the pigeon. When the delay time is over, the sensor will output a low level.
L:不可重復的觸發模式。 第一次檢測鴿子后,傳感器將輸出高電平。 對于由R1配置的延遲,它將繼續輸出高電平。 在這段時間內,傳感器無法感應到鴿子。 延遲時間結束后,傳感器將輸出低電平。
H: repeatable trigger mode. The sensor can detect the pigeon until it leaves the balcony. During that period, it is outputting at a high level. After the pigeon leaves, the sensor times a delay, also configured by R1, and then outputs a low level.
H:可重復觸發模式。 傳感器可以檢測到鴿子離開陽臺。 在此期間,它以高電平輸出。 鴿子離開后,傳感器會對同樣由R1配置的延遲進行計時,然后輸出低電平。
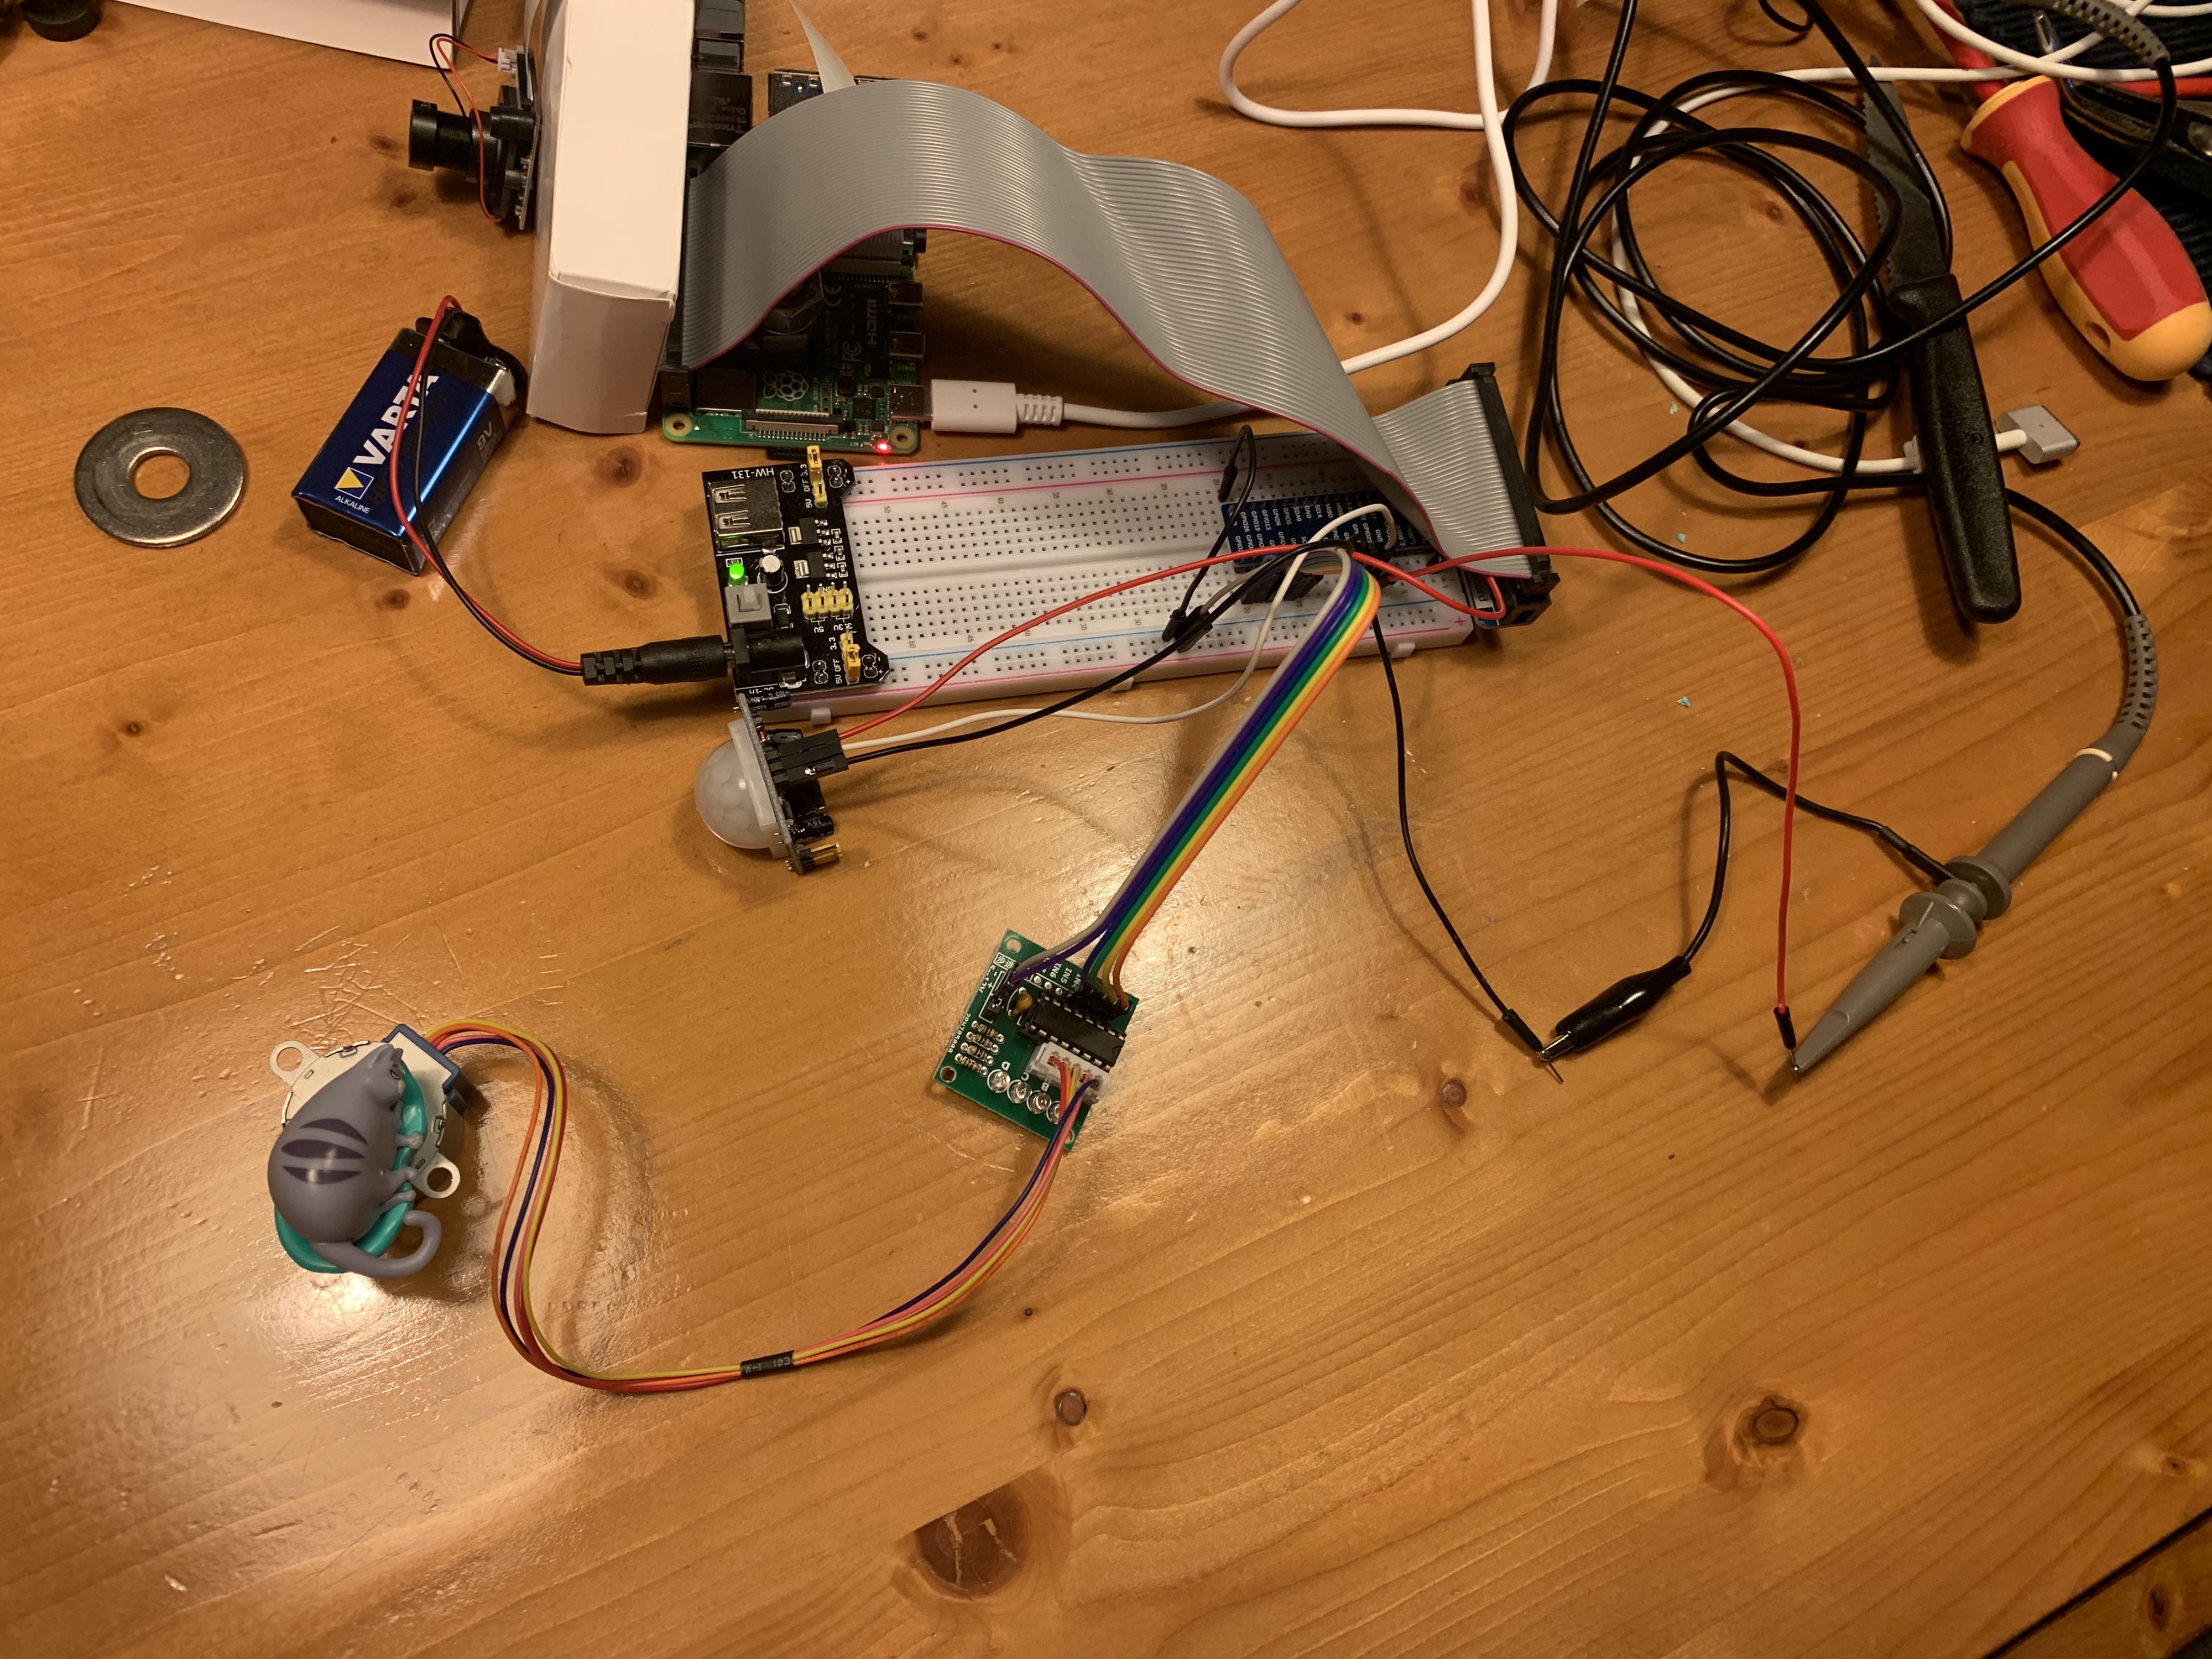
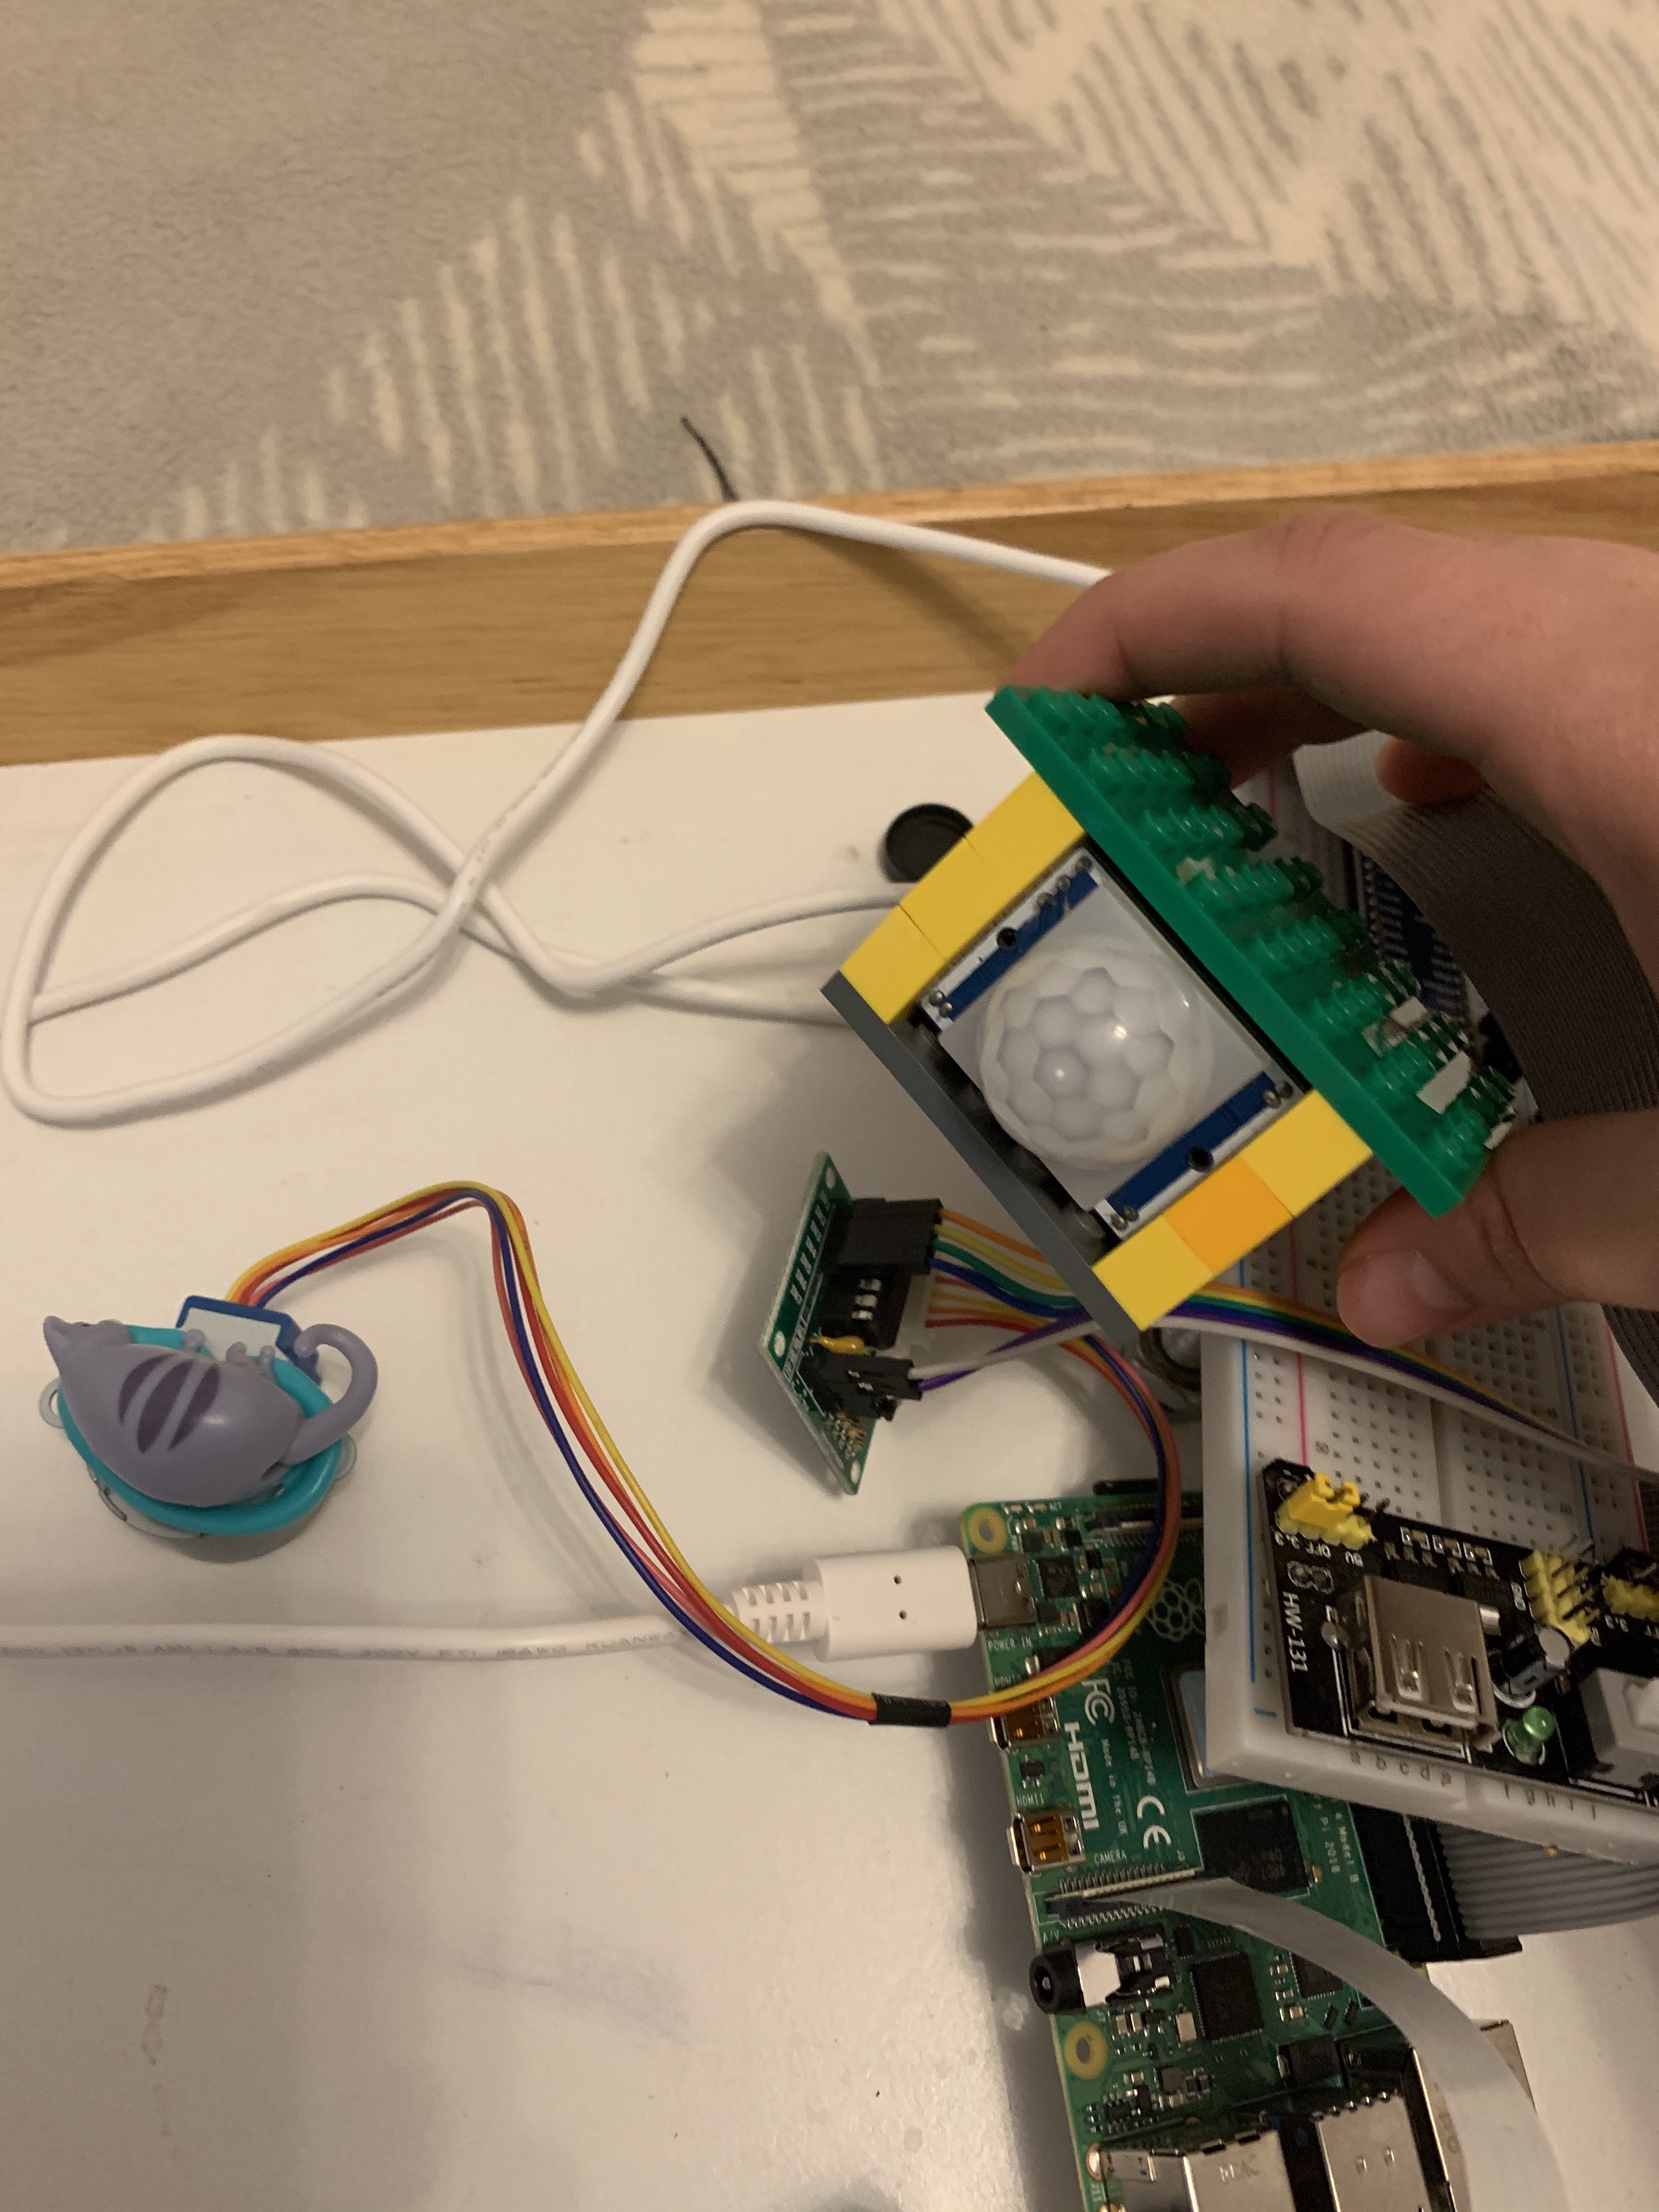
I am setting up the sensor into repeatable trigger mode, as I want to annoy the pigeons until they finally leave the balcony. Image 4 (red circle) shows how to connect the motion sensor to the Raspberry. While testing the setup I am using a Raspberry Pi extension board. In a production system, I put the jumpers directly to the Raspberry pins.
我將傳感器設置為可重復的觸發模式,因為我想讓鴿子煩惱,直到它們最終離開陽臺。 圖4(紅色圓圈)顯示了如何將運動傳感器連接到Raspberry。 在測試設置時,我正在使用Raspberry Pi擴展板。 在生產系統中,我將跳線直接放置到Raspberry引腳上。

連接步進電機 (Connecting the stepping motor)
The stepping motor will rotate a shooing device that scares pigeons away. I use a stepping motor in my setup as it can be rotated by a specific angle and for a defined time interval.
步進馬達將旋轉使鴿子嚇跑的擊球裝置。 我在設置中使用了步進電機,因為它可以旋轉特定的角度并保持一定的時間間隔。
The stepping motor has a 5-way socket that connects to the stepping motor driver. The stepping motor driver is used to convert the weak input signal that comes from the Raspberry into a robust control signal to drive the stepping motor.
步進電動機具有一個5通插座,該插座連接到步進電動機驅動器。 步進電機驅動器用于將來自Raspberry的微弱輸入信號轉換為強大的控制信號,以驅動步進電機。
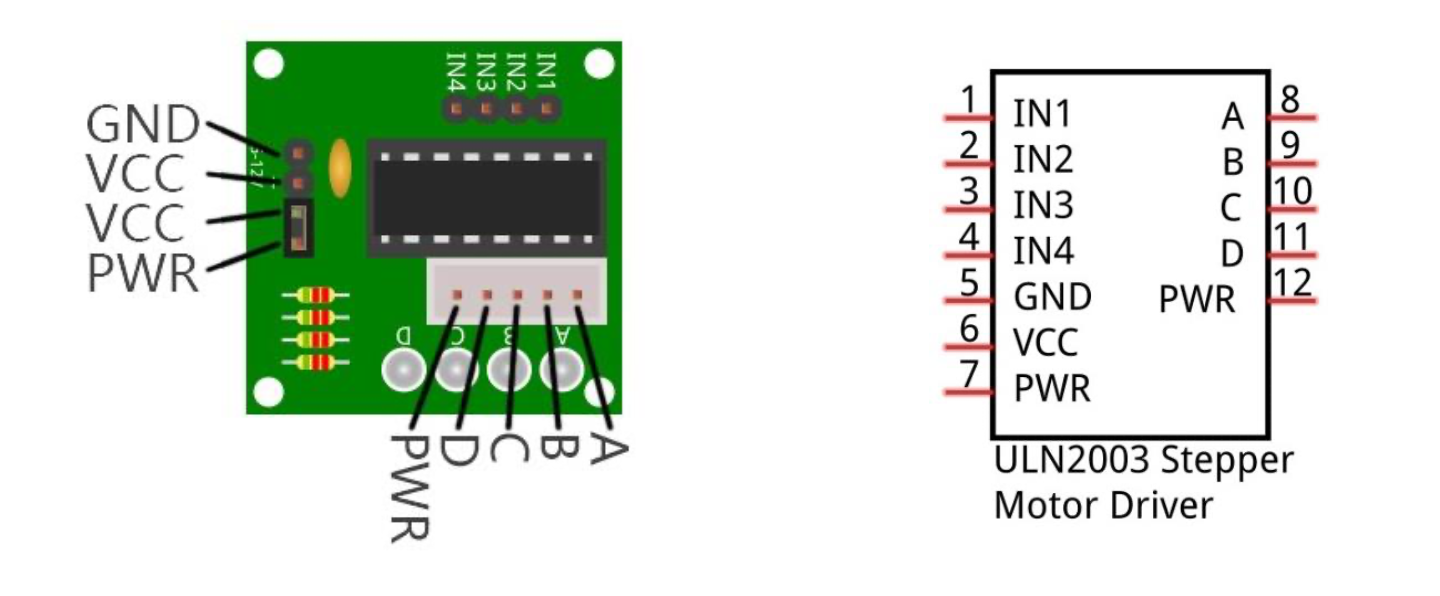
The input signals to the stepping motor driver IN1-IN4 correspond to the output signals A-D that control the position of the stepping motor. The position control can be done programmatically. The stepping motor requires an external 5V power source that should share a common ground with the Raspberry Pi. Image 4 shows how to connect the stepping motor with the Raspberry Pi (green circles).
到步進電動機驅動器IN1-IN4的輸入信號對應于控制步進電動機的位置的輸出信號AD。 位置控制可以通過編程完成。 步進電機需要一個外部5V電源,該電源應與Raspberry Pi共享一個公共地。 圖4顯示了如何將步進電機與Raspberry Pi(綠色圓圈)連接。
連接相機 (Connecting camera)
Connecting the camera is the easiest part. The camera port is located near the HDMI connectors. We just need to attach the ribbon cable of the camera firmly, and we are good to go.
連接相機是最簡單的部分。 相機端口位于HDMI接口附近。 我們只需要牢固地連接相機的帶狀電纜即可,我們一切順利。
When all the external components are connected, it will look like the mess on the picture:
連接所有外部組件后,看起來就像圖片上的混亂:
Now when all the components attached to the Raspberry Pi, we can write the python code that will manipulate it.
現在,當所有組件都連接到Raspberry Pi時,我們可以編寫將對其進行操作的python代碼。
編排軟件 (Orchestration software)
We need to write python code that will trigger the Main Pipeline whenever motion is detected. Raspberry Pi has preinstalled the python package RPi.GPIO that provides a class to control the GPIOs. The first thing that we need to do is to set up a GPIO numbering, which defines the schema to address GPIO pins on the Raspberry Pi. Then we set up a pin on which we connected the motion sensor as the input port.
我們需要編寫python代碼,該代碼將在檢測到運動時觸發主管道。 Raspberry Pi已預安裝python軟件包RPi.GPIO,該軟件包提供了用于控制GPIO的類。 我們需要做的第一件事是設置GPIO編號,該編號定義用于尋址Raspberry Pi上GPIO引腳的架構。 然后設置一個引腳,將運動傳感器連接到該引腳上作為輸入端口。
import RPi.GPIO as GPIO
import config
# set up BCM GPIO numbering
GPIO.setmode(GPIO.BCM)
# pin of a motion sensor
pin_motion = config.pin_motion # is an integer like "23"
# setup GPIO ports as an input
GPIO.setup(pin_motion, GPIO.IN, pull_up_down=GPIO.PUD_DOWN)
After that, we write an event detection method. When a rising edge is detected on the pin_motion, the add_event_detect() will call main_pipeline regardless of whatever else is happening in the program.
之后,我們編寫一個事件檢測方法。 當在pin_motion上檢測到上升沿時,無論程序中發生了什么,add_event_detect()都會調用main_pipeline。
def motion():GPIO.add_event_detect(pin_motion, GPIO.RISING, callback=main_pipeline)returnWe need to run the motion detection method in the endless while loop. This way, the program will always be executed unless Keyboard Interrupt ends it.
我們需要在無盡的while循環中運行運動檢測方法。 這樣,除非鍵盤中斷結束該程序,否則它將始終執行。
try:while True:motion()time.sleep(0.01)
except KeyboardInterrupt:GPIO.cleanup()
Now to the Main Pipeline. The Main Pipeline will call the camera and take the picture. After that, it will try to identify which objects we have on the image: pigeon, human, or nothing. Based on that, it will move the motor, sleep for 180 seconds, or do nothing.
現在到主管道。 主管道將呼叫攝像機并拍照。 之后,它將嘗試識別圖像上有哪些物體:鴿子,人類或一無所有。 基于此,它將使電動機運動,睡眠180秒或什么也不做。
def main_pipeline(port):
logger("INFO: motion detected")
img = take_pic()predicted_class = inference.predict(img, model)
if predicted_class == 2:logger("INFO: pigeon detected")rotate_motor(rotation_time)if predicted_class == 0:logger("INFO: human detected")time.sleep(180)if predicted_class == 1:logger("INFO: no one detected")
inference.save_image(img, predicted_class)pap_flag = 0
return
We take a picture with a take_pic() method that needs to be specified. First, we configure the camera module:
我們使用需要指定的take_pic()方法拍照。 首先,我們配置相機模塊:
import config
from picamera import PiCamera
from datetime import datetime
# initialise camera
camera = PiCamera()
# my camera is flipped, therefore I need to rotate the images
camera.rotation = 180
# get path to store images from the configuration file
image_path = config.image_path
As you might have noticed, I imported config, which is a configuration file in which I specify the GPIO pins for external components, image paths, and the paths to the training data for the image classification model.
您可能已經注意到,我導入了config,這是一個配置文件,在其中我為外部組件,圖像路徑和圖像分類模型的訓練數據的路徑指定了GPIO引腳。
def take_pic():now = datetime.now()current_time = now.strftime("%m-%d-%Y-%H-%M-%S")camera.start_preview()img_path = image_path + "img-" + current_time + ".jpg"camera.capture(img_path)camera.stop_preview()return img_pathtake_pic() takes pictures when a motion was detected and stores it in the img_path specified in the config. If we are still in the data collection stage, the images should be manually labeled with Pigeon Tinder, and the conditional expressions in the Main Pipeline should be commented out until we collected enough images and trained the model.
take_pic()在檢測到運動時拍攝照片并將其存儲在配置中指定的img_path中。 如果我們仍處于數據收集階段,則應使用Pigeon Tinder手動標記圖像,并應注釋掉Main Pipeline中的條件表達式,直到我們收集到足夠的圖像并訓練了模型為止。
If a pigeon was identified on the image, we need to shoo it by rotating the motor. The motor rotation is implemented in the rotate_motor method.
如果在圖像上識別出鴿子,我們需要通過旋轉馬達來射擊。 電動機旋轉通過rotate_motor方法實現。
Once again, we specify the pins to which the motor is attached. The stepping motor has four pins that are responsible for the rotation angle.
再次,我們指定電動機所連接的引腳。 步進電機有四個銷釘,它們負責旋轉角度。
# pins of the stepping motor
motor_ports = config.motor_ports # list of pins [12,16,20,21]
# setup GPIO ports as an output
for port in motor_ports:GPIO.setup(port, GPIO.OUT)
The motor rotates at a certain angle (ex. from A to B).
電機旋轉一定角度(例如,從A到B)。
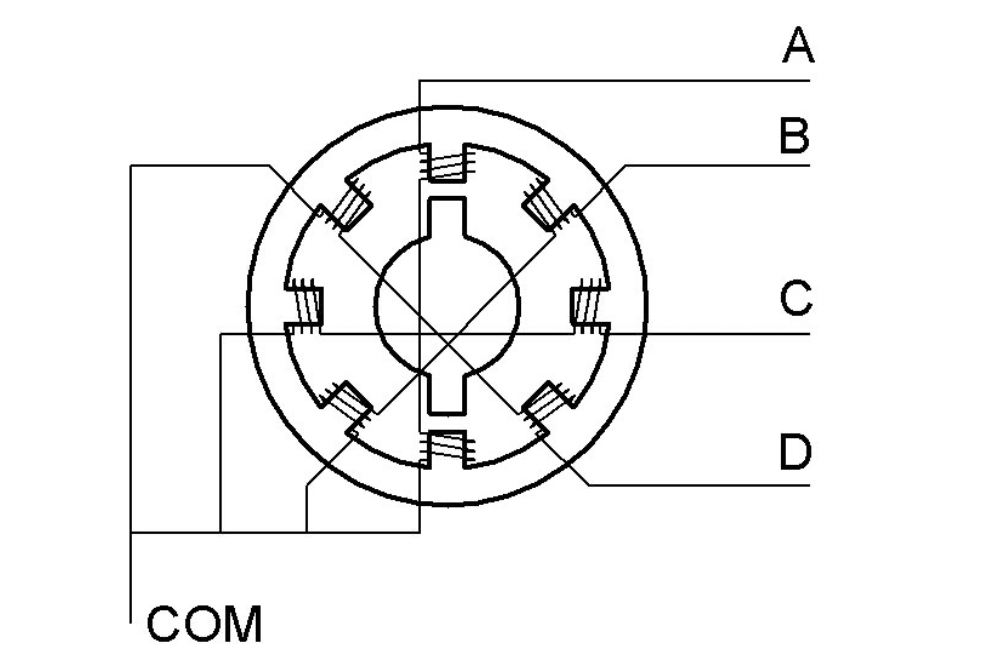
The pins specified in the code above:[12,16,20,21] correspond to the position of the stepping motor: [A, B, C, D]. For clockwise rotation, we need to iterate over that list in a forward sequence: A→B→C→D→A, etc. Each transition from one state to another (e.g., from A to B) is called a step. By controlling the number of rotation steps, we can control the rotation angle. By controlling the time between two steps, we can control the rotation speed.
上面代碼中指定的引腳:[12,16,20,21]對應于步進電機的位置:[A,B,C,D]。 對于順時針旋轉,我們需要按正向順序遍歷該列表:A→B→C→D→A等。從一個狀態到另一種狀態(例如,從A到B)的每個轉換都稱為一個步驟。 通過控制旋轉步數,我們可以控制旋轉角度。 通過控制兩個步驟之間的時間,我們可以控制轉速。
First, let’s implement a method that would stop the motor:
首先,讓我們實現一種使電動機停止的方法:
def stop_motor():global motor_ports
for port in motor_ports:GPIO.output(port, 0)return
We iterate over the motor_ports and set the output level to low. Now we can implement a rotation function that has the same logic: stepwise iteration over the motor_ports and setting up output to high. The rotate_motor() method is slightly more complicated than what we wrote so far.
我們遍歷motor_ports并將輸出電平設置為低。 現在,我們可以實現一個具有相同邏輯的旋轉函數:在motor_ports上進行逐步迭代并將輸出設置為high。 rotation_motor()方法比我們到目前為止編寫的要復雜一些。
def rotate_motor(rotation_time):"""Rotates the stepping motor:param: rotation_time - interval when motor is rotating in sec. type: int:return:"""global motor_ports# drive_sequence = [[0],[0,1],[1],[1,2],[2],[2,3],[3],[3,0]] #indices of motor portsstop_motor()# define clockwise rotation sequencedrive_sequence = [[0], [1], [2], [3]]current_position = 1drive_delay_ms = 20# define rotation angle# the lower the number, the bigger the angledrive_delay_arc_speed = 0.6start_time = datetime.now()delta_time = 0try:while delta_time < rotation_time:active_motor_indices = drive_sequence[current_position - 1]for port in range(len(motor_ports)):if port in active_motor_indices:GPIO.output(motor_ports[port], 1)else:GPIO.output(motor_ports[port], 0)if drive_delay_ms > 0:current_position += 1else:current_position -= 1if current_position > len(drive_sequence):current_position = 1if current_position == 0:current_position = len(drive_sequence)# drive delay automation partcurr_time = datetime.now()delta_time = (curr_time - start_time).total_seconds()# we want to drive the motor nicely and smoothly to impress the pigeonsdrive_speed = sin(delta_time * drive_delay_arc_speed)drive_delay_ms = 2.0 # 50 is very slow and 2 is the fastestif drive_speed < 0:drive_delay_ms = drive_delay_ms * -1time.sleep(abs(float(drive_delay_ms)) / 1000.0)stop_motor()except KeyboardInterrupt:GPIO.cleanup()returnAfter the Main Pipeline is ready, we can test our setup:
準備好主管道后,我們可以測試設置:
演示地址
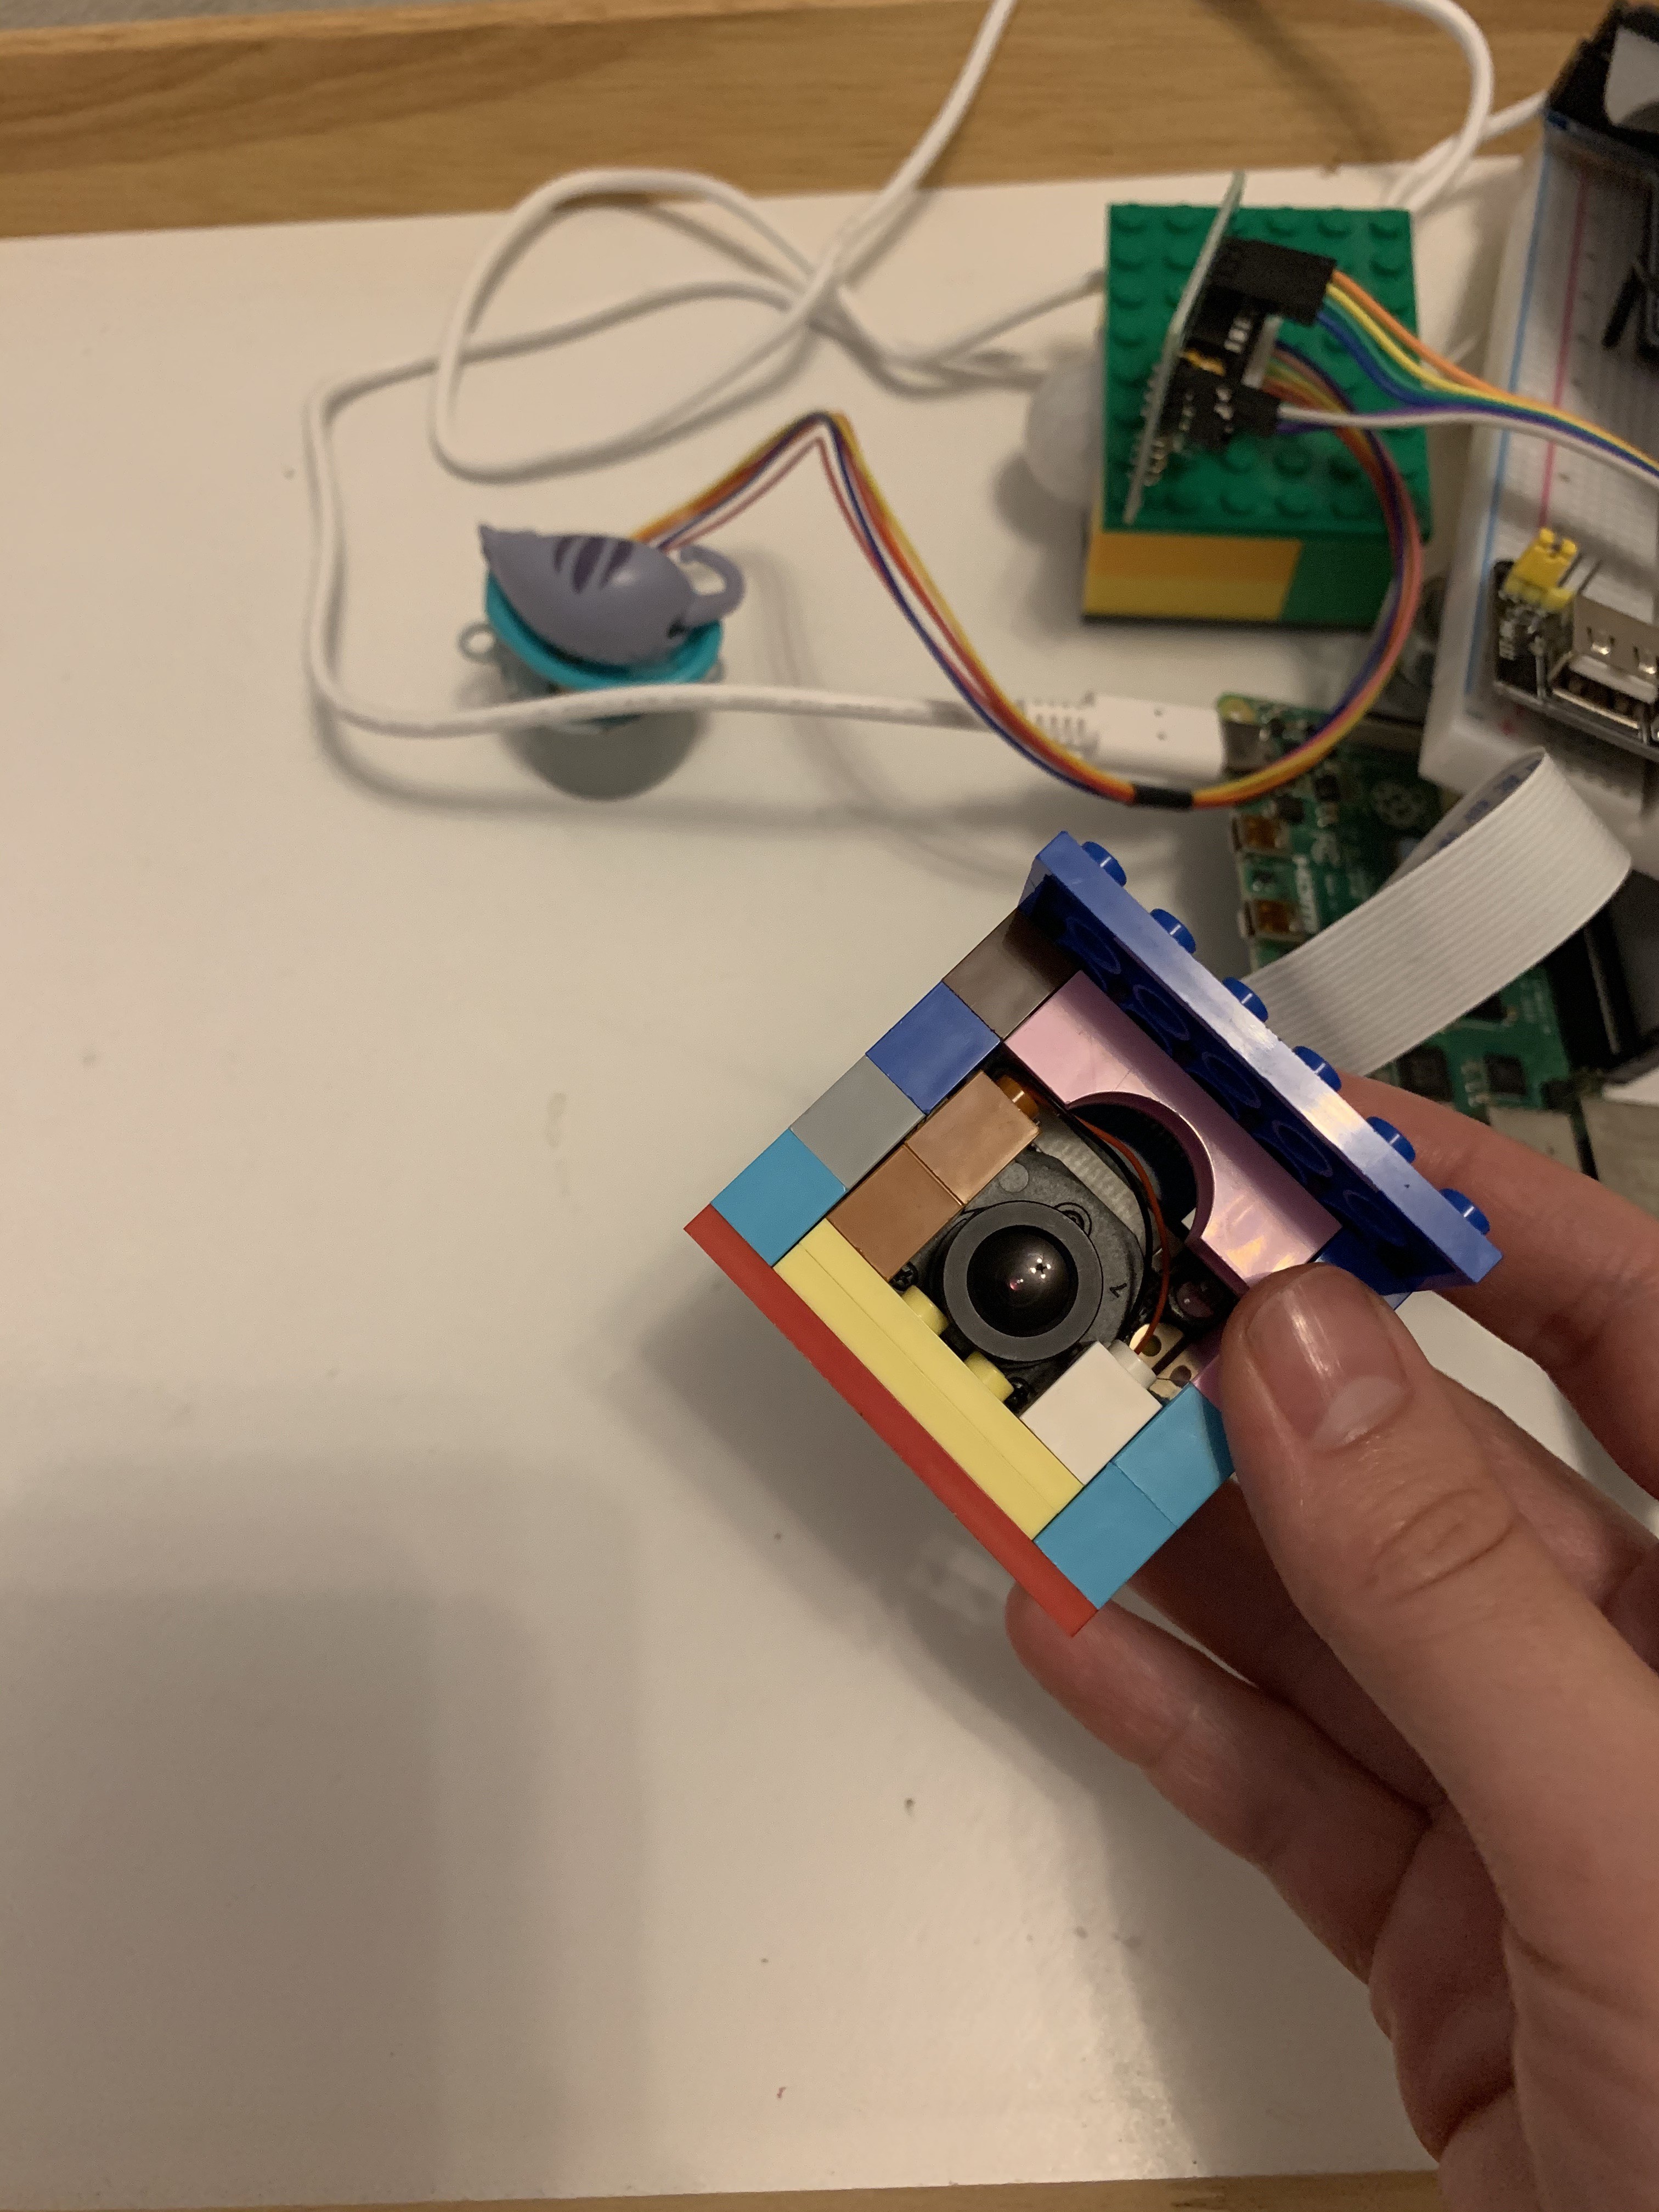
Note that in this setup, I do not have the model been trained yet. Therefore, the motor runs every time the sensor detects a movement. Also, the plastic cat is not the final solution that is aimed to scare away pigeons. It is here just to indicate that the motor runs.
請注意,在此設置中,我尚未訓練模型。 因此,每當傳感器檢測到運動時,電動機就會運行。 而且,塑料貓不是旨在嚇跑鴿子的最終解決方案。 此處僅用于指示電動機正在運行。
生產安裝 (Production installation)
Now it’s time to install the Raspberry Pi in the production environment, which is my balcony. To protect the hardware from rain and pigeon attacks, I need waterproof plastic boxes. I ordered beautiful junction boxes on AliExpress. However, I know from my past experiences with shopping shoes and handbags that the delivery might take up to four weeks, and I wanted to start data collection ASAP. Therefore, I used LEGO to build houses for the camera and motion sensor. For the Raspberry itself, I used a Tupperware box, which I, as a good housewife, of course, have in my kitchen.
現在是時候在生產環境中安裝Raspberry Pi了,這就是我的陽臺。 為了保護硬件免受雨淋和鴿子侵襲,我需要防水的塑料盒。 我在速賣通上訂購了漂亮的接線盒。 但是,根據我過去在購物鞋和手袋方面的經驗,我知道交貨可能需要長達四個星期的時間,因此我想盡快開始收集數據。 因此,我使用樂高積木為攝像機和運動傳感器建造房屋。 對于覆盆子本身,我使用了特百惠盒子,作為一個好家庭主婦,我當然把它放在廚房里。
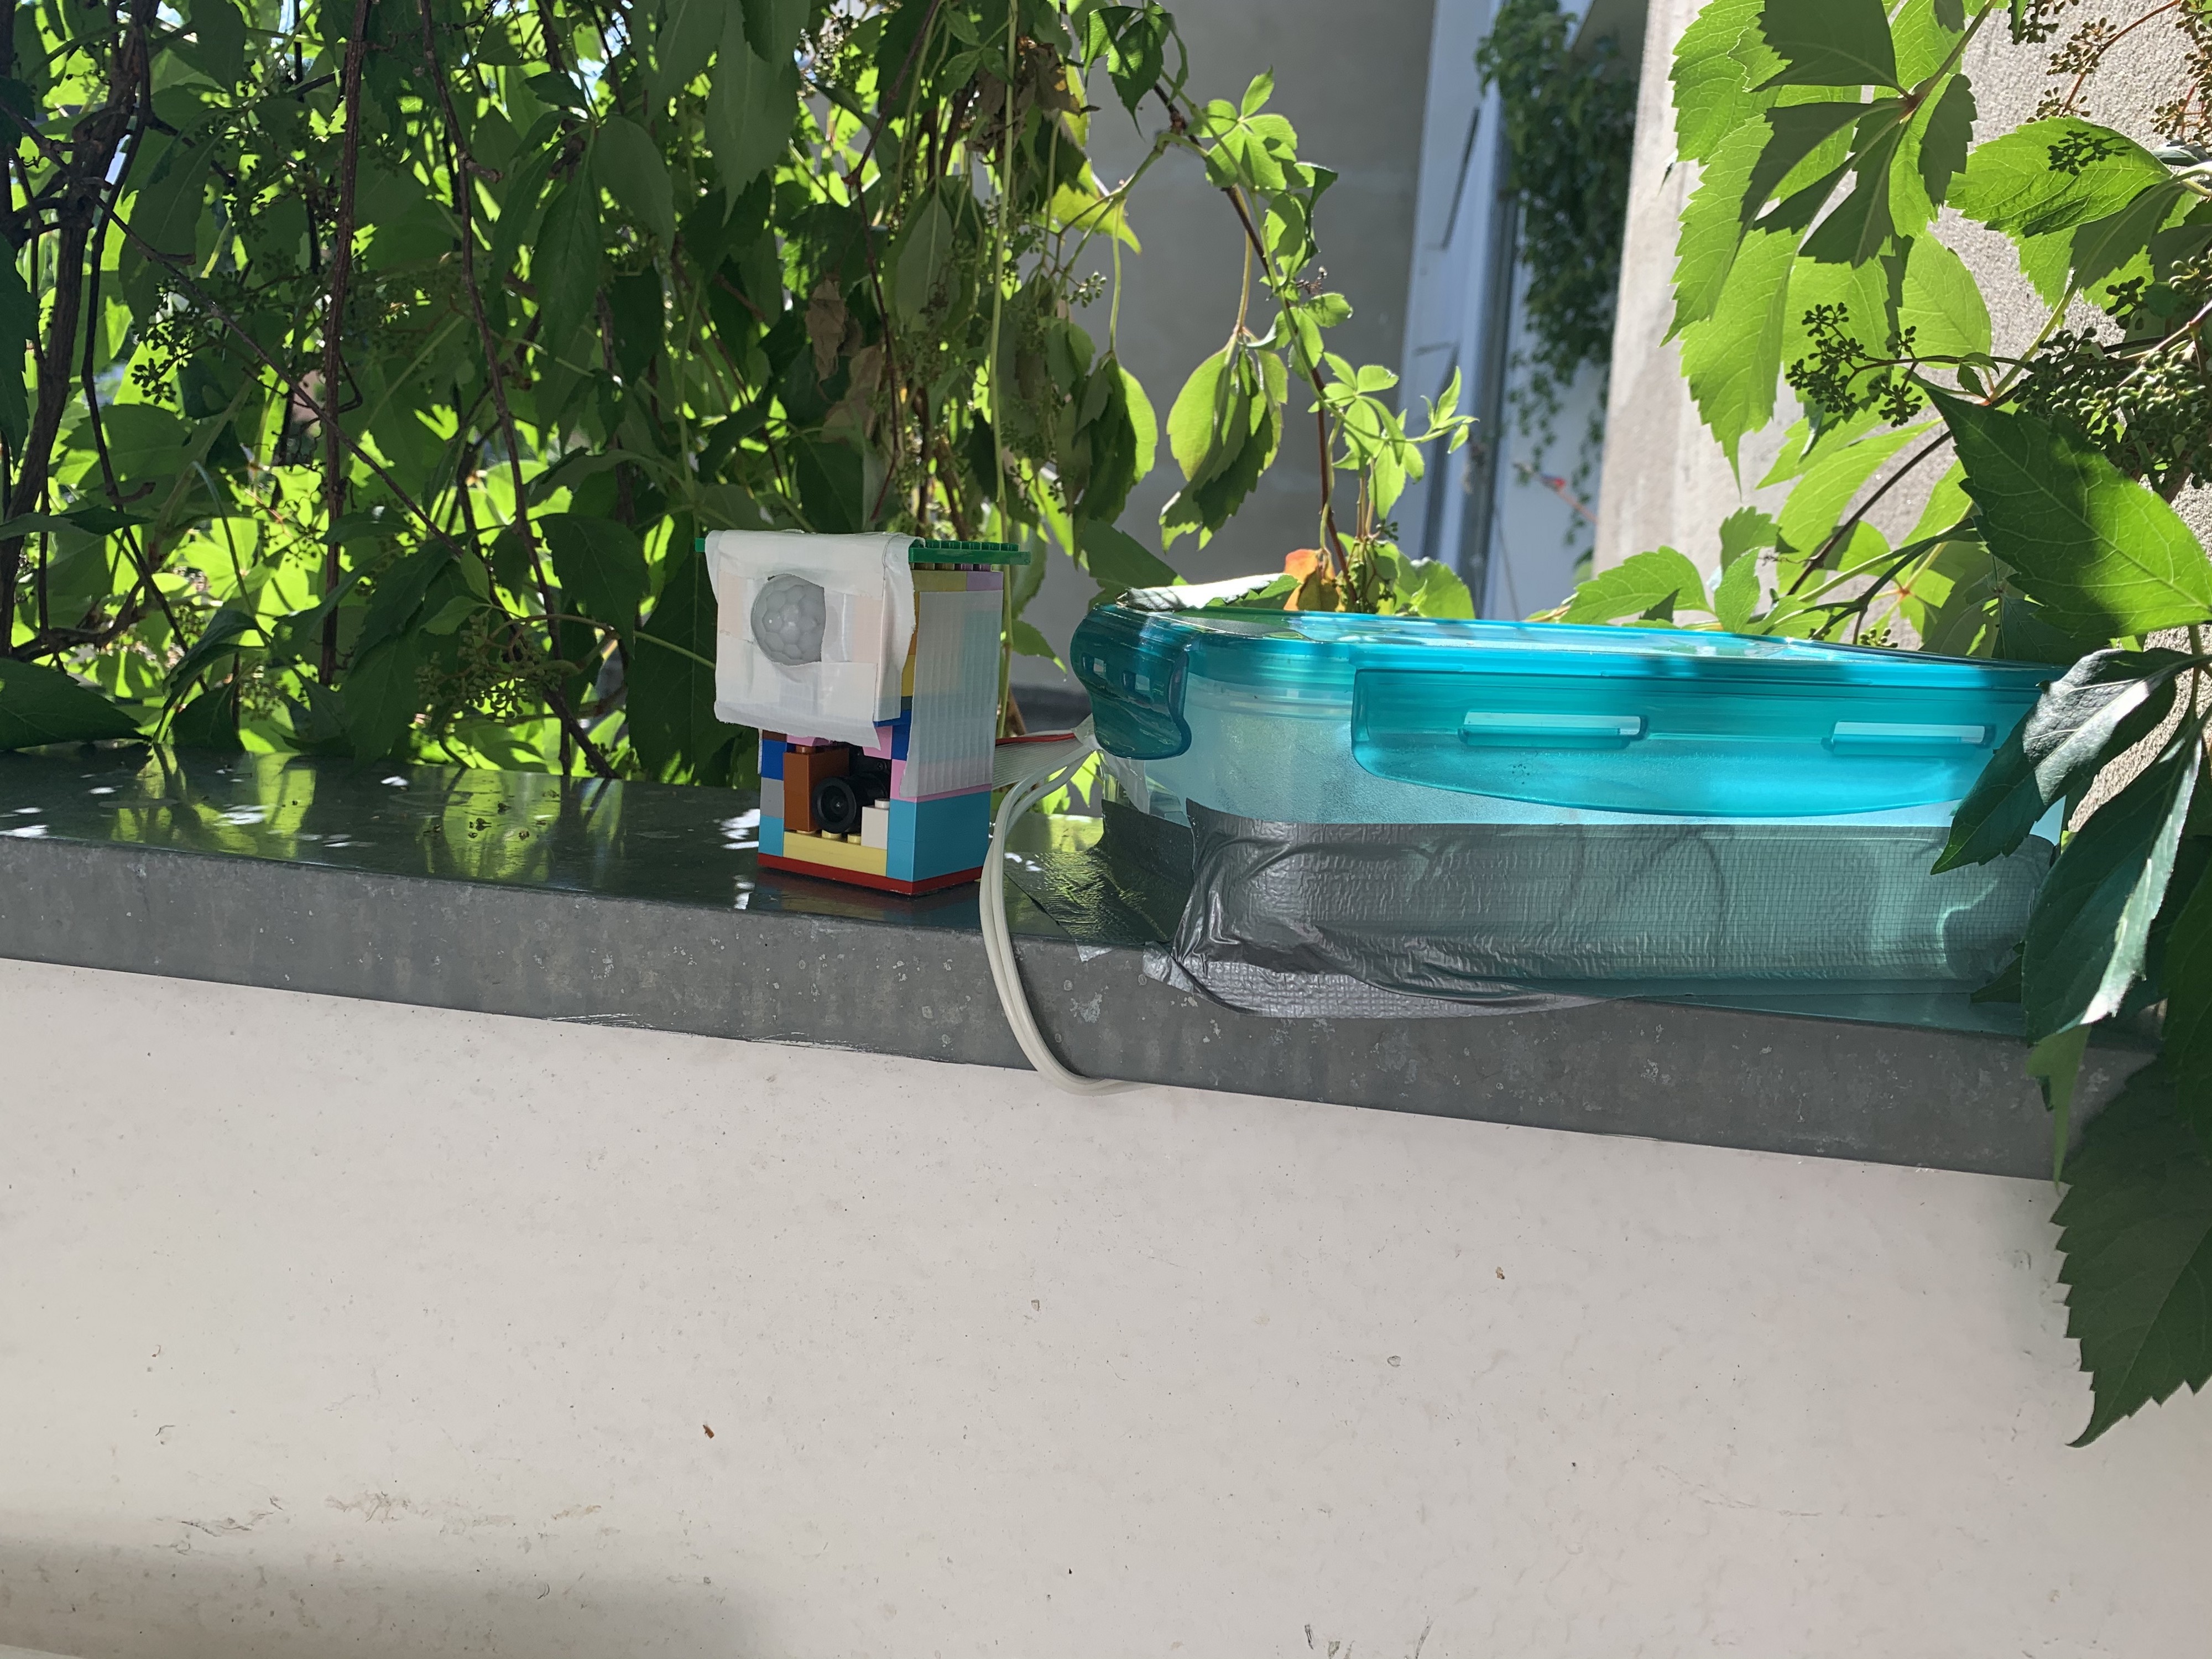
The next step is to get the Raspberry powered. Initially, it is provided with a power cord, which is about one meter long. That is far from being enough. I do not have a power socket on the balcony. Therefore, I need to power the Raspberry from the outlet inside the house. For that, I soldered a new power cord, which is 5 meters long. With the new wire, I give the power directly to the Raspberry pins, which is usually not recommended, but still is kind of ok.
下一步是使Raspberry供電。 最初,它配有一根電源線,該電源線長約一米。 這還遠遠不夠。 我的陽臺上沒有電源插座。 因此,我需要從屋內的插座為Raspberry供電。 為此,我焊接了一根5米長的新電源線。 使用新電線,我可以直接給樹莓針供電,通常不建議這樣做,但還是可以的。
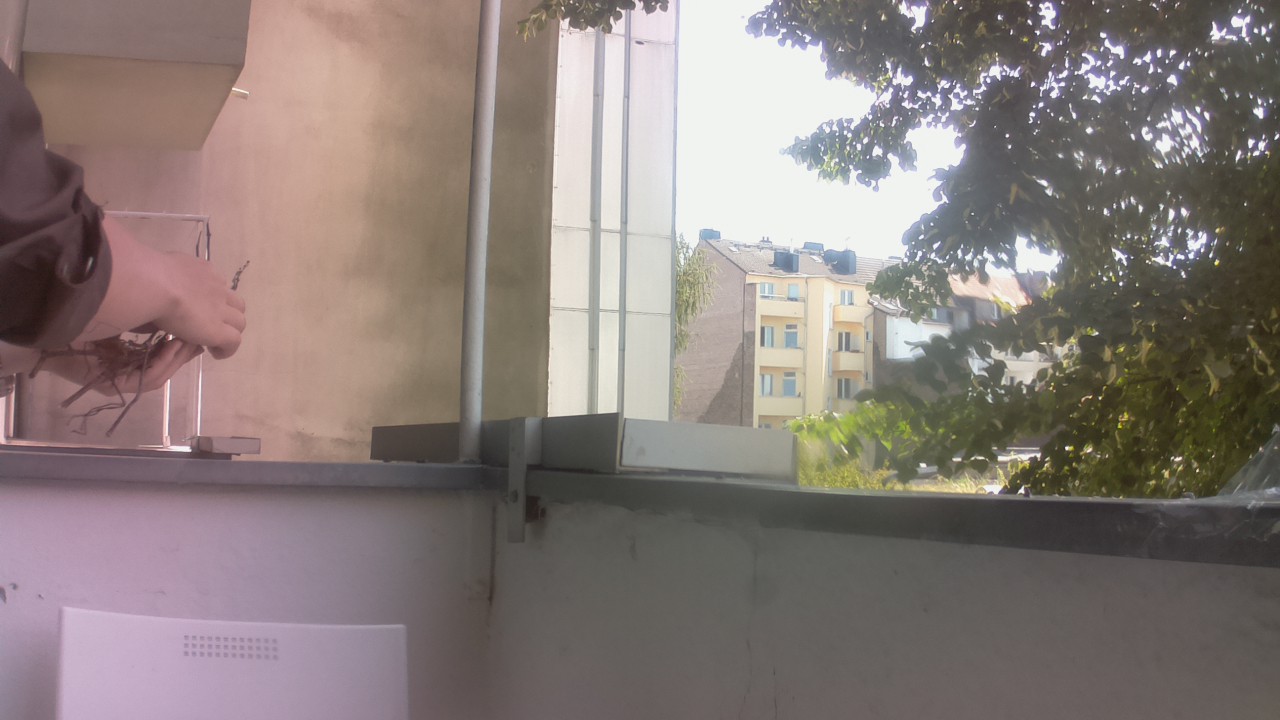
Now is the time to wait for the pigeons. Essentially I need to test how well the motion detector covers my balcony area. Therefore I put oatmeal around my balcony’s perimeter to attract the pigeons and make them walking around. This way, I can check if the motion sensor has dead corners where pigeons can not be detected. After just a few hours, I got the first image of a pigeon!
現在是時候等待鴿子了。 基本上,我需要測試移動探測器覆蓋陽臺區域的程度。 因此,我把燕麥片放在陽臺的周圍,以吸引鴿子并使其走動。 這樣,我可以檢查運動傳感器是否有死角,無法檢測到鴿子。 短短幾個小時后,我得到了第一羽鴿子圖像!
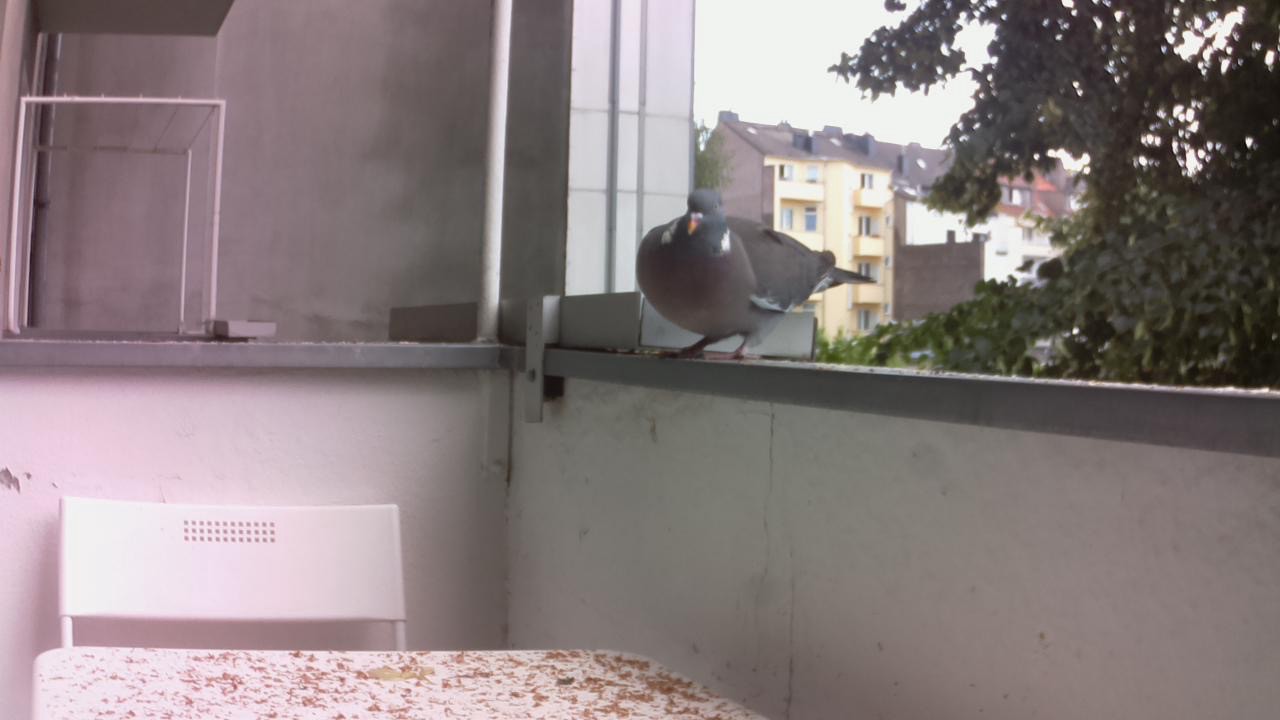
Everyone who has seen this image noticed how fat is the pigeon. Indeed we have very fat pigeons here in Düsseldorf. However, a very unfortunate surprise was that the motion sensor detects pigeons only straight in front of it and ignores the pigeons that are left or right from the sensor. Therefore, I decided to install a second motion sensor that will look into the perpendicular direction. That way, the whole perimeter of my balcony is covered.
看到此圖像的每個人都注意到鴿子有多胖。 的確,我們在杜塞爾多夫有非常胖的鴿子。 但是,非常不幸的是,運動傳感器僅在其正前方檢測到鴿子,而忽略了傳感器左側或右側的鴿子。 因此,我決定安裝第二個垂直于垂直方向的運動傳感器。 這樣,陽臺的整個周邊都被覆蓋了。
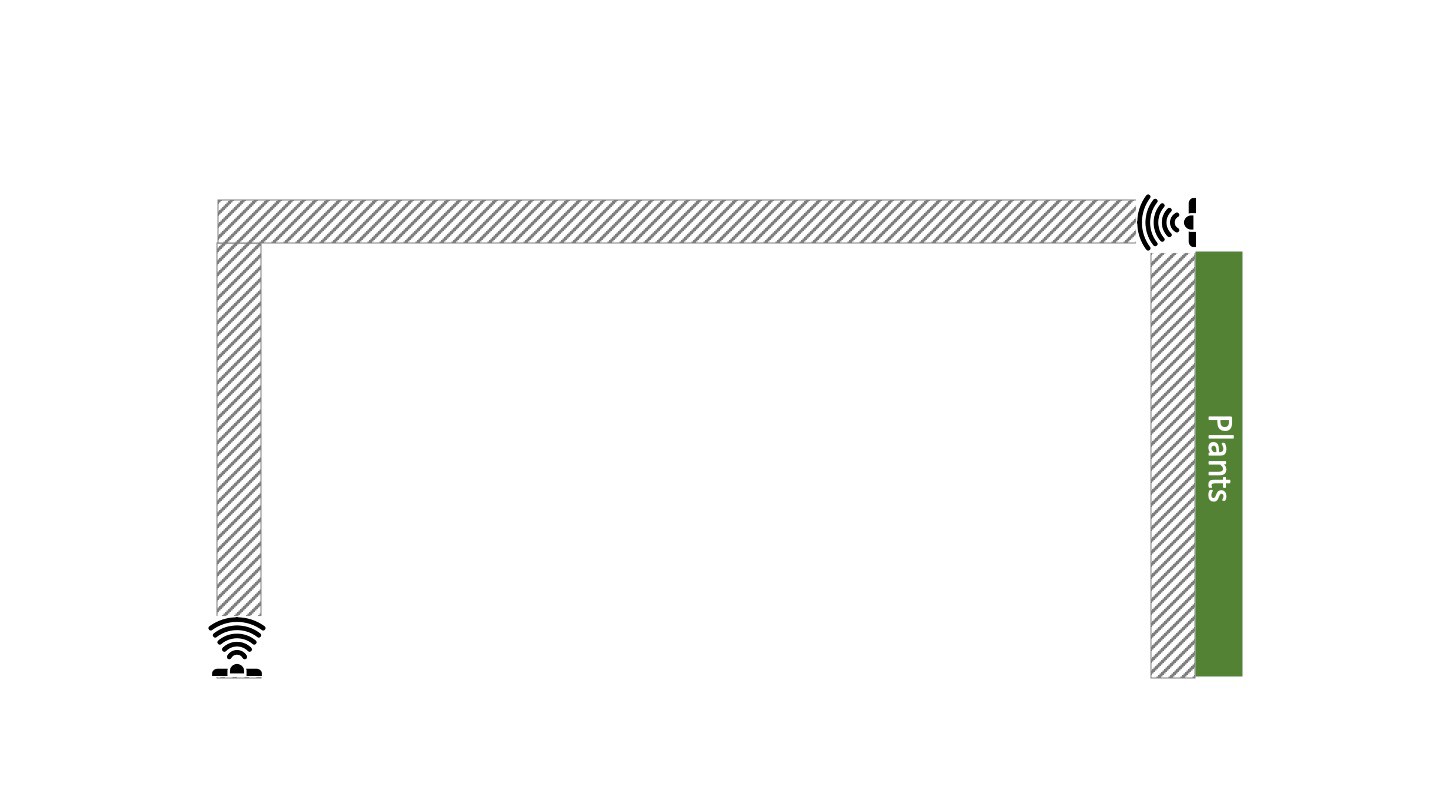
The motion sensors cover two perpendicular edges of my balcony. On the right side of the balcony, I have plants. Therefore pigeons can not land there. To keep things simple, I connected both sensors with the same wire, which sends the signals from both sensors on the same pin. After putting another portion of oatmeal on my balcony, I realized that now the whole balcony is covered, and I am getting way more pigeon pictures then just with the one sensor. Another advantage of a new setup is that I can set the sensitivity of the sensors to the minimum and therefore get less false positives (images without the pigeons which are triggered by the wind moving tree brunches).
運動傳感器覆蓋了我陽臺的兩個垂直邊緣。 在陽臺的右邊,我有植物。 因此,鴿子不能在那里降落。 為簡單起見,我用同一根導線連接了兩個傳感器,該傳感器從同一引腳上的兩個傳感器發送信號。 在另一部分燕麥片放在我的陽臺上之后,我意識到現在整個陽臺都被覆蓋了,與僅僅使用一個傳感器相比,我獲得了更多的鴿子照片。 新設置的另一個優點是,我可以將傳感器的靈敏度設置為最小,從而減少誤報(沒有鴿子的圖像是由風樹早午餐觸發的)。
Now the Pigeon Avoidance System is set up for the data collection. Whenever the sensor detects motion, the camera will take a picture and store it on the Raspberry Pi. Later on, I go through the photos with the Pigeon Tinder and label them for further training.
現在,為數據收集設置了避鴿系統。 每當傳感器檢測到運動時,相機都會拍照并將其存儲在Raspberry Pi中。 后來,我用鴿子火種瀏覽了照片,并標記了它們以進行進一步的訓練。
This is the end of Part 2. In “How to use Deep Learning to shoo the pigeons from the balcony”, I am talking about how to leverage the power of transfer learning for pigeon detection. Stay updated and, in the meantime, a sneak peek from Part 3: How to be taken for a pigeon? Just pretend you are about to build a nest.
這是第2部分的結尾。在“ 如何使用深度學習從陽臺上射擊鴿子 ”中,我正在談論如何利用轉移學習的力量進行鴿子檢測。 保持最新狀態,與此同時,還可以偷看第3部分 :如何為鴿子服用? 只是假裝您將要筑巢。
If you got any questions about this project, please feel free to reach me via Linkedin.
如果您對此項目有任何疑問,請隨時通過Linkedin與我聯系。
翻譯自: https://towardsdatascience.com/how-to-set-up-data-collection-for-the-pigeon-avoidance-system-eba572fe6dc9
鴿子為什么喜歡盤旋
本文來自互聯網用戶投稿,該文觀點僅代表作者本人,不代表本站立場。本站僅提供信息存儲空間服務,不擁有所有權,不承擔相關法律責任。 如若轉載,請注明出處:http://www.pswp.cn/news/390535.shtml 繁體地址,請注明出處:http://hk.pswp.cn/news/390535.shtml 英文地址,請注明出處:http://en.pswp.cn/news/390535.shtml
如若內容造成侵權/違法違規/事實不符,請聯系多彩編程網進行投訴反饋email:809451989@qq.com,一經查實,立即刪除!相關文章

scrum認證費用_如何獲得專業Scrum大師的認證-快速和慢速方式

981. 基于時間的鍵值存儲


css 繪制三角形_解釋CSS形狀:如何使用純CSS繪制圓,三角形等
)
密碼學基本概念(一)
)
JAVA-初步認識-第十三章-多線程(驗證同步函數的鎖)

追求卓越追求完美規范學習_追求新的黃金比例

leetcode 275. H 指數 II

Node js開發中的那些旮旮角角 第一部

文件2. 文件重命名

js字符串slice_JavaScript子字符串示例-JS中的Slice,Substr和Substring方法

leetcode 218. 天際線問題
![[Android Pro] 終極組件化框架項目方案詳解](http://pic.xiahunao.cn/[Android Pro] 終極組件化框架項目方案詳解)
[Android Pro] 終極組件化框架項目方案詳解

如何寫一個vue指令directive

安裝angular cli_Angular 9適用于初學者—如何使用Angular CLI安裝第一個應用程序

leetcode 1818. 絕對差值和

【轉載】keil5中加入STM32F10X_HD,USE_STDPERIPH_DRIVER的原因

下崗職工_下崗后我如何獲得多位軟件工程師的面試
