構建圖像金字塔
Authors: Jenny Huang, Ian Hunt-Isaak, William Palmer
作者: 黃珍妮 , 伊恩·亨特·伊薩克 , 威廉·帕爾默
GitHub Repo
GitHub回購
介紹 (Introduction)
Training an image segmentation model on new images can be daunting, especially when you need to label your own data. To make this task easier and faster, we built a user-friendly tool that lets you build this entire process in a single Jupyter notebook. In the sections below, we will show you how our tool lets you:
在新圖像上訓練圖像分割模型可能會令人生畏,尤其是當您需要標記自己的數據時。 為了使此任務更容易,更快捷,我們構建了一個用戶友好的工具,可讓您在單個Jupyter筆記本中構建整個過程。 在以下各節中,我們將向您展示我們的工具如何使您:
- Manually label your own images 手動標記自己的圖像
- Build an effective segmentation model through transfer learning 通過轉移學習建立有效的細分模型
- Visualize the model and its results 可視化模型及其結果
- Share your project as a Docker image 以Docker映像形式共享您的項目
The main benefits of this tool are that it is easy-to-use, all in one platform, and well-integrated with existing data science workflows. Through interactive widgets and command prompts, we built a user-friendly way to label images and train the model. On top of that, everything can run in a single Jupyter notebook, making it quick and easy to spin up a model, without much overhead. Lastly, by working in a Python environment and using standard libraries like Tensorflow and Matplotlib, this tool can be well-integrated into existing data science workflows, making it ideal for uses like scientific research.
該工具的主要優點是易于使用 , 在一個平臺上全部 使用 ,并且與現有的數據科學工作流程很好地集成在一起 。 通過交互式小部件和命令提示符,我們構建了一種用戶友好的方式來標記圖像和訓練模型。 最重要的是,所有內容都可以在單個Jupyter筆記本中運行,從而快速,輕松地建立模型,而沒有太多開銷。 最后,通過在Python環境中工作并使用Tensorflow和Matplotlib等標準庫,可以將該工具很好地集成到現有的數據科學工作流程中,使其非常適合科學研究等用途。
For instance, in microbiology, it can be very useful to segment microscopy images of cells. However, tracking cells over time can easily result in the need to segment hundreds of images, which can be very difficult to do manually. In this article, we will use microscopy images of yeast cells as our dataset and show how we built our tool to differentiate between the background, mother cells, and daughter cells.
例如,在微生物學中,分割細胞的顯微鏡圖像可能非常有用。 但是,隨著時間的推移跟蹤單元很容易導致需要分割成百上千個圖像,這可能很難手動完成。 在本文中,我們將使用酵母細胞的顯微圖像作為數據集,并展示如何構建用于區分背景,母細胞和子細胞的工具。
1.標簽 (1. Labelling)
There are many existing tools to create labelled masks for images, including Labelme, ImageJ, and even the graphics editor GIMP. While these are all great tools, they can’t be integrated within a Jupyter notebook, making them harder to use with many existing workflows. Fortunately, Jupyter Widgets make it easy for us to make interactive components and connect them with the rest of our Python code.
現有許多工具可以為圖像創建帶標簽的蒙版,包括Labelme , ImageJ甚至是圖形編輯器GIMP 。 這些都是很棒的工具,但是它們無法集成到Jupyter筆記本中,這使得它們很難與許多現有工作流程一起使用。 幸運的是, Jupyter Widgets使我們能夠輕松制作交互式組件并將其與我們的其余Python代碼連接。
To create training masks in the notebook, we have two problems to solve:
要在筆記本中創建訓練口罩,我們要解決兩個問題:
- Select parts of an image with a mouse 用鼠標選擇圖像的一部分
- Easily switch between images and select the class to label 輕松在圖像之間切換并選擇要標記的類別
To solve the first problem, we used the Matplotlib widget backend and the built-in LassoSelector. The LassoSelector handles drawing a line to show what you are selecting, but we need a little bit of custom code to draw the masks as an overlay:
為了解決第一個問題,我們使用了Matplotlib小部件后端和內置的LassoSelector 。 LassoSelector會處理一條線以顯示您所選擇的內容,但是我們需要一些自定義代碼來將蒙版繪制為覆蓋層:
For the second problem, we added nice looking buttons and other controls using ipywidgets:
對于第二個問題,我們使用ipywidgets添加了漂亮的按鈕和其他控件:

We combined these elements (along with improvements like scroll to zoom) to make a single labelling controller object. Now we can take microscopy images of yeast and segment the mother cells and daughter cells:
我們結合了這些元素(以及滾動縮放等改進功能)來制作了一個標簽控制器對象。 現在,我們可以對酵母進行顯微鏡檢查,并對母細胞和子細胞進行分段:
You can check out the full object, which lets you scroll to zoom, right click to pan, and select multiple classes here.
您可以簽出完整的對象,使您可以滾動以縮放,右鍵單擊以平移并在此處選擇多個類。
Now we can label a small number of images in the notebook, save them into the correct folder structure, and start to train CNN!
現在,我們可以在筆記本中標記少量圖像,將它們保存到正確的文件夾結構中,然后開始訓練CNN!
2.模型訓練 (2. Model Training)
該模型 (The Model)
U-net is a convolutional neural network that was initially designed to segment biomedical images but has been successful for many other types of images. It builds upon existing convolutional networks to work better with very few training images and make more precise segmentations. It is a state-of-the-art model that is also easy to implement using the segmentation_models library.
U-net是一個卷積神經網絡,最初設計用于分割生物醫學圖像,但已成功用于許多其他類型的圖像。 它以現有的卷積網絡為基礎,可以在很少的訓練圖像的情況下更好地工作,并進行更精確的分割。 這是一個最新的模型,也可以使用segmentation_models庫輕松實現。
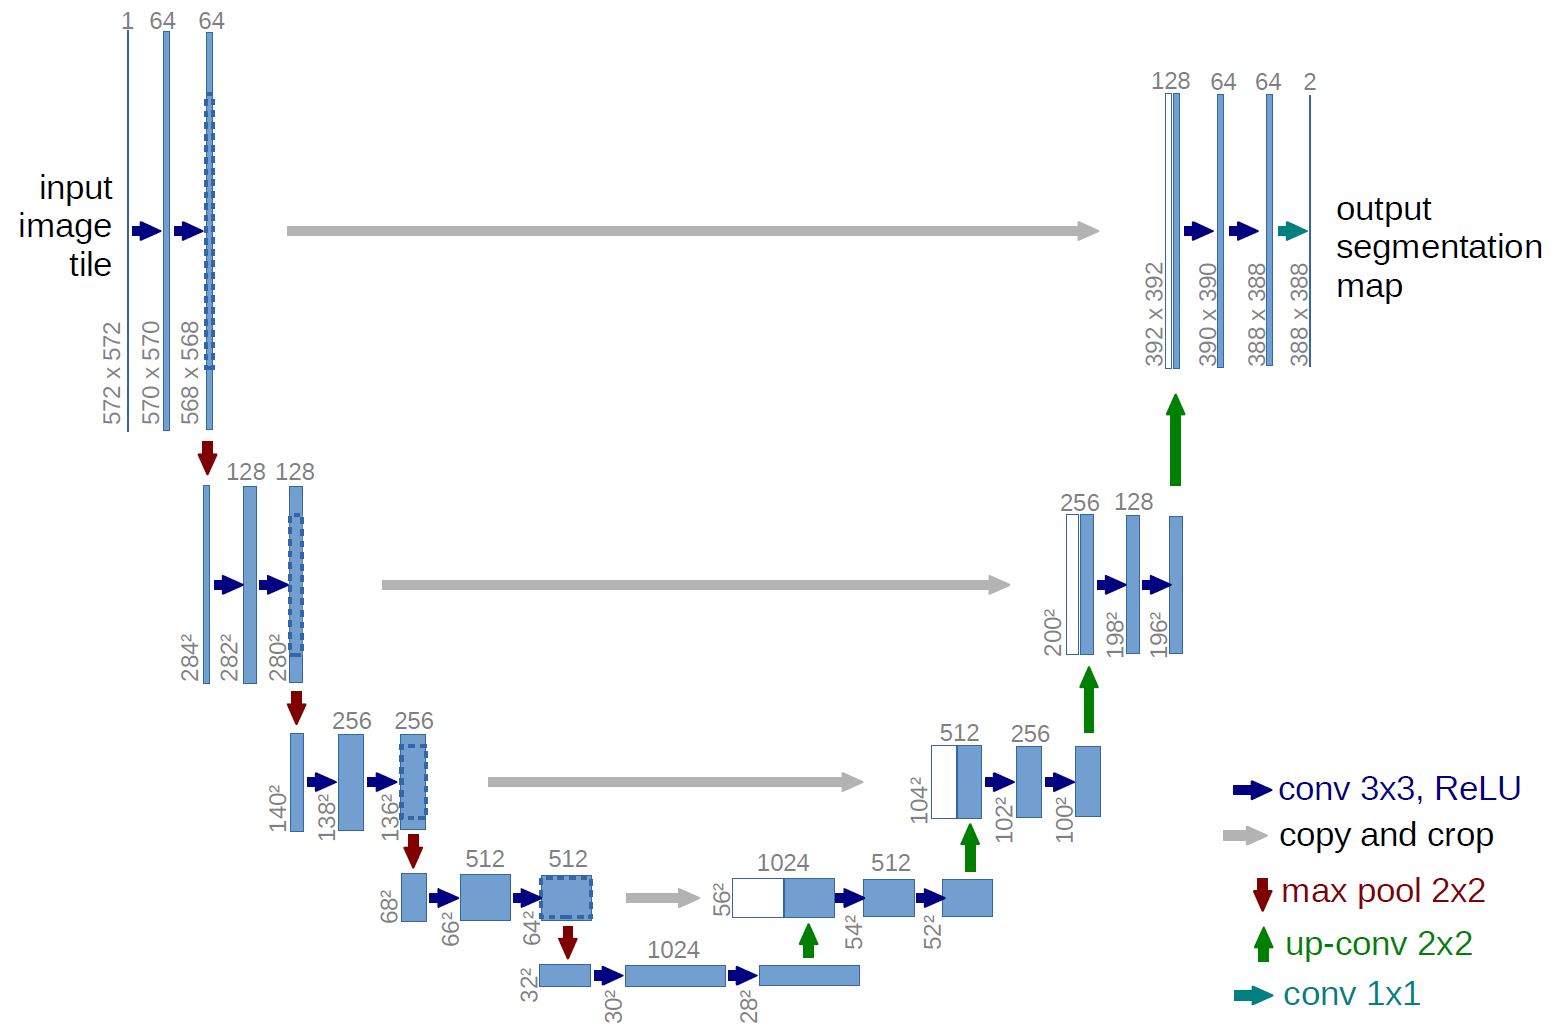
U-net is unique because it combines an encoder and a decoder using cross-connections (the gray arrows in the figure above). These skip connections cross from the same sized part in the downsampling path to the upsampling path. This creates awareness of the original pixels inputted into the model when you upsample, which has been shown to improve performance on segmentation tasks.
U-net的獨特之處在于它通過交叉連接將編碼器和解碼器結合在一起(上圖中的灰色箭頭)。 這些跳過連接從下采樣路徑中的相同大小的部分跨到上采樣路徑。 這樣可以提高您對上采樣時輸入到模型中的原始像素的了解,這已經顯示出可以提高分割任務的性能。
As great as U-net is, it won’t work well if we don’t give it enough training examples. And given how tedious it is to manually segment images, we only manually labelled 13 images. With so few training examples, it seems impossible to train a neural network with millions of parameters. To overcome this, we need both Data Augmentation and Transfer Learning.
盡管U-net很棒,但是如果我們沒有給它足夠的培訓示例,它將無法正常工作。 考慮到手動分割圖像的繁瑣工作,我們僅手動標記了13張圖像。 僅用很少的訓練示例,就不可能訓練具有數百萬個參數的神經網絡。 為了克服這個問題,我們既需要數據擴充又需要轉移學習 。
數據擴充 (Data Augmentation)
Naturally, if your model has a lot of parameters, you would need a proportional amount of training examples to get good performance. Using our small dataset of images and masks, we can create new images that will be as insightful and useful to our model as our original images.
自然,如果您的模型具有很多參數,則需要成比例的訓練示例才能獲得良好的性能。 使用我們小的圖像和蒙版數據集,我們可以創建新圖像,這些圖像對于模型和原始圖像一樣具有洞察力和實用性。
How do we do that? We can flip the image, rotate it at an angle, scale it inward or outward, crop it, translate it, or even blur the image by adding noise, but most importantly, we can do a combination of those operations to create many new training examples.
我們該怎么做? 我們可以翻轉圖像,旋轉角度,向內或向外縮放,裁剪,平移圖像,甚至可以通過添加噪點來模糊圖像,但最重要的是,我們可以將這些操作結合起來以創建許多新的訓練例子。
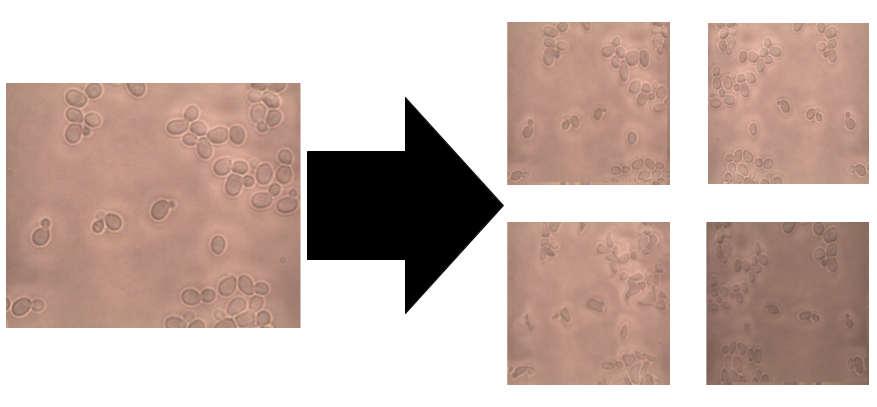
Image data augmentation has one more complication in segmentation compared to classification. For classification, you just need to augment the image as the label will remain the same (0 or 1 or 2…). However, for segmentation, the label (which is a mask) needs to also be transformed in sync with the image. To do this, we used the albumentations library with a custom data generator since, to our knowledge, the Keras ImageDataGenerator does not currently support the combination “Image + mask”.
與分類相比,圖像數據增強在分割方面具有更多的復雜性。 對于分類,您只需要放大圖像,因為標簽將保持不變(0或1或2…)。 但是,對于分割,還需要與圖像同步轉換標簽(作為蒙版)。 為此,我們使用了帶有自定義數據生成器的albumentations庫,因為據我們所知, Keras ImageDataGenerator目前不支持“ Image + Mask”組合。
轉移學習 (Transfer Learning)
Even though we have now created 100 or more images, this still isn’t enough as the U-net model has more than 6 million parameters. This is where transfer learning comes into play.
即使我們現在已經創建了100個或更多的圖像,但這仍然不夠,因為U-net模型具有超過600萬個參數。 這是轉移學習發揮作用的地方。
Transfer Learning lets you take a model trained on one task and reuse it for another similar task. It reduces your training time drastically and more importantly, it can lead to effective models even with a small training set like ours. For example, neural networks like MobileNet, Inception, and DeepNet, learn a feature space, shapes, colors, texture, and more, by training on a great number of images. We can then transfer what was learned by taking these model weights and modifying them slightly to activate for patterns in our own training images.
轉移學習使您可以采用在一項任務上受過訓練的模型,并將其重用于另一項類似任務。 它極大地減少了您的培訓時間,更重要的是,即使像我們這樣的小型培訓,它也可以產生有效的模型。 例如,諸如MobileNet,Inception和DeepNet之類的神經網絡通過訓練大量圖像來學習特征空間,形狀,顏色,紋理等。 然后,我們可以通過獲取這些模型權重并對其進行稍微修改以激活我們自己的訓練圖像中的模式來轉移所學的內容。
Now how do we use transfer learning with U-net? We used the segmentation_models library to do this. We use the layers of a deep neural network of your choosing (MobileNet, Inception, ResNet) and the parameters found training on image classification (ImageNet) and use them as the first half (encoder) of your U-net. Then, you train the decoder layers with your own augmented dataset.
現在我們如何在U-net中使用轉移學習? 我們使用segmentation_models庫執行此操作。 我們使用您選擇的深度神經網絡(MobileNet,Inception,ResNet)的各層以及針對圖像分類訓練的找到的參數(ImageNet),并將它們用作U-net的前半部分(編碼器)。 然后,您可以使用自己的擴充數據集訓練解碼器層。
Putting it Together
把它放在一起
We put this all together in a Segmentation model class that you can find here. When creating your model object, you get an interactive command prompt where you can customize aspects of your U-net like the loss function, backbone, and more:
我們將所有這些放到了Segmentation模型類中,您可以在此處找到。 創建模型對象時,您會得到一個交互式命令提示符,您可以在其中自定義U-net的各個方面,例如損失函數,主干等。
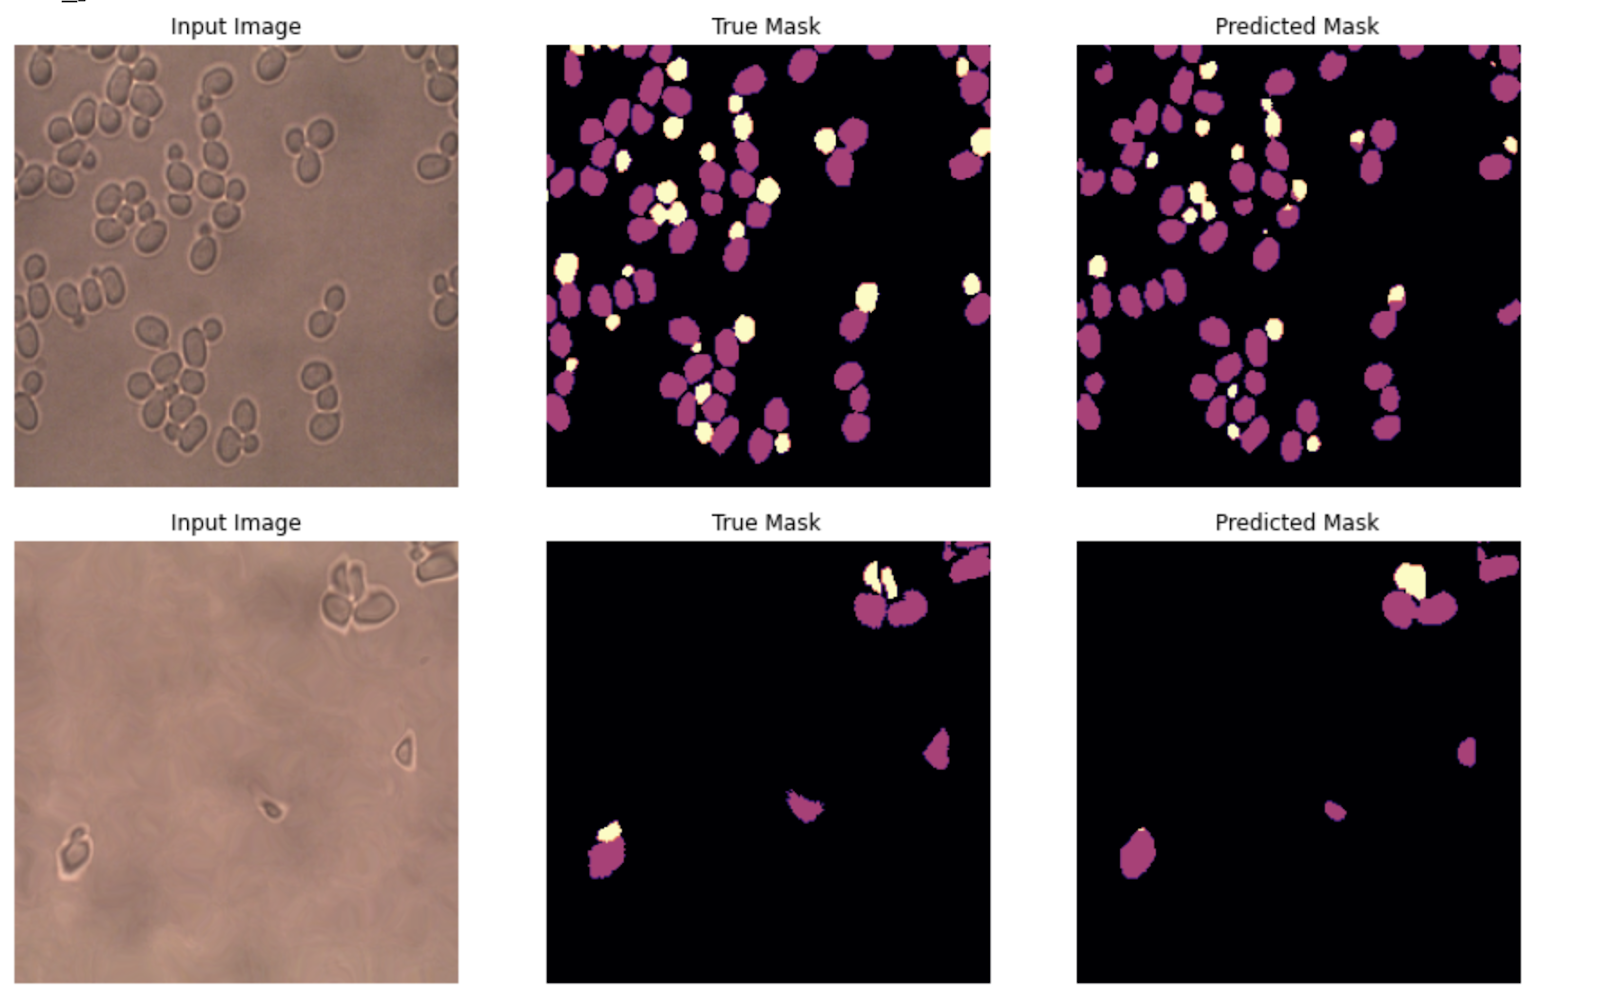
After 30 epochs of training, we achieved 95% accuracy. Note that it is important to choose a good loss function. We first tried cross-entropy loss, but the model was unable to distinguish between the similar looking mother and daughter cells and had poor performance due to the class imbalance of seeing many more non-yeast pixels than yeast pixels. We found that using dice loss gave us much better results. The dice loss is linked to the Intersection over Union Score (IOU) and is usually better adapted to segmentation tasks as it gives incentive to maximize the overlap between the predicted and ground truth masks.
經過30個星期的培訓,我們達到了95%的準確性。 請注意,選擇良好的損耗函數很重要。 我們首先嘗試了交叉熵損失,但是該模型無法區分相貌相似的母細胞和子細胞,并且由于看到的非酵母像素多于酵母像素的類不平衡,因此該模型的性能不佳。 我們發現使用骰子損失可以獲得更好的結果。 骰子損失與聯盟分數交叉點(IOU)相關聯,通常會更好地適應分段任務,因為它可以最大程度地促進預測的和真實面罩之間的重疊。
3.可視化 (3. Visualization)
Now that our model is trained, let’s use some visualization techniques to see how it works. We follow Ankit Paliwal’s tutorial to do so. You can find the implementation in his corresponding GitHub repository. In this section, we will visualize two of his techniques, Intermediate Layer Activations and Heatmaps of Class Activations, on our yeast cell segmentation model.
現在我們的模型已經訓練完畢,讓我們使用一些可視化技術來查看其工作原理。 我們按照Ankit Paliwal的教程進行操作。 您可以在他相應的GitHub存儲庫中找到實現。 在本節中,我們將在酵母細胞細分模型上可視化他的兩種技術,即中間層激活和類激活的熱圖。
中間層激活 (Intermediate Layer Activations)
This first technique shows the output of intermediate layers in a forward pass of the network on a test image. This lets us see what features of the input image are highlighted at each layer. After inputting a test image, we visualized the first few outputs for some convolutional layers in our network:
第一項技術在測試圖像上顯示了網絡的前向傳遞中中間層的輸出。 這使我們可以看到輸入圖像的哪些功能在每一層都突出顯示。 輸入測試圖像后,我們將網絡中一些卷積層的前幾個輸出可視化:
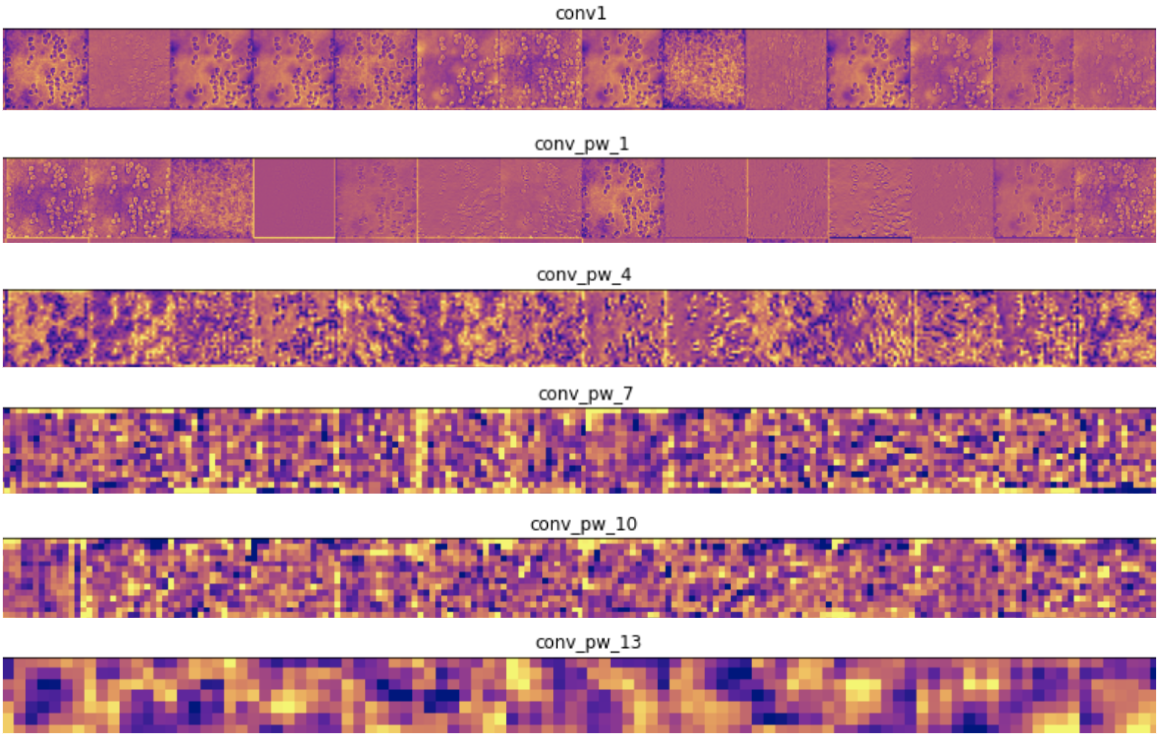
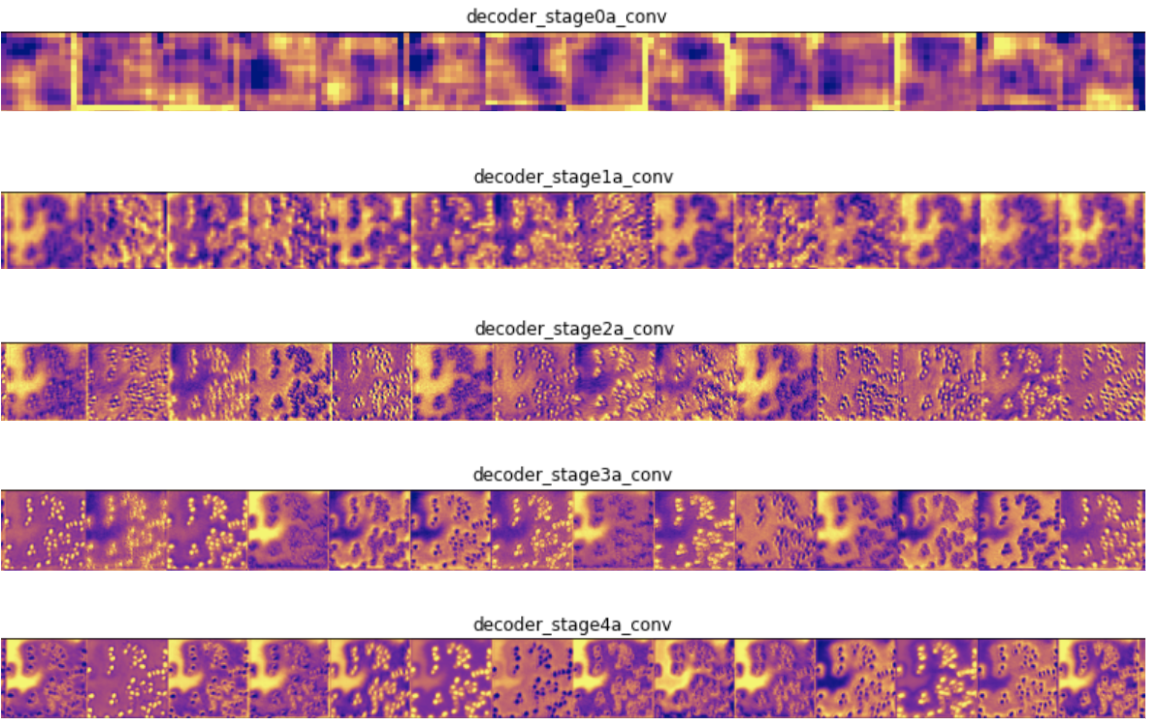
In the encoder layers, filters close to the input detect more detail and those close to the output of the model detect more general features, which is to be expected. In the decoder layers, we see the opposite pattern, of going from abstract to more specific details, which is also to be expected.
在編碼器層中,靠近輸入的過濾器可檢測更多細節,而靠近模型輸出的過濾器可檢測更一般的特征,這是可以預期的。 在解碼器層中,我們看到了相反的模式,即從抽象到更具體的細節,這也是可以預期的。
類激活的熱圖 (Heatmaps of Class Activations)
Next, we look at class activation maps. These heat maps let you see how important each location of the image is for predicting an output class. Here, we visualize the final layer of our yeast cell model, since the class prediction label will largely depend on it.
接下來,我們看一下類激活圖。 這些熱圖讓您了解圖像的每個位置對于預測輸出類別的重要性。 在這里,我們可視化酵母細胞模型的最后一層,因為類別預測標簽將在很大程度上取決于它。
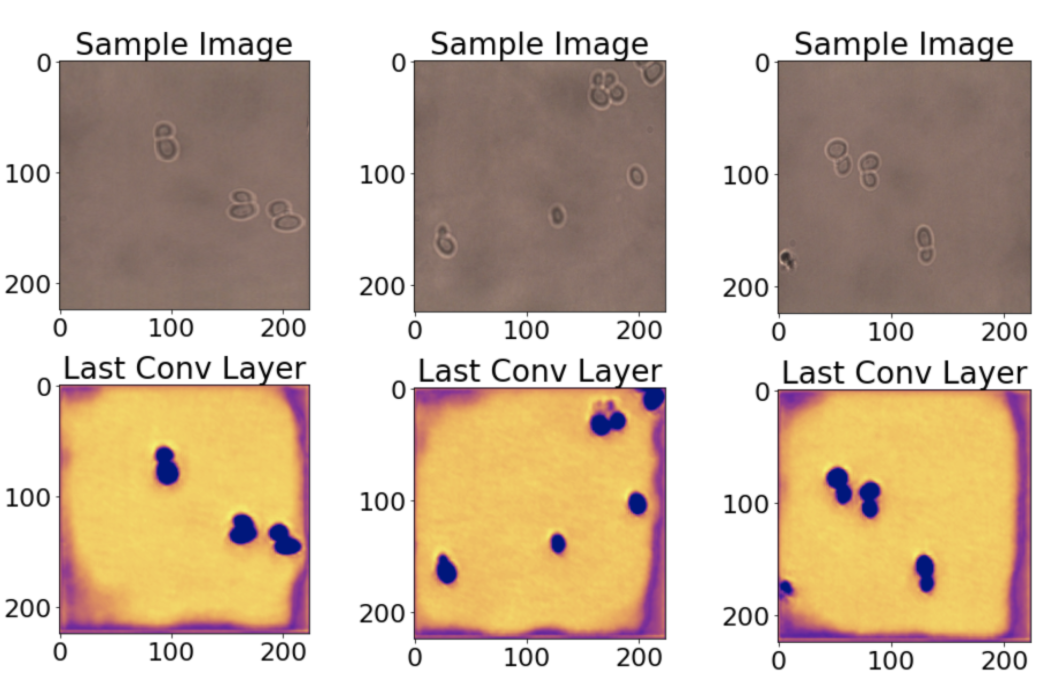
We see from the heat maps that the cell locations are correctly activated, along with parts of the image border, which is somewhat surprising.
從熱圖可以看出,單元位置以及部分圖像邊界已被正確激活,這有些令人驚訝。
We also looked at the last technique in the tutorial, which shows what images each convolutional filter maximally responds to, but the visualizations were not very informative for our specific yeast cell model.
我們還研究了本教程中的最后一項技術,該技術顯示了每個卷積濾波器最大程度地響應哪些圖像,但是可視化對于我們的特定酵母細胞模型不是很有幫助。
4.制作和共享Docker映像 (4. Making and Sharing a Docker Image)
Finding an awesome model and trying to run it, only to find that it doesn’t work in your environment due to mysterious dependency issues, is very frustrating. We addressed this by creating a Docker image for our tool. This allows us to completely define the environment that the code is run in, all the way down to the operating system. For this project, we based our Docker image off of the jupyter/tensorflow-notebook image from Jupyter Docker Stacks. Then we just added a few lines to install the libraries we needed and to copy the contents of our GitHub repository into the Docker image. If you’re curious, you can see our final Dockerfile here. Finally, we pushed this image to Docker Hub for easy distribution. You can try it out by running:
找到令人敬畏的模型并嘗試運行它,卻發現它由于神秘的依賴關系問題而在您的環境中不起作用,這非常令人沮喪。 我們通過為我們的工具創建一個Docker鏡像來解決這個問題。 這使我們可以完全定義運行代碼的環境,一直到操作系統。 對于此項目,我們基于Jupyter Docker Stacks的jupyter/tensorflow-notebook映像構建Docker映像。 然后,我們僅添加了幾行內容來安裝所需的庫,并將GitHub存儲庫的內容復制到Docker映像中。 如果您好奇,可以在此處查看我們的最終Dockerfile。 最后,我們將此映像推送到Docker Hub以便于分發。 您可以通過運行以下命令進行嘗試:
sudo docker run -p 8888:8888 ianhuntisaak/ac295-final-project:v3 \
-e JUPYTER_LAB_ENABLE=yes
結論與未來工作 (Conclusion and Future Work)
This tool lets you easily train a segmentation model on new images in a user-friendly way. While it works, there is still room for improvement in usability, customization, and model performance. In the future, we hope to:
使用此工具,您可以以用戶友好的方式輕松地在新圖像上訓練分割模型。 雖然有效,但在可用性,自定義和模型性能方面仍有改進的余地。 將來,我們希望:
- Improve the lasso tool by building a custom Jupyter Widget using the html5 canvas to reduce lag when manually segmenting 通過使用html5 canvas構建自定義的Jupyter小部件來改善套索工具,以減少手動分段時的滯后
Explore new loss functions and models (like this U-net pre-trained on broad nucleus dataset) as a basis for transfer learning
探索新的損失函數和模型(例如在寬核數據集上預先訓練的U-net )作為轉移學習的基礎
- Make it easier to interpret visualizations and suggest methods of improving the results to the user 使解釋可視化更加容易,并向用戶建議改善結果的方法
致謝 (Acknowledgements)
We would like to thank our professor Pavlos Protopapas and the Harvard Applied Computation 295 course teaching staff for their guidance and support.
我們要感謝我們的教授Pavlos Protopapas和哈佛應用計算295課程的教學人員的指導和支持。
翻譯自: https://towardsdatascience.com/how-we-built-an-easy-to-use-image-segmentation-tool-with-transfer-learning-546efb6ae98
構建圖像金字塔
本文來自互聯網用戶投稿,該文觀點僅代表作者本人,不代表本站立場。本站僅提供信息存儲空間服務,不擁有所有權,不承擔相關法律責任。 如若轉載,請注明出處:http://www.pswp.cn/news/388701.shtml 繁體地址,請注明出處:http://hk.pswp.cn/news/388701.shtml 英文地址,請注明出處:http://en.pswp.cn/news/388701.shtml
如若內容造成侵權/違法違規/事實不符,請聯系多彩編程網進行投訴反饋email:809451989@qq.com,一經查實,立即刪除!相關文章

PHP mongodb運用,MongoDB在PHP下的應用學習筆記


MFC程序執行過程剖析
)
CF888E Maximum Subsequence(meet in the middle)

virtualbox php mac,詳解mac下通過docker搭建LEMP環境

SpringBoot項目打war包部署Tomcat教程

在VS2005中使用添加變量向導十分的

關于如何使用xposed來hook微信軟件

GitHub動作簡介

java returnaddress,JVM之數據類型

![洛谷P3273 [SCOI2011] 棘手的操作 [左偏樹]](http://pic.xiahunao.cn/洛谷P3273 [SCOI2011] 棘手的操作 [左偏樹])
洛谷P3273 [SCOI2011] 棘手的操作 [左偏樹]


照顧好自己才能照顧好別人_您必須照顧的5個基本數據

matlab數字仿真實驗,DVR+備用電源自動投入的MATLAB數字仿真實驗仿真實驗

c#,xp系統,Matlab6.5

java script 對象

認識數據分析_認識您的最佳探索數據分析新朋友

架構探險筆記10-框架優化之文件上傳
