編寫最簡單的字符設備驅動
- 1 編寫驅動代碼
- 2 編寫makefile
- 3 編譯和加載驅動
- 4 編寫應用程序測試驅動
參考文章:
linux驅動開發第1講:帶你編寫一個最簡單的字符設備驅動
linux驅動開發第2講:應用層的write如何調用到驅動中的write
1 編寫驅動代碼
驅動代碼chardev.c如下:
#include <linux/module.h>
#include <linux/moduleparam.h>
#include <linux/cdev.h>
#include <linux/fs.h>
#include <linux/wait.h>
#include <linux/poll.h>
#include <linux/sched.h>
#include <linux/slab.h>#define BUFFER_MAX    (10)
#define OK            (0)
#define ERROR         (-1)struct cdev *gDev;
struct file_operations *gFile;
dev_t  devNum;
unsigned int subDevNum = 1;
int reg_major  =  232;
int reg_minor =   0;
char *buffer;
int flag = 0;
int hello_open(struct inode *p, struct file *f)
{printk(KERN_EMERG"hello_open\r\n");return 0;
}ssize_t hello_write(struct file *f, const char __user *u, size_t s, loff_t *l)
{printk(KERN_EMERG"hello_write\r\n");return 0;
}
ssize_t hello_read(struct file *f, char __user *u, size_t s, loff_t *l)
{printk(KERN_EMERG"hello_read\r\n");      return 0;
}
int hello_init(void)
{devNum = MKDEV(reg_major, reg_minor);   /* 獲取設備號 */if(OK == register_chrdev_region(devNum, subDevNum, "helloworld")){printk(KERN_EMERG"register_chrdev_region ok \n"); }else {printk(KERN_EMERG"register_chrdev_region error n");return ERROR;}printk(KERN_EMERG" hello driver init \n");gDev = kzalloc(sizeof(struct cdev), GFP_KERNEL);gFile = kzalloc(sizeof(struct file_operations), GFP_KERNEL);gFile->open = hello_open;gFile->read = hello_read;gFile->write = hello_write;gFile->owner = THIS_MODULE;cdev_init(gDev, gFile);cdev_add(gDev, devNum, 3);return 0;
}void __exit hello_exit(void)
{cdev_del(gDev);unregister_chrdev_region(devNum, subDevNum);return;
}
module_init(hello_init);    /* 驅動入口 */
module_exit(hello_exit);    /* 驅動出口 */
MODULE_LICENSE("GPL");
hello_init是驅動的入口點,它通過moduel_init注冊到系統中,在驅動被裝載時調用,module_init()注冊的函數原型必須是:
int my_init(void);
所以hello_init的返回值是int類型,沒有參數。
hello_exit是驅動的出口函數,有module_exit()注冊到系統中,在驅動被卸載時調用,module_exit()注冊的函數原型必須是:
void my_exit(void);
所以hello_exit()沒有返回,也沒有參數。
內核提供打印函數printk(),和C庫提供的printf()函數功能幾乎相同。
printk(日志級別 "消息文本");
日志級別有8 ,定義在linyx/kernel中如圖:

2 編寫makefile
Makefile內容
obj-m := chardev.oKERNELDIR := /lib/modules/$(shell uname -r)/buildall default:modules
install:modules_installmodules modules_install help clean:$(MAKE) -C $(KERNELDIR) M=$(shell pwd) $@
- obj-m := chardev.o:obj-m列出要構建的模塊,對于每一個<filename>.o,進行系統構建時會查找<filename>.c 。obj-m用于構建模塊,把模塊放在內核源碼樹外維護,obj-y用于構建內核對象,把模塊加入到內核源碼樹中。
- KERNELDIR := /lib/modules/$(shell uname -r)/build:KERNELDIR 是欲構建的內核源碼位置。如果已經從源代碼構建了內核,則應該把這個變量設置為內核構建源代碼目錄的絕對路徑。-C 要求make在讀取makefile或執行其他任何操作之前先更改到指定的目錄。
- M=$(shell pwd):內核makefile使用這個變量來定位要構建的外部模塊的目錄。.c文件應該放在該目錄下。
- all default:modules:此行指示make執行modules目標,在構建用戶應用程序時,無論是all還是default都是傳統目標,換句話說,make default、make all或者簡單的make命令都被翻譯為make modules來執行。
- $(MAKE) -C $(KERNELDIR) M=$(shell pwd) $@:為上面列舉的每個目標所執行的規則,$@被替換為引起規則運行的目標名稱。換句話說,如果調用make modules,則
$@被替換成modules,規則將被替換為$(MAKE) -C $(KERNELDIR) M=$(shell pwd) modules
linux應用層程序在編譯的時候,需要鏈接c庫和glibc庫,那驅動需不需要呢?
驅動也需要,但是驅動不能鏈接和使用應用層層的任何lib庫,驅動需要引用內核的頭文件和函數。所以,編譯的時候需要指定內核源碼的位置,KERNERLDIR就是指定內核源碼的位置。
3 編譯和加載驅動
在構建外部模塊(makefile文件里面使用 obj-m)之前,需要有一個完整的、預編譯的內核源代碼樹,內核源碼樹版本必須與將加載和使用模塊的內核相同。有兩種方法可以獲得預構建的內核版本。
- 自己下載源代碼,然后構建內核
- 從發行版庫安裝linux-headers- *包
sudo apt-get update
sudo apt-get install linux-headers-$(uname -r)
這將只安裝頭文件,而不是整個源代碼樹,然后頭文件將被安裝在/usr/src/linux-headers-$(uname -r)下。有一個符號鏈接/lib/modules/$(uname -r)/build,指向前面安裝的頭文件,是在makefile中指定位內核目錄的路徑。這就是需要為預構建的內核所做的一切。
在驅動目錄下,指向make進行編譯:
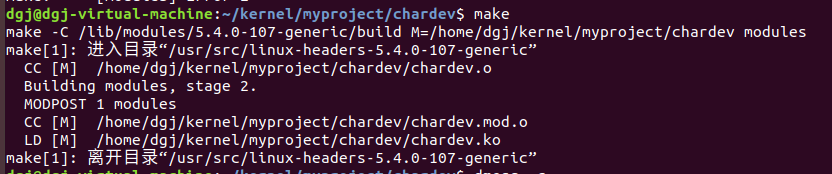
編譯出來的驅動文件為chardev.ko。
在加載驅動之前,我們可以將日志清理一下,方便我們查看驅動產生的消息,使用命令:
dmesg -c
接下來我們把這個驅動加載到內核,使用命令:
sudo insmod chardev.ko
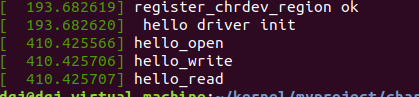
加載的時候就會執行hello_init函數,接著使用命令查看printk輸出的消息:

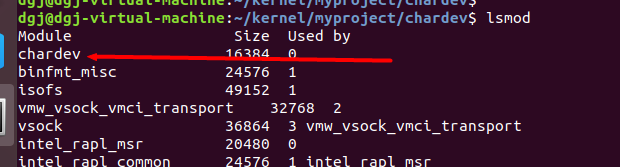
使用lsmod命令查看系統加載的驅動,可以發現chardev已經加載了
卸載驅動使用命令:
sudo rmmod chardev.ko
卸載的時候會執行hello_exit()函數
4 編寫應用程序測試驅動
本節來看驅動的測試。
我們需要編寫一個應用層的程序來對驅動進行測試:(test.c)
#include <fcntl.h>
#include <stdio.h>
#include <string.h>
#include <sys/select.h>#define DATA_NUM    (64)
int main(int argc, char *argv[])
{int fd, i;int r_len, w_len;fd_set fdset;char buf[DATA_NUM]="hello world";memset(buf,0,DATA_NUM);fd = open("/dev/hello", O_RDWR);printf("%d\r\n",fd);if(-1 == fd) {perror("open file error\r\n");return -1;}	else {printf("open successe\r\n");}w_len = write(fd,buf, DATA_NUM);r_len = read(fd, buf, DATA_NUM);printf("%d %d\r\n", w_len, r_len);printf("%s\r\n",buf);return 0;
}
編譯并執行,發現錯誤,找不到設備文件:

這是因為還沒有創建驅動的設備文件,我們為驅動手動創建設備文件
sudo mknod /dev/hello c 232 0
注意,這里的232和0要跟驅動文件chardev.c里定義的主次設備號對應起來。
我們再次執行:sudo ./test

發現成功了,我們執行dmesg查看驅動輸出,發現驅動里的hell_open, hello_write, hello_read被依次調用了。
這就是一個完整的、最簡單的驅動的開發和測試的流程。
對于應用程序中的write函數如何調用到驅動力的write函數,先上一張圖簡單說明下調用流程。

用戶空間的程序無法直接執行內核代碼,它們不能直接調用內核空間中的函數,所以應用程序會以某種方式通知系統,告訴內核自己需要執行一個系統調用,系統系統切換到內核態,通知內核的機制是靠軟中斷實現的:通過一個異常來促使系統切換到內核態去執行異常處理程序,此時異常處理程序就是系統調用程序,叫system_call(),system_call()根據系統調用號去執行相關的系統調用。
整個流程,上圖表現的已經非常明顯,但是問題也是有的,操作系統中的系統調用最終是如何知道應該調用哪個驅動里的write函數呢?
如果我們沒有記錯,在驅動文件里,有定義主次設備號:
int reg_major  =  232;
int reg_minor =   0;
int hello_init(void)
{   devNum = MKDEV(reg_major, reg_minor);gDev = kzalloc(sizeof(struct cdev), GFP_KERNEL);gFile = kzalloc(sizeof(struct file_operations), GFP_KERNEL);...cdev_init(gDev, gFile);cdev_add(gDev, devNum, 3);
}
在hello_init里,我們把主設備號232和此設備號0組合成了devNum。
cdev_t的結構體如下:
struct cdev
{  struct kobject kobj;  struct module *owner; //所屬模塊  const struct file_operations *ops; //文件操作結構  struct list_head list;  dev_t dev; //設備號,int 類型,高12位為主設備號,低20位為次設備號  unsigned int count;
};
cdev_init(gDev, gFile); 建立了gDev和gFile的邏輯關系,初始化gDev結構體中的ops。
cdev_add(gDev, devNum, 3); 建立了gDev和devNum的邏輯關系; cdev_add 用于向Linux內核系統中添加一個新的cdev結構體變量所描述的字符設備,并且使這個設備立即可用。gDev是被添加入Linux內核系統的字符設備,devNum代表設備的設備號,其中包括主設備號和次設備號,3代表想注冊設備的設備號的范圍,用于給struct cdev中的字段count賦值。
其實你翻開代碼看細節會發現,以上兩句代碼其實建立了gFile和devNum的對應關系,也就是file_operations和devNum的對應關系,也就是建立了file_operation和主次設備號(232,0)的對應關系。
注意:在linux里,在應用層用文件句柄也就是fd表示一個打開的文件,但是在內核里用struct file 表示一個打開的文件,用struct file_operations表示對該文件的操作。fd和struct file是一一對應的,而struct file和struct file_operations也是一一對應的。這是struct file_operations的結構體定義:
struct file_operations {struct module *owner;loff_t (*llseek) (struct file *, loff_t, int);ssize_t (*read) (struct file *, char __user *, size_t, loff_t *);ssize_t (*write) (struct file *, const char __user *, size_t, loff_t *);int (*mmap) (struct file *, struct vm_area_struct *);int (*open) (struct inode *, struct file *);int (*flush) (struct file *, fl_owner_t id);int (*release) (struct inode *, struct file *);int (*fsync) (struct file *, loff_t, loff_t, int datasync);int (*fasync) (int, struct file *, int);...
};
在上一講的例子里,我們打開的文件名字是/dev/hello,這是一個設備文件,對應的主次設備號分別為232和0。所以,當你打開/dev/hello之后,就已經建立了這個文件和驅動里的 struct file 的對應關系,也就建立了這個文件和驅動里的struct file_operations的對應關系。
好,了解以上的背景之后,我們來看看代碼。
我們從內核里write系統調用的實現部分開始閱讀:
相關的代碼在:fs/read_write.c
ssize_t ksys_write(unsigned int fd, const char __user *buf, size_t count)
{struct fd f = fdget_pos(fd);ssize_t ret = -EBADF;if (f.file) {loff_t pos = file_pos_read(f.file);ret = vfs_write(f.file, buf, count, &pos);if (ret >= 0)file_pos_write(f.file, pos);fdput_pos(f);}return ret;
}
關鍵代碼在vfs_write。所以,我們繼續跟進入:
ssize_t vfs_write(struct file *file, const char __user *buf, size_t count, loff_t *pos)
{ssize_t ret;if (!(file->f_mode & FMODE_WRITE))return -EBADF;if (!(file->f_mode & FMODE_CAN_WRITE))return -EINVAL;if (unlikely(!access_ok(buf, count)))return -EFAULT;ret = rw_verify_area(WRITE, file, pos, count);if (!ret) {if (count > MAX_RW_COUNT)count =  MAX_RW_COUNT;file_start_write(file);ret = __vfs_write(file, buf, count, pos);if (ret > 0) {fsnotify_modify(file);add_wchar(current, ret);}inc_syscw(current);file_end_write(file);}return ret;
}
繼續跟入__vfs_write:
ssize_t __vfs_write(struct file *file, const char __user *p, size_t count,loff_t *pos)
{if (file->f_op->write)return file->f_op->write(file, p, count, pos);else if (file->f_op->write_iter)return new_sync_write(file, p, count, pos);elsereturn -EINVAL;
}
關鍵代碼在這里:
if (file->f_op->write)return file->f_op->write(file, p, count, pos);
上面提到建立了/dev/hello和file_operations的關系。所以這里其實就是判斷chardev驅動里有沒有定義write函數,如果有,那就調用驅動里的write函數。
應用程序的write函數去調用C庫里面的write函數,C庫里面的write函數會產生一個異常,進入內核空間,調用系統調用函數system_call()。system_call()根據系統調用號去調用sys_wtite函數,sys_write函數根據應用程序傳來的fd找到file operation,也就是驅動定義的文件(gDev)可以執行那些操作,找到file operation后,調用file operation里面的write操作
所以,按照如上的路徑,應用程序里的write就順利的調用到了hello驅動里的write函數。因為我們驅動里的hello_write和hello_read里都返回了0。所以,應用程序里的write和read也返回了0。
ssize_t hello_write(struct file *f, const char __user *u, size_t s, loff_t *l)
{printk(KERN_EMERG"hello_write\r\n");return 0;
}
ssize_t hello_read(struct file *f, char __user *u, size_t s, loff_t *l)
{printk(KERN_EMERG"hello_read\r\n");      return 0;
}
如果你想讓測試程序里的write和read返回非零值,只要把驅動里的return 0,改為任意值就好了,大家可以自己測試一下。
方法與示例)


方法(帶示例))
)

方法與示例)

)

方法與示例)

)


方法及示例)

)
