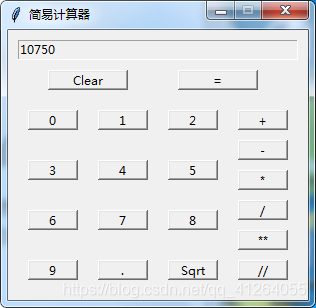
1,使用tkinter實現計算器程序。實現效果如下:
from tkinter import *
from tkinter.ttk import *def frame(master):"""將共同的屬性作為默認值, 以簡化Frame創建過程"""w = Frame(master)w.pack(side=TOP, expand=YES, fill=BOTH)return wdef button(master, text, command):"""提取共同的屬性作為默認值, 使Button創建過程簡化"""w = Button(master, text=text, command=command, width=6)w.pack(side=LEFT, expand=YES, fill=BOTH, padx=2, pady=2)return wdef back(text):"""將text最末的字符刪除并返回"""if len(text) > 0:return text[:-1]else:return textdef calc(text):"""用eval方法計算表達式字符串"""try:if (sep_flag.get() == 0):return eval(del_sep(text))else:return add_sep(str(eval(del_sep(text))))except (SyntaxError, ZeroDivisionError, NameError):return 'Error'def add_sep(text):"""向參數傳入的數字串中添加千位分隔符這里考慮了三種情況: 無整數部份, 無小數部份, 同時有整數和小數部份由于字符串是不可改變的, 這里由字符串生成列表以便執行insert操作和extend操作, 操作完成后最由列表生成字符串返回    """dot_index = text.find('.')if dot_index > 0:text_head = text[:dot_index]text_tail = text[dot_index:]elif dot_index < 0:text_head = texttext_tail = ''else:text_head = ''text_tail = textlist_ = [char for char in text_head]length = len(list_)tmp_index = 3while length - tmp_index > 0:list_.insert(length - tmp_index, ',')tmp_index += 3list_.extend(text_tail)new_text = ''for char in list_:new_text += charreturn new_textdef del_sep(text):"""刪除數字串中所有的千位分隔符"""return text.replace(',', '')# 開始界面的實現
root = Tk()
root.title("Calculator") # 添加標題main_menu = Menu() # 創建最上層主菜單# 創建Calculator菜單, 并加入到主菜單
calc_menu = Menu(main_menu, tearoff=0)
calc_menu.add_command(label='Quit', command=lambda: exit())
main_menu.add_cascade(label='Calculator', menu=calc_menu)# 創建View菜單, 并加入到主菜單
# 其中"Show Thousands Separator"菜單項是一個Checkbutton
text = StringVar()
sep_flag = IntVar()
sep_flag.set(0)
view_menu = Menu(main_menu, tearoff=0)
view_menu.add_checkbutton(label='Show Thousands Separator', variable=sep_flag,command=lambda t=text: t.set(add_sep(t.get())))
main_menu.add_cascade(label='View', menu=view_menu)root['menu'] = main_menu # 將主菜單與root綁定# 創建文本框
Entry(root, textvariable=text).pack(expand=YES, fill=BOTH, padx=2, pady=4)style = Style()
style.configure('TButton', padding=3)# 創建第一行三個按鈕
fedit = frame(root)
button(fedit, 'Backspace', lambda t=text: t.set(back(t.get())))
button(fedit, 'Clear', lambda t=text: t.set(''))
button(fedit, '±', lambda t=text: t.set('-('+t.get()+')'))# 每行四個, 創建其余四行按鈕
for key in ('789/', '456*', '123-', '0.=+'):fsymb = frame(root)for char in key:if char == '=':button(fsymb, char, lambda t=text: t.set(calc(t.get())))else:button(fsymb, char, lambda t=text, c=char: t.set(t.get()+c))root.mainloop()
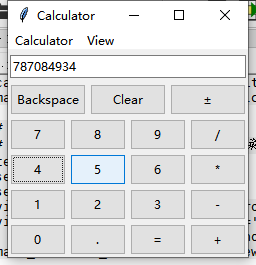
效果圖如下:
2,安裝pillow和qrcode庫并編寫程序:生成帶有圖標的二維碼,圖標為自己設置的照片,掃描后打開某個網站。(如平頂山學院的網站http://www.pdsu.edu.cn)
cmd --- pip install qrcode

import qrcode
from PIL import Image
import os,sys
def gen_qrcode(string,path,logo=""):qr=qrcode.QRCode(version=2,error_correction=qrcode.constants.ERROR_CORRECT_H,box_size=8,border=1)qr.add_data(string)qr.make(fit = True)img = qr.make_image()img = img.convert("RGBA")if logo and os.path.exists(logo):try:icon = Image.open(logo)img_w,img_h = img.sizeexcept Exception as e:print(e)sys.exit(1)factor = 4;size_w = int(img_w/factor)size_h = int(img_h/factor)icon_w,icon_h=icon.sizeif icon_w > size_w:icon_w = size_wif icon_h > size_h:icon_h = size_hicon =  icon.resize((icon_w,icon_h),Image.ANTIALIAS)w = int((img_w - icon_w)/2)h = int((img_h - icon_h)/2)icon = icon.convert("RGBA")img.paste(icon,(w,h),icon)img.save(path)#調用系統命令打開圖片os.system("start %s" %path)if __name__ == "__main__":info = "http://www.pdsu.edu.cn"pic_path = "yanyu.png"     #必須生成png格式  這里是生成的二維碼圖片名稱icon_path = "G:\TIM\圖片\yy.jpg"    #可以是jpg,也可以是png  這里是中間圖片的路徑gen_qrcode(info,pic_path,icon_path)
效果圖如下:

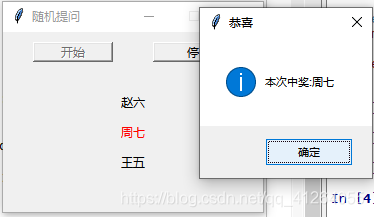
3,使用tkinter實現抽獎式提問程序。給出人抽獎人員名單,[‘張三’, ‘李四’, ‘王五’, ‘趙六’, ‘周七’, ‘錢八’],實現如下效果,點擊開始,滾動姓名,開始抽獎,點擊停,彈出中獎姓名。
import tkinter
import tkinter.messagebox
import random
import threading
import itertools
import time
root = tkinter.Tk()
#窗口標題
root.title('隨機提問')
#窗口初始大小和位置
root.geometry('260x180+400+300')
#不允許改變窗口大小
root. resizable(False,False)#關閉程序時執行的函數代碼,停止滾動顯示學生名單
def closeWindow():root.flag = Falsetime.sleep(0.1)root.destroy()
root.protocol('WM_DELETE_WINDOW',closeWindow)
#模擬學生名單,可以加上數據庫訪問接口,從數據庫中讀取學生名單
students = ['張三','李四','王五','趙六','周七','錢八']
#變量,用來控制是否滾動顯示學生名單root.flag = False
def switch():root.flag = True#隨機打亂學生名單t = students[:]random.shuffle(t)t = itertools.cycle(t)while root.flag:#滾動顯示lbFirst['text'] = lbSecond ['text']lbSecond['text'] = lbThird['text']lbThird['text'] = next(t)#數字可以修改,控制滾動速度time.sleep(0.1)def btnStartClick():#每次單擊“開始”按鈕啟動新線程t = threading.Thread (target=switch)t.start()btnStart['state'] ='disabled'btnStop['state'] ='normal'
btnStart = tkinter.Button(root,text='開始',command=btnStartClick)
btnStart.place(x= 30,y=10,width=80,height=20)def btnStopClick():# 單擊“停”按鈕結束滾動顯示root.flag = Falsetime.sleep(0.3)tkinter.messagebox.showinfo('恭喜','本次中獎:'+lbSecond['text'])btnStart['state'] ='norma1'btnStop['state'] ='disabled'
btnStop = tkinter.Button(root,text='停',command = btnStopClick)
btnStop['state'] ='disabled'
btnStop.place(x=150,y = 10,width =80,height = 20)# 用來滾動顯示學生名單的3個Labe1組件
# 可以根據需要進行添加,但要修改上面的線程函數代碼
lbFirst = tkinter.Label(root,text ='')
lbFirst.place(x=80,y = 60,width = 100,height = 20)
# 紅色Label組件,表示中獎名單
lbSecond = tkinter.Label(root,text ='')
lbSecond['fg'] ='red'
lbSecond.place(x=80,y = 90,width = 100,height = 20)
lbThird =tkinter.Label(root,text = '' )
lbThird.place(x=80,y = 120, width = 100,height = 20)# 啟動tkinter主程序
root.mainloop()
效果圖如下:

——常用操作)


方法與示例)

輸出pcm文件)
)

方法與示例)

)

輸出yuv420p文件)
)
隨機產生兩個1~10的正整數,在屏幕上輸出題目,如:5+3=?(2)學生輸入答案,程序檢查學生輸入答案是否正確,若正確,)


方法及示例)