SmartGWT簡介
我最近開始使用SmartGWT ,它是一個基于GWT的框架,該框架為您的應用程序UI提供了一個全面的小部件庫,并為服務器端的數據管理提供了幫助。 您可以在SmartGWT展示柜上查看其漂亮的功能。 我準備了一個簡短的“入門”指南,介紹如何將庫與GWT項目集成(假設您已經安裝了GWT SDK和Eclipse的Google插件 )。 請注意,Smart GWT與GWT 1.5.3,GWT 1.6.4,GWT 1.7.x和GWT 2.0.x兼容。
創建GWT項目
第一步是從下載部分下載庫。 我將在本教程中使用的版本是2.1(直接從此處下載)。 解壓縮ZIP文件,并在新目錄中找到框架的文檔,一些示例,“ Hello World”示例以及必要的JAR文件。 在新的瀏覽器選項卡中打開JavaDocs 。
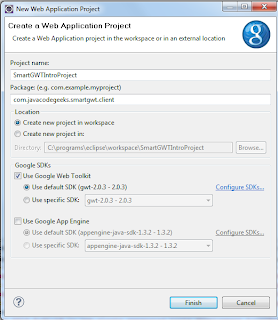
接下來,我們在Eclipse中創建一個新的“ Web應用程序項目”。 為項目選擇適當的名稱,并選擇適當的包裝。 確保選中“使用Google Web Toolkt”復選框(不需要Google的App Engine,因此請不要選擇該復選框)。 該向導將如下所示:

添加SmartGWT庫
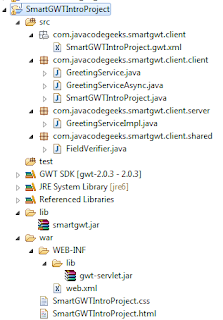
創建項目框架之后,瀏覽文件系統到項目位置,然后創建一個名為“ lib”的新文件夾。 將解壓縮的ZIP中的“ smartgwt.jar”文件復制到新創建的文件夾中,并在Eclipse中刷新項目,以便新文件顯示在此處。 然后配置項目的類路徑以包含JAR文件(“項目”→“屬性”→“ Java構建路徑”→“添加JAR”…)。 到目前為止的標準東西。 Eclipse中的擴展項目應如下所示:

然后編輯模塊xml文件(名為“ SmartGWTIntroProject.gwt.xml”),并在標準“繼承”聲明之后添加以下行:
<inherits name="com.smartgwt.SmartGwt"/>模塊xml文件將是:
<?xml version="1.0" encoding="UTF-8"?>
<module rename-to='smartgwtintroproject'>
<!-- Inherit the core Web Toolkit stuff.                        -->
<inherits name='com.google.gwt.user.User'/><!-- Inherit the default GWT style sheet.  You can change       -->
<!-- the theme of your GWT application by uncommenting          -->
<!-- any one of the following lines.                            -->
<!-- <inherits name='com.google.gwt.user.theme.standard.Standard'/> -->
<!-- <inherits name='com.google.gwt.user.theme.chrome.Chrome'/> -->
<!-- <inherits name='com.google.gwt.user.theme.dark.Dark'/>     --><!-- Other module inherits                                      --><inherits name="com.smartgwt.SmartGwt"/><!-- Specify the app entry point class.                         -->
<entry-point class='com.javacodegeeks.smartgwt.client.client.SmartGWTIntroProject'/><!-- Specify the paths for translatable code                    -->
<source path='client'/>
<source path='shared'/></module>
這使GWT知道您的應用程序將使用SmartGWT庫。
更新:“ com.google.gwt.user.theme.standard.Standard”聲明應像上面一樣被刪除或注釋掉,因為它與某些SmartGWT樣式沖突。
之后,在“ war”文件夾中找到主HTML。 編輯它,并在編譯的模塊聲明之前添加以下行:
<script>var isomorphicDir="smartgwtintroproject/sc/";</script>更新:從2.2版開始,不再需要定義isomorpihcDir值。 查看Smart GWT 2.2的發行說明 。 但是,對于本教程(使用2.1版),需要聲明。
在同一文件中,向下滾動并找到以下幾行:
<td id="nameFieldContainer"></td>
<td id="sendButtonContainer"></td>
將其替換為以下內容:
<td id="formContainer"></td>
<td id="buttonContainer"></td>
這些是將包含文本項HTML元素以及稍后將添加的按鈕。
完整HTML文件如下:
<!doctype html>
<!-- The DOCTYPE declaration above will set the    -->
<!-- browser's rendering engine into               -->
<!-- "Standards Mode". Replacing this declaration  -->
<!-- with a "Quirks Mode" doctype may lead to some -->
<!-- differences in layout.                        --><html>
<head>
<meta http-equiv="content-type" content="text/html; charset=UTF-8"><!--                                                               -->
<!-- Consider inlining CSS to reduce the number of requested files -->
<!--                                                               -->
<link type="text/css" rel="stylesheet" href="SmartGWTIntroProject.css"><!--                                           -->
<!-- Any title is fine                         -->
<!--                                           -->
<title>Web Application Starter Project</title><!--                                           -->
<!-- This script loads your compiled module.   -->
<!-- If you add any GWT meta tags, they must   -->
<!-- be added before this line.                -->
<!--                                           -->
<script>var isomorphicDir="smartgwtintroproject/sc/";</script>
<script type="text/javascript" language="javascript" src="smartgwtintroproject/smartgwtintroproject.nocache.js"></script>
</head><!--                                           -->
<!-- The body can have arbitrary html, or      -->
<!-- you can leave the body empty if you want  -->
<!-- to create a completely dynamic UI.        -->
<!--                                           -->
<body><!-- OPTIONAL: include this if you want history support -->
<iframe src="javascript:''" id="__gwt_historyFrame" tabIndex='-1' style="position:absolute;width:0;height:0;border:0"></iframe><!-- RECOMMENDED if your web app will not function without JavaScript enabled -->
<noscript>
<div style="width: 22em; position: absolute; left: 50%; margin-left: -11em; color: red; background-color: white; border: 1px solid red; padding: 4px; font-family: sans-serif">Your web browser must have JavaScript enabled
in order for this application to display correctly.
</div></noscript><h1>
Web Application Starter Project</h1><table align="center">
<tr>
<td colspan="2" style="font-weight:bold;">Please enter your name:</td>
</tr><tr>
<td id="formContainer"></td>
<td id="buttonContainer"></td>
</tr><tr>
<td colspan="2" style="color:red;" id="errorLabelContainer"></td>
</tr></table></body>
</html>
創建應用程序入口點
通過Eclipse創建GWT時,會創建許多自動生成的文件。 其中之一是“客戶端”包中的主要Java文件,該文件用作應用程序的入口點。 因此,刪除生成的代碼并添加以下內容:
package com.javacodegeeks.smartgwt.client.client;import com.google.gwt.core.client.EntryPoint;
import com.google.gwt.user.client.ui.RootPanel;
import com.smartgwt.client.util.SC;
import com.smartgwt.client.widgets.IButton;
import com.smartgwt.client.widgets.events.ClickEvent;
import com.smartgwt.client.widgets.events.ClickHandler;
import com.smartgwt.client.widgets.form.DynamicForm;
import com.smartgwt.client.widgets.form.fields.TextItem;public class SmartGWTIntroProject implements EntryPoint {public void onModuleLoad() {final DynamicForm form = new DynamicForm();final TextItem textItem = new TextItem();textItem.setTitle("Name");form.setFields(textItem);final IButton button = new IButton("Hello");button.addClickHandler(new ClickHandler() {public void onClick(ClickEvent event) {String name = textItem.getValue().toString();SC.say("Hello " + name);}});RootPanel.get("formContainer").add(form);RootPanel.get("buttonContainer").add(button);}}
確保導入的軟件包如上所示,因為SmartGWT使用的名稱與核心GWT框架的名稱相同的類。
啟動應用程序
接下來,我們準備啟動我們的應用程序。 選擇運行? 運行為? Web應用程序并使用您喜歡的瀏覽器訪問提供的URL:
http://127.0.0.1:8888/SmartGWTIntroProject.html?gwt.codesvr=127.0.0.1:9997
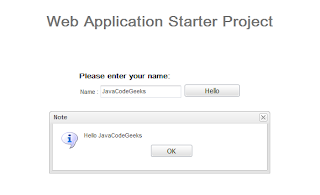
您應該能夠看到以下內容:

而已。 現在您可以創建一些由SmartGWT支持的出色應用程序了。 您可以在此處找到Eclipse項目(某些文件已從項目中刪除)。
這只是有關如何將SmartGWT添加到項目中的簡短指南。 在以下文章中,我將基于SmartGWT創建一個完整的應用程序,以向您展示其一些出色的功能。 敬請關注。
- 高級SmartGWT教程,第1部分
- 將CAPTCHA添加到您的GWT應用程序
- 使用Spring Security保護GWT應用程序
- GWT 2 Spring 3 JPA 2 Hibernate 3.5教程– Eclipse和Maven 2展示
- 建立自己的GWT Spring Maven原型
- GWT EJB3 Maven JBoss 5.1集成教程
翻譯自: https://www.javacodegeeks.com/2010/06/getting-started-smartgwt-gwt-interfaces.html
----調整屏幕的寬高比)


)
用戶管理命令)


)


)


