本文介紹MySQL的Master/Slave群集安裝和配置,版本號安裝最新的穩定版GA 5.6.19。
為了支持有限HA。我們用Master/Slave讀寫簡單孤立的集群。有限HA這是當Master不可用,數據不會丟失。但在Master寫的,必須手工處理故障。假設要支持更高的可用性。能夠使用兩臺Master來做熱切換。
Master和Slave的MySQL安裝是同樣的,僅僅是my.cnf的配置不同,須要配置二進制日志文件復制。
沒有特殊說明,命名中帶#的為root用戶操作。帶$的為mysql?Linux用戶的操作。
安裝準備
1. 在安裝MySQL前,須要確認以下的系統軟件已經安裝在Linux中。
| 軟件名稱 | 軟件描寫敘述 |
| gcc-4.4.7 | 編程語言編譯器 |
| gcc-c++-4.4.7 | C++語言編譯器 |
| cmake-2.6.4-5 | 跨平臺的開源構建系統 |
| ncurses-devel-5.7-3.20090208 | 控制打印控制臺屏幕 |
# groupadd mysql
# useradd -g mysql mysql
# passwd mysql
3.?準備安裝文件夾
創建MySQL安裝文件夾,并賦權限給mysql用戶:
# mkdir /usr/local/mysql-5.6.19
# chown mysql:mysql /usr/local/mysql-5.6.19
# chmod -R 770 /usr/local/mysql-5.6.19
4. 創建MySQL數據存儲文件夾:
# mkdir /data
# mkdir /data/mysql
# chown mysql:mysql /data/mysql
5. 授權MySQL解壓源代碼文件夾/usr/local/src文件夾的可運行權限給全部用戶:
# chmod -R 757 /usr/local/src
安裝MySQL
1. 解壓縮安裝包:
$ cd /usr/local/src
$ tar -xzvf mysql-5.6.19.tar.gz
2. 配置MySQL編譯參數
$ cd /usr/local/src/mysql-5.6.19
$ cmake . -DCMAKE_INSTALL_PREFIX=/usr/local/mysql-5.6.19\
?????? -DMYSQL_DATADIR=$MYSQL_DATA_PATH\
?????? -DSYSCONFDIR=/usr/local/mysql-5.6.19/conf\
?????? -DDEFAULT_CHARSET=utf8\
?????? -DDEFAULT_COLLATION=utf8_general_ci\
?????? -DWITH_READLINE=1\
?????? -DWITH_INNOBASE_STORAGE_ENGINE=1\
-DWITH_ARCHIVE_STORAGE_ENGINE=1 \
-DWITH_BLACKHOLE_STORAGE_ENGINE=1 \
-DWITH_PERFSCHEMA_STORAGE_ENGINE=1備注:
-DCMAKE_INSTALL_PREFIX: 配置MySQL的安裝文件夾。
-DMYSQL_DATADIR: 配置MySQL的數據文件夾。
-DSYSCONFDIR: ?配置MySQL的配置文件文件夾。
-DDEFAULT_CHARSET: 默認字符集。
-DDEFAULT_COLLATION:設定默認語言的排序規則。
-DWITH_READLINE:支持批量導入mysql數據。
-DWITH_INNOBASE_STORAGE_ENGINE:使用INNOBASE存儲引擎。
-DWITH_ARCHIVE_STORAGE_ENGINE:常應用于日志記錄和聚合分析,不支持索引。
-DWITH_BLACKHOLE_STORAGE_ENGINE:黑洞存儲引擎。
-DWITH_PERFSCHEMA_STORAGE_ENGINE:性能模式引擎。3.?運行make
$ make
$ make install
4. 改動myql用戶的環境變量,添加MYSQL_HOME。并把bin加到PATH:
$ vi ~/.bash_profile
| # User specific environment and startup programs # MySQL home文件夾 export MYSQL_HOME=/usr/local/mysql-5.6.19 ? PATH=$PATH:$HOME/bin:$MYSQL_HOME/bin ? export PATH |
初始化MySQL
1. 安裝service腳本
# cp /usr/local/mysql-5.6.19/support-files/mysql.server/etc/init.d/mysqld
# chown mysql:mysql/etc/init.d/mysqld
# chmod 700 /etc/init.d/mysqld
2.?創建mysql權限數據庫
$ $MYSQL_HOME/scripts/mysql_install_db--basedir=$MYSQL_HOME --datadir=/data/mysql
3. 創建PID文件文件夾
$ mkdir $MYSQL_HOME/var
4. 為master配置my.cnf
my.cnf格式不對,非常easy在啟動時錯誤,最好在原有文件的基礎上通過vi工具在linux上改動。
假設文件已經損壞,能夠通過默認的模板中拷貝:
$ cp $MYSQL_HOME/support-files/my-default.cnf$MYSQL_HOME/my.cnf
編輯my.cnf
$ vi $MYSQL_HOME/my.cnf
在文件里添加藍色字體部分:
| # For advice on how to change settings please see # http://dev.mysql.com/doc/refman/5.6/en/server-configuration-defaults.html ? [mysqld] ? # Remove leading # and set to the amount of RAM for the most important data # cache in MySQL. Start at 70% of total RAM for dedicated server, else 10%. innodb_buffer_pool_size = 256M innodb_flush_log_at_trx_commit=1 ? # Remove leading # to turn on a very important data integrity option: logging # changes to the binary log between backups. log_bin=master-bin log_bin_index=master-bin.index ? # These are commonly set, remove the # and set as required. # basedir = ..... datadir = /data/mysql port = 3306 # first master server id server_id = 1 socket = /tmp/mysql.sock pid-file = ?/usr/local/mysql-5.6.19/var/master.pid ? # Remove leading # to set options mainly useful for reporting servers. # The server defaults are faster for transactions and fast SELECTs. # Adjust sizes as needed, experiment to find the optimal values. # join_buffer_size = 128M # sort_buffer_size = 2M # read_rnd_buffer_size = 2M ? sql_mode=NO_ENGINE_SUBSTITUTION,STRICT_TRANS_TABLES |
5. 為slave配置my.cnf
和master的配置文件一樣進行改動。但注意文件里的log文件名稱、datadir和server_id等內容不同。
編輯my.cnf
$ vi $MYSQL_HOME/my.cnf
在文件里添加藍色字體部分:
| # For advice on how to change settings please see # http://dev.mysql.com/doc/refman/5.6/en/server-configuration-defaults.html ? [mysqld] ? # Remove leading # and set to the amount of RAM for the most important data # cache in MySQL. Start at 70% of total RAM for dedicated server, else 10%. innodb_buffer_pool_size = 256M innodb_flush_log_at_trx_commit=1 ? # Replication # relay-log=slave-relay-bin # relay-log-index=slave-relay-bin.index ? # These are commonly set, remove the # and set as required. # basedir = ..... datadir = /data/mysql port = 3306 # first slave server id of master 1 server_id = 101 socket = /tmp/mysql.sock pid-file = ?/usr/local/mysql-5.6.19/var/slave.pid ? # Remove leading # to set options mainly useful for reporting servers. # The server defaults are faster for transactions and fast SELECTs. # Adjust sizes as needed, experiment to find the optimal values. # join_buffer_size = 128M # sort_buffer_size = 2M # read_rnd_buffer_size = 2M ? sql_mode=NO_ENGINE_SUBSTITUTION,STRICT_TRANS_TABLES |
6.?啟動MySQL
啟動和停止master和slave都全然一樣。
$ service mysqldstart
通過以下命令查看是否啟動成功:
$ service mysqldstatus
7.?停止MySQL
$ service mysqld stop
管理MySQL安全性
默認MySQL的root的用戶password為空。為了提高安全性,應該設置root用戶一個安全的password。
在server上通過mysql用戶打開MySQLclient:$ mysql –u root
設置一個安全的password:
mysql> SET PASSWORD FORroot@localhost=PASSWORD('secret');
配置Master和Slave之間的復制
1. 創建運行復制的MySQL用戶
在Master上創建一個復制用戶,當中secret為用戶的password:
mysql> CREATEUSER repl_user IDENTIFIED BY 'secret';
并賦給復制權限:
mysql>GRANTREPLICATION SLAVE ON *.* TO repl_user;
2. 鎖定Master并獲取二進制日志位置值
獲取讀鎖:
mysql> FLUSH TABLES WITHREAD LOCK;
顯示當前二進制文件名稱及位置值:
mysql> SHOW MASTER STATUS;
3. 通過mysqldump工具獲取Master數據快照
在另外一個會話中在Master上運行:
$ mysqldump -u root-p --all-databases --master-data > data_dump.sql
運行后。保存在當前文件夾中。
4. 釋放Master上的讀鎖
在獲取讀鎖的會話中。運行釋放鎖命令:
mysql> UNLOCK TABLES;5. 導入dump數據到Slave中
通過scp拷貝data_dump.sql到Slave的機器上。
$ scp data_dump.sqlmysql@<ip of slave>:/home/mysql
在Slave上通過以下的命令導入到Slave的MySQL中。
$ mysql –u root -p
mysql> source data_dump.sql;6. 配置Master和Slave之間的復制
mysql> CHANGE MASTER TO MASTER_HOST='<ip or hostame of master>',
MASTER_USER='repl_user',
MASTER_PASSWORD='secret',
MASTER_PORT = 3306,
MASTER_LOG_FILE='master-bin.000003',
MASTER_LOG_POS=881;
上面的MASTER_LOG_FILE和MASTER_LOG_POS須要配置6.2中查詢到的信息。<ipor hostame of master>是Master的IP或主機名。
啟動Slave:mysql> START SLAVE;
7. 驗證Master和Slave的狀態
在Master上運行:
mysql> SHOW MASTER STATUS;
在Slave上運行:
mysql> SHOW SLAVE STATUS;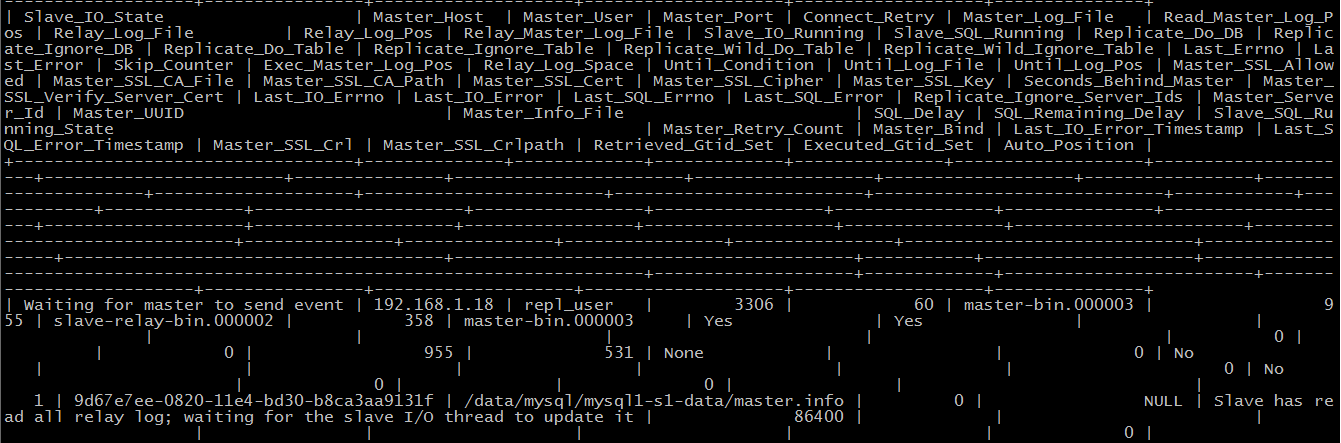
上述資料顯示,無論是什么錯誤,Slave_IO_State信息‘Waitigfor master to send event’,說明復制連接配置OK。
至今,二MySQL的Master/Slave集群模式已成功部署。能夠Master運行數據更新操作,研究發現,正常的副本Slave上。


)

數據流圖)


 - E (459E))


)
