binder是android里面的通信機制,這就不說它如何如何好了,Goog已經說過了,這里不多說。binder是一個面向對象的編程方法,大量使用虛函數類。最近研究binder看到一網友寫的,就借鑒一下。這個例子很好的解釋里binder通信關系。原文:http://blog.csdn.net/new_abc/article/details/8097775 例子不錯不過就是沒運行起來,不過這都不是問題,關鍵是很容易理解。
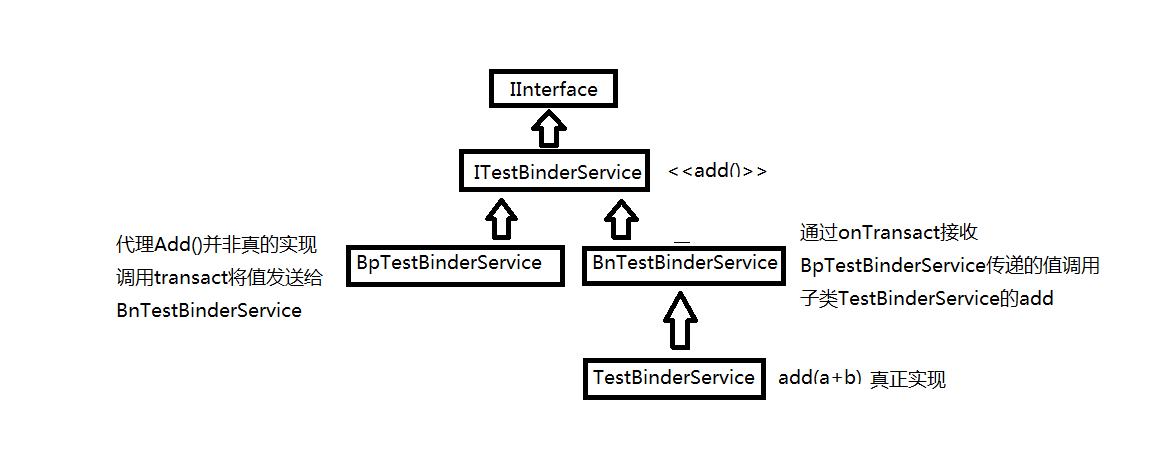
我將他的源碼整理類圖看看,不過這個是簡單的繼承關系。

基本上使用binder就這個關系,從中間一分為二,左邊客戶端使用,右邊服務端。不管是客戶端還是服務端都繼承子IXXXService這個類,這個類可以裂解為客戶端和服務端的“爺爺”,而“爺爺”繼承IInterface,所有自定義的binder都必須繼承這個類,這個是android強指針實現計數的方法。先看看源碼后再理解這個圖。
首先看下目錄結構:
TestBinderClient目錄:? Android.mk??ITestBinderService.cpp
TestBinderServer目錄: Android.mk??ITestBinderService.h??main_testBinder.cpp??testBinder.cpp??TestBinderService.cpp??TestBinderService.h??
TestBinderClient下面是Binder的客戶端,TestBinderServer是binder的服務端
我們先來看下biner服務端代碼
1、ITestBinderService.h


 1     #ifndef ANDROID_ITESTBINDERSERVICE_H_
 2     #define ANDROID_ITESTBINDERSERVICE_H_
 3
 4     #include <utils/RefBase.h>
 5     #include <binder/IInterface.h>
 6     #include <binder/Parcel.h>
 7
 8
 9     namespace android {
10
11     class Parcel;
12
13     class ITestBinderService: public IInterface {
14     public:
15         DECLARE_META_INTERFACE(TestBinderService);
16
17         virtual int add(int a, int b) = 0;
18     };
19
20     class BnTestBinderService: public BnInterface<ITestBinderService> {
21     public:
22         virtual status_t onTransact(uint32_t code, const Parcel& data,
23                 Parcel* reply, uint32_t flags = 0);
24     };
25
26     }
27
28     #endif /* ANDROID_ITESTBINDERSERVICE_H_ */
????? 這里主要是定義了兩個類ITestBinderService 和?BnTestBinderService,ITestBinderService 是TestBinderService 的基類,這里主要是DECLARE_META_INTERFACE 這個宏,定義在frameworks\base\include\binder\IInterface.h文件中。


1 #define DECLARE_META_INTERFACE(INTERFACE)                               \
2     static const android::String16 descriptor;                          \
3     static android::sp<I##INTERFACE> asInterface(                       \
4             const android::sp<android::IBinder>& obj);                  \
5     virtual const android::String16& getInterfaceDescriptor() const;    \
6     I##INTERFACE();                                                     \
7     virtual ~I##INTERFACE();
把TestBinderService代入進去


1 #define DECLARE_META_INTERFACE(TestBinderService)                               \
2     static const android::String16 descriptor;                          \
3     static android::sp<ITestBinderService> asInterface(                       \
4             const android::sp<android::IBinder>& obj);                  \
5     virtual const android::String16& getInterfaceDescriptor() const;    \
6     ITestBinderService();                                                     \
7     virtual ~I##TestBinderService();
其中封裝了實現binder所需要的一些類成員變量和成員函數,通過這些成員函數可以為一個binder實現創建proxy(代理)
2、TestBinderService.h


 1     #ifndef ANDROID_TESTBINDERSERVICE_H_
 2     #define ANDROID_TESTBINDERSERVICE_H_
 3
 4     #include <utils/KeyedVector.h>
 5     #include "ITestBinderService.h"
 6
 7     namespace android {
 8
 9     class TestBinderService: public BnTestBinderService {
10     public:
11         static void instantiate();
12         int add(int a,int b);
13     private:
14         TestBinderService();
15         virtual ~TestBinderService();
16     };
17
18     }
19
20     #endif /* ANDROID_TESTBINDERSERVICE_H_ */
這個文件比較簡單,主要就是定義了一個類TestBinderService,繼承于前面 的BnTestBinderService,并定義了一個方法add函數和instantiate
3、TestBinderService.cpp


 1     #define LOG_TAG "TestBinderService"
 2     #include <utils/Log.h>
 3     #include <binder/IServiceManager.h>
 4     #include <binder/IPCThreadState.h>
 5
 6     #include "TestBinderService.h"
 7     static int debug_flag = 1;
 8     namespace android {
 9
10     void TestBinderService::instantiate() {
11         LOGI("Enter TestBinderService::instantiate");
12         status_t st = defaultServiceManager()->addService(
13                 String16("my.test.binder"), new TestBinderService());
14         LOGD("ServiceManager addService ret=%d", st);
15         LOGD("instantiate> end");
16     }
17
18     TestBinderService::TestBinderService() {
19         LOGD(" TestBinderServicet");
20     }
21
22     TestBinderService::~TestBinderService() {
23         LOGD("TestBinderService destroyed,never destroy normally");
24     }
25
26     int TestBinderService::add(int a,int b) {
27
28         LOGI("TestBinderService::add a = %d, b = %d.", a , b);
29         return a+b;
30     }
31
32  }
在instantiate函數中,將TestBinderService注冊到系統的binder service列表中,這樣以后就可以使用這個service提供的方法,該service提供了一個add 方法,返回兩個數的和。
再來看下clinet端 的代碼
1、ITestBinderService.cpp


 1     #define LOG_TAG "ITeeveePlayerService"
 2
 3     #include <utils/Log.h>
 4
 5     #include "../TestBinderServer/ITestBinderService.h"
 6
 7     namespace android {
 8
 9     enum {
10         TEST_ADD = IBinder::FIRST_CALL_TRANSACTION,
11     };
12
13     class BpTestBinderService: public BpInterface<ITestBinderService> {
14     public:
15         BpTestBinderService(const sp<IBinder>& impl) :
16             BpInterface<ITestBinderService> (impl) {
17         }
18
19         int add(int a, int b) {
20
21             Parcel data, reply;
22             LOGI("Enter BpTestBinderService add,a = %d , b = %d", a, b);
23             data.writeInterfaceToken(ITestBinderService::getInterfaceDescriptor());
24             data.writeInt32(a);
25             data.writeInt32(b);
26             remote()->transact(TEST_ADD, data, &reply);
27             int sum = reply.readInt32();
28             LOGI("BpTestBinderService sum = %d", sum);
29             return sum;
30         }
31     };
32
33     IMPLEMENT_META_INTERFACE(TestBinderService, "android.test.ITestBinderService");
34
35     // ----------------------------------------------------------------------
36
37     status_t BnTestBinderService::onTransact(uint32_t code, const Parcel& data,
38             Parcel* reply, uint32_t flags) {
39         switch (code) {
40         case TEST_ADD: {
41
42             CHECK_INTERFACE(ITestBinderService, data, reply);
43             int a = data.readInt32();
44             int b = data.readInt32();
45             LOGI("Enter BnTestBinderService add,a = %d , b = %d", a, b);
46             int sum = 0;
47             sum  = add(a, b);
48             LOGI("BnTestBinderService sum = %d", sum);
49              reply->writeInt32(sum);
50             return sum;
51         }
52         default:
53             return BBinder::onTransact(code, data, reply, flags);
54         }
55     }
56
57     }
定義了一個類BpTestBinderService,提供add方法,該方法通過調用遠端的binder service提供的服務返回兩個數的和重載了BnTestBinderService的onTransact方法,使其在TEST_ADD時調用add方法
這個文件里面也使用了一個宏IMPLEMENT_META_INTERFACE,也是定義在frameworks\base\include\binder\IInterface.h文件中


 1     #define IMPLEMENT_META_INTERFACE(INTERFACE, NAME)                       \
 2         const android::String16 I##INTERFACE::descriptor(NAME);             \
 3         const android::String16&                                            \
 4                 I##INTERFACE::getInterfaceDescriptor() const {              \
 5             return I##INTERFACE::descriptor;                                \
 6         }                                                                   \
 7         android::sp<I##INTERFACE> I##INTERFACE::asInterface(                \
 8                 const android::sp<android::IBinder>& obj)                   \
 9         {                                                                   \
10             android::sp<I##INTERFACE> intr;                                 \
11             if (obj != NULL) {                                              \
12                 intr = static_cast<I##INTERFACE*>(                          \
13                     obj->queryLocalInterface(                               \
14                             I##INTERFACE::descriptor).get());               \
15                 if (intr == NULL) {                                         \
16                     intr = new Bp##INTERFACE(obj);                          \
17                 }                                                           \
18             }                                                               \
19             return intr;                                                    \
20         }                                                                   \
21         I##INTERFACE::I##INTERFACE() { }                                    \
22         I##INTERFACE::~I##INTERFACE() { }
代入展開后:


 1 #define IMPLEMENT_META_INTERFACE(TestBinderService, "android.test.ITestBinderService")                       \
 2     const android::String16 ITestBinderService::descriptor("android.test.ITestBinderService");             \
 3     const android::String16&                                            \
 4             ITestBinderService::getInterfaceDescriptor() const {              \
 5         return ITestBinderService::descriptor;                                \
 6     }                                                                   \
 7     android::sp<ITestBinderService> ITestBinderService::asInterface(                \
 8             const android::sp<android::IBinder>& obj)                   \
 9     {                                                                   \
10         android::sp<ITestBinderService> intr;                                 \
11         if (obj != NULL) {                                              \
12             intr = static_cast<ITestBinderService*>(                          \
13                 obj->queryLocalInterface(                               \
14                         ITestBinderService::descriptor).get());               \
15             if (intr == NULL) {                                         \
16                 intr = new BpTestBinderService(obj);                          \
17             }                                                           \
18         }                                                               \
19         return intr;                                                    \
20     }                                                                   \
21     ITestBinderService::ITestBinderService() { }                                    \
22     ITestBinderService::~ITestBinderService() { }
這樣,server和client端的binder代碼主寫好了,接著就需要把binder service加入到binder中
這里有兩種方法:
1、在system_init.cpp中添加
TestBinderService::instantiate();
如果是在這里加的話可以去掉TestBinderService中實現的instantiate方法,同時將TestBinderService繼 承自BinderService,因為在BinderService實現了這一方法,同時將其添加到binder service
2、以單獨的程序啟動
main_testBinder.cpp


 1     #include <binder/IPCThreadState.h>
 2     #include <binder/ProcessState.h>
 3     #include <binder/IServiceManager.h>
 4     #include <utils/Log.h>
 5
 6
 7     #include "TestBinderService.h"
 8
 9     using namespace android;
10
11     int main(int argc, char** argv)
12      {
13
14         sp<ProcessState> proc(ProcessState::self());
15         sp<IServiceManager> sm = defaultServiceManager();
16         LOGI("TestBinderService before");
17         TestBinderService::instantiate();
18         LOGI("TestBinderService End");
19         ProcessState::self()->startThreadPool();
20         IPCThreadState::self()->joinThreadPool();
21         return 0;
22
23     }
這里調用的是TestBinderService自己的instantiate來添加的
再來看下測試testBinder.cpp


 1     #define LOG_TAG "TestBinserService"
 2
 3     #include <utils/Log.h>
 4     #include <nativehelper/jni.h>
 5     #include <nativehelper/JNIHelp.h>
 6     #include <android_runtime/AndroidRuntime.h>
 7     #include <binder/IServiceManager.h>
 8     #include "../TestBinderServer/ITestBinderService.h"
 9
10
11     #include "TestBinderService.h"
12
13     using namespace android;
14
15     int main(int argc, char** argv)
16      {
17         int sum = 0;
18         sp<ITestBinderService> mTestBinserService;
19         if (mTestBinserService.get() == 0) {
20             sp<IServiceManager> sm = defaultServiceManager();
21             sp<IBinder> binder;
22             do {
23                 binder = sm->getService(String16("my.test.binder"));
24                 if (binder != 0)
25                     break;
26                     LOGI("getService fail");
27                 usleep(500000); // 0.5 s
28             } while (true);
29             mTestBinserService = interface_cast<ITestBinderService> (binder);
30             LOGE_IF(mTestBinserService == 0, "no ITestBinserService!?");
31         }
32         sum = mTestBinserService->add(3, 4);
33         LOGI("sum = %d", sum);
34         return 0;
35
36     }
以上就是測試代碼。


 - E (459E))


)


)


)

—— 圖片預處理)


