Spring通過HttpInvokerProxyFactoryBean和HttpInvokerServiceExporter支持HTTP調用程序基礎結構。 HttpInvokerServiceExporter,它將指定的服務bean導出為HTTP調用程序服務端點,可通過HTTP調用程序代理訪問。 HttpInvokerProxyFactoryBean是用于HTTP調用程序代理的工廠bean。
此外,還提供了有關Spring Remoting簡介和RMI Service&Client示例項目的Spring Remoting支持和RMI文章。
讓我們看一下Spring Remoting Support,以開發Http Invoker Service&Client。
二手技術:
- JDK 1.6.0_31
- 春天3.1.1
- Tomcat 7.0
- Maven的3.0.2
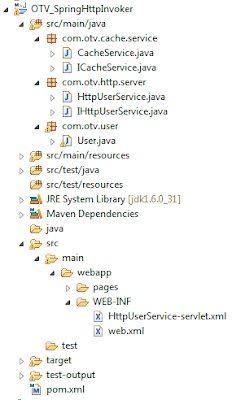
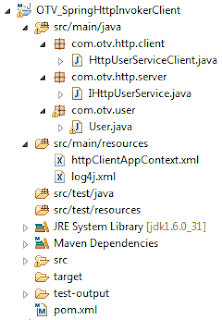
步驟1:建立已完成的專案
創建一個Maven項目,如下所示。 (可以使用Maven或IDE插件來創建它)。
步驟2:圖書館
Spring依賴項已添加到Maven的pom.xml中。
<!-- Spring 3.1.x dependencies -->
<properties><spring.version>3.1.1.RELEASE</spring.version>
</properties><dependencies><dependency><groupId>org.springframework</groupId><artifactId>spring-core</artifactId><version>${spring.version}</version></dependency><dependency><groupId>org.springframework</groupId><artifactId>spring-context</artifactId><version>${spring.version}</version></dependency><dependency><groupId>org.springframework</groupId><artifactId>spring-remoting</artifactId><version>2.0.8</version></dependency><dependency><groupId>org.springframework</groupId><artifactId>spring-web</artifactId><version>${spring.version}</version></dependency><dependency><groupId>org.springframework</groupId><artifactId>spring-webmvc</artifactId><version>${spring.version}</version></dependency>
<dependencies>
步驟3:建立使用者類別
創建一個新的用戶類。
package com.otv.user;import java.io.Serializable;/*** User Bean** @author  onlinetechvision.com* @since   24 Feb 2012* @version 1.0.0**/
public class User implements Serializable {private long id;private String name;private String surname;/*** Get User Id** @return long id*/public long getId() {return id;}/*** Set User Id** @param long id*/public void setId(long id) {this.id = id;}/*** Get User Name** @return long id*/public String getName() {return name;}/*** Set User Name** @param String name*/public void setName(String name) {this.name = name;}/*** Get User Surname** @return long id*/public String getSurname() {return surname;}/*** Set User Surname** @param String surname*/public void setSurname(String surname) {this.surname = surname;}@Overridepublic String toString() {StringBuilder strBuilder = new StringBuilder();strBuilder.append("Id : ").append(getId());strBuilder.append(", Name : ").append(getName());strBuilder.append(", Surname : ").append(getSurname());return strBuilder.toString();}
}
步驟4:建立ICacheService介面
創建了代表遠程緩存服務接口的ICacheService接口。
package com.otv.cache.service;import java.util.concurrent.ConcurrentHashMap;import com.otv.user.User;/*** Cache Service Interface** @author  onlinetechvision.com* @since   10 Mar 2012* @version 1.0.0**/
public interface ICacheService {/*** Get User Map** @return ConcurrentHashMap User Map*/public ConcurrentHashMap<Long, User> getUserMap();}
步驟5:創建CacheService類
CacheService類是通過實現ICacheService接口創建的。 它提供對遠程緩存的訪問…
package com.otv.cache.service;import java.util.concurrent.ConcurrentHashMap;import com.otv.user.User;/*** Cache Service Implementation** @author  onlinetechvision.com* @since   10 Mar 2012* @version 1.0.0**/
public class CacheService implements ICacheService {//User Map is injected...ConcurrentHashMap<Long, User> userMap;/*** Get User Map** @return ConcurrentHashMap User Map*/public ConcurrentHashMap<Long, User> getUserMap() {return userMap;}/*** Set User Map** @param ConcurrentHashMap User Map*/public void setUserMap(ConcurrentHashMap<Long, User> userMap) {this.userMap = userMap;}}
步驟6:建立IHttpUserService接口
創建了代表Http用戶服務接口的IHttpUserService。 此外,它為Http客戶端提供了遠程方法。
package com.otv.http.server;import java.util.List;import com.otv.user.User;/*** Http User Service Interface** @author  onlinetechvision.com* @since   10 Mar 2012* @version 1.0.0**/
public interface IHttpUserService {/*** Add User** @param  User user* @return boolean response of the method*/public boolean addUser(User user);/*** Delete User** @param  User user* @return boolean response of the method*/public boolean deleteUser(User user);/*** Get User List** @return List user list*/public List<User> getUserList();}
步驟7:創建HttpUserService類
HttpUserService類是通過實現IHttpUserService接口創建的。
package com.otv.http.server;import java.util.ArrayList;
import java.util.List;
import org.apache.log4j.Logger;import com.otv.cache.service.ICacheService;
import com.otv.user.User;/*** Http User Service Implementation** @author  onlinetechvision.com* @since   10 Mar 2012* @version 1.0.0**/
public class HttpUserService implements IHttpUserService {private static Logger logger = Logger.getLogger(HttpUserService.class);//Remote Cache Service is injected...ICacheService cacheService;/*** Add User** @param  User user* @return boolean response of the method*/public boolean addUser(User user) {getCacheService().getUserMap().put(user.getId(), user);logger.debug("User has been added to cache. User : "+getCacheService().getUserMap().get(user.getId()));return true;}/*** Delete User** @param  User user* @return boolean response of the method*/public boolean deleteUser(User user) {getCacheService().getUserMap().remove(user.getId());logger.debug("User has been deleted from cache. User : "+user);return true;}/*** Get User List** @return List user list*/public List<User> getUserList() {List<User> list = new ArrayList<User>();list.addAll(getCacheService().getUserMap().values());logger.debug("User List : "+list);return list;}/*** Get Remote Cache Service** @return ICacheService Remote Cache Service*/public ICacheService getCacheService() {return cacheService;}/*** Set Remote Cache Service** @param ICacheService Remote Cache Service*/public void setCacheService(ICacheService cacheService) {this.cacheService = cacheService;}}
步驟8:創建HttpUserService-servlet.xml
HttpUserService應用程序上下文如下所示。 該xml必須命名為your_servlet_name-servlet.xml
<beans xmlns="http://www.springframework.org/schema/beans"xmlns:xsi="http://www.w3.org/2001/XMLSchema-instance"xmlns:util="http://www.springframework.org/schema/util"xsi:schemaLocation="http://www.springframework.org/schema/beanshttp://www.springframework.org/schema/beans/spring-beans-3.0.xsdhttp://www.springframework.org/schema/utilhttp://www.springframework.org/schema/util/spring-util-3.0.xsd"><!-- User Map Declaration --><bean id="UserMap" class="java.util.concurrent.ConcurrentHashMap" /><!-- Cache Service Declaration --><bean id="CacheService" class="com.otv.cache.service.CacheService"><property name="userMap" ref="UserMap"/></bean> <!-- Http User Service Bean Declaration --><bean id="HttpUserService" class="com.otv.http.server.HttpUserService" ><property name="cacheService" ref="CacheService"/></bean><!-- Http Invoker Service Declaration --><bean id="HttpUserServiceExporter" class="org.springframework.remoting.httpinvoker.HttpInvokerServiceExporter"><!-- service represents Service Impl --><property name="service" ref="HttpUserService"/><!-- serviceInterface represents Http Service Interface which is exposed --><property name="serviceInterface" value="com.otv.http.server.IHttpUserService"/></bean><!-- Mapping configurations from URLs to request handler beans --><bean id="urlMapping" class="org.springframework.web.servlet.handler.SimpleUrlHandlerMapping"><property name="mappings"><props><prop key="/HttpUserService">HttpUserServiceExporter</prop></props></property></bean></beans>步驟9:創建web.xml
web.xml的配置如下:
<?xml version="1.0" encoding="UTF-8"?>
<web-app xmlns:xsi="http://www.w3.org/2001/XMLSchema-instance" xmlns="http://java.sun.com/xml/ns/javaee" xmlns:web="http://java.sun.com/xml/ns/javaee/web-app_2_5.xsd" xsi:schemaLocation="http://java.sun.com/xml/ns/javaee http://java.sun.com/xml/ns/javaee/web-app_2_5.xsd" id="WebApp_ID" version="2.5"><display-name>OTV_SpringHttpInvoker</display-name><!-- Spring Context Configuration' s Path definition --><context-param><param-name>contextConfigLocation</param-name><param-value>/WEB-INF/HttpUserService-servlet.xml</param-value></context-param><!-- The Bootstrap listener to start up and shut down Spring's root WebApplicationContext. It is registered to Servlet Container --><listener><listener-class>org.springframework.web.context.ContextLoaderListener</listener-class></listener><!-- Central dispatcher for HTTP-based remote service exporters. Dispatches to registered handlers for processing web requests.--><servlet><servlet-name>HttpUserService</servlet-name><servlet-class>org.springframework.web.servlet.DispatcherServlet</servlet-class><load-on-startup>2</load-on-startup></servlet><!-- Servlets should be registered with servlet container and mapped with url for the http requests. --><servlet-mapping><servlet-name>HttpUserService</servlet-name><url-pattern>/HttpUserService</url-pattern></servlet-mapping><welcome-file-list><welcome-file>/pages/index.xhtml</welcome-file></welcome-file-list></web-app>
步驟10:創建HttpUserServiceClient類
HttpUserServiceClient類已創建。 它調用遠程Http用戶服務并執行用戶操作。
package com.otv.http.client;import org.apache.log4j.Logger;
import org.springframework.context.ApplicationContext;
import org.springframework.context.support.ClassPathXmlApplicationContext;import com.otv.http.server.IHttpUserService;
import com.otv.user.User;/*** Http User Service Client** @author  onlinetechvision.com* @since   24 Feb 2012* @version 1.0.0**/
public class HttpUserServiceClient {private static Logger logger = Logger.getLogger(HttpUserServiceClient.class);/*** Main method of the Http User Service Client**/public static void main(String[] args) {logger.debug("Http User Service Client is starting...");//Http Client Application Context is started...ApplicationContext context = new ClassPathXmlApplicationContext("httpClientAppContext.xml");//Remote User Service is called via Http Client Application Context...IHttpUserService httpClient = (IHttpUserService) context.getBean("HttpUserService");//New User is created...User user = new User();user.setId(1);user.setName("Bruce");user.setSurname("Willis");//The user is added to the remote cache...httpClient.addUser(user);//The users are gotten via remote cache...httpClient.getUserList();//The user is deleted from remote cache...httpClient.deleteUser(user);logger.debug("Http User Service Client is stopped...");}
}
步驟11:創建httpClientAppContext.xml
Http客戶端應用程序上下文如下所示:
<beans xmlns="http://www.springframework.org/schema/beans"xmlns:xsi="http://www.w3.org/2001/XMLSchema-instance"xsi:schemaLocation="http://www.springframework.org/schema/beanshttp://www.springframework.org/schema/beans/spring-beans-3.0.xsd"><!-- Http Invoker Client Declaration --><bean id="HttpUserService" class="org.springframework.remoting.httpinvoker.HttpInvokerProxyFactoryBean"><!-- serviceUrl demonstrates Http Service Url which is called--><property name="serviceUrl" value="http://remotehost:port/OTV_SpringHttpInvoker-0.0.1-SNAPSHOT/HttpUserService"/><!-- serviceInterface demonstrates Http Service Interface which is called --><property name="serviceInterface" value="com.otv.http.server.IHttpUserService"/></bean></beans>步驟12:部署項目
將OTV_SpringHttpInvoker Project部署到Tomcat之后,將啟動Http用戶服務客戶端,并且輸出日志如下所示:
....
15.03.2012 21:26:41 DEBUG (DispatcherServlet.java:819) - DispatcherServlet with name 'HttpUserService' processing POST request for [/OTV_SpringHttpInvoker-0.0.1-SNAPSHOT/HttpUserService]
15.03.2012 21:26:41 DEBUG (AbstractUrlHandlerMapping.java:124) - Mapping [/HttpUserService] to HandlerExecutionChain with handler [org.springframework.remoting.httpinvoker.HttpInvokerServiceExporter@f9104a] and 1 interceptor
15.03.2012 21:26:41 DEBUG (RemoteInvocationTraceInterceptor.java:73) - Incoming HttpInvokerServiceExporter remote call: com.otv.http.server.IHttpUserService.addUser
15.03.2012 21:26:41 DEBUG (HttpUserService.java:33) - User has been added to cache. User : Id : 1, Name : Bruce, Surname : Willis
15.03.2012 21:26:41 DEBUG (RemoteInvocationTraceInterceptor.java:79) - Finished processing of HttpInvokerServiceExporter remote call: com.otv.http.server.IHttpUserService.addUser
15.03.2012 21:26:41 DEBUG (DispatcherServlet.java:957) - Null ModelAndView returned to DispatcherServlet with name 'HttpUserService': assuming HandlerAdapter completed request handling
15.03.2012 21:26:41 DEBUG (FrameworkServlet.java:913) - Successfully completed request
15.03.2012 21:26:41 DEBUG (DispatcherServlet.java:819) - DispatcherServlet with name 'HttpUserService' processing POST request for [/OTV_SpringHttpInvoker-0.0.1-SNAPSHOT/HttpUserService]
15.03.2012 21:26:41 DEBUG (AbstractUrlHandlerMapping.java:124) - Mapping [/HttpUserService] to HandlerExecutionChain with handler [org.springframework.remoting.httpinvoker.HttpInvokerServiceExporter@f9104a] and 1 interceptor
15.03.2012 21:26:41 DEBUG (RemoteInvocationTraceInterceptor.java:73) - Incoming HttpInvokerServiceExporter remote call: com.otv.http.server.IHttpUserService.getUserList
15.03.2012 21:26:41 DEBUG (HttpUserService.java:57) - User List : [Id : 1, Name : Bruce, Surname : Willis]
15.03.2012 21:26:41 DEBUG (RemoteInvocationTraceInterceptor.java:79) - Finished processing of HttpInvokerServiceExporter remote call: com.otv.http.server.IHttpUserService.getUserList
15.03.2012 21:26:41 DEBUG (DispatcherServlet.java:957) - Null ModelAndView returned to DispatcherServlet with name 'HttpUserService': assuming HandlerAdapter completed request handling
15.03.2012 21:26:41 DEBUG (FrameworkServlet.java:913) - Successfully completed request
15.03.2012 21:26:41 DEBUG (DispatcherServlet.java:819) - DispatcherServlet with name 'HttpUserService' processing POST request for [/OTV_SpringHttpInvoker-0.0.1-SNAPSHOT/HttpUserService]
15.03.2012 21:26:41 DEBUG (AbstractUrlHandlerMapping.java:124) - Mapping [/HttpUserService] to HandlerExecutionChain with handler [org.springframework.remoting.httpinvoker.HttpInvokerServiceExporter@f9104a] and 1 interceptor
15.03.2012 21:26:41 DEBUG (RemoteInvocationTraceInterceptor.java:73) - Incoming HttpInvokerServiceExporter remote call: com.otv.http.server.IHttpUserService.deleteUser
15.03.2012 21:26:41 DEBUG (HttpUserService.java:45) - User has been deleted from cache. User : Id : 1, Name : Bruce, Surname : Willis
15.03.2012 21:26:41 DEBUG (RemoteInvocationTraceInterceptor.java:79) - Finished processing of HttpInvokerServiceExporter remote call: com.otv.http.server.IHttpUserService.deleteUser
15.03.2012 21:26:41 DEBUG (DispatcherServlet.java:957) - Null ModelAndView returned to DispatcherServlet with name 'HttpUserService': assuming HandlerAdapter completed request handling
15.03.2012 21:26:41 DEBUG (FrameworkServlet.java:913) - Successfully completed request
...
步驟13:下載
OTV_SpringHttpInvoker
參考: Online Technology Vision博客上的JCG合作伙伴 Eren Avsarogullari 提供的Http Invoker的Spring Remoting支持 。
翻譯自: https://www.javacodegeeks.com/2012/04/spring-remoting-support-with-http.html


![【BZOJ】3575: [Hnoi2014]道路堵塞](http://pic.xiahunao.cn/【BZOJ】3575: [Hnoi2014]道路堵塞)


)


)

.)
