??程序示例精選
VS+Qt+C++旅游景區地圖導航
如需安裝運行環境或遠程調試,見文章底部個人QQ名片,由專業技術人員遠程協助!
前言
這篇博客針對<<VS+Qt+C++旅游景區地圖導航>>編寫代碼,代碼整潔,規則,易讀。 學習與應用推薦首選。
文章目錄
一、所需工具軟件
二、使用步驟
????????1. 引入庫
????????2. 代碼實現
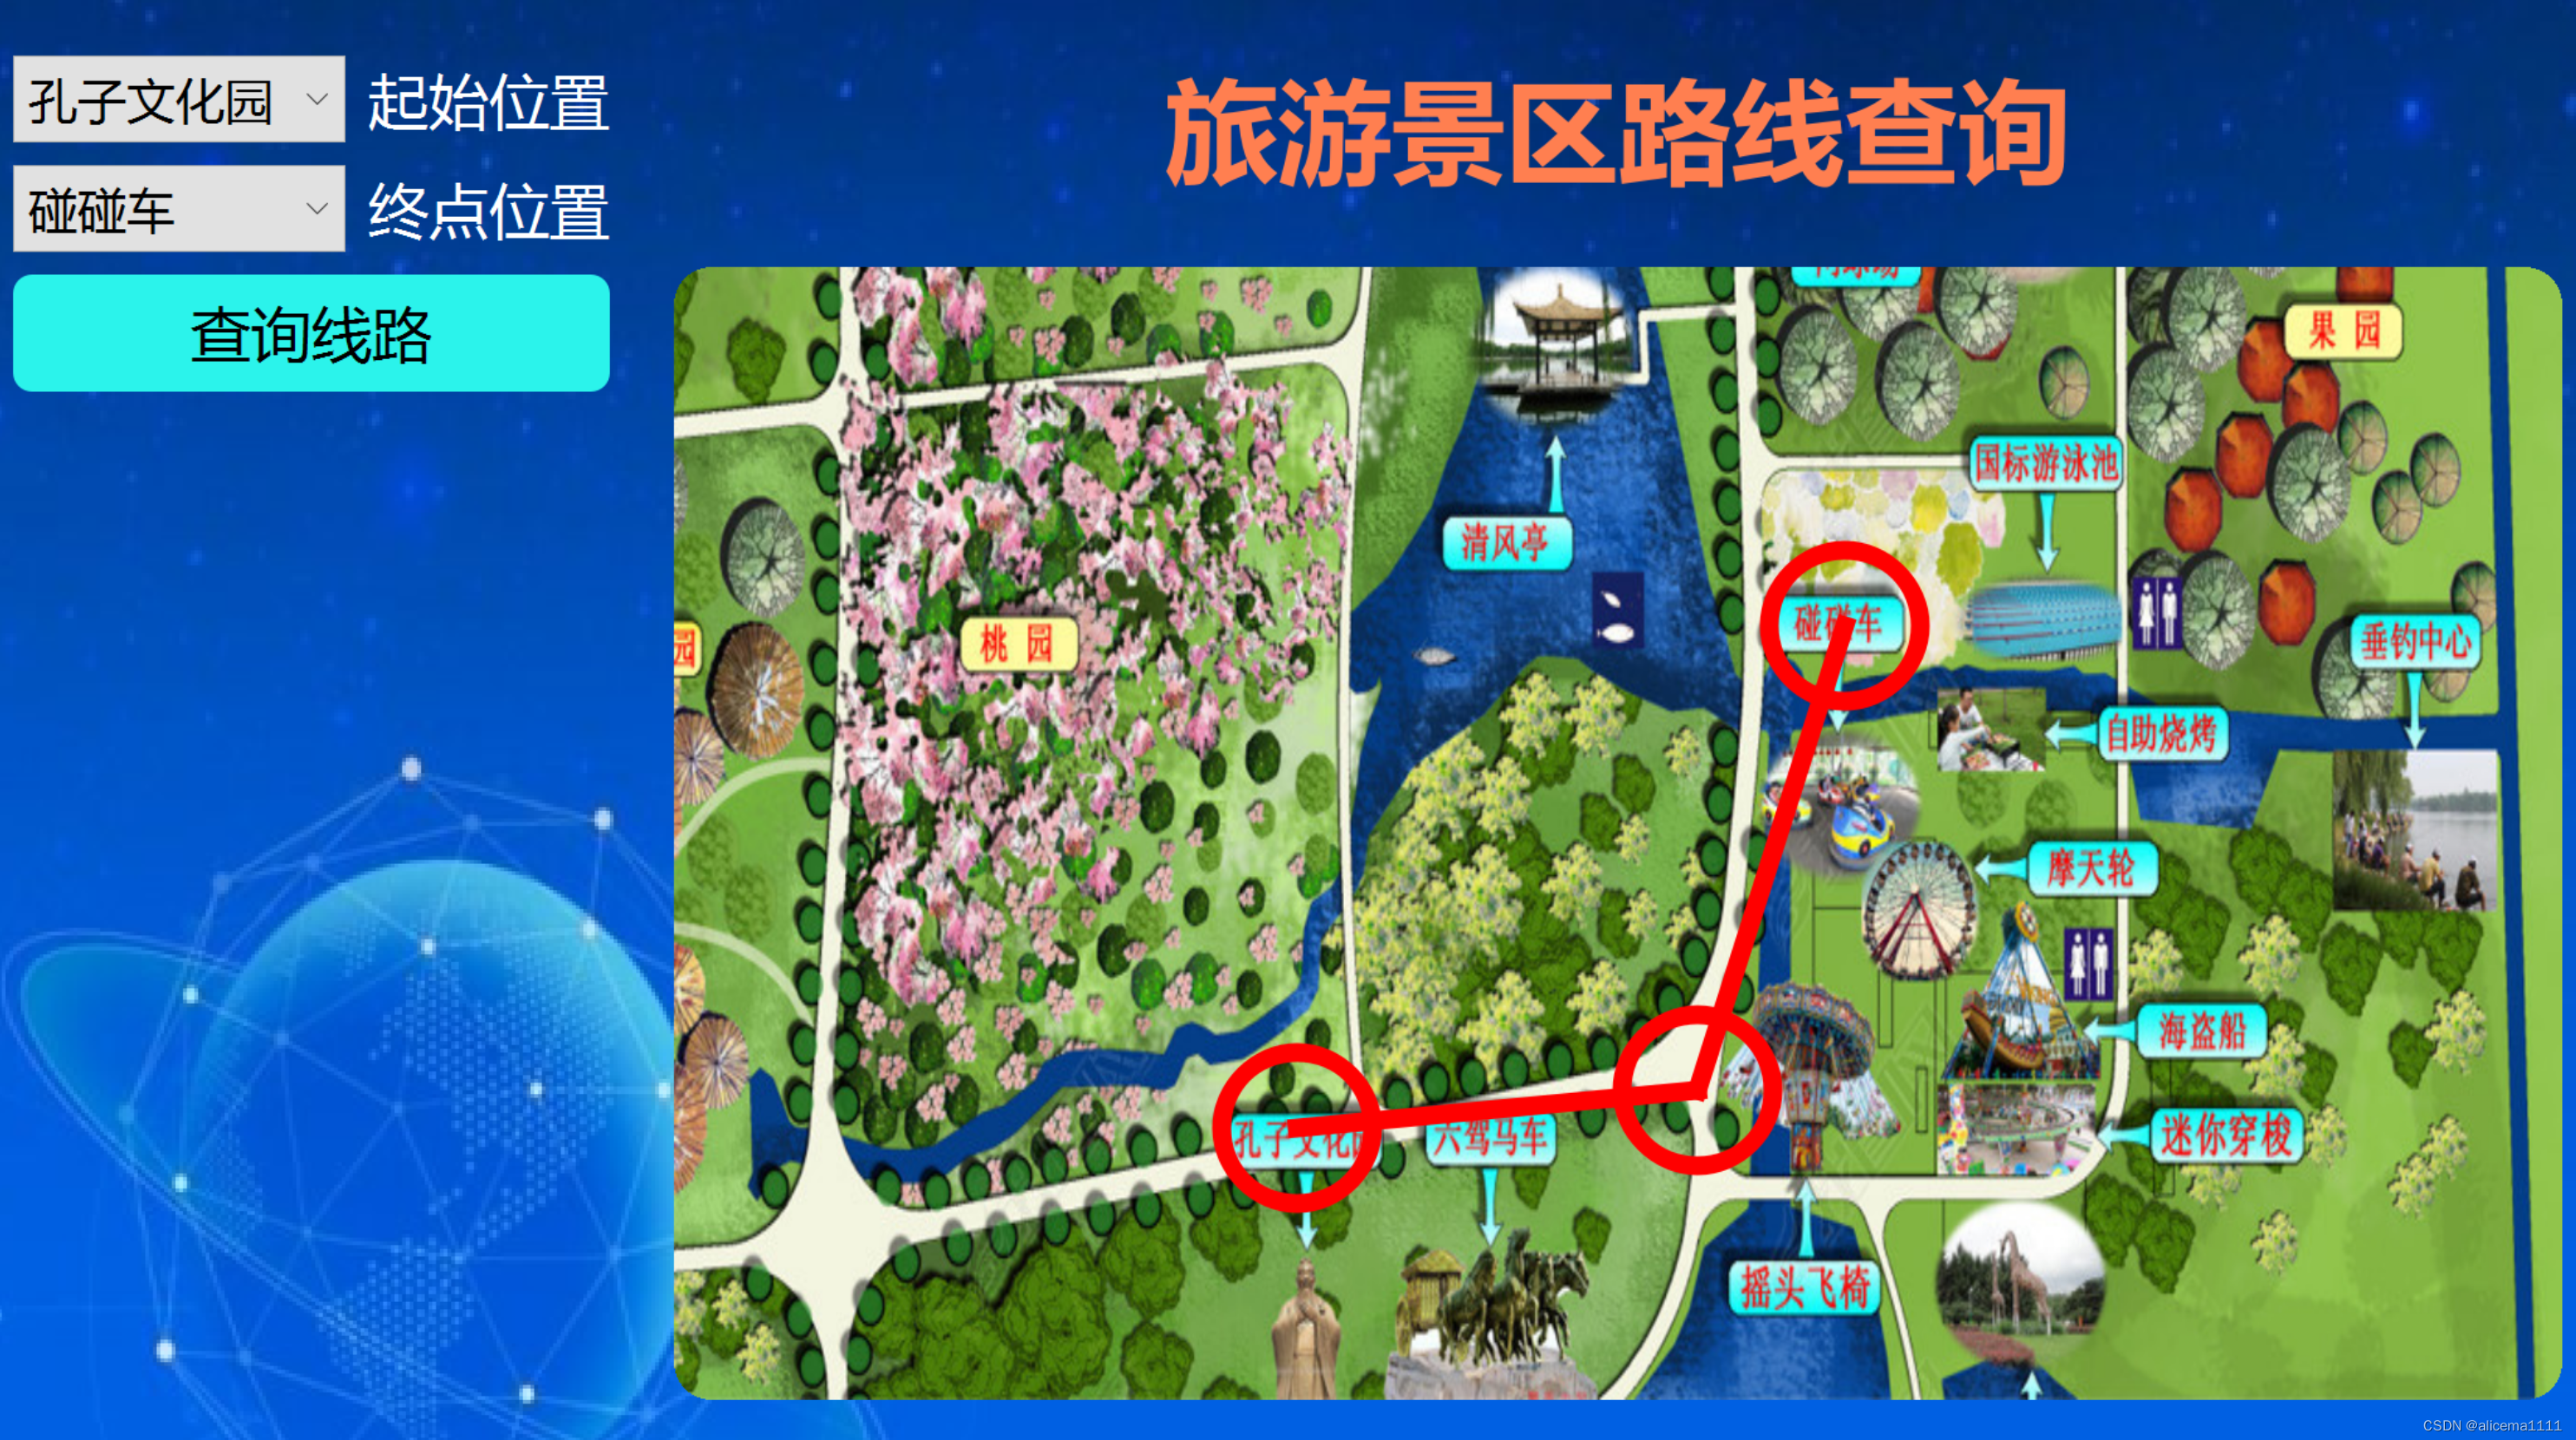
? ? ? ? 3. 運行結果
三、在線協助
一、所需工具軟件
1. VS, Qt
2. C++
二、使用步驟
1.引入庫
#include "MainWindow.h"
#include<iostream>#include<qDebug>
#include<QFile>
#include <QBitmap>
#include <QPainter>
#include<QImage>
#include<QPixmap>
#include <QGraphicsScene>
#include <QGraphicsView>
#include <QPointF>
#include <QLineF>
2. 代碼實現
代碼如下:
.h*************************************
#pragma once#include <QtWidgets/QMainWindow>
#include "ui_MainWindow.h"#include <qDebug>class MainWindow : public QMainWindow
{Q_OBJECTpublic:MainWindow(QWidget *parent = Q_NULLPTR);protected:private:Ui::MainWindowClass ui;private slots:void OnSearch();void mapBackGround();void initStyleSheetTitle();void paintEvent(QPaintEvent* event);void initStyleSheetMapButton();void initStyleSheetButton();void initStyleSheetLabel();};.cpp********************************
MainWindow::MainWindow(QWidget *parent): QMainWindow(parent)
{ui.setupUi(this);QObject::connect(ui.pushButton_7, SIGNAL(clicked()), this, SLOT(OnSearch()));ui.frame->setFrameStyle(QFrame::NoFrame);ui.frame_3->setFrameStyle(QFrame::NoFrame);
}void MainWindow::mouseDoubleClickEvent(QMouseEvent* event)
{int x = pos.x();int y = pos.y();qDebug() << "Double clicked at (" << x << "," << y << ")";
}void MainWindow::OnSearch()
{std::cout << "modelRun" << std::endl;QString startPos = ui.comboBox->currentText();QString endPos = ui.comboBox_2->currentText();qDebug() << "startPos: " << startPos;qDebug() << "endPos: " << endPos;if (startPos == QStringLiteral("孔子文化園") | startPos == QStringLiteral("碰碰車")){qDebug() << QStringLiteral("孔子文化園") ;// 添加兩個點坐標QPointF point1(165, 228);QPointF point2(271, 218);QPointF point3(310, 95);// 設置GraphicsView的大小ui.graphicsView->setRenderHint(QPainter::Antialiasing); // 設置抗鋸齒渲染ui.graphicsView->setAlignment(Qt::AlignLeft | Qt::AlignTop); // 設置對齊方式ui.graphicsView->setResizeAnchor(QGraphicsView::AnchorUnderMouse); // 設置縮放錨點為鼠標位置ui.graphicsView->setDragMode(QGraphicsView::ScrollHandDrag); // 設置拖拽模式為滾動手勢拖拽QPen pen(Qt::red); // 設置線條顏色為紅色pen.setWidth(2);   // 設置線寬為2// 在graphicsView_2的坐標系下繪制圓int radius = 25;int borderWidth = 5; // 壁厚pen.setWidth(borderWidth); // 設置線寬scene->addEllipse(point1.x() - (radius - borderWidth),point1.y() - (radius - borderWidth),(radius - borderWidth) * 2,(radius - borderWidth) * 2,pen, QBrush(Qt::NoBrush));scene->addEllipse(point2.x() - (radius - borderWidth),point2.y() - (radius - borderWidth),(radius - borderWidth) * 2,(radius - borderWidth) * 2,pen, QBrush(Qt::NoBrush));scene->addEllipse(point3.x() - (radius - borderWidth),point3.y() - (radius - borderWidth),(radius - borderWidth) * 2,(radius - borderWidth) * 2,pen, QBrush(Qt::NoBrush));// 繪制線段scene->addLine(QLineF(point1, point2), pen);scene->addLine(QLineF(point2, point3), pen);}}void MainWindow::initStyleSheetTitle()
{QString cssStr = "./style/style_label_title.css";QFile file(cssStr);if (file.open(QFile::ReadOnly)){QString qss = QLatin1String(file.readAll());ui.label->setStyleSheet(qss);file.close();}else {qDebug() << "Failed to open CSS file: " << file.fileName();}}void MainWindow::mapBackGround()
{QString cssStr = "./style/style_frame_mapBG.css";QString qss;QFile file(cssStr);if (file.open(QFile::ReadOnly)){qss = QLatin1String(file.readAll());//ui.frame_2->setStyleSheet(qss);file.close();}else {qDebug() << "Failed to open CSS file: " << file.fileName();}
}void MainWindow::initStyleSheetButton()
{QString cssStr = "./style/style_pushButton.css";QString qss;QFile file(cssStr);if (file.open(QFile::ReadOnly)){qss = QLatin1String(file.readAll());ui.pushButton_7->setStyleSheet(qss);file.close();}else {qDebug() << "Failed to open CSS file: " << file.fileName();}}void MainWindow::initStyleSheetMapButton()
{QString cssStr = "./style/style_pushButton_map.css";QString qss;QFile file(cssStr);if (file.open(QFile::ReadOnly)){qss = QLatin1String(file.readAll());//ui.pushButton_3->setStyleSheet(qss);//ui.pushButton_4->setStyleSheet(qss);//ui.pushButton_5->setStyleSheet(qss);//ui.pushButton_6->setStyleSheet(qss);file.close();}else {qDebug() << "Failed to open CSS file: " << file.fileName();}}
3. 運行結果
?
三、在線協助:
如需安裝運行環境或遠程調試,見文章底部個人 QQ 名片,由專業技術人員遠程協助!
1)遠程安裝運行環境,代碼調試
2)Qt, C++, Python入門指導
3)界面美化
4)軟件制作
當前文章連接:Python+Qt桌面端與網頁端人工客服溝通工具_alicema1111的博客-CSDN博客
博主推薦文章:python人臉識別統計人數qt窗體-CSDN博客
博主推薦文章:Python Yolov5火焰煙霧識別源碼分享-CSDN博客
? ? ? ? ? ? ? ? ? ? ? ? ?Python OpenCV識別行人入口進出人數統計_python識別人數-CSDN博客
個人博客主頁:alicema1111的博客_CSDN博客-Python,C++,網頁領域博主
博主所有文章點這里:alicema1111的博客_CSDN博客-Python,C++,網頁領域博主


)


)

)


 開源代碼解讀)
