文章目錄
- 自定義創建項目
- ESlint 代碼規范
- vuex 概述
- 創建倉庫
- 向倉庫提供數據
- 使用倉庫中的數據
- 通過store直接訪問
- 通過輔助函數 mapState(簡化)
- mutations傳參語法(同步
- 實時輸入,實時更新
- 輔助函數 mapMutations
- action (異步
- 輔助函數mapActions
- getters (類似于計算屬性
- 通過store訪問getters
- 通過輔助函數mapGetters映射
- 模塊module
- 使用模塊中的數據 / 模塊中state的訪問語法
- 直接通過模塊名訪問
- 通過mapState映射
- 默認根級別的映射 ...mapState(['user', 'setting'])
- 子模塊映射 mapState('模塊名',['xxx]) +開啟命名空間
- 使用模塊中getters中的數據 / 模塊中getters的訪問語法
- 直接通過模塊名訪問 $store.getters['模塊名/xxx']
- 通過mapGetters映射
- 默認根級別映射mapGetters(['xxx'])
- 子模塊映射mapGetters('模塊名',['xxx'])+開啟命名空間Son2.vue
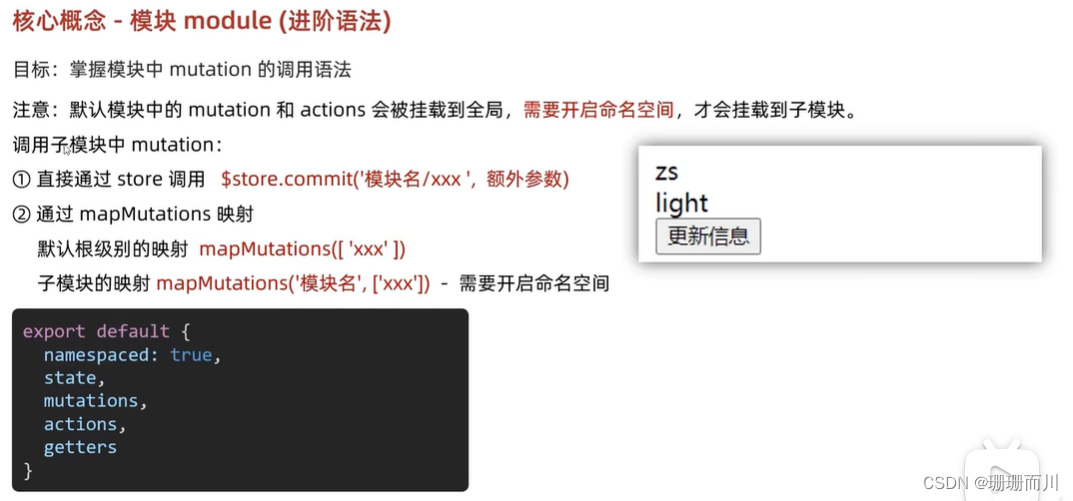
- 掌握模塊中的mutation調用語法
- 直接通過store調用 $store.commit('模塊名/xxx',額外參數)
- 通過mapMutations映射
- 默認根級別映射mapMutations(['xxx'])
- 子模塊映射mapMutations('模塊名',['xxx'])+開啟命名空間
- 直接通過模塊名訪問 $store.dispatch('模塊名/xxx',額外參數)
- 通過mapActions映射
- 默認根級別映射mapActions(['xxx'])
- 子模塊映射mapActions('模塊名',['xxx'])+開啟命名空間
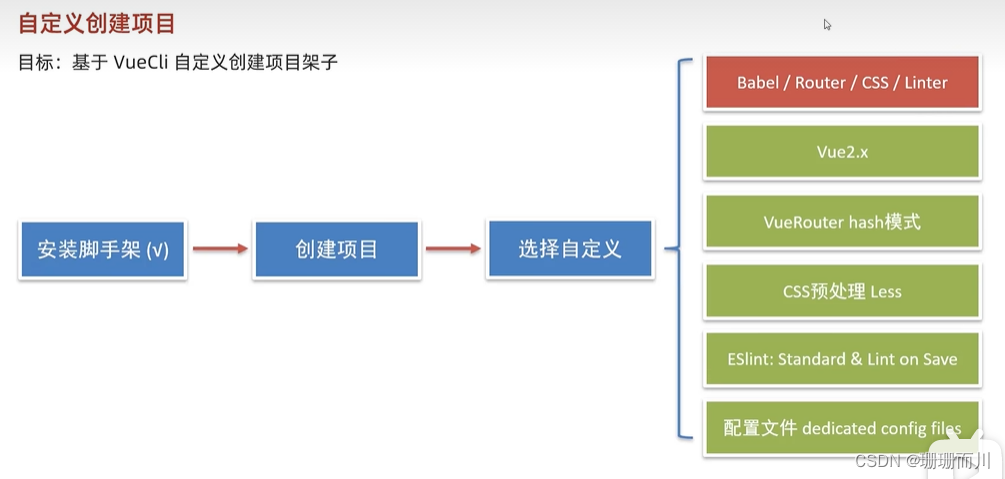
自定義創建項目
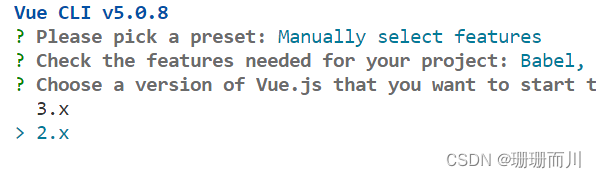
vue create exp-mobile(項目名
2.選第三個,自定義
3.空格是選中
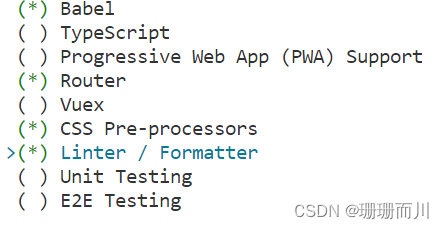
4.選vue 2.x
5.選擇哈希

6.選擇Less處理器

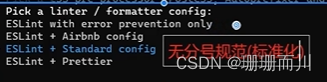
7.選擇無分號規范
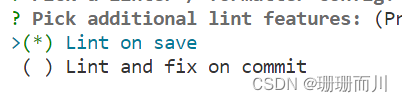
8.選擇保存時校驗
9.將配置文件放在單獨文件中

小結
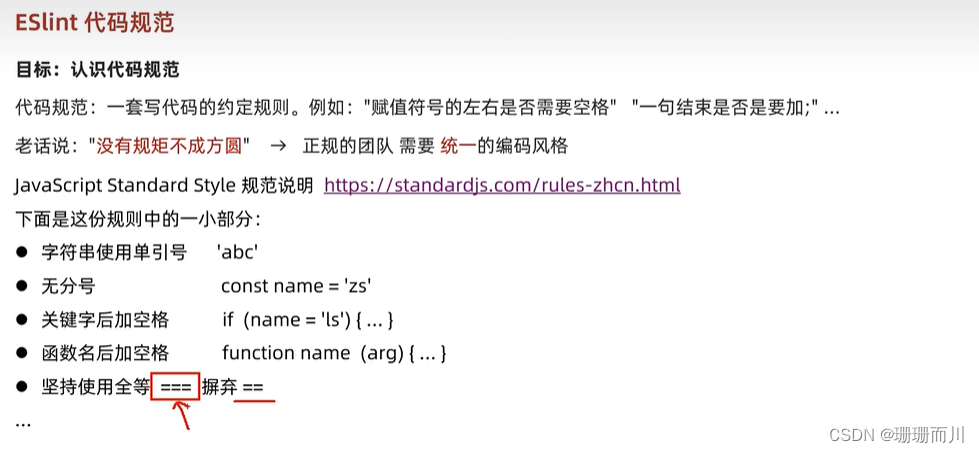
ESlint 代碼規范
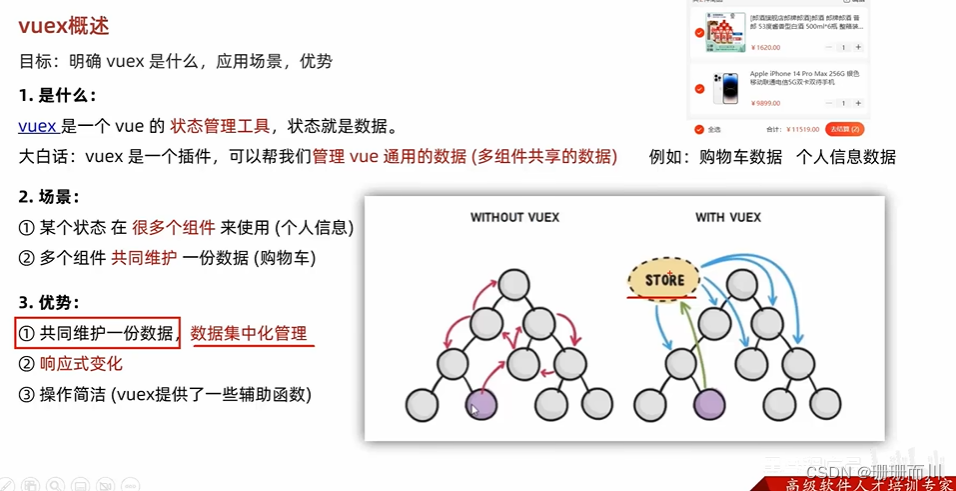
vuex 概述
創建倉庫
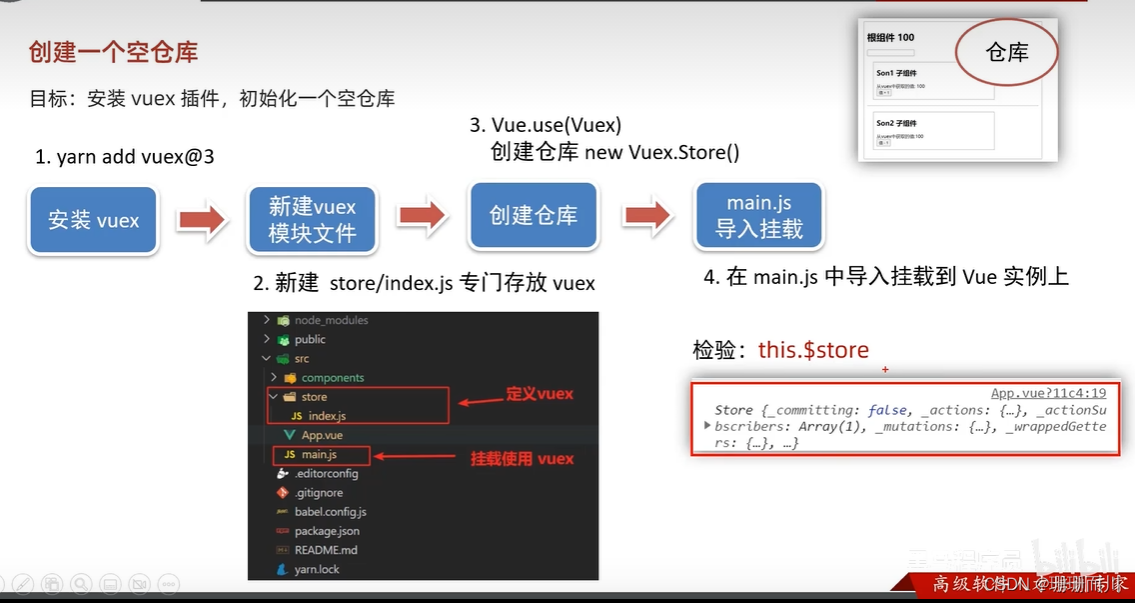
store/index.js
// 這里存放的就是vuex相關的核心代碼
import Vue from 'vue'
import Vuex from 'vuex'// 插件安裝
Vue.use(Vuex)// 創建空倉庫
const store = new Vuex.Store()// 導出給main.js
export default store
main.js
import Vue from 'vue'
import App from './App.vue'
import store from './store'Vue.config.productionTip = falsenew Vue({render: h => h(App),store //! !!!!//   倉庫在所有組件都可以訪問,用this.$store}).$mount('#app')
App.vue
created () {console.log(this.$store)}
向倉庫提供數據
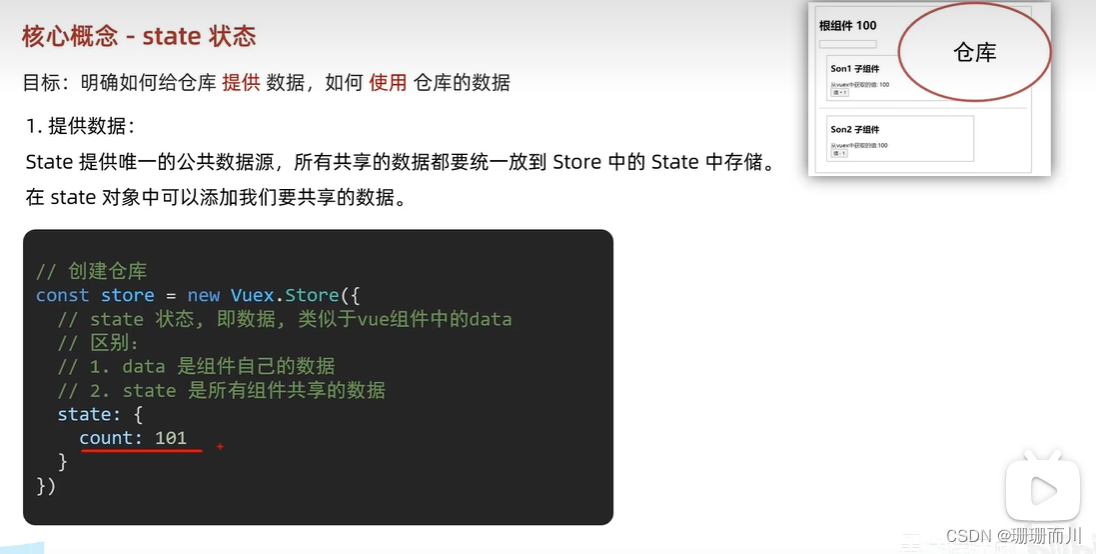
store/index.js
// 創建空倉庫
const store = new Vuex.Store({// 通過state可以提供數據,所有組件共享的數據,任意組件都可以訪問state: {title: 'hhhhh',count: 100}
})
使用倉庫中的數據
通過store直接訪問
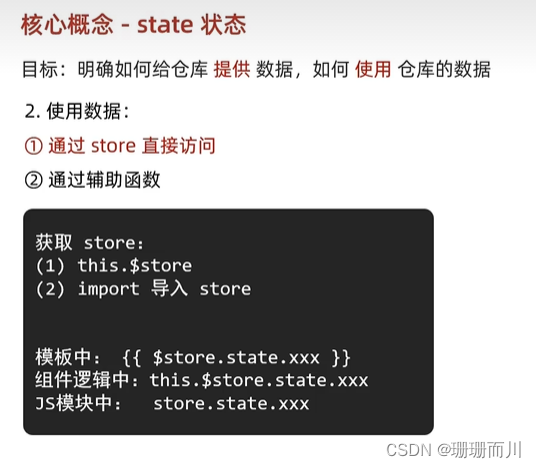
components/Son2.vue
div class="box"><h2>Son2 子組件</h2>從vuex中獲取的值:<label>{{$store.state.count}}</label><br /><button>值 - 1</button></div>
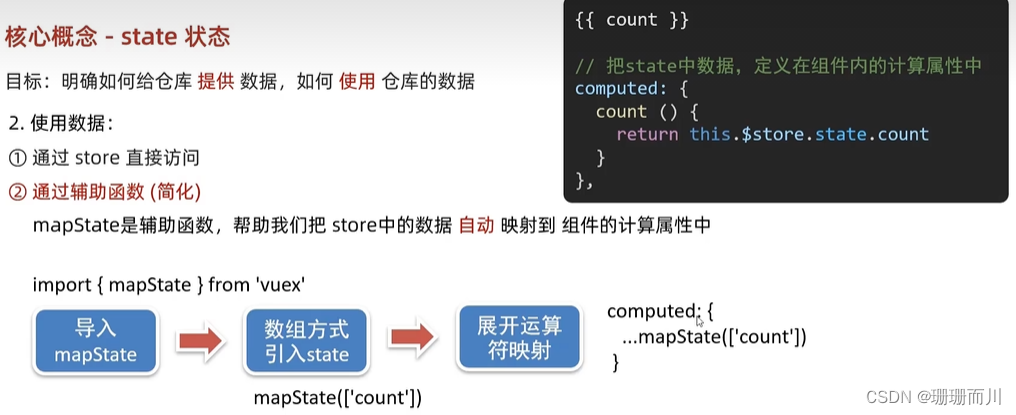
通過輔助函數 mapState(簡化)
mapState把store中的數據自動映射到組件的計算屬性computed中
computed: {...mapState(['count', 'title'])},
App.vue 節選
<template><div id="app"><h1>根組件{{ $store.state.title }}</h1><!-- 3.用了 mapState ,就直接簡寫 --><h1>根組件{{ title }}</h1><input type="text"><Son1></Son1><hr><Son2></Son2></div></template><script>
import Son1 from './components/Son1.vue'
import Son2 from './components/Son2.vue'// 1.導入
import { mapState } from 'vuex'
console.log(mapState(['count', 'title']))export default {name: 'app',//   2.展開運算符進行映射computed: {...mapState(['count', 'title'])},
# 組件(間接)修改倉庫數據 mutation

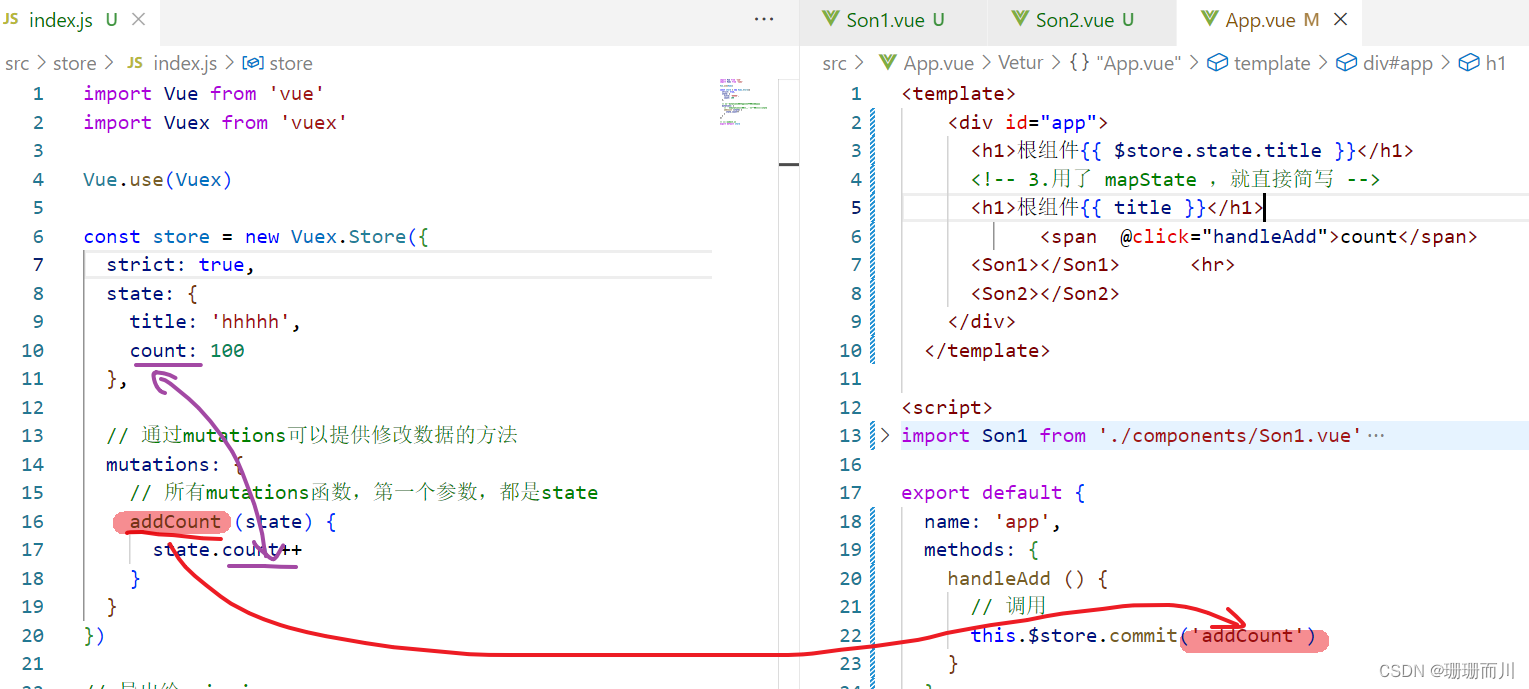
store/index.js
import Vue from 'vue'
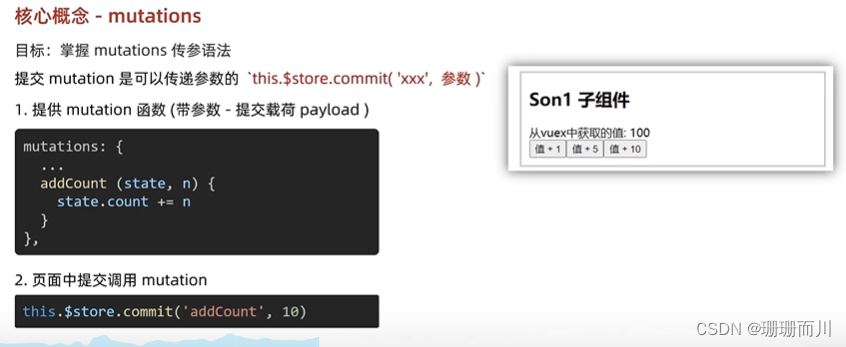
import Vuex from 'vuex'Vue.use(Vuex)const store = new Vuex.Store({strict: true,state: {title: 'hhhhh',count: 100},// 通過mutations可以提供修改數據的方法mutations: {// 所有mutations函數,第一個參數,都是stateaddCount (state) {state.count++}}
})export default storeApp.vue
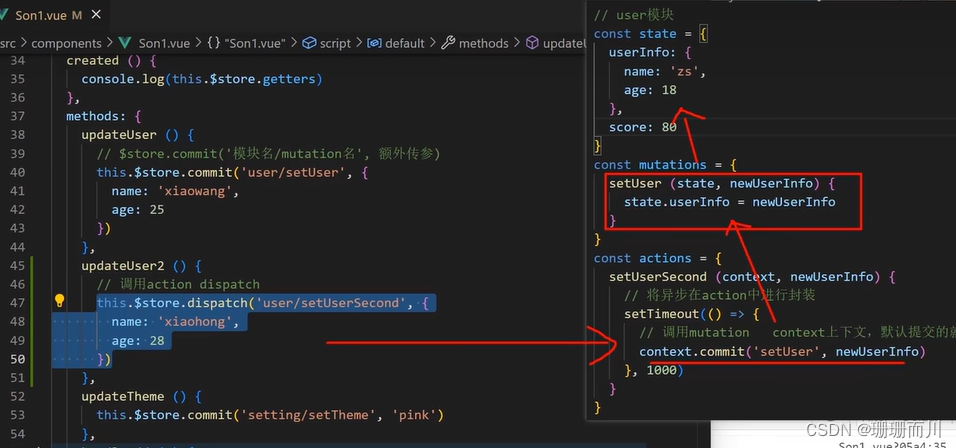
<span @click="handleAdd">count</span> <input type="text">methods: {handleAdd () {// 調用this.$store.commit('addCount')}},
mutations傳參語法(同步
提交參數只能有一個,如果有多個參數,包裝成一個對象傳遞
實時輸入,實時更新
不能用v-model,因為vuex是單向數據流
但是v-model 等于 :value @input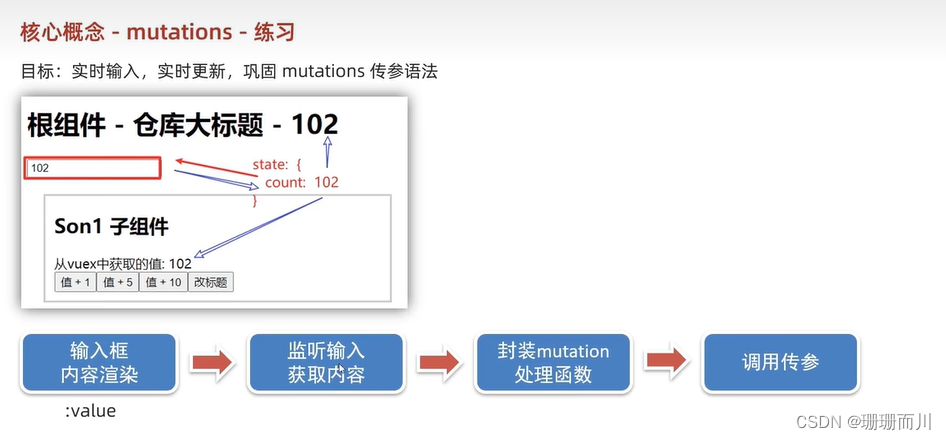
App.vue
<input :value="title" @input="handleInput" type="text">handleInput (e) {// 1.實時獲取輸入框的值console.log(e.target.value)// 2.提交mutation,調用mutation函數this.$store.commit('changeTitle', e.target.value)}
store/index.js
changeTitle (state, newTitle) {state.title = newTitle}
輔助函數 mapMutations
把位于mutations中的方法提取出來,映射到methods中
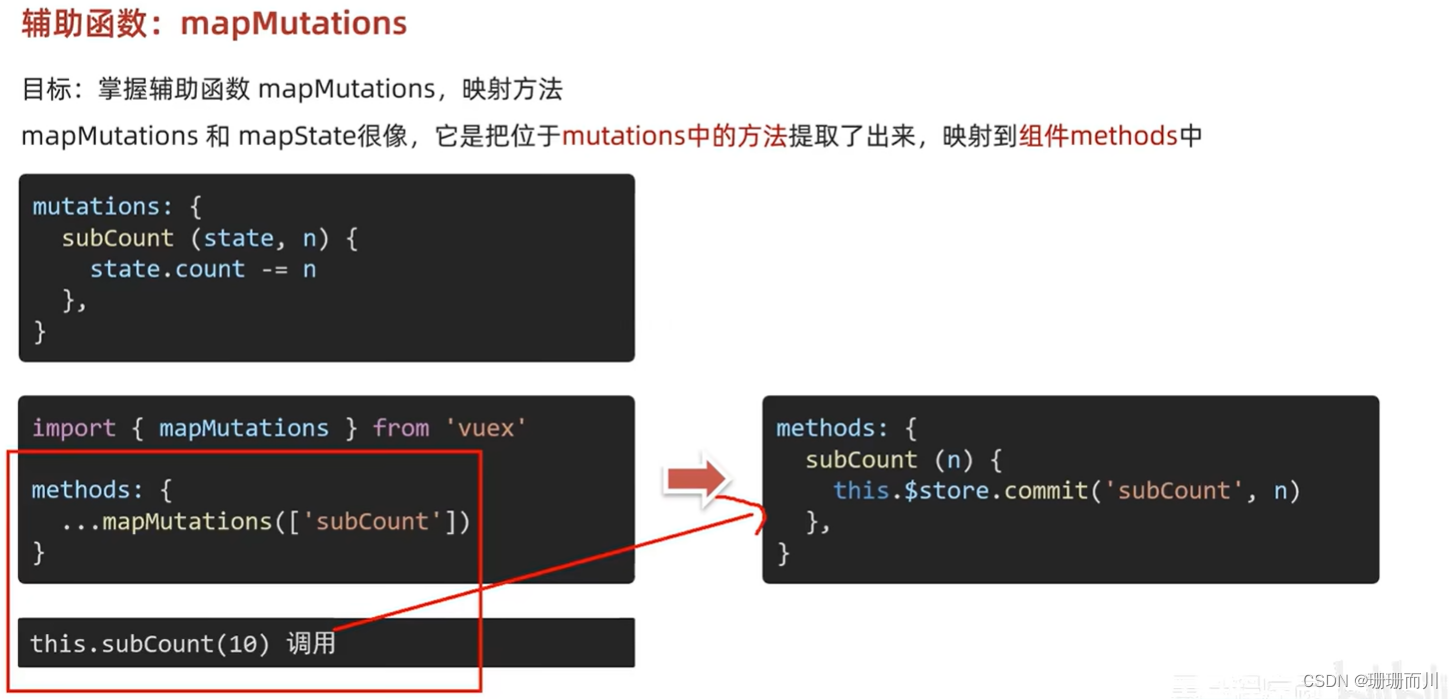
store/index.js
const store = new Vuex.Store({strict: true,state: {title: 'hhhhh',count: 100},// 通過mutations可以提供修改數據的方法mutations: {subCount (state, n) {state.count -= n},changeTitle (state, newTitle) {state.title = newTitle},changeCount (state, tt) {state.count = tt}} })
Son1.vue
<button @click="handleSub(10)">值 - 10</button><button @click="handleSub(20)">值 - 20</button><button @click="handleSub(30)">值 - 30</button><!-- 更簡單的寫法,連外面的函數都不套了 --><button @click="subCount(2)">值 - 2</button><br><button @click="changeTitle('qqq')">改成【qqq】標題</button>...mapMutations(['subCount', 'changeTitle']),handleSub (tt) {this.subCount(tt)},
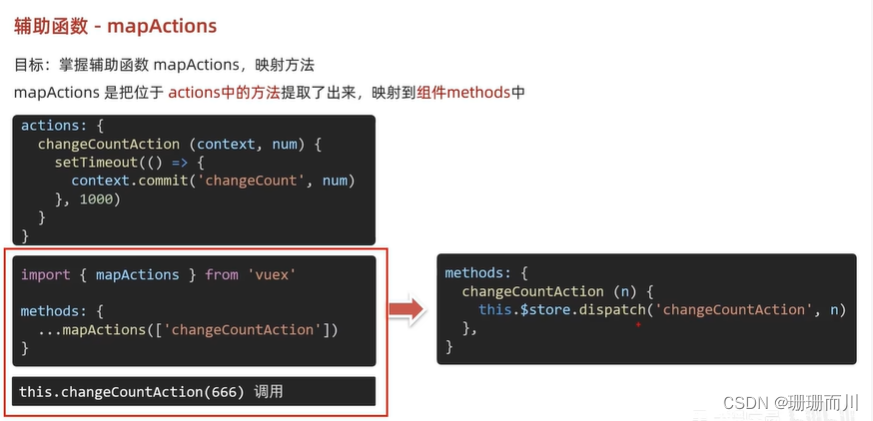
action (異步

輔助函數mapActions
把actions中的方法提取出來,映射到組件methods中
( …mapMutations([‘subCount’, ‘changeTitle’]),和 …mapActions([‘changeCountAction’]) 都在methods中
 index.js
// action 處理異步// 不能直接操作state,操作state還是需要commit mutationactions: {// 此處未分模塊,可當成store倉庫// context.commit('mutation名字',額外參數)changeCountAction (context, num) {// 這里是setTime模擬異步,以后大部分場景是發請求setTimeout(() => {context.commit('changeCount', num)}, 2000)}}
Son2.vue
<button @click="changeCountAction(0)">2秒后改成count=0</button>methods: {changeTitle () {this.$store.commit('changeTitle', 'sssss')},...mapActions(['changeCountAction']) // !!!!}
getters (類似于計算屬性
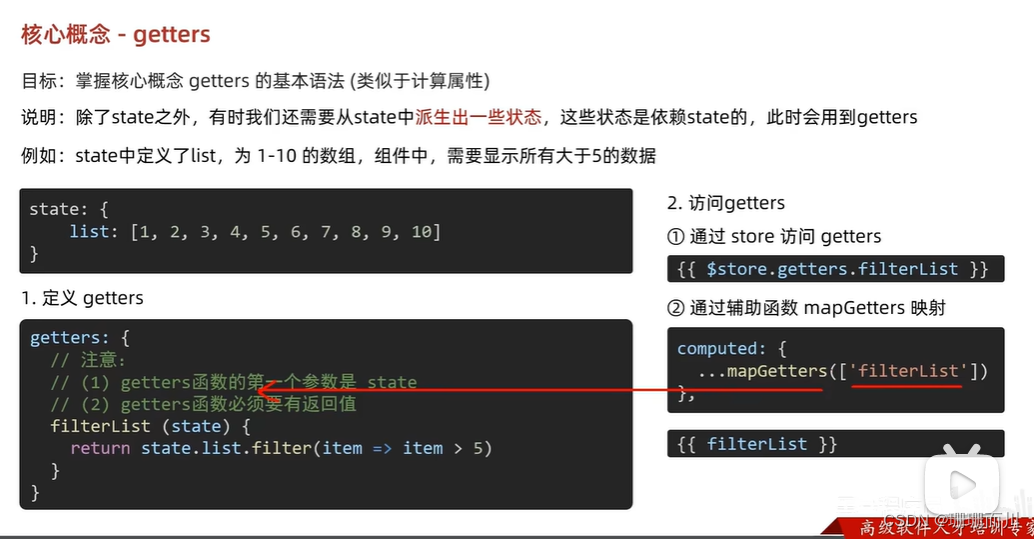
通過store訪問getters
store/index.js
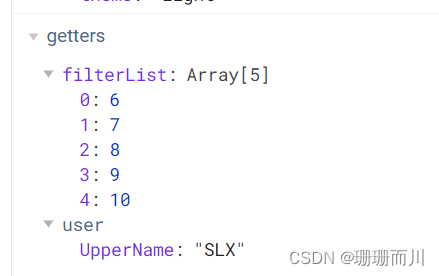
state: {title: 'hhhhh',count: 100,list: [1, 2, 3, 4, 5, 6, 7, 8, 9, 10]},// 類似于計算屬性getters: {// 注意點:// 1. 形參第一個參數,就是state// 2. 必須有返回值,返回值就是getters的值filterList (state) {return state.list.filter(item => item > 5)}}
Son1.vue
<hr>
<div>{{$store.state.list}}</div>
<div>{{ $store.getters.filterList }}</div>
通過輔助函數mapGetters映射
Son2.vue
<hr>
<div>{{ filterList }}</div>import {  mapGetters } from 'vuex'computed: {...mapGetters(['filterList'])},
模塊module
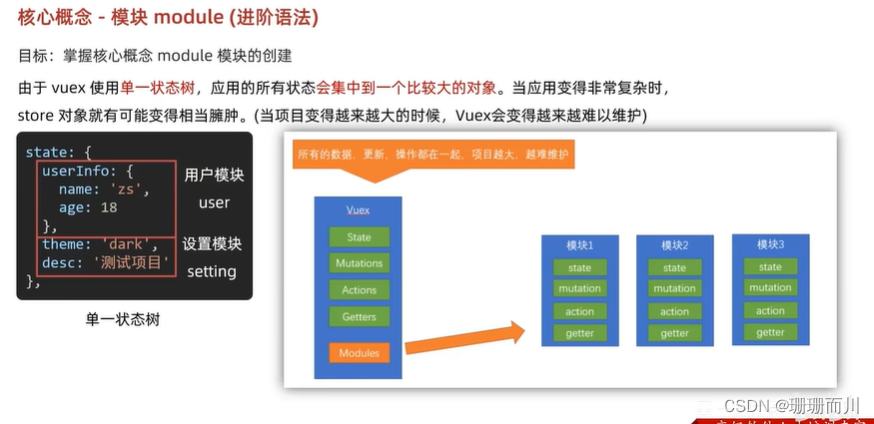
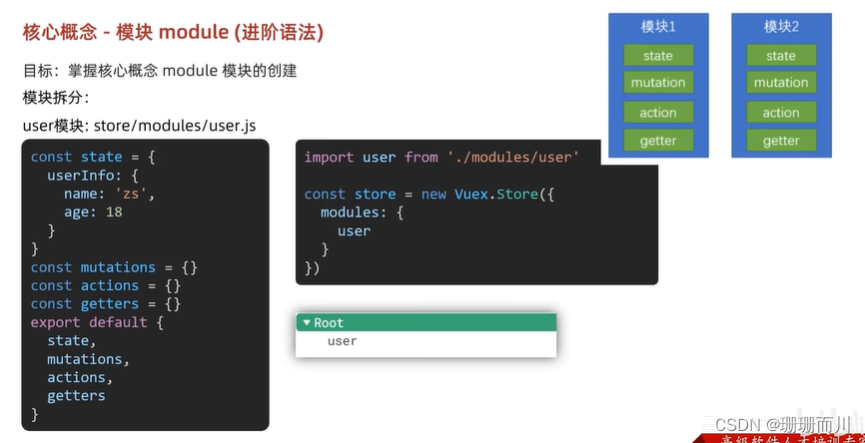 store/modules/user.js
const state = {userInfo: {name: 'slx',age: 18},score: 80
}
const mutations = {}
const actions = {}
const getters = {}export default {state,mutations,actions,getters
}
store/modules/setting.js
const state = {theme: 'light'
}
const mutations = {}
const actions = {}
const getters = {}export default {state,mutations,actions,getters
}
store/index.js
import setting from './modules/setting'modules: {user, setting}
使用模塊中的數據 / 模塊中state的訪問語法
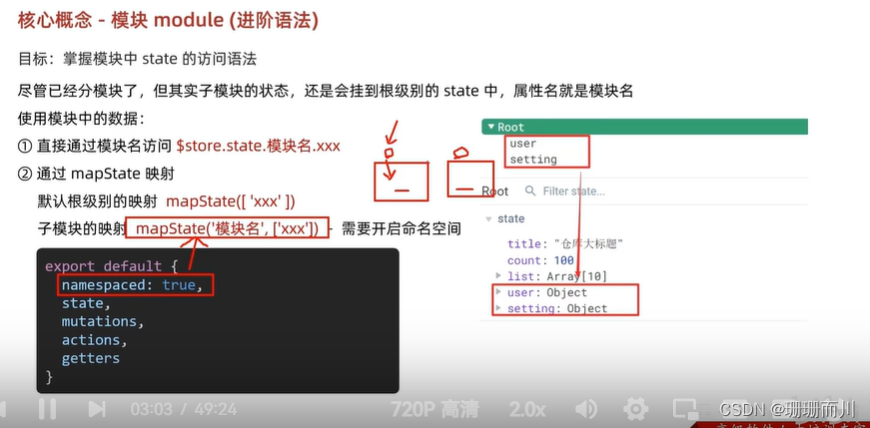
子模塊的狀態,還是會掛到根級別的state中,屬性名就是模塊名

直接通過模塊名訪問
Son1.js
<div>{{ $store.state.user.userInfo.name }}</div>通過mapState映射
默認根級別的映射 …mapState([‘user’, ‘setting’])
Son2.js
<div>{{ user.userInfo.name }}</div>
<div>{{ setting.theme }}</div>
import { mapState } from 'vuex'computed: {...mapState(['user', 'setting']),},
子模塊映射 mapState(‘模塊名’,['xxx]) +開啟命名空間
user.js
export default {namespaced: true,//開啟命名空間state,mutations,actions,getters
}
Son2.vue
<div>{{ userInfo.name }}</div>
<div>{{ score }}</div>...mapState('user', ['userInfo', 'score']), //! !!!
使用模塊中getters中的數據 / 模塊中getters的訪問語法
直接通過模塊名訪問 $store.getters[‘模塊名/xxx’]
user.js
const getters = {// 分模塊后,state就是子模塊的stateUpperName (state) {return state.userInfo.name.toUpperCase()}
}
Son1.vue
<div>{{ $store.getters['user/UpperName'] }}</div>
通過mapGetters映射
默認根級別映射mapGetters([‘xxx’])
Son2.vue
<div>{{ filterList }}</div>...mapGetters(['filterList'])
store/index.js
getters: {// 注意點:// 1. 形參第一個參數,就是state// 2. 必須有返回值,返回值就是getters的值filterList (state) {return state.list.filter(item => item > 5)}},
子模塊映射mapGetters(‘模塊名’,[‘xxx’])+開啟命名空間Son2.vue
<div>{{ UpperName }}</div>...mapGetters('user', ['UpperName']), //! !!!
掌握模塊中的mutation調用語法
直接通過store調用 $store.commit(‘模塊名/xxx’,額外參數)
setting.js
const mutations = {setTheme (state, newtheme) {state.theme = newtheme}
}
export default {namespaced: true,state,mutations,actions,getters
}
Son1.vue
        <div>{{ $store.state.setting.theme }}</div><button @click="changeTheme">改主題色</button>
changeTheme () {this.$store.commit('setting/setTheme', 'dark')},
通過mapMutations映射
默認根級別映射mapMutations([‘xxx’])
子模塊映射mapMutations(‘模塊名’,[‘xxx’])+開啟命名空間
setting.js
const state = {theme: 'light',size: 16
}
const mutations = {setTheme (state, newtheme) {state.theme = newtheme},setSize (state, newSize) {state.size = newSize}
}
Son2.vue
<div>{{$store.state.setting.size}}px</div>
<button @click="setSize(90)">改px</button>//真的注意,放在methods里,不是computedmethods: {...mapMutations('setting', ['setSize']),...mapMutations('setting', ['setTheme'])}
## 模塊中action的訪問語法 
直接通過模塊名訪問 $store.dispatch(‘模塊名/xxx’,額外參數)
Son1.vue
 <button @click="updateTheme2">一秒后更新</button>
methods: {updateTheme2 () {this.$store.dispatch('setting/setThemeSecond', 'orange')},
setting.js
const actions = {setThemeSecond (context, newTheme) {setTimeout(() => {// 調用mutation  context上下文,默認提交的就是自己模塊action和mutationcontext.commit('setTheme', newTheme)}, 1000)}
}
通過mapActions映射
默認根級別映射mapActions([‘xxx’])
子模塊映射mapActions(‘模塊名’,[‘xxx’])+開啟命名空間
Son2.vue
<button @click="setThemeSecond('black')">一秒后更新主題</button>methods: {...mapActions('setting', ['setThemeSecond'])}


,發揮應用的最大價值)


)


![VSCODE[配置ssh免密遠程登錄]](http://pic.xiahunao.cn/VSCODE[配置ssh免密遠程登錄])


Node.js 基礎模塊)

