【RabbitMQ與SpringBoot集成測試收發消息】
- 一、環境說明
- 二、實驗步驟
- 三、小結
一、環境說明
- 安裝環境:虛擬機VMWare + Centos7.6 + Maven3.6.3 + JDK1.8
- RabbitMQ版本:rabbitmq-server-3.8.8-1.el7.noarch.rpm
- 編程工具Idea + 運行JDK為17
二、實驗步驟
-
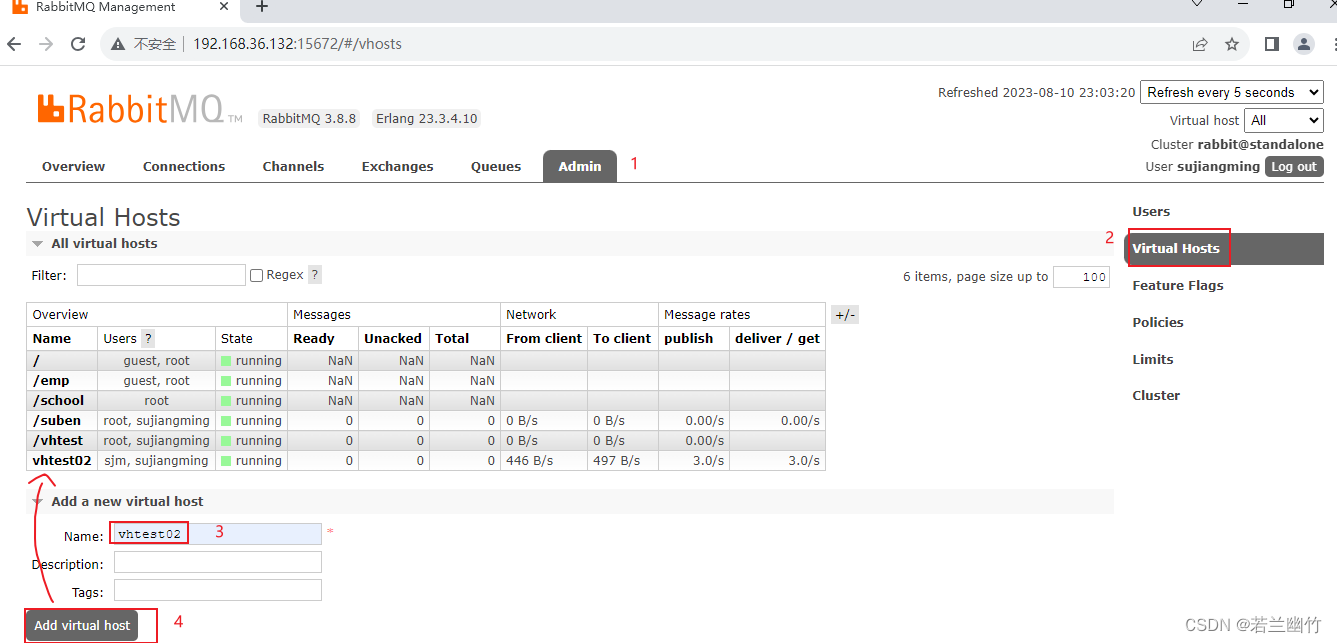
在RabbitMQ的UI界面或命令行上
創建新的Virtual Host,取名為vhtest02,如下圖所示:
-
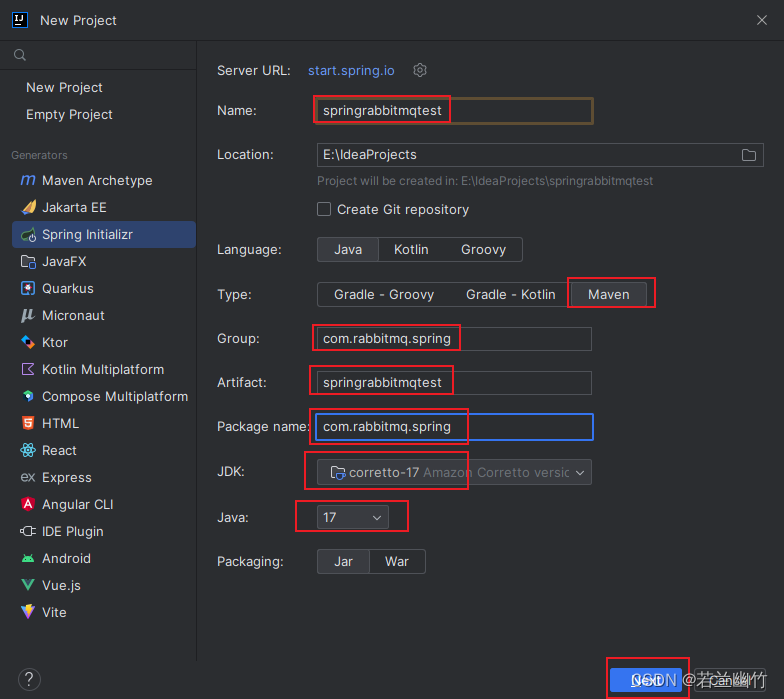
使用Idea的
Spring Initializr創建生產者工程springrabbitmqtest,坐標如下:
-
配置application.properties,可參考添加如下內容:
spring.rabbitmq.host=192.168.36.132
spring.rabbitmq.port=5672
spring.rabbitmq.virtual-host=vhtest02
spring.rabbitmq.username=sujiangming
spring.rabbitmq.password=openGauss@1234
根據你自己的環境改成你自己的ip、port、virtual-host、用戶名和密碼。
-
編寫生產者配置類,用于創建Exchange、Queue以及將兩者綁定在一起,代碼如下:
類名為:com.rabbitmq.springboot.config.RabbitMqConfig,代碼如下所示:package com.rabbitmq.springboot.config;import org.springframework.amqp.core.*; import org.springframework.beans.factory.annotation.Qualifier; import org.springframework.context.annotation.Bean; import org.springframework.context.annotation.Configuration;@Configuration public class RabbitMqConfig {//創建交換機@Bean(name = "topicExchange")public TopicExchange topicExchange(){return new TopicExchange("springboot_topic_exchange");}//創建隊列@Bean(name = "topicQueueSpringBoot")public Queue topicQueue(){return QueueBuilder.durable("springboot_topic_queue").build();}//隊列綁定交換機@Beanpublic Binding bindingExchangeTopicQueue(@Qualifier("topicQueueSpringBoot") Queue queue,@Qualifier("topicExchange")Exchange exchange){return BindingBuilder.bind(queue).to(exchange).with("log.#").noargs();} } -
修改
com.rabbitmq.springboot.SpringRabbitMqTestApplicationTests類,添加注解和測試方法,具體代碼如下:package com.rabbitmq.springboot;import org.junit.jupiter.api.Test; import org.junit.runner.RunWith; import org.springframework.amqp.rabbit.core.RabbitTemplate; import org.springframework.beans.factory.annotation.Autowired; import org.springframework.boot.test.context.SpringBootTest; import org.springframework.test.context.junit4.SpringRunner;@RunWith(SpringRunner.class) @SpringBootTest class SpringRabbitMqTestApplicationTests {@Autowiredprivate RabbitTemplate rabbitTemplate;@Testpublic void testSendMessage() throws InterruptedException {//convertAndSend(交換機名稱,路由key,消息內容)int temp = 0;while (true){rabbitTemplate.convertAndSend("springboot_topic_exchange","log.info","發送了info消息" + temp);rabbitTemplate.convertAndSend("springboot_topic_exchange","log.error","發送了error消息"+ temp);rabbitTemplate.convertAndSend("springboot_topic_exchange","log.warning","發送了warning消息"+ temp);temp++;Thread.sleep(2000);}}@Testvoid contextLoads() {}}該程序會一直運行,因為我加了while(true),模擬用戶一直產生數據。
-
運行測試:運行
com.rabbitmq.springboot.SpringRabbitMqTestApplicationTests類中的方法testSendMessage(),正常運行會看到如下內容:

-
編寫消費者工程,具體創建工程如步驟2所示;
-
修改application.properties,如步驟3所示,可直接復步驟3內容即可;
-
創建監聽類:
com.rabbitmq.consumer.listener.MessageListener,用于監聽某個隊列的消息,一旦監聽到有數據,立馬進行消費,代碼如下:package com.rabbitmq.consumer.listener;import org.springframework.amqp.rabbit.annotation.RabbitListener; import org.springframework.stereotype.Component;/*** 消息監聽器*/ @Component public class MessageListener {/*** 監聽某個隊列的消息* @param msg 接收到的消息*/@RabbitListener(queues = "springboot_topic_queue")public void topicListener(String msg){System.out.println("接收到消息:" + msg);} } -
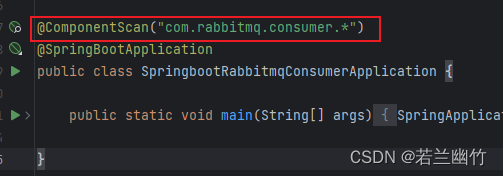
修改啟動類:
SpringbootRabbitmqConsumerApplication,在其類上面添加注解@ComponentScan("com.rabbitmq.consumer.*"),如不添加該注解運行會自動退出,修改好如下圖所示:
-
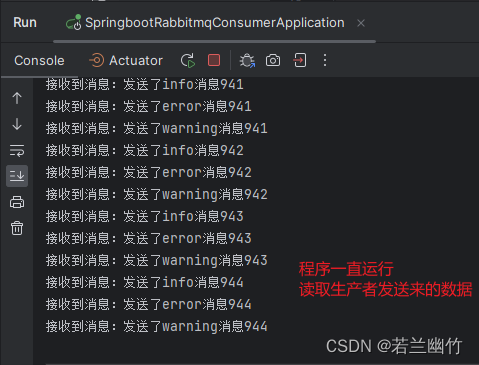
運行測試:運行
SpringbootRabbitmqConsumerApplication類,正常情況下會看到如下內容:
三、小結
本文參考了來自網絡上的資料,
如有侵權,請及時聯系博主進行刪除。本文僅是博主本人在學習過程中作為學習筆記使用,常言道:好記性不如爛筆頭。如本文對您有所幫助,請您動動發財的手指給博主點個贊,謝謝您的閱讀~~~


![C# 使用FFmpeg.Autogen對byte[]進行編解碼](http://pic.xiahunao.cn/C# 使用FFmpeg.Autogen對byte[]進行編解碼)


)


