目錄:
- pytest結合數據驅動-yaml
- pytest結合數據驅動-excel
- pytest結合數據驅動-csv
- pytest結合數據驅動-json
- pytest測試用例生命周期管理(一)
- pytest測試用例生命周期管理(二)
- pytest測試用例生命周期管理(三)
- pytest測試用例生命周期管理-自動注冊
- pytest測試用例生命周期管理-自動生效
- pytestfixture實現參數化
1.pytest結合數據驅動-yaml
數據驅動
-
什么是數據驅動?
- 數據驅動就是數據的改變從而驅動自動化測試的執行,最終引起測試結果的改變。簡單來說,就是參數化的應用。數據量小的測試用例可以使用代碼的參數化來實現數據驅動,數據量大的情況下建議大家使用一種結構化的文件(例如 yaml,json 等)來對數據進行存儲,然后在測試用例中讀取這些數據。
-
應用:
- App、Web、接口自動化測試
- 測試步驟的數據驅動
- 測試數據的數據驅動
- 配置的數據驅動
yaml 文件介紹?
- 對象:鍵值對的集合,用冒號 “:” 表示
- 數組:一組按次序排列的值,前加 “-”
- 純量:單個的、不可再分的值
- 字符串
- 布爾值
- 整數
- 浮點數
- Null
- 時間
- 日期
# 編程語言
languages:- PHP- Java- Python
book:Python入門: # 書籍名稱price: 55.5author: Lilyavailable: Truerepertory: 20date: 2018-02-17Java入門:price: 60author: Lilyavailable: Falserepertory: Nulldate: 2018-05-11
yaml 文件使用
- 查看 yaml 文件
- pycharm
- txt 記事本
- 讀取 yaml 文件
- 安裝:
pip install pyyaml - 方法:
yaml.safe_load(f) - 方法:
yaml.safe_dump(f)
- 安裝:
import yamlfile_path = './my.yaml'
with open(file_path, 'r', encoding='utf-8') as f:data = yaml.safe_load(f)
?代碼實例:
工程目錄結構
- data 目錄:存放 yaml 數據文件
- func 目錄:存放被測函數文件
- testcase 目錄:存放測試用例文件
# 工程目錄結構
.
├── data
│   └── data.yaml
├── func
│   ├── __init__.py
│   └── operation.py
└── testcase├── __init__.py└── test_add.py
?測試準備
- 被測對象:
operation.py - 測試用例:
test_add.py - 測試數據:
data.yaml
# operation.py 文件內容
def my_add(x, y):result = x + yreturn result
# test_add.py 文件內容
class TestWithYAML:@pytest.mark.parametrize('x,y,expected', [[1, 1, 2]])def test_add(self, x, y, expected):assert my_add(int(x), int(y)) == int(expected)
# data.yaml 文件內容
-- 1- 1- 2
-- 3- 6- 9
-- 100- 200- 300
import pytest
import yamlfrom func.operation import my_add# 方法一
# class TestWithYAML:
# @pytest.mark.parametrize('x,y,expected', [[1, 1, 2], [3, 6, 9], [100, 200, 300]])
# def test_add(self, x, y, expected):
# assert my_add(int(x), int(y)) == int(expected)# 方法二
def get_data():with open("../data/data.yaml", encoding='utf-8') as f:data = yaml.safe_load(f)return dataclass TestWithYAML:@pytest.mark.parametrize('x,y,expected', get_data())def test_add(self, x, y, expected):assert my_add(int(x), int(y)) == int(expected)
2.pytest結合數據驅動-excel
讀取 Excel 文件
-
第三方庫
xlrdxlwingspandas
-
openpyxl
- 官方文檔: https://openpyxl.readthedocs.io/en/stable/
openpyxl 庫的安裝
- 安裝:
pip install openpyxl - 導入:
import openpyxl
openpyxl 庫的操作
-
讀取工作簿
-
讀取工作表
-
讀取單元格
import openpyxl# 獲取工作簿
book = openpyxl.load_workbook('./data/test.xlsx')# 讀取工作表
sheet = book.active
print(sheet)# 讀取單個單元格
cell_a1 = sheet['A1']
print(cell_a1.value)cell_a3 = sheet.cell(column=1, row=3)  # A3
print(cell_a3.value)# 讀取多個連續單元格
cells = sheet["A1":"C3"]
for i in cells:for j in i:print(j.value,end=' ')print()
?代碼實例:
import openpyxl
import pytest
import yamlfrom func.operation import my_add# 方法一
# class TestWithYAML:
#     @pytest.mark.parametrize('x,y,expected', [[1, 1, 2], [3, 6, 9], [100, 200, 300]])
#     def test_add(self, x, y, expected):
#         assert my_add(int(x), int(y)) == int(expected)# 方法二
# def get_data():
#     with open("../data/data.yaml", encoding='utf-8') as f:
#         data = yaml.safe_load(f)
#     return data
#
#
# class TestWithYAML:
#     @pytest.mark.parametrize('x,y,expected', get_data())
#     def test_add(self, x, y, expected):
#         assert my_add(int(x), int(y)) == int(expected)# 方法三
def get_excel():book = openpyxl.load_workbook("../data/test.xlsx")sheet = book.activecells = sheet["A1":"C3"]values = []for row in cells:data = []for cell in row:data.append(cell.value)values.append(data)return valuesclass TestWithYAML:@pytest.mark.parametrize('x,y,expected', get_excel())def test_add(self, x, y, expected):assert my_add(int(x), int(y)) == int(expected)
3.pytest結合數據驅動-csv
csv 文件介紹
- csv:逗號分隔值
- 是 Comma-Separated Values 的縮寫
- 以純文本形式存儲數字和文本
- 文件由任意數目的記錄組成
- 每行記錄由多個字段組成
Linux從入門到高級,linux,¥5000
web自動化測試進階,python,¥3000
app自動化測試進階,python,¥6000
Docker容器化技術,linux,¥5000
測試平臺開發與實戰,python,¥8000
?csv 文件使用
-
讀取數據
- 內置函數:
open() - 內置模塊:
csv
- 內置函數:
-
方法:
csv.reader(iterable)- 參數:iterable ,文件或列表對象
- 返回:迭代器,每次迭代會返回一行數據。
import csvdef get_csv():with open('./data/params.csv', 'r', encoding='utf-8') as file:raw = csv.reader(file)for line in raw:print(line)if __name__ == '__main__':get_csv()代碼實例:
測試準備
-
被測對象:
operation.py -
測試用例:
test_add.py -
測試數據:
params.csv
# operation.py 文件內容
def my_add(x, y):result = x + yreturn result# test_add.py 文件內容
class TestWithCSV:@pytest.mark.parametrize('x,y,expected', [[1, 1, 2]])def test_add(self, x, y, expected):assert my_add(int(x), int(y)) == int(expected)# params.csv 文件內容
1,1,2
3,6,9
100,200,300
import csvimport openpyxl
import pytest
import yamlfrom func.operation import my_add# 方法一
# class TestWithYAML:
# @pytest.mark.parametrize('x,y,expected', [[1, 1, 2], [3, 6, 9], [100, 200, 300]])
# def test_add(self, x, y, expected):
# assert my_add(int(x), int(y)) == int(expected)# 方法二
# def get_data():
# with open("../data/data.yaml", encoding='utf-8') as f:
# data = yaml.safe_load(f)
# return data
#
#
# class TestWithYAML:
# @pytest.mark.parametrize('x,y,expected', get_data())
# def test_add(self, x, y, expected):
# assert my_add(int(x), int(y)) == int(expected)# 方法三
# def get_excel():
# book = openpyxl.load_workbook("../data/test.xlsx")
# sheet = book.active
# cells = sheet["A1":"C3"]
# values = []
# for row in cells:
# data = []
# for cell in row:
# data.append(cell.value)
# values.append(data)
# return values
#
#
# class TestWithYAML:
# @pytest.mark.parametrize('x,y,expected', get_excel())
# def test_add(self, x, y, expected):
# assert my_add(int(x), int(y)) == int(expected)# 方法四
def get_csv():with open('../data/test.csv', encoding='utf-8') as f:raw = csv.reader(f)data = []for line in raw:data.append(line)return dataclass TestWithYAML:@pytest.mark.parametrize('x,y,expected', get_csv())def test_add(self, x, y, expected):assert my_add(int(x), int(y)) == int(expected)
4.pytest結合數據驅動-json
json 文件介紹
-
json 是 JS 對象
-
全稱是 JavaScript Object Notation
-
是一種輕量級的數據交換格式
-
json 結構
- 對象?
{"key": value} - 數組?
[value1, value2 ...]
- 對象?
{"name:": "tom","detail": {"course": "python","city": "北京"},"remark": [1000, 666, 888]
}
?json 文件使用
- 查看 json 文件
- pycharm
- txt 記事本
- 讀取 json 文件
- 內置函數 open()
- 內置庫 json
- 方法:
json.loads() - 方法:
json.dumps()
?params.json
{"case1": [1, 1, 2],"case2": [3, 6, 9],"case3": [100, 200, 300]
}
import jsondef get_json():with open('./data/params.json', 'r') as f:data = json.loads(f.read())print(data)print(type(data))s = json.dumps(data, ensure_ascii=False)print(s)print(type(s))if __name__ == '__main__':get_json()代碼示例:
測試準備
-
被測對象:
operation.py -
測試用例:
test_add.py -
測試數據:
params.json
# operation.py 文件內容
def my_add(x, y):result = x + yreturn result# test_add.py 文件內容
class TestWithJSON:@pytest.mark.parametrize('x,y,expected', [[1, 1, 2]])def test_add(self, x, y, expected):assert my_add(int(x), int(y)) == int(expected)# params.json 文件內容
{"case1": [1, 1, 2],"case2": [3, 6, 9],"case3": [100, 200, 300]
}
import csv
import jsonimport openpyxl
import pytest
import yamlfrom func.operation import my_add# 方法一
# class TestWithYAML:
# @pytest.mark.parametrize('x,y,expected', [[1, 1, 2], [3, 6, 9], [100, 200, 300]])
# def test_add(self, x, y, expected):
# assert my_add(int(x), int(y)) == int(expected)# 方法二
# def get_data():
# with open("../data/data.yaml", encoding='utf-8') as f:
# data = yaml.safe_load(f)
# return data
#
#
# class TestWithYAML:
# @pytest.mark.parametrize('x,y,expected', get_data())
# def test_add(self, x, y, expected):
# assert my_add(int(x), int(y)) == int(expected)# 方法三
# def get_excel():
# book = openpyxl.load_workbook("../data/test.xlsx")
# sheet = book.active
# cells = sheet["A1":"C3"]
# values = []
# for row in cells:
# data = []
# for cell in row:
# data.append(cell.value)
# values.append(data)
# return values
#
#
# class TestWithYAML:
# @pytest.mark.parametrize('x,y,expected', get_excel())
# def test_add(self, x, y, expected):
# assert my_add(int(x), int(y)) == int(expected)# 方法四
# def get_csv():
# with open('../data/test.csv', encoding='utf-8') as f:
# raw = csv.reader(f)
# data = []
# for line in raw:
# data.append(line)
# return data
#
#
# class TestWithYAML:
# @pytest.mark.parametrize('x,y,expected', get_csv())
# def test_add(self, x, y, expected):
# assert my_add(int(x), int(y)) == int(expected)# 方法五
def get_json():with open('../data/params.json', 'r') as f:data = json.loads(f.read())print(data)print(type(data))print(list(data.values()))return list(data.values())class TestWithYAML:@pytest.mark.parametrize('x,y,expected', get_json())def test_add(self, x, y, expected):assert my_add(int(x), int(y)) == int(expected)
5.pytest測試用例生命周期管理(一)
Fixture 特點及優勢
- 1、命令靈活:對于 setup,teardown,可以不起這兩個名字
- 2、數據共享:在 conftest.py 配置?寫?法可以實現數據共享,不需要 import 導?。可以跨?件共享
- 3、scope 的層次及神奇的?yield?組合相當于各種 setup 和 teardown
- 4、實現參數化
Fixture 在自動化中的應用- 基本用法
- 場景:
測試?例執?時,有的?例需要登陸才能執?,有些?例不需要登陸。
setup 和 teardown ?法滿?。fixture 可以。默認 scope(范圍)function
- 步驟:
- 1.導? pytest
- 2.在登陸的函數上?加@pytest.fixture()
- 3.在要使?的測試?法中傳?(登陸函數名稱),就先登陸
- 4.不傳?的就不登陸直接執?測試?法。
import pytest@pytest.fixture()
def login():print('完成登錄操作')def test_search():print('搜索')# def test_cart():
#     login()
#     print('購物車')def test_cart(login):print('購物車')def test_order(login):print('下單功能')
6.pytest測試用例生命周期管理(二)
Fixture 在自動化中的應用 - 作用域
| 取值 | 范圍 | 說明 |
|---|---|---|
| function | 函數級 | 每一個函數或方法都會調用 |
| class | 類級別 | 每個測試類只運行一次 |
| module | 模塊級 | 每一個.py 文件調用一次 |
| package | 包級 | 每一個 python 包只調用一次(暫不支持) |
| session | 會話級 | 每次會話只需要運行一次,會話內所有方法及類,模塊都共享這個方法 |
import pytest@pytest.fixture(scope="function")
def login():print('完成登錄操作')def test_search():print('搜索')# def test_cart():
#     login()
#     print('購物車')def test_cart(login):print('購物車')def test_order(login):print('下單功能')class TestDemo:def test_case1(self, login):print("case1")def test_case2(self, login):print("case2")
7.pytest測試用例生命周期管理(三)
Fixture 在自動化中的應用 - yield 關鍵字
- 場景:
你已經可以將測試?法【前要執?的或依賴的】解決了,測試?法后銷毀清除數據的要如何進?呢?
- 解決:
通過在 fixture 函數中加? yield 關鍵字,yield 是調?第?次返回結果,第?次執?它下?的語句返回。
- 步驟:
在@pytest.fixture(scope=module)。在登陸的?法中加 yield,之后加銷毀清除的步驟
import pytest
'''
@pytest.fixture
def fixture_name():setup 操作yield 返回值teardown 操作
'''@pytest.fixture(scope="function")
def login():#setup操作print('完成登錄操作')tocken = "abcdafafasdfds"username = 'tom'yield tocken,username #相當于return#teardown操作print('完成登出操作')def test_search():print('搜索')# def test_cart():
#     login()
#     print('購物車')def test_cart(login):print('購物車')def test_order(login):print('下單功能')class TestDemo:def test_case1(self, login):print("case1")def test_case2(self, login):print("case2")
8.pytest測試用例生命周期管理-自動注冊
Fixture 在自動化中的應用 - 數據共享
- 場景:
與其他測試?程師合作?起開發時,公共的模塊要放在?家都訪問到的地?。
- 解決:
使? conftest.py 這個?件進?數據共享,并且他可以放在不同位置起著不同的范圍共享作?。
-
前提:
- conftest ?件名是不能換的
- 放在項?下是全局的數據共享的地?
-
執?:
- 系統執?到參數 login 時先從本模塊中查找是否有這個名字的變量什么的,
- 之后在 conftest.py 中找是否有。
-
步驟:
將登陸模塊帶@pytest.fixture 寫在 conftest.py 里面
代碼示例:
conftest.py
# conftest.py名字是固定的,不能改變
import pytest@pytest.fixture(scope="function")
def login():# setup操作print('完成登錄操作')tocken = "abcdafafasdfds"username = 'tom'yield tocken, username  # 相當于return# teardown操作print('完成登出操作')
test_test1.py
import pytest
'''
@pytest.fixture
def fixture_name():setup 操作yield 返回值teardown 操作
'''def test_search():print('搜索')# def test_cart():
#     login()
#     print('購物車')def test_cart(login):print('購物車')def test_order(login):print('下單功能')class TestDemo:def test_case1(self, login):print("case1")def test_case2(self, login):print("case2")
項目結構:

9.pytest測試用例生命周期管理-自動生效
Fixture 在自動化中的應用 - 自動應用
場景:
不想原測試?法有任何改動,或全部都?動實現?動應?,
沒特例,也都不需要返回值時可以選擇?動應?
解決:
使? fixture 中參數 autouse=True 實現
步驟:
在?法上?加?@pytest.fixture(autouse=True)
test_test1.py
import pytest'''
@pytest.fixture
def fixture_name():setup 操作yield 返回值teardown 操作
'''def test_search():print('搜索')# def test_cart():
#     login()
#     print('購物車')# def test_cart(login):
#     print('購物車')
def test_cart():print('購物車')# def test_order(login):
#     print('下單功能')def test_order():print('下單功能')class TestDemo:# def test_case1(self, login):#     print("case1")def test_case1(self):print("case1")# def test_case2(self, login):#     print("case2")def test_case2(self):print("case2")
?conftest.py
# conftest.py名字是固定的,不能改變
import pytest@pytest.fixture(scope="function", autouse=True)
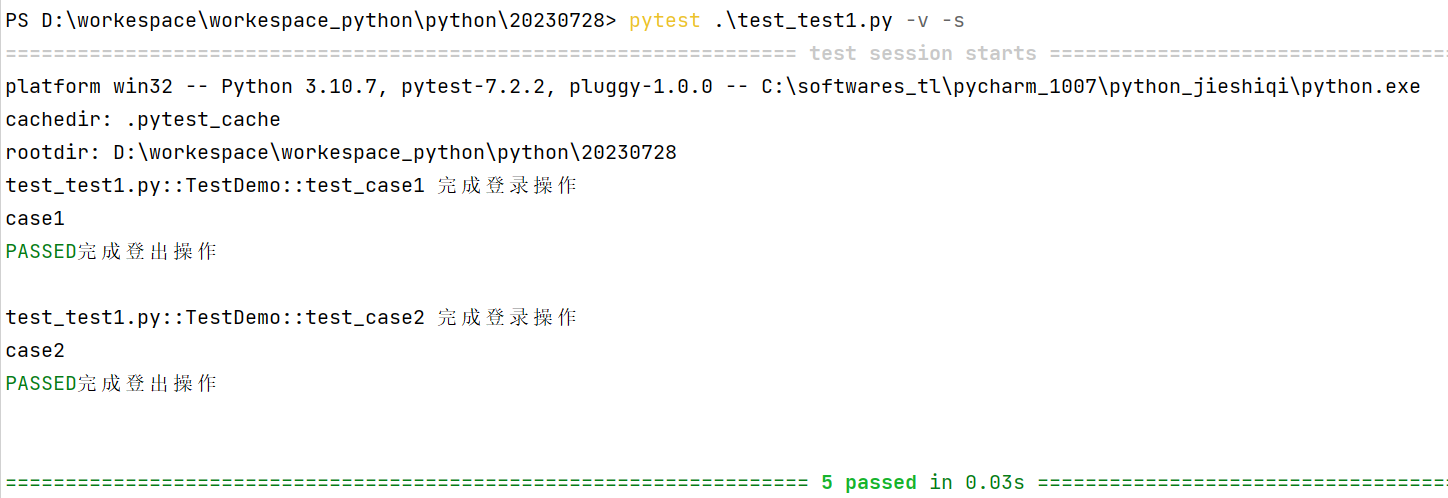
def login():# setup操作print('完成登錄操作')tocken = "abcdafafasdfds"username = 'tom'yield tocken, username # 相當于return# teardown操作print('完成登出操作')運行結果:

?
?10.pytestfixture實現參數化
Fixture 在自動化中的應用 -參數化
場景:
測試離不開數據,為了數據靈活,?般數據都是通過參數傳的
解決:
fixture 通過固定參數 request 傳遞
步驟:
在 fixture 中增加@pytest.fixture(params=[1, 2, 3, ‘linda’])
在?法參數寫 request,方法體里面使用 request.param 接收參數
# @pytest.fixture(params=['tom', 'jenny'])
# def login(request):
#     print(f"用戶名:{request.param}")
#     return request.param
#
#
# def test_demo1(login):
#     print(f'demo1 case:數據為{login}')@pytest.fixture(params=[['tom', 'harry'], ['jenny', 'jack']])
def login(request):print(f"用戶名:{request.param}")return request.paramdef test_demo1(login):print(f'demo1 case:數據為{login}')
Fixture 的用法總結
- 模擬 setup,teardown(一個用例可以引用多個 fixture)
- yield 的用法
- 作用域( session,module, 類級別,方法級別 )
- 自動執行 (autouse 參數)
- conftest.py 用法,一般會把 fixture 寫在 conftest.py 文件中(這個文件名字是固定的,不能改)
- 實現參數化

-CAM-獲取刀具類型)


