算法其他篇
目錄:
- 1.1 數據結構中的一些概念
- 1.2 棧(stack)
- 1.3 隊列
- 1.4 鏈表
- 1.5 python中字典對象實現原理
- 1.6 數組
1.1 數據結構中的一些概念?????返回頂部
1、數據結構是什么
1、簡單來說,數據結果就是設計數據以何種方式存儲在計算機中
2、比如:列表,集合,與字典等都是一種數據結構
3、程序 = 數據結構 + 算法
1.2 棧(stack)?????返回頂部
1、棧的定義
? ? ? ? ? ? ? ? ? 棧是一種數據集合,可以理解為只能在一端進行插入或刪除操作的列表
2、棧的特點
????????????????? 后進先出(last-in, first-out)
3、棧的概念
????????????????? 棧頂,棧底
4、棧的基本操作
????????????????? 進棧(壓棧):push
????????????????? 出棧:pop
????????????????? 取棧頂:gettop
5、棧的使用:匹配括號是否成對出現


def check_kuohao(s):stack = []for char in s:if char in ['(','[','{']:stack.append(char)elif char == ')':if len(stack)>0 and stack[-1] == '(':stack.pop()else:return Falseelif char == ']':if len(stack) > 0 and stack[-1] == '[':stack.pop()else:return Falseelif char == '}':if len(stack) > 0 and stack[-1] == '{':stack.pop()else:return Falseif len(stack) == 0:return Trueelse:return False
print(check_kuohao('(){}{}[]'))  #True
1.3 隊列?????返回頂部
1、隊列定義
1、隊列是一個數據集合,僅允許在列表的一端進行插入,另一端進行刪除
2、插入的一端稱為隊尾(rear),插入動作叫進隊或入隊
3、進行刪除的一端稱為對頭(front),刪除動作稱為出隊
4、隊列性質:先進先出(First-in, First-out)
5、雙向隊列:隊列的兩端都允許進行進隊和出隊操作
2、對列使用方法
1、導入: from collectios import deque
2、創建隊列:queue = deque(li)
3、進隊: append
4、出隊: popleft
5、雙向隊列隊首進隊:appendleft
6、雙向隊列隊尾出隊:pop
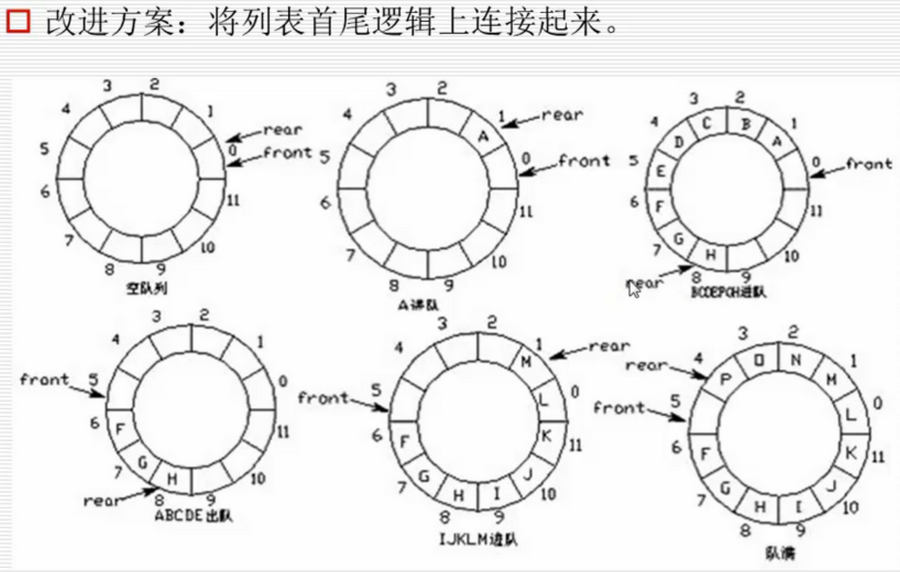
3、雙向對列原理圖
1、 環形對列:當對位指針front == Maxsize + 1 時,再進一個位置就自動到0
2、 實現方法:求余數運算
3、 隊首指針前進1: front = (front + 1)%MaxSize
4、 隊尾指針前進1:rear = (rear+1)%MaxSize
5、 隊空條件:rear == front
6、 隊滿條件:(rear+1)%MaxSize == front
? ? ? ? ? ? ? ??
1.4 鏈表?????返回頂部
1、單鏈表
注:鏈表中每個元素都是一個對象,每個對象稱為一個節點,包含有數據域key和指向下一節點的指針next,通過各個節點間的相互連接,最終串聯成一個鏈表

#! /usr/bin/env python
# -*- coding: utf-8 -*-
class Node(object):def __init__(self, item):self.item = itemself.next = Noneclass DLinkList(object):def __init__(self):self._head = Nonedef is_empty(self):return self._head == Nonedef append(self, item):'''尾部追加元素'''node = Node(item)if self.is_empty():self._head = nodeelse:cur = self._headwhile cur.next != None:cur = cur.nextcur.next = nodedef add(self, item):"""頭部插入元素"""node = Node(item)if self.is_empty():self._head = node         # 如果是空鏈表,將_head指向nodeelse:node.next = self._head      # 將node的next指向_head的頭節點self._head = node        # 將_head 指向nodedef travel(self):cur = self._headwhile cur != None:print cur.item,cur = cur.nextprint ""def remove(self, item):"""刪除元素"""if self.is_empty():returnelse:cur = self._headif cur.item == item:# 如果首節點的元素即是要刪除的元素if cur.next == None:  # 如果鏈表只有這一個節點self._head = Noneelse:  # 將_head指向第二個節點self._head = cur.nextreturnwhile cur != None:if cur.next.item == item:cur.next = cur.next.nextbreakcur = cur.nextdef insert(self, pos, item):"""在指定位置添加節點"""if pos <= 0:self.add(item)elif pos > (self.length() - 1):self.append(item)else:node = Node(item)cur = self._headcount = 0# 移動到指定位置的前一個位置while count < (pos - 1):count += 1cur_next = cur.next# 將node的next指向cur的下一個節點cur.next = nodenode.next = cur_nextdef length(self):"""返回鏈表的長度"""cur = self._headcount = 0while cur != None:count += 1cur = cur.nextreturn countif __name__ == '__main__':ll = DLinkList()# 1、將鏈表后面追加三個元素:1,2,3ll.append(1)ll.append(2)ll.append(3)ll.travel()  # 1 2 3# 2、將鏈表頭部插入一個元素:0
    ll.add(0)ll.travel()  # 1 2 3  ==>  0 1 2 3# 3、刪除鏈表中的元素:3ll.remove(3)ll.travel()  # 0 1 2 3  ==>  0 1 2# 4、在鏈表的第2號位置插入元素:8ll.insert(2,8)ll.travel()  # 0 1 2  ==>  0 8 1 2
#! /usr/bin/env python
# -*- coding: utf-8 -*-
class Node(object):def __init__(self, val):self.val = valself.next = Nonedef list_reverse(head):if head == None:return NoneL, R, cur = None, None, head  # 左指針、有指針、游標while cur.next != None:L = R             # 左側指針指向以前右側指針位置R = cur           # 右側指針前進一位指向當前游標位置cur = cur.next    # 游標每次向前進一位R.next = L        # 右側指針指向左側實現反轉cur.next = R          # 當跳出 while 循環時 cur(原鏈表最后一個元素) R(原鏈表倒數第二個元素)return curif __name__ == '__main__':'''原始鏈表:1 -> 2 -> 3 -> 4反轉鏈表:4 -> 3 -> 2 -> 1'''l1 = Node(1)l1.next = Node(2)l1.next.next = Node(3)l1.next.next.next = Node(4)l = list_reverse(l1)print l.val         # 4  反轉后鏈表第一個值4print l.next.val    # 3  第二個值3
#! /usr/bin/env python
# -*- coding: utf-8 -*-
class ListNode(object):def __init__(self, val, next=None):self.val = valself.next = next# 歸并法: 對鏈表排序
class Solution:def sortList(self, head):if head is None or head.next is None:return headpre = headslow = head  # 使用快慢指針來確定中點fast = headwhile fast and fast.next:pre = slowslow = slow.nextfast = fast.next.nextleft = headright = pre.nextpre.next = None  # 從中間打斷鏈表left = self.sortList(left)right = self.sortList(right)return self.merge(left, right)def merge(self, left, right):pre = ListNode(-1)first = prewhile left and right:if left.val < right.val:pre.next = leftpre = leftleft = left.nextelse:pre.next = rightpre = rightright = right.nextif left:pre.next = leftelse:pre.next = rightreturn first.nextnode1 = ListNode(4)
node2 = ListNode(3)
node3 = ListNode(2)
node4 = ListNode(1)node1.next = node2
node2.next = node3
node3.next = node4s = Solution()
result = s.sortList(node1)while (result != None):print result.val,    # 1 2 3 4result = result.next
#!/usr/bin/env python
# -*- coding:utf-8 -*-
def mergesort(seq):if len(seq) <= 1:return seqmid = int(len(seq) / 2)left = mergesort(seq[:mid])right = mergesort(seq[mid:])return merge(left, right)def merge(left, right):result = []i, j = 0, 0while i < len(left) and j < len(right):if left[i] <= right[j]:result.append(left[i])i += 1else:result.append(right[j])j += 1result += left[i:]result += right[j:]return resultif __name__ == '__main__':seq = [10,4,6,3,8,2,5,7]print mergesort(seq)  # [2, 3, 4, 5, 6, 7, 8, 10]
2、雙鏈表
注:雙鏈表中每個節點有兩個指針:一個指針指向后面節點、一個指向前面節點

#! /usr/bin/env python
# -*- coding: utf-8 -*-
class Node(object):"""雙向鏈表節點"""def __init__(self, item):self.item = itemself.next = Noneself.prev = Noneclass DLinkList(object):"""雙向鏈表"""def __init__(self):self._head = Nonedef is_empty(self):"""判斷鏈表是否為空"""return self._head == Nonedef length(self):"""返回鏈表的長度"""cur = self._headcount = 0while cur != None:count += 1cur = cur.nextreturn countdef travel(self):"""遍歷鏈表"""cur = self._headwhile cur != None:print cur.item,cur = cur.nextprint ""def add(self, item):"""頭部插入元素"""node = Node(item)if self.is_empty():# 如果是空鏈表,將_head指向nodeself._head = nodeelse:# 將node的next指向_head的頭節點node.next = self._head# 將_head的頭節點的prev指向nodeself._head.prev = node# 將_head 指向nodeself._head = nodedef append(self, item):"""尾部插入元素"""node = Node(item)if self.is_empty():# 如果是空鏈表,將_head指向nodeself._head = nodeelse:# 移動到鏈表尾部cur = self._headwhile cur.next != None:cur = cur.next# 將尾節點cur的next指向nodecur.next = node# 將node的prev指向curnode.prev = curdef search(self, item):"""查找元素是否存在"""cur = self._headwhile cur != None:if cur.item == item:return Truecur = cur.nextreturn Falsedef insert(self, pos, item):"""在指定位置添加節點"""if pos <= 0:self.add(item)elif pos > (self.length() - 1):self.append(item)else:node = Node(item)cur = self._headcount = 0# 移動到指定位置的前一個位置while count < (pos - 1):count += 1cur = cur.next# 將node的prev指向curnode.prev = cur# 將node的next指向cur的下一個節點node.next = cur.next# 將cur的下一個節點的prev指向nodecur.next.prev = node# 將cur的next指向nodecur.next = nodedef remove(self, item):"""刪除元素"""if self.is_empty():returnelse:cur = self._headif cur.item == item:# 如果首節點的元素即是要刪除的元素if cur.next == None:# 如果鏈表只有這一個節點self._head = Noneelse:# 將第二個節點的prev設置為Nonecur.next.prev = None# 將_head指向第二個節點self._head = cur.nextreturnwhile cur != None:if cur.item == item:# 將cur的前一個節點的next指向cur的后一個節點cur.prev.next = cur.next# 將cur的后一個節點的prev指向cur的前一個節點cur.next.prev = cur.prevbreakcur = cur.nextif __name__ == "__main__":ll = DLinkList()ll.add(1)ll.add(2)# ll.append(3)# ll.insert(2, 4)# ll.insert(4, 5)# ll.insert(0, 6)# print "length:",ll.length()# ll.travel()# print ll.search(3)# print ll.search(4)# ll.remove(1)print "length:",ll.length()ll.travel()
#! /usr/bin/env python
# -*- coding: utf-8 -*-
class Node(object):def __init__(self, item):self.item = itemself.next = Noneself.prev = Noneclass DLinkList(object):def __init__(self):self._head = Nonedef is_empty(self):return self._head == Nonedef append(self, item):node = Node(item)if self.is_empty():self._head = nodeelse:cur = self._headwhile cur.next != None:cur = cur.nextcur.next = nodenode.prev = curdef travel(self):cur = self._headwhile cur != None:print cur.item,cur = cur.nextif __name__ == '__main__':ll = DLinkList()ll.append(1)ll.append(2)ll.append(3)# print ll._head.item              # 打印第一個元素:1# print ll._head.next.item         # 打印第二個元素:2# print ll._head.next.next.item    # 打印第三個元素:3ll.travel()    # 1 2 3
1.5 python中字典對象實現原理?????返回頂部
? 注:字典類型是Python中最常用的數據類型之一,它是一個鍵值對的集合,字典通過鍵來索引,關聯到相對的值,理論上它的查詢復雜度是 O(1)?
1、哈希表 (hash tables)
1.?哈希表(也叫散列表),根據關鍵值對(Key-value)而直接進行訪問的數據結構。
2.?它通過把key和value映射到表中一個位置來訪問記錄,這種查詢速度非常快,更新也快。
3.?而這個映射函數叫做哈希函數,存放值的數組叫做哈希表。?
4.?通過把每個對象的關鍵字k作為自變量,通過一個哈希函數h(k),將k映射到下標h(k)處,并將此對象存儲在這個位置。
2、具體操作過程
1.?數據添加:把key通過哈希函數轉換成一個整型數字,然后就將該數字對數組長度進行取余,取余結果就當作數組的下標,
? ? ? ? ? ? ? ? ? 將value存儲在以該數字為下標的數組空間里。
2.?數據查詢:再次使用哈希函數將key轉換為對應的數組下標,并定位到數組的位置獲取value。
3、{“name”:”zhangsan”,”age”:26} 字典如何存儲的呢??
1.?比如字典{“name”:”zhangsan”,”age”:26},那么他們的字典key為name、age,假如哈希函數h(“name”) = 1、h(“age”)=3,
2.?那么對應字典的key就會存儲在列表對應下標的位置,[None, “zhangsan”, None, 26 ]
4、解決hash沖突

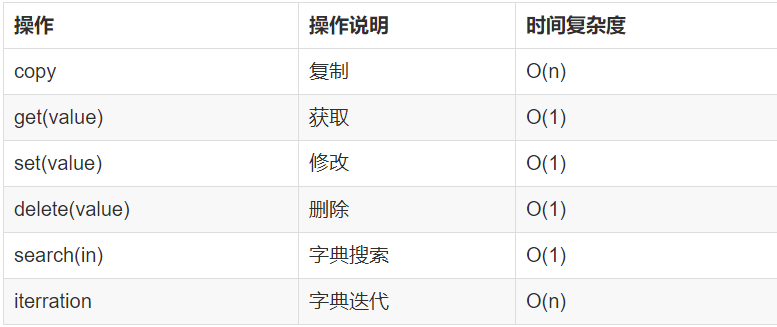
5、python字典操作時間復雜度
1.6 數組?????返回頂部
1、數組定義
1.?所謂數組,就是相同數據類型的元素按一定順序排列的集合
2.?在Java等其他語言中并不是所有的數據都能存儲到數組中,只有相同類型的數據才可以一起存儲到數組中。
3.?因為數組在存儲數據時是按順序存儲的,存儲數據的內存也是連續的,所以他的特點就是尋址讀取數據比較容易,插入和刪除比較困難。
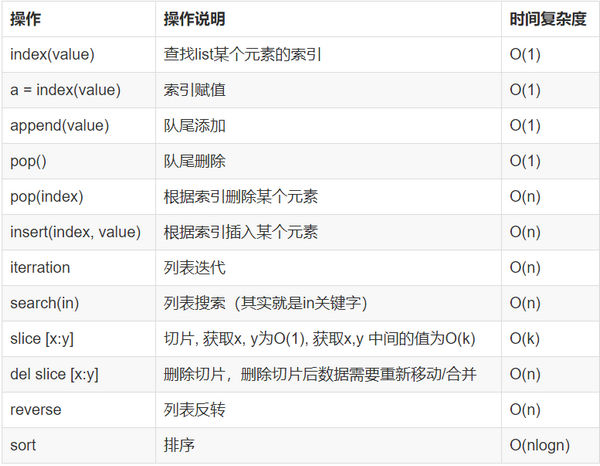
2、python中list與數組比較
1.?python中的list是python的內置數據類型,list中的數據類不必相同的,而array的中的類型必須全部相同。
2.?在list中的數據類型保存的是數據的存放的地址,簡單的說就是指針,并非數據
3.?這樣保存一個list就太麻煩了,例如list1=[1,2,3,'a']需要4個指針和四個數據,增加了存儲和消耗cpu。
?
?
?
?
?


![[面經]春季跳槽面筋總結 [2018年3月17]](http://pic.xiahunao.cn/[面經]春季跳槽面筋總結 [2018年3月17])
)


)