
筆記本電腦升級固態硬盤好嗎
Upgrading your laptop’s hard drive is a great way to get some extra life out of an old machine (or resurrect a dead one). Read on as we walk you through the prep work, the installation, and the followup.
升級筆記本電腦的硬盤驅動器是從舊機器(或恢復死機)中獲得更多使用壽命的好方法。 在我們逐步完成準備工作,安裝和后續操作時,請繼續閱讀。
我為什么要這樣做? (Why Do I Want To Do This?)
The most obvious reason you want to upgrade your laptop hard drive is because the old one is dying (or has already died). That’s exactly where we found ourselves, with a dying hard drive throwing up errors left and right, and why we promptly upgraded the drive in our work laptop.
您要升級筆記本電腦硬盤的最明顯原因是舊的硬盤快要死了(或已經死了)。 那就是我們發現自己的地方,一個快要死了的硬盤驅動器向左和向右拋出錯誤,以及為什么我們立即在工作筆記本電腦中升級了該驅動器。
Aside from the obvious replacing-the-dying-drive scenario, there is the upgrading-to-an-SSD scenario. SSD prices have been falling for years and it’s now really economical to replace the budget drive that came in your laptop with a radically faster and pretty cheap SSD. For this tutorial we picked up a 250GB SSD for under $100, no coupons, bargain shopping, or sales necessary. ?(Before you run out and buy a drive this second, however, do read ahead to the drive-selection section of the tutorial for some tips on ensuring you get the right drive for your laptop.)
除了明顯的“即將死機”方案外,還有“升級到SSD”方案。 SSD的價格已經下降了多年,現在用一種更快,更便宜的SSD取代筆記本電腦中的預算驅動器,現在確實很經濟。 在本教程中,我們以低于$ 100的價格購買了250GB SSD ,無需優惠券,討價還價或銷售。 (但是,在此之前用完硬盤并購買驅動器之前,請務必先閱讀本教程的驅動器選擇部分,以獲取有關確保為筆記本電腦獲得正確驅動器的一些提示。)
While solid state drives improve any computer experience (we use them as primary/operating system disks in all our desktop machines too) they’re a match made in heaven for laptops: they’re silent, give off very little heat, consume very little power, and are very shock resistant all thanks to the lack of mechanical guts and moving parts. Further, they radically reduce your boot time and, in the process, give older laptops a much needed boost. Unless you have a very pressing need to use a mechanical drive in your laptop (e.g. you need a lot of local storage and only have one drive bay) there’s no reason not to upgrade to an SSD.
盡管固態驅動器可以改善任何計算機體驗(我們在所有臺式機中也將它們用作主要/操作系統磁盤),但它們卻是筆記本電腦的絕配:它們無聲,發熱量極少,消耗很少由于沒有機械膽量和活動部件,因此具有很高的抗沖擊能力。 此外,它們從根本上減少了您的啟動時間,并且在此過程中為舊筆記本電腦提供了急需的增強功能。 除非您迫切需要在筆記本電腦中使用機械驅動器(例如,您需要大量本地存儲并且只有一個驅動器托架),否則沒有理由不升級到SSD。
Now, before we proceed, let’s highlight one obvious thing: swapping out your laptop drive is not difficult and for veteran computer hobbyists who have been building computers their entire lives the rest of our guide is going to be a bit overkill in the guidance and explanation department. At its most basic a laptop HDD upgrade is simply: open back panel, pull old drive, stick new drive in, boot and install OS and you’re done. But there’s a bunch of little details that we (and the veteran computer hobbyists reading this) have learned the hard way over years of tinkering.
現在,在我們繼續之前,讓我們重點介紹一件顯而易見的事情:更換筆記本電腦驅動器并不困難,對于一生都在建造計算機的資深計算機愛好者來說,本指南的其余部分在指導和解釋中會有些過大。部門。 筆記本電腦HDD的升級最簡單的方法是:打開后面板,拉出舊驅動器,插入新驅動器,啟動并安裝操作系統,就完成了。 但是,有很多小細節,我們(和資深的計算機愛好者閱讀)在經過多年的修補后已經學會了艱難的方法。
For those of you attempting your first upgrade we’ll distill all those oops, errors, and hair pulling moments into a detailed walk through that ensures your blood pressure stays stable and no hair is pulled out.
對于那些嘗試進行第一次升級的人,我們將把所有這些糟糕,錯誤和拔毛時刻都提取到詳細的演練中,以確保您的血壓保持穩定并且不會拔毛。
準備交換驅動器 (Preparing To Swap The Drive)
If your hard drive is absolutely dead with no chance of data recovery possible, you can actually skip this entire section as the following tips and tricks are all for readers that have some data to recover or back up. If your drive is dead you can hop right into the next section and read all about selecting and installing the new one. The rest of this section assumes either that your current drive is in fully operating condition or that it is experiencing errors but has not completely failed.
如果您的硬盤驅動器已完全耗盡而無法進行數據恢復,則實際上可以跳過此部分,因為以下提示和技巧僅適用于具有一些要恢復或備份數據的讀者。 如果驅動器已損壞,則可以跳至下一部分,并閱讀有關選擇和安裝新驅動器的全部信息。 本節的其余部分假定您當前的驅動器處于完全運行狀態,或者遇到錯誤,但還沒有完全失效。
克隆原始驅動器 (Cloning?Your Original Drive)
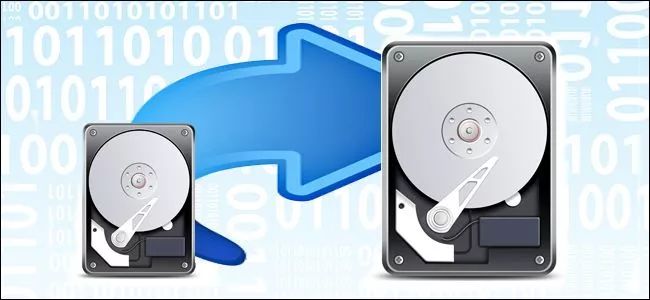
If your laptop is currently in good operating condition but you’d just like to upgrade to a new SSD then the most hassle-free option around is to clone the existing drive to the new drive and then swap them out. The short of it is that you take your brand new drive, tether it to your laptop with a special USB to SATA cable, and make a perfect 1:1 copy of the old drive to the new drive.
如果您的筆記本電腦當前處于良好的運行狀態,但是您只想升級到新的SSD,那么最輕松的選擇就是將現有驅動器克隆到新驅動器上,然后將它們換出。 簡而言之,就是您將全新的驅動器拿來,用專用的USB到SATA電纜將其拴在筆記本電腦上,然后將舊驅動器完美地1:1復制到新驅動器。
We’ve used this technique on many desktops and laptops over they years with great success. It’s a really low-stress way to upgrade as you keep your OS, all your files, and other than the time it takes to clone the disk and put the new disk in you have no down time.
多年來,我們已經在許多臺式機和筆記本電腦上使用了這項技術,并取得了巨大的成功。 在保留操作系統,所有文件以及克隆磁盤并將新磁盤放入新磁盤所需的時間之外,這是一種真正的低壓力升級方法。
You can check out our detailed guide to the process here: How to Upgrade Your Existing Hard Drive in Under an Hour.
您可以在此處查看有關該過程的詳細指南:如何在一個小時內升級現有硬盤。
備份原始驅動器 (Backing Up?Your Original Drive)
Even if you have every intention of starting fresh with a clean install of your current operating system or an upgrade to a newer operating system, we strongly recommend backing up your original drive. This step is especially important if the drive you’re replacing is experiencing errors; you want to capture a perfect copy of the data now so that you can recover as much of it as possible before the drive dies.
即使您打算從全新安裝當前操作系統或升級到新版本的操作系統中重新開始,我們也強烈建議備份原始驅動器。 如果要更換的驅動器出現錯誤,則此步驟特別重要。 您現在要捕獲數據的完美副本,以便可以在驅動器死機之前恢復盡可能多的數據。
This backup should include both a backup of your files and a backup of the entire disk. In most instances it is sufficient to simply copy all your important files (like the contents of My Documents and other data storage folders) to a flash drive or removable hard drive. This way you have a simple and easy-to-access file backup.
此備份應包括文件的備份和整個磁盤的備份。 在大多數情況下,只需將所有重要文件(例??如“我的文檔”和其他數據存儲文件夾的內容)復制到閃存驅動器或可移動硬盤中就足夠了。 這樣,您可以進行簡單且易于訪問的文件備份。
The second component should be backing up the entire hard drive. We highly recommend using Macrium Reflect. Not only is it a free tool but you can easily mount the whole disk image as a drive to look for files you may have forgot to include in your personal file backup. You can read about performing a disk image in our tutorial How to Create an Image of your PC before Upgrading to Windows 10 (it doesn’t matter if you’re not upgrading to Windows 10, the process of creating the image is valid for any operating system and any version). If you?later find you need to retrieve a file from that image, check out How to Mount a Macrium Reflect Backup Image to Retrieve Files.
第二個組件應該是備份整個硬盤驅動器。 我們強烈建議您使用Macrium Reflect。 它不僅是一個免費工具,而且可以輕松地將整個磁盤映像掛載為驅動器,以查找您可能忘記包含在個人文件備份中的文件。 您可以在我們的教程“如何在升級到Windows 10之前創建PC的映像”中閱讀有關執行磁盤映像的信息(如果您不升級到Windows 10則無所謂,創建映像的過程對任何人都有效操作系統和任何版本)。 如果以后發現需要從該映像中檢索文件,請查看如何安裝Macrium Reflect備份映像以檢索文件。
選擇新驅動器 (Selecting The New Drive)
Once you’ve properly backed up and imaged your disk (or if the poor old disk was so dead that wasn’t a necessary step) the next step is selecting your drive. While you might have assumed this section of the tutorial would talk about drive storage size that component of the process is completely at your discretion?based on how much space you need. All we have to say about drive sizes is that given the falling price of SSD models we’d recommend against buying anything smaller than a 120GB drive and encourage you to aim more for the 250GB mark or bigger (once you have your operating system and all your apps installed, 120GB is pretty cramped these days).
一旦正確備份并鏡像了磁盤(或者可憐的舊磁盤已經死了,這不是必需的步驟),下一步就是選擇驅動器。 雖然您可能已經假定本節的內容將討論驅動器的存儲大小,但該過程的組成部分完全取決于您需要的空間,完全由您決定。 關于驅動器大小,我們要說的是,鑒于SSD型號的價格不斷下降,我們建議您不要購買小于120GB的驅動器,并鼓勵您將目標定為250GB或更大(一旦擁有操作系統,并且所有您安裝的應用,這些天120GB的存儲空間非常有限。
The really important consideration in drive selection isn’t the storage size but the?physical size. First there is the footprint of the drive: laptops use 2.5″ drives and not the larger 3.5″ drives found in desktop computers. (It’s worth noting that solid state drives in general are 2.5″ so even when you use them in a desktop machine you use a bracket adapter to size them up). So that’s the first consideration: you need to buy a 2.5″ form factor drive.
選擇驅動器時,真正重要的考慮因素不是存儲大小,而是物理大小。 首先是驅動器的占用空間:筆記本電腦使用2.5英寸驅動器,而不是臺式計算機中使用的較大的3.5英寸驅動器。 (值得注意的是,固態驅動器通常為2.5英寸,因此即使在臺式機中使用固態驅動器,也要使用托架適配器來調整它們的大小)。 因此,這是第一個考慮因素:您需要購買2.5英寸外形驅動器。

The other consideration, and one less obvious than the 3.5″ vs. 2.5″ form factor distinction, is the?thickness of the drive. 2.5″ form factor drives come in three thicknesses: 12.5mm, 9.5 mm, and 7 mm. The 12.5 mm thick drives are relatively uncommon and generally only found in beefy workstation-replacement type laptops, are mechanical, and are higher capacity (as the extra millimeters house an extra mechanical disk platter). The 9.5 mm thick is the most common mechanical 2.5″ hdd thickness. Solid state drives are, almost universally, are 7 mm thick (many models even ship with a little 2.5mm spacer to make up the difference if the mounting style requires it).
另一個考慮因素是驅動器的厚度,這是3.5英寸vs. 2.5英寸外形之間的明顯區別。 2.5英寸外形尺寸的驅動器具有三種厚度:12.5毫米,9.5毫米和7毫米。 12.5毫米厚的驅動器相對較少見,通常僅在功能強大的工作站替換型筆記本電腦中找到,具有機械性和更高的容量(因為額外的毫米數會容納額外的機械磁盤盤)。 9.5毫米厚是最常見的機械2.5英寸硬盤厚度。 固態驅動器的厚度幾乎普遍為7毫米(許多型號甚至附帶2.5毫米的小墊片,以彌補安裝方式的要求)。
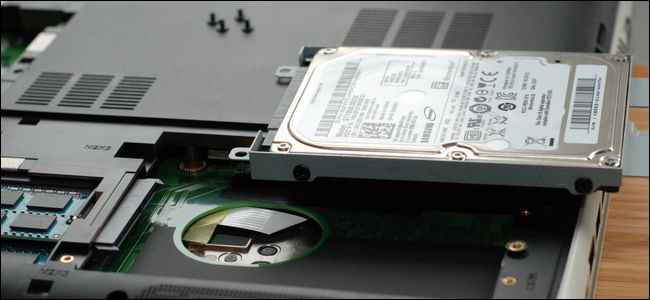
In many instances you won’t even need the spacer.?In the photo above you can see our upgrade drive mounted in the small drive metal drive caddy from our Dell laptop. It’s large enough for a traditional 9.5 mm mechanical hard drive but there’s no issue mounting a newer 7 mm SSD inside it as the caddy acts as a spacer and the mount holds still hold the drive in the proper position.
在許多情況下,您甚至不需要墊片。 在上面的照片中,您可以看到我們的升級驅動器安裝在Dell筆記本電腦的小型驅動器金屬驅動器盒中。 它足以容納傳統的9.5毫米機械硬盤驅動器,但是在其中安裝更新的7毫米SSD沒問題,因為球童充當間隔物,并且安裝座仍將驅動器保持在正確的位置。
Generally speaking you should run into no problems upgrading a laptop with a mechanical hard drive to an SSD as you’ll be going from a thicker drive (12.5 or 9.5 mm) to a thinner drive (7 mm). Still, we want you to be aware of this often overlooked distinction so that you can check the model of your laptop and what drive size it uses before ordering a new one.
一般來說,將具有機械硬盤驅動器的筆記本電腦升級到SSD時,應該不會遇到任何問題,因為您將從較厚的驅動器(12.5或9.5毫米)升級到較薄的驅動器(7毫米)。 盡管如此,我們還是希望您知道這一經常被忽略的區別,以便您在訂購新筆記本電腦之前可以檢查筆記本電腦的型號以及使用的驅動器大小。
準備安裝 (Preparing for Installation)
With your backup/image secured and your new drive on hand, there’s a few considerations before we actually crack open the case and start swapping parts.
在保護好備份/映像并準備好新驅動器之后,在實際打開機箱并開始交換零件之前,需要考慮一些注意事項。
The first thing we’d recommend is visiting the manufacturer’s website and downloading all the most current drivers for your device. Save them on a flash drive. Even if you’re just cloning the drive to a new drive things might get a little wonky and your OS might insist it needs drivers for something. If you’re installing a fresh OS or reinstalling your old OS it always pays to have the drivers ready to go.
我們建議的第一件事是訪問制造商的網站并為您的設備下載所有最新的驅動程序。 將它們保存在閃存驅動器上。 即使您只是將驅動器克隆到新驅動器上,某些情況也可能會變得有些不穩定,并且您的OS可能會堅持認為它需要驅動程序才能完成某些工作。 如果您要安裝新的操作系統或重新安裝舊的操作系統,則始終需要準備好驅動程序,這總是值得的。
The next step, if you’re not keeping the old drive as a backup, is to properly wipe your drive so you don’t have to deal with data sanitizing issues once it is out of the machine. To that end you can just use trusty old Darik’s Boot and Nuke.
如果您不保留舊驅動器作為備份,則下一步是正確擦除驅動器,這樣,當驅動器不在計算機中時,您就不必處理數據清理問題。 為此,您可以只使用值得信賴的舊版Darik's Boot和Nuke 。
Finally, if you’re doing a fresh OS installation, get your product key and installation media before you proceed.
最后,如果您要重新安裝操作系統,請先獲取產品密鑰和安裝介質,然后再繼續。
安裝新驅動器 (Installing The New Drive)
This is the step that most people think of when they think of installing a new drive on their laptop: all the prep work aside the real meat of the project is changing the physical drive. Power down your laptop if it isn’t already powered down, unplug it if it is plugged in, and remove the battery.
這是大多數人在筆記本電腦上安裝新驅動器時想到的步驟:除了項目的實際工作之外,所有準備工作都在改變物理驅動器。 如果尚未關閉筆記本電腦電源,請關閉筆記本計算機的電源;如果已插入筆記本電腦的電源,請拔下電源插頭,然后取出電池。
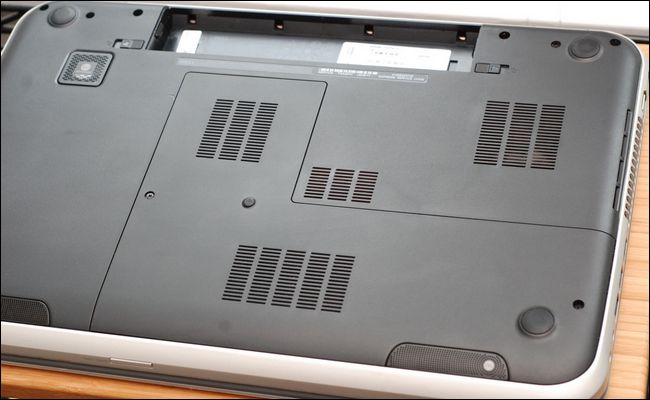
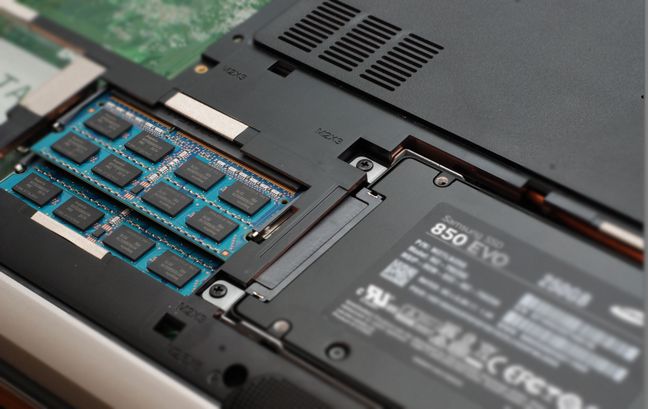
While you will need to consult with your manual and/or manufacturer to see how to access the drive compartment in your laptop, for the vast majority of laptops on the market there’s generally a quick access panel, like that seen in the photo below. One tip we would highly recommend is snapping pictures of each step of the process with a camera. Laptops are a little tighter and trickier than desktops and it’s very handy to have a photo to reference when you’re trying to remember how something was oriented.
雖然您需要咨詢手冊和/或制造商以了解如何訪問筆記本電腦中的驅動器倉,但是對于市場上絕大多數筆記本電腦而言,通常都有一個快速訪問面板,如下圖所示。 我們強烈建議您使用相機為過程的每個步驟拍攝照片。 筆記本電腦比臺式機更緊湊,更棘手,當您想記住某物的方向時,有一張要參考的照片非常方便。
Carefully loosen the screws (you may not be able to fully remove them as many laptop case screws have small retention washers that prevent them from falling completely out of the case) and gently open the panel.
小心地松開螺釘(您可能無法完全將其卸下,因為許多筆記本電腦機箱的螺釘都帶有小的固定墊圈,以防止它們完全掉入機箱外),然后輕輕地打開面板。
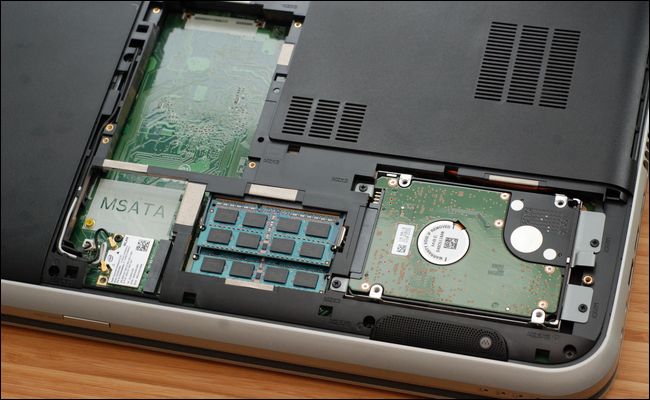
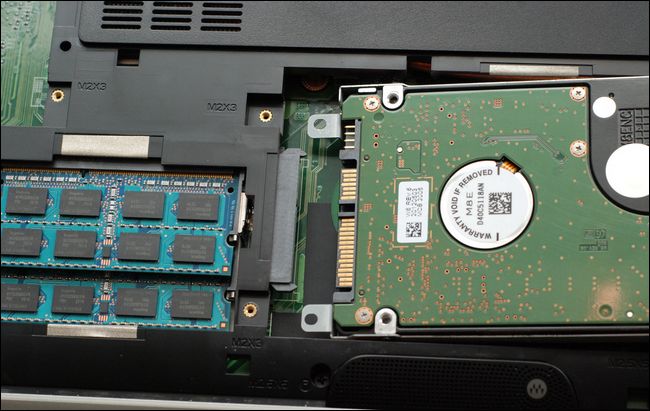
With this particular model we gain access to multiple components via the service panel. At the far lower right we find the primary hard drive bay (which houses the dead drive we wish to replace). Beside the primary drive bay you can see the two memory DIMMs, then beside that an empty mSATA slot, below that (the white rectangle with the wires) the Wi-Fi adapter, and above that section where the bare circuit board is visible there is a secondary drive bay.
使用此特定模型,我們可以通過服務面板訪問多個組件。 在最右下角,找到主硬盤驅動器托架(其中裝有我們要更換的死驅動器)。 在主驅動器托架旁邊,您可以看到兩個內存DIMM,然后是一個空的mSATA插槽,在該插槽下方(帶有電線的白色矩形)是Wi-Fi適配器,在該區域上方可以看到裸露的電路板。輔助驅動器托架。
Some laptops have individual service panels for each component so you’ll need to open the specific one for the hard drive bay. Other laptops are built so compactly that you have to go to greater lengths to access the drive bay (such as removing the keyboard).
有些筆記本電腦的每個組件都有單獨的服務面板,因此您需要打開硬盤驅動器托架的特定面板。 其他筆記本電腦的結構如此緊湊,以至于您必須加大長度才能訪問驅動器托架(例如卸下鍵盤)。
Loosen the mounting screws on the hard drive or hard drive caddy and gently remove the assembly from the laptop. Your primary concern here should be to 1) not drop any of the tiny screws into the body of the laptop and 2) not drag the hard drive or caddy across the circuit board beneath it.
松開硬盤驅動器或硬盤驅動器盒上的安裝螺釘,然后從筆記本電腦中輕輕卸下組合件。 您的主要關注點是:1)不要將任何細小的螺釘掉入筆記本電腦的主體中,以及2)不要將硬盤驅動器或盒式驅動器拖到其下方的電路板上。
With the assembly removed all that’s left to do is swap out the old drive with the new drive. As we mentioned earlier in the guide, we didn’t need to use a spacer for our drive as the drive caddy functions as a spacer.
拆下組件后,剩下要做的就是將舊驅動器換成新驅動器。 正如我們在指南前面提到的那樣,我們不需要為驅動器使用墊片,因為驅動器盒可以用作墊片。
A few loosened screws later, we’ve swapped the old drive out and placed the new drive in the caddy (being careful to preserve the orientation of the drive so that the connectors still line up properly) and we’re good to go. Slide it gently back into place, secure any screws around the drive or the drive caddy in their original configuration, and then replace the service panel.
稍后松開了一些螺絲,我們將舊驅動器換出,并將新驅動器放入盒中(請小心保持驅動器的方向,以使連接器仍正確對齊),我們準備好了。 輕輕地將其滑入到位,以原始配置將驅動器或驅動器盒周圍的所有螺釘擰緊,然后裝回維修面板。
整理安裝 (Wrapping Up The Installation)
If you’ve cloned your drive there isn’t really any wrap up to speak of: you should be able to boot right back into your computer as if nothing happened (albeit with a faster and/or bigger drive installed).
如果您已經克隆了驅動器,那么實際上并沒有什么好說的:您應該能夠像沒有任何React一樣直接引導回計算機(盡管安裝了更快和/或更大的驅動器)。
If you’re installing your operating system from scratch now is the time to plug in your installation media (be it a disk or USB drive) and boot the machine. You’ll likely need to make a pit stop in the BIOS (typically accesses via F2 during the boot process but check your screen and/or manual for instructions) and change the boot order so that removable media/USB drives rank above the DVD drive/hard drive.
如果現在要從頭開始安裝操作系統,是時候插入安裝介質(無論是磁盤還是USB驅動器)并引導計算機了。 您可能需要在BIOS中進站(通常在引導過程中通過F2訪問,但查看屏幕和/或手冊以獲取說明)并更改引導順序,以使可移動介質/ USB驅動器位于DVD驅動器之上。 /硬盤。
After installing your operating system we would highly recommend revisiting the imaging technique we talked about in an earlier section of this article. Install the operating system, update all the drivers, install your applications, and before you actually begin using the machine take a moment to make an image of the drive. This will be your reset-to-zero recovery image should you desire to wipe the machine and start fresh (but without the hassle of reinstalling the OS and all your applications). We can’t tell you how many times we’ve not taken our own advice regarding creating a virgin disk image of a new installation and how many times we’ve regretted it. It’s a huge time saver to spend a few extra minutes making the disk image before putting the machine into regular use.
安裝完操作系統后,我們強烈建議您重新使用本文前面部分中討論的映像技術。 安裝操作系統,更新所有驅動程序,安裝應用程序,并且在實際開始使用計算機之前,請花一點時間制作驅動器映像。 如果您希望擦拭機器并重新啟動,這將是重置為零的恢復映像(但無需重新安裝操作系統和所有應用程序)。 我們無法告訴您多少次我們沒有就創建新安裝的原始磁盤映像采取自己的建議,還有多少次我們對此感到后悔。 在將機器投入正常使用之前,花一些額外的時間來制作磁盤映像可以節省大量時間。
By following our guide you’ll spend far more time preparing for the process and tidying up after than you actually spend physically changing the drives out, but the end result is a smoother experience with no worry that you forgot to backup an important file or time wasted searching for the right drivers.
通過遵循我們的指南,您將花費更多的時間準備過程并進行后續整理,而不是實際花費很多時間來物理地更換驅動器,但是最終結果是使您獲得了更流暢的體驗,而不必擔心您忘記備份重要的文件或時間浪費了尋找合適驅動程序的時間。
翻譯自: https://www.howtogeek.com/229132/how-to-upgrade-your-laptop-hardrive/
筆記本電腦升級固態硬盤好嗎


實現通用模型數據校驗)


![《ASP.NET Core 6框架揭秘實例》演示[35]:利用Session保留語境](http://pic.xiahunao.cn/《ASP.NET Core 6框架揭秘實例》演示[35]:利用Session保留語境)


