figma下載
第1部分 (Part 1)
Prototyping has never had such a high profile with a whole host of tools that now give you varying ability to realize your designs beyond their static UI and into a working usable thing. It’s fair to say that prototyping within tools has been a bit of a battlefield, with some UI tools offering basic prototyping on top of their established drawing features and others offering a more advanced but specialized set of prototyping features to enable designers to build more realistic experiences.
原型開發從未具有如此高的知名度,它擁有大量的工具,這些工具現在使您能夠從靜態UI到可使用的東西來實現您的設計。 可以說,工具內的原型制作一直是一個戰場,有些UI工具在其既定的繪圖功能之上提供基本的原型制作,而其他UI工具則提供了一套更高級但更專業的原型制作功能,以使設計師能夠構建更逼真的體驗。
Today I want to look at Figma and ProtoPie who offer on the surface an overlap of features but with differences in their capabilities and approach to prototyping.
今天,我想看看Figma和ProtoPie,它們表面上提供了重疊的功能,但是在功能和原型制作方法上卻有所不同。
Figma is a fully-fledged UI creation tool that has some prototyping capabilities. Its prototyping features allow you to do basic clickthroughs with some nice simple motion design capabilities.
Figma是功能完善的UI創建工具,具有一些原型設計功能。 它的原型功能使您可以通過一些不錯的簡單運動設計功能來進行基本的點擊操作。
ProtoPie, on the other hand, is not a UI creation tool per se, its focus is on interaction design and prototyping relying on tools such as Figma for UI creation. With ProtoPie you can build everything from basic clickthroughs all the way up to high fidelity prototypes — to the point where you would be hard-pressed to differentiate them from real apps.
另一方面, ProtoPie本身并不是UI創建工具,它的重點是交互設計和原型設計,該工具依賴于諸如Figma之類的工具來創建UI。 借助ProtoPie,您可以構建所有內容,從基本的點擊一直到高逼真度的原型,直至難以將它們與真實應用程序區分開的地步。
This tutorial will hopefully give a good overview of what each tool is capable of doing, how they work individually but also how they can work together to complete your prototyping arsenal.
希望本教程能夠很好地概述每種工具的功能,它們各自的工作方式,以及它們如何可以共同完成原型設計庫。
我們會做什么 (What we’ll be doing)
To explore these tools we’ll be prototyping a fairly simple but common app login journey. I have already designed the screens and UI in Figma so that we can concentrate on Prototyping.
為了探索這些工具,我們將對一個相當簡單但通用的應用程序登錄過程進行原型設計。 我已經在Figma中設計了屏幕和UI,以便我們可以專注于原型設計。
用戶體驗 (The user experience)
Before we get stuck in let’s review the experience we are looking to build.
在陷入困境之前,讓我們回顧一下我們正在尋求的經驗。
The login prototype has three views
登錄原型具有三個視圖
- Application load 應用負荷
- Login 登錄
- Home 家
01應用負荷 (01 Application load)
I want to start by loading the application animating its brand logo. I want to animate this to the top of the screen and then reveal the username and password text fields underneath. Because its a login screen and the primary action is to input the username first, I want to give focus to the username text field.
我想首先加載動畫其品牌徽標的應用程序。 我想將此動畫設置為屏幕頂部,然后在下面顯示用戶名和密碼文本字段。 因為它是一個登錄屏幕,并且主要的操作是首先輸入用戶名,所以我想重點介紹用戶名文本字段。
02登錄 (02 Login)
Once the user has typed their username I want to autofocus on the Password field. If the user types the correct password they will successfully log into the app’s home screen; if not then I want to show them that an error has occurred.
用戶鍵入用戶名后,我要在“ 密碼”字段上自動對焦。 如果用戶輸入正確的密碼,他們將成功登錄到應用程序的主屏幕; 如果不是,那么我想向他們顯示發生了錯誤。
The user will then need to find and correct the error.
然后,用戶將需要查找并糾正錯誤。
03首頁 (03 Home)
Once the login credentials are correct the user will be logged in to the home screen. I want to also show a personalized message at the top of the home.
登錄憑據正確后,用戶將登錄到主屏幕。 我還想在家庭頂部顯示個性化消息。
In part 1 of this tutorial, we’ll be focussing on the application load.
在本教程的第1部分中,我們將專注于應用程序負載。
在Figma中原型化應用程序負載 (Prototyping application load in Figma)
Figma works by linking screens together, You define a start and end state, and then an animation type to define what happens in between.
Figma的工??作方式是將屏幕鏈接在一起,定義開始和結束狀態,然后定義一種動畫類型以定義之間的關系。
To create the app load transition I’ve created these screens ( if you’re new to Figma these are called frames).
為了創建應用程序加載過渡,我創建了這些屏幕(如果您不熟悉Figma,這些屏幕稱為框架)。

To prototype in Figma, you have to select the Prototype tab located in the right-hand contextual panel.
要在Figma中進行原型制作 ,您必須選擇位于右側上下文面板中的Prototype標簽。
Prototyping mode reveals little circular nodes on each frame (and nested frame). These nodes are what you use to connect frames together to allow you to create the interactions in between.
原型制作模式在每個框架(和嵌套框架)上顯示出很少的圓形節點。 這些節點是用于將框架連接在一起以允許您在它們之間創建交互的對象。
Figma has a special After Delay interaction which allows you to trigger animations automatically when the frame loads rather than by a user-generated interaction such as a button tap. This is useful as it allows me to ‘daisy-chain’ many frames together to achieve a seamless animation.
Figma具有特殊的After After交互作用,該交互作用使您可以在框架加載時自動觸發動畫,而無需通過用戶生成的交互作用(如按鈕點擊)觸發動畫。 這很有用,因為它允許我將許多幀“菊花鏈”在一起以實現無縫動畫。
To connect two frames together I can click and drag the frame node from the first frame to the second or choose the destination frame in the Interaction sub-panel within the Prototype.
要將兩個框架連接在一起,我可以單擊框架節點并將其從第一個框架拖到第二個框架,或者在Prototype的Interaction子面板中選擇目標框架。
In the case of my prototype, I want my first screen to animate automatically so I’m using the After Delay option. Because I want my logo to animate first before I show the login form I need a logo end-state frame.
對于我的原型,我希望我的第一個屏幕能夠自動設置動畫,因此我使用了After Delay選項。 因為我希望在顯示登錄表單之前先對徽標進行動畫處理,所以我需要一個徽標結束狀態框。
Here I want to animate multiple object properties, namely position, and scale so I’ll use the Smart Animate option. Smart Animate works by figuring out individual property transformations between two states. Setting the Animation type to this gives me my first animation of the logo moving and scaling into position.
在這里,我想為多個對象屬性(即位置和比例)設置動畫,因此我將使用“ 智能動畫”選項。 Smart Animate通過找出兩個狀態之間的單個屬性轉換來工作。 設置動畫類型為此,我得到徽標移動和縮放到位置的第一個動畫。

The second part of the animation is to show the login text fields. I simply want these to fade in so I set another After Delay between frames 2 and 3 and change the Animation preset this time to Dissolve.
動畫的第二部分是顯示登錄文本字段。 我只是想讓它們淡入,所以我在第2幀和第3幀之間設置了另一個After Delay ,并將這次的Animation預設更改為Dissolve。

The final part of the app load animation is to give focus to the username text field and show the keyboard.
應用程序加載動畫的最后一部分是將焦點放在用戶名文本字段并顯示鍵盤。
Again I’m using After Delay for this. This time though I need to animate the keyboard up. To do this I’m using Smart Animate to move a fake keyboard into position. This means I need the keyboard on my previous frame but off-screen.
我再次為此使用After Delay 。 這次雖然我需要為鍵盤設置動畫。 為此,我使用Smart Animate將假鍵盤移動到適當位置。 這意味著我需要鍵盤在上一幀但不在屏幕上。

In a real app, the user knows which text field has focus because of the flashing cursor. Because Figma doesn’t have a real keyboard I need to fake it, the best I can do is to add a static cursor in the text field. a cursor
在真實的應用程序中,由于光標閃爍,用戶知道哪個文本字段具有焦點。 因為Figma沒有真正的鍵盤,所以我需要偽造它,所以我能做的最好的就是在文本字段中添加一個靜態光標。 光標
Below you can view the Figma prototype animation:
您可以在下面查看Figma原型動畫:
ProtoPie中的原型應用程序負載 (prototyping application load in ProtoPie)
Now let’s look at how we can achieve the same thing and more in ProtoPie
現在讓我們看看如何在ProtoPie中實現相同的目標
To prototype my login in ProtoPie I need to import assets from Figma. The first thing I need to do before I import anything is to optimize my Figma file.
為了使登錄ProtoPie原型化,我需要從Figma導入資產。 導入任何內容之前,我需要做的第一件事就是優化Figma文件。
Because I’m doing all of the interaction inside of ProtoPie all I need from Figma are the assets. All of my assets for the login are covered by these three screens.
因為我正在ProtoPie內部進行所有交互,所以我從Figma中需要的就是資產。 這三個屏幕涵蓋了我所有的登錄資產。

First off I want my logo to be a single vector object. It was drawn using multiple paths which I don’t need access to in ProtoPie as I’ll only be animating the logo as a single object. To do this I can use the Flatten command to reduce the logo to a single vector object (CMD+E or Object Menu > Flatten Selection).
首先,我希望徽標是單個矢量對象。 它是使用多個路徑繪制的,在ProtoPie中我不需要訪問這些路徑,因為我只會將徽標作為單個對象進行動畫處理。 為此,我可以使用“展平”命令將徽標縮小為單個矢量對象(CMD + E或“對象菜單”>“展平選擇”)。
The smaller logo on the second screen will just be used as a reference which I’ll delete later so it doesn’t need flattening but you can do so if you wish.
第二個屏幕上較小的徽標將用作參考,稍后我將刪除它,因此它不需要展平,但是您可以根據需要這樣做。
I’ve made sure that I haven’t used components for anything, as a component when imported will be turned into a flattened graphic.
我已經確保沒有使用任何組件,因為導入時組件將變成平坦的圖形。
For the list on Home, I’m going to use the component flattening feature to my advantage. I’ve made each card a component. This means it will be flattened on import but as its still a component in Figma, I‘ll have access to its elements if I need to make any edits in the future. Nested frames map to ProtoPie containers so I can leave the cards grouping as is.
對于Home上的列表,我將利用組件展平功能來發揮自己的優勢。 我已經將每張卡都制成了組件。 這意味著它將在導入時變平,但由于它仍然是Figma中的一個組成部分,如果將??來需要進行任何編輯,我將可以訪問其元素。 嵌套框架映射到ProtoPie容器,因此我可以將卡片分組保持原樣。
With that, all done my assets are prepped and ready for when I need to import them into ProtoPie.
這樣,當我需要將所有資產導入ProtoPie時,我的資產就做好了準備。
設置我的ProtoPie文件 (Setting up my ProtoPie file)
Before I import anything I need to set up my pie.
在導入任何東西之前,我需要先設置好餡餅。
By default, a new pie will default to an iPhone 11 Pro/X which is what I want but you can choose from many presets by tapping the device name in the toolbar just below the file name.
默認情況下,新的餅圖將默認為我想要的iPhone 11 Pro / X,但是您可以通過點擊文件名下方工具欄中的設備名稱,從許多預設中進行選擇。

ProtoPie has a dedicated Figma importer which allows me to easily import my assets, so the first thing I’ll do is tap Import and choose Figma.
ProtoPie具有專用的Figma導入器,它使我可以輕松導入我的資產,因此我要做的第一件事是點擊Import并選擇Figma 。
I’ve already logged into Figma from ProtoPie, once done ProtoPie will automatically read the file I have open in Figma in the background. in the importer, I can see a list of my frames in the same order that they appear in my Figma file. The first screen I want to import is Start. A thing to note; to the right of the frames list is an Import Size list. ProtoPie currently only supports pixel-based graphics via import; for the most part, this is fine for our needs. All I need to make sure is that the screen density in the box matches the screen density of my pie, which in this case for iPhone 11 is @3x (Note: There are SVG import capabilities outside of the Figma import).
我已經從ProtoPie登錄到Figma,一旦完成,ProtoPie將自動在后臺讀取我在Figma中打開的文件。 在導入程序中,我可以按照與我的Figma文件中出現的順序相同的順序查看框架列表。 我要導入的第一個屏幕是Start 。 要注意的事情; 框架列表右側的是“ 導入大小”列表。 ProtoPie當前僅通過導入支持基于像素的圖形。 在大多數情況下,這可以滿足我們的需求。 我只需要確保框中的屏幕密度與我的餡餅的屏幕密度匹配即可,在這種情況下,iPhone 11的屏幕密度為@ 3x(注意:在Figma導入之外,還有SVG導入功能)。

I’m going to leave the rest of the dialog settings at their defaults and press Import.
我將其余的對話框設置保留為默認值,然后按Import 。
I now have my start screen imported. In the layers panel on the left, I can see a single logo graphic.
現在,我的啟動屏幕已導入。 在左側的圖層面板中,我可以看到一個徽標圖形。

ProtoPie has the concept of multiple pages like Figma does but in ProtoPie these are called scenes. We are going to use scenes to build our prototype but they work a bit differently to Figma pages.
ProtoPie具有類似于Figma的多個頁面的概念,但是在ProtoPie中,這些稱為場景。 我們將使用場景來構建我們的原型,但是它們的工作方式與Figma頁面略有不同。
動畫模型 (The Animation model)
Unlike Figma, ProtoPie doesn’t have a Smart Animate feature. Scenes are merely a way of breaking up the complexity of your prototype. Scenes do, however, have a similar set of page transitions to Figma which are detailed below:
與Figma不同,ProtoPie沒有Smart Animate功能。 場景僅僅是打破原型復雜性的一種方式。 但是,場景確實具有與Figma類似的一組頁面過渡,下面將對此進行詳細介紹:
ProtoPie transition| Figma transition
原型過渡 | Figma過渡
None | Instant
無 | 瞬間
Fade | Dissolve
淡入淡出 溶解
Pop | No comparison, Pop is a scaling animation
流行音樂 | 沒有可比性,Pop是縮放動畫
Slide In | Slide In
滑入 滑入
Slide Out | Slide Out
滑出 滑出
N/A | Move In ( Can be created as a custom transition)
N / A | 移入(可以創建為自定義過渡)
N/A | Move Out ( Can be created as a custom transition)
N / A | 移出(可以創建為自定義過渡)
N/A | Push ( Can be created as a custom transition)
N / A | 推送(可以創建為自定義過渡)
For our prototype, we are going to use scenes but instead of thinking of scenes representing every state like Figma, we are going to think of scenes as representing app views.
對于我們的原型,我們將使用場景,而不是考慮將場景表示為每個狀態(例如Figma),而是將場景視為表示應用程序視圖。
Our first scene will be our Login View and will start with the logo animation and end with the login form. Our second scene will be our Logged-In View.
我們的第一個場景是“ 登錄視圖” ,它將以徽標動畫開始,并以登錄表單結束。 我們的第二個場景是登錄視圖 。
Let’s grab the other graphics we need for our login view by going back to the Figma import and this time choosing the Login frame.
返回到Figma導入,這次選擇“ 登錄”框架,以獲取登錄視圖所需的其他圖形。

We need to do some tidying up so I’m going to change the name of Scene 1 to Login. Scenes can be accessed by tapping the Scenes icon just under Import.
我們需要進行一些整理,因此我將場景1的名稱更改為Login 。 可以通過點擊Import下方的Scenes圖標來訪問場景。
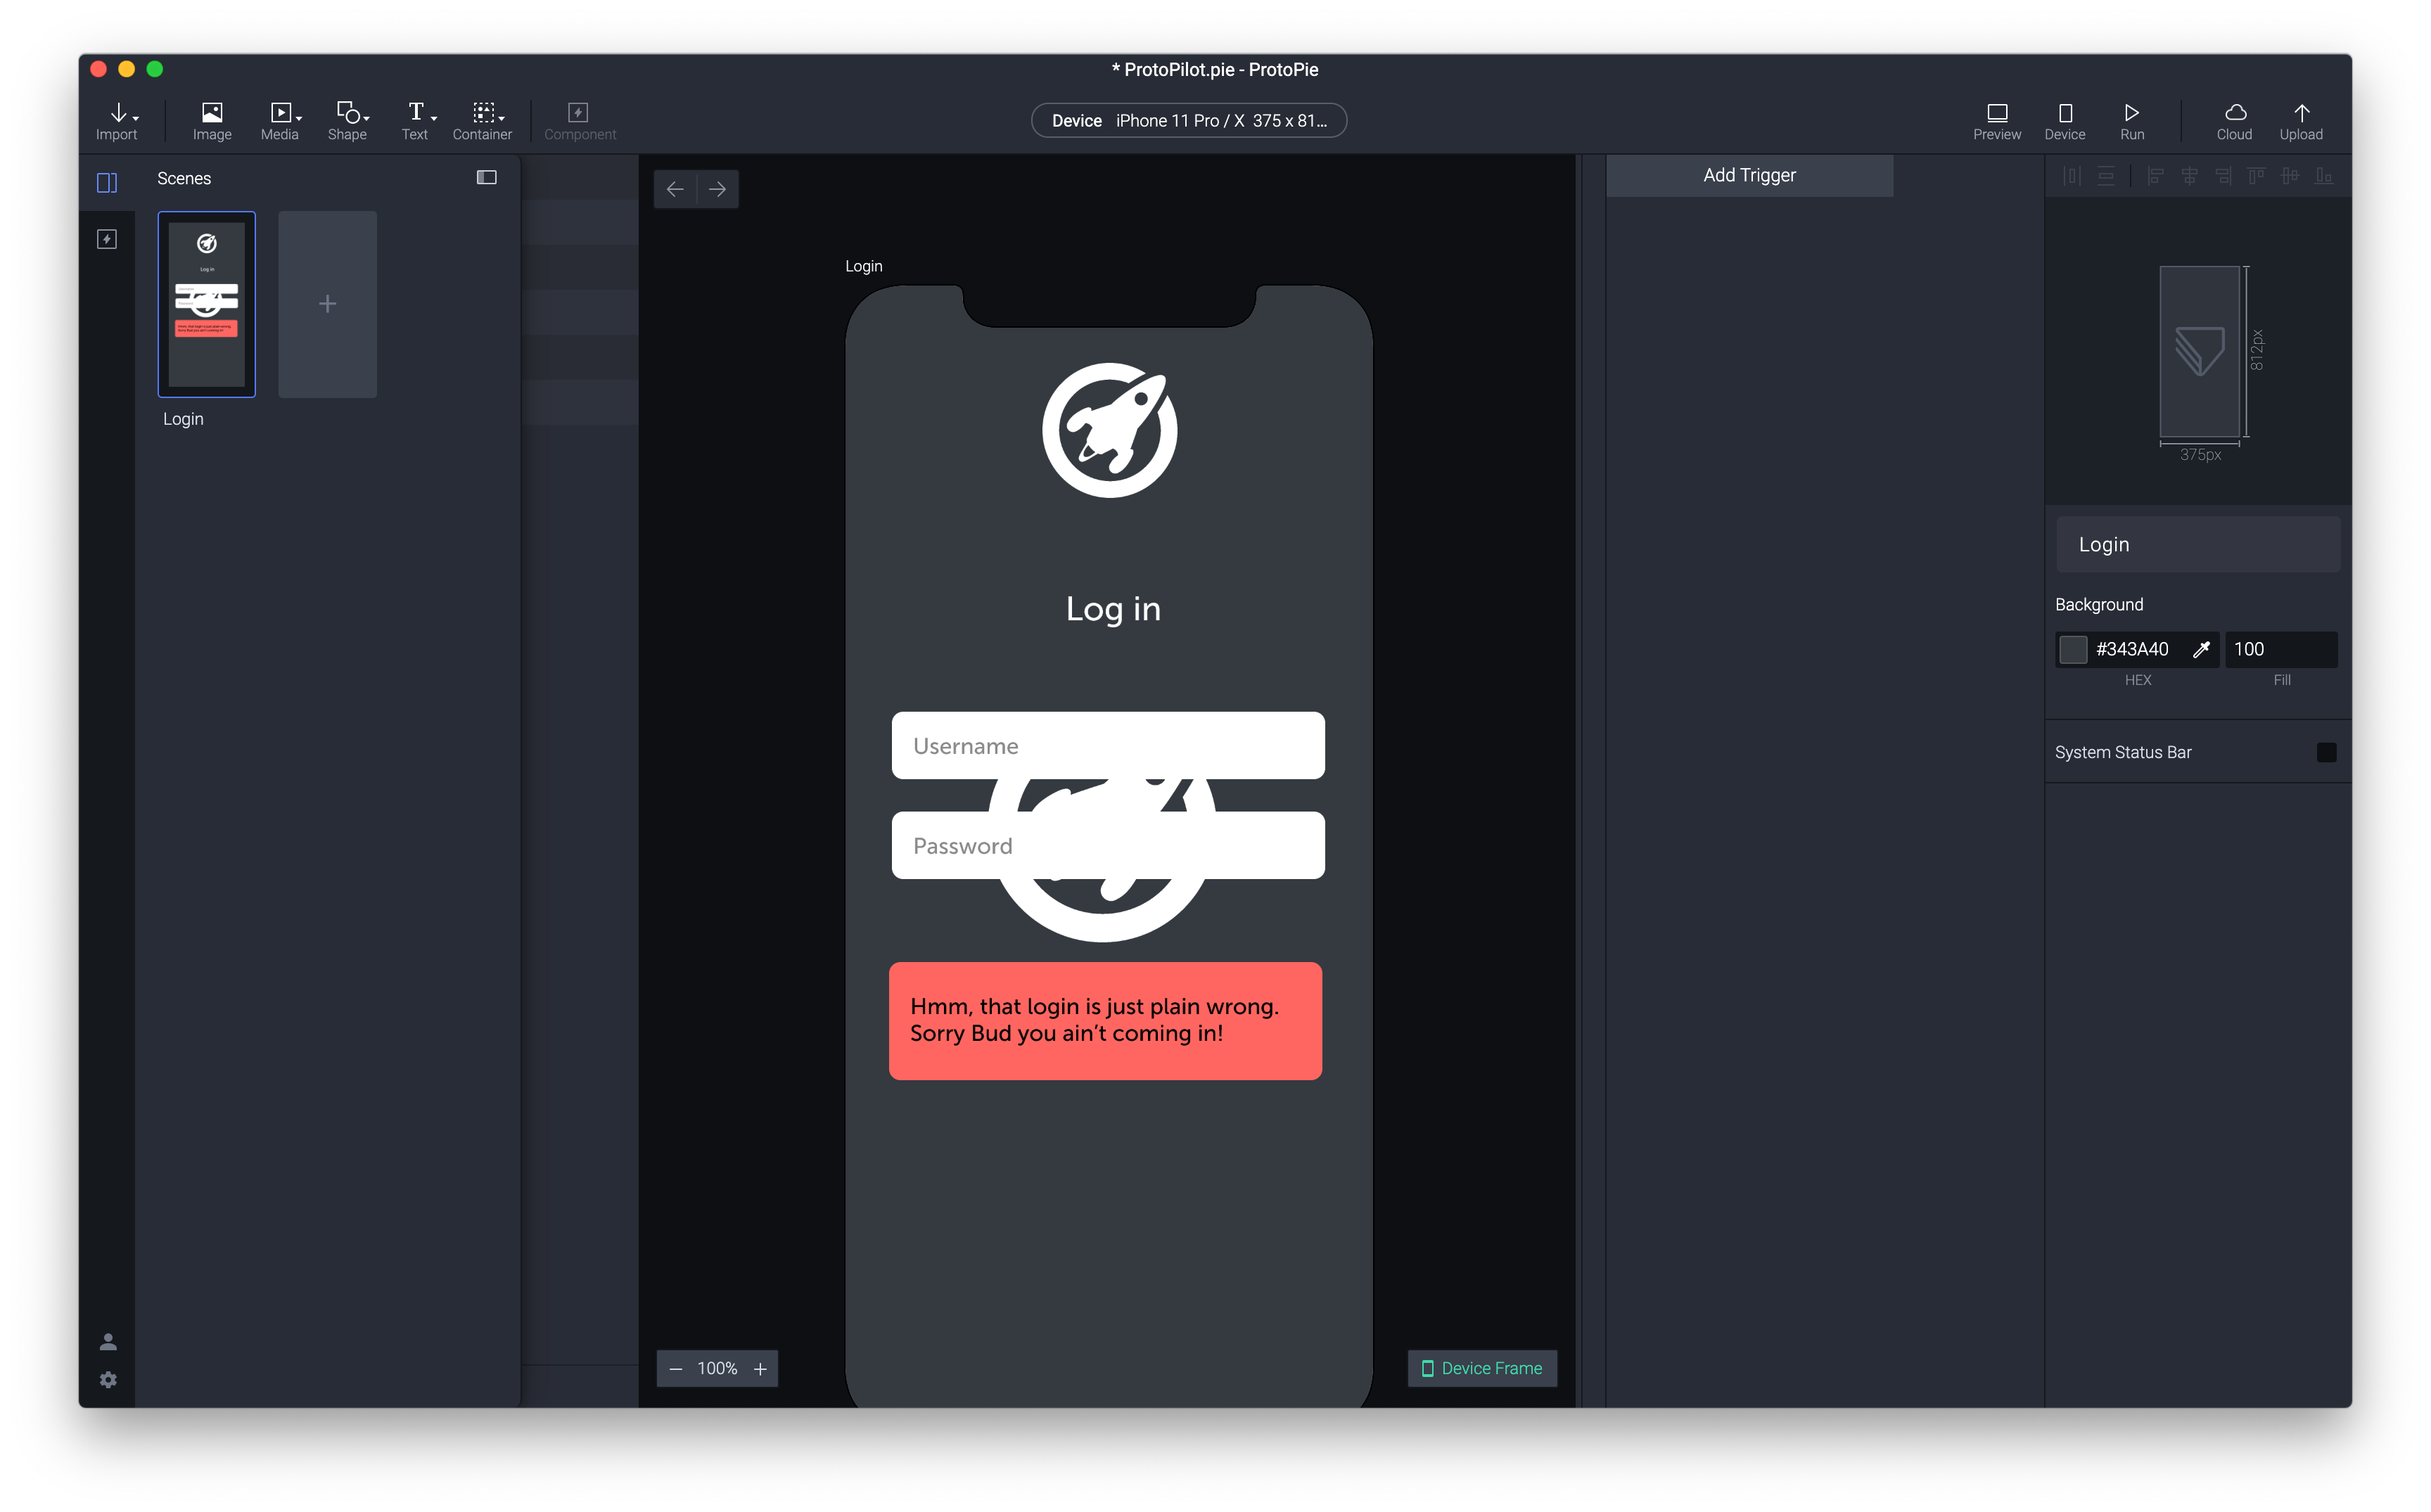
Like Figma all objects in ProtoPie have properties that you can change such as position and opacity and can be located in the right-hand context panel; I want my view to represent the starting state so I’m going to set the opacity of my title, text fields and authentication message to 0. So now all I have visible is the two logos.
像Figma一樣,ProtoPie中的所有對象都具有可以更改的屬性,例如位置和不透明度,并且可以位于右側上下文面板中。 我希望我的視圖代表開始狀態,因此我將標題,文本字段和身份驗證消息的不透明度設置為0。所以現在我看到的是這兩個徽標。
In ProtoPie we don’t animate between a start and end state but instead change properties over time. This is a more classic way of animating and will be familiar to you if you’ve used tools such as After Effects. For our logo, we want to animate its position and size over time. We also want this to happen as soon as the view loads.
在ProtoPie中,我們不在開始狀態和結束狀態之間進行動畫處理,而是隨時間更改屬性。 這是一種更經典的動畫制作方式,如果您使用過After Effects之類的工具,將會很熟悉。 對于我們的徽標,我們希望隨時間變化其位置和大小。 我們還希望這種情況在視圖加載后立即發生。
Both tools share the interaction model:
這兩個工具共享交互模型:
Object > Trigger > Response
對象>觸發器>響應
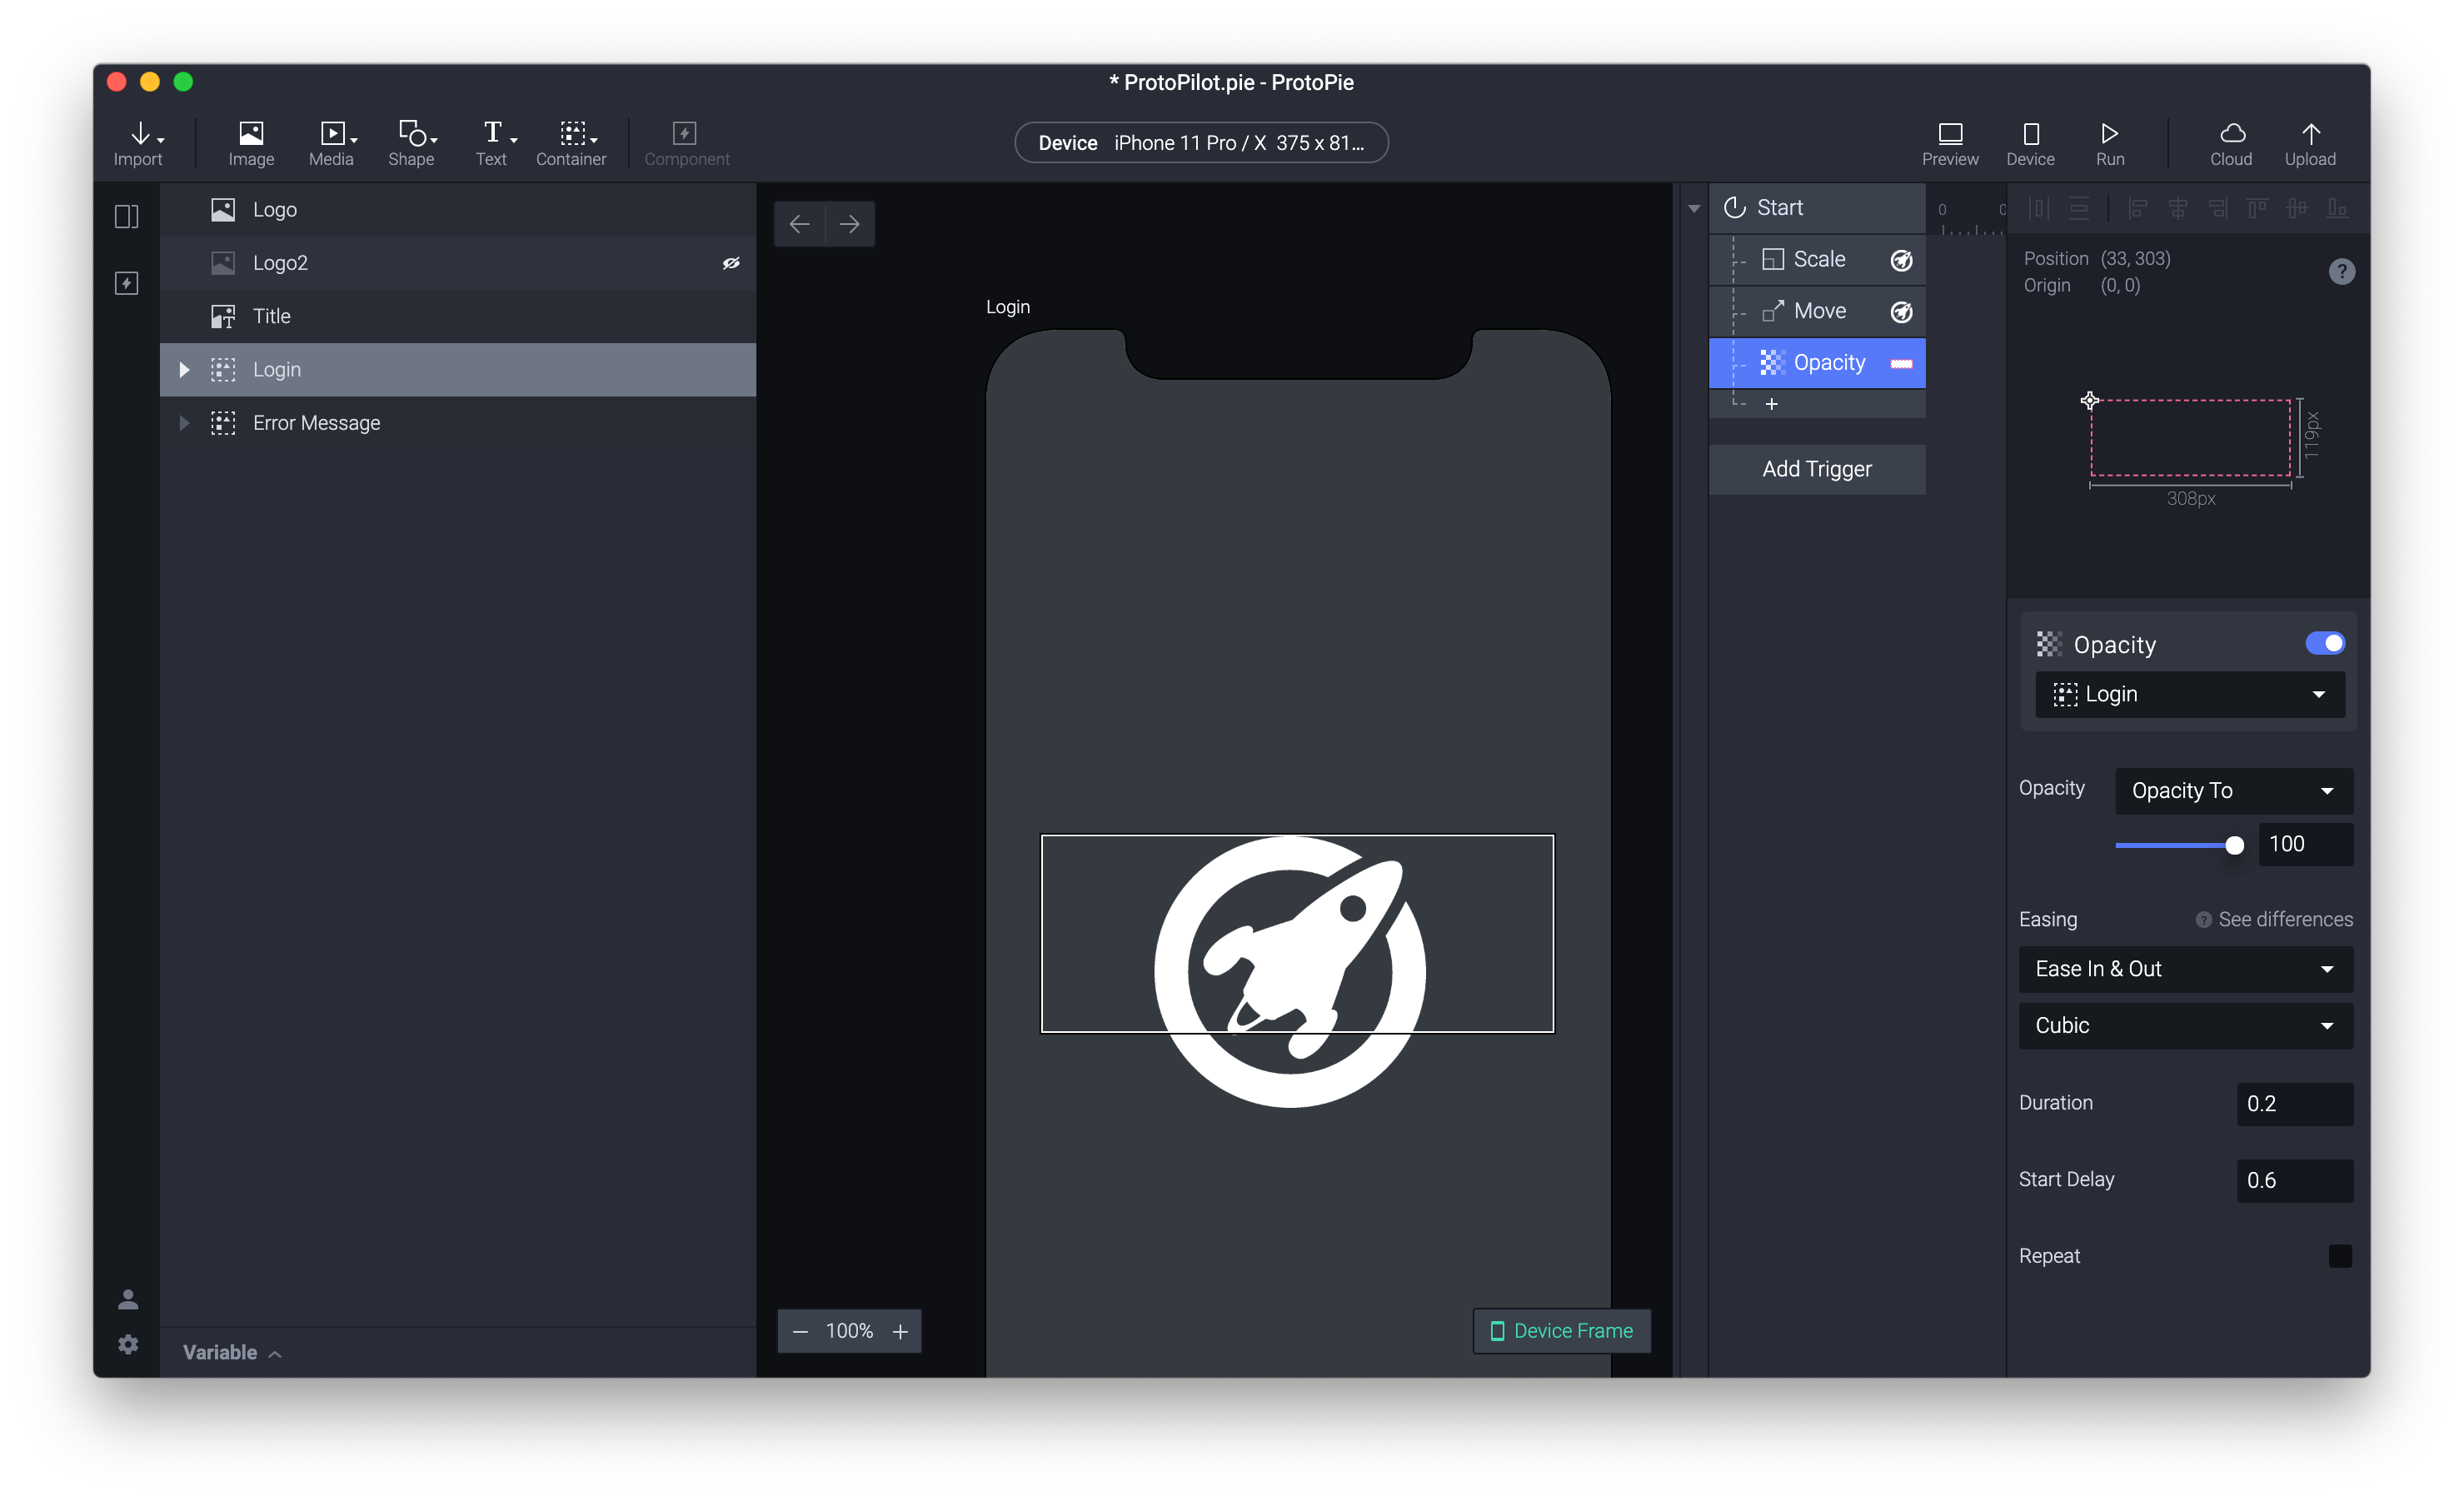
Our object, in this case, is our logo; with it selected I’m going to add a Start response in the trigger panel.
在這種情況下,我們的對象是我們的徽標; 選擇它后,我將在觸發面板中添加一個開始響應。

Now I’ve added the Trigger (Start) I can add a response. I’m going to add two responses by tapping the + icon under Start, Scale and Move.
現在,我已經添加了觸發器(開始),可以添加響應。 我將通過點擊“ 開始”,“縮放”和“ 移動”下的+圖標來添加兩個響應。
I know where I want my logo to end up as I have the reference image (the small logo) already in my scene so I’m just going to read off the values. This is an easy way to mimic the smart move approach in Figma and should take some of the sting out of a different way of doing things until you get used to it. One more thing I want to do before I set the values is to change the Origin point of both logo graphics which by default are set to the top left, to the center. The origin point is where the animation will pivot from, I want mine to animate from the center.
我知道我希望徽標結束的位置,因為我的場景中已經有參考圖像(小徽標),因此我將讀取這些值。 這是模仿Figma中的智能移動方法的簡便方法,并且應該從一些不同的處理方式中脫穎而出,直到您習慣了。 在設置值之前,我還想做的一件事是將兩個徽標圖形的“ 原點”更改為默認設置為左上角至中間。 原始點是動畫旋轉的起點,我希望我的動畫從中心開始。

Going back to my responses I’m going to first read of the end width and height of my small logo and add them to the Scale response values which are both 96.
回到我的回答中,我將首先閱讀小徽標的末端寬度和高度,并將它們添加到Scale響應值中,它們均為96 。
Next, I want to tweak the animation timings. In Figma, we used the After Delay interaction with duration, and then we set another duration in the Animate section. In ProtoPie we do this by adding values to Start Delay and Duration which you can see in the image below. ProtoPie’s values are in seconds as opposed to Figma using milliseconds so 200ms would be 0.2.
接下來,我想調整動畫時間。 在Figma中,我們使用了After Delay交互作用與持續時間, 然后我們設置另一個 動畫部分中的持續時間。 在ProtoPie中,我們通過在“ 開始延遲”和“ 持續時間”中添加值來做到這一點,您可以在下圖中看到。 ProtoPie的值以秒為單位,而Figma使用毫秒,因此200ms為0.2。

Unlike Figma, we have more control over the individual properties which means I can set my move trigger to different values. I want to do this as I want a sort of swooping animation. You can see here I’ve changed the values slightly to create this animation effect. I can also now remove my reference logo image as its no longer needed.
與Figma不同,我們可以更好地控制各個屬性,這意味著我可以將移動觸發器設置為不同的值。 我想要這樣做,因為我想要一種撲朔迷離的動畫。 您可以在此處看到我稍微更改了值以創建此動畫效果。 現在,我也可以刪除不再需要的參考徽標圖像。

ProtoPie allows me to play with all object properties separately and it even has a basic timeline that you can access to the right of the interaction stack. This allows me to visually control delay and duration and is especially useful when choreographing complex motion.
ProtoPie允許我分別處理所有對象屬性,它甚至具有一個基本的時間軸,您可以訪問交互堆棧的右側。 這使我可以從視覺上控制延遲和持續時間,在編排復雜動作時特別有用。

動畫形式 (Animating the form)
In the final part of my load animation, I want to fade in the title and form elements and give focus to the first text field.
在加載動畫的最后一部分中,我要淡入標題和表單元素,并將焦點放在第一個文本字段上。
One of the cool features of ProtoPie is that it has a real keyboard. To add this feature we need to edit our text field graphics to include a special input element.
ProtoPie的很酷的功能之一是它具有真實的鍵盤。 要添加此功能,我們需要編輯文本字段圖形以包括特殊的輸入元素。
I’m going to increase the opacity of my text fields so I can edit them and then add inputs from the text toolbar menu.
我將增加文本字段的不透明度,以便可以對其進行編輯,然后從文本工具欄菜單中添加輸入。

The input element has a broad range of features and customization but I’m going to focus on restyling the field to match my design. I can completely replace my graphic field for username by changing the Placeholder Text and the input’s visual appearance using Radius to round the corners and Fill to change the color.
輸入元素具有廣泛的功能和自定義功能,但我將重點介紹如何重新設計字段以使其與我的設計相匹配。 我可以通過使用Radius圓角和Fill更改顏色來更改占位符文本和輸入的視覺外觀,從而完全替換用戶名的圖形字段。
You can control the type of keyboard for each input in Keypad options. For this one seeing as its a standard text field, I’m going to leave it at the defaults.
您可以在“ 鍵盤”選項中控制每個輸入的鍵盤類型。 對于這個將其視為標準文本字段的人,我將其保留為默認值。
I’ll then duplicate this field to use it for the password field. I can change the keyboard type for this to Text Password which will give the native password masking dots.
然后,我將復制該字段以將其用作密碼字段。 我可以將其鍵盤類型更改為“ 文本密碼” ,以提供本機密碼屏蔽點。

I can now remove the graphic text field groups and animate the two text fields in by just fading them after the logo has moved into place. Because I want to apply the same fade animation to both text fields I’ll group them and apply the fade to the group container instead.
我現在可以刪除圖形文本字段組,并通過在徽標移動到位后將它們淡化來設置兩個文本字段的動畫。 因為我想對兩個文本字段應用相同的淡入淡出動畫,所以將它們分組,然后將淡入淡出應用于組容器。
I’ll set the Opacity of the group to 0 in the properties panel to set the default state and then with the group selected I’ll add an Opacity response to the Start trigger. I’ll set the Duration to 0.2 and the Start Delay to 0.6
我將在屬性面板中將該組的“ 不透明度 ”設置為0以設置默認狀態,然后在選擇該組的情況下,將“ 不透明度”響應添加到“ 開始”觸發器。 我將“ 持續時間”設置為0.2 ,“ 啟動延遲”設置為0.6
The final thing I want to do for the login view animation is to have the keyboard pop up by default and give focus to the username field.
我要為登錄視圖動畫做的最后一件事是默認情況下彈出鍵盤,并將焦點放在用戶名字段上。
To do this I’ll add a Focus response to the Start trigger and choose my username text field. I’ll then set the Focus In Start Delay to 0.6.
為此,我將Focus響應添加到Start觸發器,然后選擇我的用戶名文本字段。 然后,我將“ 開始聚焦延遲”設置為0.6 。
That’s it! the first part of my prototype is complete.
而已! 我的原型的第一部分完成了。
Here is the ProtoPie prototype animation:
這是ProtoPie原型動畫:
This completes part of 1 of comparing Figma prototyping to ProtoPie. You can already see some of the advanced features ProtoPie gives you as well as how easy it is to start to think in terms of basic interaction and motion with Figma.
這樣就完成了將Figma原型制作與ProtoPie進行比較的部分1。 您已經可以看到ProtoPie提供的一些高級功能,以及開始思考與Figma的基本交互和運動方面的難度。
Both have their pros and cons but hopefully, this gives you some insight into both to help you choose when and where you should use them.
兩者都有其優點和缺點,但有希望的是,這可以使您對兩者都有一定的了解,以幫助您選擇何時何地使用它們。
下周第二部分! (Coming up in part 2 next week!)
In part 2 I’ll be continuing to build out our login prototype and showing you how you can use both tools to prototype failed and successful journeys.
在第2部分中,我將繼續構建我們的登錄原型,并向您展示如何使用這兩種工具對失敗和成功的旅程進行原型設計。
See you in part 2!
在第二部分見!
翻譯自: https://uxdesign.cc/prototyping-in-figma-and-protopie-a-comparison-part-1-7313004f6b3
figma下載
本文來自互聯網用戶投稿,該文觀點僅代表作者本人,不代表本站立場。本站僅提供信息存儲空間服務,不擁有所有權,不承擔相關法律責任。 如若轉載,請注明出處:http://www.pswp.cn/news/276095.shtml 繁體地址,請注明出處:http://hk.pswp.cn/news/276095.shtml 英文地址,請注明出處:http://en.pswp.cn/news/276095.shtml
如若內容造成侵權/違法違規/事實不符,請聯系多彩編程網進行投訴反饋email:809451989@qq.com,一經查實,立即刪除!相關文章


javascript 手機手勢動作touch觸屏原理分析
線程間的交換數據 Exchanger)
并發工具類(四)線程間的交換數據 Exchanger

「前端組件化」該怎么理解?

大屏設計的視覺統一_視覺設計中的統一
L0、L1與L2范數)
l2范數求導_機器學習中的范數規則化之(一)L0、L1與L2范數

9.struts1.x中tiles框架的使用

Debian 9.6.0 + OpenMediaVault 4.x : U盤作系統盤時遇到的問題

新浪微博、騰訊微博、QQ空間、人人網、豆瓣 一鍵分享API

跟著官方文檔能學懂React Hooks就怪了
:寒假都結束了,這個圖還是不會畫?【數據繪圖】...)
origin圖上顯示數據標簽_Origin(Pro):寒假都結束了,這個圖還是不會畫?【數據繪圖】...

可以激發設計靈感的音樂_建立靈感庫以激發您的創造力

CentOS服務器上部署 oracle10gr2

回顧:中網通訊網絡公司CEO羅與曾作客新浪嘉賓聊天室

form——驗證器Validators

若川知乎問答:做前端感覺很吃力怎么辦?

惠新宸php教程_惠新宸:首位國人加入PHP語言官方開發組

d3 制作條形圖_停止制作常見的壞條形圖的5個簡單技巧

