識別人聲
什么是聲樂伴奏? (What is Vocal Comping?)
Vocal comping describes the process of combining multiple vocal takes into one “supertake” that has the best parts of each. This is called a “composite track,” or comp for short. Many instruments can be comped on studio tracks, but vocals are the most common since they are the most central aspect of most popular songs.
人聲合唱描述了將多個人聲合唱成一個“超級合唱”的過程,每個合唱中都有最好的部分。 這稱為“復合音軌”或簡稱comp。 可以在錄音室的軌道上演奏許多樂器,但是人聲是最常見的,因為它們是最受歡迎歌曲中最重要的方面。
Comping vocals has become essential in popular music because popular music must sustain repeat listens, which requires a near-perfect vocal take with many interesting dimensions. This is a tall order, so it normally takes multiple takes to get all the right pieces, which then need to be fit together.
在流行音樂中,合唱已成為必不可少的,因為流行音樂必須維持重復收聽,這需要具有許多有趣維度的近乎完美的人聲。 這是一個很高的要求,因此通常需要花費很多時間才能獲得所有正確的零件,然后將它們組裝在一起。
In this article, you will learn common practices for comping as well as some more advanced tips for getting the best sound.
在本文中,您將學習進行編排的常見做法以及一些獲得最佳音質的更高級的技巧。
編譯的偽像 (Artifacts from Comping)
Before we get into more advanced tips for comping, let’s take a moment to understand the artifacts that can surface when comping is done poorly, and the basic techniques used to do comping well.
在介紹更高級的編譯技巧之前,讓我們花一點時間來理解在編譯不佳時可能會出現的工件,以及用來進行良好編譯的基本技術。
點擊和流行 (Clicks and Pops)
The main artifact you get from comping is clicks/pops. You get this artifact when you introduce a sudden break in the waveform through comping.
從壓縮中獲得的主要工件是clicks / pops 。 通過壓縮在波形中引入突然的中斷時,您會得到此偽像。
Speakers produce sound when a cone moves backward and forwards, creating air pressure waves. This cone moves in response to an electrical signal (the waveform) which is telling it which position it should be in. For any organic waveform, this wave is going to be continuous and the speaker will move smoothly without producing any artifacts.
當圓錐體前后移動時,揚聲器會發出聲音,從而產生氣壓波。 該錐體響應電信號 (波形)而移動,該電信號告訴它應該位于哪個位置。對于任何有機波形,該波將是連續的,并且揚聲器將平穩移動而不會產生任何偽像。
But, with human intervention like comping, it’s possible to make waveforms that are not continuous, which will cause the speaker to jump as quickly as possible to keep up. This is what produces a click or pop sound. (This is why you often hear clicks when plugging in an audio source into your speaker. The speaker suddenly receives a signal other than zero, and it jumps to that position as quickly as it can.)
但是,借助諸如壓縮之類的人工干預,有可能產生不連續的波形,這將導致揚聲器盡快跳動以跟上。 這就是產生點擊或彈出聲音的原因。 (這就是為什么在將音頻源插入揚聲器中時經常聽到喀噠聲的原因。揚聲器突然收到除零以外的信號,并且它會盡快跳到該位置。)
When comping vocals, it is common to accidentally join two vocals so that their waveforms don’t “line up” and that will give you a click!
合成人聲時,通常會意外地將兩個人聲結合在一起,以使它們的波形不會“對齊”,這會給您帶來點擊的感覺!
Depending on your DAW, this may not be much of a problem. Many DAWs like Ableton apply a small envelope at the beginning and end of each audio clip by default to avoid clicks and pops. (To see this in Ableton, go to Create > Show Fades).
根據您的DAW,這可能不是什么大問題。 諸如Ableton之類的許多DAW默認情況下都會在每個音頻剪輯的開頭和結尾處使用一個小信封,以避免發生咔嗒聲和爆裂聲。 (要在Ableton中查看此內容,請轉到“創建”>“顯示漸變”)。

When both audio clips are faded like this, they are connected at 0 amplitude, and there’s no artifact.
當兩個音頻片段像這樣淡入淡出時,它們以0的幅度連接,并且沒有偽像。

This is handy, but it can cause problems. Take this example from Pro Tools.
這很方便,但是會引起問題。 以Pro Tools為例。
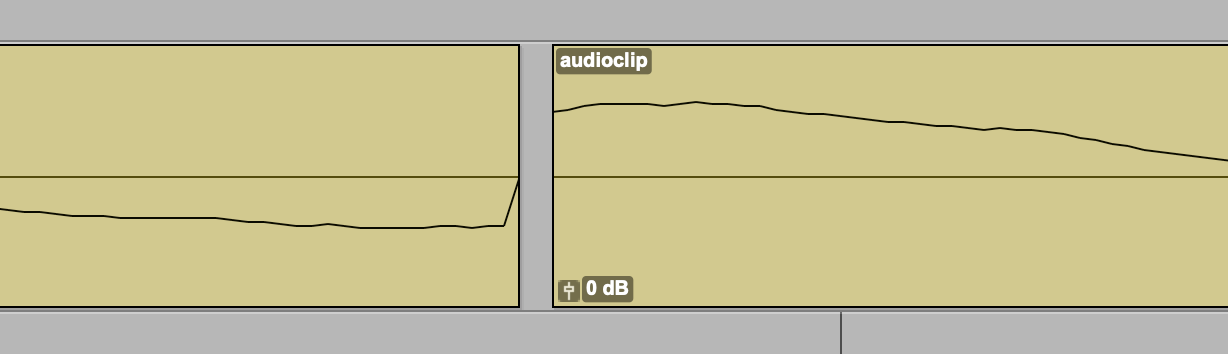
This is an example of a bad place to comp because the speaker would have to suddenly jump positions creating a click/pop. This version of Pro Tools try to mediate the situation by connecting the lines. But what appears to be a “smooth” connection is still too quick and jagged for a speaker and you will likely still get an artifact.
這是一個糟糕的地方,因為揚聲器必須突然跳開位置以產生咔嗒聲/彈出聲,這是一個糟糕的地方。 該版本的Pro Tools嘗試通過連接線路來調解這種情況。 但是對于揚聲器來說,似乎“平滑”的連接仍然太快且參差不齊,您可能仍會得到人工制品。

零交叉 (Zero-Crossings)
The solution to this problem is by using zero-crossings. Zero-crossings are literally just places where an audio clip crosses zero. By choosing these locations to be the point of comping for two audio files, we ensure that the speaker does not have to jump a large distance, even with rapid fading from a DAW.
解決這個問題的方法是使用零交叉。 過零實際上就是音頻剪輯過零的地方。 通過選擇這些位置作為兩個音頻文件的合成點,我們可以確保揚聲器即使在DAW快速衰落的情況下也不必跳遠。
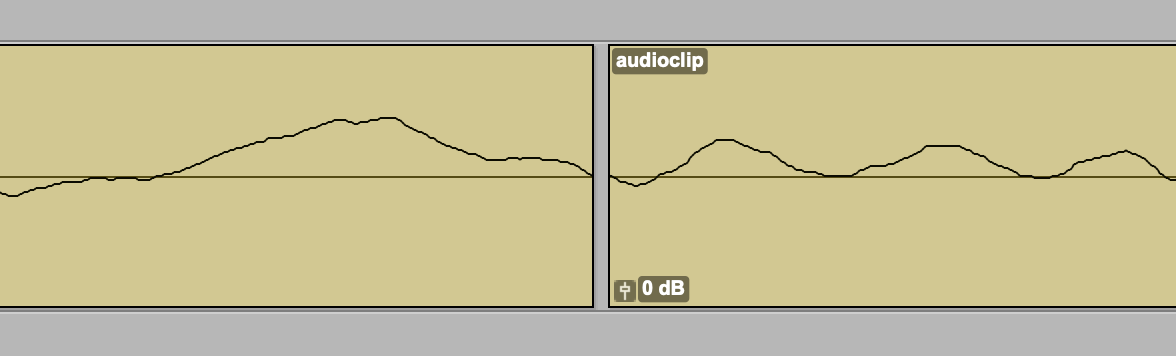
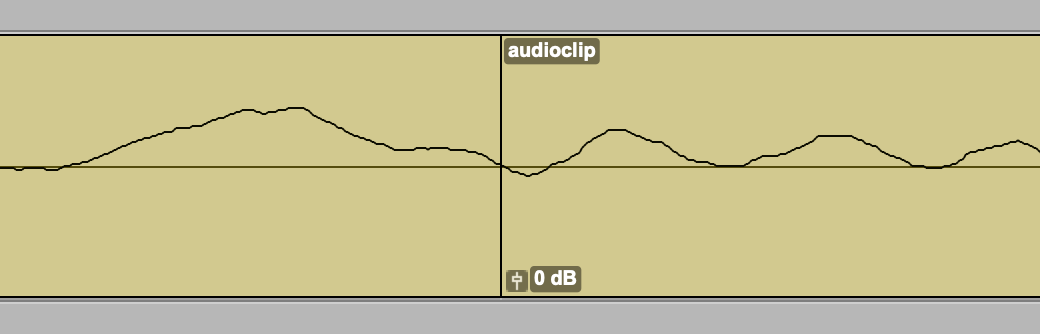
Doing a little dragging of the audio clips on the timeline to accomplish this shouldn’t mess with the rhythm of the song or otherwise be noticeable. Since we are working on a such a small scale, we are dragging audio by amounts smaller than millisecond.
在時間軸上稍微拖動音頻片段以完成此操作,不應使歌曲的節奏混亂,否則就不會引起注意。 由于我們的工作規模很小,因此將音頻拖拽的時間小于毫秒。
進階技巧 (Advanced Tips)
Now that you have the basic mechanics of comping down, you can learn some more advanced techniques to comp more efficiently and effectively.
現在,您已經掌握了壓縮的基本原理,您可以學習一些更高級的技術來更有效地進行壓縮。
1.補貼 (1. Comp on sibilances)
When possible, it’s always nice to comp together entire phrases using the silence that separates them. This is the most invisibile way to make a comp. But sometimes you really do need the first half of a phrase in one take and the second half of the phrase from another take.
在可能的情況下,最好使用分隔它們的沉默將整個短語組合在一起。 這是制作伴奏的最隱蔽方式。 但是有時候,您確實確實需要在一次練習中使用短語的前半部分,而在另一次練習中使用短語的后半部分。
In this case, sibilances are the way to go. Sibilances are bits of audio that sound like “s” or “sh.” Basically, sounds that contain a lot of noise.
在這種情況下,解決辦法是可行的。 平衡是聽起來像“ s”或“ sh”的音頻位。 基本上,聲音包含很多噪音。
Because of the noise in these sounds, it’s a great place to make seamless edits between two audio clips. When comping on sibilances, I mostly find that I don’t have to worry about zero-crossings and the default fading behavior of most DAWs is sufficient to mask the edit.
由于這些聲音中的噪音,因此是在兩個音頻剪輯之間進行無縫編輯的好地方。 當進行平衡時,我大多數時候發現我不必擔心過零,并且大多數DAW的默認衰落行為足以掩蓋編輯。
Other good sibilances to edit on are “ch,” “h,” “z,” “k,” “f,” and there’s a good number more that you’ll happen upon. Rather than memorizing these, just look for noisy sounding consonants in your vocal takes.
其他可以編輯的良好標記是“ ch”,“ h”,“ z”,“ k”,“ f”,還有很多其他可能會發生。 與其記住這些,不如在聲帶中尋找嘈雜的發音輔音。
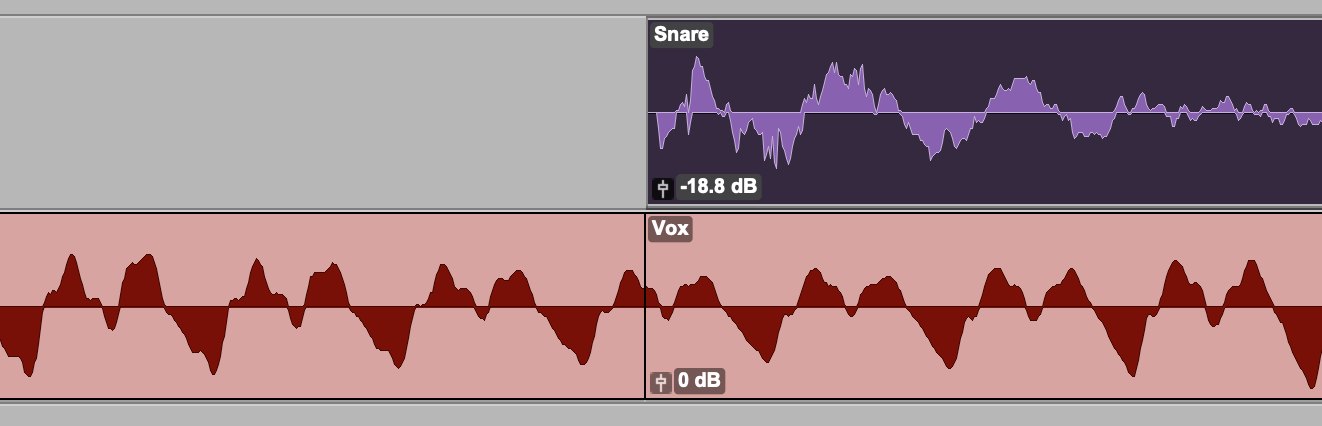
2.將伴奏隱藏在低調的背后 (2. Hide comps behind downbeats)
There are times when getting the parts of a take that you really want can mean you have to make a super audible edit. This is where masking comes into play.
有時候,獲得真正想要的部分可能意味著您必須進行超級聽覺編輯。 這是遮罩起作用的地方。
There are two main types of masking: frequency masking, where sounds of similar frequencies tend to mask one another, and auditory masking, where louder sounds tend to mask quieter sounds. These are psychological phenomenon, meaning its in our heads. The frequencies are still there, and its our brains that ignore them.
掩蔽主要有兩種類型: 頻率掩蔽 (相似頻率的聲音趨向于彼此掩蓋)和聽覺掩蔽 ( 聽覺掩蔽) ,較大的聲音趨向于掩蓋安靜的聲音。 這些都是心理現象,這意味著它在我們的腦海中。 頻率仍然在那里,我們的大腦忽略了它們。
(In fact, part of how mp3 files perform their compression is by removing audio information that you wouldn’t be able to hear because it was masked by other sounds.)
(實際上, mp3文件如何執行壓縮的一部分是通過刪除由于其他聲音掩蓋了而無法聽到的音頻信息。)
So how does this apply to comping? If you are able to place a nasty vocal edit behind a particularly loud sound and/or one of similar frequencies to the vocal, then the edit might be masked entirely. You’ll be surprised with the unforgivable comps you can get away with by hiding them behind a snare drum.
那么這如何適用于壓縮呢? 如果您能夠在特別大聲的聲音和/或與人聲相似的頻率之一之后放置討厭的人聲編輯,則該編輯可能會被完全掩蓋。 將不可告人的音效隱藏在軍鼓后,您會為之驚訝。
3.謹慎使用交叉漸變 (3. Use cross-fades sparingly)
Cross fades are a pretty common way to avoid clicks and pops. Crossfades involve blending two audio clip by fading one out while simultaneously bringing the other one in. Film sound designers commonly use them to loop background ambiences without the listener noticing. DJs use them as a way to switch between songs in a mashup.
交叉淡入淡出是避免單擊和彈出的一種非常常見的方法。 交叉淡入淡出涉及通過淡出一個淡入淡出同時將另一個淡入淡出來混合兩個音頻片段。電影聲音設計師通常使用它們來循環背景氛圍而聽眾不會注意到。 DJ使用它們作為混搭中的歌曲之間切換的方式。
Comping is not my favorite use of crossfades, however. By design, crossfades are playing two similar sounding audio files at the same time. For a vocal, this can create an unwanted chorus effect that appears only for a split second, but that can be very disruptive to the listener.
但是,壓縮并不是我最喜歡的交叉淡化用法。 根據設計,交叉淡入淡出可以同時播放兩個相似的聲音音頻文件。 對于人聲來說,這可能會產生不想要的合唱效果,這種效果僅在瞬間出現,但對聽眾來說卻極具破壞性。
The other approaches discussed should be tried first before trying a crossfade. In most cases using a zero crossing and/or finding a sibilance to comp on is possible and sufficient.
討論淡入淡出之前,應先嘗試討論其他方法。 在大多數情況下,使用零交叉和/或尋找補償的可能性是足夠的。
4.記錄時跟蹤好鏡頭 (4. Keep track of good takes while recording)
If possible, you (or a tracking engineer if you have one) should try to keep track of the good takes and bad takes while you record. When you start comping, you can go straight to the takes you know you love before having to circle back to the other files. This way you’ll be less frustrated sifting through takes and you’ll make sure you don’t miss out on your best deliveries. You really can get as specific as you like here, just figure out what works for you. Here’s a little example.
如果可能的話,您(或者如果有的話,請一位跟蹤工程師)應該在記錄時嘗試跟蹤好壞。 當您開始編曲時,您可以直接進入自己喜歡的片段,然后再回頭瀏覽其他文件。 這樣一來,您就可以輕而易舉地篩選收件清單,并確保您不會錯過最佳交付商品。 您確實可以在這里得到盡可能具體的信息,只是找出適合您的方法。 這是一個小例子。

In this example, the ?s and X’s help keep track of good and bad takes more generally so you know where to start when comping. There still might be useable stuff in the “bad” takes, but starting with the good ones will save a lot of time and limit the number of comps you need to do. (Comping is necessary, but if you can avoid doing it then you should!)
在此示例中,?和X有助于更全面地跟蹤好壞拍子,因此您知道在進行合成時從何處開始。 “不好的”鏡頭中可能仍然有用,但是從好的鏡頭開始將節省大量時間,并限制了您需要做的伴奏數量。 (必須進行壓縮,但是如果可以避免這樣做,則應該這樣做!)
It also might be helpful to keep track on takes of any particularly good phrase that you want to keep, even in a bad take. You could do this with a lyric or even a timestamp. Comping is largely about finding all the little magic moments in all the individual takes and combining them into a super take that wows the listener.
跟蹤您想保留的任何特別好短語的用法,即使是不好的用法,也可能會有所幫助。 您可以使用歌詞甚至是時間戳來完成此操作。 作曲主要是要在所有個人錄音中找到所有微小的魔術時刻,并將它們組合成一個令聽眾贊嘆的超級錄音。
It’s sometimes pretty common to redo just one or two sections of a song that you didn’t get good takes for rather than sing the whole thing through. So using some sort of neutral notation like a dash might help in that situation.
重做一首或兩首您收錄不好的樂曲,而不是整首歌,有時是很常見的。 因此,在這種情況下使用某種破折號等中性符號可能會有所幫助。
If you aren’t able to keep track of your takes while recording, it might be worth it to listen to all of your takes once through and take notes before you start your comping process. Also, be cautious about the number of takes you do. In the digital era where data storage is not an issue, it can be tempting to do dozens of takes to get a perfect vocal, but you might just end up overwhelming yourself. The law of diminishing returns definitely applies to the number of takes you have!
如果您在錄制時無法跟蹤自己的樂曲,那么在開始進行合成之前,最好先聽一遍所有樂曲并做筆記,這是值得的。 另外,請注意您要拍的張數。 在數據存儲不成問題的數字時代,可能很想做很多事情來獲得完美的聲音,但最終可能會讓您不知所措。 收益遞減定律絕對適用于您的收益數量!
5.用耳朵而不是眼睛聽。 (5. Listen with your ears, not your eyes.)
Sometimes you’ll make a comp that you can just barely hear, and it can be frustrating. What you might forget is that if you are watching your playhead move across your audio file, you know exactly when to listen for the comp sound and you are going to hear it. The best comps are definitely the ones that you can’t hear even when looking at your DAW, but if you can’t tell without looking at your DAW then that’s totally fine!
有時您會制作幾乎無法聽到的樂曲,這可能會令人沮喪。 您可能會忘記的是,如果您正在觀看播放頭在音頻文件中的移動,那么您確切地知道何時收聽伴奏聲音,而您將聽到它。 最好的組合絕對是即使您看著DAW也聽不到的音色,但是如果您不看DAW就無法分辨,那就太好了!
Next time you’re unsure about a comp, close your eyes and then play it back. See if you can tell where is the comp is then. You might be surprised at how invisible it becomes.
下次您不確定音色時,請閉上眼睛,然后播放。 看看您是否可以知道組合在哪里。 您可能會對它變得無形感到驚訝。
其他應用 (Other Applications)
Comping is not the only application of these techniques. Another big application is sound editing for films. Film sound designers often have to insert artificial ambience into a scene, and the ambience audio file might be shorter than the scene itself, and they have to loop the audio file without the viewer noticing. Or other times they are given a 4 minute chunk of music and asked to cut it to fit a 3 minute scene. This kind of task requires cutting out sections of music and seamlessly joining the remaining pieces by using zero-crossings in the music file.
壓縮不是這些技術的唯一應用。 另一個重要的應用是電影的聲音編輯。 電影聲音設計師通常必須在場景中插入人為的氛圍,并且氛圍音頻文件可能比場景本身短,并且他們不得不循環播放音頻文件而沒有引起觀眾的注意。 或者其他時候,他們會得到4分鐘的音樂,并要求將其剪切以適合3分鐘的場景。 此類任務需要切出音樂的各個部分,并通過使用音樂文件中的零交叉來無縫連接其余部分。
That’s all for this post! Hopefully, you’ll be able to implement these techniques into your own music sometime soon.
這就是這篇文章的全部! 希望您很快就能在自己的音樂中實現這些技術。
翻譯自: https://uxdesign.cc/5-tips-for-comping-vocals-ebdd39fc30ea
識別人聲
本文來自互聯網用戶投稿,該文觀點僅代表作者本人,不代表本站立場。本站僅提供信息存儲空間服務,不擁有所有權,不承擔相關法律責任。 如若轉載,請注明出處:http://www.pswp.cn/news/275749.shtml 繁體地址,請注明出處:http://hk.pswp.cn/news/275749.shtml 英文地址,請注明出處:http://en.pswp.cn/news/275749.shtml
如若內容造成侵權/違法違規/事實不符,請聯系多彩編程網進行投訴反饋email:809451989@qq.com,一經查實,立即刪除!相關文章

你知道source map如何幫你定位源碼么?

OOP 中的 方法調用、接口、鴨式辯型、訪問者模式

Substitution控件MethodName無法取到Session的解決辦法

java中想要保留2位小數_java使double保留兩位小數的多方法 java保留兩位小數

游戲 新手引導 設計_我認為每個新手設計師都應該知道什么

畢業年限不長的前端焦慮和突破方法

開源自然語言處理工具包hanlp中CRF分詞實現詳解
![java 素數歐拉篩選_[C++]歐拉素數篩的理解與實現](http://pic.xiahunao.cn/java 素數歐拉篩選_[C++]歐拉素數篩的理解與實現)
java 素數歐拉篩選_[C++]歐拉素數篩的理解與實現

交互規則_您必須永不中斷的10條交互設計規則

一個幫助我100%拿offer的面試學習法


java獲取apk啟動activity_兼容 Android 10 啟動 APK 實現方案

Android Studio中解決jar包重復依賴導致的代碼編譯錯誤

面試被問項目經驗不用慌,按這個步驟回答絕對驚艷

使用概念模型 和心智模型的_為什么要使用模型?
...)
長效密鑰與臨時密鑰JAVA判斷_MSBuild無法使用臨時密鑰簽署ClickOnce清單(錯誤MSB3326和MSB3321)...


什么?在 VSCode 里也能用 Postman了?

根據窗口名稱查找關鍵字彈性域用到的表,列等信息
