figma下載
Groups and Frames have very different uses in Figma, but it’s difficult at first to tell why both of them exist. I can assure you that they complement each other, but first, you need to understand the nuances of each. I’ll show you how to make them, how each one works, and some good use cases for each to level up your Figma skills.
組和框架在Figma中有非常不同的用途,但是起初很難說出它們為什么都存在。 我可以向您保證,它們是相輔相成的,但是首先,您需要了解它們之間的細微差別。 我將向您展示如何制作它們,每個組件如何工作,以及每個組件的一些良好用例,以提高您的Figma技能。
如何制作組或框架 (How to make Group or a Frame)
Anyone coming from other visual editors, whether Photoshop, Sketch, LucidChart or Google Slides, will usually be familiar with the grouping shortcut. Highlight several objects, press Cmd + G on Mac or Ctrl + G on PC, and the program will group them together so you can treat it as one unit.
來自其他視覺編輯器的任何人,無論是Photoshop,Sketch,LucidChart還是Google Slides,通常都會熟悉分組快捷方式。 突出顯示幾個對象,在Mac上按Cmd + G或在PC上Ctrl + G ,程序會將它們組合在一起,因此您可以將其視為一個單元。
Making a frame is very similar, except you press the Cmd + Option + G keys on Mac or the Ctrl + Alt + G keys in Windows. As shown in the screenshot above the layers panel has a dashed square icon to indicate a Group and the hashtag icon indicates a Frame. You can also access the shortcut by right-clicking on the selected layers.
制作框架非常相似,除了在Mac上按Cmd + Option + G鍵或在Windows上Ctrl + Alt + G鍵外。 如上方屏幕截圖所示,“圖層”面板上有一個虛線方形圖標表示“組”,而“主題標簽”圖標表示“幀”。 您也可以通過右鍵單擊所選圖層來訪問快捷方式。

哪些團體適合 (What Groups are good for)
矢量對象 (Vector objects)
As you might expect if you’ve used Powerpoint or Google Slides, grouping objects and layers puts them altogether. It also behaves the same when you resize the group, stretching vector objects to whatever dimensions the parent group is. If you haven’t come across it before, holding down the Shift key will maintain the aspect ratio if you’re making your Group bigger or smaller.
如您所料,如果您使用過Powerpoint或Google幻燈片,則將對象和圖層歸為一組即可。 調整組大小,將矢量對象拉伸到父組的任何尺寸時,它的行為也相同。 如果您以前從未遇到過,如果您要增大或縮小組的大小,請按住Shift鍵將保持寬高比。
圖片 (Images)
It behaves a little differently for images, but in a positive responsive way. When building prototypes you will less often want to skew the aspect ratio of an image. Figma will maintain the aspect ratio of the image centre it in the group and ‘crop’ the excess. Any frontend developers will be familiar with the object-fit: cover CSS property that mimics this behaviour.
對于圖像,它的行為略有不同,但是以積極的響應方式。 在構建原型時,您很少會希望歪曲圖像的縱橫比。 Figma將在組中保持圖像中心的縱橫比,并“裁剪”多余的部分。 任何前端開發人員都將熟悉模仿此行為的object-fit: cover CSS屬性 。
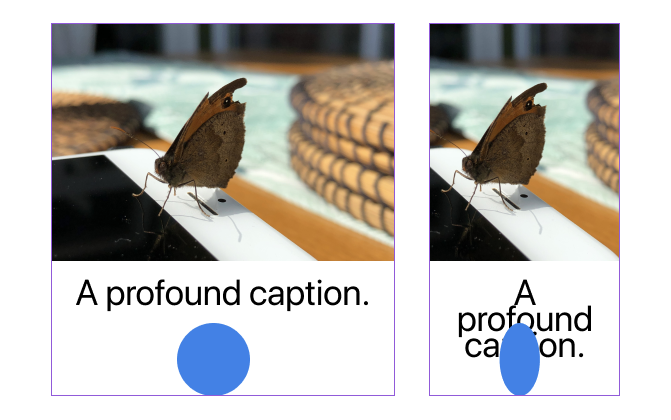
看到所有的文字 (Seeing all the text)
As you can see in the image above, the text box behaves as if it has the ‘Left and Right’ horizontal constraint. Its width shrank in relation to the parental Group. This is perfect if you’re looking to resize things regularly as you work on your prototype, and have all the text visible. It’s curious that it actually has the default ‘Left’ horizontal constraint.
如上圖所示,該文本框的行為就像具有“左右”水平約束一樣。 它的寬度相對于父母組縮小了。 如果您希望在處理原型時定期調整大小,并使所有文本可見,那么這是完美的選擇。 奇怪的是,它實際上具有默認的“左”水平約束。
什么框架適合 (What Frames are good for)

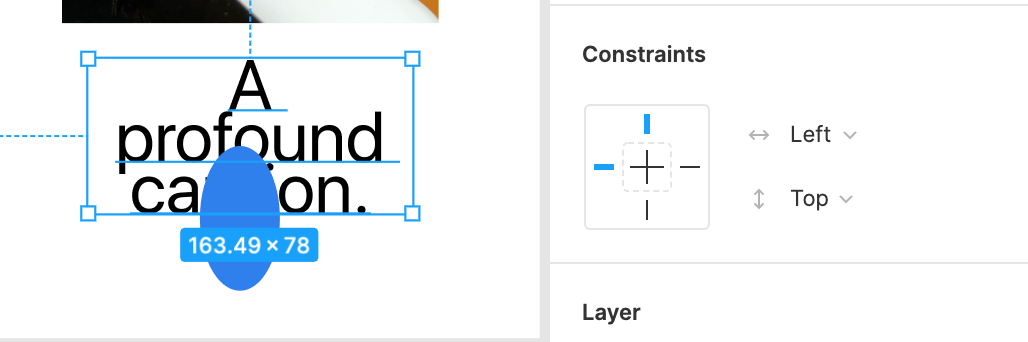
約束條件 (Constraints)
Those with a Frontend Engineering background will find these intuitive; constraints determine the ‘set point’ of things in relation to its parent container. The default behaviours are the ‘Left’ and ‘Top’ sides are fixed. As you can see in the image above, the blue circle in the Framed example stayed in position relative to everything else even though the Frame is narrower.
那些具有前端工程背景的人會發現這些直觀; 約束確定事物相對于其父容器的“設定點”。 默認行為是“左側”和“頂部”是固定的。 如上圖所示,即使“框架”較窄,“框架”示例中的藍色圓圈仍相對于所有其他位置保持不變。
自動滾動 (Automatic scrolling)

If the objects or layers inside a Frame are larger than the Frame itself, or sit outside the Frame, you can turn on automatic scrolling. In the example above, clicking on the Prototype tab in the top right and enabling the ‘Horizontal Scrolling’ option in ‘Overflow Behaviour’ means in preview mode I can scroll left and right to reveal the rest of the content inside the Frame.
如果框架內的對象或圖層大于框架本身,或者位于框架外,則可以啟用自動滾動。 在上面的示例中,單擊右上角的Prototype選項卡,然后在“ Overflow Behaviour”中啟用“ Horizo??ntal Scrolling”選項,這意味著在預覽模式下,我可以左右滾動以顯示Frame內的其余內容。
布局網格 (Layout grids)
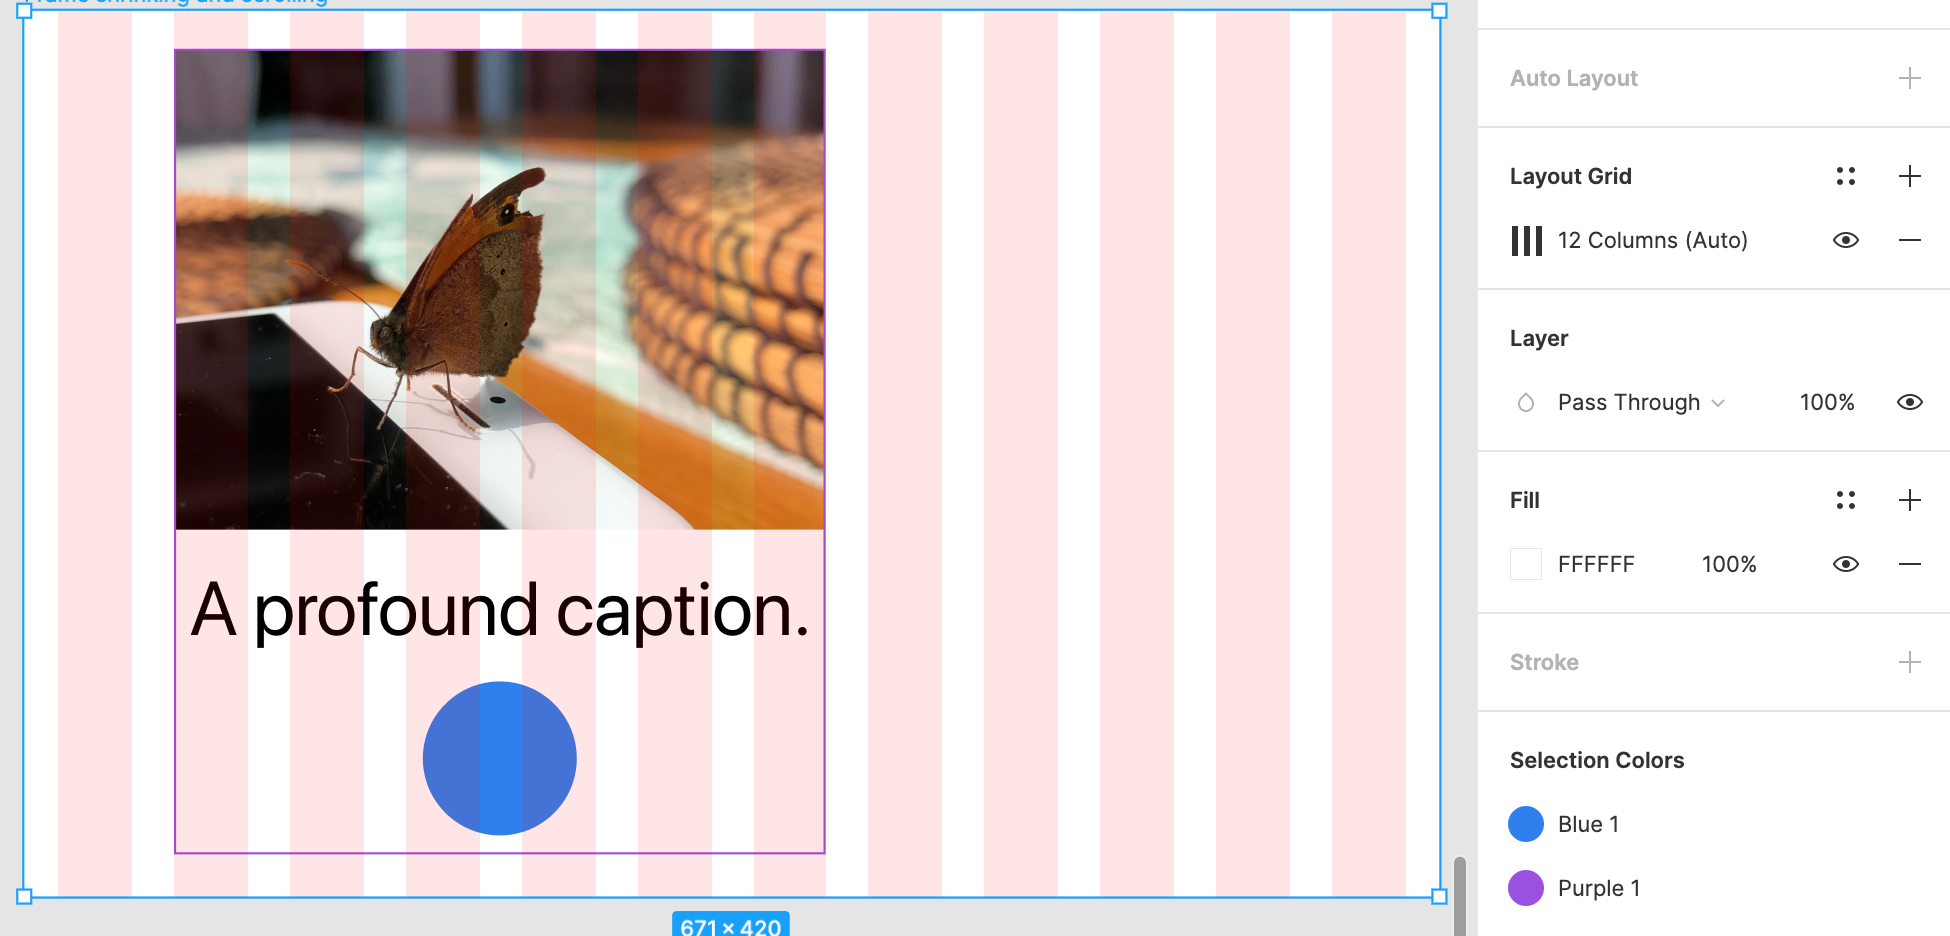
Once you get a hang of Layout grids they are a godsend, making your work go from amateur to semi-pro without too much extra work. Anyone that’s used a UI system in their projects as a Frontend Engineer will probably have used a grid system at one time or another such as Bootstrap or Pure.css. It lets you lay out boxes of text or images consistently in development land, and in Figma land gives you the guides you need to make it look professional.
一旦掌握了Layout Grid,它們就是天賜之物,使您的工作從業余變為半專業,而無需太多額外工作。 在其項目中以前端工程師的身份使用過UI系統的任何人可能一次或多次使用網格系統,例如Bootstrap或Pure.css 。 它使您可以在開發領域中一致地布置文本或圖像的框,而在Figma領域中,可以為您提供使其看起來更專業所需的指南。
Bonus, using this skilfully means the developers you work with will be less frustrated with designs that aren’t possible, and you’ll have fewer extra changes to make after handoff.
優點是,熟練地使用此功能意味著與您一起工作的開發人員將對不可能的設計感到沮喪,并且在交接后無需進行任何其他更改。
Protip: press
Ctrl + Gon a Mac orShift + Gon Windows to show or hide layout grids.Protip :在Mac上按
Ctrl + G,在Windows上按Shift + G可顯示或隱藏布局網格。
疊加層 (Overlays)

When creating interactions such as pop up modals you can only do it using a Frame, not a Group. It works well for other overlays such as Snackbar messages or Navigation drawers.
創建交互(如彈出模式)時 ,只能使用框架而不是組。 它適用于其他疊加層,例如Snackbar消息或Navigation抽屜 。
Protip: if you’ve accidentally created your overlay as a Group, simply select your overlay and add it to a Frame. Your layers can quickly become messy, but it’s handy if your deadline is around the corner.
提示 :如果您不小心將疊加層創建為一個組,只需選擇疊加層并將其添加到框架中即可。 您的圖層很快就會變得混亂,但是如果您的截止日期臨近,這將很方便。
日常使用什么 (What to use day-to-day)
To be honest there are very few instances where I reach for the Group function over the Frame function. If you’re using Figma you’re mostly likely interested in rapidly designing how someone would interact with a digital experience.
老實說,我很少遇到使用Frame函數的Group函數的情況。 如果您使用的是Figma,那么您最有可能對快速設計某人與數字體驗的交互方式感興趣。
Since Frames offer so much of that functionality you need for rich prototypes, I use Frames by default. It’s only for graphical work like icon design or text-heavy Components I would actually use a Group.
由于框架提供了豐富的原型所需的大量功能,因此我默認使用框架。 它僅用于圖形工作,例如圖標設計或大量文本的組件,而實際上我會使用一個組。
Groups and Frames appear similar at first but they have very different use cases. Groups are great to stretch and scale its contents, work with text, or getting ‘responsive’ images after resizing things without worrying about constraints. However, you’ll want to get accustomed to Frames as quickly as possible to unlock the true power of Figma by designing the interactions of your prototypes.
組和框架最初看起來很相似,但它們的用例卻大不相同。 小組非常適合在調整大小后擴展和縮放其內容,使用文本或獲得“響應式”圖像而無需擔心約束。 但是,您將希望盡快習慣Frames,通過設計原型的交互來釋放Figma的真正力量。
翻譯自: https://uxdesign.cc/when-to-use-a-group-or-a-frame-in-figma-507063ed4c35
figma下載
本文來自互聯網用戶投稿,該文觀點僅代表作者本人,不代表本站立場。本站僅提供信息存儲空間服務,不擁有所有權,不承擔相關法律責任。 如若轉載,請注明出處:http://www.pswp.cn/news/275715.shtml 繁體地址,請注明出處:http://hk.pswp.cn/news/275715.shtml 英文地址,請注明出處:http://en.pswp.cn/news/275715.shtml
如若內容造成侵權/違法違規/事實不符,請聯系多彩編程網進行投訴反饋email:809451989@qq.com,一經查實,立即刪除!相關文章

java標記錯誤_標記電子郵件Java時出錯
)
邁入現代 Web 開發(GMTC 2021 演講全文)

Laravel 測試: PHPUnit 入門教程

Brad Wilson寫的 ASP.NET MVC 3 Service Location 系列文章索引

注釋標記的原則_它關系到平臺如何標記操縱的媒體。 這是設計師應遵循的12條原則。

saltapi java_搭建基于Jenkins salt-api的運維工具

他開發了redux,昨晚字節一面卻掛了?

Onew積極開拓國際市場,為全球用戶提供全方位金融服務

高通董事長:努力降低智能手機價格

mysql數據庫的新特性_【數據庫】MySQL新特性歸檔介紹

為什么同事寫的代碼那么優雅~
![[轉]讓你賺大錢成富翁的4個投資習慣](http://pic.xiahunao.cn/[轉]讓你賺大錢成富翁的4個投資習慣)
[轉]讓你賺大錢成富翁的4個投資習慣

thymeleaf th:href url傳遞多參數

spring 加載java類_在Spring中基于Java類進行配置的完整步驟
)
2021 年最值得了解的 Node.js 工具(下)


掃描java類文件_java遞歸與非遞歸實現掃描文件夾下文件的實例代碼

【阿里內部應用】基于Blink為新商業調控打造實時大數據交互查詢服務

