大家好,我是若川。持續組織了6個月源碼共讀活動,感興趣的可以點此加我微信 ruochuan12?參與,每周大家一起學習200行左右的源碼,共同進步。同時極力推薦訂閱我寫的《學習源碼整體架構系列》?包含20余篇源碼文章。
今天,你將為自己創建一個最重要的應用程序——你的作品集。
每個 React 開發者或者 Web 開發者通常需要向潛在的客戶或者雇主展示自己能做什么。
在這篇文章里,我們將使用 React、Tailwind CSS、Netlify 等等行業標準工具創建一個作品集網站。
開始吧!
作品集是怎樣的
這是你將要建立的最終版本。
它的作用是展示你自己、你做過什么項目、你在做這些項目時用了什么技能,還有一個聯系表單,以便客戶或者雇主聯系上你。
我們將使用什么工具
- 我們將用 React 來創建應用程序的用戶界面。它將允許我們通過可重復使用的組件來組成登錄頁面的每一部分,以及添加我們想要的功能,例如博客。
- 為了設計我們的應用程序,我們將使用 Tailwind CSS。Tailwind 允許我們通過組合類名(classnames)將多種樣式輕松應用到 React 項目上,給應用程序一個專業的外觀。
- 為了把我們的應用程序部署到網絡上,我們將使用免費的 Netlify。通過 CDN 的幫助下,用戶可以通過我們自己的的域名快速訪問到我們的項目。
如何開始
你可以在這里下載我們項目的啟動文件:https://reedbarger.ck.page/react-portfolio-2021。
當你獲取到代碼,你要做的是把(解壓好的)項目文件夾拖到代碼編輯器中,然后在終端運行命令。
npm?install然后可以開始了!
我需要使用什么工具來構建作品集
從創建到部署應用程序,需要:
- 你的電腦安裝 Node.js,你可以在 nodejs.org 下載安裝程序。
- 在你的電腦安裝 Git,你可以在 git-scm.com 下載。
- 我建議使用 VS Code 作為你的代碼編輯器。你可以在 code.visualstudio.com 下載它。
- 一個在 Netlify.com 上的免費的 Netlify 賬戶。
- 一個免費的 GitHub 賬號。
如何建立作品集的結構
使用 React 的好處是,我們可以將我們的應用程序擴展到任意多的頁面,并添加大量的內容,這是非常容易的。
但是,由于我們只處理一個頁面,所以可以在應用程序組件中非常快速地找到需要的不同組件。我們將在頂部放一個導航欄,通過上面的鏈接可以跳轉到作品集的不同部分。
然后,我們將有一個“關于”部分,這里包含我們的項目介紹、客戶推薦以及聯系表單。
這種快速的規劃使我們能夠弄清楚組件怎樣命名,以什么順序命名。下一步,把它們全部添加到我們的 App.js 文件夾中(在 src 文件夾):
//?src/App.jsimport?React?from?"react";export?default?function?App()?{return?(<main><Navbar?/><About?/><Projects?/><Skills?/><Testimonials?/><Contact?/></main>);
}
如何創建組件
現在我們已經列出了所有這些組件,我們需要繼續創建它們。
在源代碼(src)文件夾中,我們將創建一個?components?文件夾,里面有我們需要的所有文件。
my-portfolio
├──?README.md
├──?node_modules
├──?package.json
├──?.gitignore
├──?public
│???├──?favicon.ico
│???├──?index.html
│???└──?manifest.json
└──?src├──?App.js├──?data.js├──?index.css├──?index.js└──?components├──?About.js├──?Contact.js├──?Navbar.js├──?Projects.js├──?Skills.js└──?Testimonials.js
然后我們將創建每個 React 組件的基本結構,并使用?export default?從該文件導出:
//?src/components/About.jsexport?default?function?About()?{}//?repeat?the?same?basic?structure?for?all?6?components(在所有的?6?個組件中重復相同的結構)最后在 App.js 中導入它:
//?src/App.jsimport?React?from?"react";
import?About?from?"./components/About";
import?Contact?from?"./components/Contact";
import?Navbar?from?"./components/Navbar";
import?Projects?from?"./components/Projects";
import?Skills?from?"./components/Skills";
import?Testimonials?from?"./components/Testimonials";export?default?function?App()?{return?(<main><Navbar?/><About?/><Projects?/><Skills?/><Testimonials?/><Contact?/></main>);
}
請注意,總共應該有?6 個組件
Tailwind CSS 介紹
做完上面的,我們可以開始使用 Tailwind CSS 給我們的應用程序一個基本的外觀。
使用 Tailwind CSS 的好處是,我們不必在 CSS 中手動編寫任何樣式,而是組合多個類(class)來創建我們想要的外觀。
//?src/App.jsimport?React?from?"react";
import?About?from?"./components/About";
import?Contact?from?"./components/Contact";
import?Navbar?from?"./components/Navbar";
import?Projects?from?"./components/Projects";
import?Skills?from?"./components/Skills";
import?Testimonials?from?"./components/Testimonials";export?default?function?App()?{return?(<main?className="text-gray-400?bg-gray-900?body-font"><Navbar?/><About?/><Projects?/><Skills?/><Testimonials?/><Contact?/></main>);
}如何構建?About?組件
現在開始第一部分,即?about?部分,介紹我們的基本情況和擅長的技能。
它還將包含聯系表單的鏈接,以及我們過去的項目。由于這些鏈接將指向同一頁面的不同部分,我們能使用 "/#projects" 和 "/#contact"。
為了使這些鏈接能跳轉到每個部分,我們把項目部分?id?的屬性設置為?projects,把聯系部分的?id?屬性設置為?contact。
//?src/components/About.jsimport?React?from?"react";export?default?function?About()?{return?(<section?id="about"><div?className="container?mx-auto?flex?px-10?py-20?md:flex-row?flex-col?items-center"><div?className="lg:flex-grow?md:w-1/2?lg:pr-24?md:pr-16?flex?flex-col?md:items-start?md:text-left?mb-16?md:mb-0?items-center?text-center"><h1?className="title-font?sm:text-4xl?text-3xl?mb-4?font-medium?text-white">Hi,?I'm?Reed.<br?className="hidden?lg:inline-block"?/>I?love?to?build?amazingapps.</h1><p?className="mb-8?leading-relaxed">Lorem?ipsum?dolor?sit?amet,?consectetur?adipisicing?elit.?Quilaborum?quasi,?incidunt?dolore?iste?nostrum?cupiditate?voluptas?Laborum,?voluptas?natus?</p><div?className="flex?justify-center"><ahref="#contact"className="inline-flex?text-white?bg-green-500?border-0?py-2?px-6?focus:outline-none?hover:bg-green-600?rounded?text-lg">Work?With?Me</a><ahref="#projects"className="ml-4?inline-flex?text-gray-400?bg-gray-800?border-0?py-2?px-6?focus:outline-none?hover:bg-gray-700?hover:text-white?rounded?text-lg">See?My?Past?Work</a></div></div><div?className="lg:max-w-lg?lg:w-full?md:w-1/2?w-5/6"><imgclassName="object-cover?object-center?rounded"alt="hero"src="./coding.svg"/></div></div></section>);
}對于本部分右側的圖片,我使用的?public?文件夾中的一個 svg 文件(coding.svg)。
這個圖片只是作為一個臨時的占位符,我強烈建議你使用你自己的圖片。
如何構建 Projects?組件
我們的項目部分是由一個?section?元素組成,id為?prpjects。這將是包含所有項目的圖片集。
//?src/components/Projects.jsimport?{?CodeIcon?}?from?"@heroicons/react/solid";
import?React?from?"react";
import?{?projects?}?from?"../data";export?default?function?Projects()?{return?(<section?id="projects"?className="text-gray-400?bg-gray-900?body-font"><div?className="container?px-5?py-10?mx-auto?text-center?lg:px-40"><div?className="flex?flex-col?w-full?mb-20"><CodeIcon?className="mx-auto?inline-block?w-10?mb-4"?/><h1?className="sm:text-4xl?text-3xl?font-medium?title-font?mb-4?text-white">Apps?I've?Built</h1><p?className="lg:w-2/3?mx-auto?leading-relaxed?text-base">Lorem?ipsum,?dolor?sit?amet?consectetur?adipisicing?elit.?Explicabofacilis?repellat?ab?cupiditate?alias?vero?aliquid?obcaecati?quisquamfuga?dolore.</p></div><div?className="flex?flex-wrap?-m-4">{projects.map((project)?=>?(<ahref={project.link}key={project.image}className="sm:w-1/2?w-100?p-4"><div?className="flex?relative"><imgalt="gallery"className="absolute?inset-0?w-full?h-full?object-cover?object-center"src={project.image}/><div?className="px-8?py-10?relative?z-10?w-full?border-4?border-gray-800?bg-gray-900?opacity-0?hover:opacity-100"><h2?className="tracking-widest?text-sm?title-font?font-medium?text-green-400?mb-1">{project.subtitle}</h2><h1?className="title-font?text-lg?font-medium?text-white?mb-3">{project.title}</h1><p?className="leading-relaxed">{project.description}</p></div></div></a>))}</div></div></section>);
}注意,我們還將使用庫?@heroicons/react,以便將 SVG 圖標寫成 React 組件。
我們從同一個文件夾中的?data.js?文件導入一個項目數組。在那里,我們導出一個對象數組,每個對象包含項目的數據。
//?src/data.jsexport?const?projects?=?[{title:?"React?Reserve",subtitle:?"MERN?Stack",description:"Lorem?ipsum?dolor?sit?amet?consectetur?adipisicing?elit.?Praesentium?dolore?rerum?laborum?iure?enim?sint?nemo?omnis?voluptate?exercitationem?eius?",image:?"./project-1.gif",link:?"https://reactbootcamp.com",},{title:?"React?Tracks",subtitle:?"React?and?Python",description:"Lorem?ipsum?dolor?sit?amet?consectetur?adipisicing?elit.?Praesentium?dolore?rerum?laborum?iure?enim?sint?nemo?omnis?voluptate?exercitationem?eius?",image:?"./project-2.gif",link:?"https://reedbarger.com",},{title:?"DevChat",subtitle:?"React?and?Firebase",description:"Lorem?ipsum?dolor?sit?amet?consectetur?adipisicing?elit.?Praesentium?dolore?rerum?laborum?iure?enim?sint?nemo?omnis?voluptate?exercitationem?eius?",image:?"./project-3.gif",link:?"https://jsbootcamp.com",},{title:?"Epic?Todo?App",subtitle:?"React?Hooks",description:"Lorem?ipsum?dolor?sit?amet?consectetur?adipisicing?elit.?Praesentium?dolore?rerum?laborum?iure?enim?sint?nemo?omnis?voluptate?exercitationem?eius?",image:?"./project-4.gif",link:?"https://pythonbootcamp.com",},
];如何構建?Skills?組件
我們在這部分填寫自己會的技能和技術。
這將包含一個簡單的清單,列出在我們熟悉的主要工具,可用于雇主或客戶的項目中。
再一次,我們將從?data?文件夾導入一個數組。但是這個數組是由字符串組成,是我們所知道的技能,如 JavaScript、React 和 Node。
//?src/components/Skills.jsimport?{?BadgeCheckIcon,?ChipIcon?}?from?"@heroicons/react/solid";
import?React?from?"react";
import?{?skills?}?from?"../data";export?default?function?Skills()?{return?(<section?id="skills"><div?className="container?px-5?py-10?mx-auto"><div?className="text-center?mb-20"><ChipIcon?className="w-10?inline-block?mb-4"?/><h1?className="sm:text-4xl?text-3xl?font-medium?title-font?text-white?mb-4">Skills?&?Technologies</h1><p?className="text-base?leading-relaxed?xl:w-2/4?lg:w-3/4?mx-auto">Lorem?ipsum?dolor?sit?amet?consectetur,?adipisicing?elit.?Nisi?sitipsa?delectus?eum?quo?voluptas?aspernatur?accusantium?distinctiopossimus?est.</p></div><div?className="flex?flex-wrap?lg:w-4/5?sm:mx-auto?sm:mb-2?-mx-2">{skills.map((skill)?=>?(<div?key={skill}?className="p-2?sm:w-1/2?w-full"><div?className="bg-gray-800?rounded?flex?p-4?h-full?items-center"><BadgeCheckIcon?className="text-green-400?w-6?h-6?flex-shrink-0?mr-4"?/><span?className="title-font?font-medium?text-white">{skill}</span></div></div>))}</div></div></section>);
}如何構建?Testimonials?組件
在?Testimonials?組件中,我們將列出一些過去的比較熟悉的客戶的推薦信。
這些將由幾個卡片組成,里面有推薦人和推薦人所在的公司。
我們將導入一個包含推薦信息的數組,里面的對象包含了評價、圖片和公司。
//?src/components/Testimonialsimport?React?from?"react";
import?{?TerminalIcon,?UsersIcon?}?from?"@heroicons/react/solid";
import?{?testimonials?}?from?"../data";export?default?function?Testimonials()?{return?(<section?id="testimonials"><div?className="container?px-5?py-10?mx-auto?text-center"><UsersIcon?className="w-10?inline-block?mb-4"?/><h1?className="sm:text-4xl?text-3xl?font-medium?title-font?text-white?mb-12">Client?Testimonials</h1><div?className="flex?flex-wrap?m-4">{testimonials.map((testimonial)?=>?(<div?className="p-4?md:w-1/2?w-full"><div?className="h-full?bg-gray-800?bg-opacity-40?p-8?rounded"><TerminalIcon?className="block?w-8?text-gray-500?mb-4"?/><p?className="leading-relaxed?mb-6">{testimonial.quote}</p><div?className="inline-flex?items-center"><imgalt="testimonial"src={testimonial.image}className="w-12?rounded-full?flex-shrink-0?object-cover?object-center"/><span?className="flex-grow?flex?flex-col?pl-4"><span?className="title-font?font-medium?text-white">{testimonial.name}</span><span?className="text-gray-500?text-sm?uppercase">{testimonial.company}</span></span></div></div></div>))}</div></div></section>);
}如何構建?Contact?組件
在登錄頁的尾部,我們將加入聯系表單,以便潛在的雇主能聯系到我們。
這個表格包含 3 個輸入:姓名、電子郵件和輸入信息。
為了接收這些表格所提交的信息,我們將使用 Netlify 表格工具以輕松保存這些信息。
//?src/components/Contact.jsimport?React?from?"react";export?default?function?Contact()?{return?(<section?id="contact"?className="relative"><div?className="container?px-5?py-10?mx-auto?flex?sm:flex-nowrap?flex-wrap"><div?className="lg:w-2/3?md:w-1/2?bg-gray-900?rounded-lg?overflow-hidden?sm:mr-10?p-10?flex?items-end?justify-start?relative"><iframewidth="100%"height="100%"title="map"className="absolute?inset-0"frameBorder={0}marginHeight={0}marginWidth={0}style={{?filter:?"opacity(0.7)"?}}src="https://www.google.com/maps/embed/v1/place?q=97+warren+st+new+york+city&key=AIzaSyBFw0Qbyq9zTFTd-tUY6dZWTgaQzuU17R8"/><div?className="bg-gray-900?relative?flex?flex-wrap?py-6?rounded?shadow-md"><div?className="lg:w-1/2?px-6"><h2?className="title-font?font-semibold?text-white?tracking-widest?text-xs">ADDRESS</h2><p?className="mt-1">97?Warren?St.?<br?/>New?York,?NY?10007</p></div><div?className="lg:w-1/2?px-6?mt-4?lg:mt-0"><h2?className="title-font?font-semibold?text-white?tracking-widest?text-xs">EMAIL</h2><a?className="text-indigo-400?leading-relaxed">reedbarger@email.com</a><h2?className="title-font?font-semibold?text-white?tracking-widest?text-xs?mt-4">PHONE</h2><p?className="leading-relaxed">123-456-7890</p></div></div></div><formnetlifyname="contact"className="lg:w-1/3?md:w-1/2?flex?flex-col?md:ml-auto?w-full?md:py-8?mt-8?md:mt-0"><h2?className="text-white?sm:text-4xl?text-3xl?mb-1?font-medium?title-font">Hire?Me</h2><p?className="leading-relaxed?mb-5">Lorem?ipsum?dolor?sit?amet?consectetur,?adipisicing?elit.?Illumsuscipit?officia?aspernatur?veritatis.?Asperiores,?aliquid?</p><div?className="relative?mb-4"><label?htmlFor="name"?className="leading-7?text-sm?text-gray-400">Name</label><inputtype="text"id="name"name="name"className="w-full?bg-gray-800?rounded?border?border-gray-700?focus:border-indigo-500?focus:ring-2?focus:ring-indigo-900?text-base?outline-none?text-gray-100?py-1?px-3?leading-8?transition-colors?duration-200?ease-in-out"/></div><div?className="relative?mb-4"><label?htmlFor="email"?className="leading-7?text-sm?text-gray-400">Email</label><inputtype="email"id="email"name="email"className="w-full?bg-gray-800?rounded?border?border-gray-700?focus:border-indigo-500?focus:ring-2?focus:ring-indigo-900?text-base?outline-none?text-gray-100?py-1?px-3?leading-8?transition-colors?duration-200?ease-in-out"/></div><div?className="relative?mb-4"><labelhtmlFor="message"className="leading-7?text-sm?text-gray-400">Message</label><textareaid="message"name="message"className="w-full?bg-gray-800?rounded?border?border-gray-700?focus:border-indigo-500?focus:ring-2?focus:ring-indigo-900?h-32?text-base?outline-none?text-gray-100?py-1?px-3?resize-none?leading-6?transition-colors?duration-200?ease-in-out"/></div><buttontype="submit"className="text-white?bg-indigo-500?border-0?py-2?px-6?focus:outline-none?hover:bg-indigo-600?rounded?text-lg">Submit</button></form></div></section>);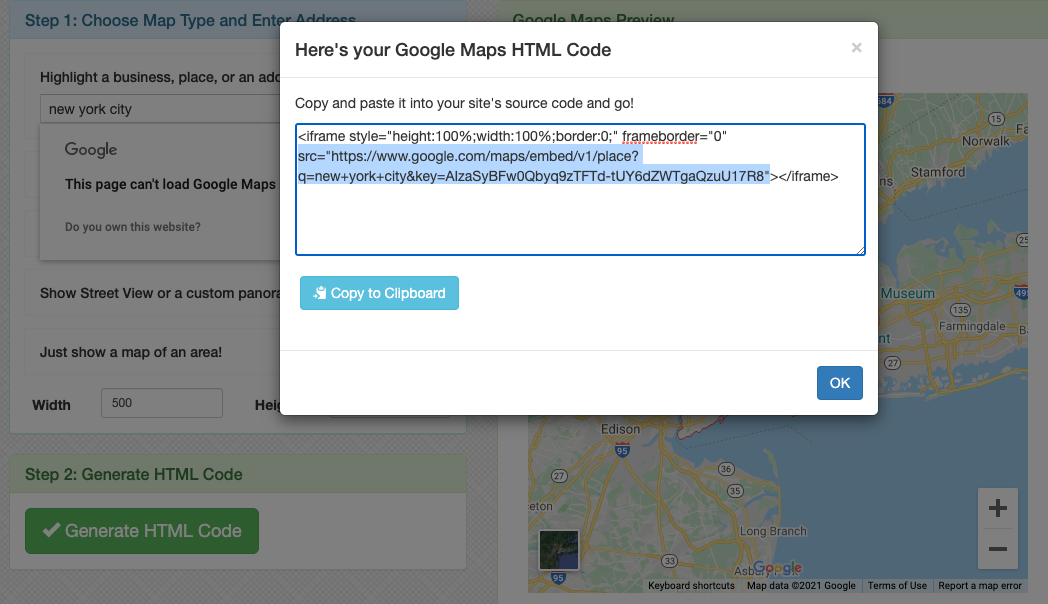
}如何嵌入?Google Maps?位置
在表格的左邊,我們將一個?Google Maps?嵌入,顯示我們的所在位置。
我們可以在一個在線工具(embed-map.com)的幫助下這樣做。你所要做的事只是輸入你的位置并點擊Generate HTML code。
在給我們生成的代碼中,不要復制所有的代碼,只要復制 ifame 中的?src?屬性,然后替換掉?src?的默認值。
向 Netlify 發送任何提交的表單數據,Netlify Forms 需要將從靜態 HTML 中識別表單。因為我們的 React 應用是由 JavaScript 控制的,而不是普通的 HTML 組成,所以我們需要在?public?文件夾下的 index.html 文件中添加一個隱藏的表單。
<!--?public/index.html?--><!DOCTYPE?html>
<html?lang="en"><head><!--?head?content?skipped?--></head><body><form?name="contact"?netlify?netlify-honeypot="bot-field"?hidden><input?type="text"?name="name"?/><input?type="email"?name="email"?/><textarea?name="message"></textarea></form><noscript>You?need?to?enable?JavaScript?to?run?this?app.</noscript><div?id="root"></div></body>
</html>
我們需要隱藏這個表單,因為它不需要被用戶看到,它只需要被Netlify看到。
如何從聯系表單提交
完成上面這些,我們將回到 Contact.js。我們將使用 JavaScript 提交這個表單。
const?[name,?setName]?=?React.useState("");
const?[email,?setEmail]?=?React.useState("");
const?[message,?setMessage]?=?React.useState("");我們將在?onChange?處理程序的幫助下,將用戶在每個輸入項的信息存儲在?state。
//?src/components/Contact.jsimport?React?from?"react";export?default?function?Contact()?{const?[name,?setName]?=?React.useState("");const?[email,?setEmail]?=?React.useState("");const?[message,?setMessage]?=?React.useState("");function?encode(data)?{return?Object.keys(data).map((key)?=>?encodeURIComponent(key)?+?"="?+?encodeURIComponent(data[key])).join("&");}function?handleSubmit(e)?{e.preventDefault();fetch("/",?{method:?"POST",headers:?{?"Content-Type":?"application/x-www-form-urlencoded"?},body:?encode({?"form-name":?"contact",?name,?email,?message?}),}).then(()?=>?alert("Message?sent!")).catch((error)?=>?alert(error));}return?(<section?id="contact"?className="relative"><div?className="container?px-5?py-10?mx-auto?flex?sm:flex-nowrap?flex-wrap"><div?className="lg:w-2/3?md:w-1/2?bg-gray-900?rounded-lg?overflow-hidden?sm:mr-10?p-10?flex?items-end?justify-start?relative"><iframewidth="100%"height="100%"title="map"className="absolute?inset-0"frameBorder={0}marginHeight={0}marginWidth={0}style={{?filter:?"opacity(0.7)"?}}src="https://www.google.com/maps/embed/v1/place?q=97+warren+st+new+york+city&key=AIzaSyBFw0Qbyq9zTFTd-tUY6dZWTgaQzuU17R8"/><div?className="bg-gray-900?relative?flex?flex-wrap?py-6?rounded?shadow-md"><div?className="lg:w-1/2?px-6"><h2?className="title-font?font-semibold?text-white?tracking-widest?text-xs">ADDRESS</h2><p?className="mt-1">97?Warren?St.?<br?/>New?York,?NY?10007</p></div><div?className="lg:w-1/2?px-6?mt-4?lg:mt-0"><h2?className="title-font?font-semibold?text-white?tracking-widest?text-xs">EMAIL</h2><a?className="text-indigo-400?leading-relaxed">reedbarger@email.com</a><h2?className="title-font?font-semibold?text-white?tracking-widest?text-xs?mt-4">PHONE</h2><p?className="leading-relaxed">123-456-7890</p></div></div></div><formnetlifyname="contact"onSubmit={handleSubmit}className="lg:w-1/3?md:w-1/2?flex?flex-col?md:ml-auto?w-full?md:py-8?mt-8?md:mt-0"><h2?className="text-white?sm:text-4xl?text-3xl?mb-1?font-medium?title-font">Hire?Me</h2><p?className="leading-relaxed?mb-5">Lorem?ipsum?dolor?sit?amet?consectetur,?adipisicing?elit.?Illumsuscipit?officia?aspernatur?veritatis.?Asperiores,?aliquid?</p><div?className="relative?mb-4"><label?htmlFor="name"?className="leading-7?text-sm?text-gray-400">Name</label><inputtype="text"id="name"name="name"className="w-full?bg-gray-800?rounded?border?border-gray-700?focus:border-indigo-500?focus:ring-2?focus:ring-indigo-900?text-base?outline-none?text-gray-100?py-1?px-3?leading-8?transition-colors?duration-200?ease-in-out"onChange={(e)?=>?setName(e.target.value)}/></div><div?className="relative?mb-4"><label?htmlFor="email"?className="leading-7?text-sm?text-gray-400">Email</label><inputtype="email"id="email"name="email"className="w-full?bg-gray-800?rounded?border?border-gray-700?focus:border-indigo-500?focus:ring-2?focus:ring-indigo-900?text-base?outline-none?text-gray-100?py-1?px-3?leading-8?transition-colors?duration-200?ease-in-out"onChange={(e)?=>?setEmail(e.target.value)}/></div><div?className="relative?mb-4"><labelhtmlFor="message"className="leading-7?text-sm?text-gray-400">Message</label><textareaid="message"name="message"className="w-full?bg-gray-800?rounded?border?border-gray-700?focus:border-indigo-500?focus:ring-2?focus:ring-indigo-900?h-32?text-base?outline-none?text-gray-100?py-1?px-3?resize-none?leading-6?transition-colors?duration-200?ease-in-out"onChange={(e)?=>?setMessage(e.target.value)}/></div><buttontype="submit"className="text-white?bg-indigo-500?border-0?py-2?px-6?focus:outline-none?hover:bg-indigo-600?rounded?text-lg">Submit</button></form></div></section>);
}正如你在上面看到的,我們正在用一個特殊的encode(編碼)函數對表單數據進行編碼。
如何構建?Navbar?組件
最后一步是構建我們的?Navbar?組件。
//?src/components/Navbar.jsimport?{?ArrowRightIcon?}?from?"@heroicons/react/solid";
import?React?from?"react";export?default?function?Navbar()?{return?(<header?className="bg-gray-800?md:sticky?top-0?z-10"><div?className="container?mx-auto?flex?flex-wrap?p-5?flex-col?md:flex-row?items-center"><a?className="title-font?font-medium?text-white?mb-4?md:mb-0"><a?href="#about"?className="ml-3?text-xl">Reed?Barger</a></a><nav?className="md:mr-auto?md:ml-4?md:py-1?md:pl-4?md:border-l?md:border-gray-700?flex?flex-wrap?items-center?text-base?justify-center"><a?href="#projects"?className="mr-5?hover:text-white">Past?Work</a><a?href="#skills"?className="mr-5?hover:text-white">Skills</a><a?href="#testimonials"?className="mr-5?hover:text-white">Testimonials</a></nav><ahref="#contact"className="inline-flex?items-center?bg-gray-800?border-0?py-1?px-3?focus:outline-none?hover:bg-gray-700?rounded?text-base?mt-4?md:mt-0">Hire?Me<ArrowRightIcon?className="w-4?h-4?ml-1"?/></a></div></header>);
}如何在較大的設備上將?Navbar?組件在頁面的頂部顯示?我們將使用?md:sticky?類添加到?header?元素。
如何部署作品集
現在,為了使我們的作品集上線,我們需要把應用程序推送到 GitHub。
一旦你熟悉了這個流程,我們可以首先創建一個新的 GitHub 倉庫。之后,我們將運行?git add .、git commit -m "Deploy",創建 git 遠程,然后?git push -u orgin master。
一旦我們的項目建立在 GitHub 上,我們就可以去 Netlify,選擇?Choose Site from Git。然后選擇 GitHub 作為持續部署,并選擇我們剛剛推送代碼的 GitHub 倉庫。
之后,我們的項目將自動部署到網絡上!
下一步是什么
祝賀你,你現在可以通過一個在線的作品集應用程序向潛在雇主展示你的所有項目和技能了!
下一步要做的事設置一個自己的域名,最好用你的名字(例如 reedbarger.com)。
由于 Netlify 包含一個 DNS,你可以很容易在那里設置一個自己的域名。
可以考慮在你的 React 應用程序中添加一個博客,向潛在的雇主展示你更多的開發知識。
通過個人作品集表達你自己以及你作為開發者的熱情所在,你將獲得成功!
原文鏈接:https://www.freecodecamp.org/news/build-portfolio-website-react/
作者:Reed Barger
譯者:luojiyin

·················?若川簡介?·················
你好,我是若川,畢業于江西高校。現在是一名前端開發“工程師”。寫有《學習源碼整體架構系列》20余篇,在知乎、掘金收獲超百萬閱讀。
從2014年起,每年都會寫一篇年度總結,已經寫了7篇,點擊查看年度總結。
同時,最近組織了源碼共讀活動,幫助3000+前端人學會看源碼。公眾號愿景:幫助5年內前端人走向前列。

識別上方二維碼加我微信、拉你進源碼共讀群
今日話題
略。分享、收藏、點贊、在看我的文章就是對我最大的支持~


——Spring整合RabbitMQ實例)


)


