c++編寫托管dll
本教程適用于誰? (Who is this tutorial for?)
- This tutorial assumes no prior knowledge and is suitable for complete beginners as a first project 本教程假定您沒有先驗知識,并且適合初學者作為第一個項目
您將需要什么 (What you will need)
a GitHub account (if you already have one set up, skip step 1)
一個GitHub帳戶(如果已經設置了一個帳戶,請跳過步驟1)
- a Netlify account 一個Netlify帳戶
a code editor (for this tutorial I used Visual Studio Code)
一個代碼編輯器(對于本教程,我使用了Visual Studio Code )
- terminal app 終端應用
- approximately 1–2 hour 大約1-2小時
讓我們開始吧! (Let’s get started!)
步驟1:注冊GitHub帳戶。 (Step 1: Sign up for a GitHub account.)
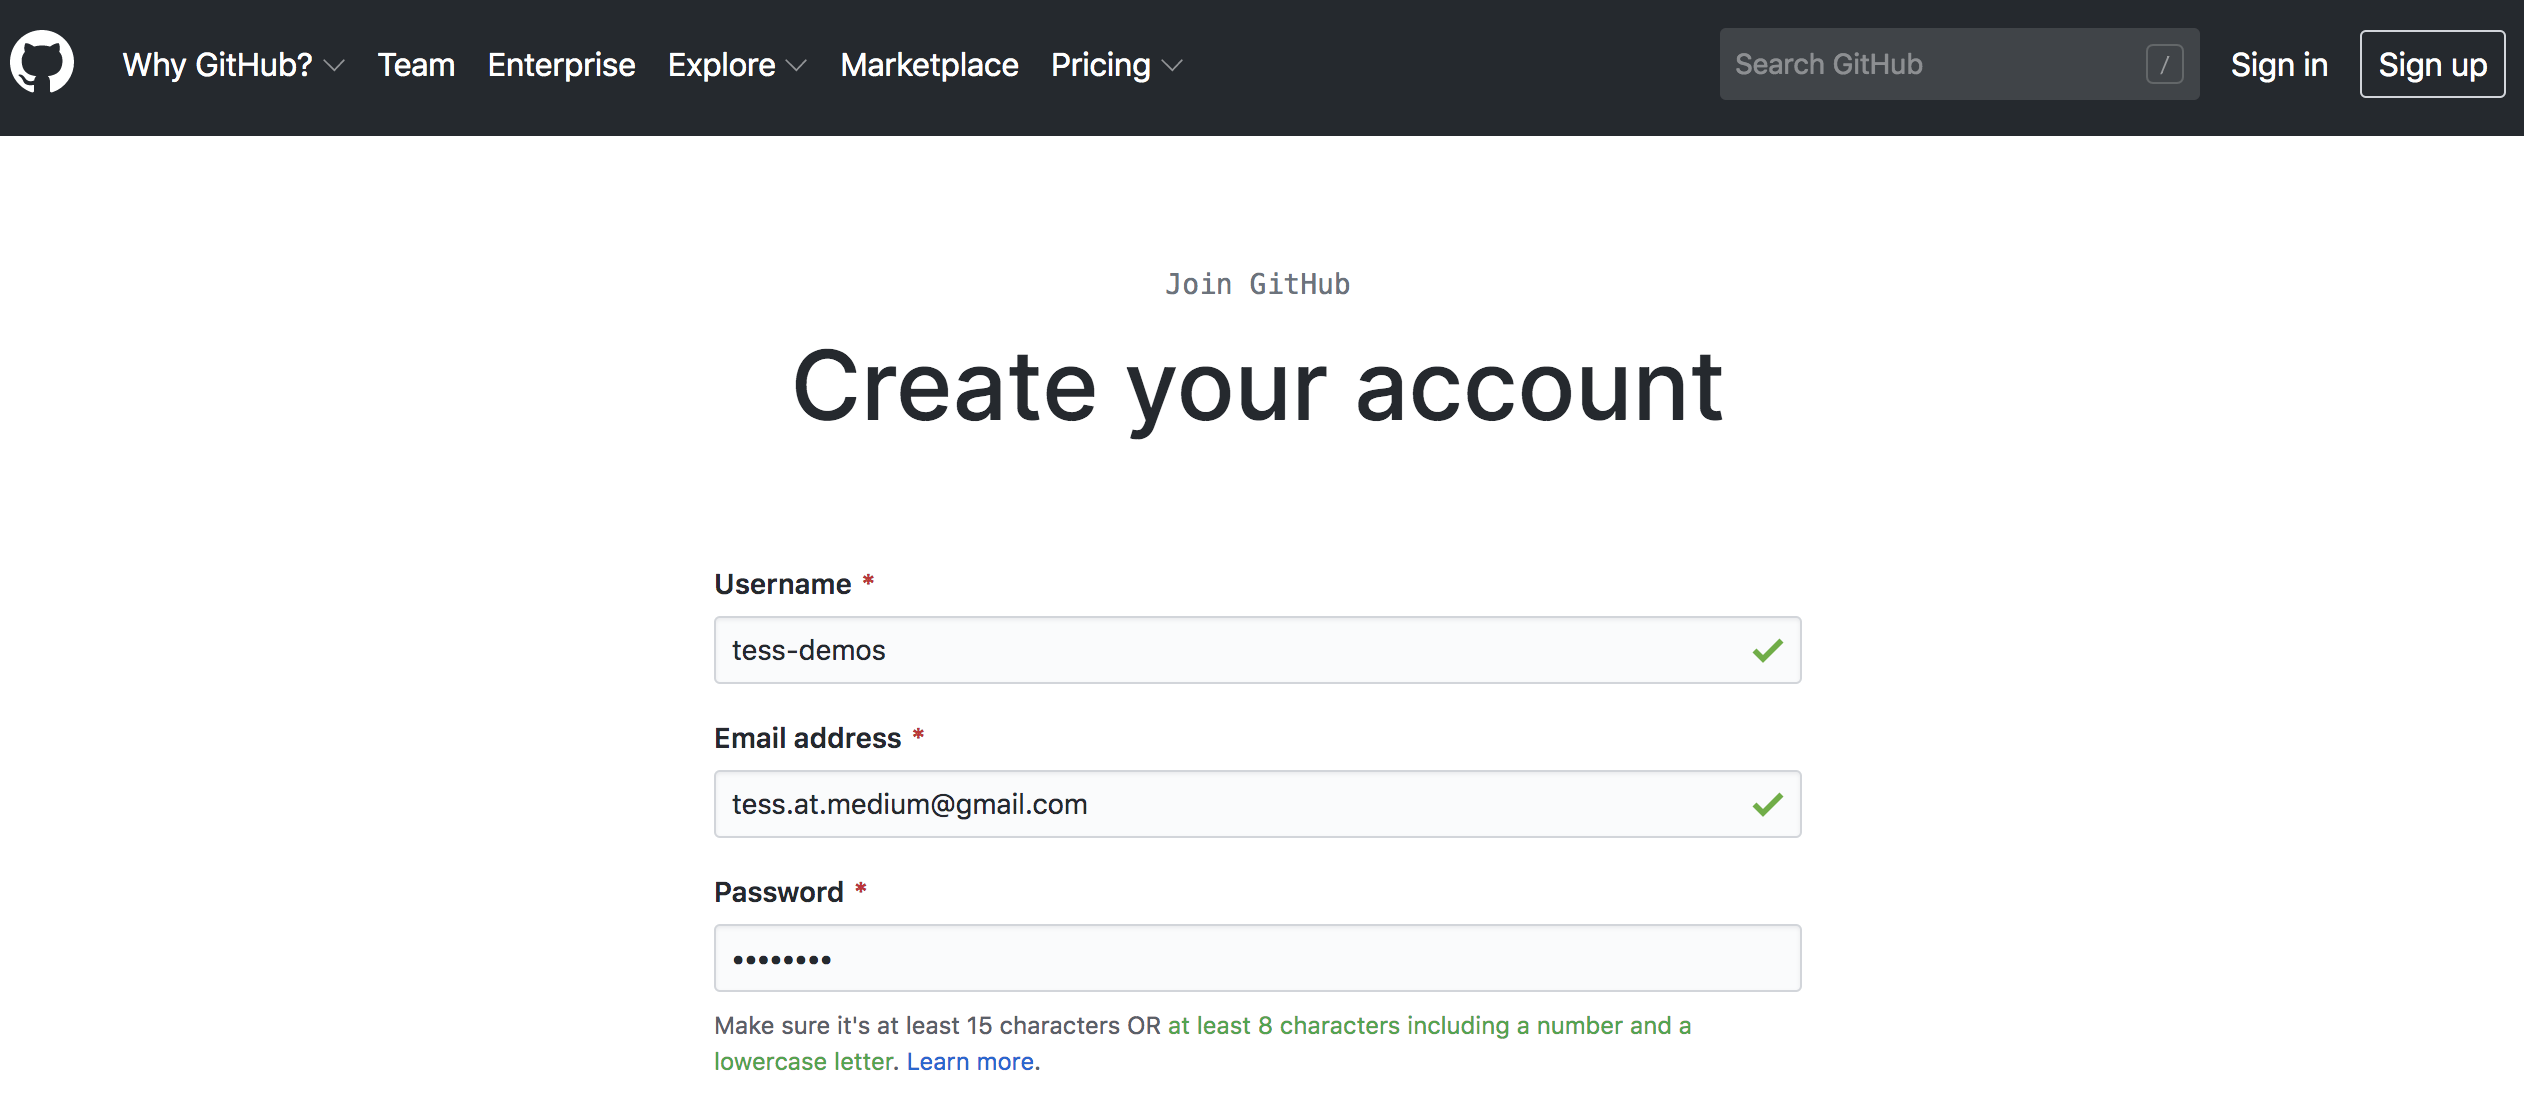
What exactly is GitHub? The Git in GitHub is a version control system, so that every time anything changes in our code, that change is tracked. This lets you trace everything you’ve ever written and changed within a project and revert back to an old version of your code if you need to. Git on its own is a command-line tool. GitHub is where it all comes together. It’s where we can store our projects, track all our work and code changes, as well as network with other developers (and check out their projects!).
GitHub到底是什么? GitHub中的Git是一個版本控制系統,因此每當我們的代碼中發生任何更改時,都會跟蹤該更改。 這樣,您就可以跟蹤您在項目中編寫和更改的所有內容,并在需要時還原為舊版本的代碼。 Git本身就是一個命令行工具。 GitHub是所有功能的結合體。 在這里,我們可以存儲我們的項目,跟蹤我們的所有工作和代碼更改,以及與其他開發人員建立聯系(并檢查他們的項目!)。
步驟2:建立新的GitHub存放區 (Step 2: Create a new GitHub repository)
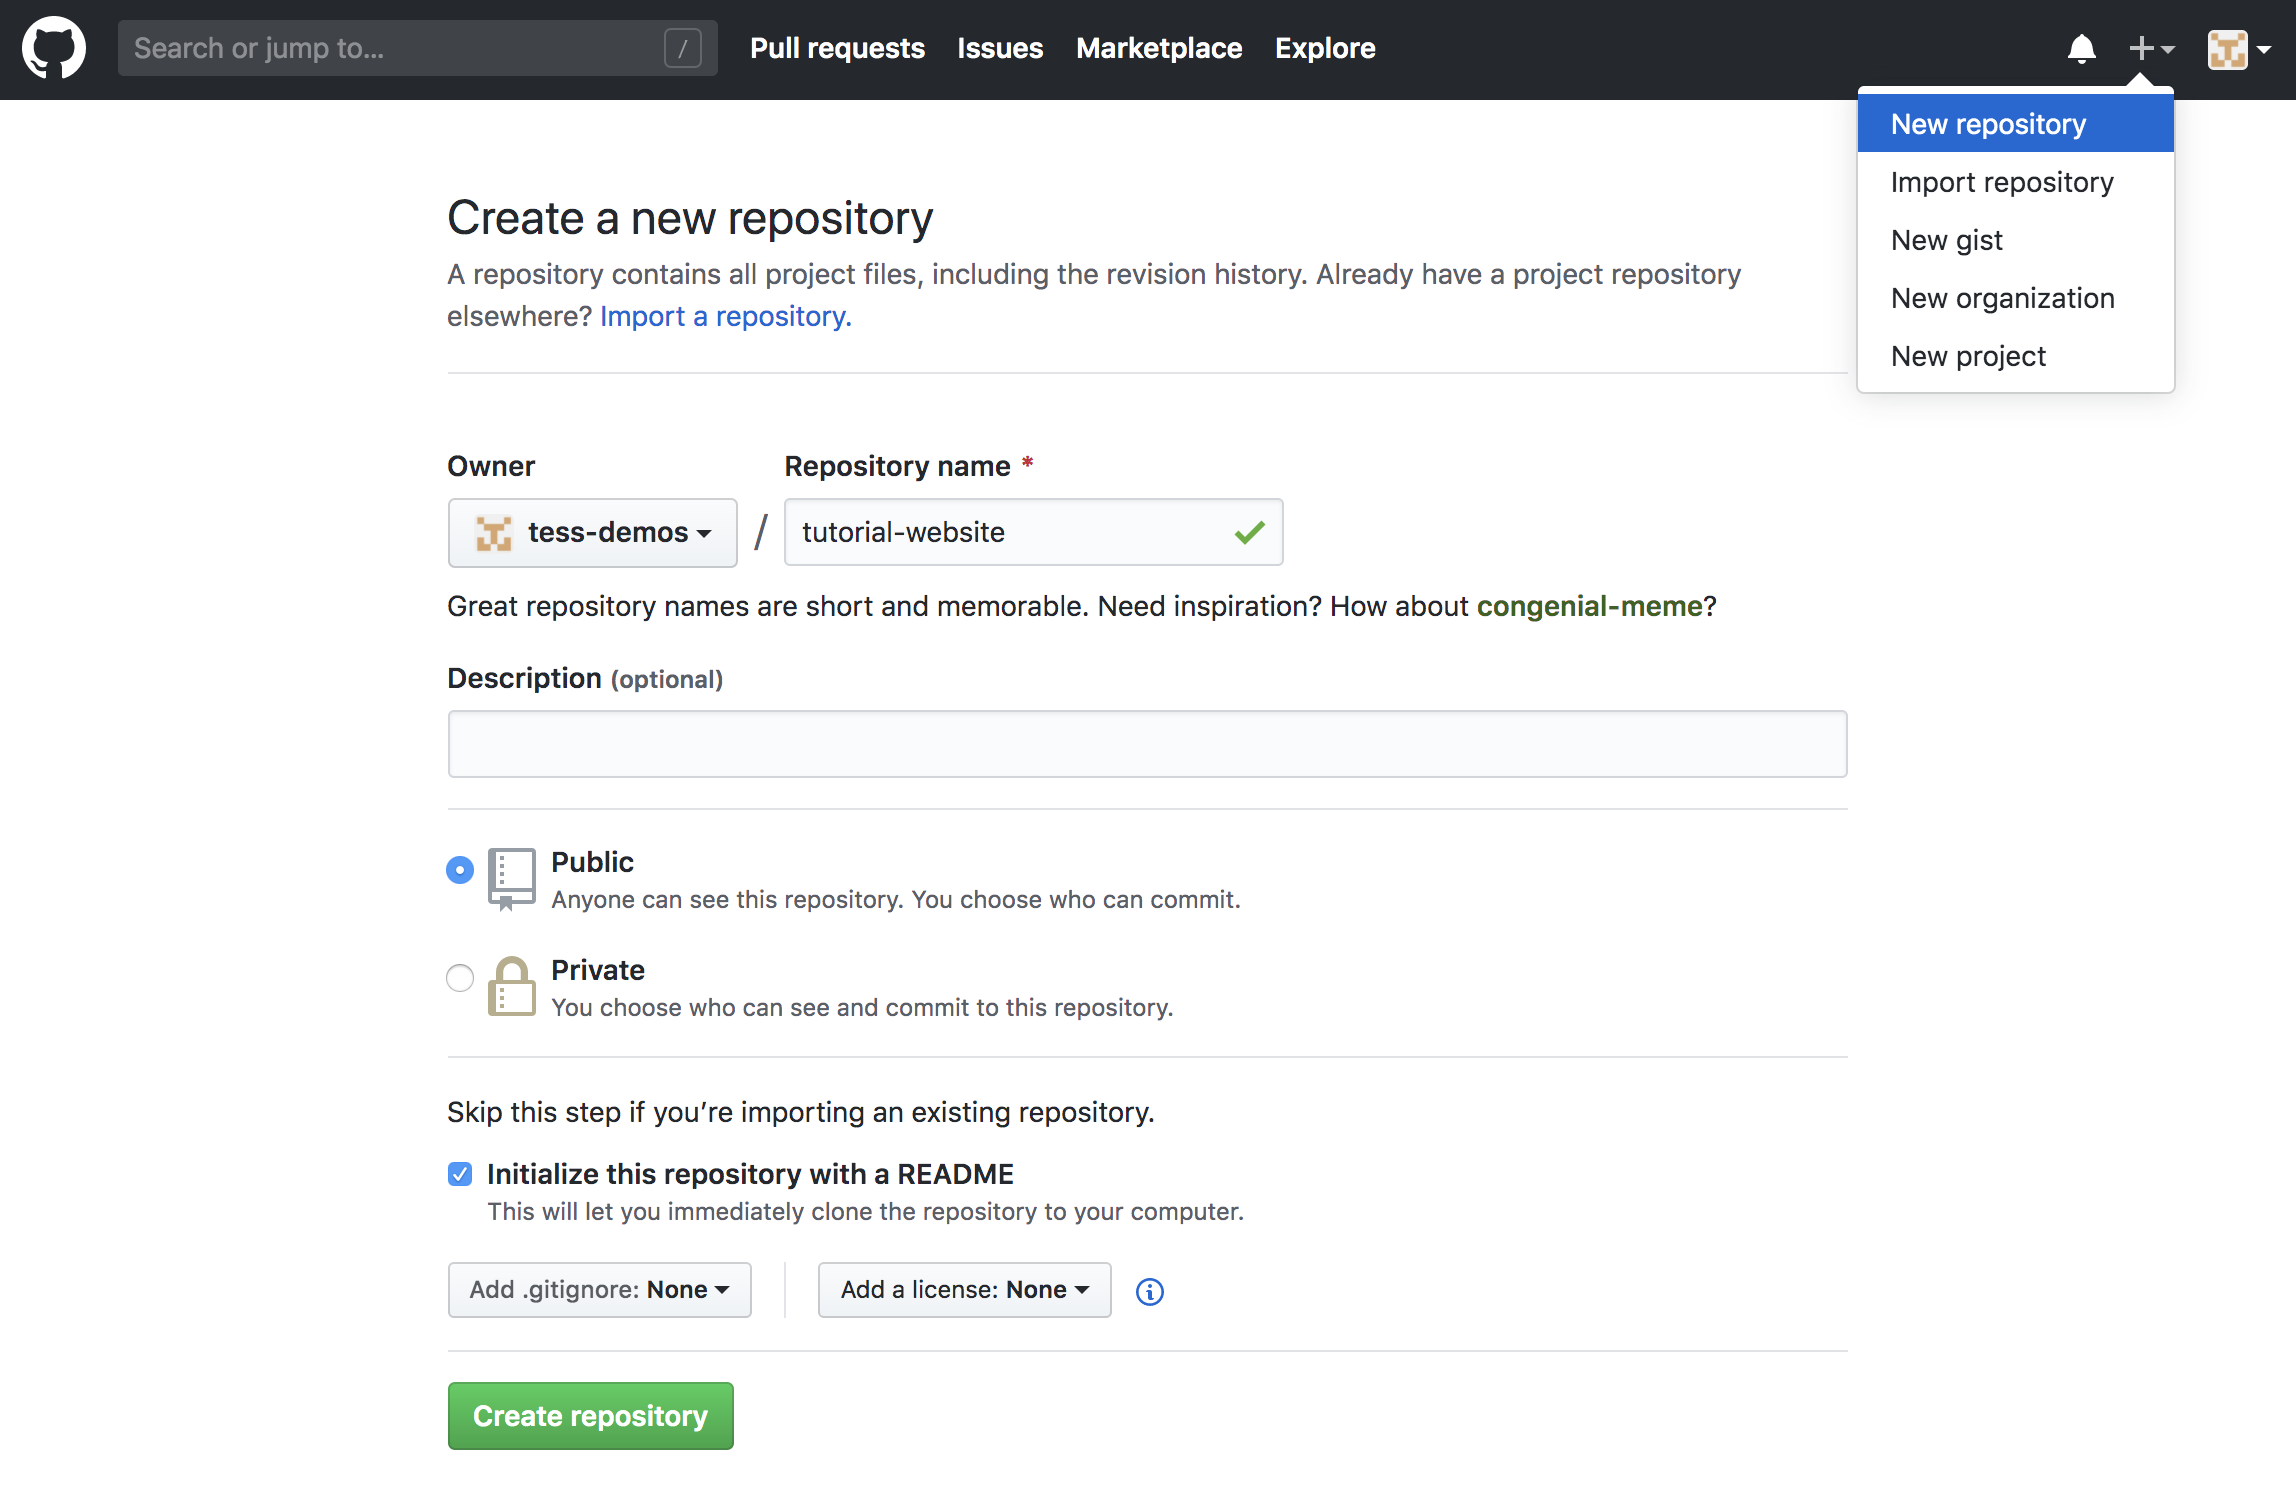
It’s good practice to initialize your project with a README file. In this file, you can put some information about your project so that anyone who is interested can understand what the project is and how to make sense of the project files.
最好使用README文件初始化項目。 在此文件中,您可以放入有關項目的一些信息,以便任何感興趣的人都可以了解項目是什么以及如何理解項目文件。
步驟3:將存儲庫克隆到計算機上 (Step 3: Clone your repository on to your computer)
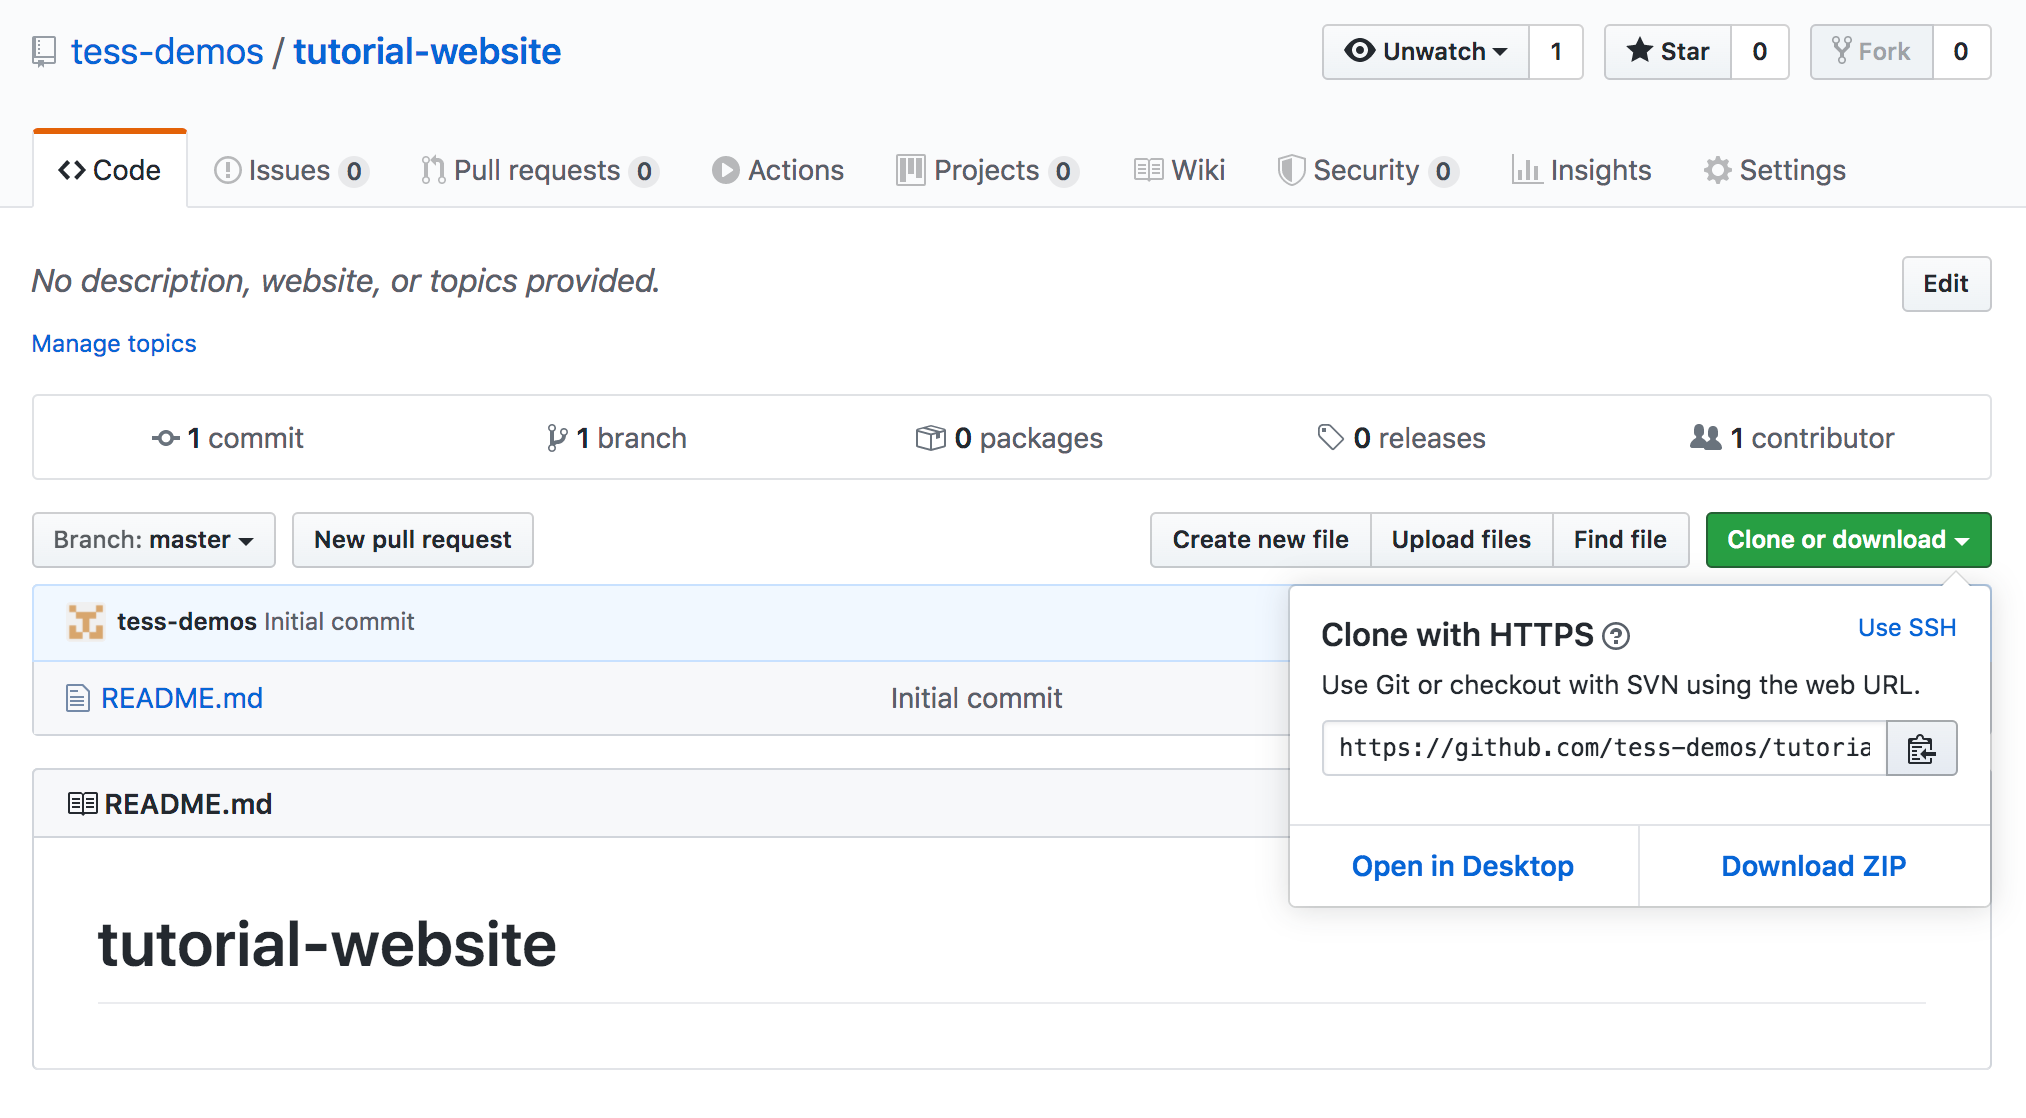
- Click on “Clone or download” and copy the HTTPS URL 單擊“克隆或下載”并復制HTTPS URL
Open up your terminal (on a mac just hit the search icon and type Terminal)
打開終端(在Mac上,只需點擊搜索圖標,然后輸入Terminal )
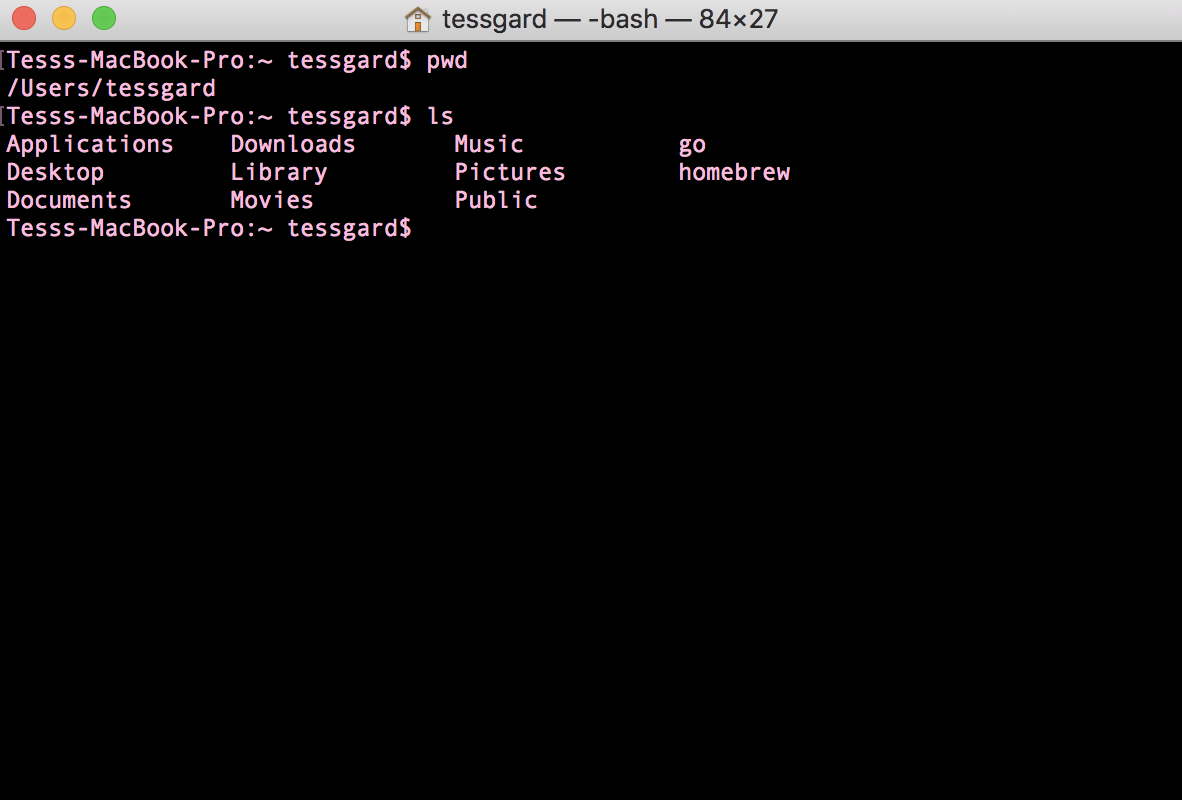
The Terminal is the interface to the underlying operating system of our computer. It is a command line. From here we can do a bunch of cool things. But for now, let’s navigate to where we want to keep our project files and make a “clone” of the repository that we just created on GitHub.
終端是計算機底層操作系統的接口。 這是一個命令行。 從這里我們可以做很多很酷的事情 。 但是現在,讓我們導航到要保留項目文件的位置,并對剛剛在GitHub上創建的存儲庫進行“克隆”。
Give it a go with the following commands:
嘗試以下命令:
$ pwdThis stands for print working directory. As you can see above, it will show you where you are within your files.
這代表打印工作目錄。 如上所示,它將顯示文件中的位置。
$ lsThis one will give you a list of all the directories and files within your current directory. It stands for short listing as it only gives you the name of the file or directory.
這將為您提供當前目錄中所有目錄和文件的列表。 它代表簡短清單 ,因為它只為您提供文件或目錄的名稱。
To learn more terminal commands, check out this cheat sheet.
要了解更多終端命令,請查看此備忘單 。
Let's create a directory for our project
讓我們為項目創建一個目錄
Use the following commands to create a new directory and clone your project
使用以下命令創建新目錄并克隆您的項目
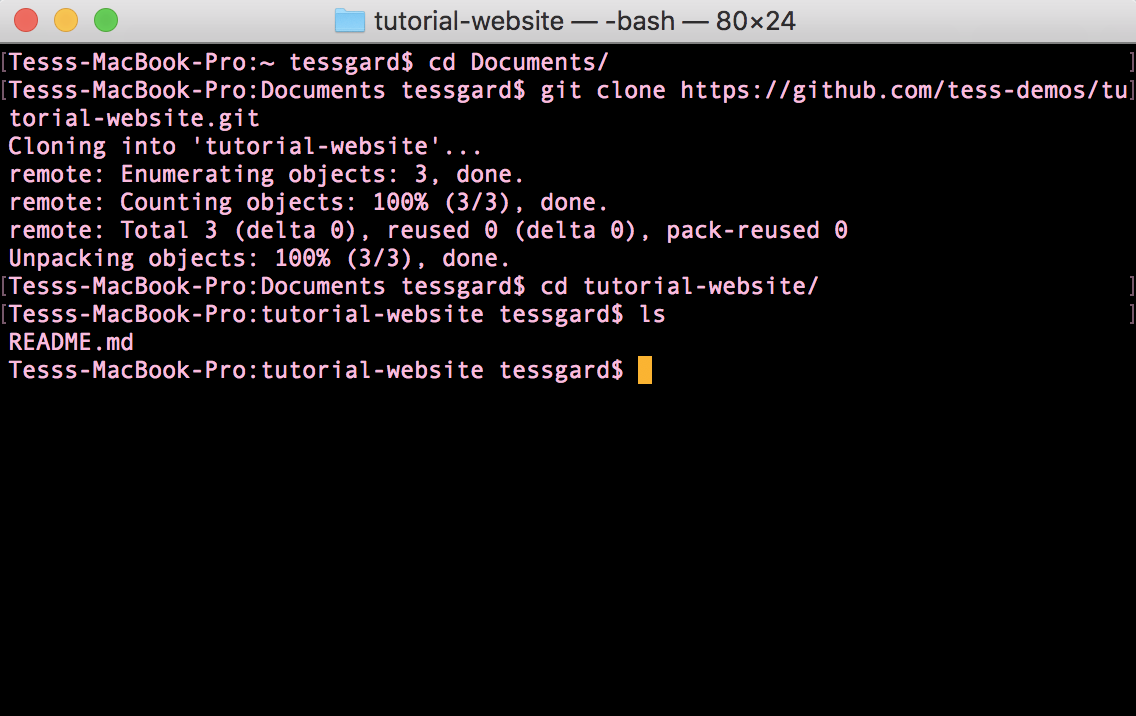
$ cd Documents
$ git clone <HTTPS URL from your GitHub repository>
$ cd <name of your project repository>
$ ls
Now we have a new directory, mine is called tutorial-website, and within this directory, we can type “ls” to see that we have our README file.
現在,我們有了一個新目錄,我的目錄稱為tutorial-website,在該目錄中,我們可以鍵入“ ls”以查看我們是否有README文件。
步驟4:打開代碼編輯器并創建項目文件 (Step 4 : Open your code editor and create your project files)
There are lots of different code editors and everyone has their personal preferences. For this tutorial, I will use Visual Studio Code. It’s free, it’s simple, it’s good. You can download it here.
有許多不同的代碼編輯器,每個人都有自己的個人喜好。 在本教程中,我將使用Visual Studio Code。 它是免費的,它很簡單,很好。 您可以在此處下載。
- Let’s launch VS code and open our project 讓我們啟動VS代碼并打開我們的項目
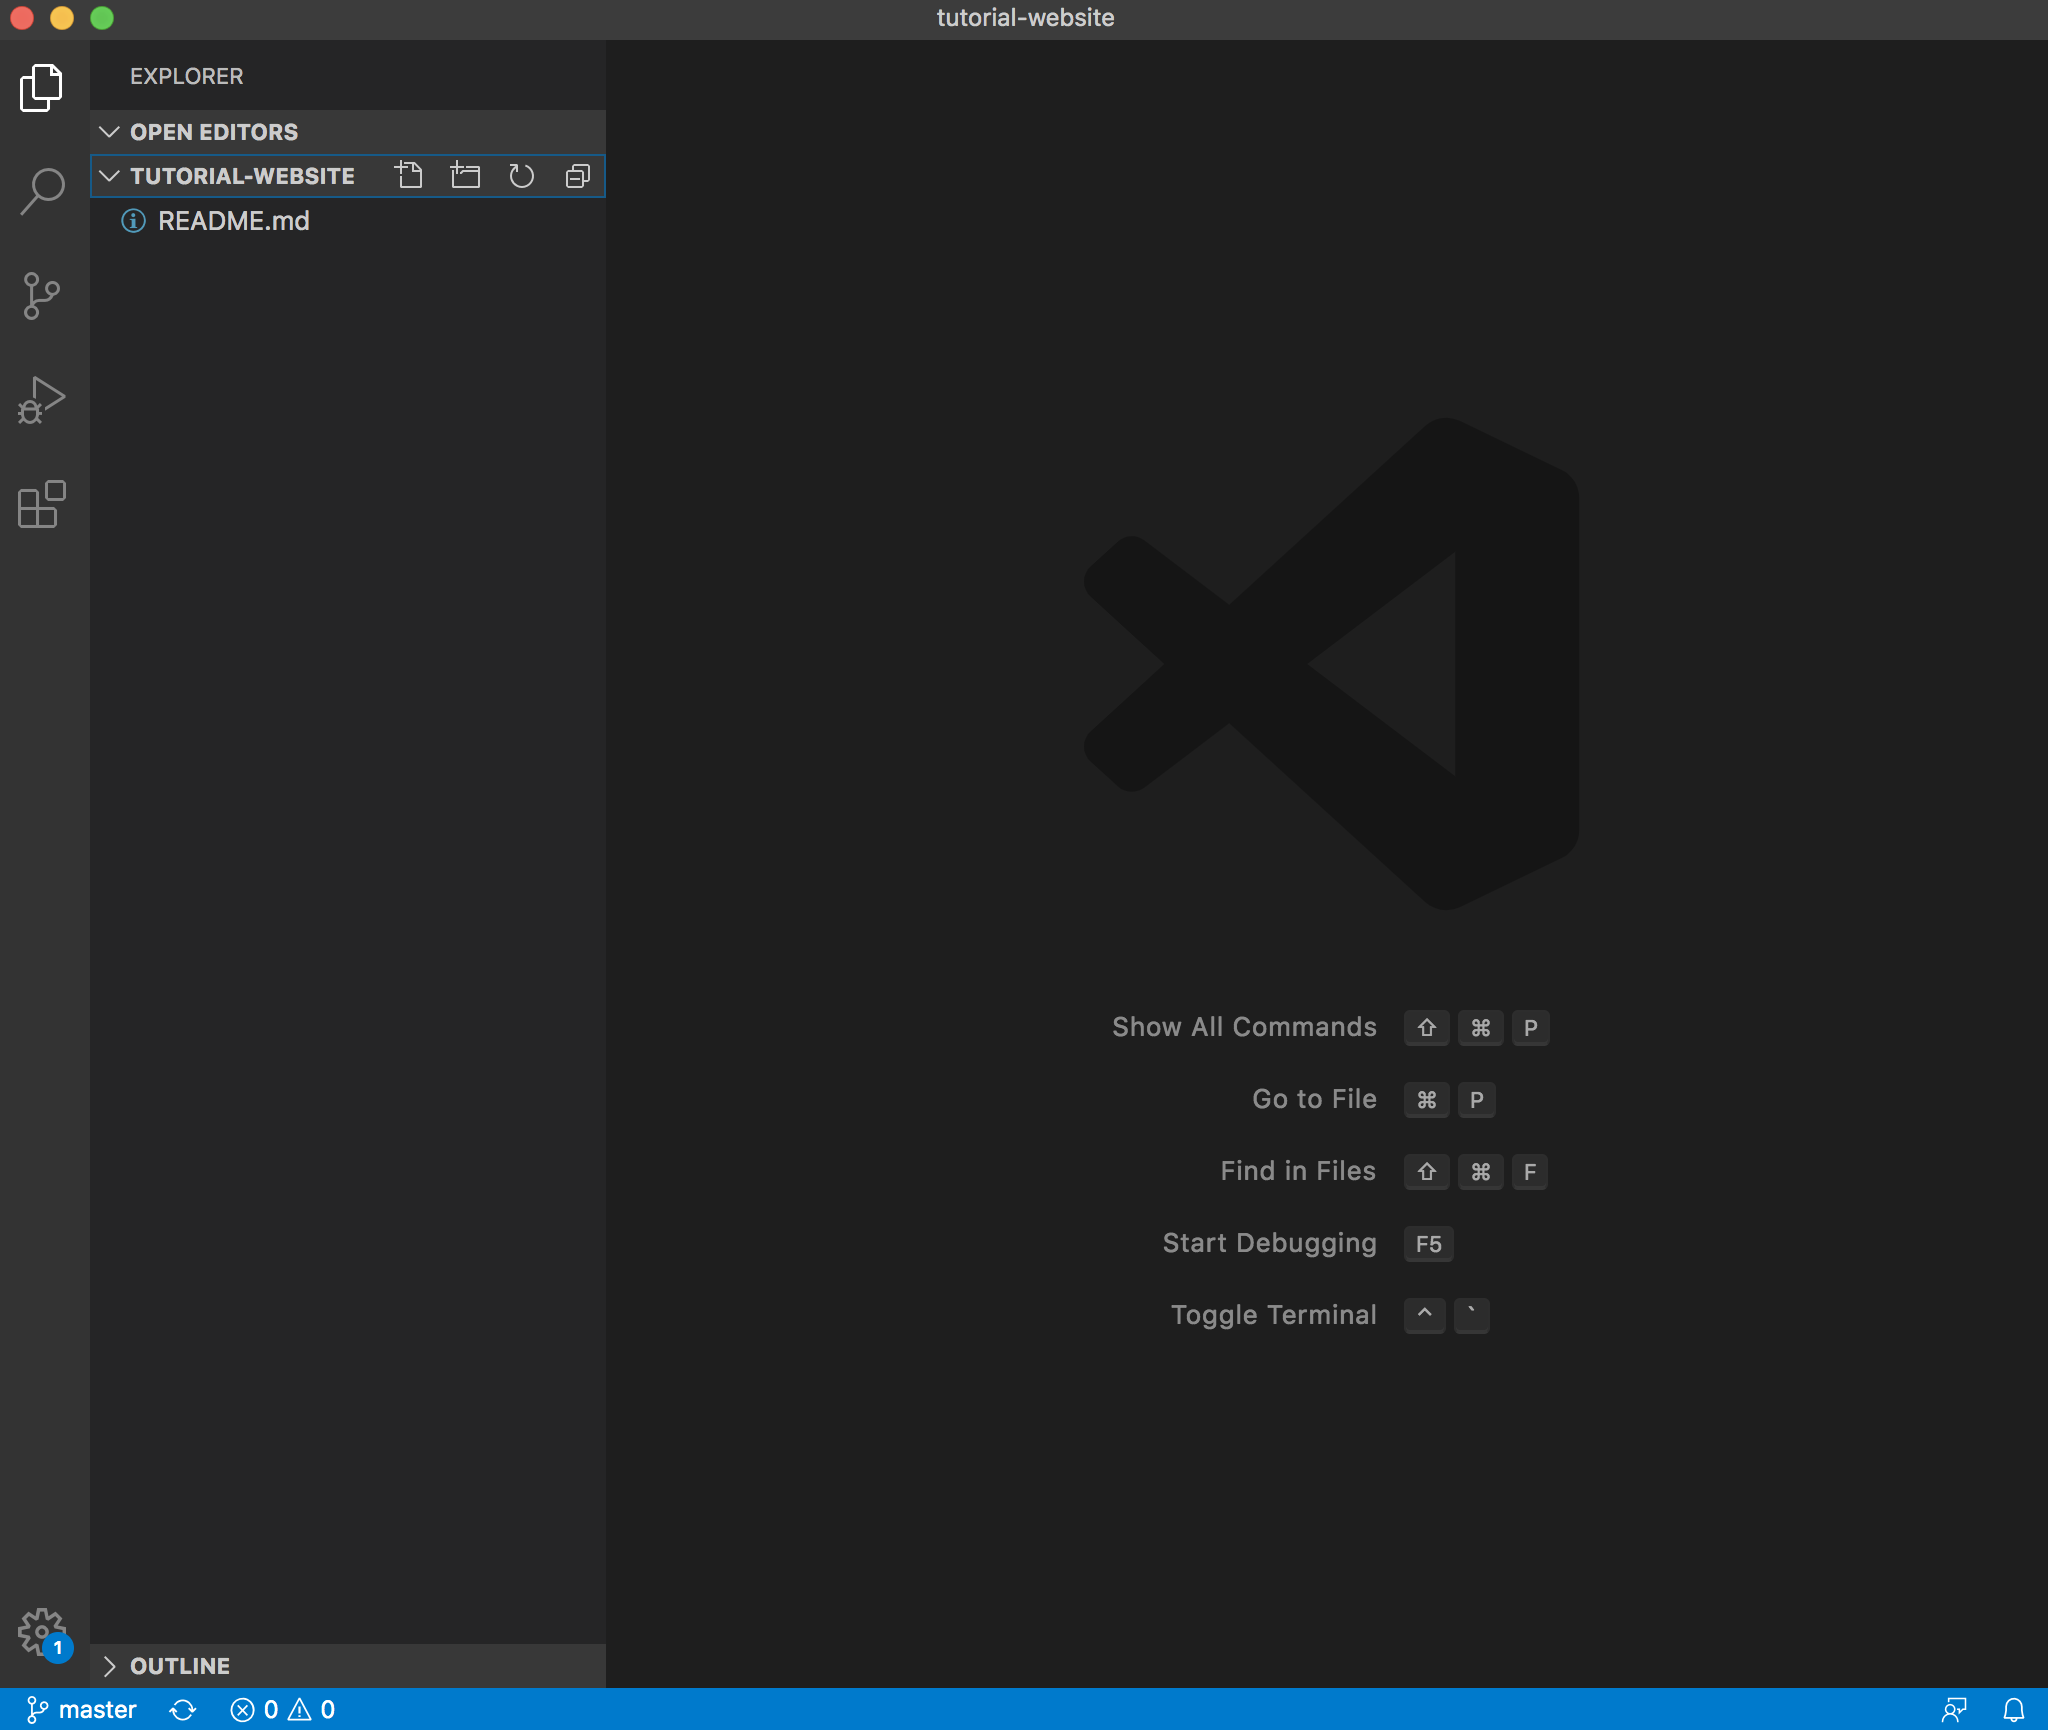
So far we only have our README file. Let’s go to our terminal and create 2 new files, one will be our HTML file and the other will be the CSS file.
到目前為止,我們只有README文件。 讓我們轉到終端并創建2個新文件,一個是我們HTML文件,另一個是CSS文件。
$ ls (to make sure you are still in the right directory)
$ touch index.html
$ touch style.css
The touch command followed by the name of our file is how we can create a new file. Now let’s go back to VS code and see our files.
緊隨我們文件名之后的touch命令是我們如何創建新文件的方法。 現在,讓我們回到VS代碼并查看我們的文件。
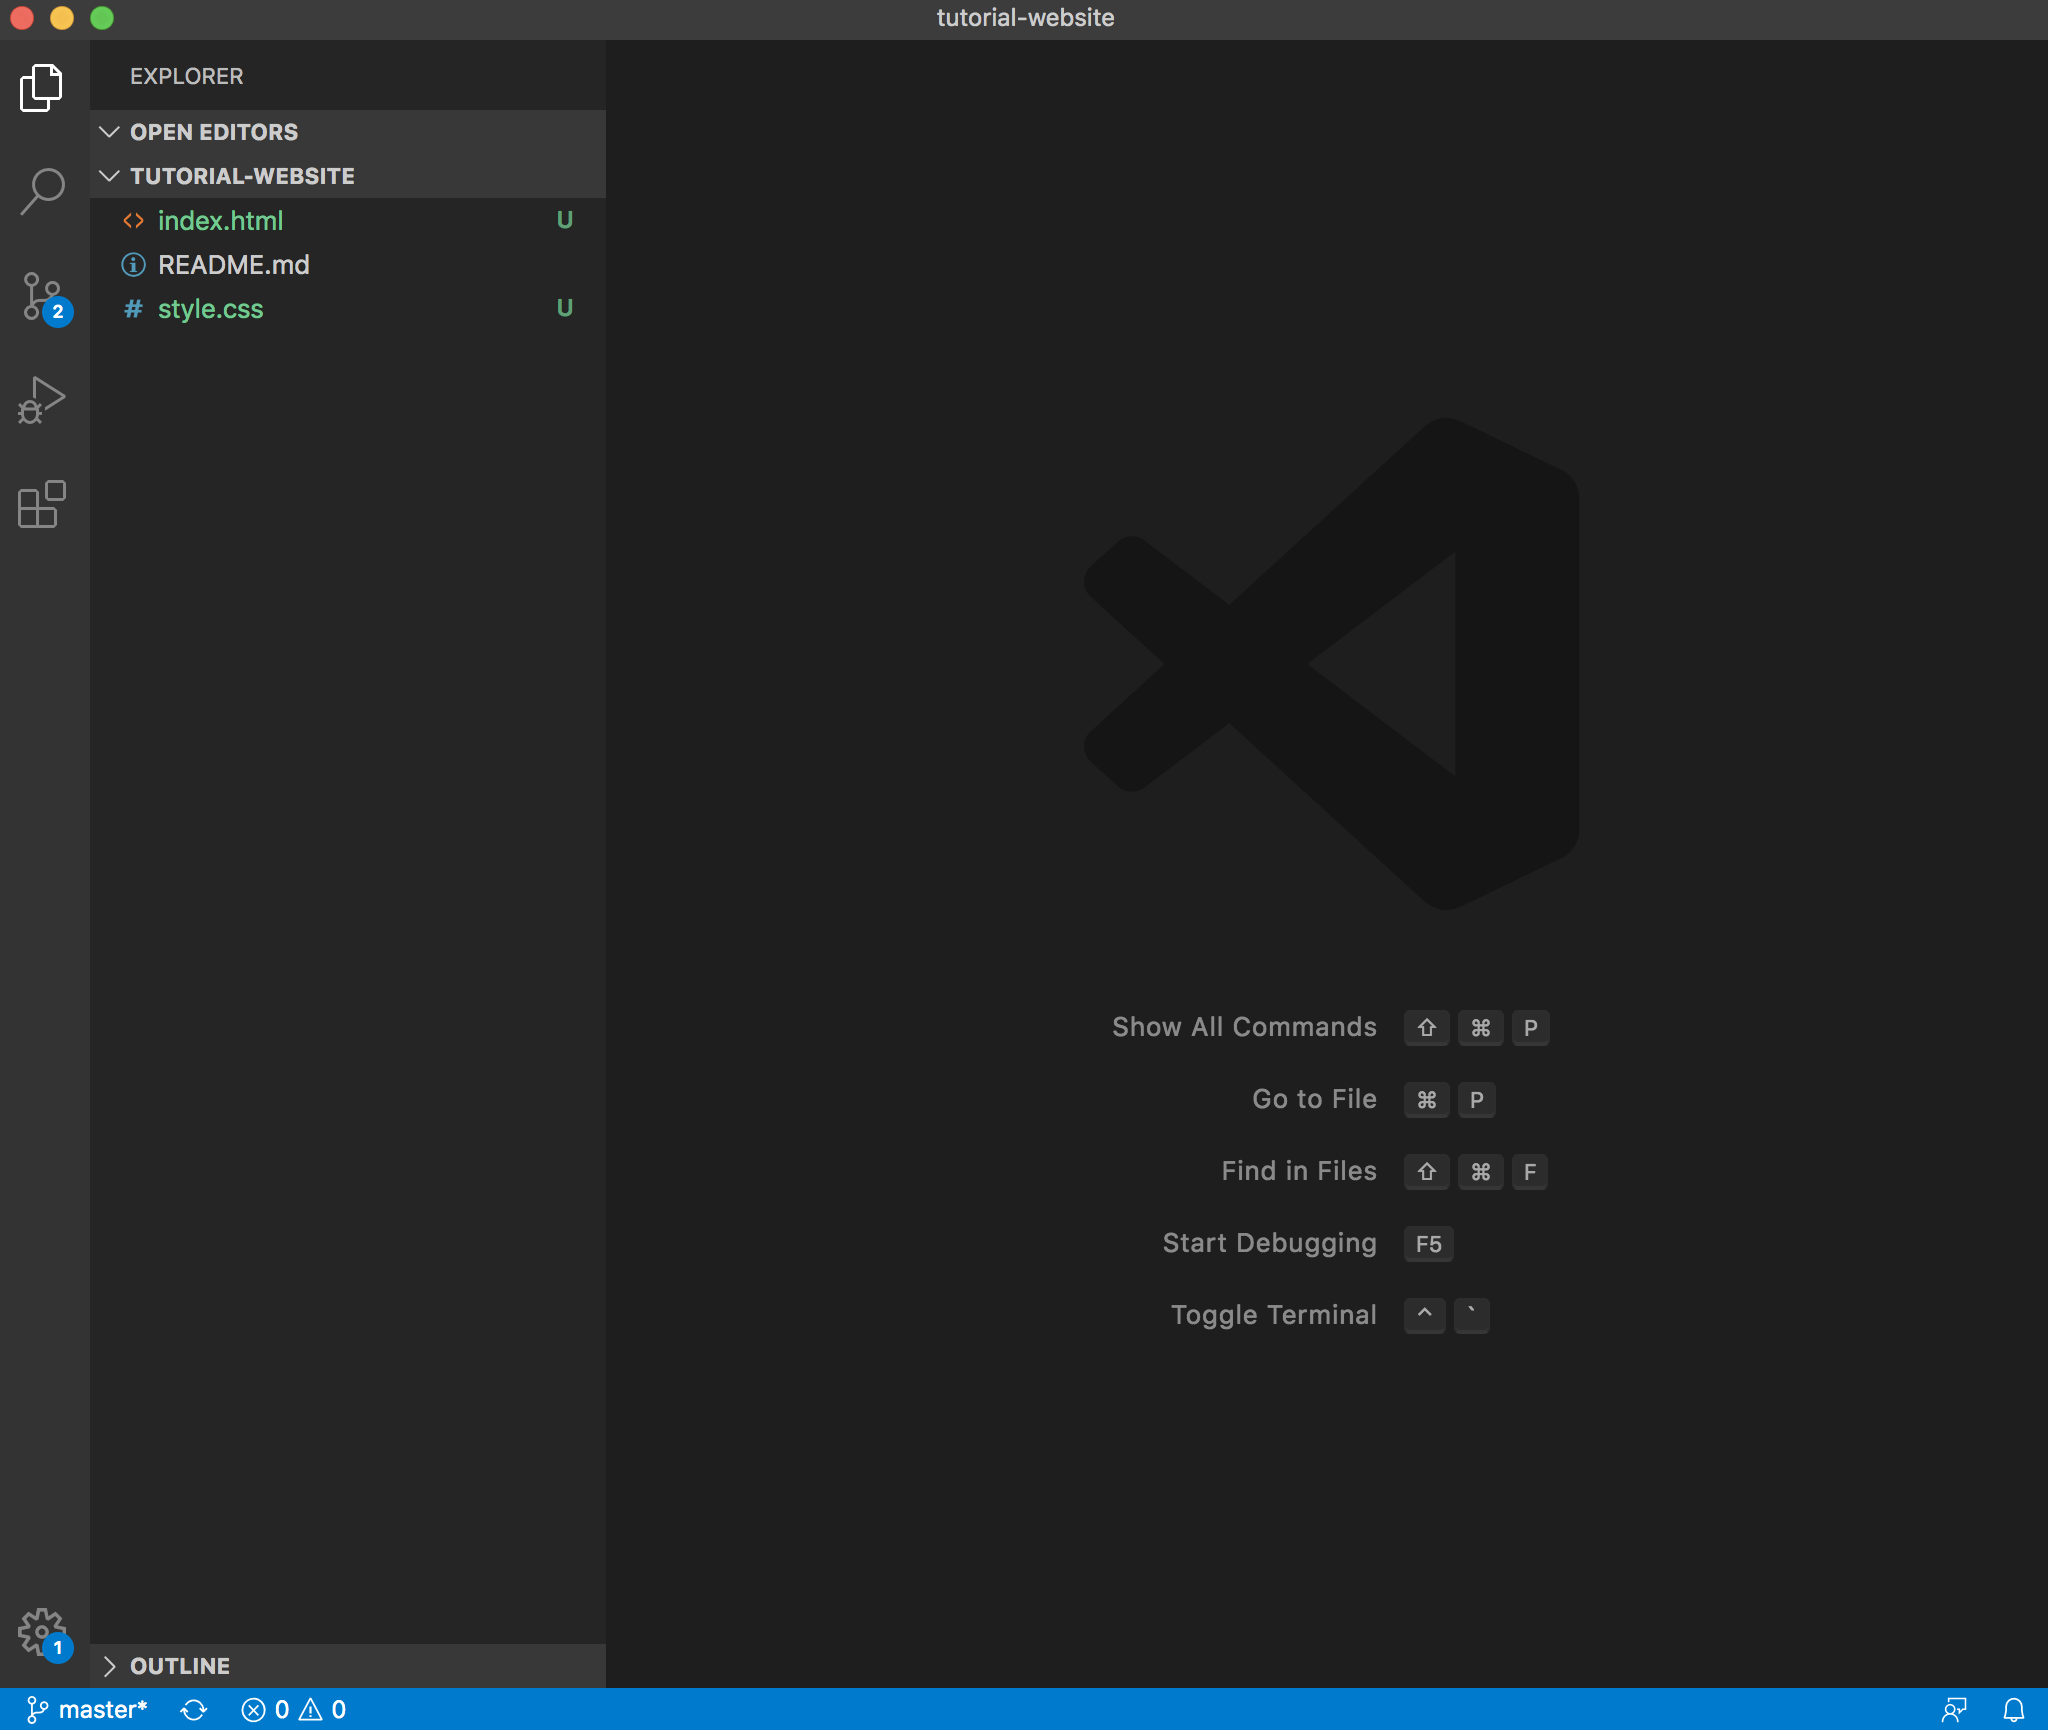
Our 2 new files have arrived in our project folder and they are highlighted green so that we know that they are new.
我們的2個新文件已到達項目文件夾,并以綠色突出顯示,因此我們知道它們是新文件。
第5步:編寫一些代碼! (Step 5: Write some code!)
- let’s open our index.html file and write some code 讓我們打開index.html文件并編寫一些代碼
<!DOCTYPE html>
<html>
<head>
  <title>Tutorial Website</title>
</head>
<body></body>
</html>- This boilerplate code is the structure of our Html file. In the <head> tag, we have our meta-data, which is simply information about our website. 此樣板代碼是我們HTML文件的結構。 在<head>標記中,我們有我們的元數據,這只是有關我們網站的信息。
- In the <body> tag is where we will write our code to bring our website together 在<body>標記中,我們將編寫代碼以將我們的網站整合在一起
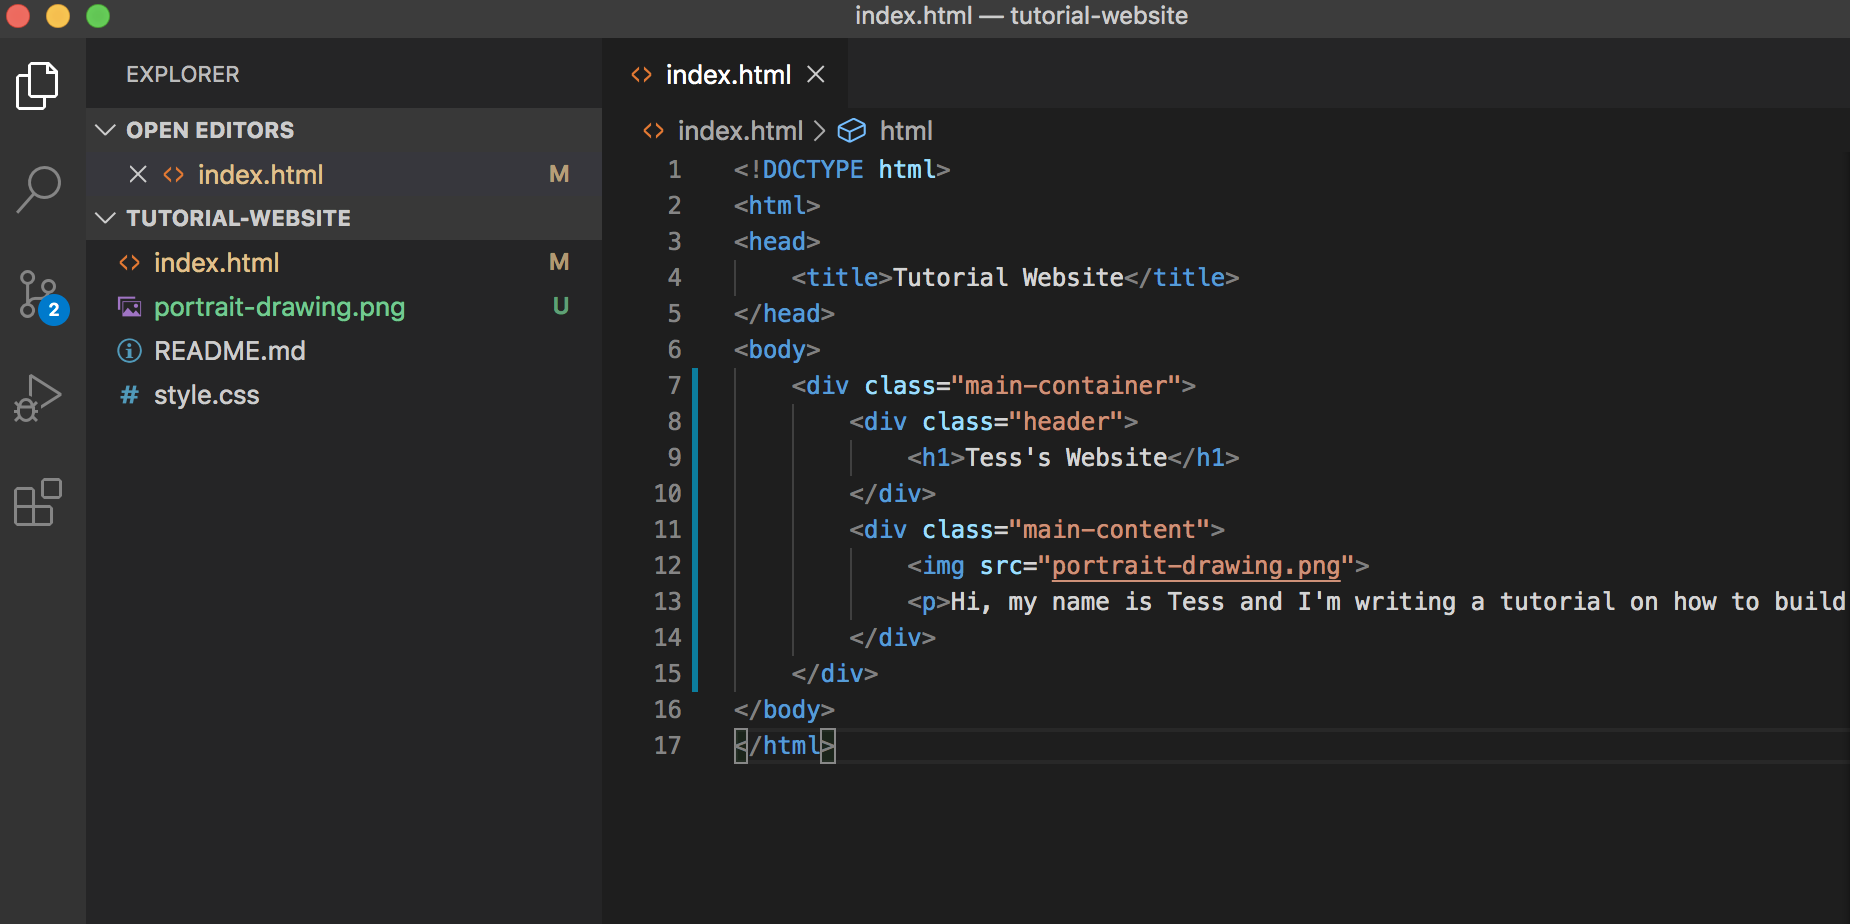
Let’s put some content in the <body> tag.
讓我們在<body>標簽中添加一些內容。
You can copy and paste the code below of course but I’ve found that the best way to learn how to code when you’re just getting started, is to type everything out!
您當然可以復制和粘貼下面的代碼,但是我發現,剛入門時學習編碼的最佳方法是鍵入所有內容!
<!DOCTYPE html>
<html>
<head>
<title>Tutorial Website</title>
</head>
<body>
<div class="main-container">
<div class="header">
<h1>Tess's Website</h1>
</div>
<div class="main-content">
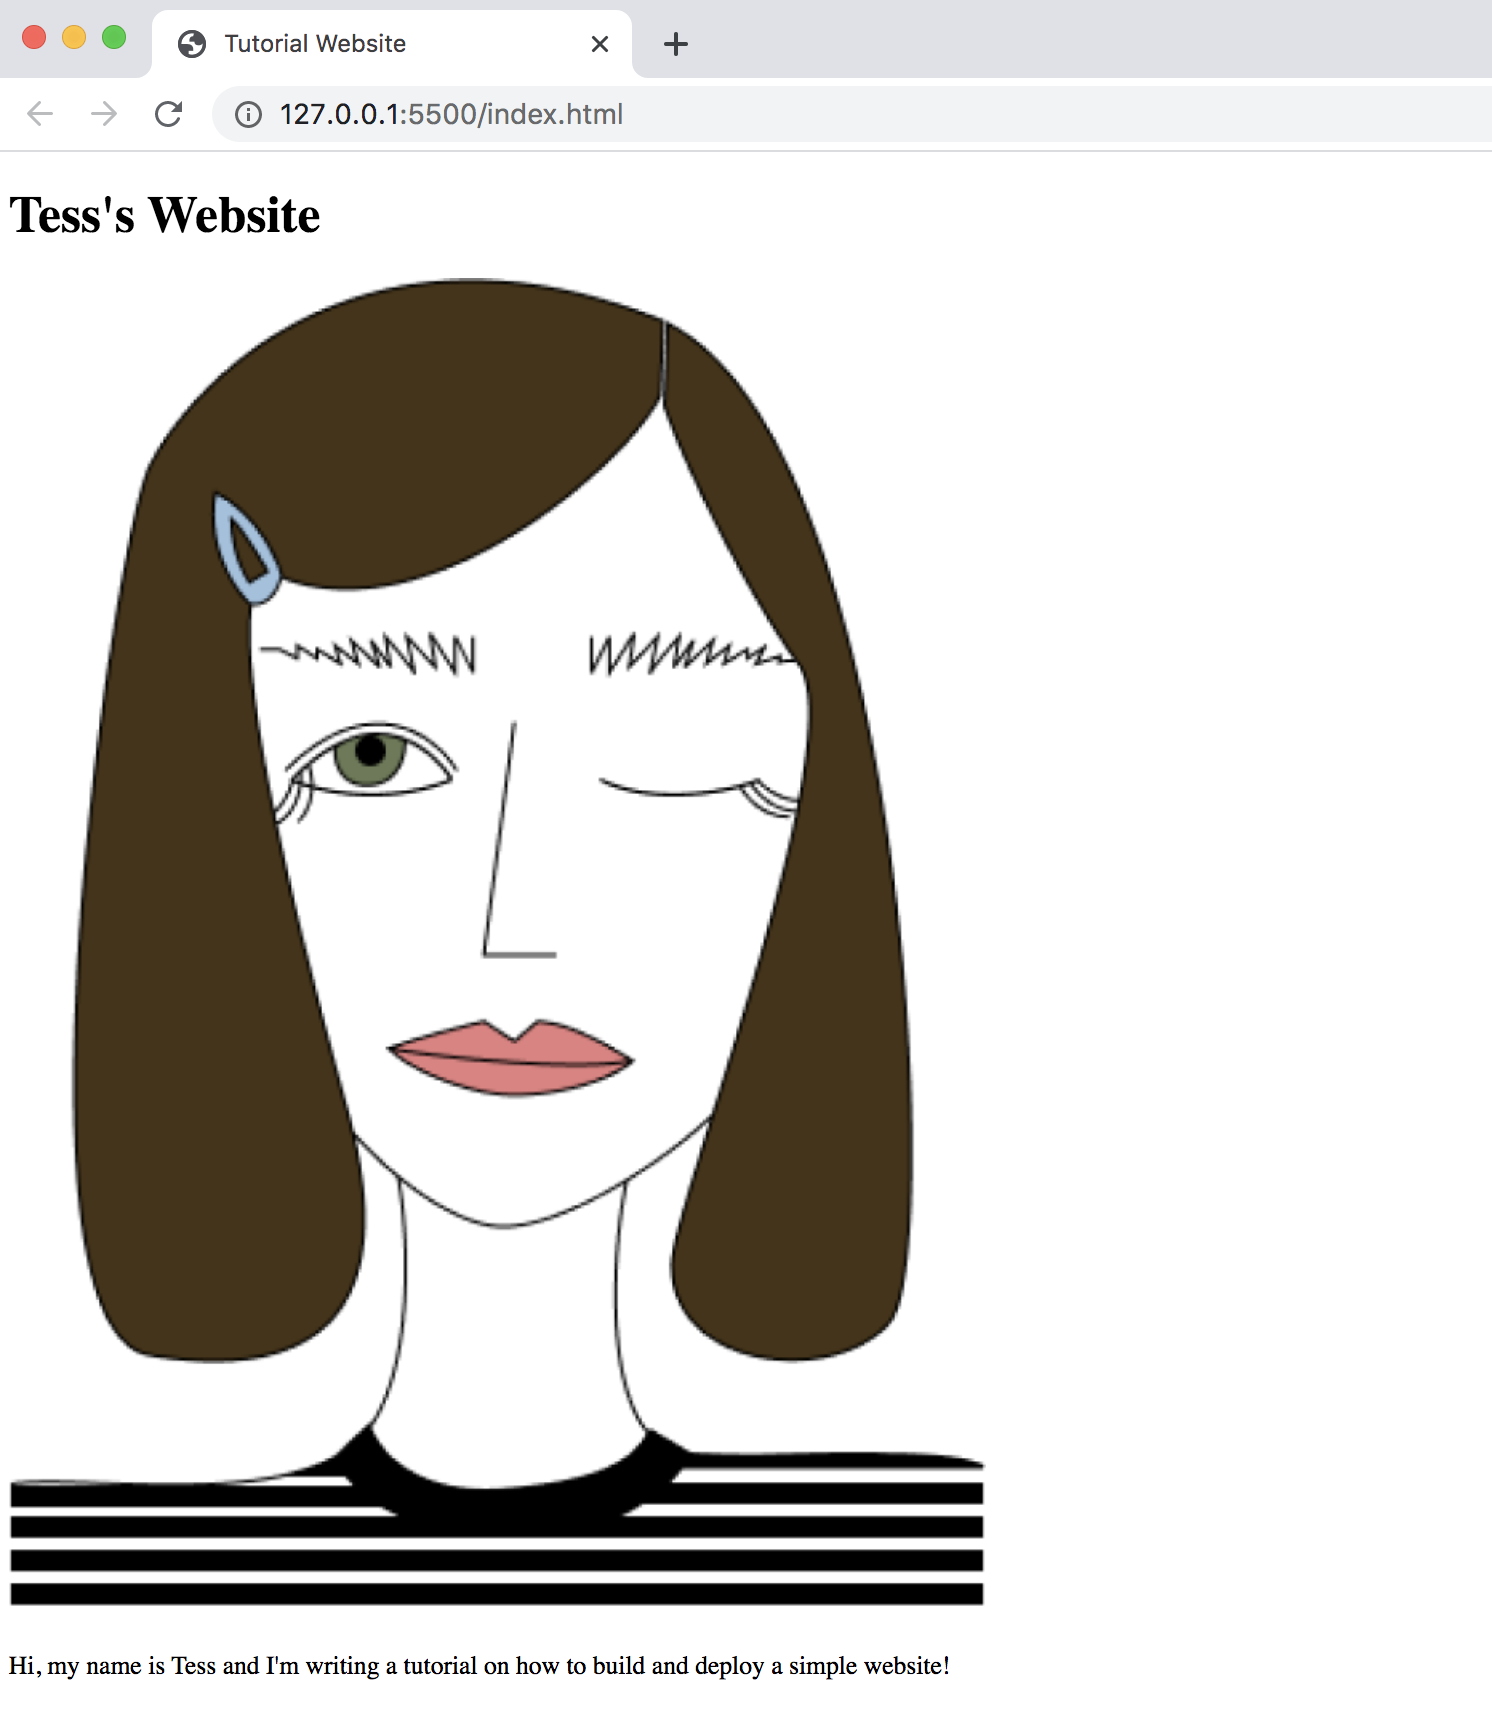
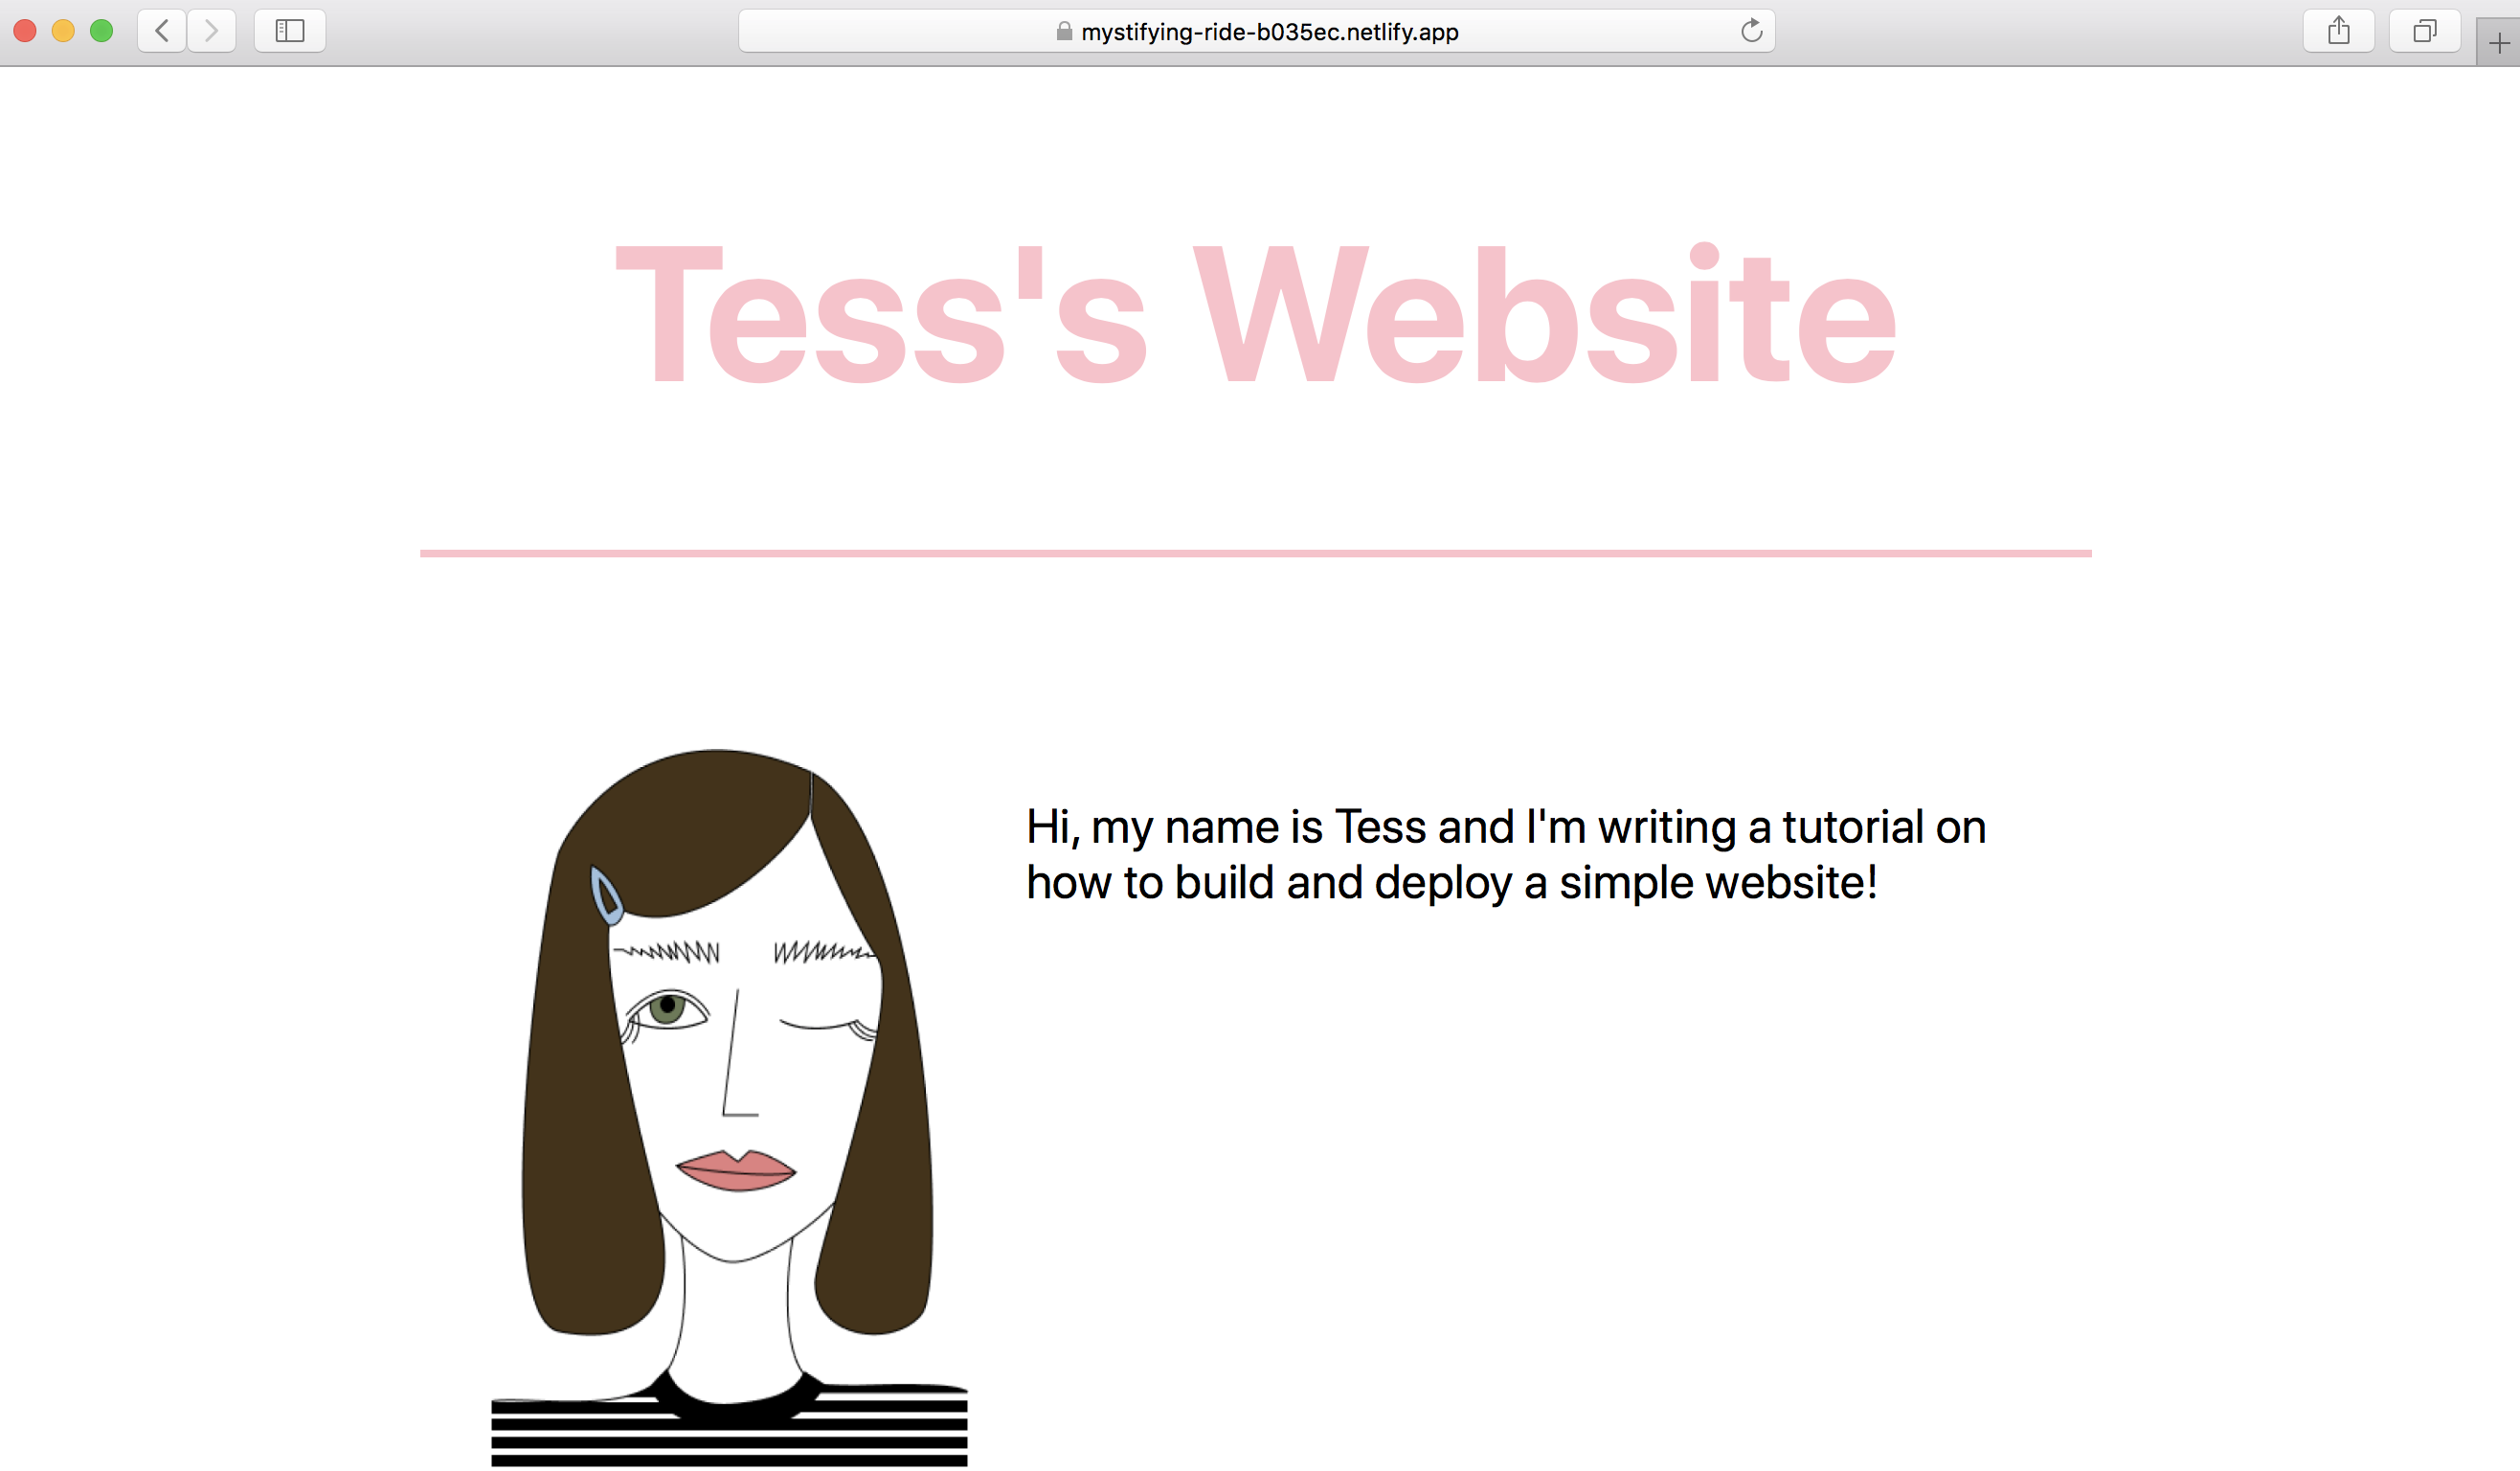
<img src="portrait-drawing.png"
<p>Hi, my name is Tess and I'm writing a tutorial on how to build and deploy a simple website!</p>
</div>
</div></body>
</html>I’ve decided to put an image on my website. Make sure to add your image to the project folder and put the file name in the <img> tag.
我決定在我的網站上放一張圖片。 確保將圖像添加到項目文件夾,并將文件名放在<img>標記中。
This is how everything should look at this point:
這是此時一切的樣子:
How can we tell if it’s working? Simply open your index.html file with your browser.
我們如何知道它是否有效? 只需使用瀏覽器打開index.html文件。
This is how it’s looking so far:
到目前為止是這樣的:
步驟6:添加CSS樣式 (Step 6: Adding CSS styling)
Let’s make it look good! Html is the structure of our page, but CSS is where the magic happens to make it look just how we want it.
讓我們看起來不錯! HTML是頁面的結構,而CSS恰恰是神奇的地方,它使它看起來像我們想要的樣子。
- Open the style.css file 打開style.css文件
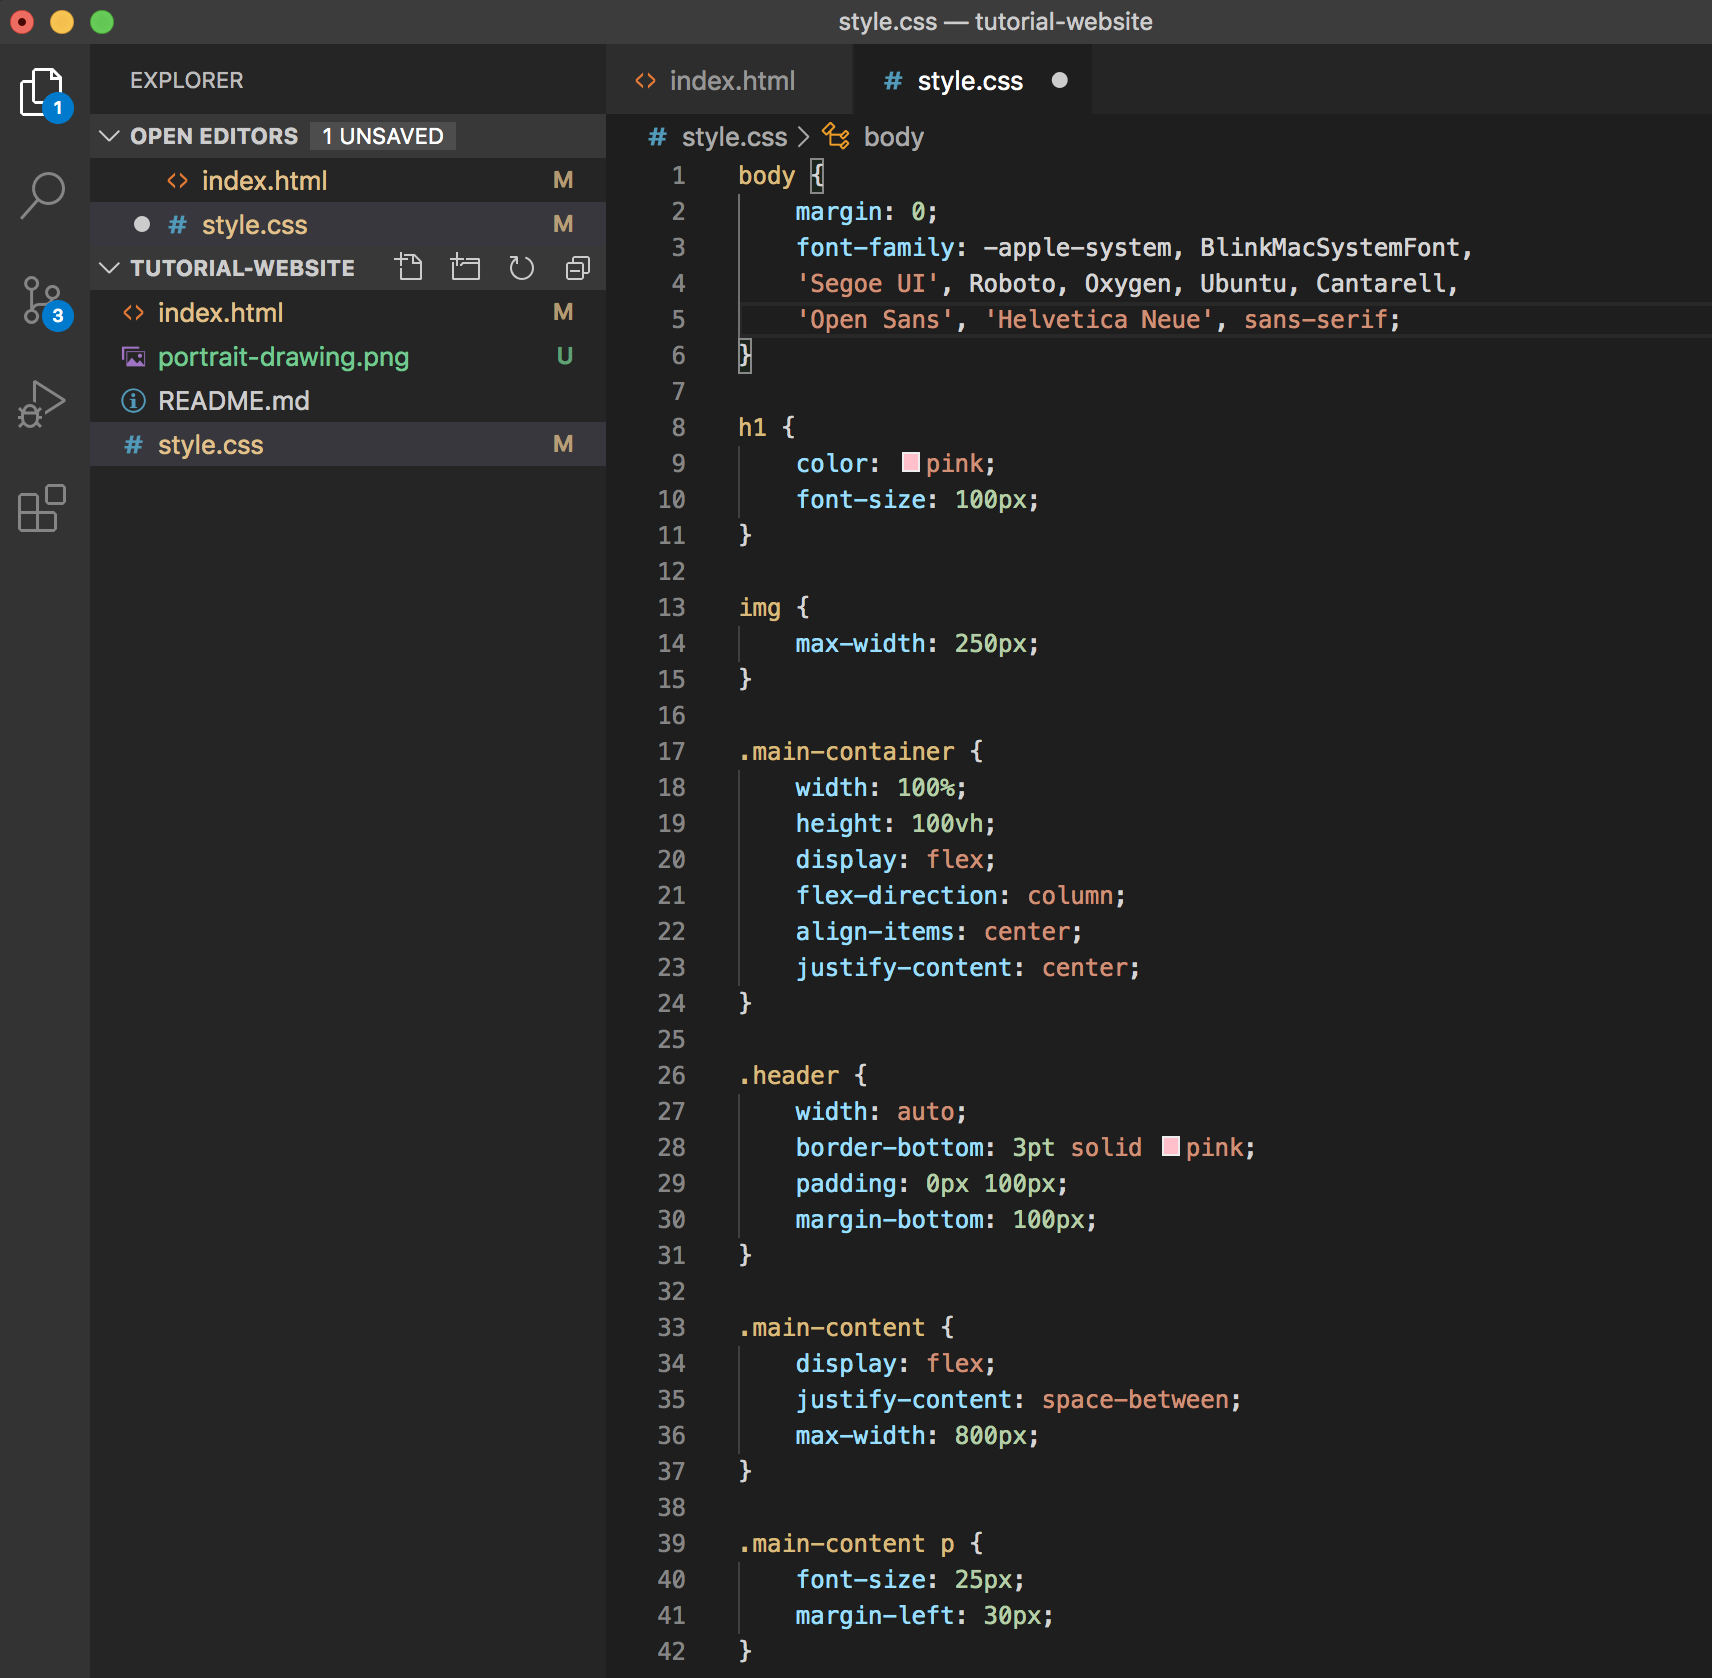
Let’s write some code
讓我們寫一些代碼
body {
  margin: 0;
  font-family: -apple-system, BlinkMacSystemFont,
  'Segoe UI', Roboto, Oxygen, Ubuntu, Cantarell,
  'Open Sans', 'Helvetica Neue', sans-serif;
}h1 {
  color: pink;
  font-size: 100px;
}img {
  max-width: 250px;
}.main-container {
  width: 100%;
  height: 100vh;
  display: flex;
  flex-direction: column;
  align-items: center;
  justify-content: center;
}.header {
  width: auto;
  border-bottom: 3pt solid pink;
  padding: 0px 100px;
  margin-bottom: 100px;
}.main-content {
  display: flex;
  justify-content: space-between;
  max-width: 800px;
}.main-content p {
  font-size: 25px;
  margin-left: 30px;
}
This is how our CSS file should look now:
這就是我們CSS文件現在的外觀:
Now we need to make sure our CSS file is referenced in our Html file so that our website knows to read the styles we have defined in our CSS file.
現在我們需要確保我們HTML文件中引用了我們CSS文件,以便我們的網站知道讀取我們在CSS文件中定義的樣式。
In our Html file, let’s add some code to our <head> tag.
在我們HTML文件中,讓我們向<head>標簽添加一些代碼。
<!DOCTYPE html>
<html>
<head>
  <title>Tutorial Website</title>
  <link rel="stylesheet" type="text/css" href="style.css">
</head>
<body>
  <div class="main-container">
    <div class="header">
      <h1>Tess's Website</h1>
    </div>
    <div class="main-content">
      <img src="portrait-drawing.png"
      <p>Hi, my name is Tess and I'm writing a tutorial on how to build and deploy a simple website!</p>
    </div>
</div></body>
</html>
Let’s go ahead and check how everything is looking now in our browser!
讓我們繼續前進,檢查瀏覽器中現在的一切情況!

A bit of an improvement!
有點改善!
Step 7: Commit the code to GitHub
步驟7:將代碼提交到GitHub
As you work on your project, it’s important to commit your code to your GitHub repository to make sure that you never lose any of your work. The most common way to work is to commit your code every time you finish a feature.
在您處理項目時,將代碼提交到GitHub存儲庫以確保您不會丟失任何工作非常重要。 最常見的工作方式是在每次完成功能時提交代碼。
Let’s go back to our terminal and commit our code.
讓我們回到終端并提交我們的代碼。
$ git add .
$ git commit -m "write a message here that describes the change you've made to your project files"
$ git push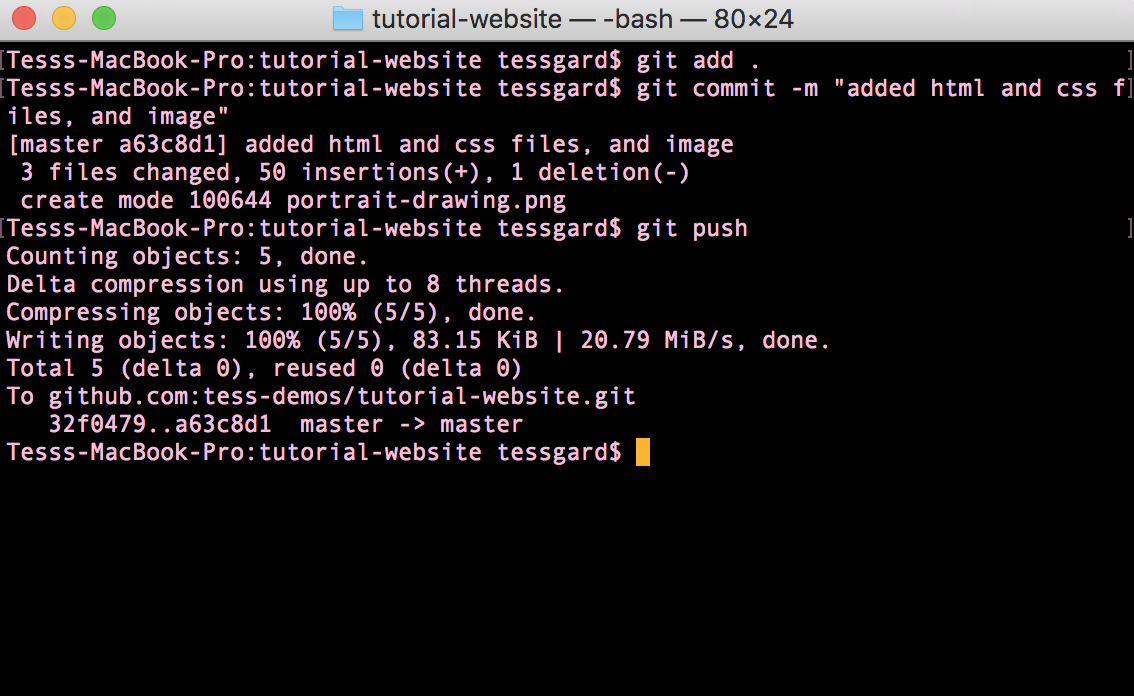
Now we can go to our GitHub repository and our files will be there.
現在,我們可以轉到我們的GitHub存儲庫,我們的文件將在那里。
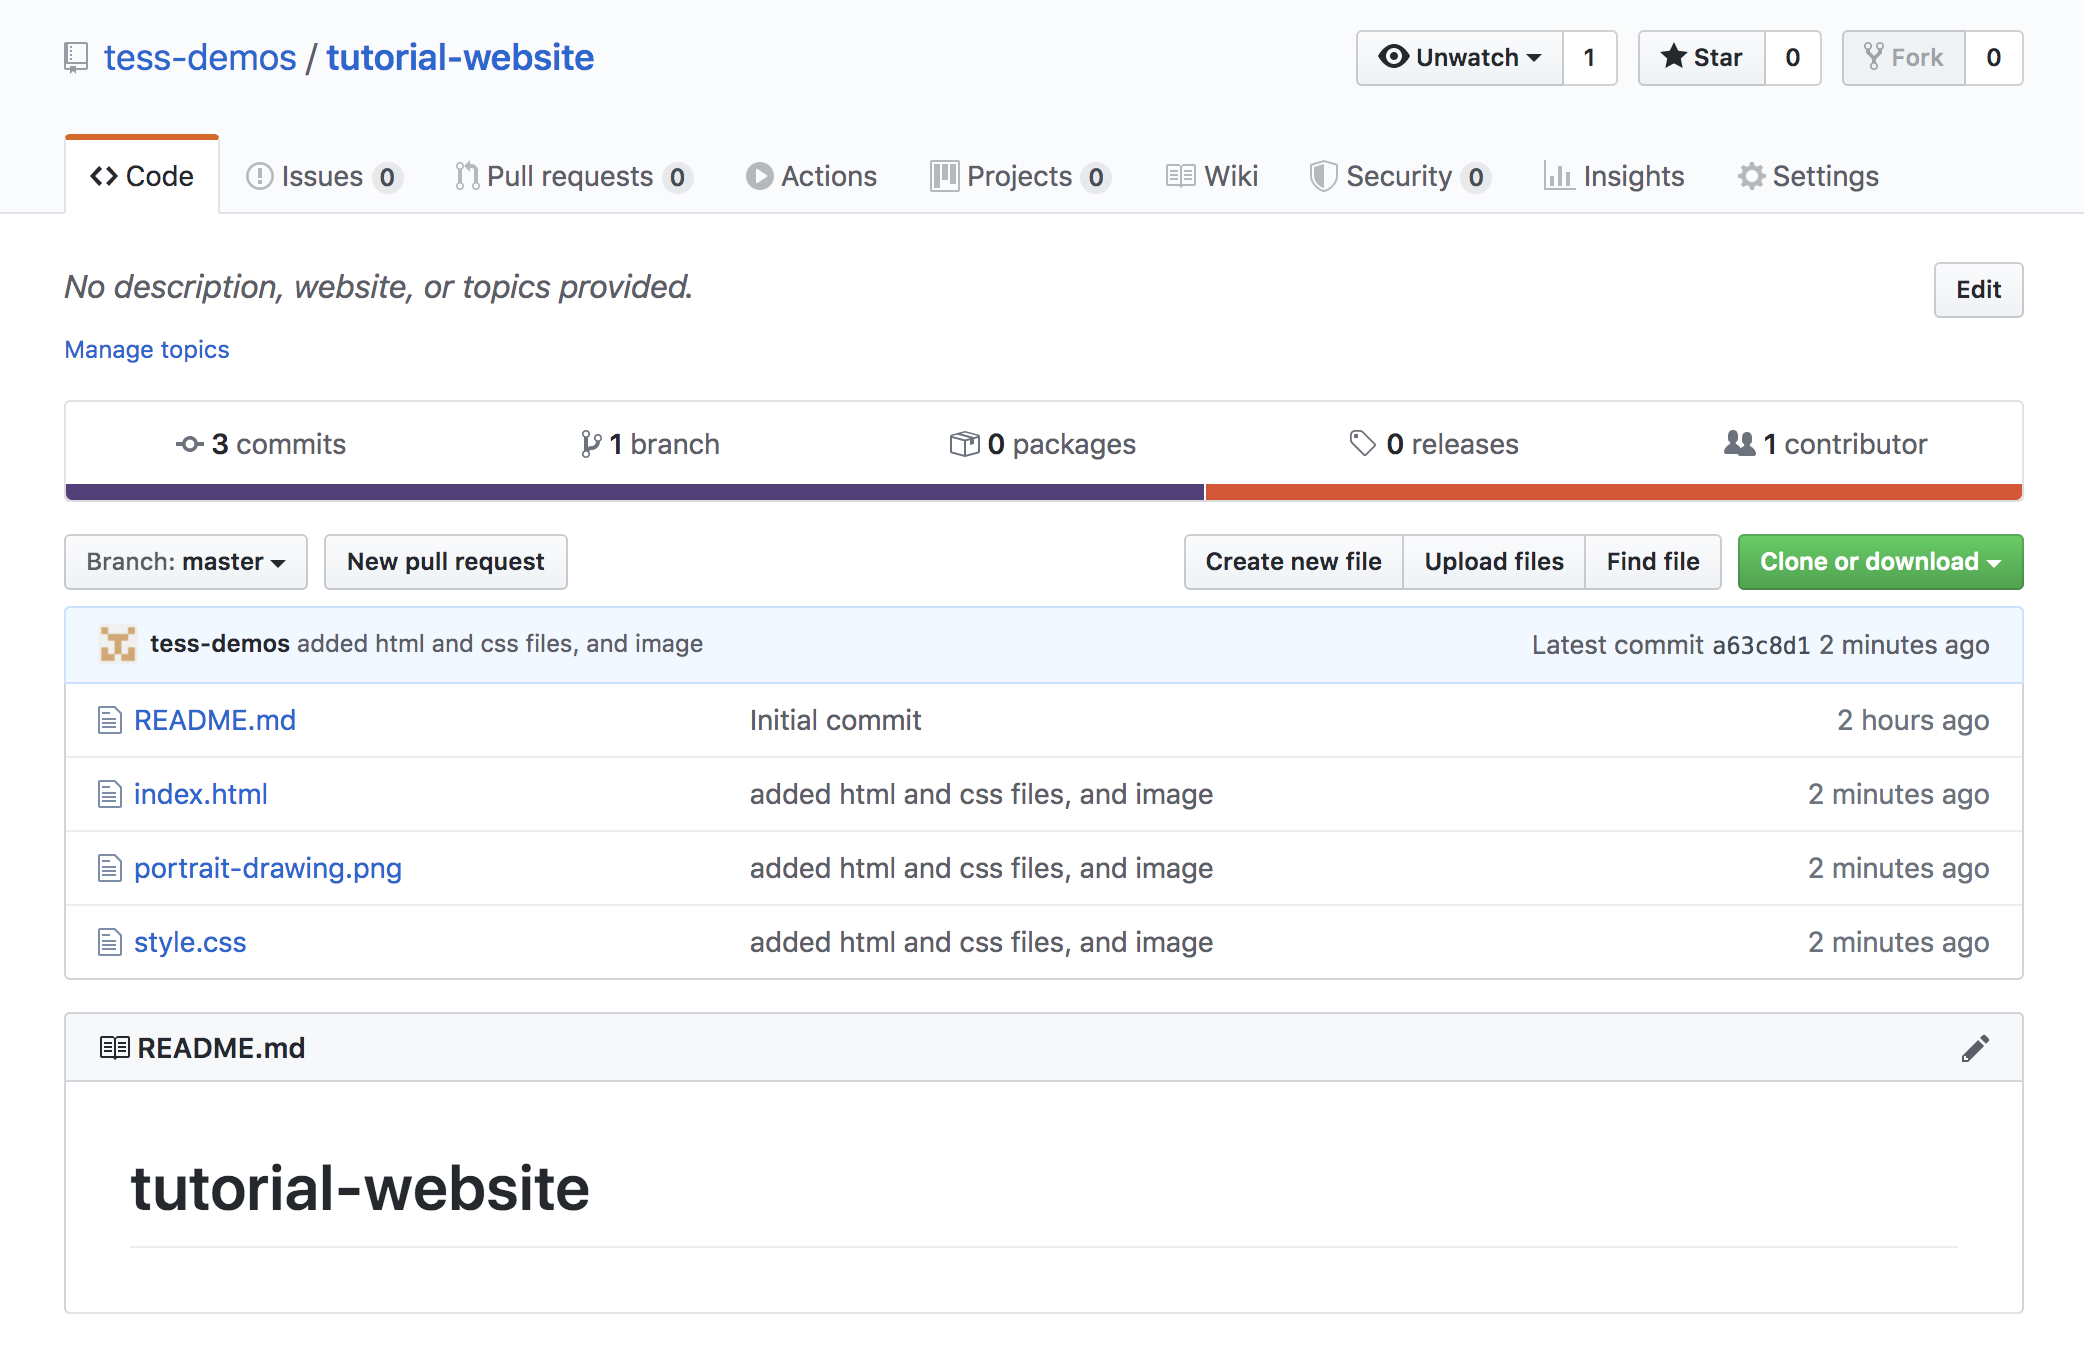
We can see our new files, and we can see the commit message which should include information about the changes we are committing to our project.
我們可以看到我們的新文件,也可以看到提交消息,其中應該包含有關我們提交給項目的更改的信息。
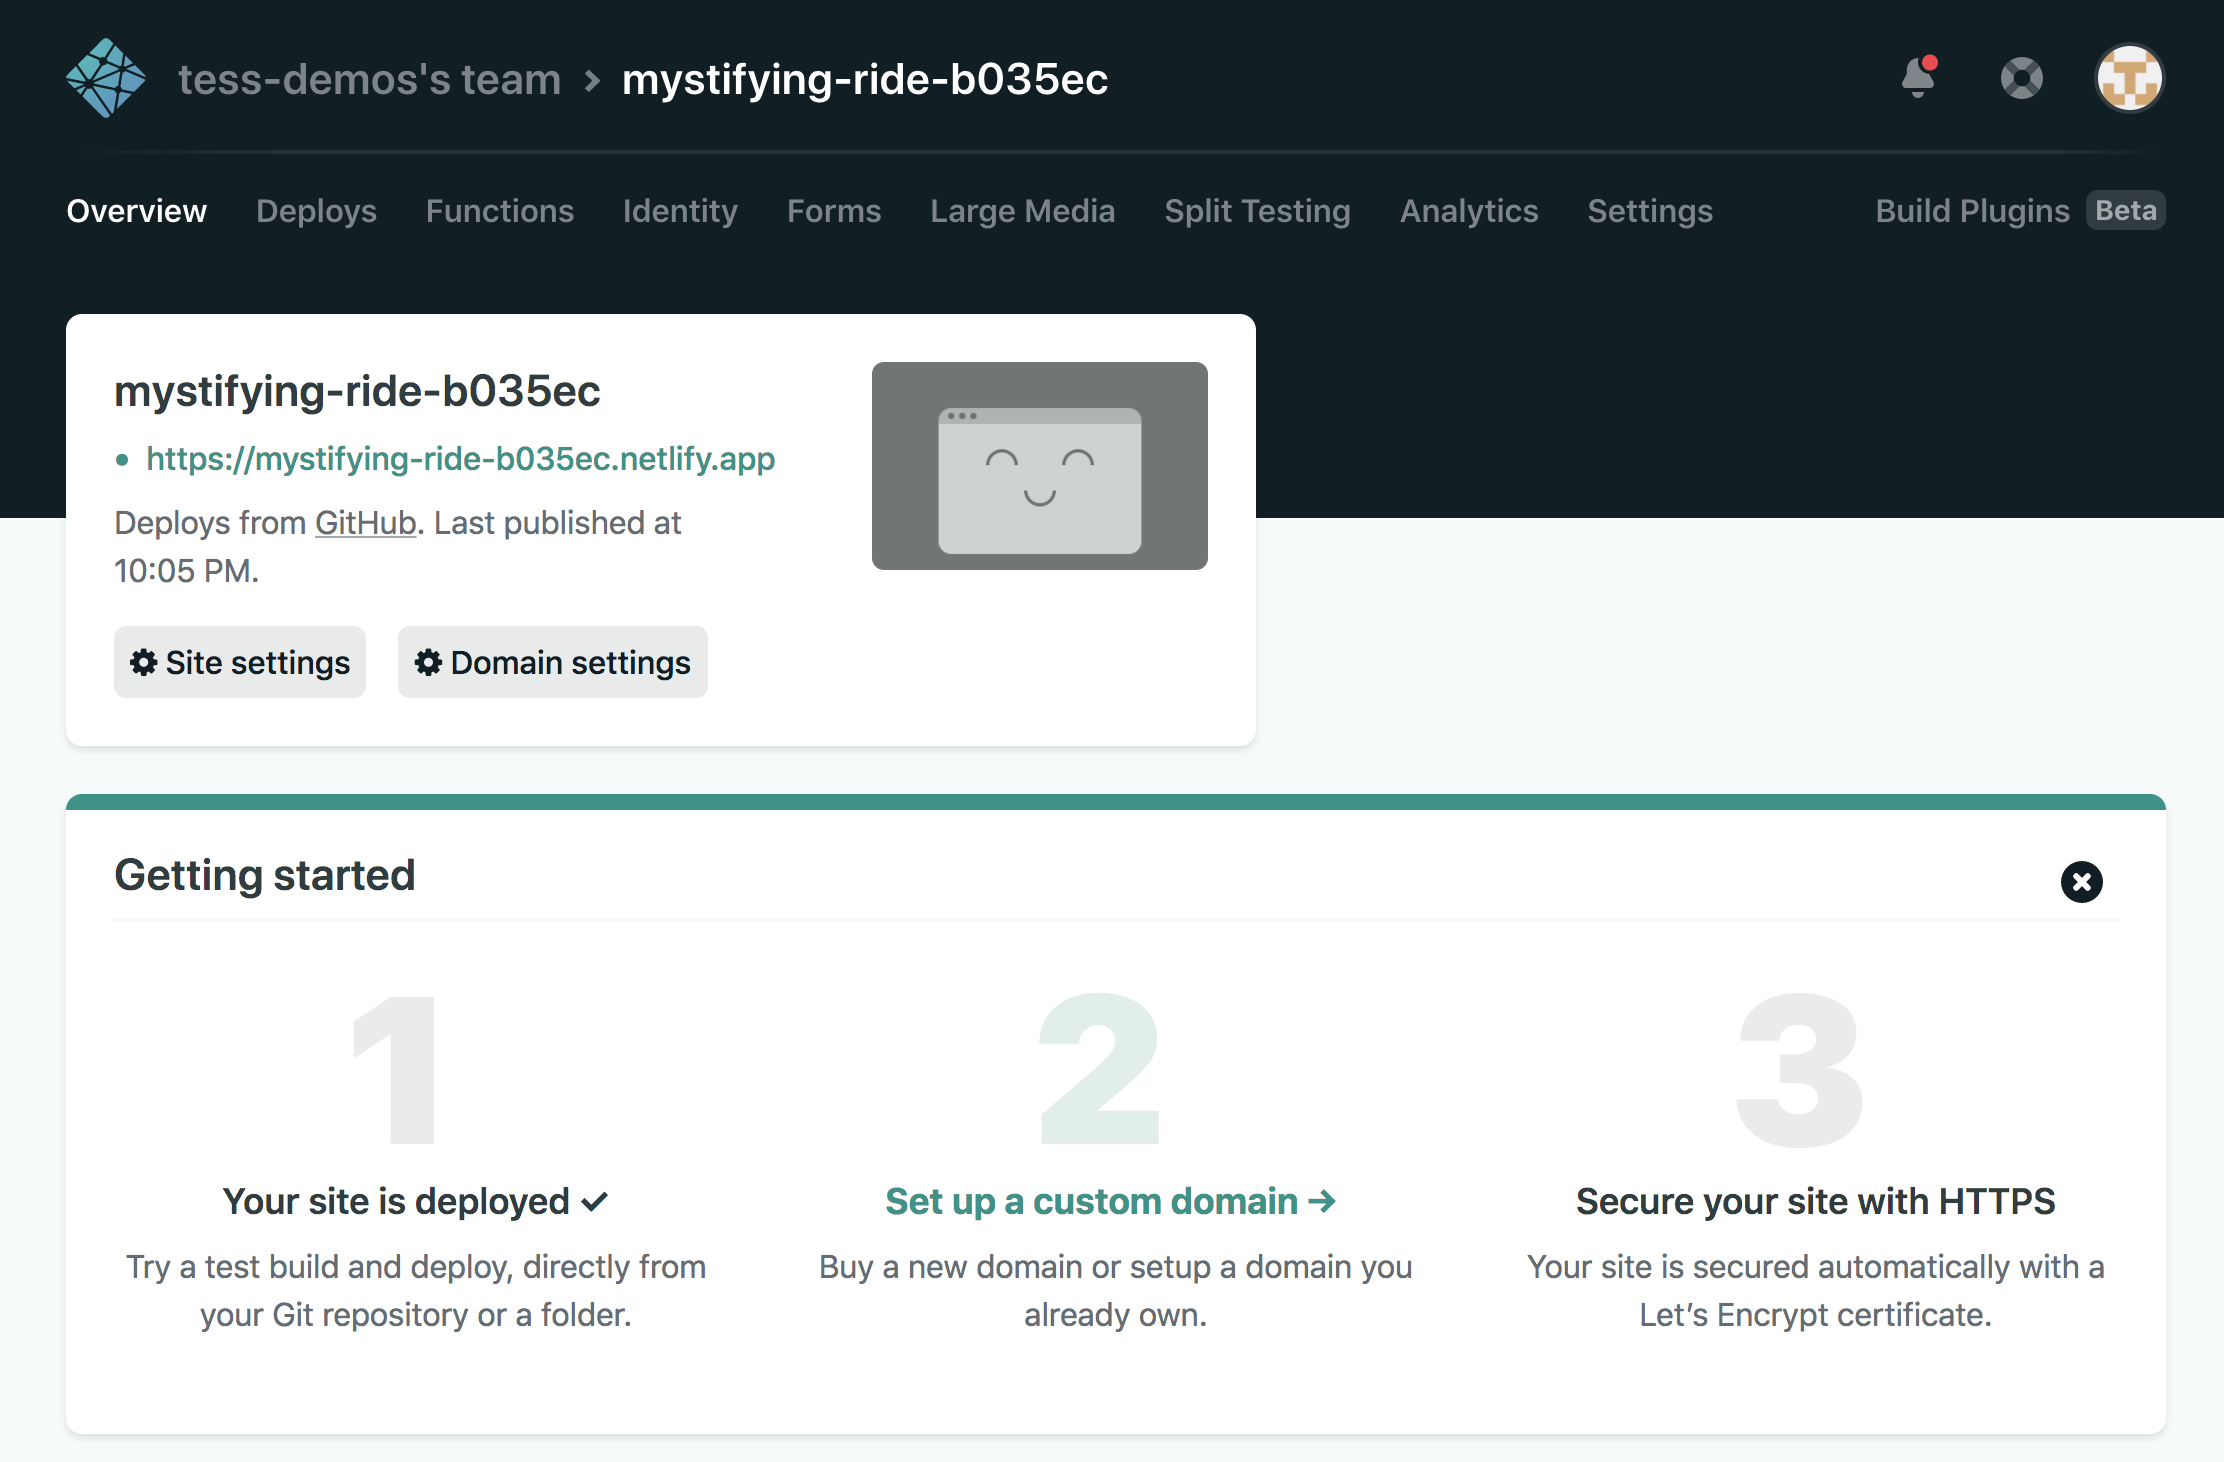
第8步:直播! 讓我們部署我們的網站 (Step 8: Make it live! Let’s deploy our website)
Sign up for a Netlify account here
在此處注冊Netlify帳戶
- I used my GitHub login to sign-up, makes it easy and quick 我使用GitHub登錄名進行注冊,因此變得簡單快捷
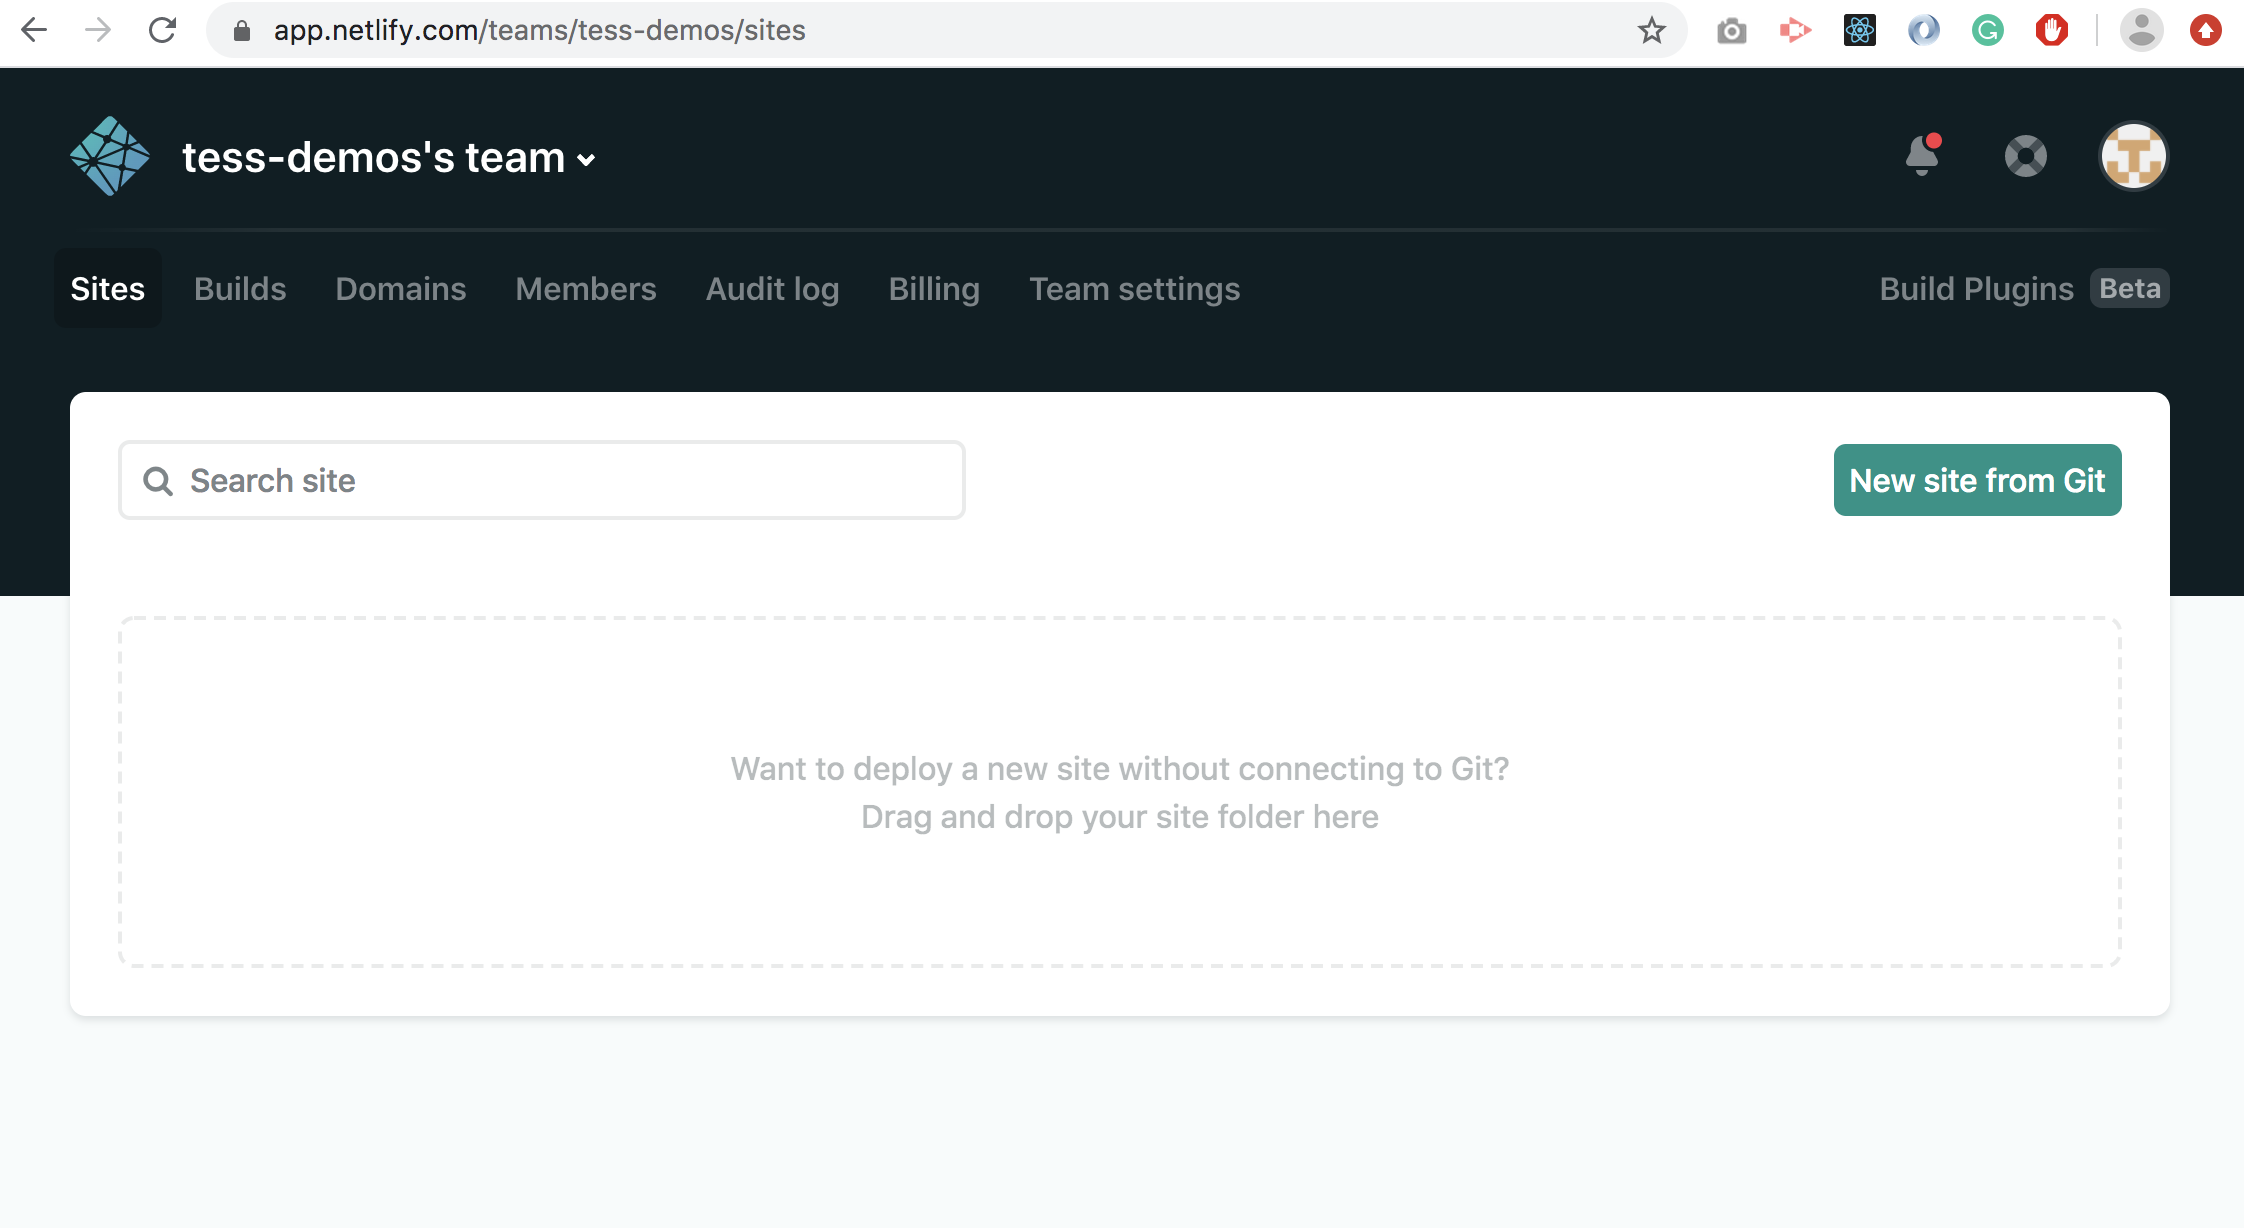
From the landing dashboard, click on “New site from Git”
在著陸儀表板中,單擊“來自Git的新站點”
Select GitHub for continuous deployment
選擇GitHub進行連續部署

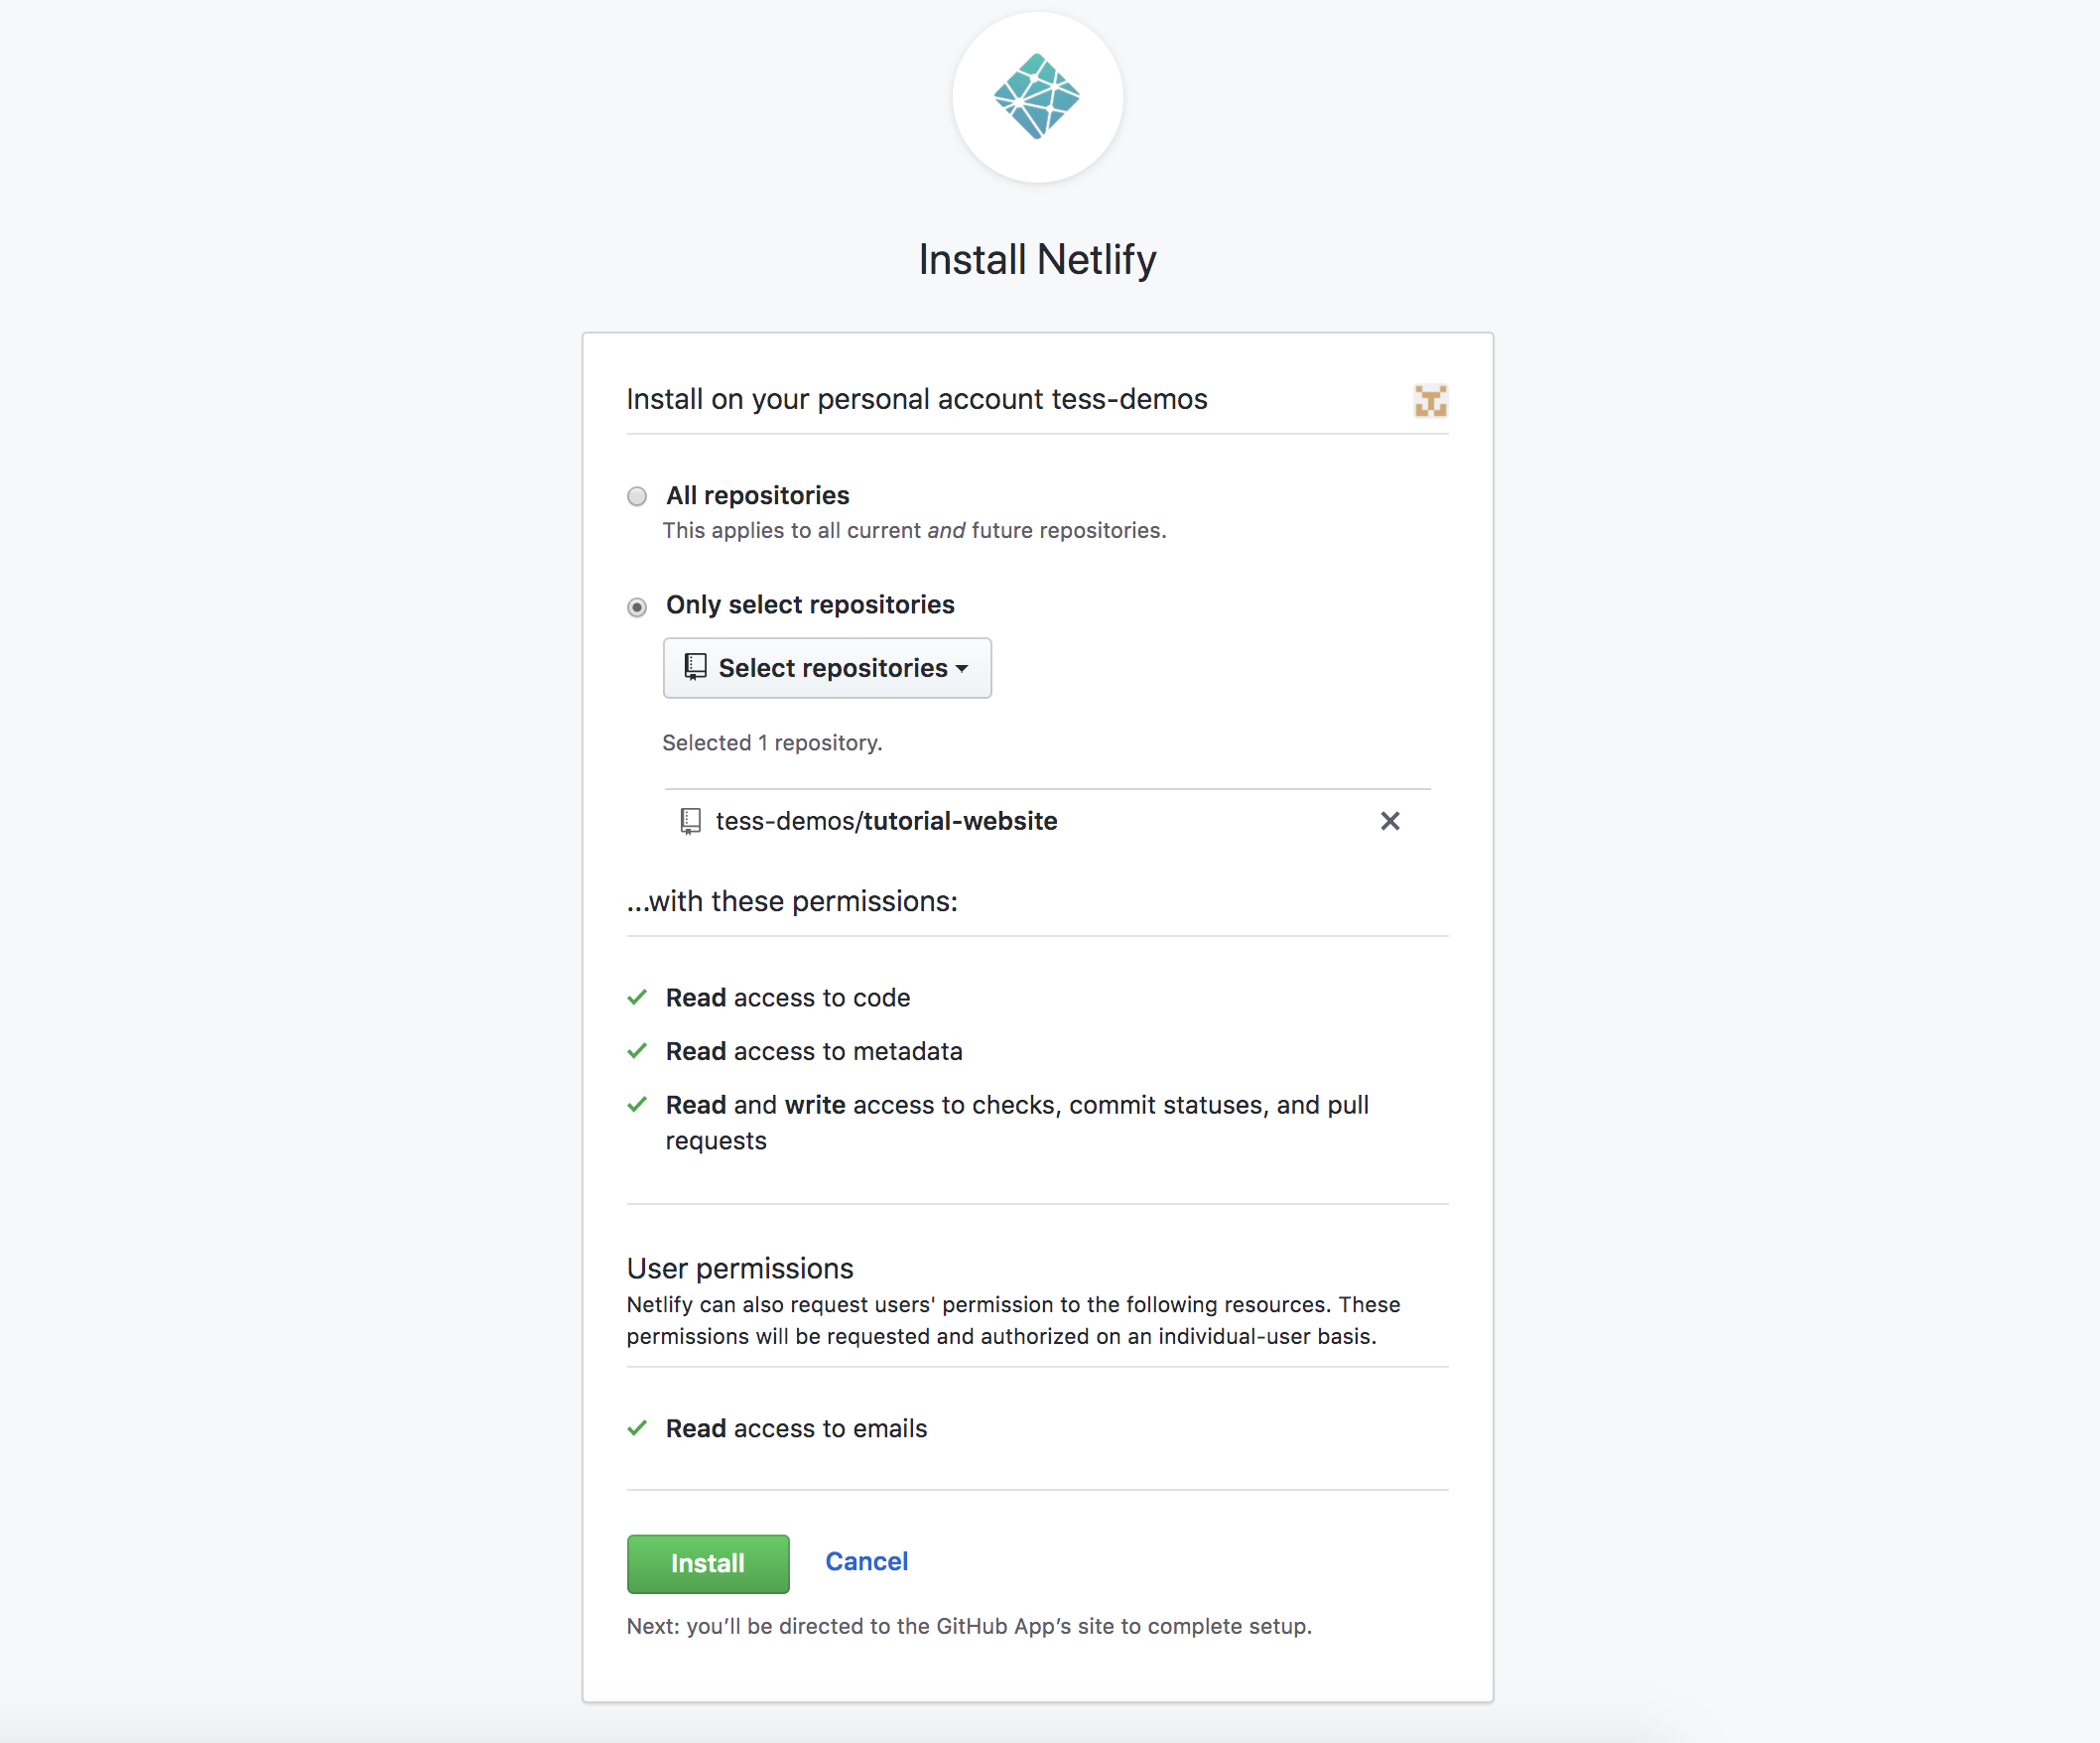
Chose whether you want to allow Netlify to access all your repositories, or select only specific repositories, and click “install”.
選擇是要允許Netlify訪問您的所有存儲庫,還是僅選擇特定的存儲庫,然后單擊“安裝”。
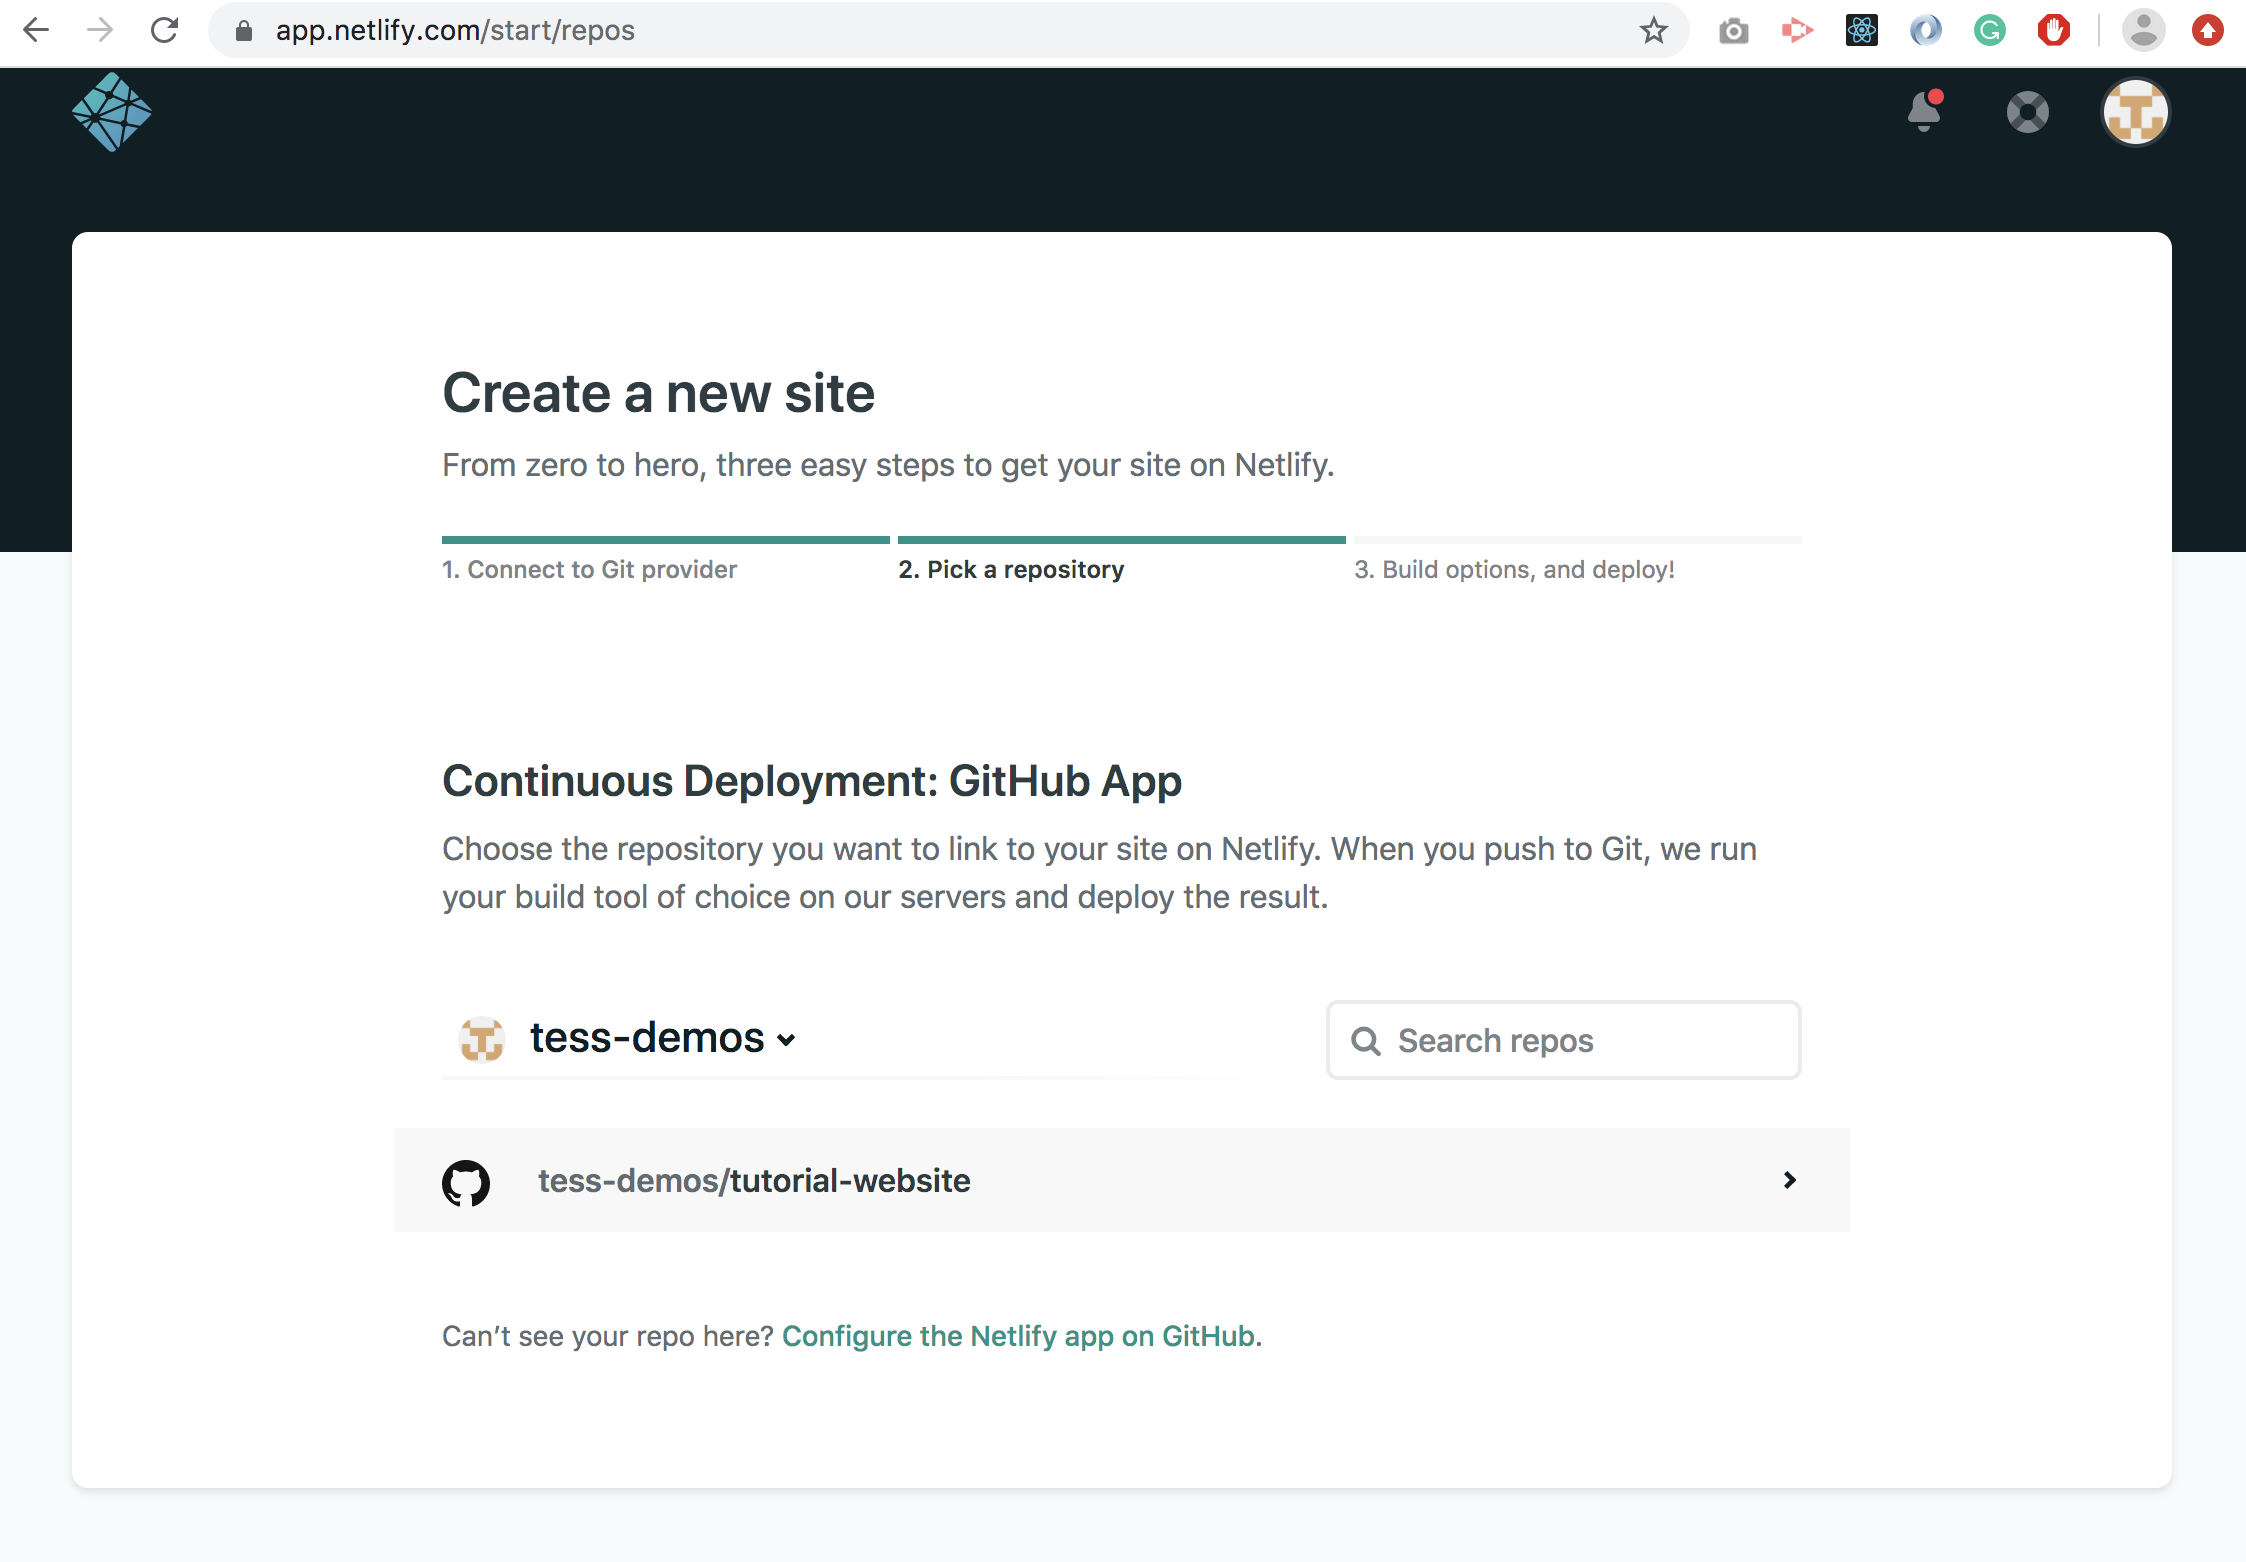
Go back to the Netlify dashboard and select your project repository:
返回到Netlify儀表板并選擇您的項目存儲庫:
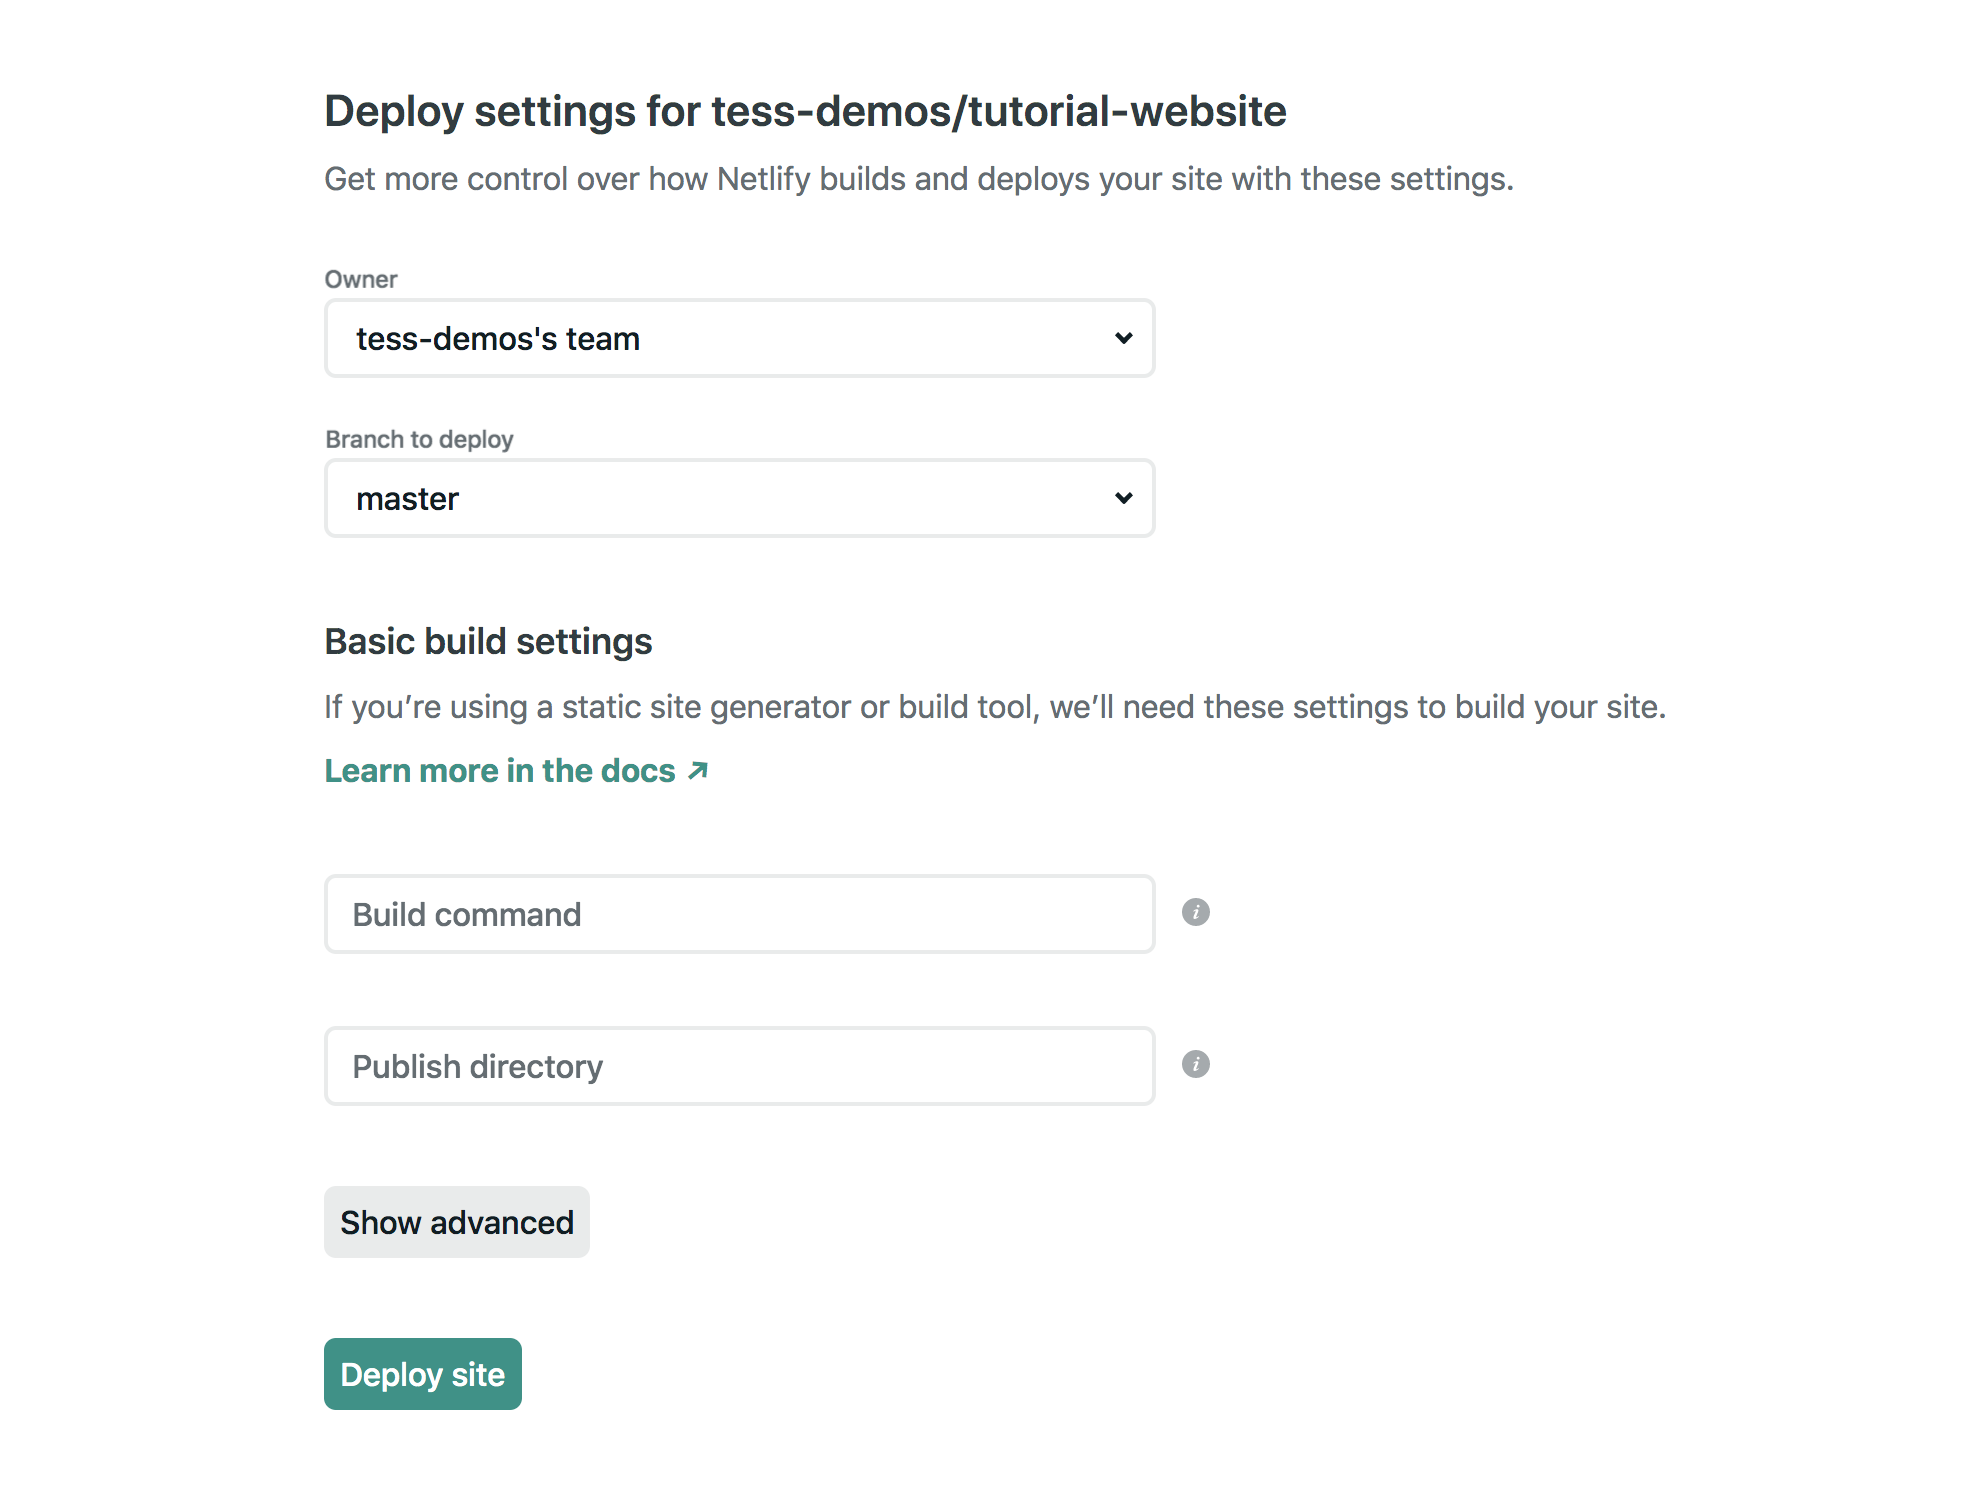
Double-check the details, and click “Deploy site”
仔細檢查詳細信息,然后單擊“部署站點”
We are live baby!
我們是活著的寶貝!
Your URL will consist of a strange generated Netlify domain. Here is the final product: https://mystifying-ride-b035ec.netlify.app/
您的URL將包含一個奇怪的生成的Netlify域。 這是最終產品: https : //mystifying-ride-b035ec.netlify.app/
You can also buy a domain name and set up your site to point to your custom domain name by following Netlify’s easy instructions here.
你也可以買一個域名,并通過以下Netlify的簡易說明你的網站點設置到您的自定義域名在這里 。
Here is the final product:
這是最終產品:
I hope you enjoyed following this tutorial. The fun part now is to play around with the code and make it your own!
希望您喜歡本教程。 現在最有趣的部分是使用代碼并自己編寫代碼!
Thanks for following along, I hope it was useful!
感謝您的關注,希望它對您有所幫助!
翻譯自: https://uxdesign.cc/how-to-code-a-simple-website-and-host-it-for-free-d3bf8b1bab37
c++編寫托管dll
本文來自互聯網用戶投稿,該文觀點僅代表作者本人,不代表本站立場。本站僅提供信息存儲空間服務,不擁有所有權,不承擔相關法律責任。 如若轉載,請注明出處:http://www.pswp.cn/news/274129.shtml 繁體地址,請注明出處:http://hk.pswp.cn/news/274129.shtml 英文地址,請注明出處:http://en.pswp.cn/news/274129.shtml
如若內容造成侵權/違法違規/事實不符,請聯系多彩編程網進行投訴反饋email:809451989@qq.com,一經查實,立即刪除!相關文章

淺述WinForm多線程編程與Control.Invoke的應用
)
Android 第五課 常用控件的使用方法(TextView、Button、EditView、 ImageView、 ProgressBar、 ProgressDialog等)

設計 色彩 構圖 創意_我們可以從時尚的創意方向中學到色彩

Android 第六課 4種基本布局之LinearLayout和Relativelayout

如何在UI設計中制作完美陰影

微軟2013年校園實習生招聘筆試題及答案

Android 第七課 4種基本布局之FrameLayout和百分比布局

mongodb 群集圖_群集和重疊條形圖

第一次寫python

Android 第八課 創建自定義控件

figma下載_搬到Figma對我意味著什么

解決IE中img.onload失效的方法

Android 第九課 常用控件-------ListView
)
Singleton patterns 單件(創建型模式)

Android 第十一課 SQlite 數據庫存儲

淺析SQL Server 2005中的主動式通知機制
)
Android 第十二課 使用LitePal操作數據庫(記得閱讀最后面的注意事項哦)

listview頻繁刷新報錯

