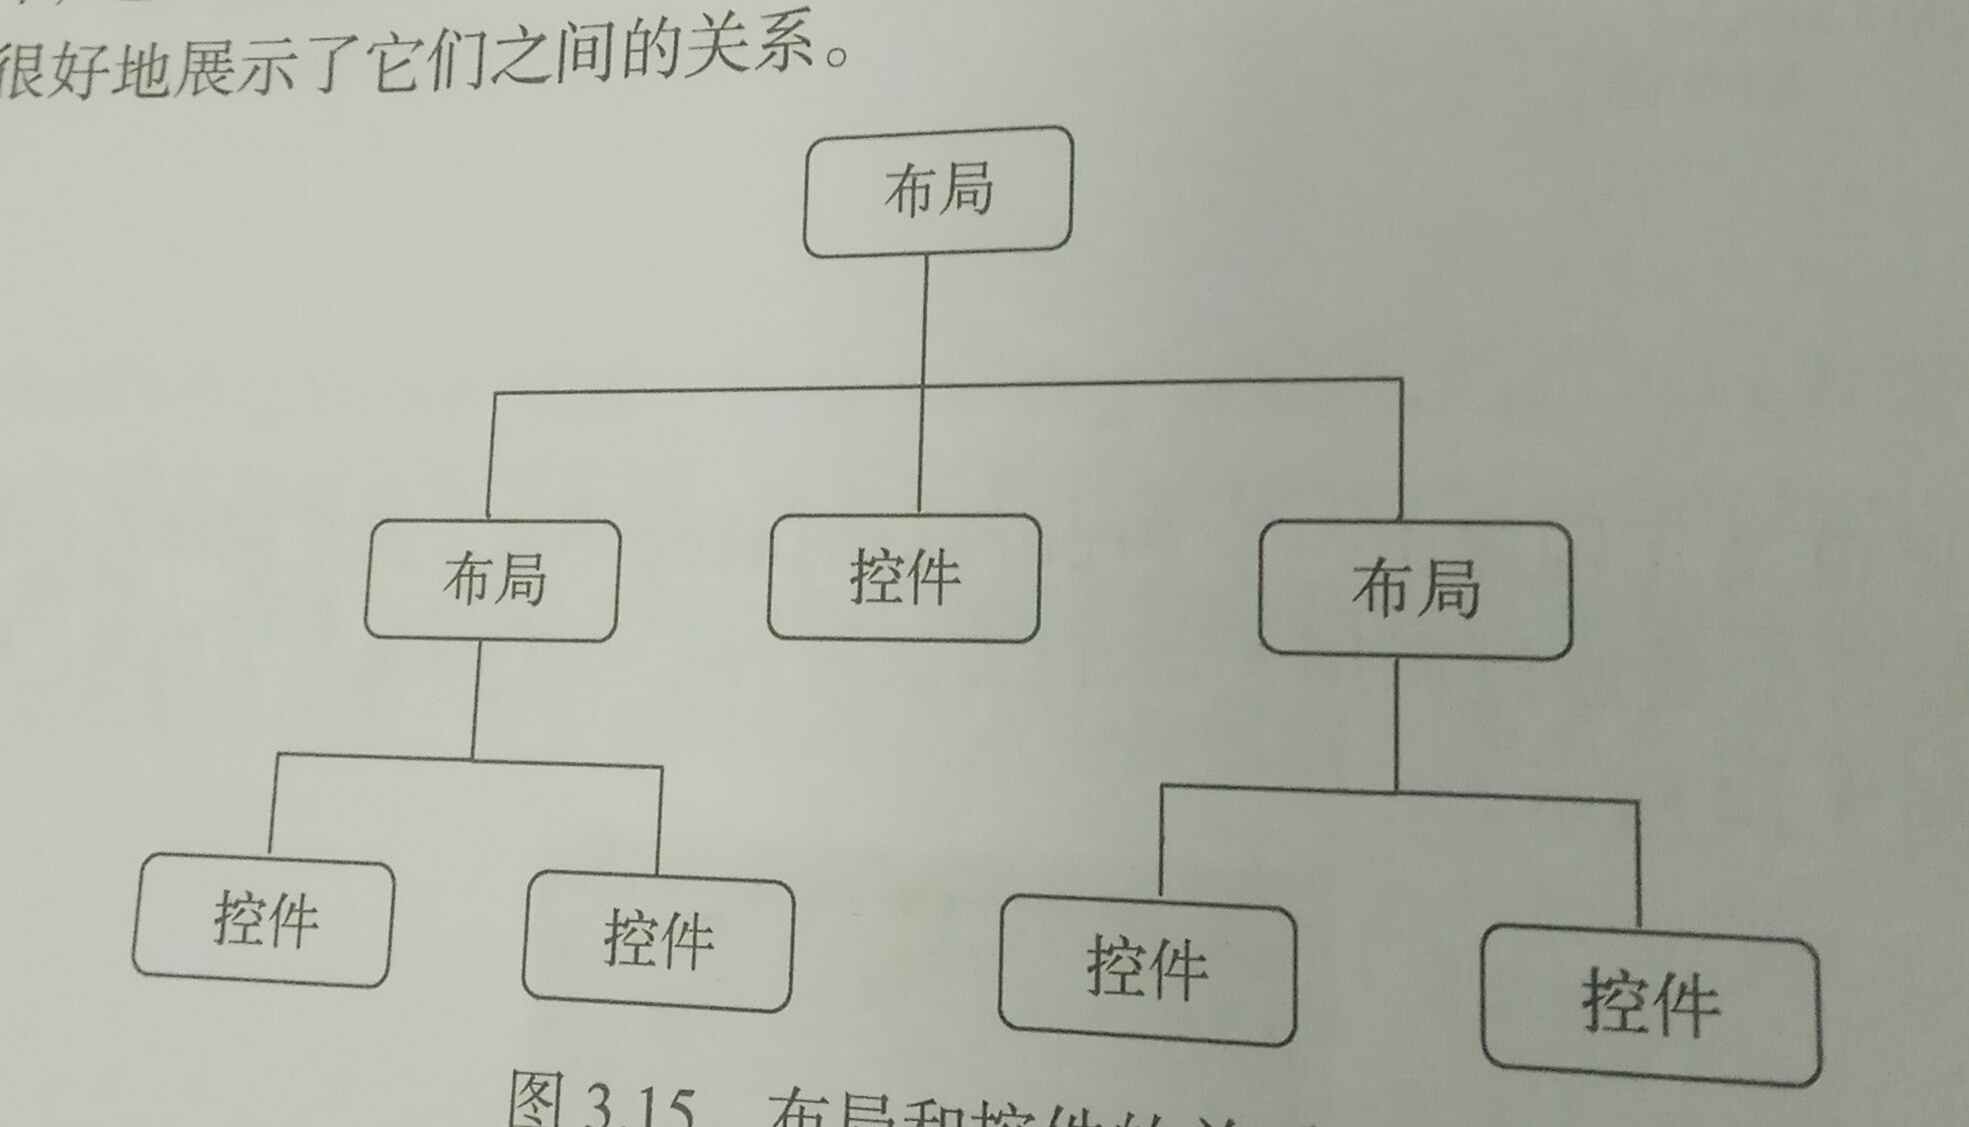
看完控件,緊接著看布局,布局是可以來放置控件,管理控件的。布局里也可以嵌套布局。
我們新建項目UILayoutTest項目,活動名和布局名選擇默認。加入活動及其對應的布局已經創建完成。
- 線性布局(LinearLayout)
- android:layout_gravity屬性
- android:layout_weight屬性
- 相對布局(RelativeLayout)
- 相對于父布局定位
- 相對于控件定位:注意:當一個控件去引用另一個控件的id時,該控件一定要定義在引用控件的后面,不然會找不到id的情況
????????LinearLayout布局會將它所包含的控件在線性方向上一次排列,所謂線性方向,可能是垂直方向,或者是水平方向,前面我們都是在垂直方向上排列控件,我們可以通過android:orientation屬性指定了排列方向是vertical,如果指定的是horizontal,控件就會在水平方向上排列了。修改activity_layout.xml新增加三個按鈕,我們可以想不寫android:orientation屬性,發現3個按鈕根據自身大小水平排列,因為這是LinearLayout布局默認的控件排列方式,(倘若你的第一個控件的android:layout_width="match_parent",就是說你的一個控件的寬度等于整個屏幕的寬度,那么你后面的哪個控件很有可能顯示不出來。)
等到我們寫過android:orientation="vertical",我們會發現3個按鈕垂直的排列了。
????? ??
<?xml version="1.0" encoding="utf-8"?>
<LinearLayout xmlns:android="http://schemas.android.com/apk/res/android"xmlns:app="http://schemas.android.com/apk/res-auto"xmlns:tools="http://schemas.android.com/tools"android:orientation="vertical"android:layout_width="match_parent"android:layout_height="match_parent"tools:context="com.example.uilayouttest.MainActivity"><Buttonandroid:id="@+id/button1"android:layout_width="wrap_content"android:layout_height="wrap_content"android:text="Button 1"/><Buttonandroid:id="@+id/button2"android:layout_width="wrap_content"android:layout_height="wrap_content"android:text="Button 2"/><Buttonandroid:id="@+id/button3"android:layout_width="wrap_content"android:layout_height="wrap_content"android:text="Button 3"android:textAllCaps="false"/></LinearLayout>
這里需要注意:如果LinearLayout的排列方式是horizontal,內部的控件就不能將寬度指定為match_parent,因為這樣,單獨一個控件會將整個水平方向占滿,其他控件就沒有可以放置的位置了。同樣的道理如果LinearLayout的排列方式是horizontal,內部控件就不能將高度指定為match_parent,因為這樣,單獨一個控件會將整個垂直方向占滿。
我們首先來看布局的android:layout_gravity屬性,我們之前看過android:gravity屬性,這兩者有些相似。區別是:android:gravity是指定文字在控件中的對齊方式,而android:layout_gravity是指定控件在布局中的對齊方式。兩者的可選值差不多,但是需要注意:LinearLayout的排列方向是horizontal時,只有垂直方向上的對齊方式才會生效,因為此時水平方向的長度是不固定的,每增加一個控件,水平方向上的長度都會改變,因而無法指定該方向上的對齊方式。同樣道理,當LinearLayout的排列方向是vertical時,只有水平方向上的對齊方式才會生效。修改activity_main.xml文件,代碼如下:
<?xml version="1.0" encoding="utf-8"?>
<LinearLayout xmlns:android="http://schemas.android.com/apk/res/android"xmlns:app="http://schemas.android.com/apk/res-auto"xmlns:tools="http://schemas.android.com/tools" android:orientation="horizontal"android:layout_width="match_parent"android:layout_height="match_parent"tools:context="com.example.uilayouttest.MainActivity"><Buttonandroid:id="@+id/button1"android:layout_width="wrap_content"android:layout_height="wrap_content"android:layout_gravity="top"android:text="Button 1"/><Buttonandroid:id="@+id/button2"android:layout_width="wrap_content"android:layout_height="wrap_content"android:layout_gravity="center_vertical"android:text="Button 2"/><Buttonandroid:id="@+id/button3"android:layout_width="wrap_content"android:layout_height="wrap_content"android:layout_gravity="bottom"android:text="Button 3"android:textAllCaps="false"/></LinearLayout>我們再來看LineraLayout中另一個重要屬性android:layout_weight。它允許我們使用比例的方式來指定控件的大小,它可以去適應手機的屏幕。下面我們來編輯一個消息發現界面,需要一個文本編輯框和一個發送按鈕,修改activity_main.xml中的代碼,如下所示:
<?xml version="1.0" encoding="utf-8"?>
<LinearLayout xmlns:android="http://schemas.android.com/apk/res/android"xmlns:app="http://schemas.android.com/apk/res-auto"xmlns:tools="http://schemas.android.com/tools"android:orientation="horizontal"android:layout_width="match_parent"android:layout_height="match_parent"tools:context="com.example.uilayouttest.MainActivity"><EditTextandroid:id="@+id/input_message"android:layout_width="0dp"android:layout_height="wrap_content" android:layout_weight="3"android:hint="Type something"/><Buttonandroid:id="@+id/send"android:layout_width="0dp"android:layout_height="wrap_content" android:layout_weight="2"android:text="Send"/></LinearLayout>
發現<EditText>和<Button>的寬度都指定為了0dp,不過你不用擔心文本編輯框和按鈕不存在,因為我們又接著使用了android:layout_weight屬性,此時控件大小由android:layout_weight來決定。這里0dp是一種比較規范的寫法。另外,dp是Android中用于指定控件大小、間距等屬性的單位。在這里我們把<EditText>和<Button>的android:layou_weight分別設置為3和2,這表明EditText占整個屏幕寬度的3份,Button占2份(我們是將整個屏幕分為3+2份)。
當然,我們也可以只是指定部分控件的layout_weight值來實現更好的效果。修改activity_main.xml文件中的代碼,如下:
<?xml version="1.0" encoding="utf-8"?>
<LinearLayout xmlns:android="http://schemas.android.com/apk/res/android"xmlns:app="http://schemas.android.com/apk/res-auto"xmlns:tools="http://schemas.android.com/tools"android:orientation="horizontal"android:layout_width="match_parent"android:layout_height="match_parent"tools:context="com.example.uilayouttest.MainActivity"><EditTextandroid:id="@+id/input_message"android:layout_width="0dp"android:layout_height="wrap_content"android:layout_weight="3"android:hint="Type something"/><Buttonandroid:id="@+id/send"android:layout_width="wrap_content"android:layout_height="wrap_content"android:text="Send"/></LinearLayout>
我們只是指定了EditText的android:layout_weight屬性,并將Button的寬度改為wrap_content。這表明Button的寬度仍然按照wrap_content來計算,而EditText則會占滿屏幕的所有剩余空間。

- 相對布局(RelativeLayout)
- android:layout_alignParentLeft屬性可以讓控件和父布局的左上角對齊
- android:layout_above屬性可以讓一個控件位于另一個控件的上方
- android:layout_alignLeft表示讓一個控件的左邊緣和另一個控件的左邊緣對齊
相比較LinearLayout,RelativeLayout更加隨意一些,它通過相對定位的方式讓控件出現在布局的任何位置。正因為如此,RelativeLayout的屬性非常多,不過都是有規律可循的。修改activity_main.xml中的代碼,如下:
<?xml version="1.0" encoding="utf-8"?>
<RelativeLayout xmlns:android="http://schemas.android.com/apk/res/android"xmlns:app="http://schemas.android.com/apk/res-auto"xmlns:tools="http://schemas.android.com/tools"android:orientation="horizontal"android:layout_width="match_parent"android:layout_height="match_parent"tools:context="com.example.uilayouttest.MainActivity"><Buttonandroid:id="@+id/button1"android:layout_width="wrap_content"android:layout_height="wrap_content"android:layout_alignParentLeft="true"android:layout_alignParentTop="true"android:text="button 1"/><Buttonandroid:id="@+id/button2"android:layout_width="wrap_content"android:layout_height="wrap_content"android:layout_alignParentRight="true"android:layout_alignParentTop="true"android:text="button 2"/><Buttonandroid:id="@+id/button3"android:layout_width="wrap_content"android:layout_height="wrap_content"android:layout_centerInParent="true"android:text="button 3"/><Buttonandroid:id="@+id/button4"android:layout_width="wrap_content"android:layout_height="wrap_content"android:layout_alignParentLeft="true"android:layout_alignParentBottom="true"android:text="button 4"/><Buttonandroid:id="@+id/button5"android:textAllCaps="false"android:layout_width="wrap_content"android:layout_height="wrap_content"android:layout_alignParentBottom="true"android:layout_alignParentRight="true"android:text="button 5"/></RelativeLayout>
我們讓Button 1和父布局的左上角對齊,Button 2和父布局的右上角對齊,Button 3居中顯示,Button 4 和父布局的左下角對齊,Button 5 和父布局的右下角對齊。程序運行如下:

上面這是相對于父布局定位。
下面我們相對于控件進行定位。
修改activity_main.xml中的代碼,如下:
<?xml version="1.0" encoding="utf-8"?>
<RelativeLayout xmlns:android="http://schemas.android.com/apk/res/android"xmlns:app="http://schemas.android.com/apk/res-auto"xmlns:tools="http://schemas.android.com/tools"android:orientation="horizontal"android:layout_width="match_parent"android:layout_height="match_parent"tools:context="com.example.uilayouttest.MainActivity"><Buttonandroid:id="@+id/button1"android:layout_width="wrap_content"android:layout_height="wrap_content" android:layout_above="@id/button3"android:layout_toLeftOf="@id/button3"android:text="button 1"/><Buttonandroid:id="@+id/button2"android:layout_width="wrap_content"android:layout_height="wrap_content"android:layout_above="@id/button3"android:layout_toRightOf="@id/button3"android:text="button 2"/><Buttonandroid:id="@+id/button3"android:layout_width="wrap_content"android:layout_height="wrap_content"android:layout_centerInParent="true"android:text="button 3"/><Buttonandroid:id="@+id/button4"android:layout_width="wrap_content"android:layout_height="wrap_content"android:layout_below="@id/button3"android:layout_toLeftOf="@id/button3"android:text="button 4"/><Buttonandroid:id="@+id/button5"android:textAllCaps="false"android:layout_width="wrap_content"android:layout_height="wrap_content"android:layout_below="@id/button3"android:layout_toRightOf="@id/button3"android:text="button 5"/></RelativeLayout>
其中android:layout_above屬性可以讓一個控件位于另一個控件的上方,需要為這個屬性指定相對控件的id的引用。
android:layout_toLeftOf表示一個控件位于另一個控件的左側。注意:當一個控件去引用另一個控件的id時,該控件一定要定義在引用控件的后面,不然會找不到id的情況。重新運行程序,如下圖:

RelativeLayout中還有另外一組相對于控件進行定位的屬性,android:layout_alignLeft表示讓一個控件的左邊緣和另一個控件的左邊緣對齊,android:layout_alignRight、android:layout_alignTop、android:layout_alignBottom道理是一樣的。


)


)


)


)