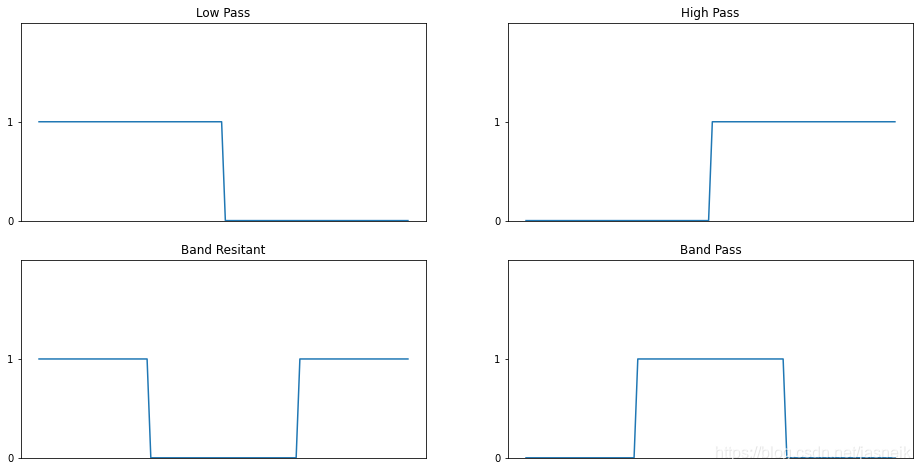
低通、高通、帶阻和帶通濾波器
得到空間濾波器的第三種方法,生成一維濾波器函數,然后要么使用式(3.42)w=vvTw = vv^Tw=vvT生成二維可分離的濾波器函數,要么旋轉這些一維函數來生成二維核。旋轉后的一維函數是圓對稱(各向同性)函數的近似。
# 低通、高通、帶阻和帶通濾波器
x = np.arange(100)
y = np.where(x > 50, x, 1)
lp = np.where(x < 50, y, 0)hp = 1 - lpplt.figure(figsize=(16, 8))
plt.subplot(2, 2, 1), plt.plot(lp), plt.title('Low Pass'), plt.xticks([]), plt.yticks([0, 1]), plt.ylim([0, 2])
plt.subplot(2, 2, 2), plt.plot(hp), plt.title('High Pass'), plt.xticks([]), plt.yticks([0, 1]), plt.ylim([0, 2])y = np.where(x > 30, x, 1)
l_1 = np.where(x < 30, y, 0)y = np.where(x > 70, x, 1)
l_2 = np.where(x < 70, y, 0)
h_1 = 1 - l_2br = h_1 + l_1
plt.subplot(2, 2, 3), plt.plot(br), plt.title('Band Resitant'), plt.xticks([]), plt.yticks([0, 1]), plt.ylim([0, 2])
bp = 1 - br
plt.subplot(2, 2, 4), plt.plot(bp), plt.title('Band Pass'), plt.xticks([]), plt.yticks([0, 1]), plt.ylim([0, 2])plt.show()
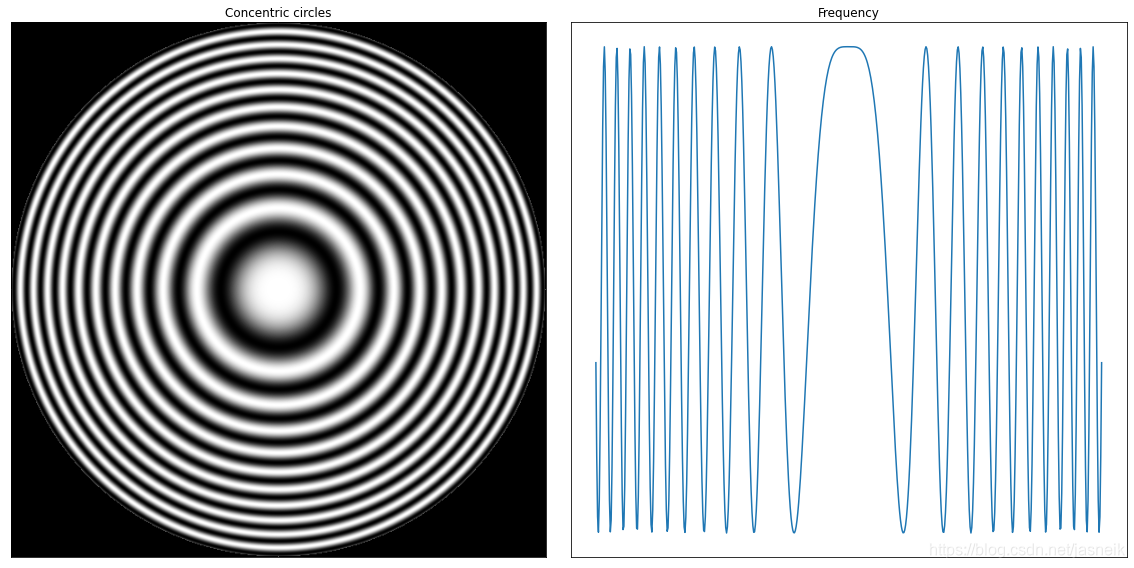
同心反射板
z(x,y)=12[1+cos(x2+y2)](3.66)z(x, y) = \frac{1}{2}[1 + cos(x^2 + y^2)] \tag{3.66}z(x,y)=21?[1+cos(x2+y2)](3.66)
xxx和yyy在區間[-8.2, 8.2],變化量為0.0275,所以會得到一幅597×597597\times597597×597的圖像。邊緣的黑色區域是通過將中心距離大于8.2的所有像素設置為0得到的。
597的中心是(298, 298),像素的距離應該是298
# 同心反射板
height, width = 597, 597
m = int((height - 1) / 2)
n = int((width - 1) / 2)
X = np.linspace(-8.2, 8.2, height)
Y = np.linspace(-8.2, 8.2, width)
x, y = np.meshgrid(X, Y)
circle = 0.5 * (1 + np.cos(x**2 + y**2))
for i in range(circle.shape[0]):for j in range(circle.shape[1]):if np.sqrt((i - m)**2 + (j - n)**2 ) > m:circle[i, j] = 0else:continueplt.figure(figsize=(16, 8))
plt.subplot(1, 2, 1), plt.imshow(circle, 'gray'), plt.title('Concentric circles'), plt.xticks([]), plt.yticks([])
plt.subplot(1, 2, 2), plt.plot(circle[298, :]), plt.title('Frequency'), plt.xticks([]), plt.yticks([])
plt.tight_layout()
plt.show()
這是之前寫的,感覺有點不對
# 一維空間低通濾波器函數通過式(3.42)構造的二維低通濾波器
height, width = 128, 128
m = int((height - 1) / 2)
n = int((width - 1) / 2)
x = np.linspace(-6*np.pi, 6* np.pi, height)
y = np.linspace(-6*np.pi, 6* np.pi, width)
scale = 1                  # scale可以縮放濾波器的尺寸
x = np.sin(x * scale) / x
y = np.sin(y * scale) / y
x = np.array([x])
y = np.array([y])w = x * y.T# for i in range(w.shape[0]):
#     for j in range(w.shape[1]):
#         if np.sqrt((i - m)**2 + (j - n)**2 ) > m:
#             w[i, j] = 0
#         else:
#             continue
plt.figure(figsize=(16, 8))
plt.subplot(1, 2, 1), plt.imshow(w, 'gray'), plt.title('Concentric circles'), plt.xticks([]), plt.yticks([])
plt.subplot(1, 2, 2), plt.plot(w[64, :]), plt.title('Frequency'), plt.xticks([]), plt.yticks([])
plt.tight_layout()
plt.show()
新增: 這個才像函數旋轉得到的
圖像看起來有點粗糙,是采樣少了,只有128,如果增加到512,會得到很好的效果。
# 一維空間低通濾波器函數通過式(3.42)構造的二維低通濾波器
height, width = 128, 128
m = int((height - 1) / 2)
n = int((width - 1) / 2)
x = np.linspace(-1*np.pi, 1* np.pi, height)
y = np.linspace(-1*np.pi, 1* np.pi, width)
x, y = np.meshgrid(x, y)
scale = 1                  # scale可以縮放濾波器的尺寸
w = np.sinc((x**2 + y**2) * scale)for i in range(w.shape[0]):for j in range(w.shape[1]):if np.sqrt((i - m)**2 + (j - n)**2 ) > m:w[i, j] = 0else:continue
plt.figure(figsize=(16, 8))
plt.subplot(1, 2, 1), plt.imshow(w, 'gray'), plt.title('Concentric circles'), plt.xticks([]), plt.yticks([])
plt.subplot(1, 2, 2), plt.plot(w[64, :]), plt.title('Frequency'), #plt.xticks([]), plt.yticks([])
plt.tight_layout()
plt.show()

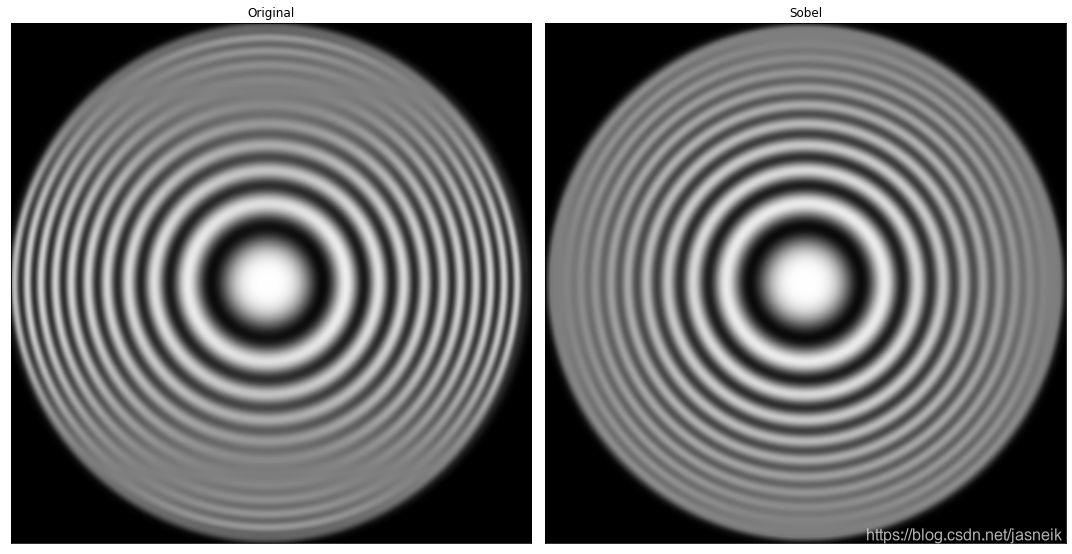
# 不同的濾波器對同心圓反射板的效果,圖1效果不是很好
img_ori = circle.copy()kernel_size = 19
x = np.ones([kernel_size])
x[kernel_size//3:] = 0.1
y = np.ones_like(x)
x = np.array([x])
y = np.array([y])
w = x * y.T
img_sep = separate_kernel_conv2D(img_ori, w)
img_sep = np.uint8(normalize(img_sep) * 255)# 各向同性
height, width = img_ori.shape[:2]
m = int((height - 1) / 2)
n = int((width - 1) / 2)
x = np.linspace(-6*np.pi, 6* np.pi, 21)
y = np.linspace(-6*np.pi, 6* np.pi, 21)
scale = 0.5                  # scale可以縮放濾波器的尺寸
x = np.sin(x * scale) / (x + 1e-8)
y = np.sin(y * scale) / (y + 1e-8)
x = np.array([x])
y = np.array([y])w = x * y.Timg_sep_1 = separate_kernel_conv2D(img_ori, w)
img_sep_1 = np.uint8(normalize(img_sep_1) * 255)plt.figure(figsize=(15, 12))
plt.subplot(1, 2, 1), plt.imshow(img_sep,   'gray', vmax=255), plt.title("Original"), plt.xticks([]), plt.yticks([])
plt.subplot(1, 2, 2), plt.imshow(img_sep_1, 'gray', vmax=255), plt.title("Sobel"), plt.xticks([]), plt.yticks([])plt.tight_layout()
plt.show()
組合使用空間增強方法
# 1 拉普拉斯突出細節
# 2 平滑后的梯度圖像來掩蔽拉普拉斯圖像
# 3 灰度變換增大灰度級的動態范圍
# 圖1
img_ori = cv2.imread("DIP_Figures/DIP3E_Original_Images_CH03/Fig0343(a)(skeleton_orig).tif", 0)# 圖2,拉普拉斯變換
# kernel_laplacian = np.array((
#                     [0,1,0],
#                     [1,-4,1],
#                     [0,1,0]), np.int8)
kernel_laplacian_d = np.array([[-1, -1, -1],[-1, 8, -1],[-1, -1, -1]],)
img_laplacian = cv2.filter2D(img_ori, ddepth=-1, kernel=kernel_laplacian_d)
img_laplacian = np.uint8(normalize(img_laplacian) * 255)# 圖3,原圖+拉普拉斯
img_ori_laplacian = img_ori + img_laplacian
img_ori_laplacian = normalize(img_ori_laplacian) * 255# 圖4,原圖Sobel變換
sobel_x = np.zeros([3, 3], np.int)
sobel_x[0, :] = np.array([-1, -2, -1])
sobel_x[2, :] = np.array([1, 2, 1])
sobel_y = np.zeros([3, 3], np.int)
sobel_y[:, 0] = np.array([-1, -2, -1])
sobel_y[:, 2] = np.array([1, 2, 1])
# gx = separate_kernel_conv2D(img_ori, kernel=sobel_x)
# gy = separate_kernel_conv2D(img_ori, kernel=sobel_y)
gx = cv2.filter2D(img_ori, ddepth=-1, kernel=sobel_x)
gy = cv2.filter2D(img_ori, ddepth=-1, kernel=sobel_y)
# thred = 120
# gx = np.where(gx >= thred, gx, 0)
# gx = np.where(gx < thred, gx, 1)
# gy = np.where(gy >= thred, gy, 0)
# gy = np.where(gy < thred, gy, 1)
# 先對gx gy做二值化處理再應用下面的公式
# img_sobel = np.sqrt(gx**2 + gy**2)
img_sobel = abs(gx) + abs(gy)
img_sobel = np.uint8(normalize(img_sobel) * 255)#  圖5, 使用5x5的盒式濾波器平滑Sobel
kernel_box = np.ones([5, 5])
kernel_box = kernel_box / kernel_box.sum()
sobel_box = separate_kernel_conv2D(img_sobel, kernel=kernel_box)
sobel_box = normalize(sobel_box)
# sobel_box = np.uint8(normalize(sobel_box) * 255)# 圖6,圖2與圖5相乘的模板圖像
mask = img_laplacian * sobel_box
img_mask = np.uint8(normalize(mask) * 255)# 圖7,原圖與圖6相加
img_passi = img_ori + img_mask * 0.3
img_passi = np.uint(normalize(img_passi) * 255)# 圖8 對圖7做冪律變換
img_gamma = gamma_transform(img_passi, 1, gamma=0.5)plt.figure(figsize=(13, 40))
plt.subplot(4, 2, 1), plt.imshow(img_ori,   'gray', vmax=255), plt.title("OriginalA"), plt.xticks([]), plt.yticks([])
plt.subplot(4, 2, 2), plt.imshow(img_laplacian, 'gray', vmax=255), plt.title("LaplacianB"), plt.xticks([]), plt.yticks([])
plt.subplot(4, 2, 3), plt.imshow(img_ori_laplacian, 'gray', vmax=255), plt.title("Original + LaplacianC"), plt.xticks([]), plt.yticks([])
plt.subplot(4, 2, 4), plt.imshow(img_sobel, 'gray', vmax=255), plt.title("SobelD"), plt.xticks([]), plt.yticks([])
plt.subplot(4, 2, 5), plt.imshow(sobel_box, 'gray', vmax=1), plt.title("Sobel Box filterE"), plt.xticks([]), plt.yticks([])
plt.subplot(4, 2, 6), plt.imshow(img_mask, 'gray', vmax=255), plt.title("Sobel mask F"), plt.xticks([]), plt.yticks([])
plt.subplot(4, 2, 7), plt.imshow(img_passi, 'gray', vmax=255), plt.title("Passivation G"), plt.xticks([]), plt.yticks([])
plt.subplot(4, 2, 8), plt.imshow(img_gamma, 'gray', vmax=255), plt.title("Gamma Transform H"), plt.xticks([]), plt.yticks([])
plt.tight_layout()
plt.show()


 - 頻率域濾波1 - 傅里葉級數和變換簡史)

![[ofbiz]less-than (lt;) and greater-than (gt;) symbols](http://pic.xiahunao.cn/[ofbiz]less-than (lt;) and greater-than (gt;) symbols)


 - 頻率域濾波2 - 復數、傅里葉級數、連續單變量函數的傅里葉變換、卷積)

)

![[React Native]高度自增長的TextInput組件](http://pic.xiahunao.cn/[React Native]高度自增長的TextInput組件)

 - 頻率域濾波3 - 取樣和取樣函數的傅里葉變換、混疊)
![[轉]Android開發,實現可多選的圖片ListView,便于批量操作](http://pic.xiahunao.cn/[轉]Android開發,實現可多選的圖片ListView,便于批量操作)
收集使用個人信息自評估指南...)

